|
[#1]
Originally Posted By krdt:
Told ya :D. M3 is where the win lives. You've now joined the super-secret M3-instead-of-M2 Club. And the first rule of M3 Club... Originally Posted By krdt:
Originally Posted By Dyzastr:
Originally Posted By wissota4:
I need a lower like that!! @Dyzastr maybe save some parts for the rest of us man.. M3 is where the win lives. You've now joined the super-secret M3-instead-of-M2 Club. And the first rule of M3 Club... 
|
|
|
|
|
[#2]
You guys know what time it is... CQBR-B-Que time! :D

CQBR Dog is keeping watch while three lovely racks of porky delicious pig ribs smoke it up. 
|
|
|
|
|
[#3]
Originally Posted By krdt: Told ya :D. M3 is where the win lives. You've now joined the super-secret M3-instead-of-M2 Club. And the first rule of M3 Club... |
|
|
|
|
[#4]
Originally Posted By MILSPEC556:
Is get an EOTech? Originally Posted By MILSPEC556:
Originally Posted By krdt:
Originally Posted By Dyzastr:
Originally Posted By wissota4:
I need a lower like that!! @Dyzastr maybe save some parts for the rest of us man.. M3 is where the win lives. You've now joined the super-secret M3-instead-of-M2 Club. And the first rule of M3 Club... On a Block 1.5 or 2? Eotech all day. On a Mod 0/Block I? I dunno... kinda prefer the classic look of an M2 or M3. If I were going to use anything besides the M3/Wilcox on my Block 1, it'd be an EXPS3. Actually, I already have some kinda 1.5 thing going on with the M300 (just can't bring myself to run the M962 boat anchor) - an EXPS would really make a good bit of sense. Oh, well... I'll just call it a Block 1.25 for now :\. Originally Posted By Dyzastr:
I think in the military world it's all m68 from m2 to m3 to m4. I could be wrong but I'm wondering if a big name of "m2's" aren't actually m3's. Just sayin. I think the m3 is clone correct. Just not the original issued m68 cco. Anyone with backing or refuting evidence? I do remember the sopmod poster milspec posted said m2/m3. But ya, 2 moa all day every day! Couldn't agree more. Did you notice the polarizer I found for it? Aimpoint used to make em. It cuts down glare from reflective surfaces by like 20% or somethin. Never seen one and thought why not. Tactical advantage in vehicle/ building scenario. Really anytime you'd have to shoot through glass. Didn't notice the polarizer till you mentioned it... didn't even know such a thing existed, lol. |
|
|
|
WA, USA
|
[Last Edit: tnbigdawg]
[#5]
Originally Posted By krdt:
You guys know what time it is... CQBR-B-Que time! :D http://wkd.site.nfoservers.com/CQBR/CQBR.101918.CQBR.B.Q-01.jpg CQBR Dog is keeping watch while three lovely racks of porky delicious pig ribs smoke it up. http://wkd.site.nfoservers.com/CQBR/CQBR.101918.CQBR.B.Q-03.jpg Ya know, I've always wondered what the hole was for on the A1 grip. Then I found this thread. I got bored and decided to spend 15 minutes filing off the nub on another A2 grip for my "M4A1" 80% lower today. It's currently waiting for F1 approval. El Cheapo A2 
Snip off the nub with some shears 
Rough file and 3 minutes later 
Sand with 100/150 grit, then wet sand with 400 grit to burnish it. About 4 minutes. 
Hit it with some flat black paint and voila 
Here's the first one I did for my DDMK18; I spent more time on this one 
|
|
|
MD, USA
|
[#6]
Originally Posted By tnbigdawg: Looks good Ya know, I've always wondered what the hole was for on the A1 grip. Then I found this thread. I got bored and decided to spend 15 minutes filing off the nub on another A2 grip for my "M4A1" 80% lower today. It's currently waiting for F1 approval. El Cheapo A2 https://i.imgur.com/pZbEMKE.jpg Snip off the nub with some shears https://i.imgur.com/s8znTfl.jpg Rough file and 3 minutes later https://i.imgur.com/FcAJyHM.jpg Sand with 100/150 grit, then wet sand with 400 grit to burnish it. About 4 minutes. https://i.imgur.com/ykmA2t2.jpg Hit it with some flat black paint and voila https://i.imgur.com/lf1sLeA.jpg Here's the first one I did for my DDMK18; I spent more time on this one https://i.imgur.com/hM0aZfE.jpg?1 |
|
|
|
[Last Edit: wissota4]
[#7]
Originally Posted By tnbigdawg: Looks good Ya know, I've always wondered what the hole was for on the A1 grip. Then I found this thread. I got bored and decided to spend 15 minutes filing off the nub on another A2 grip for my "M4A1" 80% lower today. It's currently waiting for F1 approval. El Cheapo A2 https://i.imgur.com/pZbEMKE.jpg Snip off the nub with some shears https://i.imgur.com/s8znTfl.jpg Rough file and 3 minutes later https://i.imgur.com/FcAJyHM.jpg Sand with 100/150 grit, then wet sand with 400 grit to burnish it. About 4 minutes. https://i.imgur.com/ykmA2t2.jpg Hit it with some flat black paint and voila https://i.imgur.com/lf1sLeA.jpg Here's the first one I did for my DDMK18; I spent more time on this one https://i.imgur.com/hM0aZfE.jpg?1 Got a lower needing some engraving bruh |
|
|
|
|
[#8]
Originally Posted By Dyzastr:
I think in the military world it's all m68 from m2 to m3 to m4. I could be wrong but I'm wondering if a big name of "m2's" aren't actually m3's. Just sayin. I think the m3 is clone correct. Just not the original issued m68 cco. Anyone with backing or refuting evidence? I do remember the sopmod poster milspec posted said m2/m3. But ya, 2 moa all day every day! Couldn't agree more. Did you notice the polarizer I found for it? Aimpoint used to make em. It cuts down glare from reflective surfaces by like 20% or somethin. Never seen one and thought why not. Tactical advantage in vehicle/ building scenario. Really anytime you'd have to shoot through glass. |
|
|
|
|
[#9]
Originally Posted By ArmedFerret:
Seems like buying an old A1 from numrich or a new one from brownells would be way easier. *Coldblue = USMC LTC in charge of the A2 project |
|
|
|
|
[Last Edit: krdt]
[#10]
Originally Posted By tnbigdawg:
Looks good Ya know, I've always wondered what the hole was for on the A1 grip. Then I found this thread. I got bored and decided to spend 15 minutes filing off the nub on another A2 grip for my "M4A1" 80% lower today. It's currently waiting for F1 approval. El Cheapo A2 https://i.imgur.com/pZbEMKE.jpg Snip off the nub with some shears https://i.imgur.com/s8znTfl.jpg Rough file and 3 minutes later https://i.imgur.com/FcAJyHM.jpg Sand with 100/150 grit, then wet sand with 400 grit to burnish it. About 4 minutes. https://i.imgur.com/ykmA2t2.jpg Hit it with some flat black paint and voila https://i.imgur.com/lf1sLeA.jpg Here's the first one I did for my DDMK18; I spent more time on this one https://i.imgur.com/hM0aZfE.jpg?1 Originally Posted By tnbigdawg:
Originally Posted By krdt:
You guys know what time it is... CQBR-B-Que time! :D http://wkd.site.nfoservers.com/CQBR/CQBR.101918.CQBR.B.Q-01.jpg CQBR Dog is keeping watch while three lovely racks of porky delicious pig ribs smoke it up. http://wkd.site.nfoservers.com/CQBR/CQBR.101918.CQBR.B.Q-03.jpg Ya know, I've always wondered what the hole was for on the A1 grip. Then I found this thread. I got bored and decided to spend 15 minutes filing off the nub on another A2 grip for my "M4A1" 80% lower today. It's currently waiting for F1 approval. El Cheapo A2 https://i.imgur.com/pZbEMKE.jpg Snip off the nub with some shears https://i.imgur.com/s8znTfl.jpg Rough file and 3 minutes later https://i.imgur.com/FcAJyHM.jpg Sand with 100/150 grit, then wet sand with 400 grit to burnish it. About 4 minutes. https://i.imgur.com/ykmA2t2.jpg Hit it with some flat black paint and voila https://i.imgur.com/lf1sLeA.jpg Here's the first one I did for my DDMK18; I spent more time on this one https://i.imgur.com/hM0aZfE.jpg?1 I'd like to see more on the 80% as well. Braceman do the engraving? What finish did you go with? I'm currently trying to decide if I want to shell out for a jig, get a 2018 Colt SOCOM for the lower or just get another M4 Carbine lower from Brownells; I need a new lower to F1 for my Block 1.25 CQBR. Really want the SOCOM, but then I get to thinking I could go the jig route for less and be able to do more lowers down the road. Kinda hesitant about an 80% wondering if I'd ever be able to get anodizing that would be close to looking like a Colt. |
|
|
|
|
[Last Edit: Dyzastr]
[#11]
Originally Posted By krdt: ^ Clearly not a member of M3 Club :\. On a Block 1.5 or 2? Eotech all day. On a Mod 0/Block I? I dunno... kinda prefer the classic look of an M2 or M3. If I were going to use anything besides the M3/Wilcox on my Block 1, it'd be an EXPS3. Actually, I already have some kinda 1.5 thing going on with the M300 (just can't bring myself to run the M962 boat anchor) - an EXPS would really make a good bit of sense. Oh, well... I'll just call it a Block 1.25 for now :\. Never really considered whether an M3 might have been floating around on some CQBR Block 1s, but that's a good point. I suppose it's entirely possible and we just didn't know the difference. Didn't notice the polarizer till you mentioned it... didn't even know such a thing existed, lol. Eta- I'm with ya on the cco block 1 Combo, but I do like the 552/ 551 on occasion. Especially paired with the m900. And they are block 1. But nothin looks better with an m962 than an aimpoint. M962/ aimpoint 
M900 with eotech 552 
M900 with eotech 551 
God dang that took forever to get this post to work. Like ten damn edits. Stupid outdated iPad. Originally Posted By wissota4:
Yeah, they just call em m68 "cco" I don't think 80% of the people even know they're aimpoints. |
|
|
|
|
[#12]
Originally Posted By krdt:
Really nice job on the A2. I usually use a sanding drum on a Dremel for the bulk of the removal, then a rat tail file and a fine mini-file to get the final shape, then sand it with 150. I haven't taken the extra step to wet sand, but judging how nicely your A2 turned out, I might start adding that step. I'd like to see more on the 80% as well. Braceman do the engraving? What finish did you go with? I'm currently trying to decide if I want to shell out for a jig, get a 2018 Colt SOCOM for the lower or just get another M4 Carbine lower from Brownells; I need a new lower to F1 for my Block 1.25 CQBR. Really want the SOCOM, but then I get to thinking I could go the jig route for less and be able to do more lowers down the road. Kinda hesitant about an 80% wondering if I'd ever be able to get anodizing that would be close to looking like a Colt. Or just get one of the 6920 US ones with “fire” & the selector stops milled off if you don’t wanna GBPSE. |
|
|
|
|
[#13]
Originally Posted By Dyzastr:
Neither did I till one popped up and I did a little research. I've been finding some good things. I found a brand new m962 with new uu07 tail switch and sw02 clicky cap. And I mean new, never mounted. Eta- I'm with ya on the cco block 1 Combo, but I do like the 552/ 551 on occasion. Especially paired with the m900. And they are block 1. But nothin looks better with an m962 than an aimpoint. M962/ aimpoint http://i.imgur.com/aHTKkZ2.jpg M900 with eotech 552 http://i.imgur.com/gy5lbEO.jpg M900 with eotech 551 I had a feeling. Once I learned m3s had been issued, I thought to myself, hmm... How many cco's are actually m3's? |
|
|
|
|
[#14]
Originally Posted By C6H12O6:
You could always get an anodized 80 then have it engraved and just Aluma-Black the engraving. Or just get one of the 6920 US ones with “fire” & the selector stops milled off if you don’t wanna GBPSE. Originally Posted By C6H12O6:
Originally Posted By krdt:
Really nice job on the A2. I usually use a sanding drum on a Dremel for the bulk of the removal, then a rat tail file and a fine mini-file to get the final shape, then sand it with 150. I haven't taken the extra step to wet sand, but judging how nicely your A2 turned out, I might start adding that step. I'd like to see more on the 80% as well. Braceman do the engraving? What finish did you go with? I'm currently trying to decide if I want to shell out for a jig, get a 2018 Colt SOCOM for the lower or just get another M4 Carbine lower from Brownells; I need a new lower to F1 for my Block 1.25 CQBR. Really want the SOCOM, but then I get to thinking I could go the jig route for less and be able to do more lowers down the road. Kinda hesitant about an 80% wondering if I'd ever be able to get anodizing that would be close to looking like a Colt. Or just get one of the 6920 US ones with “fire” & the selector stops milled off if you don’t wanna GBPSE. I'm leaning toward either a Brownells Colt lower, or bite the bullet and buy a 2018 SOCOM to part out for the Govt Property marked lower :\. |
|
|
|
AL, USA
|
[#15]
Originally Posted By krdt: If I did 80% I'd want to get it raw, have it engraved or do electroetching myself, then mill and anodize. Problem is, I don't know how close I could get the anodizing to matching Colt stuff. New Frontier Armory does anodizing for a very reasonable price, but the few examples I've seen aren't a very good match. I suspect US Anodizing would probably be the closest to something that would match Colt, but I don't even know if they are accepting small jobs now. I'm leaning toward either a Brownells Colt lower, or bite the bullet and buy a 2018 SOCOM to part out for the Govt Property marked lower :\. |
|
|
|
[#16]
Originally Posted By 46MUSCLE01:
The Colt lowers at Brownells are Discontinued Originally Posted By 46MUSCLE01:
Originally Posted By krdt: If I did 80% I'd want to get it raw, have it engraved or do electroetching myself, then mill and anodize. Problem is, I don't know how close I could get the anodizing to matching Colt stuff. New Frontier Armory does anodizing for a very reasonable price, but the few examples I've seen aren't a very good match. I suspect US Anodizing would probably be the closest to something that would match Colt, but I don't even know if they are accepting small jobs now. I'm leaning toward either a Brownells Colt lower, or bite the bullet and buy a 2018 SOCOM to part out for the Govt Property marked lower :\. Guess I could part out a 6920-OEM and get a Colt barrel to cut in the bargain. Pfft, that's annoying. |
|
|
|
WA, USA
|
[#17]
Originally Posted By wissota4:
Pics and info on the 80 lower plz Got a lower needing some engraving bruh Originally Posted By wissota4:
Pics and info on the 80 lower plz Got a lower needing some engraving bruh Originally Posted By krdt: Really nice job on the A2. I usually use a sanding drum on a Dremel for the bulk of the removal, then a rat tail file and a fine mini-file to get the final shape, then sand it with 150. I haven't taken the extra step to wet sand, but judging how nicely your A2 turned out, I might start adding that step. I'd like to see more on the 80% as well. Braceman do the engraving? What finish did you go with? I'm currently trying to decide if I want to shell out for a jig, get a 2018 Colt SOCOM for the lower or just get another M4 Carbine lower from Brownells; I need a new lower to F1 for my Block 1.25 CQBR. Really want the SOCOM, but then I get to thinking I could go the jig route for less and be able to do more lowers down the road. Kinda hesitant about an 80% wondering if I'd ever be able to get anodizing that would be close to looking like a Colt. Originally Posted By krdt: If I did 80% I'd want to get it raw, have it engraved or do electroetching myself, then mill and anodize. Problem is, I don't know how close I could get the anodizing to matching Colt stuff. New Frontier Armory does anodizing for a very reasonable price, but the few examples I've seen aren't a very good match. I suspect US Anodizing would probably be the closest to something that would match Colt, but I don't even know if they are accepting small jobs now. I'm leaning toward either a Brownells Colt lower, or bite the bullet and buy a 2018 SOCOM to part out for the Govt Property marked lower :\. 
I milled it out using 5D Tactical Pro jig and a Bosch router (tricky with this router). Broke the mill on my first pass and nicked the receiver - fcking sht!! Ended up getting another 80% from Vader with yet another personalized serial that I like much better, and some extra replacement mill bits from 5D. Had to use a torch to heat up the mill holder and swap the bits out. Finished both lowers, and found an issue with the Pro jig. So I did this workaround I came up with. Luckily the second lower came out flawlessly. I spot sanded any gouges or weird scratches that I felt wouldn't come out from sand blasting. I then paid online for the anodizing service and shipping cost on Frontier's website and shipped both to them following the rules of shipping a firearm (UPS asked to see the FFL). A few weeks later I get it in the mail via USPS priority. Both came out great! The texture definitely isn't smooth as Colt's but oh well; it's hardcoat anodized at least. I'll try to take some more pics for you guys in a bit. 
This was all done before the new Colt SOCOM US marked rifles came out. If I could go back, I'd go the SOCOM route because I'd rather have a true Colt and a stamped rollmark instead of engraved. |
|
|
|
[#18]
Originally Posted By tnbigdawg: I got the raw 80% engraved from VaderSpade after emailing my specs and gave it a personalized serial. https://i.imgur.com/Sq2xLxc.jpg I milled it out using 5D Tactical Pro jig and a Bosch router (tricky with this router). Broke the mill on my first pass and nicked the receiver - fcking sht!! Ended up getting another 80% from Vader with yet another personalized serial that I like much better, and some extra replacement mill bits from 5D. Had to use a torch to heat up the mill holder and swap the bits out. Finished both lowers, and found an issue with the Pro jig. So I did this workaround I came up with. Luckily the second lower came out flawlessly. I spot sanded any gouges or weird scratches that I felt wouldn't come out from sand blasting. I then paid online for the anodizing service and shipping cost on Frontier's website and shipped both to them following the rules of shipping a firearm (UPS asked to see the FFL). A few weeks later I get it in the mail via USPS priority. Both came out great! The texture definitely isn't smooth as Colt's but oh well; it's hardcoat anodized at least. I'll try to take some more pics for you guys in a bit. https://i.imgur.com/lGQ3723.jpg This was all done before the new Colt SOCOM US marked rifles came out. If I could go back, I'd go the SOCOM route because I'd rather have a true Colt and a stamped rollmark instead of engraved. |
|
|
|
WA, USA
|
[#19]
Okay I got some more pics for those interested. As you can see, I assume the sand blasting they did gave it a rougher texture than the Colt upper. Of course oiling both receivers (or maybe spray brake cleaner on both) will probably make it match closer but I don't really care.

I missed a spot in the sanding process and you can see some scuff marks on the rib/channel/whatchamacallit (where the pivot pin spring goes inside). The sand blasting didn't get rid of it, and anodizing isn't technically a coating that would hide these imperfections. Oh well; it's not like Colt receivers are perfect anyways


For those wanting to go this route, I would recommend contacting Braceman. I think I've seen his engraving come out as deep/wide as a stamped rollmark. |
|
|
WA, USA
|
[#20]
Originally Posted By wissota4:
Looks good. So that's actually engraved? Not the laser etched bs? |
|
|
|
[#21]
Originally Posted By tnbigdawg:
Okay I got some more pics for those interested. As you can see, I assume the sand blasting they did gave it a rougher texture than the Colt upper. Of course oiling both receivers (or maybe spray brake cleaner on both) will probably make it match closer but I don't really care. https://i.imgur.com/VyDCVMZ.jpg I missed a spot in the sanding process and you can see some scuff marks on the rib/channel/whatchamacallit (where the pivot pin spring goes inside). The sand blasting didn't get rid of it, and anodizing isn't technically a coating that would hide these imperfections. Oh well; it's not like Colt receivers are perfect anyways
https://i.imgur.com/KWUerxL.jpg https://i.imgur.com/Jax5jTf.jpg https://i.imgur.com/CtoYi0t.jpg https://i.imgur.com/DUfq5Jx.jpg For those wanting to go this route, I would recommend contacting Braceman. I think I've seen his engraving come out as deep/wide as a stamped rollmark. |
|
|
|
|
[Last Edit: Dyzastr]
[#22]
Originally Posted By tnbigdawg:
Okay I got some more pics for those interested. As you can see, I assume the sand blasting they did gave it a rougher texture than the Colt upper. Of course oiling both receivers (or maybe spray brake cleaner on both) will probably make it match closer but I don't really care. https://i.imgur.com/VyDCVMZ.jpg I missed a spot in the sanding process and you can see some scuff marks on the rib/channel/whatchamacallit (where the pivot pin spring goes inside). The sand blasting didn't get rid of it, and anodizing isn't technically a coating that would hide these imperfections. Oh well; it's not like Colt receivers are perfect anyways
https://i.imgur.com/KWUerxL.jpg https://i.imgur.com/Jax5jTf.jpg https://i.imgur.com/CtoYi0t.jpg https://i.imgur.com/DUfq5Jx.jpg For those wanting to go this route, I would recommend contacting Braceman. I think I've seen his engraving come out as deep/wide as a stamped rollmark. |
|
|
|
MD, USA
|
[#23]
Originally Posted By tnbigdawg:
For those wanting to go this route, I would recommend contacting Braceman. I think I've seen his engraving come out as deep/wide as a stamped rollmark. |
|
|
AZ, USA
|
[#24]
Mixed 'n' matched just for fun. Not gonna leave it this way.

|
|
|
|
[#25]
That’s affirmative on braceman. He just sent mine back to me not engraved, and said he won’t be doing it anymore. Lots of things pop up in life, so totally understandable. Is VaderSpade a member on here? Need to find someone new who can do the M4A1 engraving.
|
|
|
|
WA, USA
|
[Last Edit: tnbigdawg]
[#26]
Ohh I didn’t know Brace stopped taking in work. Vader was/is a member but I went through one of his GB ads and emailed him my specs the first time. The second time I emailed him direct. He supplies the 80% so you don’t waste money sending him one.
Vader is the guy that had a DIY anodizing thread here on arfcom. ——————- Both of my Block II’s (in temporary configurations for photo op). Never shot either yet. Top one is pending F1. Trying to stick with mostly clone correct on this one once I get the stamp. Bottom one is a DDMK18. Swapped the furniture and barrel before I even shot it. 
|
|
|
|
[#27]
Originally Posted By Hopscotch:
That’s affirmative on braceman. He just sent mine back to me not engraved, and said he won’t be doing it anymore. Lots of things pop up in life, so totally understandable. Is VaderSpade a member on here? Need to find someone new who can do the M4A1 engraving. Wish I could get like a wire frame or a program of the engraving so I could do it here. |
|
|
|
FL, USA
|
[#28]
|
|
|
|
[Last Edit: wissota4]
[#29]
Originally Posted By pbjunkiee:
https://whatacountry.com/colt-9mm-smg-parts-kit.aspx
|
|
|
|
|
[#30]
Originally Posted By Dyzastr:
That is very nice. Beautiful. But like you said, Colts finishes were far from perfect/good and they weren't consistent on color or finish (at least in my experience) so I wouldn't sweat the details. I have roughly 4 or five colt uppers, and not a one of em matches. Hell, my latest upper has machine chatter marks, and they just anodized over it. But if I were puttin that kind of coin on a lower I'd want it to my std too and not necessarily colts. Keep up the nice work! I keep seein jigs pop up on the EE, but I'm not quite there yet. One day, if I go 80%, I wanna do an a1 with the crane engraving on the right side magwell... Mmm. Originally Posted By Dyzastr:
Originally Posted By tnbigdawg:
Okay I got some more pics for those interested. As you can see, I assume the sand blasting they did gave it a rougher texture than the Colt upper. Of course oiling both receivers (or maybe spray brake cleaner on both) will probably make it match closer but I don't really care. https://i.imgur.com/VyDCVMZ.jpg I missed a spot in the sanding process and you can see some scuff marks on the rib/channel/whatchamacallit (where the pivot pin spring goes inside). The sand blasting didn't get rid of it, and anodizing isn't technically a coating that would hide these imperfections. Oh well; it's not like Colt receivers are perfect anyways
https://i.imgur.com/KWUerxL.jpg https://i.imgur.com/Jax5jTf.jpg https://i.imgur.com/CtoYi0t.jpg https://i.imgur.com/DUfq5Jx.jpg For those wanting to go this route, I would recommend contacting Braceman. I think I've seen his engraving come out as deep/wide as a stamped rollmark. I wouldn't go massively out of my way to get everything to match up, but I try to match 'em on unpainted guns if possible. Originally Posted By tnbigdawg:
Ohh I didn’t know Brace stopped taking in work. Vader was/is a member but I went through one of his GB ads and emailed him my specs the first time. The second time I emailed him direct. He supplies the 80% so you don’t waste money sending him one. Vader is the guy that had a DIY anodizing thread here on arfcom. ——————- Both of my Block II’s (in temporary configurations for photo op). Never shot either yet. Top one is pending F1. Trying to stick with mostly clone correct on this one once I get the stamp. Bottom one is a DDMK18. Swapped the furniture and barrel before I even shot it. https://i.imgur.com/ktQ22ZM.jpg 
Unfired on both? That's unacceptable; get out there and shoot those babies :\. |
|
|
|
WA, USA
|
[#31]
Originally Posted By krdt: https://i.imgur.com/7lZwLKc.jpg Unfired on both? That's unacceptable; get out there and shoot those babies :\. |
|
|
|
[#32]
|
|
|
|
|
[#33]
Took the 10.3's to my farm yesterday...
Got the RC stuck on. Just shot a few more rounds through to warm it up then it came off... 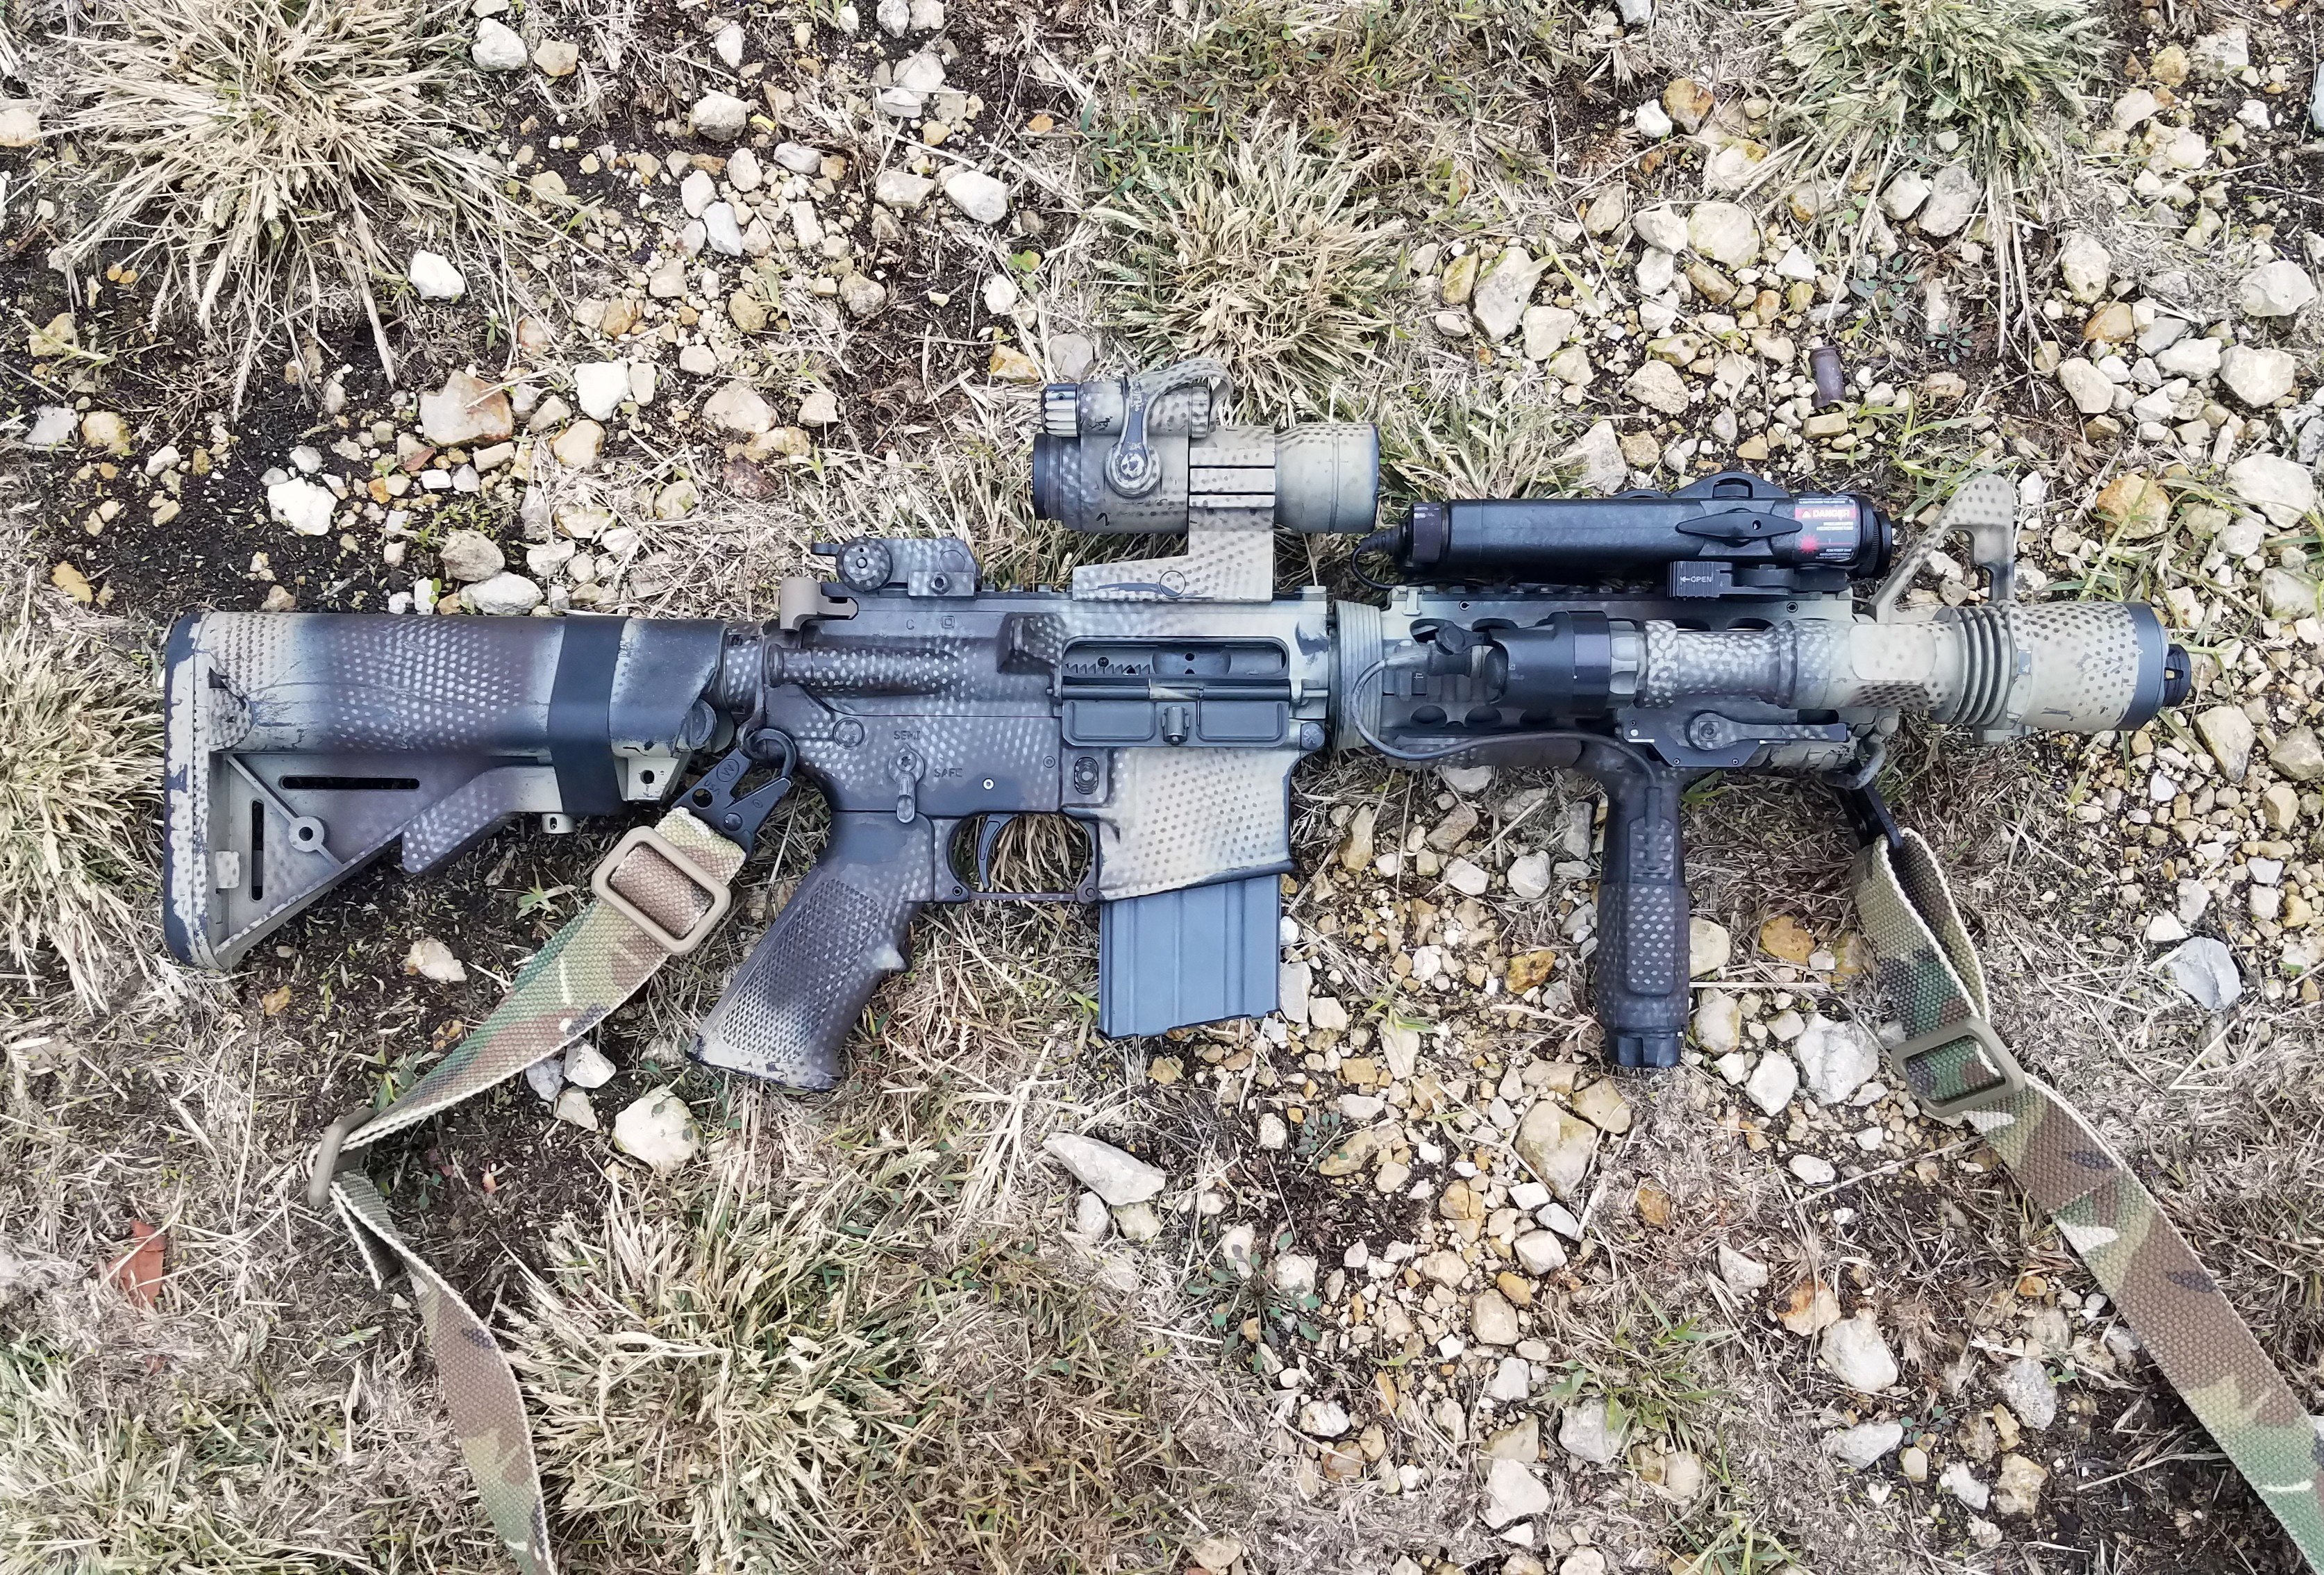
|
|
|
|
|
[#34]
Originally Posted By tnbigdawg:
Haha Originally Posted By tnbigdawg:
Originally Posted By krdt: https://i.imgur.com/7lZwLKc.jpg Unfired on both? That's unacceptable; get out there and shoot those babies :\. They do the same "fire danger" bullshit here and shut down a lot of spots for major portions of the year. Often seems they're happy with just about any excuse to shut down areas to go shooting. Of course, those are generally the better-known areas, and I tend to avoid those anyway - too many unsafe morons out there. I don't particularly enjoy having to hope the goof near me has some notion of safe practices, heh. There's also the unfortunate fact that a ton of shooters are just plain lazy, filthy motherfuckers that won't clean up after themselves (mostly the casual crowd) - it brings new meaning to the phrase "filthy casual," lol. That's resulted in a bunch of areas being closed permanently. So, the number of year-round spots available has shrunk considerably over the last 10 years or so. Luckily, I still have a few spots squirreled away where I can shoot year-round. |
|
|
|
WA, USA
|
[Last Edit: tnbigdawg]
[#35]
Originally Posted By Jlgil73:
Took the 10.3's to my farm yesterday... Got the RC stuck on. Just shot a few more rounds through to warm it up then it came off... https://farm2.staticflickr.com/1918/45443300931_fdcdede1de_o.jpg https://farm2.staticflickr.com/1925/43626084420_1fc0183cec_o.jpg Originally Posted By Jlgil73:
Took the 10.3's to my farm yesterday... Got the RC stuck on. Just shot a few more rounds through to warm it up then it came off... https://farm2.staticflickr.com/1918/45443300931_fdcdede1de_o.jpg https://farm2.staticflickr.com/1925/43626084420_1fc0183cec_o.jpg Originally Posted By krdt: Well, that sucks. They do the same "fire danger" bullshit here and shut down a lot of spots for major portions of the year. Often seems they're happy with just about any excuse to shut down areas to go shooting. Of course, those are generally the better-known areas, and I tend to avoid those anyway - too many unsafe morons out there. I don't particularly enjoy having to hope the goof near me has some notion of safe practices, heh. There's also the unfortunate fact that a ton of shooters are just plain lazy, filthy motherfuckers that won't clean up after themselves (mostly the casual crowd) - it brings new meaning to the phrase "filthy casual," lol. That's resulted in a bunch of areas being closed permanently. So, the number of year-round spots available has shrunk considerably over the last 10 years or so. Luckily, I still have a few spots squirreled away where I can shoot year-round. |
|
|
NC, USA
|
[#36]
So I haven’t been in the MK18 game since the UID labels got big.
What’s the correct label for a CQBR and a MK18 Mod 0? They have their own lowers. Thanks! |
|
|
|
[#37]
Originally Posted By Eyekahn:
So I haven’t been in the MK18 game since the UID labels got big. What’s the correct label for a CQBR and a MK18 Mod 0? They have their own lowers. Thanks! |
|
|
|
NC, USA
|
[#38]
Originally Posted By MILSPEC556:
CQBR can have any of them. Circle, square, or rectangular. Mk18 Mod 0 would have no label, as the weapon is just too old. UIDs didn't exist yet. Their lowers are laser marked Mk18 Mod 0 Crane Indiana with the Anchor, and some or all have the govt acceptance "stamp" on the front of the mag well. |
|
|
|
[#39]
Just said some things have come up and he won’t be doing engraving anymore.
|
|
|
|
|
[#40]
Originally Posted By tnbigdawg:
Ohh I didn’t know Brace stopped taking in work. Vader was/is a member but I went through one of his GB ads and emailed him my specs the first time. The second time I emailed him direct. He supplies the 80% so you don’t waste money sending him one. Vader is the guy that had a DIY anodizing thread here on arfcom. ——————- Both of my Block II’s (in temporary configurations for photo op). Never shot either yet. Top one is pending F1. Trying to stick with mostly clone correct on this one once I get the stamp. Bottom one is a DDMK18. Swapped the furniture and barrel before I even shot it. https://i.imgur.com/ktQ22ZM.jpg |
|
|
|
|
[#41]
Originally Posted By Hopscotch:
Just said some things have come up and he won’t be doing engraving anymore. |
|
|
|
WA, USA
|
[#42]
Originally Posted By Ivan1:
Whats vaders contact info? I want a gov marked lower. Those socom lowers are going for alot. |
|
|
|
[#43]
Originally Posted By tnbigdawg: Not sure of the rules so I'll IM you |
|
|
|
WA, USA
|
[#44]
Originally Posted By Hopscotch:
Just said some things have come up and he won’t be doing engraving anymore. |
|
|
|
[#45]
Originally Posted By tnbigdawg:
Yikes, you talking about Braceman or VaderSpade? Originally Posted By tnbigdawg:
Originally Posted By Hopscotch:
Just said some things have come up and he won’t be doing engraving anymore. |
|
|
|
|
[#46]
Originally Posted By tnbigdawg:
Yikes, you talking about Braceman or VaderSpade? Originally Posted By tnbigdawg:
Originally Posted By Hopscotch:
Just said some things have come up and he won’t be doing engraving anymore. |
|
|
|
|
[#47]
@tnbigdawg did you get the lower from him too or did you have one you sent in? Did he do the snoozing?
Here is a link to one of his guides. https://www.ar15.com/forums/ar-15/Vader_Spade_s_80__AR_15_build___Milling__Etching__and_Anodizing/4-484783/? I hope he actually is engraving them and not that electric etch thing.. |
|
|
|
WA, USA
|
[Last Edit: tnbigdawg]
[#48]
Originally Posted By wissota4:
@tnbigdawg did you get the lower from him too or did you have one you sent in? Did he do the snoozing? Here is a link to one of his guides. https://www.ar15.com/forums/ar-15/Vader_Spade_s_80__AR_15_build___Milling__Etching__and_Anodizing/4-484783/? I hope he actually is engraving them and not that electric etch thing.. He supplied the raw 80% and engraved it with a machine. All I did was emailed him my specs, pics, and he responded back with a digitized representation of what I wanted and a quote. He was really responsive when I had a design change. Once you confirm the design you send PayPal (I sent mine as F&F) and he goes to work. About 4 days later it shows up in the mail. |
|
|
|
[#49]
Originally Posted By tnbigdawg: Glad you were able to get it off. Did you apply lube or anti seize on the mount? I was thinking of packing one of those automotive plastic pry tools they use for interiors in case mine got stuck. Maybe it would work? I would not want to do the launch procedure lol. Mine was stuck pretty badly after shooting today (definitely the worst it's been thus far). I put 300+ rounds through and let it cool completely, and it was stuck solid. I couldn't even budge it at all by hand - not even the sliding forward slightly on the locking tab that it usually does before getting stuck further forward. But, the gentle prying method I've been using got it off pretty easily. I took a thin flathead screwdriver and folded a 3" cotton cleaning swab over the end, then gently pried on each side with the locking ring unlocked. Once it started moving forward a bit, I whacked it with my palm to reseat it, then pulled it back forward a few times. After that, I took a large flathead and continued prying gently on each side until it worked itself forward enough to clear the locking tab and I could rotate it off by hand. You don't need to pry hard at ALL (and wouldn't want to as you certainly don't want to deform your locking ring threads). If it won't budge, I'd move to another option. I'm thinking about picking up some blanks just on the off chance it ever gets too stuck to remove with the above method. I'll just line a Rubbermaid type tote box with towels and blast it into that. |
|
|
|
|
[#50]
Originally Posted By krdt:
Just FYI, be careful putting lube or anti-seize on your mount. I put a little high temp grease on the mount before I went shooting the second time with the RC, and a little splatter landed on the can. Grease baked into the finish instantly. I tried removing it with some Lucas Oil solvent, and did end up getting it off, but only after rubbing off a thin layer of Cerakote. It was completely baked into it. Luckily I stopped before exposing bare metal, but I don't bother with any lube on the 4P anymore, lol. If the plastic pry tool will fit between the ring and RIS II when the can is fully seated, it should work fine. Mine was stuck pretty badly after shooting today (definitely the worst it's been thus far). I put 300+ rounds through and let it cool completely, and it was stuck solid. I couldn't even budge it at all by hand - not even the sliding forward slightly on the locking tab that it usually does before getting stuck further forward. But, the gentle prying method I've been using got it off pretty easily. I took a thin flathead screwdriver and folded a 3" cotton cleaning swab over the end, then gently pried on each side with the locking ring unlocked. Once it started moving forward a bit, I whacked it with my palm to reseat it, then pulled it back forward a few times. After that, I took a large flathead and continued prying gently on each side until it worked itself forward enough to clear the locking tab and I could rotate it off by hand. You don't need to pry hard at ALL (and wouldn't want to as you certainly don't want to deform your locking ring threads). If it won't budge, I'd move to another option. I'm thinking about picking up some blanks just on the off chance it ever gets too stuck to remove with the above method. I'll just line a Rubbermaid type tote box with towels and blast it into that. Originally Posted By krdt:
Originally Posted By tnbigdawg: Glad you were able to get it off. Did you apply lube or anti seize on the mount? I was thinking of packing one of those automotive plastic pry tools they use for interiors in case mine got stuck. Maybe it would work? I would not want to do the launch procedure lol. Mine was stuck pretty badly after shooting today (definitely the worst it's been thus far). I put 300+ rounds through and let it cool completely, and it was stuck solid. I couldn't even budge it at all by hand - not even the sliding forward slightly on the locking tab that it usually does before getting stuck further forward. But, the gentle prying method I've been using got it off pretty easily. I took a thin flathead screwdriver and folded a 3" cotton cleaning swab over the end, then gently pried on each side with the locking ring unlocked. Once it started moving forward a bit, I whacked it with my palm to reseat it, then pulled it back forward a few times. After that, I took a large flathead and continued prying gently on each side until it worked itself forward enough to clear the locking tab and I could rotate it off by hand. You don't need to pry hard at ALL (and wouldn't want to as you certainly don't want to deform your locking ring threads). If it won't budge, I'd move to another option. I'm thinking about picking up some blanks just on the off chance it ever gets too stuck to remove with the above method. I'll just line a Rubbermaid type tote box with towels and blast it into that. 
|
|
|
|
 Win a FREE Membership!
Sign up for the ARFCOM weekly newsletter and be entered to win a free ARFCOM membership. One new winner* is announced every week!
You will receive an email every Friday morning featuring the latest chatter from the hottest topics, breaking news surrounding legislation, as well as exclusive deals only available to ARFCOM email subscribers.

AR15.COM is the world's largest firearm community and is a gathering place for firearm enthusiasts of all types.
From hunters and military members, to competition shooters and general firearm enthusiasts, we welcome anyone who values and respects the way of the firearm.

Subscribe to our monthly Newsletter to receive firearm news, product discounts from your favorite Industry Partners, and more.
Copyright © 1996-2024 AR15.COM LLC. All Rights Reserved.
Any use of this content without express written consent is prohibited.
AR15.Com reserves the right to overwrite or replace any affiliate, commercial, or monetizable links, posted by users, with our own.


