|
Posted: 4/30/2010 7:02:05 PM EDT
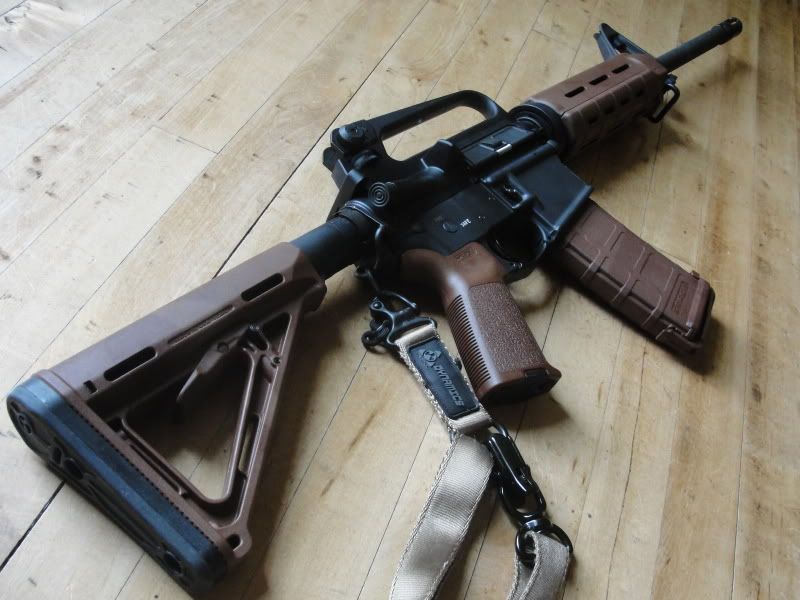
and a doo doo brown Bushmaster.
ETA: Post your pics of your dyed polymer and share your recipe. 


|
|
|
|
[#1]
I like it.
Works much better than FDE around here. What was your base color and what color dye? You all keep posting this stuff and I'm going to have to try it myself. |
|
|
|
[#2]
doo doo brown, lol.
poo blends in well with mud and dirt, good camo choice as opposed to desert tan in the woods |
|
|
|
[#3]
Quoted:
I like it. Works much better than FDE around here. What was your base color and what color dye? You all keep posting this stuff and I'm going to have to try it myself. Thanks. It was FDE and I used 1.5 tbsp of liquid cocoa brown in about two quarts of hot water. |
|
|
|
[#4]
I like the darker brown. Looks good. *Do we have a rit picture thread? Would really like to see more examples. |
|
|
|
[#5]
Quoted:
I like the darker brown. Looks good. *Do we have a rit picture thread? Would really like to see more examples. I edited the title, lets see if we could get it going. |
|
|
|
[#6]
Looks great, nice job.
|
|
|
|
[#7]
I'm liking it.
|
|
|
|
[#8]
I like it as well. How did the stock come out? Was it originally FDE I assume?
|
|
|
|
[#9]
How durable is the RIT dye process?
|
|
|
|
[#10]
Do you have an idea of how it would turn out if the base color is OD? I want to do that.
|
|
|
|
[#11]
Quoted:
Quoted:
I like the darker brown. Looks good. *Do we have a rit picture thread? Would really like to see more examples. I edited the title, lets see if we could get it going. Nice move. You think you could write a short walk-through. Like how long to keep the item in the dye and how long to let it dry. |
|
|
|
[#12]
Quoted:
How durable is the RIT dye process? It's very stable. My HK UMP clone has not faded at all. I dyed the stock last fall and it's still the same as day 1. |
|
|
|
[#13]
Quoted:
Quoted:
Quoted:
I like the darker brown. Looks good. *Do we have a rit picture thread? Would really like to see more examples. I edited the title, lets see if we could get it going. Nice move. You think you could write a short walk-through. Like how long to keep the item in the dye and how long to let it dry. Well I am no expert but this is how I did it. First, use a pot big enough to submerge the biggest parts you have. This may sound like a common sense thing but I didnt do it. The result being I had to turn the handguards around in the dye and this resulted in portions of the handguard being exsposed to dye longer than other portions. You really have to be looking hard to notice though. Fill the pot to the point where you will be able to submerge your parts and place it on the stove on high. I let the water get just hot enough to where it was steaming, then turned to low. At this point I added my dye. I used liquid RIT. I looked at thier website and they have a color chart which will give you some ideas of what the colors will look like and what colors you can mix to achieve different results. Unfortunatly the small northern Michigan town I live in only has one store that sells liquid RIT and they didnt have colors that I would have wanted to combine. I used 2 tablespoons of Cocoa brown in a 1.5 litre pyrex saucepan nearly full of water. This part I found to be a little tricky. As I added the dye I wasnt able to really see the color in the water, to me it just appeared to turn the water black, so if you are mixing colors you may want to practice on p-mag covers. Another thing I wasnt quite expecting is how quickly the polymer would absorb the hot dye. The first thing I did was a floorplate and dipped it in 20 second incraments. I achieved this shade of brown in sixty seconds so each part I dipped after the floor plate I left in the dye for 60 seconds. After the amount of time has passed that you feel is nessesary to achieve the color you want, pull the parts out of the pot. I pulled them out of the pot and put them directly under running water to rinse the excess off of them and set them on a towel to dry. The color I started with was FDE but I would think you would be able to get similar results with FG. OD might be a little dark to start with but it might be interesting to see the variences you could get. I would really like to see someone do a set charcoal grey. I hope this info helps some of you guys out. |
|
|
|
[#14]
To add...
The dye, rather than being a coating, is absorbed into the polymer so unlike paint it will not scratch off. If you were to get deep gouges I would assume you would be able to see the original color if the gouge was deeper than the absorbtion of the dye. I dont anticipate fading but I imagine the Pmags will be the first to show it. I will run the two mags I did hard for a while and try to put some wear on them but I dont think the color will wear off. |
|
|
|
[#15]
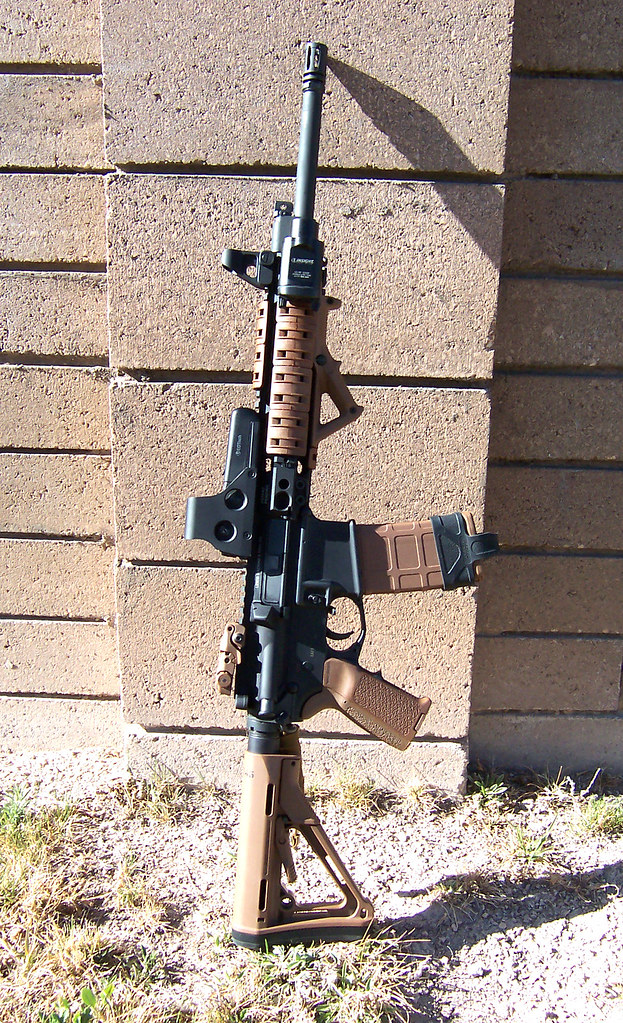
I have done several projects.

I did these magazines to prove that I could dye multiple colors and make camo patterns. That test turned into this Bushmaster 


|
|
|
|
[#16]
There is a ton of other examples and lots of advice and formulas here
After all of the dye jobs I have done I have only invested about $50 in dye, electrical tape, and razer knives. All of those at rural Alaska prices. |
|
|
|
[#17]
Quoted:
That test turned into this Bushmaster http://i920.photobucket.com/albums/ad50/AKsnowHare/VinniesBushmasterproject-02.jpg That is awesome. How about a detailed how to? Check here for some more good ideas on solid colors. |
|
|
|
[#18]
I have found several tricks to help with making the camo patterns.
1. plan out what you want. I often will draw the camo patten with colored pencils and paper first, listing what order I will do the dye steps. 2. I use electrical tape to mask with. I have found my best results are with Scotch brand professional '33' electrical tape. I have found in in black, blue, green, clear, and white. (clear really didn't work for me) 3. Have a smooth cutting surface to cut the tape on. I use a srap piece of plexi glass. That allows me to place a sheet of graph paper behind it to use a reference lines. 4. Knives- new exacto blades are good. I even found a crafting swivel head razor knife at Michael's. 5. for the digital patterns I used graph paper (five squares per inch) to make templates. Then transfered them to cardstock. rotating my templates and flipping them over gave me many options for shapes. 6. When making masks that us more than one width of tape make sure to tape the seams of the two peices to avoid bleed through. 7. For lifting/positioning tools I have retired dental tools. (just visit you dentist and ask) They work good for ensuring the tape sticks in the inside corners. 8. When putting the electrical tape on your part ensure the tape is not pulled tight at all. The heat will cause it to shrink (relax) and it will cause all types of problems. I have series of pictures for my digital that I can explain. 
Water temp was maintained from 170-190 degrees ratio of dye to water was 1/4 teaspoon per 4 cups 
example of my masking stage. This was my first attempt at the digital pattern. You can see the squares are larger on the magazine vs the MOE stuff. That is the difference in using quad rulled (4 squares per inch) paper and the smaller 5 squares per in paper to make your stencils with. 
Starting with a FDE plastic the blue tape covers up what will stay FDE. This will get dipped into brown rit. The 511 vest is used as a color match. I kept it close by to check my colors 
Next came green tape. The Blue tape remains still protecting the original FDE. green tape will now save the brown-er color. 
next is white tape keeping the previous blue and green in place. After the white is applied this will be the final dye for this set. 
After each time I would rinse the part with clean water and towel dry, followed by blow drying. Any pieces of tape that let water in (normally at inside corners) I would use a paper towel and press out the water. This is a great poor mans project. You can get awesome results with very little money. |
|
|
|
[#19]
Gotta go buy some RIT
|
|
|
|
[#20]
FDE base, 10 cups water, 1/8 teaspoon cocoa brown powder

|
|
|
|
[#21]
+1 Vote to make this Sticky!!!
|
|
|
 Win a FREE Membership!
Sign up for the ARFCOM weekly newsletter and be entered to win a free ARFCOM membership. One new winner* is announced every week!
You will receive an email every Friday morning featuring the latest chatter from the hottest topics, breaking news surrounding legislation, as well as exclusive deals only available to ARFCOM email subscribers.

AR15.COM is the world's largest firearm community and is a gathering place for firearm enthusiasts of all types.
From hunters and military members, to competition shooters and general firearm enthusiasts, we welcome anyone who values and respects the way of the firearm.

Subscribe to our monthly Newsletter to receive firearm news, product discounts from your favorite Industry Partners, and more.
Copyright © 1996-2024 AR15.COM LLC. All Rights Reserved.
Any use of this content without express written consent is prohibited.
AR15.Com reserves the right to overwrite or replace any affiliate, commercial, or monetizable links, posted by users, with our own.


