|
Posted: 5/28/2015 4:42:54 PM EDT
Finished my first 80% lower with my 80% arms Easy Jig. I had read everything there was to read and watched every available video about using the Easy Jig that was available on the internet and I was pretty confident I knew exactly what to expect. Even with all of the book learning nothing beats good old fashioned experience in doing something to really learn how to do it. I got my easy jig, the 80% arms 3/4" length of cut 1/4" end mill, my set of drill bits out of my tool box, and a 3 pack of Tactical Machining forged 7075 80% lowers. I highly recommend getting the 80% arms end mill. I looked everywhere for a cheaper alternative, and it's not worth trying to save $4-5. Their end mill works well and you don't have to worry about milling into your jig. Get it, it's worth it.
Starting off with the drilling which should have been the most straight forward and easy part of the process. My handy chart said to use a drill speed of between 2k-3kRPM for aluminum with a 3/8" drill bit. I originally went with 2180 RPM setting on my old Delta 8" benchtop drill press. It's a good 15 years old but looks almost exactly like the current el cheapo 8" benchtop drill press from harbor freight. With a jobbers length 3/8" bit (~5" long) I could not fit the jig on the table and slide it under the bit. Moving the table out of the way my drill press didn't have enough throw to drill the holes deep enough. To get around this I had to move the table out of the way, pick the jig up sliding the drill bit into the hole I want to drill, and slide the table back under the jig. Didn't take too long to realize my little drill press didn't quite have the omph even at 2180 RPM the drill press was noticeably bogging down even with proper lubrication and pecking. I dropped the RPMs to 1630 which slowed my drilling down a bit and the drill press performed much better at those speeds. Good machining practice keeping the chips clear and keeping the drill bit lubed and checking my drill stop collar frequently for slippage found all of the holes drilled in less than 30 minutes and that was taking it slow. 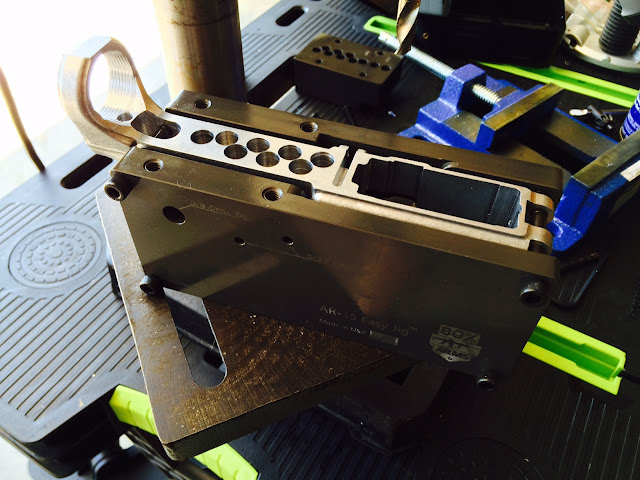
Next came the milling. I had a Blue Hawk (Lowes Brand) el cheapo plunge router that I had bought for $79 *with a router table* for another project. $79 with a router table? Yeah it's a cheap PoS :D It looks a lot like the Black and Decker RP250 that 80% arms does not recommend. I'm sure they came out of the same Chinese factory rebadged for Lowes. I figured I would give it a shot and see if it would work. If not I would invest in another router. Don't the look suspiciously alike? 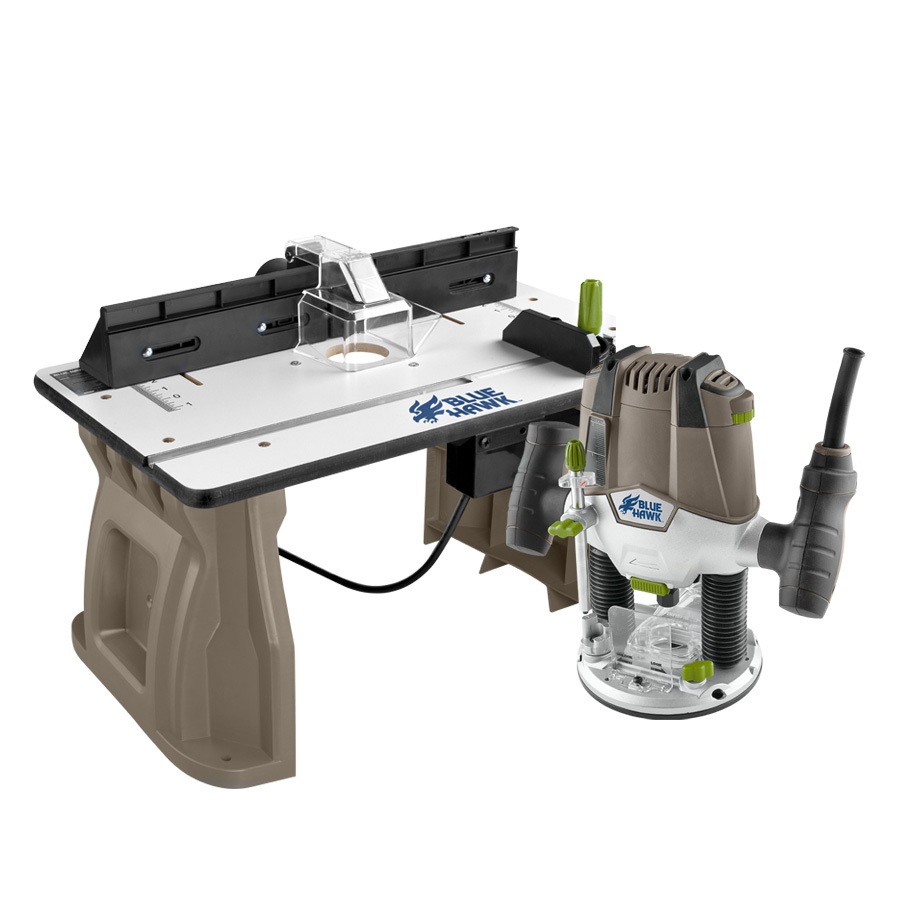

I made a couple of mistakes in the beginning but after about half way through my first lower I found my groove and got into a rhythm. In no particular order, my main mistakes were: 1. Trying to remove too much material. In my excitement of wanting to get this done the first couple of passes I tried to remove "1/3" of the hash mark. I was getting a lot of chatter with that depth of cut. I tried adjusting the router speed up and down but was still getting chatter. 80% arms says to do 1/4 to 1/5 a hash mark per pass. This leads me directly to item number 2. 2. Not using the depth adjustment/measurement tools on my router for a more consistent depth change from pass to pass. Trying to use the included cutting gauge that is built into the jig was pretty difficult when using a plunge router. Trying to hold the gauge pushing down on the plunger to get the depth set consistently... well that was a very inconsistent operation. After a couple of passes I finally wised up, abandoned the depth gauge build into the jig to adjust my cutting depth using it only for periodic sanity checks and started using the depth controls built into my router. I found I could get a really smooth cut when I cut at a depth of 3/64" or less. I found I could actually cut faster using the shallower cut because I didn't have to be as slow or steady when making the pass. Walls get smoother as I go down the lower. 
3. Not cleaning my collet or tightening my collet tight enough. My router has been used on wood projects and has bits of wood dust all over it. I should have cleaned the collet out before I started but I just jammed the end mill (backed it off about 1/4") and started milling. About half way through my 2nd pass the router was really starting to jump a lot. I futzed with the speed (RPMs and the speed I was moving the router) but it was only getting worse and worse. After I finished that pass that's when I noticed my bit had backed out almost 1/4". Then I vacuumed the collet out, blew compressed air in there, and swabbed it with some alcohol soaked Q-tips to pick up all of the fine wood dust. I tightened the crap out of it and didn't have any issues after that. After bottoming my router on the jig's depth guide I thought I was done. Well it turns out I wasn't. Jig is bottom out! I'm done! 
Wait... it looks like I'm a 32nd out from the 1.249" number. That's not within the 1.249" +/- 0.01" tolerance. 
Breaking out the calipers verifies that I'm still outside of tolerance. 
I took two more really light ~1/64" passes to sneak up on the 1.249". Since my lower came with the rear take take down area already milled I didn't bother removing the material between the fire control pocket and the rear take down shelf. After reading a lot of horror stories on milling out the trigger hole I read over on another site several people having success milling the trigger hole using a different method than the one listed in the instructions for the easy jig. User JAE on the site suggested not drilling the hole for the trigger slot. Instead he bottomed the mill out on the bottom of the lower. Then lowered the end mill just a hair, I did it in 1/64" steps. Then you rest one edge of the router on the work surface and tilt the router down to begin your cutting pass. After tilting the router down your make your pass. It took me 5 passes this way and I ended up with a very clean trigger pocket. I haven't tried it any other way but this way was very easy and made a very nice clean trigger pocket. 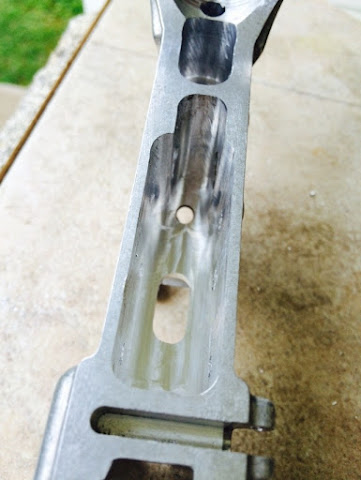
After finishing the trigger slot I was home free. Couple of hits with the drill press and I had a completed lower. I've learned a lot doing my first lower. I expect my next two to be much improved over this first one. It's been a 5 month journey since I started researching my first AR and this lower was past piece of the puzzle and is now complete. I'm glad I spent a little extra on the Easy jig over drill press jigs or settling for a polymer 80% lower. I have zero regrets with my choice of the Easy jig and would choose it again for my 80% build if I had to do it over again. Only way I could improve it I think is if I spent way more money on a mini mill. 
Finally built up my lower today (Sans rear takedown pin because I dropped my detent and they make detents out of material that evaporates on contact with the ground). and happy to say everything checks out functionally. Hope to function check my completed rifle this weekend. It's been a fun journey and I've learned a lot. Big thanks to ARFCOM which has been an invaluable resource during my first build. 
|
|
|
|
[#1]
Good review.
|
|
|
|
[#2]
Looks fantastic you should be very proud.
Vince |
|
|
|
[#3]
Tag for reference
|
|
|
|
[#4]

|
|
|
|
[#5]
Did you have any issue with the safety? I used the same lower and jig on mine and what looks to be the same lpk..(PSA classic lpk?)
Anyways, On the opposite side of the safety selector the hole seemed too small, so I went up one size of a drill bit in my set(for get size) in order to get it to fit. I also thought that maybe I hadn't milled deep enough, but never measured and went with the jig's end mill measurements. Because of this I'm assuming is the reason why I had to install safety without having the push pins installed in the trigger assembly. This doesn't seem to be an issue though...Just makes the trigger pull feel A LOT lighter and everything seems to function fine like it had before I installed the safety selector... I still haven't mounted and tested my upper yet since its in the process of being delivered. Any thoughts, or concerns guys? |
|
|
|
[#6]
Yes, I did have the issue of the right side safety selector hole feeling too small so it wouldn't pass through both sides. But if I slid the selector from the opposite side it slides in and gets stuck on the left side. Mine was getting stuck because the left and right side holes were fractions of a degree off from being perfectly normal. So I attached my bit to a drill and ran it through both sides at once and I worked it back and forth a couple of times. Selector slid right in after that.
|
|
|
|
[#7]
Quoted:
Yes, I did have the issue of the right side safety selector hole feeling too small so it wouldn't pass through both sides. But if I slid the selector from the opposite side it slides in and gets stuck on the left side. Mine was getting stuck because the left and right side holes were fractions of a degree off from being perfectly normal. So I attached my bit to a drill and ran it through both sides at once and I worked it back and forth a couple of times. Selector slid right in after that. I also thought that may have been the case but wasn't positive. I didn't wanna go straight through one to the other because the instructions say do each side one at a time. Which I honestly don't see why that's the case. I think I'm going to build it and see how it performs and possibly drop the floor of the receiver if need be. Thanks. |
|
|
|
[#8]
Standard aka jobber drills aren't all that precise, not at this level of work anyway, and have issues with drifting especially when you're making a long unsupported hole like going through the thin metal of one side of an upper and then the open void into the other side. Not only does the bit angle by itself but when you hit the far side the rotation of the drill bit will cause it to walk sideways and well where it starts to dig in is anyone's guess. It's more luck than anything else if you get a perfect 90 degree hole to hole.
But with that said it doesn't have to be perfect to be 'good enough'. Quoted:
because the instructions say do each side one at a time. Which I honestly don't see why that's the case. Thanks. |
|
|
|
[#9]
Even on a manual mini-mill with DRO's, I still drill from each side separately. Maybe if I spent an extra 20 minutes double and triple checking my level I could drill through both from one side and be just fine. But it works for me and I enjoy the time spent. Makes me sleep better too.
|
|
|
|
[#10]
Quoted:
Didn't take too long to realize my little drill press didn't quite have the omph even at 2180 RPM the drill press was noticeably bogging down even with proper lubrication and pecking. I dropped the RPMs to 1630 which slowed my drilling down a bit and the drill press performed much better at those speeds. Drilling smaller pilot holes first helps a lot. I used a 7/32" I.D. Press-Fit Drill Bushing from McMaster-Carr to keep the pilot holes precisely centered in the 80% Arms drill jig. After reading a lot of horror stories on milling out the trigger hole I read over on another site several people having success milling the trigger hole using a different method than the one listed in the instructions for the easy jig. User JAE on the site suggested not drilling the hole for the trigger slot. Instead he bottomed the mill out on the bottom of the lower. Then lowered the end mill just a hair, I did it in 1/64" steps. Then you rest one edge of the router on the work surface and tilt the router down to begin your cutting pass. After tilting the router down your make your pass. It took me 5 passes this way and I ended up with a very clean trigger pocket. I haven't tried it any other way but this way was very easy and made a very nice clean trigger pocket. IME, the problem is that the size of the drill bit that 80% Arms supplies is larger than it needs to be for this task. If you substitute a slightly smaller bit, any irregularities in the trigger hole will be cut away later when you mill it out, leaving a perfectly-shaped slot for the trigger. This slot has a larger diameter than the end mill, so it can also be used to start your last few "finishing" passes around the entire inside of the trigger cavity. |
|
|
|
[#11]
Quoted:
Sans rear takedown pin because I dropped my detent and they make detents out of material that evaporates on contact with the ground This made me laugh +1 |
|
|
|
[#12]
Thanks for your review. I just purchased the 80% arms jig and looking to do my first 80%er. I have built over a dozen with stripped lowers.
Thanks for the tip also on not removing the material between the fire control pocket and the rear shelf. I doubt I would have thought of that! |
|
|
|
[#13]
I did a second lower last week. This one did NOT have the rear takedown shelf milled. Chalk this up as another lesson learned but if you are having to mill the rear shelf make sure the hole you drill for the rear shelf that passes through the rear jig retainer bolt is drilled with a brand new (or at least really sharp) drill bit. Of not you will have to exert enough pressure to drill that you rotate the lower in the jig.

BTW... 80% lowers are like potato chips, you can never have only one! 
|
|
|
|
[#14]
Quoted:
Chalk this up as another lesson learned but if you are having to mill the rear shelf make sure the hole you drill for the rear shelf that passes through the rear jig retainer bolt is drilled with a brand new (or at least really sharp) drill bit. Of not you will have to exert enough pressure to drill that you rotate the lower in the jig. Again - Using a smaller bit to drill pilot holes first avoids this problem. Expecting a 3/8" bit to quickly make accurate first holes in forged 7075 aluminum is asking a lot - particularly with a tabletop drill press or hand drill. |
|
|
|
[#15]
Quoted:
I did a second lower last week. This one did NOT have the rear takedown shelf milled. Chalk this up as another lesson learned but if you are having to mill the rear shelf make sure the hole you drill for the rear shelf that passes through the rear jig retainer bolt is drilled with a brand new (or at least really sharp) drill bit. Of not you will have to exert enough pressure to drill that you rotate the lower in the jig. https://lh3.googleusercontent.com/k1Dk0qk3G9EtAG1obyvmMGH6WGUVtEHolWZRycgxXKc=s640 BTW... 80% lowers are like potato chips, you can never have only one! https://lh3.googleusercontent.com/tO5WPsSchuNt5C67wHOEpv0yyb38shDPOxObYYm1VqE=s640 I would always recommend buying a 80% lower that has the rear take-down lug pre-cut like many of the newer designs currently have...by doing this it not only saves a lot of machining time it also to helps avoid misalignment between the front and rear pivot and take down pins, and other potential machining mistakes, etc. Good luck. |
|
|
|
[#16]
I had pretty good results from my Easy Jig.
Went real slow, so the first one took four hours. That is set up to sweep up. Only a couple boo-boos for me, nothing major. Working on my third lower now. |
|
|
|
[#17]
Looks like it came out pretty clean for a drill press and router job. Good work.
My handy chart said to use a drill speed of between 2k-3kRPM for aluminum with a 3/8" drill bit Throw that chart in the trash where it belongs. 3K RPM is about right for milling aluminum with a 3/8 cutter, provided you have your feed speeds down, but way to fast for a little manual drill press plunging a HSS bit. Try it at 1,000-1,200 RPM; I think you'll find that even more agreeable than 1,600. There's really no such thing as too slow with drilling. |
|
|
|
[#18]
Nice work. I too purchased the easy jig along with one of the 80% arms 80% lowers with fixed trigger guard. I took my time as many had said and the 80% video repeats. While it took a while, the end result was fantastic. I have another 80% ready to go, will not mention the name since anything I see on this site refers to the manufacturer as a shill since this is my first post I do not want to ruffle feathers and give any wrong impressions. I will be interested in how this turns out. The 80% arms lower is 6061-T6 aluminum, but the one I am about to start is the 7075-T6. From reading it sounds like the 7075-T6 will be a little harder to drill, but will give it a go.
Anyway, really nice work, thanks for sharing, and Happy Shooting! |
|
|
|
[#19]
I've used the 80% Arms easy jig for both their 6061 and 7075 lowers, the 6061 was very easy in comparison. But that just comes from pure impatience, if you go slowly they turn out great...
|
|
|
|
[#20]
Quoted:
This made me laugh +1 Quoted:
Quoted:
Sans rear takedown pin because I dropped my detent and they make detents out of material that evaporates on contact with the ground This made me laugh +1 I know, that's hilarious . |
|
|
|
[#21]
Quoted:
I know, that's hilarious . Quoted:
Quoted:
Quoted:
Sans rear takedown pin because I dropped my detent and they make detents out of material that evaporates on contact with the ground This made me laugh +1 I know, that's hilarious . This, plus much awesome. Op wins many internet points. Truly inspiring. Thanks. |
|
|
|
[#22]
ha. made me laugh OP. nice review.
|
|
|
|
[#23]
Found a better way to dead with the rotating lower in the jig. Take one of the screws and partially thread it through the left side hole just deep enough so it catches the rear takedown pin so the lower doesn't rotate but not deep enough so that the threads enter the rear takedown area and get milled away. Problem solved!
|
|
|
|
[#24]
I've been looking for a reason to build an 80%...
this might be just the right form of motivation. I am wondering if a milling vice for a benchtop press would be better than a router, though.. |
|
|
|
[#25]
Nice review. Based on it I ordered one last night, got a shipping notice this morning so service is good at least from them. I'm using a couple of 'horse' 80% lowers in 7075 I picked up at a GS a couple of months back on a whim that I'll be using. Two because I'm assuming the first one will probably be a learning experience. I do have a mill so that's a plus in my chances of not screwing things up. :)
I was looking at the modulos jig but that extra $60 seemed high when I'm hoping with some practice on the first one or two that I won't need the jig any more other than just sanity checking and can do it jigless on the mill once I get my x/y DRO on it. Not that DRO is needed but for an amateur like myself it surely will help. |
|
|
 Win a FREE Membership!
Sign up for the ARFCOM weekly newsletter and be entered to win a free ARFCOM membership. One new winner* is announced every week!
You will receive an email every Friday morning featuring the latest chatter from the hottest topics, breaking news surrounding legislation, as well as exclusive deals only available to ARFCOM email subscribers.

AR15.COM is the world's largest firearm community and is a gathering place for firearm enthusiasts of all types.
From hunters and military members, to competition shooters and general firearm enthusiasts, we welcome anyone who values and respects the way of the firearm.

Subscribe to our monthly Newsletter to receive firearm news, product discounts from your favorite Industry Partners, and more.
Copyright © 1996-2024 AR15.COM LLC. All Rights Reserved.
Any use of this content without express written consent is prohibited.
AR15.Com reserves the right to overwrite or replace any affiliate, commercial, or monetizable links, posted by users, with our own.


.jpg)

