|
[#1]
Originally Posted By Dano523:
Yep, split lock washer will solve the shell plate bolt back off problem, but double check the drive hub height to figure out if it needed to be shimmed. When you have the sub plate off to shim (or to just clean up the mating surfaces of the drive hub to the bottom of the sub plate and grease the two) double check the fit of the sub plate to the top of the ram as well. The side Head taper draw bolts should pull the sub plate down tight to the top of the ram, and if needed, you can shim here as well. Lastly, double check the slop of the drive shaft to the ram through channel for it. If the slop is bad enough (BB in a box car), then instead of the pawn cleanly turning the index wheel on contact, it just shoves the drive shaft around in the sloppy channel to begin with instead. Also, make sure that you grease these bearing parts as well. Originally Posted By Dano523:
Originally Posted By GHPorter:
Typically the shell plate retaining bolt gets a little bit loose and it lets the plate "float" a little bit over the sub plate. Yep, split lock washer will solve the shell plate bolt back off problem, but double check the drive hub height to figure out if it needed to be shimmed. When you have the sub plate off to shim (or to just clean up the mating surfaces of the drive hub to the bottom of the sub plate and grease the two) double check the fit of the sub plate to the top of the ram as well. The side Head taper draw bolts should pull the sub plate down tight to the top of the ram, and if needed, you can shim here as well. Lastly, double check the slop of the drive shaft to the ram through channel for it. If the slop is bad enough (BB in a box car), then instead of the pawn cleanly turning the index wheel on contact, it just shoves the drive shaft around in the sloppy channel to begin with instead. Also, make sure that you grease these bearing parts as well. But this reminds me to check my pawls, check my ram lubrication, and check on those draw bolts to make sure everything is tight. It's good PM to pay attention to this sort of thing. |
|
|
|
|
[#2]
Basic solution to the problem for the shell plate bolt loosening up,
Better solution, just get a 3/8 x16 x 1-1/2 set screw, and loctite it into the drive shaft instead. This allows for a 3/8x 16 Threaded Single Split Shaft Collar with single washer under it to hold the shell plate in place instead. http://www.nutsandbolts.com/stainless-steel-inch-3816-threaded-single-split-shaft-collar-stainless-steel-qty-2-p-5092.html?zenid=0amu5cktif6ppnpjfq768c9541 But as you pointed out, a lot of having to check and re-lube on the AP progressive press, and something that you should not have to do but every 10K rounds and with normal cleaning instead. Hence the Glitch, and lucky to get a few thousand rounds on the AP before it has to be checked for what has come loose and needs to be tightened back up, needs to cleaned and relubed, and/or needs to be re-adjusted again. |
|
|
|
AR, USA
|
[Last Edit: studmonkey76]
[#3]
Originally Posted By johnh57:
I wonder if Hornady would exchange a plate with flatness issues? I haven't really tried to do any diagnostics on any of my plates, they all seem to work. I did have an issue with the shims, I used a fairly thin shim .003 or .002 and it worked great for the 9mm, but not very good for .223 (binding IIRC). It could be that my .223 plate needs some work, though the only cartridge I have any issues with is the 9mm because my cases are full. If I ever run out of Blue Dot, I'll find a better 9mm powder. Im having the exact same issue. .002 works great for 9mm but on my .223 plate, it would have some friction but in only one station i wasnt sure if that was a good thing or not. I went with the .0015 shim and it seems to work ok with both 9mm and 223. Filled a 9mm almost 3/4 full and tried indexing a few times and only a few flakes of powder shook out. With the .002 shim, it seemed that no flakes would shake out, but wasnt sure if leaving it in and having it have friction on one 223 station would cause any problems. |
|
|
|
[#4]
Bump
|
|
|
|
|
[#5]
Originally Posted By TZ250:
Bump This is a toggled thread that does not require a bump to keep it out of the archives. |
|
|
|
|
[#6]
Cross posted (with edits) from another thread... This isn't about the press, but rather about the case feeder, and particularly the system that feeds one case at a time to drop onto the sub plate.
It seems that I hadn't done too much with my case feeder and .357 brass in the past. Today I sized about 150 .357 cases and had a big lightbulb pop up over my head. "AH! This is that 'issues with .357 feeding' thing!" Hornady's instructions tell you that all you need is the right size tube from the collator, and the cases will feed just fine. Well yeah, if... These cases often stick on the outside/back of the pivot, and they require more than a little nudge to get 'em to feed. My prior .38/.357 loading on the LnL was prior to getting the case feeder, but when I ran into these issues, I had a fix already. I'd made a plastic adapter to go on top of the pivot so I could get .30 Carbine brass to feed consistently. Later, ARFCOM member LutzNutz used his 3D printer smarts to create custom pivot adapters for a lot of calibers that had specific issues, including 300 Blackout. That adapter works perfectly for .30 Carbine, so my little gadget wasn't needed anymore. Now for the cool part: a .30 Carbine case is 33mm long. So is a .357 case. AH HA!!! Here's my adapter: 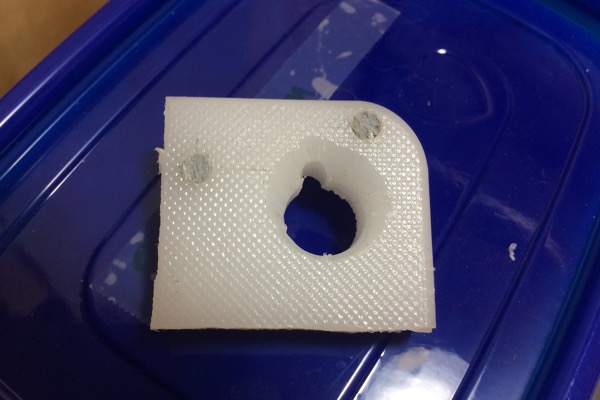
I opened up the top part to get the rim of a .357 case to drop in every time, and it works, every time. Here's the adapter in position on the pivot: 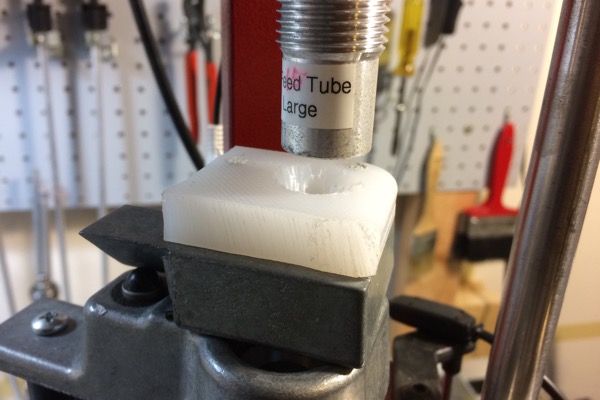
With one case on the adapter: 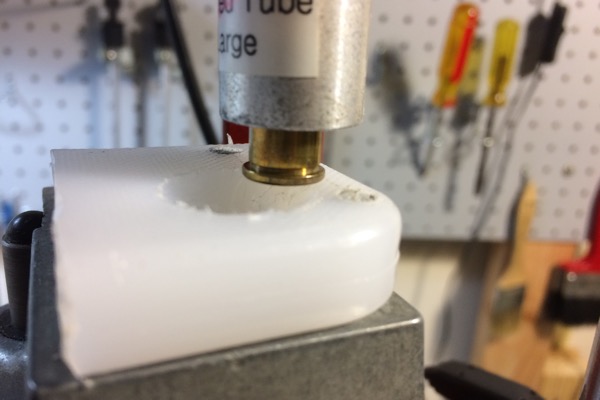
And with one case in the pivot and the next one "on deck": 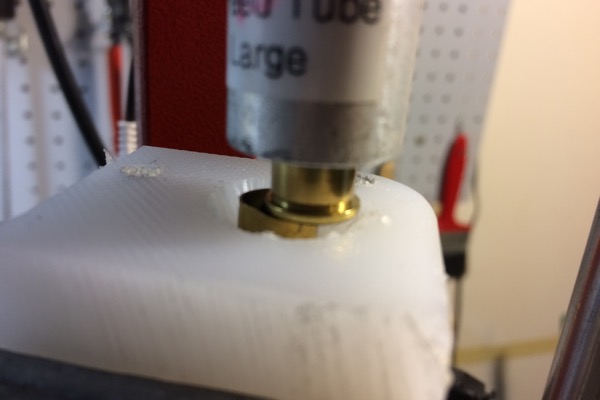
Note that these are .38 Special cases; it works for them exactly as well as .357 cases. The high tech part: this is cut off of a 3/8" thick (and cheap) cutting board. I basically traced the outline of the Hornady pivot adapter, then cut out a (yes, rough) chunk of the plastic stuff to cover the same space. I used some plastic rod for the alignment pegs, then drilled the hole through the block. Today, I used an RCBS deburring tool to open up and funnel the top, then I used a hobby knife to open it up a little more on the side that the case needed to slip into the adapter from. The outside edges of the thing don't interact with anything, so the actual outline is unimportant. Just making sure the alignment pegs fit and that the hole through it is properly aligned with the hole in the pivot is all that's needed. I'm not sure if I'm going to get motivated enough to clean up this little gadget to make it all smooth and pretty, but I'm very, very pleased with how well it works as is. |
|
|
|
|
[#7]
ON my Hornady Lock&load press, my Spent Primer Tube keeps coming out.
Is it a friction fit in the sub plate?? anyone else had this problem?? thanks |
|
|
|
|
[Last Edit: ws-6]
[#8]
Originally Posted By jvm:
ON my Hornady Lock&load press, my Spent Primer Tube keeps coming out. Is it a friction fit in the sub plate?? anyone else had this problem?? thanks If you are talking about the plastic tube, yes mine did it to until a put a small zip tie on it right before the flare in the metal tube. If it is the metal tube to the subplate, no I haven't but it does look like a friction/press fit |
|
|
|
|
[Last Edit: Dano523]
[#9]
Brass tube to sub plate is tap in fit,
Go to 3:40 to see how the brass tube is driving in place with the tool that will not kill the tube. [youtube]https://youtu.be/wSlOzIOxBxk[/youtube] If your is falling out of the sub plate, then can slightly expand the top of the tube to re-tap it in place, or use some Blue 242 loctite to semi lock in place isntead. I state semi, since at some point you want to be able to remove the brass tube if you have to remove the sub plate, and 242 will allow you to do this with the removal tool still. |
|
|
|
|
[#10]
Having the spent primer tube fall out is the opposite of the problem I've had. To remove the sub plate you have to remove the primer tube, and after I assembled my press way back when, that tube was a b*%$& to get out. Even with the tool that came with the replacement EZ-Ject sub plate and channel lock pliers, it was a bear.
As noted, expanding the top of the tube a little should help, and seating it with LocTite will definitely keep it from just falling out. However, in your case I'd also make sure the plastic tubing doesn't apply any "pull" on the brass tube. |
|
|
|
|
[Last Edit: Dano523]
[#11]
Here is the tool that comes in real handy.
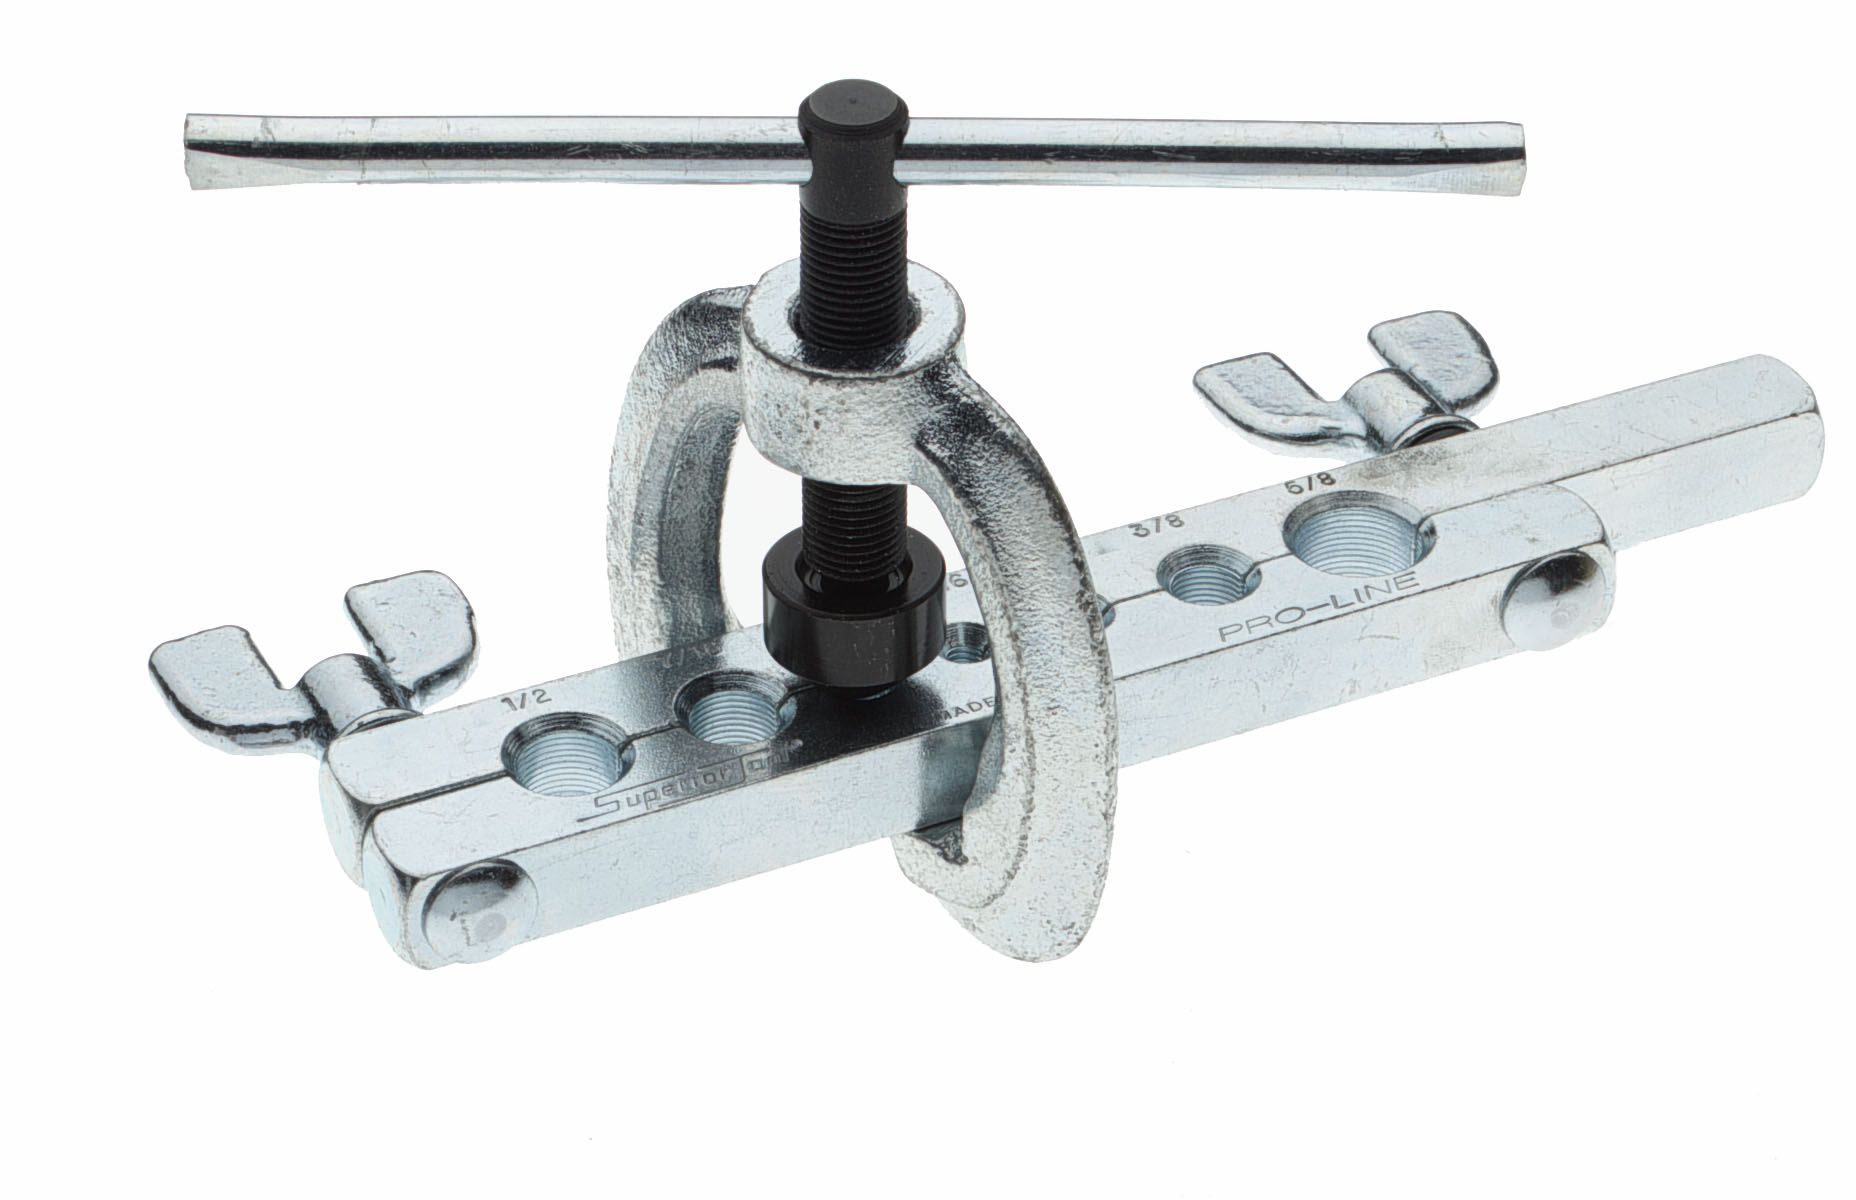
On the top of tube, just kiss off the tube end enough that when you go to seat the tube in the sub plate, you have enough resistance that when tapped in place in the sub plate, it going to stay in place. On the bottom of the tube, go a touch more heavy, and it will produce a lip that the ID of the plastic tube will lock in place. As for once the copper tube has been mounted in the sub plate, you may still need to tweak the tube so it not binding in the press body channel as the sub plate is going up and down as well. Also, double check the pass through channel for the spent primer tube in the press body, since it may have too much over paint in the channel, and you may have to remove the over paint with a drill bit so the tube is not dragging against the over paint in the channel. |
|
|
|
|
[#12]
You can also use a punch or a nail set to flare the tube, as long as you have something that will hold the tube fairly steady. As Dano mentions, it doesn't take much to expand the tube enough to get it to stick in the ram.
|
|
|
|
|
[#13]
Here's a picture of the primer tube tool that came with my upgraded (EZJect) sub plate.
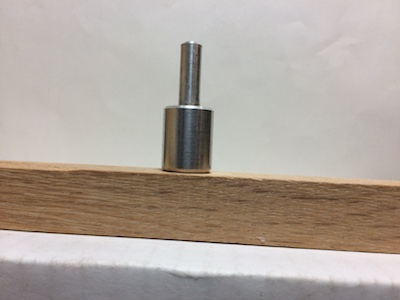
It's sized to fit inside the tube and keep you from crushing it when using a pair of pliers to remove the tube from the press. This afternoon I removed the tube by wiggling it - over time, it wasn't easy. I was going to take pictures of how the tool worked in the tube, but those pictures weren't particularly good. Not only was my photography crappy, but a brass tube isn't very interesting. And I forgot to measure the tube's ID and OD before I reinstalled it. 
On reinstallation: when the tube is big enough for a good interference fit, it's a bear to get started. I wound up raising the ram all the way so I could see what I was doing, then aligning the tube in the hole in the sub plate. Once it was kinda in place, I inserted the tool and lowered the ram until the tube tool was sitting on a stack of scrap 1x2. Then I pushed the press lever forward firmly... It took a couple of tries but the tube seated with a clunk. |
|
|
|
|
[Last Edit: Dano523]
[#14]
I still like the 242 loctite on it as well.
Push comes to shove, I do have a pipe tube flaring tool as show above, and it make short work of pulling the tube out of the sub plate down the line, since it allows me to clamp on the copper tube, and hit the tool with a rubber mallet to yank the tube out of the sub plate first try; even with the tube end 242 in place. |
|
|
|
|
[#15]
Originally Posted By GHPorter:
I've had the case feeder for my LnL AP for almost as long as I've had the press. The bracket that the output bin hangs on, which is also the base for the cam wire that operates the case feed "pusher" slide, seemed to be "springy" when I tried to bottom the press for priming. I had issues with priming consistently, and sometimes unprimed cases (fine ball powder makes a HUGE mess when it trickles all over your press), and I was thinking it was just that I wasn't doing something right. Maybe that was the case - I was putting up with the bracket being in the way. I finally got tired of fighting it and examined it in detail. The bracket has a flat piece that goes under the sub plate, which is supposed to act as a ramp for cases to fall from the shell plate into the output bin. Mine was bent upward, just enough that when I tried bottoming out the ram, it resisted. So I unmounted the whole press - necessary to get the bracket off - and re-bent the ramp section of the bracket so that it's now pretty close to level. WHAT A DIFFERENCE! Tonight I ran some cases through the press, sizing them and seeing how well the press operated. It's almost effortless, and bottoming the press to operate the priming punch is so natural and smooth, I'm really looking forward to my next session with the press. I'm quoting myself here to add some pictures. I don't have any "before" pictures, of course, but since I fixed this, I now can show pictures of "how it should be." Here's the ram sitting over the output bin bracket. It has plenty of space under it. 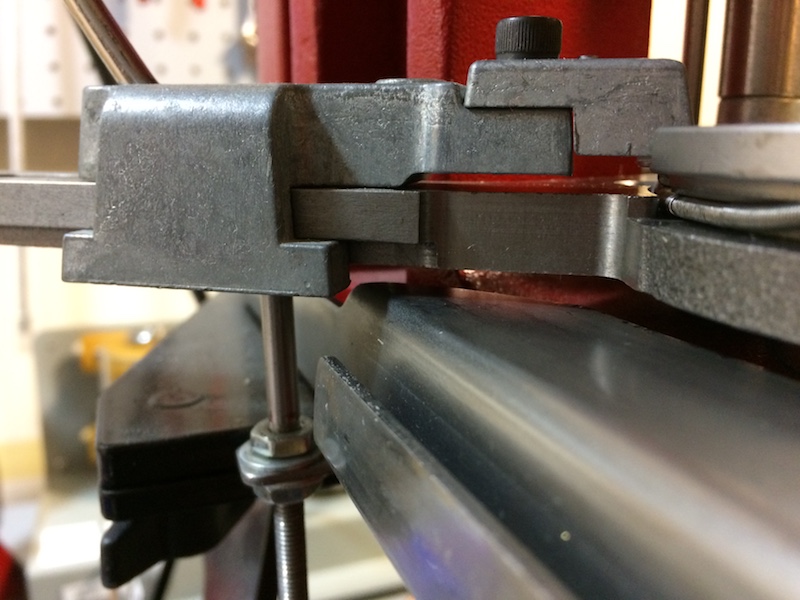
And here it is with the ram all the way down for priming. Note that it looks like it's touching the bracket. It may have a gap of 0.001" or so - I don't have that small a feeler gauge. But the actual clearance isn't as important as the fact that the ram isn't deflecting the bracket at all. Before rebending the bracket, it would flex A LOT when the ram was pushed down below neutral. 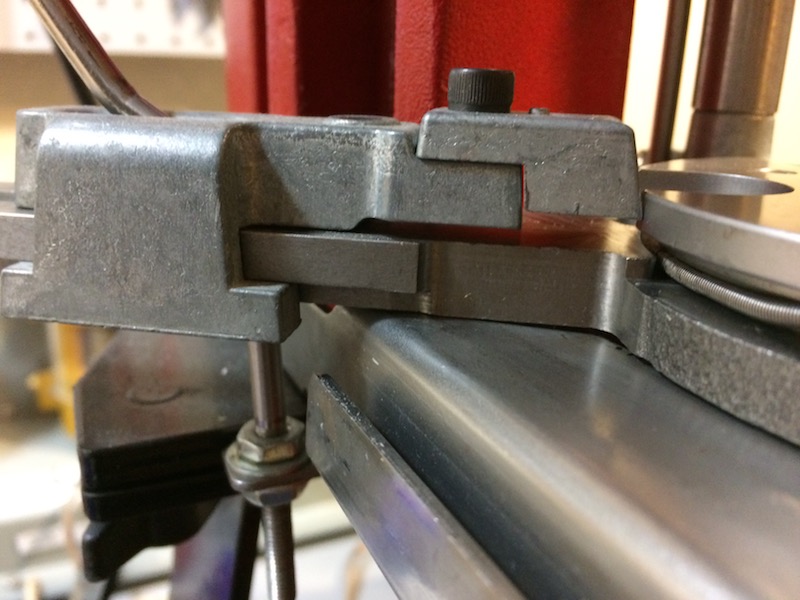
Now the important part: the priming punch. First, with the ram in neutral - see that the punch tip is touching the press frame: 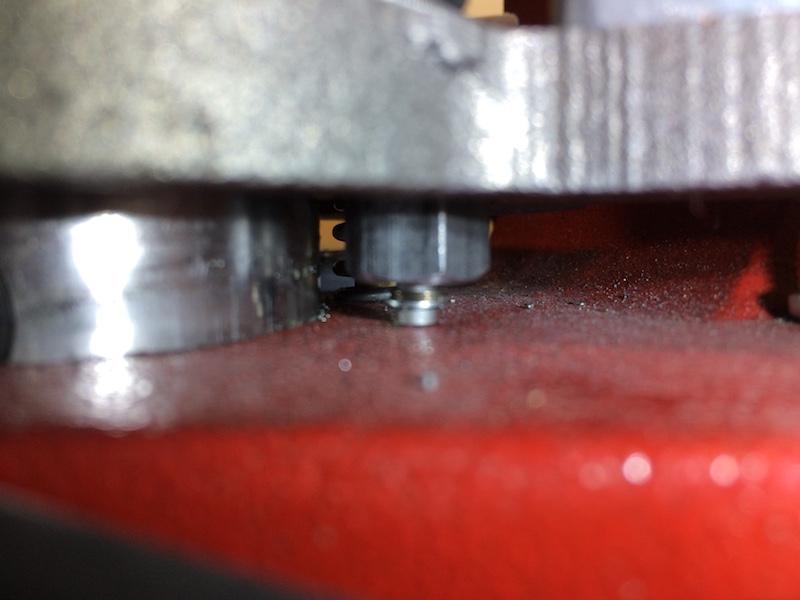
And now with the ram all the way down. See how the "nut" portion of the punch is bottomed out on the press frame? You can't get any farther down than that. (Sorry for the focus on the dust and stuff next to the punch...) 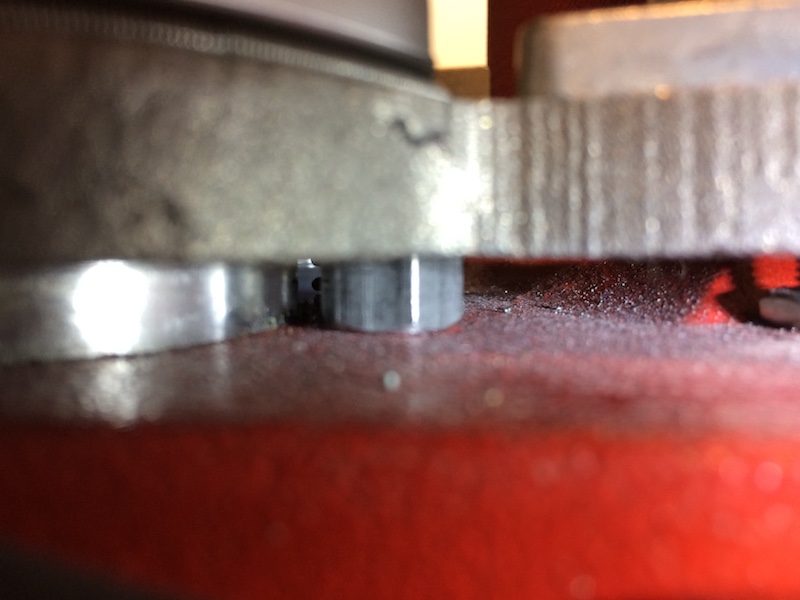
|
|
|
|
|
[#16]
Originally Posted By Dano523:
I still like the 242 loctite on it as well. Push comes to shove, I do have a pipe tube flaring tool as show above, and it make short work of pulling the tube out of the sub plate down the line, since it allows me to clamp on the copper tube, and hit the tool with a rubber mallet to yank the tube out of the sub plate first try; even with the tube end 242 in place. |
|
|
|
|
[Last Edit: Dano523]
[#17]
A little trick to the case pusher, and the ideal started from another persons concept mod below,

So he was trying to use the bent paper clip to keep both the pushed shoe upward, and to keep the case from tipping over when it was being pushed by adding pressure to the bottom of the case as well. What I came up with instead, is just drill and tap the bottom of the shoe pusher to add in a piece of U slot steel (piece of metal banding strap) that would lock into the rim of the case as it was being pushed forward and the plate is retained to the bottom of the shoe with a brass button head bolt isntead. With the plate slotted, this allow you to adjust it in and out, you can tweak the plate end to dial it into the case rim groove, and as for the brass button head bolt, you can file some brass off the head of the 6-32x1/4" button head bolt (aimed downward towards the sub plate surface ramp) or just add a washer or two, to dial it in to reduce the slop up and down on the pusher as well. 
|
|
|
|
NY, USA
|
[Last Edit: chrisben]
[#18]
Wonder if 3d printed ABS would be strong enough to replace the cast aluminum shoe as above... then we could make a shoe that extends lower toward the sub plate...
|
|
|
|
[#19]
Originally Posted By Dano523:
A little trick to the case pusher, and the ideal started from another persons concept mod below, http://i.imgur.com/2aj43Cy.jpg So he was trying to use the bent paper clip to keep both the pushed shoe upward, and to keep the case from tipping over when it was being pushed by adding pressure to the bottom of the case as well. What I came up with instead, is just drill and tap the bottom of the shoe pusher to add in a piece of U slot steel (piece of metal banding strap) that would lock into the rim of the case as it was being pushed forward and the plate is retained to the bottom of the shoe with a brass button head bolt isntead. With the plate slotted, this allow you to adjust it in and out, you can tweak the plate end to dial it into the case rim groove, and as for the brass button head bolt, you can file some brass off the head of the 6-32x1/4" button head bolt (aimed downward towards the sub plate surface ramp) or just add a washer or two, to dial it in to reduce the slop up and down on the pusher as well. http://i81.photobucket.com/albums/j226/Dano523/SAM_0001_zpsnpswuiyl.jpg That looks like a great mod! |
|
|
|
|
[Last Edit: Dano523]
[#20]
Originally Posted By chrisben:
Wonder if 3d printed ABS would be strong enough to replace the cast aluminum shoe as above... then we could make a shoe that extends lower toward the sub plate... The problem is that the front of the shoe has to move over the ledge of the shell plate, so it pushes the case all the way in.
So so maybe a L bottom shaped shoe would work to add some bottom tension, and still allow the front of show to get over the edge in the recess of the shell plate. But the second glitch to the system, is that the case has to jump the case spring retainer ramp on the sub plate that the spring rides in to drop away on the shell plate at the case insertion station. Note the rim spot right after the groove of where cases end up on the shell plate once seated to it. 
So here is where the clip that I posted to add on to the bottom of the shoe comes in to play, which locks in to the rim relief groove to hold the back shoe side of the case for a forward control feed on the shoe, and prevent the front of rim from dropping into the spring groove on the sub plate, or even a longer case like 223 tilting sideways at all as it being pushed forward via the shoe isntead. |
|
|
|
|
[#21]
I'll add that it's possible to get the case pusher shoe on slightly "wrong." That lets it be misaligned, so it pushes the cases at a slight angle. It's sort of important to hold each shoe firmly against the rest of the assembly when you attach it, so that it indexed properly. This seems to have more impact on smaller diameter cases.
|
|
|
|
MO, USA
|
[#22]
Interesting this thread comes up, as I was referencing it trying to fix my LnL AP.
Hornady ended up sending me a new subplate to solve my ejection issues. So far so good. I also stretched my case retainer spring considerably to get straight wall cases to align with the dies, and went to using Lee sizer dies for straight wall cases since they have a bit more taper and cases feed more easily into them. To solve my case feeder issues with 357, I purchased an aftermarket pivot insert from a guy on eBay. Haven't tested it yet, but looks like it will work well. Basically, the case feeder on these presses tries to use a few parts for all cartridge cases. The replacement pivot insert abandons this idea and has an insert for specific calibers. We'll see how it works. |
|
|
|
[Last Edit: edgephoto]
[#23]
Originally Posted By JamesP81:
Interesting this thread comes up, as I was referencing it trying to fix my LnL AP. Hornady ended up sending me a new subplate to solve my ejection issues. So far so good. I also stretched my case retainer spring considerably to get straight wall cases to align with the dies, and went to using Lee sizer dies for straight wall cases since they have a bit more taper and cases feed more easily into them. To solve my case feeder issues with 357, I purchased an aftermarket pivot insert from a guy on eBay. Haven't tested it yet, but looks like it will work well. Basically, the case feeder on these presses tries to use a few parts for all cartridge cases. The replacement pivot insert abandons this idea and has an insert for specific calibers. We'll see how it works. I believe that guy "on eBay" is a member here. I was trying to find out who he is and order one of each of his bits direct. |
|
|
|
|
[#24]
Originally Posted By edgephoto:
I believe that guy "on eBay" is a member here. I was trying to find out who he is and order one of each of his bits direct. |
|
|
|
NY, USA
|
[#25]
Originally Posted By GHPorter:
Yes, he is. He's the same guy I bought a (prototype) pivot adapter from for 300 Blackout (and incidentally also for .30 Carbine). http://www.ar15.com/forums/t_6_42/414607_How-to-tune-the-Hornady-Lock-N-Load-AP-progressive-press.html&page=6#i4722428 |
|
|
|
[#26]
Originally Posted By chrisben:
And you list his name in an earlier post above. http://www.ar15.com/forums/t_6_42/414607_How-to-tune-the-Hornady-Lock-N-Load-AP-progressive-press.html&page=6#i4722428 |
|
|
|
|
[#27]
Originally Posted By GHPorter:
I'm quoting myself here to add some pictures. I don't have any "before" pictures, of course, but since I fixed this, I now can show pictures of "how it should be." Here's the ram sitting over the output bin bracket. It has plenty of space under it. http://www.ghporter.com/PubPics/Arfcom/Press/RamNeutralBracket.jpg And here it is with the ram all the way down for priming. Note that it looks like it's touching the bracket. It may have a gap of 0.001" or so - I don't have that small a feeler gauge. But the actual clearance isn't as important as the fact that the ram isn't deflecting the bracket at all. Before rebending the bracket, it would flex A LOT when the ram was pushed down below neutral. http://www.ghporter.com/PubPics/Arfcom/Press/RamDownBracket.jpg Now the important part: the priming punch. First, with the ram in neutral - see that the punch tip is touching the press frame: http://www.ghporter.com/PubPics/Arfcom/Press/PunchNeutral.jpg And now with the ram all the way down. See how the "nut" portion of the punch is bottomed out on the press frame? You can't get any farther down than that. (Sorry for the focus on the dust and stuff next to the punch...) http://www.ghporter.com/PubPics/Arfcom/Press/PunchDown.jpg I had to grind a bit off the press body to get the primer punch timed correctly. IIRC I had to remove .020 -.030. In my case the ram was contacting too soon causing the primer to hit the bottom of the shell case before the shell plate could fully index. Before I ground that bit out I had to stop my stroke at neutral, let the plate index, and then push forward to seat the primer. Now it's just one smooth stroke with no pause at neutral. |
|
|
|
|
[#28]
Originally Posted By johnh57:
I had to grind a bit off the press body to get the primer punch timed correctly. IIRC I had to remove .020 -.030. In my case the ram was contacting too soon causing the primer to hit the bottom of the shell case before the shell plate could fully index. Before I ground that bit out I had to stop my stroke at neutral, let the plate index, and then push forward to seat the primer. Now it's just one smooth stroke with no pause at neutral. Just to clarify, you ground the press base under the primer punch, right? In the past, folks have mentioned having to build up under there after the punch had worn the casting through long use. |
|
|
|
|
[#29]
Originally Posted By GHPorter:
Just to clarify, you ground the press base under the primer punch, right? In the past, folks have mentioned having to build up under there after the punch had worn the casting through long use. Yes, I had to grind off material from the body of the press. I spent a while with a depth micrometer measuring things and checking timing before I did anything. I'd like to put some sort of hardened adjustable surface there. |
|
|
|
|
[Last Edit: Dano523]
[#30]
Originally Posted By johnh57:
I had to grind a bit off the press body to get the primer punch timed correctly. IIRC I had to remove .020 -.030. In my case the ram was contacting too soon causing the primer to hit the bottom of the shell case before the shell plate could fully index. Before I ground that bit out I had to stop my stroke at neutral, let the plate index, and then push forward to seat the primer. Now it's just one smooth stroke with no pause at neutral. Would dare to bank that the problem was too much slop between the drive rod and the bottom of ram channel that it rides though, and why the shell plate is indexing so late instead. When the bottom of ram channel for the drive rod gets too much slop, then as the pawns are pushing on the star gear, it's allowing the star gear itself with drive rod to move fore and aft too much, before the star gear start to turn instead. Why Hornady did not install at least a bronze shim at this channel that was replaceable is beyond me (ball bearing would have been bettter), but if you mic the bottom of ram channel against the OD of the drive shaft and end up with say over .003", would be getting Hornady on the phone for a new ram replacement. And yes, I have seen machines that are brand new, with up to .020" of slop between the two, before the machine was every used. To be blunt, the farther you move the indexer of the shell plate away from the shell plate on the sub plate, the worse things start to get. On the LNL, the more slop you get at the bottom of the machine (cam lever block, drive channel through channel, and even pivot pins to lever parts), not only the faster the indexer is going to come out of tune, but the later that it will index the shell plate as well. This is the huge downfall of the machine, since it has no sleeves that are replaceable to tighten the areas back up, and the only solution to the problem is to either void the warranty by installing the needed sleeves/bushing to tighten the bottom end back up, or at the mercy of Hornady to send replacement parts to tighten it back up once they have determined that the wear is beyond their acceptable range isntead. Simply, the shell plate should be indexing and locking into position, well before the primer punch even gets close to touching the base of the machine. |
|
|
|
|
[Last Edit: johnh57]
[#31]
I agree the plate should be indexed before the primer comes up, on mine, it did not.
I cannot detect any slop or runout in the main ram, I get a very small amount of side play in the star gear itself. It was pretty easy though to check the distance from the subplate to the top of the casting and compare it to the primer seating piston and realize there was an issue. This is under static conditions so there is no force or deflection from force in the system. IIRC, I stopped the plate from indexing when the detent balls were right on the edge of the recess in the sub-plate. On my press the primer was already proud of the subplate. I'm sure something is out of spec on this press - I just don't think it has anything to do with slop in ram or drive system. Hornady said I could send the press in to have them go through it, but after measuring things, observing how adjusting the pawls affected things, I decided to remove a small amount of material from the body of the press myself. I have not loaded a great deal on it since then, but the little bit I did there was dramatic improvement. Primers are seating to the proper depth, I don't have to pause at neutral and let the plate index. Worked for me, ymmv. |
|
|
|
|
[#32]
http://www.hornady.com/assets/files/manuals-current/metalic-reloading/LNL_AP.pdf
Notice that shaft 30 goes through a channel in 37. This is the area that you want less than .003" of slop between the two. Part 41 is a wave washer that will pull 47 up right against the bottom of the ram, but when you have the slop as noted above, the star gear is pushed fore and aft before it starts to turn via the pawns instead. So here, there are a few options, and the simple way to solve the problem and not void the warrently if the bottom channel on the ram is not out of round, it to sleeve the drive rod at the channel to remove the slop isntead. If the ram channel is out of round (egged), then either a new ram and take your luck that is not going to have a ton of slop as well, or just mill in a bushing instead. As for drive hub 29 against sub plate 24, you can have two problems here. The first is that is can cause too much slop between the shell plate to sub plate to cause priming problems, and the second is the OD of the drive hub against the ID of the sub plate to cause too much slop as well. Throw in that both sides of the drive rod 30 has through pins that can be loose to both the star gear 47, and the drive hub 29 and this just causes more problems with a late index as well. Lastly as the pin channels on the lever block 39, ram 37 get wear, this causing problems with the pawns not wanting to stay in tune. As for the primer ram tip and housing, with it threaded and tightened to the sub plate, both tops should be flush with the sub plate slider channel recess. If the primer rod tip is proud of the housing top edge, then you need to pull the C clip to take it apart to figure out why the rod is not coming all the way back down instead. If the housing top and rod are proud of the bottom of the channel (should be flush with it), then you can call up Hornady to send you new parts, or correct the problem your self instead. |
|
|
|
|
[#33]
I'd like to see bushings inside 37 for the shaft to stay stable top-to-bottom. It wouldn't take much of a bushing at both ends to make the shaft really stable. That would reduce the variability in the mechanism. And the bearings, as Dano mentioned, would be great.
I love my press, but it has some areas that might need tinkering with - or might not - depending on the luck of the draw for parts. More precision would probably make it much more expensive, though. So I'm also wondering why there isn't an upgrade parts market for this press, the way there is for Dillon's progressive presses... Business opportunities, even for niche markets like this, aren't something I'd think would go ignored... |
|
|
|
WA, USA
|
[#34]
Before I saw this mod I did teardrop dremel mod and it solved my problem, I couldn't be happier! I was able to run a case full (3x charge) of 9mm and it wouldn't spill but I got the shim kit anyway. Prior to that I solved the higher primer issue by gluing a copper penny (1979) under primer plunger rod.
I didn't really understood how to measure, it appeared that I needed depth micrometer which I don't have so I started with .010 shim which would bind everything, .008 would not bind but it dragged and I couldn't apply split nut, progressively as I went with thinner shims I could tighten the split nut until I got to .0045 where I could tighten the split nut fully without over tightening and shellplate wouldn't drag on subplate. I also had to push the ball bearings IN more as I pushed them out earlier for better indexing. I loaded 160 rounds of 7.62x40WT and not a kernel of fine powder (1680) spilled! The tilting in station 5 is still a problem but I'll try milling out extra slot for spring as others have posted. This mod is sure is less nerve wracking than a permanent dremel mod and I would've done it first if I have found this thread in time. https://www.youtube.com/watch?v=g9nGMxoUhSg&t=26s |
|
|
WA, USA
|
[#35]
Originally Posted By GremlinHunter:
How is the sub plate height being measured? I only have calipers here. My drive hub was .942 just like the OP. Now reassembled, the drive hub is .019 below the surface of the subplate. Any help or direction? I'm mostly having a priming issue. |
|
|
|
[#36]
Originally Posted By dimaprok:
If you're just having primer issues, I solved this when I first bought the press by gluing the copper penny underneath subplate on top of press where primer rod hits the press, thecre should be a spot there with indentation. This might not be the smartest fix but I never had problems afterwards with high primers. Solution, was to puta steel washer instead |
|
|
|
|
[#37]
So to simplify the initial post what this shimming does is raise the drive hub closer to being flush with the sub plate so the balls don't have as much movement when they drop into the detent? I am loading .44 mags in my new AP and even with a substantial amount of room left in the case I am still seeing some powder flicking out. I have driven the roller balls up about .010 and tweaked the pawls to no effect. I have no other issues with the press. I load slowly and index slowly so that isn't it. I did notice the shell plate has a lot of wobble in it, however I am used to a Loadmaster which is tight. I double checked the shellplate bolt and have used a lock washer on it. The bolt is as tight as I can get it without using a tool to hold it as I tighten it further. It seems the entire drive hub raises up when the shell plate is tightened down. Do I need to shim?
|
|
|
|
|
[#38]
Before you look at shimming, make 100% sure that your pawls are properly adjusted. It only takes a tiny bit of pawl misalignment for the locator balls to cause the shell plate to jerk. Your press manual should have all the info you need to get your pawls properly aligned.
The next step, taken only if pawl alignment doesn’t fix the indexing jump, is to go through the shim steps as described above. |
|
|
|
|
[#39]
I'm convinced the pawls are correct. When I tuned the press I moved the pawl adjustment until it over advanced the plate. Then I backed them off until the plate just started to index with the balls. Any less indexing and it would stop short. A bit more and it would over index. I would raise and lower the handle just as slow as I could and watch it and it would suddenly jerk and settle into the detent.
|
|
|
|
|
[#40]
Added a .004+.003 shims along with setting the balls even deeper and now the detent jerk is gone. Did a little finer tuning of the pawls and everything seems fine. Waiting on more bullets to try the press out some more. Loaded about 1250 .44 mag rounds on it so far. Case tilt at station 5 is still present but seems ok for this case size. I also cleaned up and polished the fcd as that was sticking to the cases causing some powder to pop out upon release. Since all I have left are preprimed aluminum cases I won't get to see if the primers are seated any deeper. Prior to this they seated flush to .002 deep.
|
|
|
|
|
[#41]
I.e. Spent the last two days reading this thread thoroughly front to back and while I have tinkered with my press to give my eyes a break I: tightened up the drive hub(two facing bolts-it was loose), removed the primer disposal tube several times, cleaned the primer slide and feed attachments(but still need to put a few coats of Johnson's on the slide), and broke the edge where the detente balls land.
I then loaded another relatively uneventful 100 rds of 223. I'm still having issues with primer seating depth and may try to trim the insert body(I have one that I lost the C clip to so I may experiment with it)but that is where I am. I've never tried to shim the press, mainly because I couldn't figure out how but anyway I will carry on. I will eventually get back to loading pistol rounds and may have more problems but I know where to find the answers and sadly it's not with Hornady. Thanks to all who have contributed here! |
|
|
|
|
[#42]
I recently disassembled the primer pin assembly and sanded down the hex portion so it would allow the pin to seat deeper. Was bottoming out on that hex portion.
|
|
|
|
|
[#43]
As in you took off the C clip and everything?
|
|
|
|
|
[#44]
Built a "primer tube empty" audio indicator. Cost was only about $8. Based on previously searched versions with my own little spin on it. I used one of these switches https://www.amazon.com/gp/product/B07P4CJ8TV/ref=ppx_yo_dt_b_asin_title_o03_s00?ie=UTF8&psc=1
and this siren https://www.amazon.com/gp/product/B01JU3SK1I/ref=ppx_yo_dt_b_asin_title_o03_s01?ie=UTF8&psc=1 Wired them together and added a power supply from my old rechargable razor. Mounting was the hardest part. I had some left over scrap polyethelyne(cutting board material). I just recessed the switch into it and screwed it to the bench. Works like a charm from my testing. |
|
|
|
|
[#45]
Originally Posted By DUX4LIFE:
I'm convinced the pawls are correct. When I tuned the press I moved the pawl adjustment until it over advanced the plate. Then I backed them off until the plate just started to index with the balls. Any less indexing and it would stop short. A bit more and it would over index. I would raise and lower the handle just as slow as I could and watch it and it would suddenly jerk and settle into the detent. I found 76Highboy on YouTube. He did a series of excellent videos on tuning and setting up the Hornday press. I noticed how smooth his shellplate indexed. Mine seem to snap a little bit into place. Once I learned how to adjust it correctly it works like a charm. What I did was back the detent balls out far enough that they did not work. I then adjusted the pawls until it indexed perfectly. I then pushed the balls down just enough to hold the plate in position. I would screw up the press and do it over and over until I could do it fast and by instinct. This video really helped me.  Failed To Load Title |
|
|
|
|
[#46]
Originally Posted By xdmikey:
As in you took off the C clip and everything? |
|
|
|
|
[#47]
Since it looks like I have three of the small ones I think I'll take one apart and experiment!
Thanks. |
|
|
|
|
[#48]
If you don't want to sand the primer seating piece you could drill the frame and install a set screw that allows you to adjust the seating depth by lushing just the plunger.
|
|
|
|
|
[#49]
Thanks edgephoto but I'll take a chance on fubarring the primer seater first. It's cheaper if I do go full fubar.
|
|
|
|
|
[#50]
edgephoto, I removed the C clip w/o issue, ran the threaded end across a file a few times and thought I had it but when I screwed it back together the primer slide still hung up on the primer punch.
Where to go next: file the bottom(as opposed to the top)of the primer punch? My major issue on my LNL is the failure to get primers seated deep enough and consistently, along with hangups at the case kicker/last point on the hub. Any and all comments welcome. |
|
|
|
 Win a FREE Membership!
Sign up for the ARFCOM weekly newsletter and be entered to win a free ARFCOM membership. One new winner* is announced every week!
You will receive an email every Friday morning featuring the latest chatter from the hottest topics, breaking news surrounding legislation, as well as exclusive deals only available to ARFCOM email subscribers.

AR15.COM is the world's largest firearm community and is a gathering place for firearm enthusiasts of all types.
From hunters and military members, to competition shooters and general firearm enthusiasts, we welcome anyone who values and respects the way of the firearm.

Subscribe to our monthly Newsletter to receive firearm news, product discounts from your favorite Industry Partners, and more.
Copyright © 1996-2024 AR15.COM LLC. All Rights Reserved.
Any use of this content without express written consent is prohibited.
AR15.Com reserves the right to overwrite or replace any affiliate, commercial, or monetizable links, posted by users, with our own.


