


Armory Sponsor

Posted: 2/28/2011 7:29:17 PM EDT
|
So primers don't want to seat in my military brass, presumably due to the crimp.
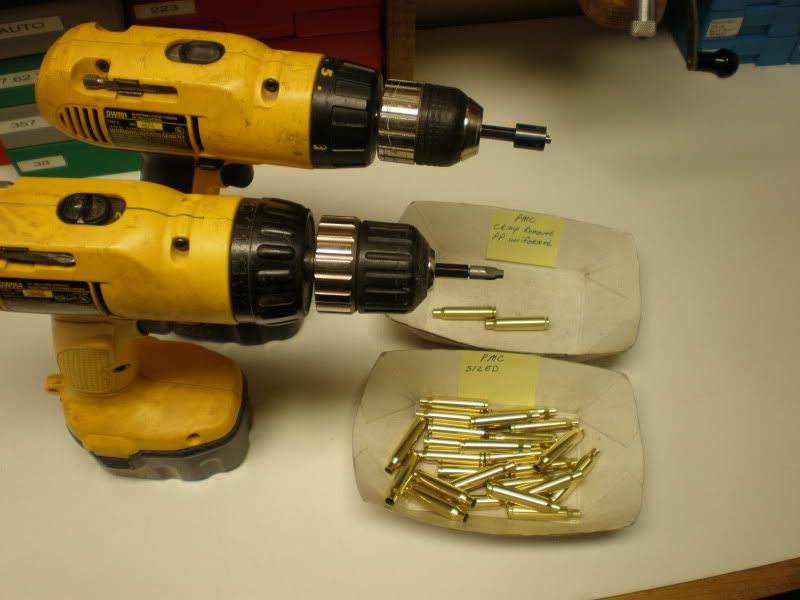
I have an RCBS chamfer & deburring tool as well as a trim mate military crimp remover that I can chuck up in a drill. My only question is how much needs to be removed? (don't say until you can fit a primer easily) Pics would be most helpful, as I'm afraid of removing too much. ETA: How does either compare to a swager, versus a chamferer? |
|
Using that method works pretty well, but its extremely easy to go too far, you will know when you went too far when the primers are too easy to seat, so easy that often they will fall out all by themselves. No photo can capture the difference between not enough and too much, experience will show you the way. Unfortunately when you go too far..the brass is only good for scrap. |
|
All you have to do is round the edges of the PP for a new one to go in
A crimped PP is pretty square at the edge, thus the hang-up I have used a Phillips head screwdriver to do a few here and there on strays, sort of an auger it out approach, yet still rounded, not near as harsh as the infamous "reamer boy". |
|
I use a swager- After swaging, the edge of the pocket has approximately the same radius as the primer cup. I used to cut the crimp, but primer seating pressure was somewhat inconsitent. I think crimping the primer distorts the pocket somewhat, under the crimp. Swaging affects that area as well, and results in very consistent primer seating.
In either case, the main thing is that you leave enough material to fully support the sides of the primer. |
|
From an old post of mine.............
Some books have said to use a "reamer".....IMHO…..DON'T USE THIS STYLE OF TOOL..........
www.midwayusa.com/eproductpage.exe/showproduct?saleitemid=364181&t=11082005 Someone once asked: Why Not? A standard chamfer/de-burr tool (like the tool above) could be used but, your results will vary greatly. In my younger days I tried using it but, I encountered problems with getting squared cuts and sometimes over doing it. And, it does nothing for the actual diameter of the pocket (IF, there is a problem there). YMWV. Currently, I use these tools...... Large Primer Pocket Size #7777785 www.midwayusa.com/eproductpage.exe/showproduct?saleitemid=682934 Small Primer Pocket Size #7777784 www.midwayusa.com/eproductpage.exe/showproduct?saleitemid=643126 With, the Lyman Hand tool I've eliminated those problems. It has a safe edge on the bottom.....it won't cut the pocket deeper. The cutter will simply spin, via hand power, cutting off the crimp and, it'll leave a slight chamfer to the primer pocket opening. It will also correct an "undersized pocket" and an "out of round" condition, but only to the limits of the tool's cutting edge, under hand power. And, the cutting edge can be dulled, to "adjust" the cut (IF, you wanted to do that). It's a "hand tool" and I wouldn't mount it in a drill........but, that's ME. BTW, my Speer #10 Re-loading manual has a picture of a pocket knife being used to “process” a military crimp (page 71). And, for commercial cases, IF needed, the Lyman reamer hand tool will also slightly "chamfer" the primer pocket opening that has that "sharp edge." And, while it's in there.....IF, the primer pocket is too small, it'll do it's magic for that problem, too. Then again, sometimes just changing your brand of primer can work to tighten things up a bit. Perhaps, using the wrong tool and/or other misusage of a hand de-crimp reamer, may be the reason why, some people are so anti-reamer? You know the saying about using the right tool for the job? Well, IMHO......the right tool, is the one specially made for the job of addressing the crimp. In this case, I use a Lyman Hand military de-crimp reamer tool. Not to mention that, the learning curve is so short. Just insert the tool into the primer pocket, twist, remove the tool and it’s done. It’s the sort of a mindless operation, that I can do while watching T.V. IF, your hand starts to cramp or you get tired..........just stop and take a break. IF, you choose the swage method (Dillon $94.95).........so be it. YMWV. Aloha, Mark PS.....don't bother with the web site address links.....they don't work anymore. |
|
I just got through prepping 650 lake city cases, including swaging. Affter finishing, I thought of the swaging time, and ordered a reamer that I can chuck in my drill/drill press/lathe.
From what I've seen, reaming should be a lot faster than swaging. Also, the swaging didn't seem as consistent as I would have thought it would be. Supposedly, the reamers will only shave the crimp, but not the walls of the pocket or the bottom, so hopefully it will be as consistent as the primer pockets themselves are. I guess I'll find out in a few days. |
|
Funny this thread comes up as I am sitting here taking a break from chamfering / reaming crimped 5.56.
I save the hardest work for last, my last bucket of crimped 5.56. I use the trim mate screwed to my bench - chamfer the PP pretty hard for about 1 sec. then ream it (on the trim mate), if it reams pretty easy, good, check for media in the flash hole and put in bin labeled good pocket. if it is hard to ream or won't ream, I clean the pocket w/ the wire brush tool, also on the trim mate. check the flash hole for media, and put into bin labeled tight pockets. I do this to keep the tight pockets for the last run. the ones w/ what I call good pockets are very easy to seat on the 550b, and the loading cycle is easy and consistent, I very, very rarely get a pocket that is to loose, and I can feel one when I do. As for the tight pockets, I just give a much more positive primer seating stroke on the 550b, I like to keep them separate, and I never like to lose even 1 primer via smashing into a pocket. BTW - this is the last big run w/o a Dillon swager, I will be adding one to my next Dillon order - My system works but it is hell on my fingers and wrists, especially in the volume that I run..................... |
|
The Dillon has it's place (like when doing 1000s of cases from the same mfn)............don't get me wrong.
With the Dillon, be aware that............. You need to adjust it correctly (you could over/under do it). You need to keep your body parts out of the action mechanism. Pls, focus your attention so, that you don't injure yourself. You might/could get a crushed burr obstructing or partially obstructing the flash path. It's due to the rod that enters from the neck and presses against the case head...........pressing back the burrs left from initial production of the flash path hole. Aloha, Mark |
|
Quoted:
All you have to do is round the edges of the PP for a new one to go inA crimped PP is pretty square at the edge, thus the hang-up I have used a Phillips head screwdriver to do a few here and there on strays, sort of an auger it out approach, yet still rounded, not near as harsh as the infamous "reamer boy". Usually that is the case, however I have some H1 and PMC headstamped brass that I have had to remove some brass around the wall of the primer pocket in order to get a new primer in. Only thing I can think of is that they used a primer whose cup had a smaller diameter than the CCI 41's I am using. |

|
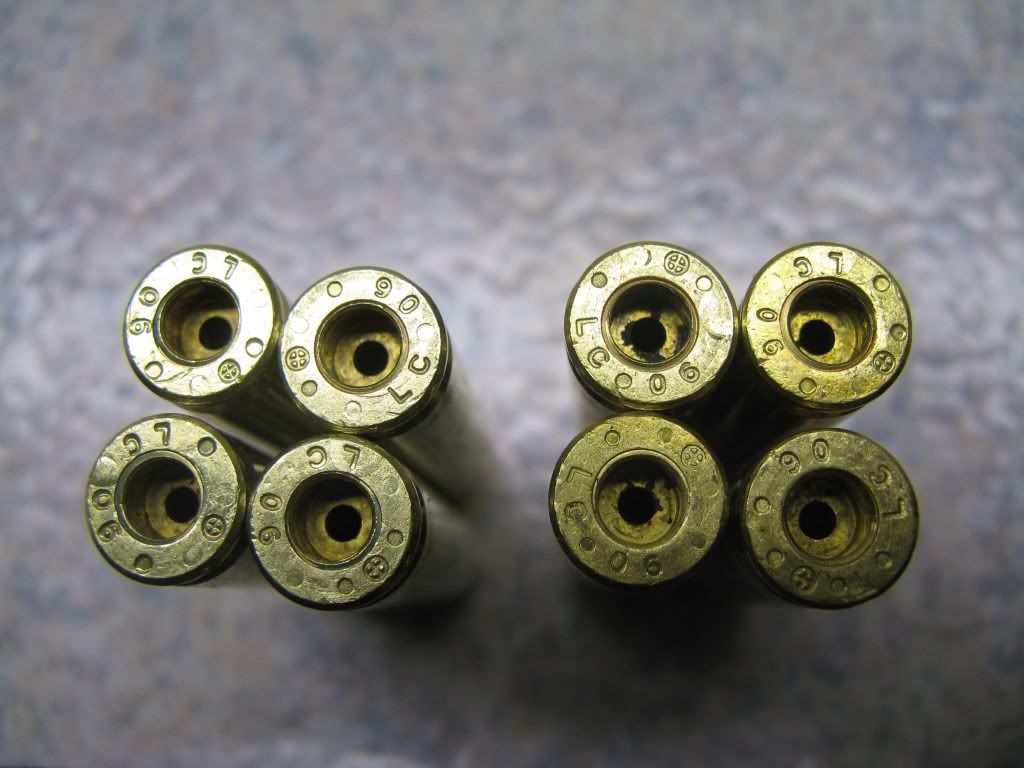
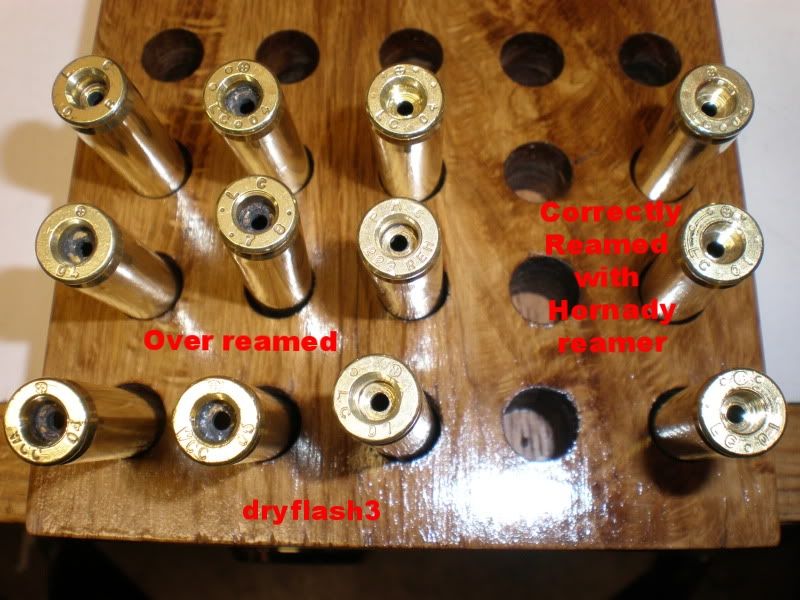
i use the hornady primer pocket reamer and most of my cases look like the ones on the left of your pic after reaming,
what is the problem of the over cut cases in your opinion? If the the hornady reamer prevents overcutting, then why do I get what you call overcutting? have you tried seating a primer in one of the ones on the left? have you tested? what were the results? |
| I use the Possum Hollow case trimmer in a small table top drill press. After a few seconds of that I have a Hornaday reamer (just the tip ) in a battery powered drill laying flat on an old towel on the bench next to the drill. I just come right out of the triming over to the drill and give it about a second of reaming. Check the flash hole while using a hand held primer (RCBS) and it all works good. I wear a tight fiting rubber type glove on the right hand also. |
|
Quoted:
i use the hornady primer pocket reamer and most of my cases look like the ones on the left of your pic after reaming, what is the problem of the over cut cases in your opinion? If the the hornady reamer prevents overcutting, then why do I get what you call overcutting? have you tried seating a primer in one of the ones on the left? have you tested? what were the results? I have 500 "processed" military brass from Midway that looks similar to the stuff on the left. I shoot it with Wolf primers and Midsouth blems. Get me some pull down powder and I will be in for the quadfecta. It goes bang. |
|
Quoted:
Quoted:
i use the hornady primer pocket reamer and most of my cases look like the ones on the left of your pic after reaming, I've had the same experience. I try to stop reaming before the tool bottoms out. The first Hornady reamer I bought (about 3 years ago) reamed too deply. I trimmed the end off on a grinder to make it right. The newer one I have (bought about a year ago) was perfect. The stop is set correctly. |
Armory Sponsor