


Posted: 3/21/2010 10:19:24 PM EDT
|
You guys probably recall the original thread: BBQ Gun or Pimp CCW?
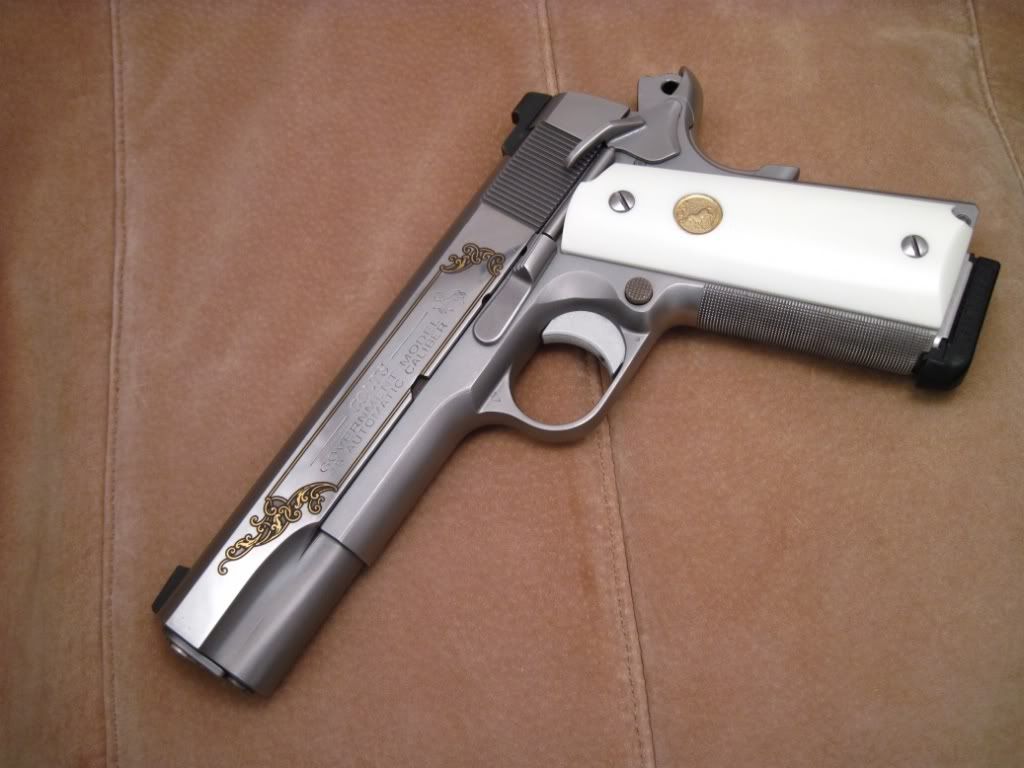
I found this rode-hard-and-put-up-wet Colt and something about its sheer tackiness appealed to me. And on a deeper level, sometimes I get a bit tired of the constantly accelerating tactical trend in 1911 styling, so this was the right project gun at the right time. When I bought the gun, it had more than its share of problems. First, the rear of the firing pin had mushroomed (and/or been filed down) to the point it was flush with the firing pin stop. The trigger was a good solid 7 pounds if it was an ounce. Upon firing, the gun would fail to feed my SWC reloads about 5% of the time, and way too much brass was hitting me in the face. And as a final insult, half of the rear sight leaf was broken off. On the plus side, it appeared that it was pretty much all original, nobody had begun cutting on it, not even the dreaded "feed ramp polish", and the barrel and bushing fit was actually pretty solid. 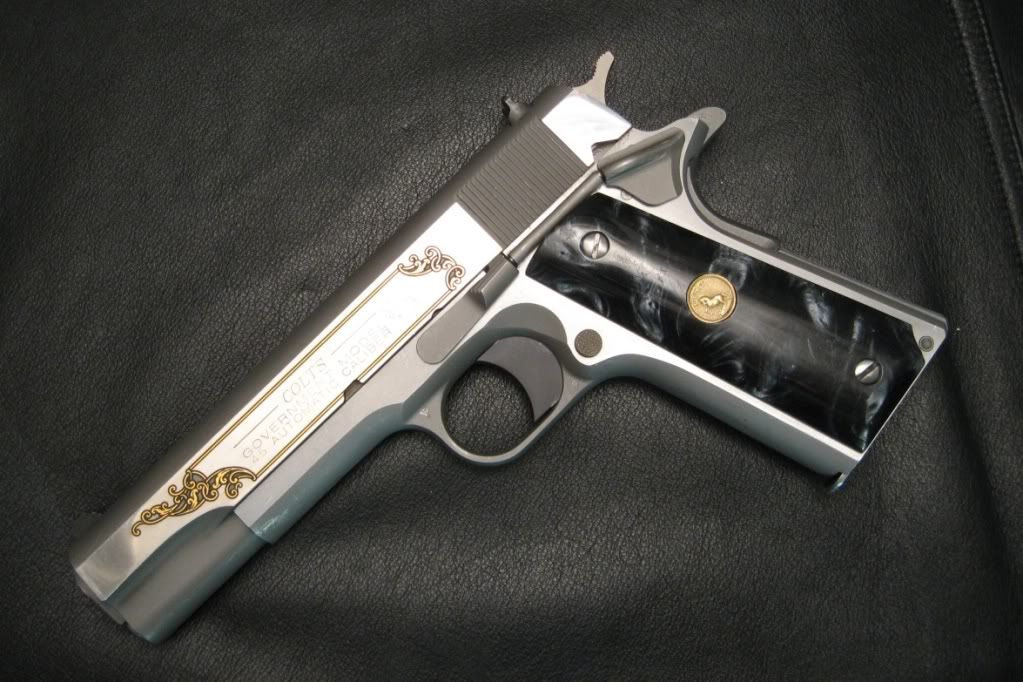
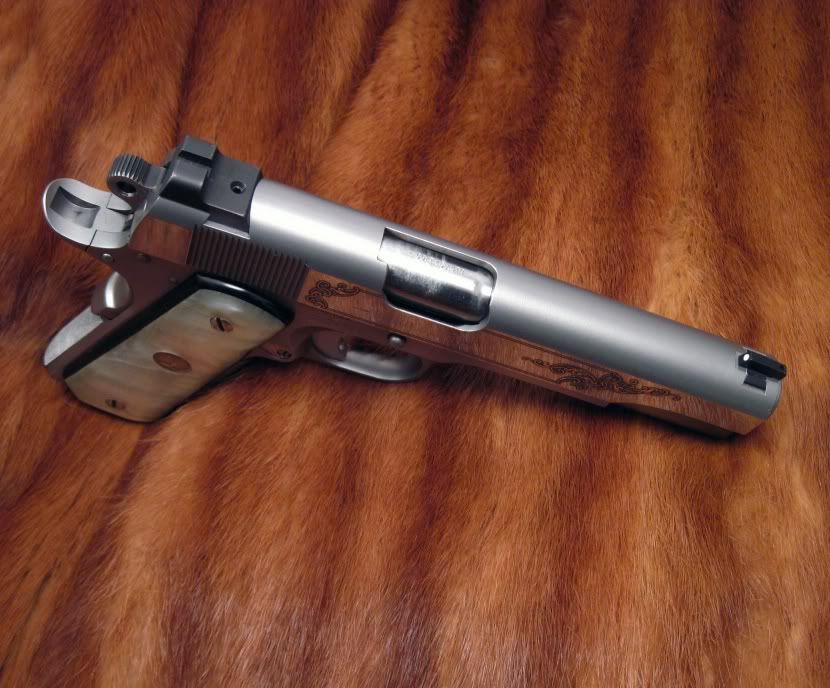
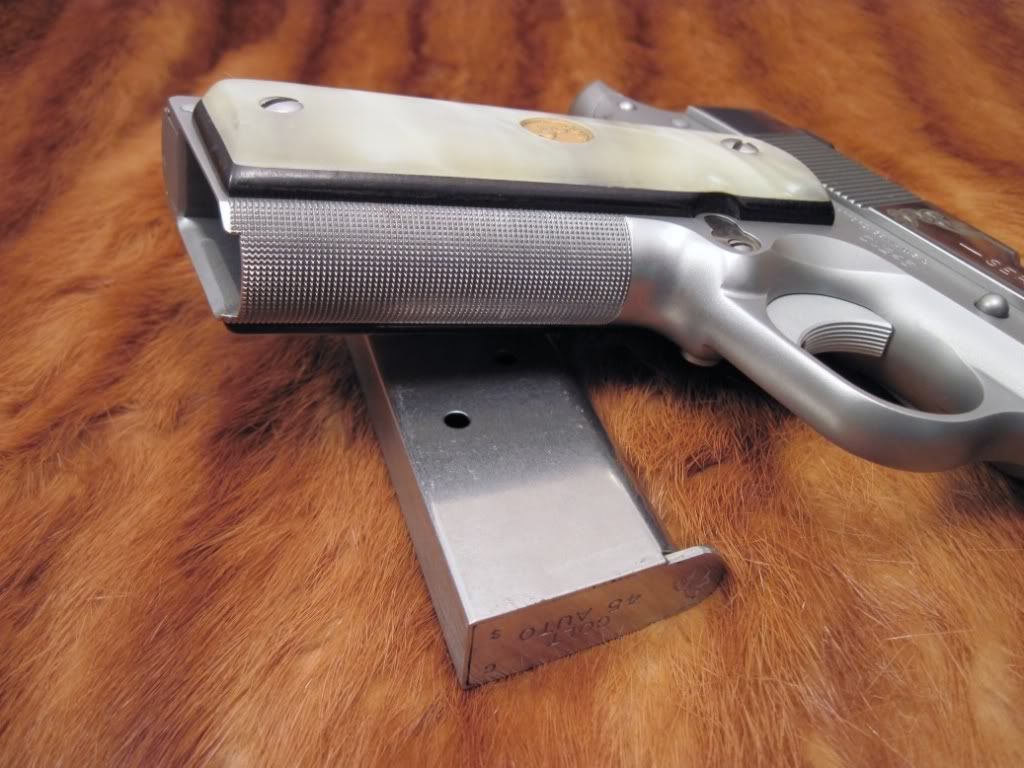
Here's what I did to it: Milled slide for Novak front and Yost-Bonitz rear Fit a S&A beavertail Nighthawk trigger and sear Colt Commander hammer Brown thumb safety EGW firing pin and firing pin stop Smooth S&A mainspring housing, which I checkered to 30 lpi High-cut and checkered the frontstrap at 30 lpi Lightly beveled sharp edges Opened up magwell Throated barrel New springs Set trigger pull to 4 pounds Adjusted extractor tension Adjusted ejector angle (note that ejection port is lowered but not flared) Removed Colt grip medallions and installed them on a set of old white pearl grips I had lying around Blasted frame & slide rounds & controls with 80 grit glass beads 


As for the parts, I really liked the Nighthawk sear. It's my first time buying them and they really turned out a good part. I didn't have to touch it at all, just dropped it in. The Nighthawk trigger bow, on the other hand, was a little too long for my taste, and I had to modify it before it would function correctly. The shaft on the Brown thumb safety was even thinner than the stock Colt part, which made it tricky to get a seamless fit on the beavertail. There are still some scratches on the polished slide flats, and at least one ding near the muzzle that I was too chickenshit to polish completely out, but at least it shoots like a champ now. I put about 150 rounds through it after the upgrades, and not one problem occurred. That's a vast improvement over the first time I took it out after buying it, where I was having at least one problem per magazine. No doubt that's why the owner wanted to dump it to begin with. It's fortunate he didn't decide to do some kitchen table improvements to try to address the issues. I have a feeling this Colt will be one of my new favorites. I left the trigger at 4 pounds because I intend to carry it at least some of the time. I'm definitely going to take it to some matches, too. It's just flashy enough to really stand out. |
|
Quoted:
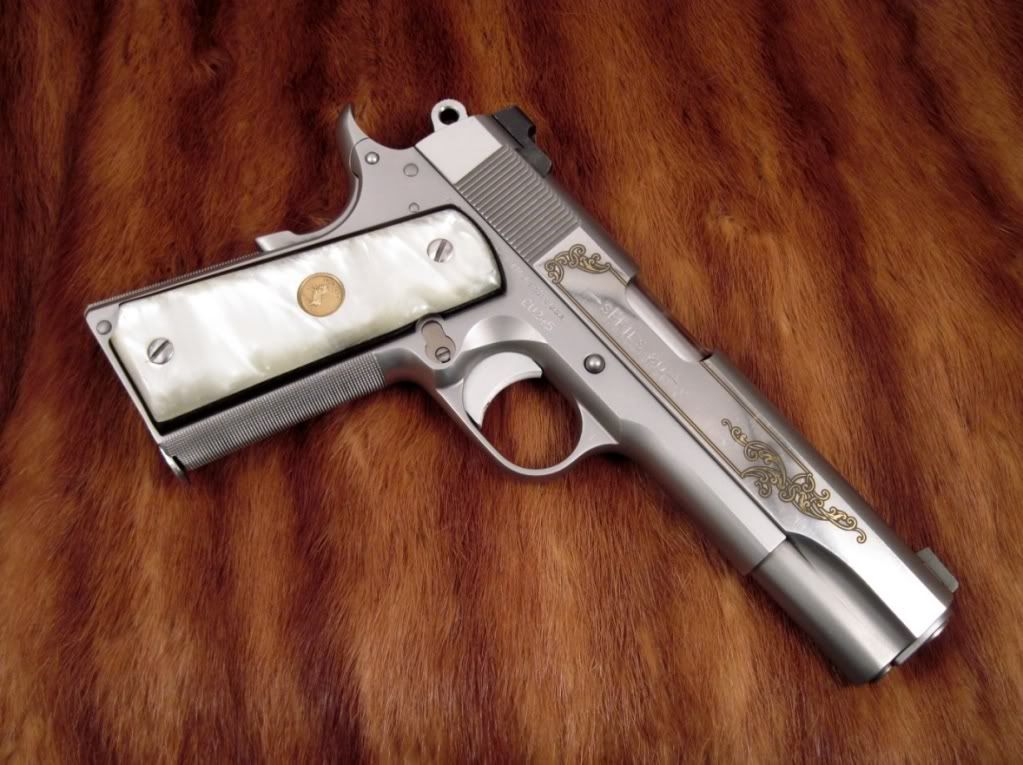
Ken, You do outstanding work! Grip safety fit, checkering.....wow! Gun is looking like a million bucks. Thanks –– that means a lot, coming from one of the best in the business! I'm actually not happy with the grip safety fit, but I did pick up a hint that you shared a while back over on the other forum that may make it look a bit better. But in the end, I'm the kind of guy who will always obsess over the mistakes I made on the build, even though they may not be apparent to most people. I'm less critical of work done by others, for some reason; maybe because I just don't know all the nasty behind-the-scenes details! Here's an earlier photo I took of it in its "natural habitat." I tried to duplicate the quality of this photo but never quite got there, despite playing with my camera and lighting. 
|
|
Hey Ken,
Did you do the frontstrap checkering on a machine or with a file? Looks fantastic! Also, if you don't mind, could you please post that tip from Chuck about fitting the grip safety? (or would Chuck please post it?) I don't much care for bling'd out pistols, but I'd be proud to have that one in my holster |
|
Quoted: Hey Ken, Did you do the frontstrap checkering on a machine or with a file? Looks fantastic! Also, if you don't mind, could you please post that tip from Chuck about fitting the grip safety? (or would Chuck please post it?) These. Also, what PSI were you running your blast gun and about how far away were you blasting with the glass beads? I have a SS S80 Colt that's going in my blast cabinet when I get a chance.  |
|
Quoted:
Hey Ken, Did you do the frontstrap checkering on a machine or with a file? Looks fantastic! By hand. I have a mill, but it's too small to handle a checkering jig. Also, if you don't mind, could you please post that tip from Chuck about fitting the grip safety? (or would Chuck please post it?) http://forums.1911forum.com/showthread.php?t=181743&page=3 Post #57 and #60. For the beadblast, I was running about 90 PSI and held it about 2" away from the surface. |
|
Quoted:
Quoted:
Hey Ken, Did you do the frontstrap checkering on a machine or with a file? Looks fantastic! By hand. I have a mill, but it's too small to handle a checkering jig. Also, if you don't mind, could you please post that tip from Chuck about fitting the grip safety? (or would Chuck please post it?) http://forums.1911forum.com/showthread.php?t=181743&page=3 Post #57 and #60. For the beadblast, I was running about 90 PSI and held it about 2" away from the surface. I like it...not into the scroll work, but it flows with this one. If I may ask Ken...what media did you use when you bead-blasted it? |
|
Quoted:....
oh, that fitting tip is BRILLIANT!!!! Thanks for posting that! Excellent work on the checkering––-My last hand checkering job came out pretty good, but not nearly as good as yours. I checkered a few jack handles and several pieces of scrap pipe since then, and I think I'm ready to give it another go....this time I'm cutting on my new Delta Elite and after the practice sessions, I'm hoping for results as good as yours. |
|
Quoted:
Quoted:
Quoted:
Hey Ken, Did you do the frontstrap checkering on a machine or with a file? Looks fantastic! By hand. I have a mill, but it's too small to handle a checkering jig. Also, if you don't mind, could you please post that tip from Chuck about fitting the grip safety? (or would Chuck please post it?) http://forums.1911forum.com/showthread.php?t=181743&page=3 Post #57 and #60. For the beadblast, I was running about 90 PSI and held it about 2" away from the surface. I like it...not into the scroll work, but it flows with this one. If I may ask Ken...what media did you use when you bead-blasted it? 80 grit glass beads, much like this: http://www.harborfreight.com/cpi/ctaf/displayitem.taf?Itemnumber=30972 Quoted:
Excellent work on the checkering––-My last hand checkering job came out pretty good, but not nearly as good as yours. I checkered a few jack handles and several pieces of scrap pipe since then, and I think I'm ready to give it another go....this time I'm cutting on my new Delta Elite and after the practice sessions, I'm hoping for results as good as yours. Thanks. There are a couple spots I messed up a bit, but they're tricky to photograph and you can't easily see them with the naked eye... but I'll always know they're there. This is my fifth or sixth checkering job, I think, and the best so far. My biggest fear with checkering is getting the first set of lines laid out. Once they are cut to depth, I breathe a sigh of relief. I don't have an actual checkering jig. This time I clamped my frame in a vise between 123 blocks and used them to lay out the verticals, then used a V-block clamped to the frontstrap to lay out the horizontals. This had the added benefit of being able to easily be moved up with each successive set of lines to help keep the file straight. |
|
Quoted:
Quoted:
Quoted:
Quoted:
Hey Ken, Did you do the frontstrap checkering on a machine or with a file? Looks fantastic! By hand. I have a mill, but it's too small to handle a checkering jig. Also, if you don't mind, could you please post that tip from Chuck about fitting the grip safety? (or would Chuck please post it?) http://forums.1911forum.com/showthread.php?t=181743&page=3 Post #57 and #60. For the beadblast, I was running about 90 PSI and held it about 2" away from the surface. I like it...not into the scroll work, but it flows with this one. If I may ask Ken...what media did you use when you bead-blasted it? 80 grit glass beads, much like this: http://www.harborfreight.com/cpi/ctaf/displayitem.taf?Itemnumber=30972 Quoted:
Excellent work on the checkering––-My last hand checkering job came out pretty good, but not nearly as good as yours. I checkered a few jack handles and several pieces of scrap pipe since then, and I think I'm ready to give it another go....this time I'm cutting on my new Delta Elite and after the practice sessions, I'm hoping for results as good as yours. Thanks. There are a couple spots I messed up a bit, but they're tricky to photograph and you can't easily see them with the naked eye... but I'll always know they're there. This is my fifth or sixth checkering job, I think, and the best so far. My biggest fear with checkering is getting the first set of lines laid out. Once they are cut to depth, I breathe a sigh of relief. I don't have an actual checkering jig. This time I clamped my frame in a vise between 123 blocks and used them to lay out the verticals, then used a V-block clamped to the frontstrap to lay out the horizontals. This had the added benefit of being able to easily be moved up with each successive set of lines to help keep the file straight. Thanks for the info Ken.. |


|
Quoted:
Should have made the grips ivory.... "Only a pimp from a cheap New Orleans whorehouse would carry a pearl-handled pistol." to paraphrase..... I wanted to go over-the-top with this one. Besides I didn't have any ivory grips... but I've got some coming. I'm afraid the pearl ones might be a bit fragile to use on a daily basis. ETA: and Ammo_X, I see what you did there.  
|

| I am a parkerized kind of guy, but I like the look with the faux ivory. A couple of the guys I used to know that worked narcotics use to carry .45s that were pretty close to what you have done, enough glitz to not look like a cop gun, but not enough to get in the way of it being a real carry piece. Nice job. Now I think I would like a commander done in the same style, may have to start looking for a stainless or nickled one... |