


Posted: 10/31/2010 6:49:50 PM EDT
|
I noticed that there weren't any guides to disassembling the Kahr polymer frame (or I just have weak Google-fu), so I figured I'd give it a shot. This guide should be good for all TP, P, CW, and PM series of Kahr pistols. The pistol used was my new Kahr PM9.
DISCLAIMER: I AM NOT RESPONSIBLE IF YOU DAMAGE YOUR PISTOL WHILE PERFORMING DISASSEMBLY OR ANY OTHER TYPE OF MODIFICATIONS. PLEASE REFER TO THE EXPLODED DIAGRAM PROVIDED BY KAHR ARMS ON THEIR WEBSITE: http://www.kahr.com/DL/kahrpartslist.pdf Tools: 1. T5 screw driver 2. T6 screw driver 3. 1/8” pin punch 4. Brass hammer (or other non-marring hammer) 5. Dental pick (or other pointed tool) 6. Pair of small needle nose pliers Disassembly 1. Ensure that the magazine is removed from your pistol and that the chamber is empty. 
2. Follow the standard procedure for field stripping of your specific pistol. 
3. Using a T6 screw driver, remove the slide stop spring screw and washer (30) retaining the slide release spring (29) located on the left side of the frame. 
4. Using a T5 screw driver, remove the side panel screw (41) located at the rear right side of the frame and gently pry the side panel up and out of the frame. NOTE: IT HAS COME TO MY ATTENTION THAT EARLIER MODELS USE A HEADED PIN INSTEAD OF THE NOW STANDARD SCREW. I DO NOT CURRENTLY HAVE A METHOD OF SAFELY REMOVING THIS PIN 
5. Grab hold of the top portion of the trigger bar spring (14) using a pair of pliers and pull down and outward removing it from the frame. 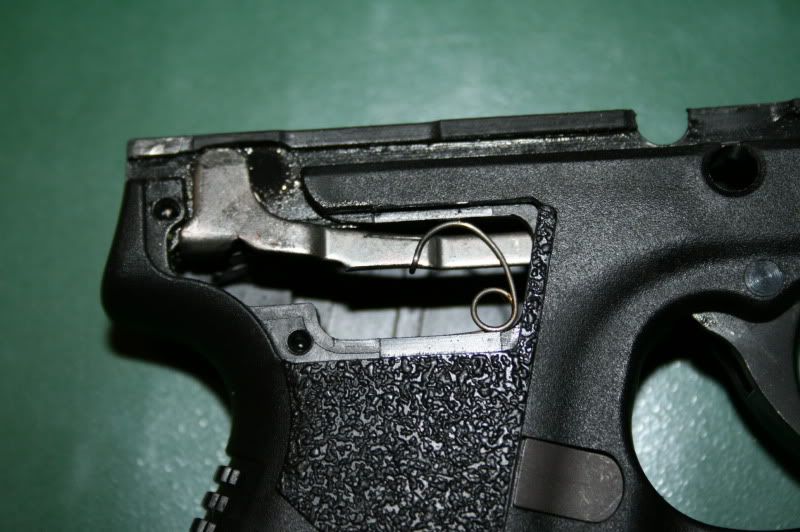

6. Using a 1/8” punch, remove the headed trigger pivot pin (12) from the frame taking care to remove it from left to right. NOTE: TRIGGER SPRING IS UNDER TENSION 7. With the trigger pivot pin (12) removed the trigger (9), trigger spring (10), trigger spacer (11), and trigger bar (13) can be removed from the frame. 
8. Using a dental pick, hook the cocking cam pivot pin (32) through the small hole in the head and remove it from the frame. 

9. Grab the ejector (31) and pull it out of the frame. With it, the cocking cam (15) and cocking cam spring (16) will be removed as well. 
10. Using a dental pick, hook the magazine catch spring (18) and pull it to the side and outward in order to release it from the magazine catch (17). 11. Using a pair of pliers grab the top of the magazine catch spring (18) and pull it straight and out of the frame. 12. Remove the magazine catch (17) from the right side of the frame. 
Reassembly Tips 1. The legs of the cocking cam spring (16) correspond to the holes in both the ejector (31) and the cocking cam (15) itself. The spring can be placed in either way and the entire unit in reinstalled into the frame. 
2. The trigger assembly is to be assembled as shown below (trigger spring (10) has been omitted from the photo for clarity). 
3. The easiest way to reinstall the trigger bar spring (14) is to attach the hook onto the bar as normal and then use a pair of needle nose pliers to grab the loop in the spring and then bend the lower half into the slot in the frame.

4. Do not, I repeat, DO NOT over tighten the Torx screws when reinstalling them into the frame. You are mating steel threads with polymer threads and if you tighten them too much the steel threads will win and gut the polymer. Only tighten the screws until they are snug! If anyone has any other questions you can ask them here and I'll try my best to explain it and/or provide a more detail photo of the piece/process. |
| I purchased a used pm9 and I noticed that the magazine catch spring (18) was sticking out about an 1/8". is this something that is normal and should I just push it back in? I also don't get how this is for the magazine when it's right next to the trigger. I don't have the gun in my hands yet since nj laws say I need to wait 30 from last purchase. the lgs owner let me fire off 10 rounds to make sure it functioned correctly. I have to say that it shoots great...love trigger and accuracy. I have deposit on it so It's mine on the 14th of feb. |
|
Quoted:
I purchased a used pm9 and I noticed that the magazine catch spring (18) was sticking out about an 1/8". is this something that is normal and should I just push it back in? I also don't get how this is for the magazine when it's right next to the trigger. I don't have the gun in my hands yet since nj laws say I need to wait 30 from last purchase. the lgs owner let me fire off 10 rounds to make sure it functioned correctly. I have to say that it shoots great...love trigger and accuracy. I have deposit on it so It's mine on the 14th of feb. I don't think it's normal, but a picture of what your talking about after you get it in hand might help. If it functions correctly then its probably not a big deal, but you can always call or e-mail kahr and they will take great care of you. |
|
so I purchased the pm9 today. I pushed the pin thats in question back into the frame and fed 4 clips through it. this thing shoots great. the pin never moved but I still want to know what its purpose is. it's right next to the trigger . I'm thinking it has to do with holding the trigger pivot pin in place?
http://i1093.photobucket.com/albums/i424/snoopy245/firearms/th_DSC01747.jpg?t=1297719371 HOW DO I GET THE PICTURE TO SHOW UP BIGGER? |
|
Quoted:
Quoted:
Wow! Great tutorial. This needs to get tacked. Thanks. I'm also currently working on perfecting a method of shorting the reset of the PM9 trigger (which will also work for the other models). Stay tuned... can't wait for that. its my only gripe about the Kahr. Also, i've got an older E9 (steel framed). is there much difference in frame disassembly than what you've posted? thanks for teh writeup! |


|
Quoted:
http://<a href=http://img853.imageshack.us/img853/1390/img4844.jpg Image of the flat screw head on my Kahr PM40. http://img864.imageshack.us/img864/6059/img4845.jpg On the left side of the frame there is this little bump thats molded into the plastic frame. Any ideas on how to remove this side plate? It looks like I have an older model frame possibly. From those pics it looks as though that instead of a screw they used a headed pin. Will that little bump on the left hand side of the frame push in at all? |
|
Quoted:
Nope Interesting. Looking at pics of the PM40 from SHOT Show when they were first coming out they too show the headed pin. Kahr's website shows the same screw is used on all of the side plates for their PM models, but their exploded diagram of the PM40 shows a headed pin instead of a screw. I can't really give you any definitive answers without having one in front of me, and I don't want to recommend you prying the side plate. At this point I would recommend just leaving it alone unless you're brave enough to tackle it blindly. If you are, post the results and I'll update the OP with the info for those with the same revision. |
|
Well thanks for all your help with this. So it does look like I have an older design, where I had this for about 5 years. This is also my second frame because there was hair line fracture with my original and had it replaced. Yeah at this time I don't feel comfortable going at it blind. I will see if I can get additional information or look at it closer and see if I can figure it out. Maybe someone else can jump in with knowledge and help me out. If I figure it out I will post about it.
I could call Kahr and ask someone there and eventually replace it with the screw if thats possible. |