


AR Sponsor

Posted: 8/27/2016 1:54:17 PM EDT
|
heres my dilemma , I have a windham weaponry AR , it had a commercial buffer tube on it originally, it worked perfect, I wanted to change the but stock and it required a mil spec buffer tube, after swapping the tube with a mil spec tube i got inexpensive from amazon, the rifle cycles great and shoots great but the bolt will not lock open on the last round. I have read every post i could find on similar topics but heres where im getting lost.. the folks at windham weaponry had suggested that the buffer tube may not be long enough, going as far as saying that in the past they have found similar issues and the problem was the aftermarket tube was .25 inches too short. I measured both tubes from the inside of the tube to the opening and it was exactly as they indicated. I have no reason to doubt this advice and I have not tried to replace the tube with a different mil spec tube. the problem i have is that no one else seems to have heard about this issue. so id like more feedback.
oh, also, the bolt locks open with an empty magazine with no difficulty when i pull the charging handle back, and it may be my imagination but the buffer spring seems alot noisier than before, could i possibly cure this issue with cutting the spring down a coil? Im not really trying to be cheap on this but I do have a budget to maintain thanks for any feed back |
|
Quoted:
heres my dilemma , I have a windham weaponry AR , it had a commercial buffer tube on it originally, it worked perfect, I wanted to change the but stock and it required a mil spec buffer tube, after swapping the tube with a mil spec tube i got inexpensive from amazon, the rifle cycles great and shoots great but the bolt will not lock open on the last round. I have read every post i could find on similar topics but heres where im getting lost.. the folks at windham weaponry had suggested that the buffer tube may not be long enough, going as far as saying that in the past they have found similar issues and the problem was the aftermarket tube was .25 inches too short. I measured both tubes from the inside of the tube to the opening and it was exactly as they indicated. I have no reason to doubt this advice and I have not tried to replace the tube with a different mil spec tube. the problem i have is that no one else seems to have heard about this issue. so id like more feedback. It's not super-common, but it's also not unheard of on no-name parts. oh, also, the bolt locks open with an empty magazine with no difficulty when i pull the charging handle back, and it may be my imagination but the buffer spring seems alot noisier than before, could i possibly cure this issue with cutting the spring down a coil? Im not really trying to be cheap on this but I do have a budget to maintain
thanks for any feed back Compare the finish inside the receiver extension on your old one and the new one; the extra noise is probably due to a rougher finish on the new one. Try spraying the spring with CLP and reinstall, but don't cut any coils, as that changes spring force and preload, and can effect cycling. |
|
If the new receiver extension came with it own buffer, then just remove needed amount off the buffer bumper to allow the bolt to retraced back behind the catch instead.
Simply, charging handle pulled all the way back, the face of the bolt should be in front of the back of the ejection port window's rear edge 1/8" to 1/4". So start with this, get a good measurement of how much more the bolt needs to come back to get to withing this spec, and just remove it off the back of the buffer bumper isntead. A lathe make a cleaner more precise job of it, but hell, steak knives for the initial trim to leave it slightly longer then needed, then a few strokes of the face of the buffer across some sandpaper on a lapping plate will re-square the face of the buffer back up and bring it to the needed reduced length. If you total screw up and cut the buffer bumper too shot, then they are like a buck to replace and start over again. https://www.kakindustry.com/ar-15-parts/lower-parts/buffer-tubes-and-parts/buffer-bumper-orange Note, you can get them in different colors as well. One last thing, and if the telescoping butt stock came with a recoils spring as well, measure the length of it. For a telescoping butt stock, the recoil spring should be about 10.5 long. Full lenght fix stock recoil spring is about 11.75" isntead Hence full length spring in the shorter telescoping butt stock receiver extension ends up with the spring coils binding up before the buffer bumper can reach the back of the tube. And to add, the length of the buffer has to do with the void of the receiver extension. the longer full lenght receiver extesnion needs the full lengh buffer to prevent the back of the carrier key from crashing into the back of the lower receiver, while the shorter telescoping buffer extension needs the shorter buffer instead (to allow the bolt to retract back past the catch, while at the same time, prevents the back of the carrier key from crashing into the back of the lower receiver at the end rear stroke. |
|
thanks to both of you so far, that was exactly the info I was missing,
heres what ive found, the measurement of both springs were different, the spring I had in was just over 11" and the other spring i had was 10.5" , I cleaned the inside of the tube and lightly sprayed some clp and installed the shorter spring, ill do a test fire tomorrow and see what happens, the question i have left is regarding the buffers, which is which , they are both the same length, one has a slightly larger face, im assuming the larger face will go with the mil spec tube and the shorter spring, am i missing anything else? and again thank you for the info |
At this point, you posting photo's would help, since both tubes should have the same ID's, and its just the mill spec tube that has the thinner wall thickness to cause the thinner OD (outside diameter) on it instead.

As for springs and buffers, try both with a full charging handle pull. If one of the springs is coil binding up before the face of the bolt comes all the way back face of the buffer bumper reaches the back of the tube void surface, your going to feel it in the last of the charging handle pull. If one of the buffers is shorter/longer, then you will see this in relationship of the face of the bolt to the back of the ejection port window. |
|
hotos/Shared/Aztec/01e67600cfc9346381c7b8c927998b71b71c172892.jpgfile:///C:/Users/User/Pictures/iCloud%20Photos/Shared/Aztec/0185aa46c8fc37b06d4f608d345f6b546b9621a38f.jpg
after test fire, with the shorter spring installed the rifle does cycle smoother and is much quieter, but still will not lock open by itself after last round fired, and again it Will lock open with an empty mag by pulling the charging handle, something else I noticed and i hope may be helpful is that with the bolt locked open i can still pull back slightly with the charging handle and get the bolt to go further back, the two pics are the bolt locked and resting, the second one is charging handle pulled back as far as it will go, |
|
When posting photo's, you need to use a site like Photobucket (free) to host the photo's full time to the web isntead.
Hence trying to link the photo's from your hard drive, will not work instead. As for the rig, you are sure that that the only think you worked on/changed was the receiver extension alone????? When pulling back on the charging handle from half way back, to all the way back, the needed tension to do this, should not ramp up the farther you pull the charging handle back, but should be the same instead. Hence at the initial pull, you are unlocking the bolt and starting to cock the hammer back, but once you get half way back with the charging handle, there is should be no more increased tension when pulling the charging handle farther back isntead. So here is what I need, A photo of a spent case out of the rifle, and need clean details of not only the side of the case, but the back of the case and rim where the extractor pulled the spent case out of the chamber. Need to know the weight of the buffer, and it should be 2.9oz, and when you shake it, should sound like discs moving in the buffer and not BB's instead. Need a clean shot of the inside of the receiver extension, to make sure that the buffer or end of spring coil bur is not scrap binding down the inside of the tube. Need to know what else on the rig that was changed, besides the receiver extension tube and it's internal parts. Lastly, what ammo is being run in the rig/ what type mags/you have correctly cleaned the rig (including using a chamber brush with CLP to scrub it by hand, and the upper receiver bearing areas (including the inside of the tube, the recoil spring, and the buffer) all lightly lubed with CLP as well. |
| ammo is winchester fmj 55 grain, the weight of the buffer i dont know, the mods made were hand guard, mil spec extention to accept a mil spec but stock, the blue plastic thing was 3D printed to snug up the fit of the recievers, i forget the name at the moment, its been easy bolt on stuff except for the tube, and i think i added a target pic in there also, the center grouping was 60 rounds, (the others were a mini14 im learning about as well) |
|
From the slide show photos you listed,
If any are of the bolt face with the charging handle pulled back, the bolt is not retracted back far enough from the bolt catch, but we know this from the start with the void of the tube being short to start with. So on that note, one of the buffer bumpers will need to be mod'd/ buffer bumper shortened to allow the bolt face to retract far enough behind the catch to allow the mag follower to get the catch up at the back of stroke, before the bolt starts moving forward from the back of stroke isntead. But, I going to take this one step deeper, since not a fan of the way the receiver extension is mounted in the lower receiver, and the buffer sticking way to far out of it with the upper open. 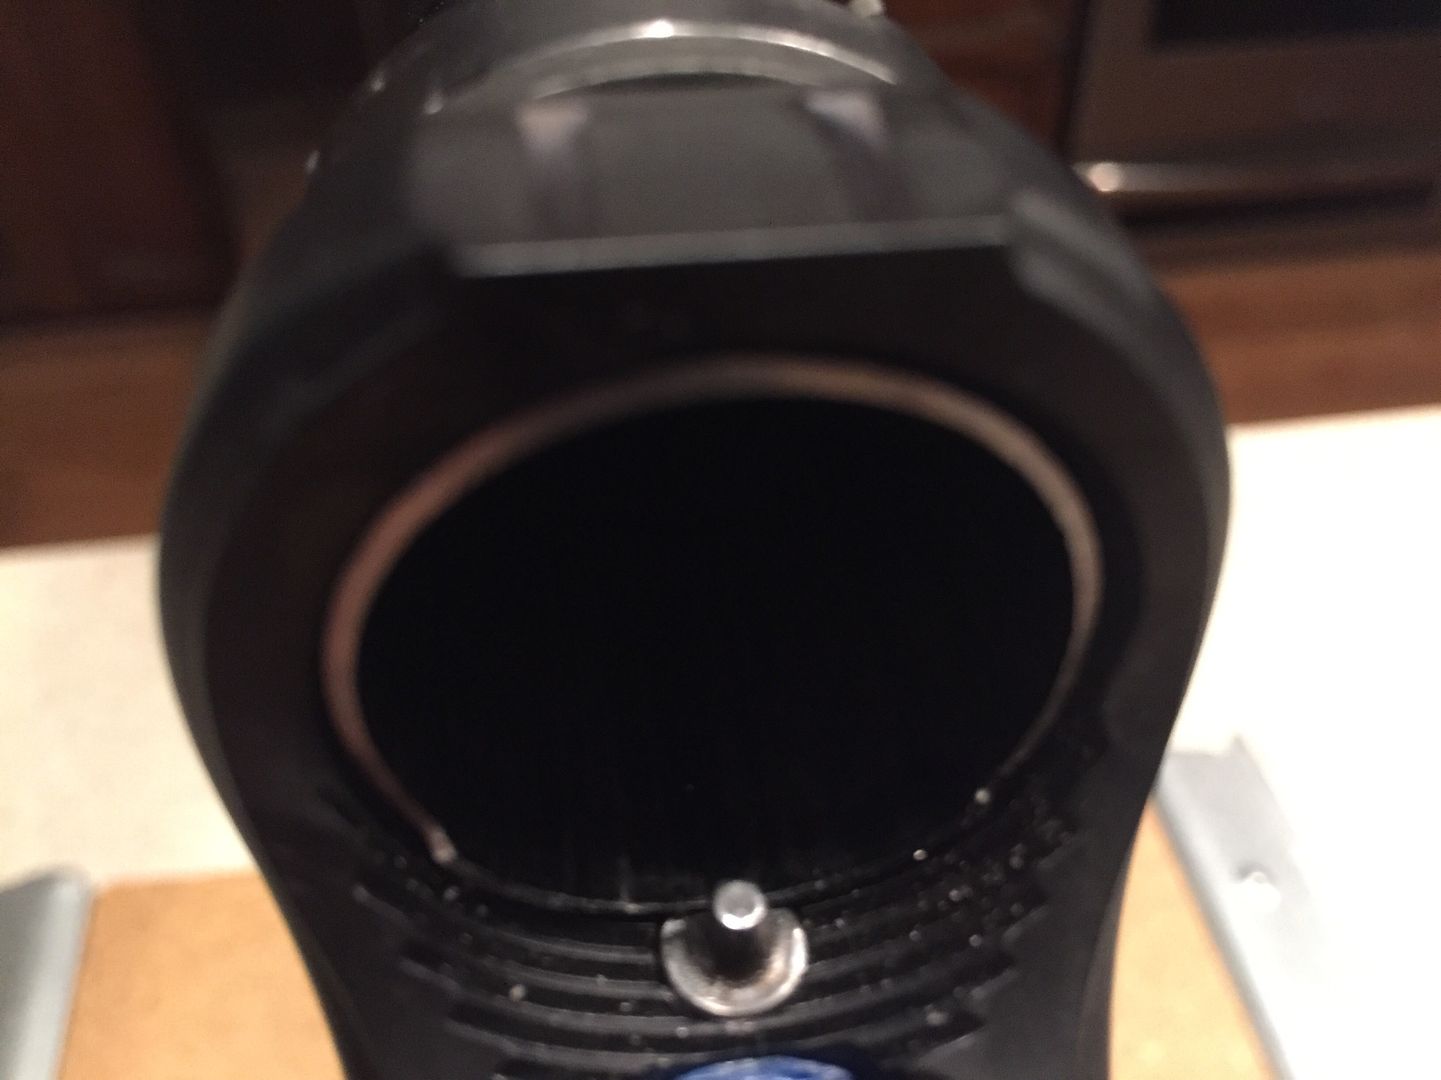
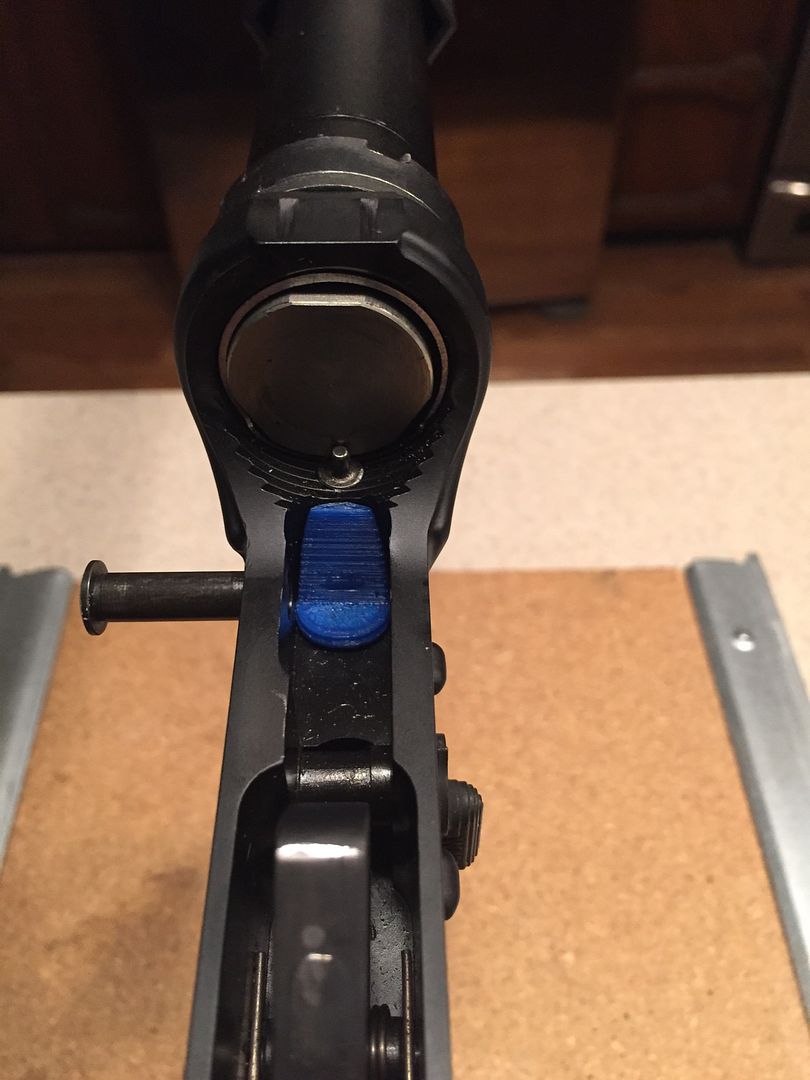
So step one, we are going to mod/set back the lower receiver extension lip so it can be threaded in one more turn, with the face of the bottom lip kissing the center post of the buffer retaining pin. Hence I want the upper end lip of the tube dam near flush with the inside edge of the lower receiver threaded ring surface isntead. Hence forget about the bottom protruding lip for a second, and here is the relation ship I want with the top of the tube end of lip to the inside face of the thread ring on the lower receiver (read dam near flush with each other, with at most, the tube end face only lightly back from the face of the tube a few thousands of an inch, and now where near the plus I turn you have it now). 

Now with this done, we need to mod/shorten one of the buffer bumpers to achieve the desired bolt face with full charging charging handle pull retraction distance so the face of the bolt is only 1/8" to 1/4" in front of the back edge of the ejection port. Note: counted the spring coils on the spring with buffer, and since it 39 coils, it good to use as it is. Here is where you are now if this is a full charging handle pull (got to be, since I don't see the raise bolt catch in front of the bolt face holding the bolt back isntead). And yes, the way the bolt catch works, is by the bolt face retracting back behind the catch to raise up in front of the bolt face, and not just catching the bottom of the carrier instead. 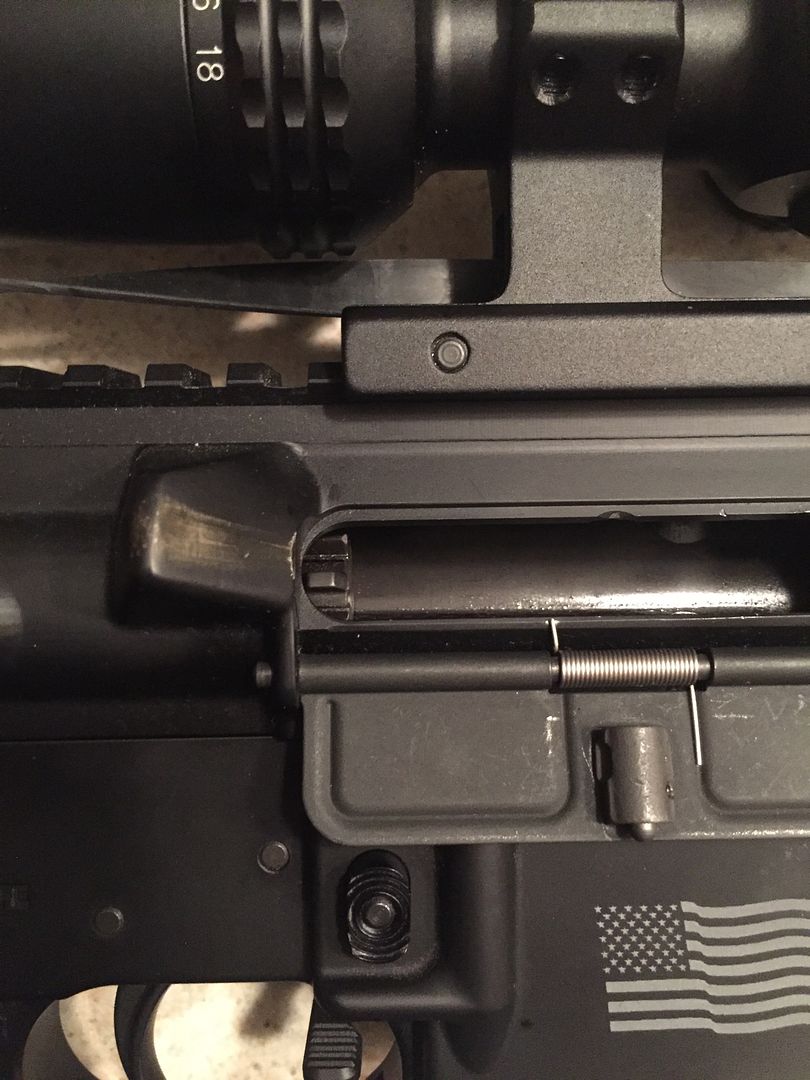
Here is where it should be instead with the charging handle pulled all the way back, and the buffer bumper shortened to allow such. Again, front face of the bolt, to the back edge of the ejection port window being 1/8" to 1/4". hence this walls the bolt to retract back behind the bolt catch far enough, that is allow the empty mag follower to raise up in front of the bolt before it starts moving back forward again. 
Bolt catch holding the bolt back via is face, so again, bolt has to retract back the catch enough at bolt of stroke, to get the mag follower enough time to get it up in front of the bolt before it come back to the bolt catch. As for why we don't want the bolt face to retract past the back of the ejection port, then spent cases as pivot off the bolt face at the back of stroke during the buffer stall, and we don't want them to tag the back inside edge of the ejection port window to deflect the spent rounds back into the action to cause a stove pipe jam, 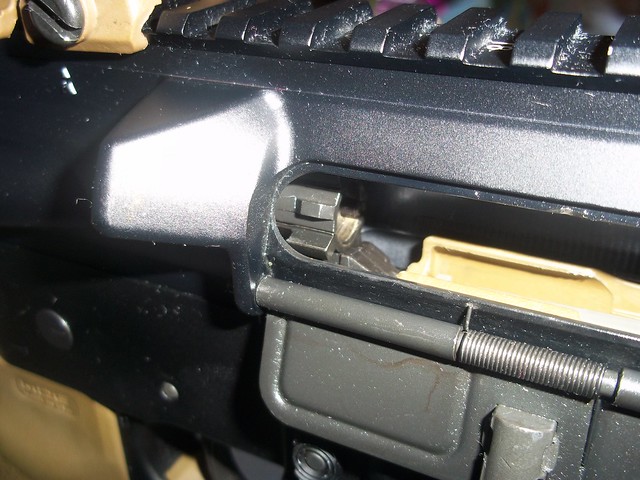
Now lets move onto this, hence you mention a hand guard change as well, 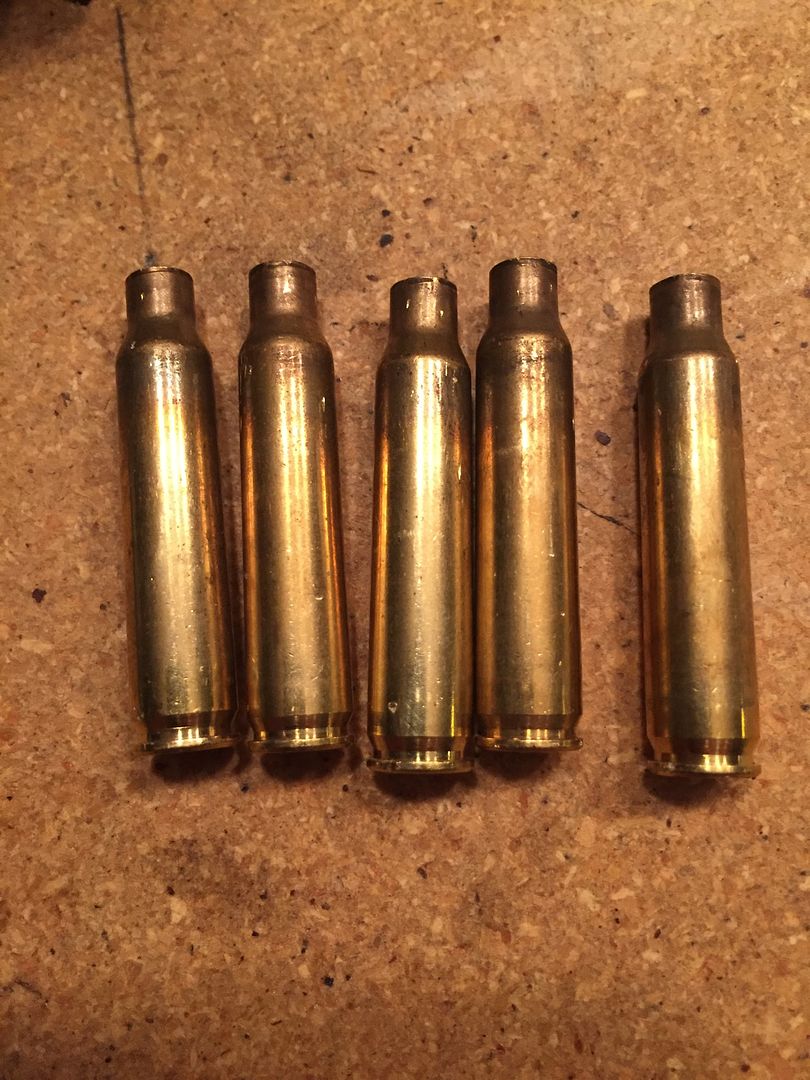
So lets be blunt, did you remove the FSB,Gas block and even barrel nut to change out the front hand guard? If you did not touch any of these, and the only thing you did was pull back on the delta ring to slip the guards open to remove them, then install another set of slip guards back on the barrel/delta nut/front hand guard clip, then no problem. here, all I need you to do is to pull the bolt off the carrier and with the carrier and key, just dry fit them to the upper receiver to make sure that the carrier moves freely in the upper receiver, and the gas tube is indexed with the carrier key (end of gas tube will enter the carrier key when the front of the carrier is about an inch from the front off touching the back of the barrel extension. But if the FSB, gas block/FSB was removed, then we need to go back and start addressing possible problem with the barrel receiver index timing to the upper receiver, the FSB/gas block gas passage indexing to the barrel gas port, and even barrel nut to gas block channel and even gas tube indexing to carrier key as well. I bring this up since you do not post a photo of the front end of the upper receiver so see what was changed there. Also to bring it back to the spent case, please tell me that you are using an Ar-15 chamber brush with CLP to clean the chamber by hand during cleanings. 
I bring this up, since the spent case just before the shoulders look less than stellar from a dirty chamber that was not fully cleaned each cleaning instead. |
|
http://s61.photobucket.com/user/Dan_Bogonis/slideshow/second%20set
alright, I understand most of what your saying, here are pics of the hand guard, i never removed loosened the barrel barrel nut gas block, I used a delta ring tool to back the ring and slipped out the guard in two ieces and reinstalled the new one the same way, now, the tube being too far in, i see that now however when i had the tube out further i experienced a failure where the buffer retaining pin and spring came loose and was jammed up in the receiver, , I got a new pin and spring and that was when i thought the tube needed to be turned in a revolution, my fear is that happening again, the bolt removed from the carrier and the carrier slid into pace, it moves freely mating the key and the gas tube, now, how can i gauge (mind you by feel as i have no proper measuring tools to speak of) how much to shave off the bumper and if i do too much will i risk the chance of it bottoming out whether by the rear of the tube or the key going too far to the rear of the lower receiver? and lastly, i was apprehensive to use the brush you recommended for cleaning because i was afraid to score scratch the inside of the barrel, ive been using a bore snake and a large amount of qtips and clp to clean with, i guess you can tell im new to this and this rifle is very special to me, thanks for the patients and advice |
|
On the bore snake, ditch it!!!!
Instead pick up a single piece cleaning rod, and the needed patch jig and brushes to use it to clean the barrel isntead. On the receiver extension, standard caliper will work fine, and you should have one anyways. You can pick up a cheap digital caliper from harbor freight for around $10, but would suggest that you spend some extra money to pick up a dial caliper instead. 
The reason for this, with the cheap digital calipers, too much of a skip problem when you are trying to measure items past a few inches, and every time you take a new reading, end up coming up with a different demension each time. With the dial units, if push comes to shove, easy to pull them apart to clean and reset them when needed instead. Now down to business on the receiver extension. It's pitch threads is 16tpi, meaning for every rotation of the barrel extension in one thread, the front surface is going to move .0625" forward. So with using the tail of the caliper, we can check how far back the top lip of the tube is recessed back from the inner face of the lower receiver thread ring. #3 
If more than top lip is more than .0625" recessed back from the inside face of the receiver inner surface, that is does not need to be touched with the tube threaded in one more turn. On the lower lip to center post of the buffer retainer, measure the gap you now have if it not lightly kissing the center pin now, we are going to subtract it from .0625" that the bottom lip will need to be faced back to allow the tube to be threaded in one more turn. So lets say that you have a .020" gap now between the end of the tube bottom lip and the post of the buffer retainer pin., So we take the .0625", subtract the .020" from it, and now in order to spin the tube into the receiver one more turn and have the bottom lip of the tube just kiss the center pin of the buffer retainer center pine, will need to remove .0605" from the end of the tube. Since the tube is make out of soft aluminum, lock the caliper at .0605", and while riding the edge of the lip with one side of the caliper jaws, use the other jaw tip to scribe a line on the outside of the tube of what needs to be removed. Here with the follow scribe line, standard file to first face back, then some 400 sandpaper to clean up the end of the tube to the scribe'd line will work fine (faster to just face in a lathe or mill, but file and sandpaper will work fine). Now with the tube installed one more thread inwards, drop the buffer and spring in play, pull back on the charging handle and use the caliper via #2 to see what the bolt face is now, and then how much you need to remove from the buffer bumper to get the face of the bolt to stop 1/4" to 1/8" in front of the port with a full chargign handle pull instead. If you are trying to figure out what 1/8" is, just divide 1 by 8, and the same for 1/4" as well. Hence you want the bolt face to stop .125" to .250" in front of the ejection port window. |
|
http://i61.photobucket.com/albums/h54/Dan_Bogonis/image1_zpsedmxeond.jpeg
so the clearance i want between the two white lines is 1/4 to 1/8 the lower lip of the extension tube needs to just kiss the retainer pin post now with a fully pulled back charging handle, measure the distance from the ejection port to the face of the bolt shave off the difference from the plastic bumper ,,, so the spring fully compressed is actually shorter than the buffer itself? i guess i always thought of the compressed spring being longer and that is what dictated the total compressed length, so in theory, my bolt sticks out +- 1/8 inch too far and to remedy that ill shave off +-1/8 inch from the bumper and that will allow the buffer to dwell behind the bolt catch far and long enough for the catch to engage if my understanding is correct, then tomorrow at work (im a wholesale manager of an auto-part store) ill get a caliper take some measurements and perform a buffer bumper circumcision may god have mercy on my soul |
|
aztecsmyth, yes on all the above, but do take the time to rework the receiver extension so you thread it into the receiver one more wind.
And as you figured it out, the end of the buffer tube against the back wall of the receiver void should dictate the amount that the bolt comes back either a full charging handle pull, or during live cycle as well. As for checking to make sure that the recoil spring is not too long for the buffer in play once shortened, just put it on the buffer with the front face of the buffer on a table and compress the spring all the way down on the buffer it's coils are tight against each other for the full stack. With the recoil spring compressed down on the buffer like this, the end of the buffer bumper be higher than the top of last spring coil isntead. To add, the reason that we want the face of the bolt to be at least 1/8" in front of the back edge, is during live fire self cycling when the buffer bumper hits the back of the receiver extension, the buffer bumper is going to lightly compress. Hence is during the live fire that we do not want the face of the bolt to retract back past the back edge/during this buffer compaction and dead blow effect of the buffer at the back of the stroke, since this is the same time that the spent case is clearing the extractor claw (via the ejection pushing the case off the face of the bolt the final way). hence face of bolt behind the back edge of the ejection port window, and you chance the spent case tagging it on the pivot off the bolt, with the chance of the tag defecting the spent case back into the action for a stove pipe jam. |
|
after doing the measuring as instructed working the extension in further and shaving down the buffer stop i think im in good shape, test fire tomorrow and see what happens
http://i61.photobucket.com/albums/h54/Dan_Bogonis/01354de5fa0a55132d00cc6c0d8d62fdc95090fce9_zpsr0b6hvcj.jpg http://i61.photobucket.com/albums/h54/Dan_Bogonis/0186741b6fb789deb672f4b7a0f5d077aaadb2a73e_zpsrkp8hirh.jpg |
|
No worries, but take the time to break out chamber brush with CLP to clean the chamber and barrel extension void correctly.
I the above photo the condition of the barrel extension looks like Shite, and appears be that you are using some kind of grease to lube the rifle as well (only use CLP to clean and lube the rifle, with the exception of something like Sweets to clean the actual bore before the chamber and barrel extension is cleaned next). |
AR Sponsor