


AR Sponsor

Posted: 6/5/2016 10:28:03 PM EDT


|
DI system will end up with the back of the carrier angled down to about that spot on unlock, but the upper receiver ID track channe should prevent the back of the carrier from actually making contact to the tube isntead (allow it to cant that far over instead).
So my guess, either the OD of the carrier is too small, or the ID of the upper receiver channel for the carrier is too large instead. As for if the receiver extension was canted in the lower receiver when installed, the scrapping should go much farther back inside the tube isntead. Got a photo of the back side of the carrier, since they may be a nasty bur that is causing the problem instead. Also, run your finger inside the tube, since it may be a high spot in the tube that is allowing the back of the carrier to make contact to it as it come back. |
|
Quoted:
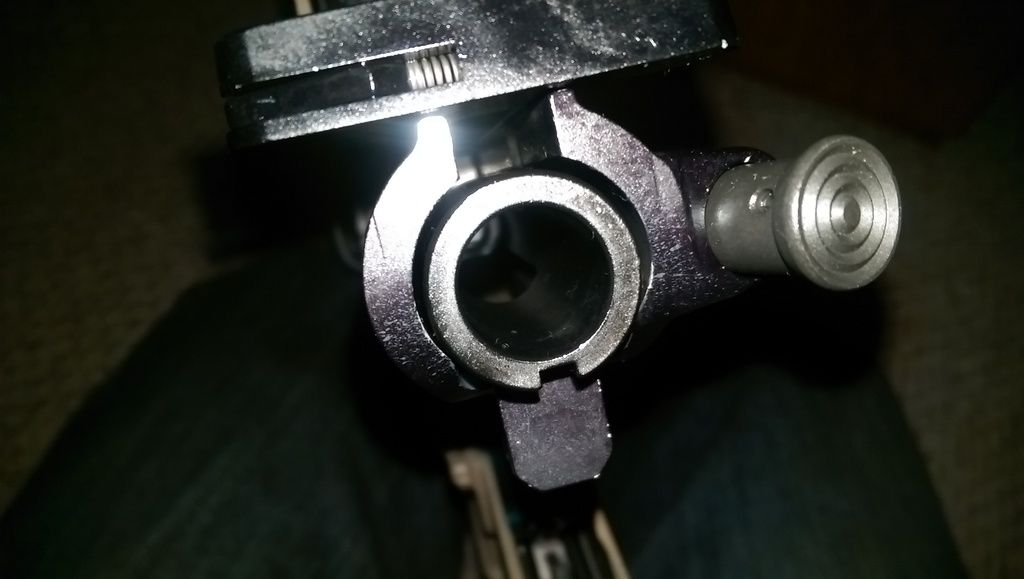
<a href="http://s1067.photobucket.com/user/carbon244/media/Mobile%20Uploads/IMAG0611_zpsieirjabz.jpg.html" target="_blank">http://i1067.photobucket.com/albums/u440/carbon244/Mobile%20Uploads/IMAG0611_zpsieirjabz.jpg</a> Here's a picture of the back of the bcg, Any sure well of telling if the carrier or upper is out of spec? Need a few more photo's, Need one of the back of the upper receiver straight on to verify if the carrier channel in it was milled dead center, the buffer, and even to check the recoil spring end of coil for possible a end of coil wind that is protruding. As for the carrier to upper receiver, carrier looks to be sloppy in the upper receiver, the back of the carrier having sharp edges and burs (other inside and out side edges) and this alone may still be the problem at hand. Hence the back edges of the carrier should be slightly tapered/radius, and the back of your carrier looks to be sharp/burred instead. If you look at the top carrier below, will notice how the outer back edges of it is slightly tapered/radius isntead. This way, when the carrier is first coming back into the tube, it it does make contact with the extension wall, it will only glance off it, and not dig channels into it instead. The bottom one, looks to have missed the radius edge'g step of production instead. 
|
|
Quoted:
Need a few more photo's, Need one of the back of the upper receiver straight on to verify if the carrier channel in it was milled dead center, the buffer, and even to check the recoil spring end of coil for possible a end of coil wind that is protruding. As for the carrier to upper receiver, carrier looks to be sloppy in the upper receiver, the back of the carrier having sharp edges and burs (other inside and out side edges) and this alone may still be the problem at hand. Hence the back edges of the carrier should be slightly tapered/radius, and the back of your carrier looks to be sharp/burred instead. If you look at the top carrier below, will notice how the outer back edges of it is slightly tapered/radius isntead. This way, when the carrier is first coming back into the tube, it it does make contact with the extension wall, it will only glance off it, and not dig channels into it instead. The bottom one, looks to have missed the radius edge'g step of production instead. http://blog.cheaperthandirt.com/wp-content/uploads/2014/04/Bolt_Carrier_Assembly_1-800x532.jpg Quoted:
Quoted:
<a href="http://s1067.photobucket.com/user/carbon244/media/Mobile%20Uploads/IMAG0611_zpsieirjabz.jpg.html" target="_blank">http://i1067.photobucket.com/albums/u440/carbon244/Mobile%20Uploads/IMAG0611_zpsieirjabz.jpg</a> Here's a picture of the back of the bcg, Any sure well of telling if the carrier or upper is out of spec? Need a few more photo's, Need one of the back of the upper receiver straight on to verify if the carrier channel in it was milled dead center, the buffer, and even to check the recoil spring end of coil for possible a end of coil wind that is protruding. As for the carrier to upper receiver, carrier looks to be sloppy in the upper receiver, the back of the carrier having sharp edges and burs (other inside and out side edges) and this alone may still be the problem at hand. Hence the back edges of the carrier should be slightly tapered/radius, and the back of your carrier looks to be sharp/burred instead. If you look at the top carrier below, will notice how the outer back edges of it is slightly tapered/radius isntead. This way, when the carrier is first coming back into the tube, it it does make contact with the extension wall, it will only glance off it, and not dig channels into it instead. The bottom one, looks to have missed the radius edge'g step of production instead. http://blog.cheaperthandirt.com/wp-content/uploads/2014/04/Bolt_Carrier_Assembly_1-800x532.jpg Here's a few more pictures.  


|
|
Since I'm guessing that a lathe is out of the question, then we will have to WECSOG this to solve the problem isntead.
Short piece of a Thick chop stick or wooden dowel in a cordless drill. Spin the drill while using some tape to build up a even roll wad on the dowel/stick until it fits tightly into the back of the carrier, Now with having somene spin the carrier via the cordless drill with there finger on the front of the carrier to hold is steady, you going to spin file/sand the back outer edge of the carrier to remove the burs and give the back outside edge of a light radius as shown in the above photo's. Don't go buck wild, just break/slightly round the ever back outer edges to remove the burs and so it not a sharp edge. From here, get the raw metal edge surface you just sanded dry with some acetone, then use some cold bluing ( Birchwood Casey Gun Super Blue) to re-blacken the raw surface. Next, since we now that the back of the carrier is hitting lower (and just deburing he back of the carrier outer edge may not solve the problem alone), we want to make sure that the upper is retained as high as it can against the rear take down pin. Here, just installing a Accuwedge will pull this off, while even tighting up the fit of the upper to the lower as well. Not sure if you have a high or low shelf receiver, but if you can get the upper to lock down on the lower with the accuwedge installed, you may have to shave the bottom of the wedge. 
As for the dings inside the tube, you can smooth them out if you like with some 400 wet/dry sand paper and them reblacken the inside of the tube with Birchwood Casey Aluminum Black. Note the Aluminum Black is used on Aluminum Black, while the super blue is used on steel isntead. Both are nice to have around, since they make touching up small dings on the rifle a snap. Just remember that you have to degrease the surfaces with acetone before either will work on there corresponding surfaces. P.S, where did the upper and the carrier come from, since the fit between the two is sloppy to being with/most of the problem to begin with instead. Hence just looking at your photo's, you can see that the carrier is not riding as tightly in the upper as one would desire, and instead the back of the carrier is drooping down in the upper receiver channel isntead. |
|
Quoted:
Since I'm guessing that a lathe is out of the question, then we will have to WECSOG this to solve the problem isntead. Short piece of a Thick chop stick or wooden dowel in a cordless drill. Spin the drill while using some tape to build up a even roll wad on the dowel/stick until it fits tightly into the back of the carrier, Now with having somene spin the carrier via the cordless drill with there finger on the front of the carrier to hold is steady, you going to spin file/sand the back outer edge of the carrier to remove the burs and give the back outside edge of a light radius as shown in the above photo's. Don't go buck wild, just break/slightly round the ever back outer edges to remove the burs and so it not a sharp edge. From here, get the raw metal edge surface you just sanded dry with some acetone, then use some cold bluing ( Birchwood Casey Gun Super Blue) to re-blacken the raw surface. Next, since we now that the back of the carrier is hitting lower (and just deburing he back of the carrier outer edge may not solve the problem alone), we want to make sure that the upper is retained as high as it can against the rear take down pin. Here, just installing a Accuwedge will pull this off, while even tighting up the fit of the upper to the lower as well. Not sure if you have a high or low shelf receiver, but if you can get the upper to lock down on the lower with the accuwedge installed, you may have to shave the bottom of the wedge. http://www.dharkon.com/images/DPMS%20-%20Accu%20Wedge%20-%202.jpg As for the dings inside the tube, you can smooth them out if you like with some 400 wet/dry sand paper and them reblacken the inside of the tube with Birchwood Casey Aluminum Black. Note the Aluminum Black is used on Aluminum Black, while the super blue is used on steel isntead. Both are nice to have around, since they make touching up small dings on the rifle a snap. Just remember that you have to degrease the surfaces with acetone before either will work on there corresponding surfaces. P.S, where did the upper and the carrier come from, since the fit between the two is sloppy to being with/most of the problem to begin with instead. Hence just looking at your photo's, you can see that the carrier is not riding as tightly in the upper as one would desire, and instead the back of the carrier is drooping down in the upper receiver channel isntead. Upper and carrier are both colt. Thanks for your help, I may just buy another stripped upper and check fitment. |
|
ignore all the "fixes" in this thread and run it..
Quoted:
You do know that it is not a sin to occasionally wipe the crud off these things..... and as Lysander says.. you're running it a little "too wet".. more oil attracts more dirt/dust/sand/etc. more dirt/dust/sand means more wear.. |
AR Sponsor