


AR Sponsor

Posted: 12/29/2015 4:43:43 AM EDT
|
Two questions, first my AR will double fire at times, not every time, and there is no consistency to it. Also, I'm have issues with the buffer retainer jumping out of the pocket it goes in. Are these two related. or is it two separate problems. Any suggestions on what the problems could be. Its and ATI Omni 223/556
|
|
The buffer retaining pin jumping out channel is the receiver extension needs to be threaded in one more wind. If the end of the tube will not allow such, then the end of the tube needs to be faced back the needed amount to allow the tube to be spun in another wind, yet the end of the tube should kiss the center pin of the buffer retainer with the receiver extension indexed correctly with the stock.
If you don't want to take the time to figure out how much the end of tube needs to be faced back for a perfect fit, you can cheat with just a small knotch in the end the tube instead. 
As for the double firing, first pull the FCG and make sure that the disco spring in installed large coils side down into the trigger under disco tail, and the disco is not binding up as it moves on the trigger pin (bur on the side of the disco pin channel) or in the trigger slot (burs in the trigger slot that the disco rides in. Also, check for burs on the trigger C sides for burs that may not be allowing the trigger to rotate back freely to it at rest position when you dry fit the pin to the hammer/disco out side the rifle. 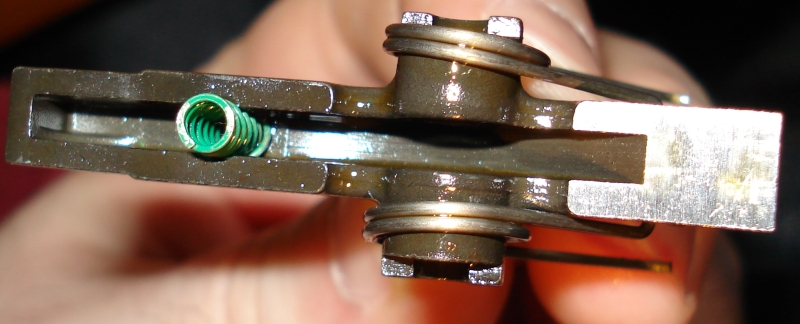

Almost forgot, when you are doing the hammer rear sear/disco free gap check, cock the hammer all the way back against the disco tail, and make sure that the hammer tail makes contact only to the tail of the disco, and not to the forward rounded section of the back side of the disco instead. The disco being spring loaded is a buffer for the hammer during over cock, and if the inside tail of the hammer it tagging the disco in front of the tail, then is can lead to all kinds of problem. If this is the case, then the FCG is either way of spec, or the FCG pin locations where not milled correctly in the lower receiver. Now with the CLP lubed (including the pins) FCG back in the rifle, 
Cock the hammer back until you get the disco sear, and the back hammer sear as close to each other. What we are looking for is the gap between the two with the trigger untouched. The free gap between the two should be .001" to .003" (max thickness of a sheet of paper). If the Free gap between the hammer rear sear and the disco sear is wider than .003, such in the below photo, then the disco needs to be re-timed. 
To re-time the disco, your going to remove metal from the front/bottom of the disco noise, where it seats against the front/top of the trigger. This will allow the disco to cam more forward to close the free gap, and at the same time, as you release the trigger during trigger reset the disco will retain the hammer longer to allow the front trigger sear to get in the correct position to catch the hammer. Idealy on a new trigger, will just just close the gap until the hammer rear sear just kisses the disco sear on the hammer cock back with the trigger untouched. As the parts start to wear, it will increase the gap a few throusands, and don't need to go back in and re-time the disco again latter. To point out, the bottom portion of the disco nose pads is where you are removing metal from in the below link, but do check to make sure that the disco is not shite to begin with. Hence the old disco in the below link in meta4 reply is total bollocks, and if you disco looks like that to begin with, then just replace the disco from the start!! https://www.ar15.com/archive/topic.html?b=3&f=66&t=557049 OR, if this a factory build rifle, then send it back to have the manufacturer to correct the rifle defects instead!!!! |
|
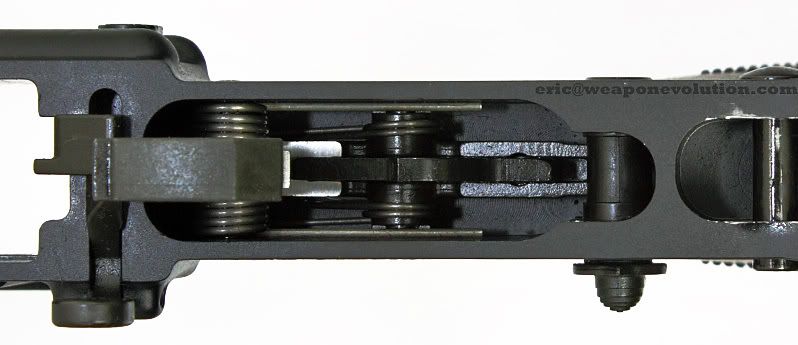
Here are some pics of one of mine from a different thread. What does your look like. I have yet to decide if I should notch mine. But since it didn't pop out I may leave it alone.
Here is mine. Others can comment. I was concerned a bit....putting an extra turn places the extension 1/2 way over the hole and would also need to reface most of the whole tube in addition to notching the tube since it would stick out from the lower arond the circumference of the tube. I've used it live fire and it didn't go anywhere. I also ordered a few different tunes to see if they are different enough in specs to make a difference. The BCM ones I ordered are identical and that's the one in the pic. The spikes one I have doesn't appear to offer an advantage either.  </a>" /> </a>" />
 </a>" /> </a>" />
|
|
Really easy,
The receiver extension is thread 18tpi, so for every wind more the tube is threaded in more, it going to move the bottom tab .056" deeper each turn. 1 divided by 18 (threads per inch), equals .056. So if you measure the current gap from the end of the tube to the back of the buffer retainer pin, subtract that from .056, which gives you the amount that the bottom lip of the tube needs to be faced-sanded-filed-or milled back, so the tube can be threaded in one more tune to both, just kill the center pin on the buffer retainer, and to index the butt stock correctly as well. And you didn't think that you where going to use that whole math thing you learned in school. And why some tubes have to be faced back, while others don't, there is not common standard for both the threading on the tubes, nor the threading on the receiver indexing starting point for the start of threads. Hence take two receiver or tubes from different manufacturers, and the threading point indexing is not the same. Hence on one receiver on the back side, the entry to the threads could start at the 2:00 o'clock postion, while the other receiver 9:00 o'clock isntead. Same goes for the tubes as well. So since the tube index will always be with the stock part to the bottom, and the fact that the tube can be anywhere out on the one rotation (.065), you may have to face the end of the tube isntead. |
|
Quoted:
Dano, Do I really need to cut my tube down? And if the rest of the tube sticks out from the lower does it need to be faced as well? I would, to get the bottom end of the tube to just kiss the center of the retainer pin with plenty of tube wall retention over the top outer flats of the buffer retainer pin:, especially if you do a full rearward charging handle pull and find that the face of the bolt is even, or retracting back past the back of ejection port window edge (want the face of the bolt to stop 1/8" to 1/4" in front of the back of the ejection port window edge). As for the upper section of the tube, it only needs to face back if the tube is proud of the inner face of the receiver extension thread ring, and is blocking the back of the carrier from coming down into index with the tube when you go to lock the upper to the lower receiver. |
|
Stupid question, but how difficult is it to mess up removing the FCG, I'm not new to shooting or stripping a semi auto, but kinda gun shy (no pun intended) about messing with stuff like that on my AR. my face is too purdy for one to blow up on me if I screw something up!! |
Its easy to remove a FCG,

http://www.ar15.com/content/guides/assembly/lower/
Start by removing the pistol grip, and as you pull the grip off the receiver, there will be a spring in the grip channel, and a small selector detent pin up in the spring channel that you want to pull out and save. With the pistol grip, the selector spring, and the selector detent removed, you can push the selector out of the receiver. Now with the hammer uncocked, hold the hammer straight in the lower receiver, then use a punch to punch out the hammer pin. The hammer has a J spring in the middle of the channel, while the hammer pin has an annular groove on only once side of it. Hence depending which way you punch the pin out, if you don't see the side groove on the trigger pin as it starts to punch out the other side, keep in mind that the your punching the pin with the end grove that will catch on the hammer J spring, and will have to give the pin another hard tap when it about half way through the hammer. Also again, as your are driving the hammer pin out of the receiver, hold the hammer square as the pin clears the first side, so you don't oblong the far side channel as you are just pushing the pin out the rest of the way. From here, the trigger pin will just push out with a punch, the disco will remove from the tail of the trigger and you can life the trigger out. Note, it does not matter which side the pin side grove goes to, or even if the pin grooves are both on the same side. Really, once the FCG had been installed, work the FCG a few times against your hand, and if one of the pins seems to be protruding farther out one side than the other, the turn the pin around so the side groove is on the other side. Now you can clean the FCG is needed, them make sure to CLP lube all the parts, channels, and pins before you reinstall the FCG. To reinstall, make sure that the disco spring is installed in the trigger slot large coil side down, start the trigger pin through the receiver(trigger and hammer pins are both the same) and into the trigger, drop the disco in place and then push it down as you push the trigger pin through the disco channel, the other side of the trigger channel and into the other receiver side channel. Also, does not matter which side you have the pin side groove facing. Note here, if the selector did not come out of the rifle until you pulled the trigger pin, then install the trigger, put the selector in, then install the disco and trigger pin. Now on the hammer, start the pin into the receiver with the side annular groove to the punch side that you are pushing in, so the J spring will only catch on the center groove only as the pin is being pushed in place. Now rest the hammer legs against the top of the trigger pin, push the hammer down into position, and drive the pin through the hammer and into the other side of the receiver channel. Note, the hammer pin only has a grove on one side, so the hammer leg will only lock into the pin groove that you have it facing on the pin. Back at the pistol grip, turn the receiver top side down, drop the selector detent pin in the channel with the pointed end towards the selector, turn the receiver so the right side is up, then install the grip with the selector spring in the channel straight inwards towards the receiver so you don't kink the spring. Lastly, install the grip bolt with the washer on it, making sure not to cross thread the pistol grip bolt in the receiver threaded channel for it. So here, before you install the grip bolt, look through the grip bolt channel to make sure that you have it aligned with the receiver channel for it. Really, the only hard part of removing the FCG, is just to make sure that you are holding/positioning the hammer square to the receiver pin channels so the pin will just push out in and out. hence the only hard part is just starting the pin past the J spring in the center channel, and once you have started the pin past the J spring, it will push right out with the punch. To add, you really don't need to remove the pistol grip to remove the selector. If you put thumb pressure on the side of the selector on the ejection side, and work the selector from safe to fire, you can get the selector detent pin to pop out the selector channel to remove the selector that way. The selector detent pin is a stepped pin in a stepped channel and once the selector is remove, only the tip of the selector detent will will protruded into the selector channel. 
To reinstall the selector, just start it in the channel, then use a pick tool to push the selector detent pin downwards sp the selector can ride over it to lock back into the selector detent channel. 
|
|
Is the Lower Receiver a commercially produced Lower, or was it made from a 80%? It may be the photo, but the machining looks a little abnormal to me.
If the hammer or trigger pin holes or buffer retainer pin hole were drilled slightly off, that could explain both of your problems. It looks like the receiver extension/buffer tube is screwed far enough onto the frame to keep the retainer pin in place (although it would be better with another turn), and the buffer retainer pin should not be popping out of the hole, unless the hole was drilled too large, or not in the right place, The problem with the gun doubling is either a defective FCG (hammer, disconnector or trigger), or the holes for the pins are not located properly, so the disconnector or trigger is/are not catching the hammer when the gun is cycled. The easiest way to troubleshoot the problems would probably be to replace the LPK (trigger, trigger spring, hammer, hammer spring, disconnector, disconnector spring, buffer retainer pin and buffer retainer spring). You should have a set of spare parts anyway, for the times that you lose parts during maintenance takedowns. I use PSA LPKs (priced around $45-$50). Then, test fire the gun to see if the problems are still present. If the problems are still there after changing the parts, a defective Lower Receiver is probably the problem. |
| Went through the bolt, replaced the gas key, gas rings and cleaned it up. On of the gas rings was actually broken, on the tip. Got back o the range with it and not a single double fire, and I also tightened up the buffer tube and the retainer hasn't moved since. Appreciate all the tips, and suggestions. |
AR Sponsor