


AR Sponsor

Posted: 12/26/2015 2:42:39 AM EDT
|
So this is my first build. So I'm not sure what issues I'm having exactly. It's a 300blk ballistic advantage performance barrel with nickle boron extension and m4 Ramps. The upper is a vltor Mur 1a. Bolt carrier is a gemtech adjustable, bolt sharps relia bolt. Now my issue.
I haven't fired the gun yet but I was at home doing a function check with gen 2 pmags and hexmags. I was using both Remington 120 supers, Sig 125 supers. The pmags loaded zero issues but I noticed large gouges on the caseings along with the projectile itself. The Remington's in the hexmags didn't want to load unless I dropped the bolt from lock. If I sling shot the charging handle it would hang up between the mag/feed ramps/barrel. The Sig ammo loads in both mags regardless of charging method. But I do have marks on the cases again along with gouges in the projectiles. If I load either round in either mag and and bring the bolt back slowly then slowly release forward it won't go into full battery. It sits just shy. Under full pressure of charging or dropping the bolt the rounds load but again with marks. Now j reload. So I know the caseings shouldn't have marks this rough. Ejection wise everything is smooth as butter. I'm ejecting between 3-4 o'clock with no rough marks to the case rims. Here's some pictures of the rounds. I forgot to snap a pic of the feed ramp/barrel match up. I'll get one. The pictures with 2 rounds are the Sig rounds. If you look at the second two pics of the Sig rounds the one on the left is a new round the one on the right has been fed and ejected. Notice the deformation of the tip of the projectile. The 4 rounds are the 120 grn Remington's (barns brass) you can see the extreme gouge down the case along with the scratches into the projectile. These rounds while not flawless the Tips overall weren't effected as much as they were originally wider and open. The Sig projectiles are a lot slimer at the edge. Are these types of marks normal for feeding? If not what areas do I need to focus my attention towards for issues? I'm going shooting this week as I've been waiting for a tool so I could adjust the gas block. It was sitting too far back in the rail for me to reach with all the current drivers I had. Slr has been sold out of the 2mm X long drivers for a while. So snagged one elsewhere online. Should be here Monday and I'll tune the gas system and zero in then. 


|
|
Your bullet crimping sucks, with it leaving the case mouth's high, instead of tapered into the bullet cannelure.
If you are afraid to add more bullet crimp pressure in fear of budging the case shoulders, then use a lee FCD to bullet crimp instead. But let digress, Starting with the mags, tapering the back of the front inside edge downward so the front wall of the mag wall is tapered up inside back to outside upwards. Also, on the front sides of the bullet guide in the mags, taper them as well. Hence as the round is being pushed out of the mag, no sharp wall edges for the case mouth to catch on. If these are aluminum mags, then run your finger nail down the bottom for the mag feed lips when you have them apart to CLP clean them as well, to check for any burs that may need to be stoned off. Moving onto the barrel ramp, break out some 400 wet/dry sand paper wrapped around a chop stick, and polish the inner ends of the barrel feed ramps in the barrel extension to remove any burs if found. On the mag catch, make sure that the threaded section end of the catch is flush with the face of the button. On the barrel, take a photo of the entry to the chamber inside the barrel extension and post it. I want to check if the long scrap marks of the brass is coming from the cases entering the chamber, or coming out of the mag isntead. Note, with the distance that the lines are way back to the rim of the cases, suspecting that these lines on the case are coming from the mag instead. As for the lateral rings around the bullets, might be caused by the last step cut of the chamber ring bur that just has not self polished out through live fire yet. On the long scrap marks on the bullet surfaces with chatter bumps, these are being caused when you cycle the rounds out by hand instead. The ejector cams the round to the right when you are cycling the round out by hand, and as the bullet clears the chamber, it dances off the right hand lug corner in the barrel extension before the bullet tip clears the front of the ejection port window. So short of some quick checks like the mag release button and tear down CLP cleanings of the new mags from the start, it really boils down to if the rig will run correctly or not, since with a few hundred rounds through the rig, it will solve most of the bur problem above itself instead. |
|
Quoted:
Your bullet crimping sucks, with it leaving the case mouth's high, instead of tapered into the bullet cannelure. If you are afraid to add more bullet crimp pressure in fear of budging the case shoulders, then use a lee FCD to bullet crimp instead. But let digress, Starting with the mags, tapering the back of the front inside edge downward so the front wall of the mag wall is tapered up inside back to outside upwards. Also, on the front sides of the bullet guide in the mags, taper them as well. Hence as the round is being pushed out of the mag, no sharp wall edges for the case mouth to catch on. If these are aluminum mags, then run your finger nail down the bottom for the mag feed lips when you have them apart to CLP clean them as well, to check for any burs that may need to be stoned off. Moving onto the barrel ramp, break out some 400 wet/dry sand paper wrapped around a chop stick, and polish the inner ends of the barrel feed ramps in the barrel extension to remove any burs if found. On the mag catch, make sure that the threaded section end of the catch is flush with the face of the button. On the barrel, take a photo of the entry to the chamber inside the barrel extension and post it. I want to check if the long scrap marks of the brass is coming from the cases entering the chamber, or coming out of the mag isntead. Note, with the distance that the lines are way back to the rim of the cases, suspecting that these lines on the case are coming from the mag instead. As for the lateral rings around the bullets, might be caused by the last step cut of the chamber ring bur that just has not self polished out through live fire yet. On the long scrap marks on the bullet surfaces with chatter bumps, these are being caused when you cycle the rounds out by hand instead. The ejector cams the round to the right when you are cycling the round out by hand, and as the bullet clears the chamber, it dances off the right hand lug corner in the barrel extension before the bullet tip clears the front of the ejection port window. So short of some quick checks like the mag release button and tear down CLP cleanings of the new mags from the start, it really boils down to if the rig will run correctly or not, since with a few hundred rounds through the rig, it will solve most of the bur problem above itself instead. Thank you for your reply. First the rounds are all factory loads. None were reloads. I was simply saying I reload ammo and don't typically see lateral gouges on caseings. Both the Sig and Remington ammo were new in box complete rounds. The magazines are all polymers. Both the hexmag and the magpul. I'll take your advice and smoth the followers off and the lip edges. But I would be surprised as those causing these as they are actual gouges into the case rather then a scuff of the surface. Running your nail across you feel a crips scratch in the case itself. So i was assuming metal on metal contact for that. So maybe the feed Ramps. I do see a lot of copper from the jacket on the feed ramps themselves. As far as the mag catch goes it was pre installed by San tan for the ambi system but it is flush. |

|
The barrel needs to be pulled from the upper receiver and reworked to clean up some flaws. If you have a lathe and time, they you can do it yourself, or just send the upper back to have it corrected isntead.
Starting with the barrel ramps, they need to be polished and cleaned up (read should not have that amount of brass fouling on them). Next when the barrel is reinstalled, the front ends of the barrel extension ramps should stop just a tad short of the ramps in the upper receiver itself, so if a bullet tip is traveling up the receiver ramps, when it comes to the start of the extension ramp, it slightly skips over the start of the extension ramp, isntead of catching the protruding lip of the extension ramp instead. Now on to the barrel chamber it self before the barrel is remounted to the receiver, being the taper entry to the chamber. Hence the start edge of the taper from the other flat ,and the end edge of the taper to start of the chamber are too sharp. This is a quick fix with a lathe, and both these edges need to be softened/ever so radius isntead. Also the taper surface it self could do with some polishing as well. Hence as the case starts to enter the chamber up the taper, the last of entry tape edge needs to be rounded so it not trying to scrap brass off the case isntead. Also, with the surface of the taper polished, cleaner feeding and will foul slower as well. Here is what a the chamber taper section should look like, including any burs on the entry sections of the feed ramps pre-polished out, 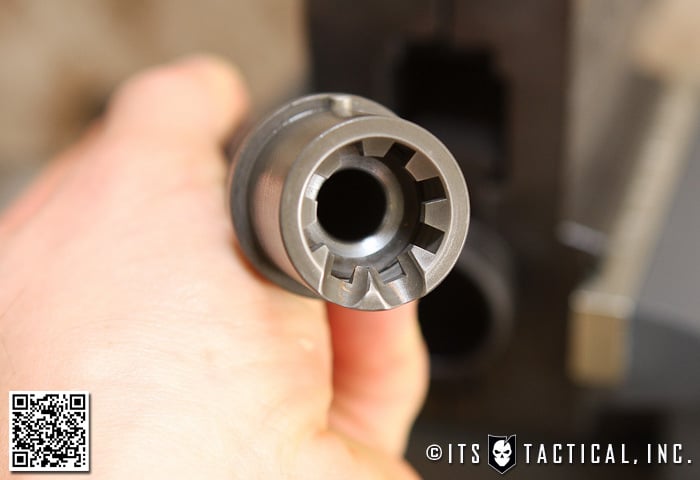
And fully polished ramps for a final step. 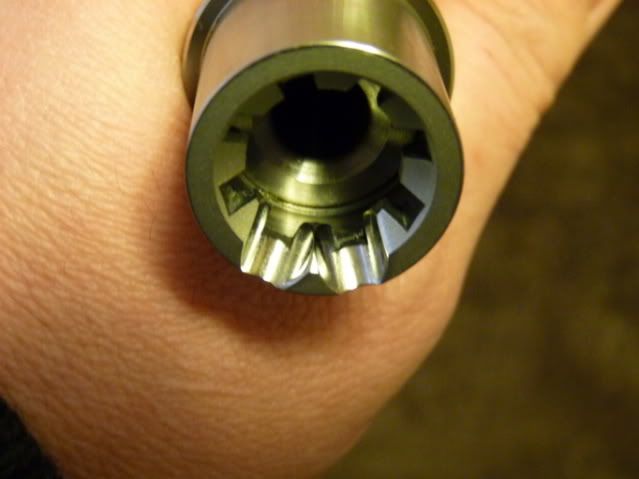
Lastly, not a huge fan of the recess depth of the barrel extension face to the back side of the upper receiver inner edge on your upper. Hence when the bolt goes to lock up, prefer the barrel extension face to be flush with the back of the receiver so the face for the carrier mates to both the barrel extension and the back of the receiver, instead of the carrier just mating up to the back side of the upper receiver alone (leaving a gap between it and the barrel extension instead). So if the upper receiver barrel socket is faced to correct this problem, then the barrel extension ramps front section will need to be lowered to mate up correctly to the receiver ramps (so the front/start of the extension ramps are not proud of the receiver ramps to cause a lip for the bullet tips to bind up on instead). So to conclude, there is just slapping parts together and hoping for the best during a build, and there is taking the time to go through the parts and cleaning them up during a build so everything is just perfect isntead. So with a few tweaks, your rig may shoot just fine, but had you handed the built to me for a final check before it when out the shop, it would have been handed back to you to re-due with a wicked laundry list instead. |
AR Sponsor