


AR Sponsor

Posted: 1/25/2017 2:10:36 PM EDT
| Is it worthwhile for accuracy sake or waste of time? Can it be done on a mill? |
|
Any variances are almost certainly well within the tolerances of the sights, with imperfections in parts or assembly being corrected or allowed for by adjusting the sights while sighting in. What matters more is that the assembled firearm holds a consistent zero, than that every part be perfect and fit with zero adjustment anywhere.
So if you're talking about truing the face of the upper receiver where the barrel nut attaches, it can be done on a mill or with specialized tools, and it's not a bad thing, but its actual utility is questionable if one or two clicks on the rear sight would have zeroed the resultant rifle anyway. |
|
There are quite a few threads on this is you are able to manipulate the search tool of this forum effectively.
I started a thread a while back when I was having some issues. Lapping Tool |
|
Quoted:
Does lapping a receiver improve accuracy? |
|
Quoted:
Does lapping a receiver improve accuracy? Generally, no. But I do true the receiver face and shim, if necessary, the barrel for a light press fit, if the barrel is a precision match custom barrel intended to shoot sub MOA. Unless you are using that type barrel and shooting match ammo, you are not likely to see a measurable improvement in accuracy. The only reason to do it with a "regular" barrel is if your rear iron sight has to be moved way over to the side to zero. When used in conjunction with a good bench vise and clamshell receiver vise, the Wheeler tool's mandrel produces good results. 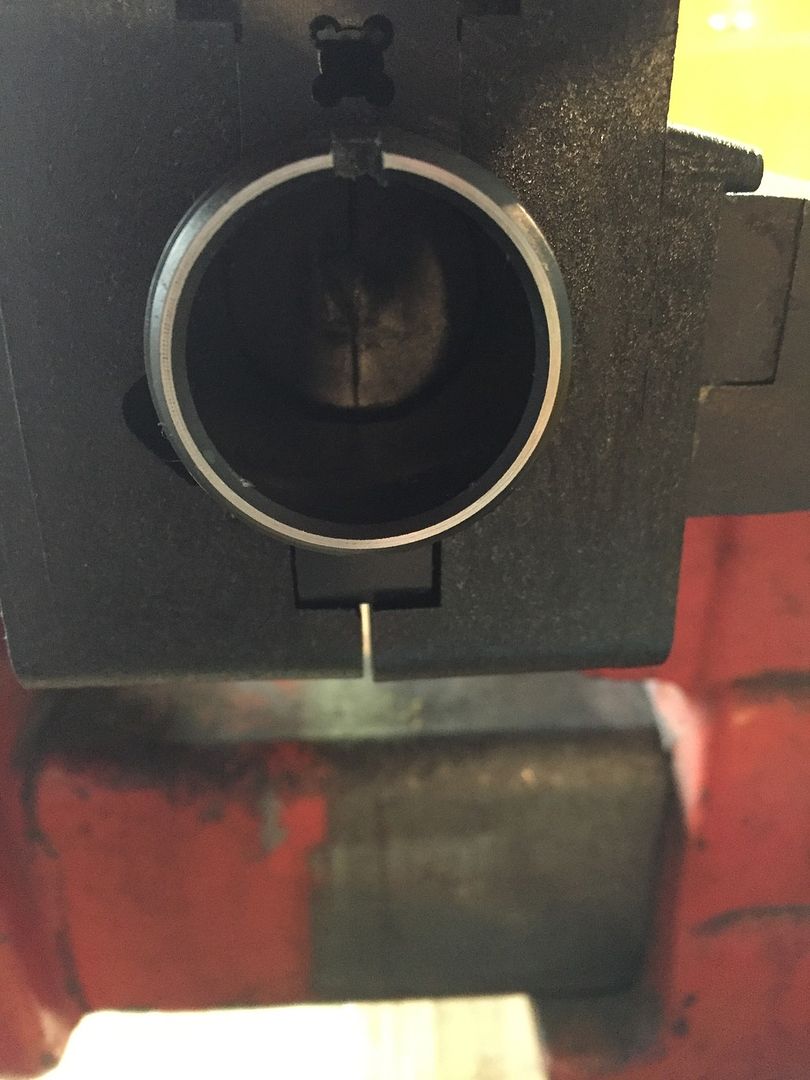
|
|
I feel like I am a huge downer when these tools get brought to attention, but I feel my information is accurate, so.....
Here goes! Repost from another that I did a month back or so: I have seen these silly tools take material off of one side of a 2A Upper that was known to be square within 2 tenths. I don't care how precise your spinning hand drill is, it is not as precise as a 400mm pallet in a 20,000 lb Makino A51NX. All I am conveying is be careful with what you might think you are "Fixing." Ok, I figured I would go ahead and model what I am getting at in Solidworks so people understand what these tools are doing. I often see people say stuff like "It did take some material off one side, so it must be out!!!" It will look like this after you run the tool in your upper. Picture as found on internet! Notice how material is gone off one side to start??? Why would that be? Is it because the face is not square with the bore? NO! It's because your squaring tool is not square to begin with. 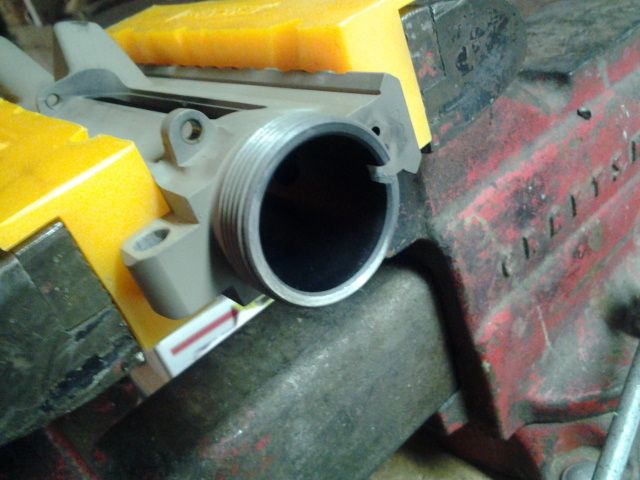
Here I have created a model of an upper receiver bore that is dead nuts square. The extension bore is at 1.000" for 1.25" Depth, most uppers are around 1.000 + .002/-.000 The rest of the bore (Where the tool, and your carrier ride in) is often around 1.005 or so. This means that your squaring tool must be at least .999 to even get inside the upper! Most likely it's around .995 or so in order to turn with the drill. I have my modeled lapping tool inserted in the mock upper. 
Next I set the back of the lapping tool (The part riding on the bore) tangent to the bore at its extreme. I then set the tool tangent towards the front to its extreme. This would model the tool exactly as it would fall if you were to apply any sort of force on the device. If the tool is able to go through the extension bore, then it has room to FALL into the larger bore where your carrier rides. You can see the tool setting crooked in the mock upper receiver here! 
Now lets see what we can see at the front, or the "Face" of our receiver in relation to our tool????? 
What you see is a tiny gap at the bottom where the tool is off of the face of the receiver. If you were to spin this with a drill, it would remove material on one side only! just like the picture I posted above. If you were to keep going, eventually it would remove enough material to make your new upper "Lapped in" and it would be 100% now out of square with the bore. |
|
Quoted:
Generally, no. But I do true the receiver face and shim, if necessary, the barrel for a light press fit, if the barrel is a precision match custom barrel intended to shoot sub MOA. Unless you are using that type barrel and shooting match ammo, you are not likely to see a measurable improvement in accuracy. The only reason to do it with a "regular" barrel is if your rear iron sight has to be moved way over to the side to zero. When used in conjunction with a good bench vise and clamshell receiver vise, the Wheeler tool's mandrel produces good results. http://i1366.photobucket.com/albums/r772/gbloss/EE29A166-F2F9-4DA7-90C9-F42A2FC44A38_zpsk0mmiocg.jpg Quoted:
Quoted:
Does lapping a receiver improve accuracy? Generally, no. But I do true the receiver face and shim, if necessary, the barrel for a light press fit, if the barrel is a precision match custom barrel intended to shoot sub MOA. Unless you are using that type barrel and shooting match ammo, you are not likely to see a measurable improvement in accuracy. The only reason to do it with a "regular" barrel is if your rear iron sight has to be moved way over to the side to zero. When used in conjunction with a good bench vise and clamshell receiver vise, the Wheeler tool's mandrel produces good results. http://i1366.photobucket.com/albums/r772/gbloss/EE29A166-F2F9-4DA7-90C9-F42A2FC44A38_zpsk0mmiocg.jpg I kind of want to. I really wanted to get into 3-gun or some sort of shooting sport however, there really isn't any of that going on in my little corner of VA. Most of the local ranges won't even allow standing at the bench. So, I was thinking of building a very accurate AR. Once that reciever is lapped, is that aluminum left bare? Also, would shimming the gap between the receiver and barrel work to close up that gap? |
|
Quoted:
I kind of want to. I really wanted to get into 3-gun or some sort of shooting sport however, there really isn't any of that going on in my little corner of VA. Most of the local ranges won't even allow standing at the bench. So, I was thinking of building a very accurate AR. Once that reciever is lapped, is that aluminum left bare? Also, would shimming the gap between the receiver and barrel work to close up that gap? Quoted:
Quoted:
Quoted:
Does lapping a receiver improve accuracy? Generally, no. But I do true the receiver face and shim, if necessary, the barrel for a light press fit, if the barrel is a precision match custom barrel intended to shoot sub MOA. Unless you are using that type barrel and shooting match ammo, you are not likely to see a measurable improvement in accuracy. The only reason to do it with a "regular" barrel is if your rear iron sight has to be moved way over to the side to zero. When used in conjunction with a good bench vise and clamshell receiver vise, the Wheeler tool's mandrel produces good results. http://i1366.photobucket.com/albums/r772/gbloss/EE29A166-F2F9-4DA7-90C9-F42A2FC44A38_zpsk0mmiocg.jpg I kind of want to. I really wanted to get into 3-gun or some sort of shooting sport however, there really isn't any of that going on in my little corner of VA. Most of the local ranges won't even allow standing at the bench. So, I was thinking of building a very accurate AR. Once that reciever is lapped, is that aluminum left bare? Also, would shimming the gap between the receiver and barrel work to close up that gap? Yes, it is usually left bare. I don't think a Shim would work, but YMMV. As per above...the tool and process to "true" the receiver is a bit more blacksmithing than gunsmithing. "True" IMO would mean that you true the entire thing and do so with one central line, likely the bore. The tool is only trueing the face. What about the receiver threads, the tunnel, the top rail, the barrel extension itself, the chamber, and so on. All need to be on one straight line...yet the tool is only looking at one of those surfaces. |
|
Quoted:
I feel like I am a huge downer when these tools get brought to attention, but I feel my information is accurate, so..... Here goes! Repost from another that I did a month back or so:I have seen these silly tools take material off of one side of a 2A Upper that was known to be square within 2 tenths. I don't care how precise your spinning hand drill is, it is not as precise as a 400mm pallet in a 20,000 lb Makino A51NX. All I am conveying is be careful with what you might think you are "Fixing." Ok, I figured I would go ahead and model what I am getting at in Solidworks so people understand what these tools are doing. I often see people say stuff like "It did take some material off one side, so it must be out!!!" It will look like this after you run the tool in your upper. Picture as found on internet! Notice how material is gone off one side to start??? Why would that be? Is it because the face is not square with the bore? NO! It's because your squaring tool is not square to begin with. http://i1085.photobucket.com/albums/j422/LRRPF52/2013-12-11141153_zps541496bb.jpg Here I have created a model of an upper receiver bore that is dead nuts square. The extension bore is at 1.000" for 1.25" Depth, most uppers are around 1.000 + .002/-.000 The rest of the bore (Where the tool, and your carrier ride in) is often around 1.005 or so. This means that your squaring tool must be at least .999 to even get inside the upper! Most likely it's around .995 or so in order to turn with the drill. I have my modeled lapping tool inserted in the mock upper. http://i1383.photobucket.com/albums/ah294/TZLVredmist/Bore%20Tool%201_zpskfzy8uek.png Next I set the back of the lapping tool (The part riding on the bore) tangent to the bore at its extreme. I then set the tool tangent towards the front to its extreme. This would model the tool exactly as it would fall if you were to apply any sort of force on the device. If the tool is able to go through the extension bore, then it has room to FALL into the larger bore where your carrier rides. You can see the tool setting crooked in the mock upper receiver here! http://i1383.photobucket.com/albums/ah294/TZLVredmist/Bore%20Tool%202_zpsbj7ocfqj.png Now lets see what we can see at the front, or the "Face" of our receiver in relation to our tool????? http://i1383.photobucket.com/albums/ah294/TZLVredmist/Bore%20Tool%203_zpsyetsgk0j.png What you see is a tiny gap at the bottom where the tool is off of the face of the receiver. If you were to spin this with a drill, it would remove material on one side only! just like the picture I posted above. If you were to keep going, eventually it would remove enough material to make your new upper "Lapped in" and it would be 100% now out of square with the bore. Thank you sir! Just what I was trying to wrap my noggin around. |
|
Quoted:
Thank you sir! Just what I was trying to wrap my noggin around. Quoted:
Quoted:
I feel like I am a huge downer when these tools get brought to attention, but I feel my information is accurate, so..... Here goes! Repost from another that I did a month back or so:I have seen these silly tools take material off of one side of a 2A Upper that was known to be square within 2 tenths. I don't care how precise your spinning hand drill is, it is not as precise as a 400mm pallet in a 20,000 lb Makino A51NX. All I am conveying is be careful with what you might think you are "Fixing." Ok, I figured I would go ahead and model what I am getting at in Solidworks so people understand what these tools are doing. I often see people say stuff like "It did take some material off one side, so it must be out!!!" It will look like this after you run the tool in your upper. Picture as found on internet! Notice how material is gone off one side to start??? Why would that be? Is it because the face is not square with the bore? NO! It's because your squaring tool is not square to begin with. http://i1085.photobucket.com/albums/j422/LRRPF52/2013-12-11141153_zps541496bb.jpg Here I have created a model of an upper receiver bore that is dead nuts square. The extension bore is at 1.000" for 1.25" Depth, most uppers are around 1.000 + .002/-.000 The rest of the bore (Where the tool, and your carrier ride in) is often around 1.005 or so. This means that your squaring tool must be at least .999 to even get inside the upper! Most likely it's around .995 or so in order to turn with the drill. I have my modeled lapping tool inserted in the mock upper. http://i1383.photobucket.com/albums/ah294/TZLVredmist/Bore%20Tool%201_zpskfzy8uek.png Next I set the back of the lapping tool (The part riding on the bore) tangent to the bore at its extreme. I then set the tool tangent towards the front to its extreme. This would model the tool exactly as it would fall if you were to apply any sort of force on the device. If the tool is able to go through the extension bore, then it has room to FALL into the larger bore where your carrier rides. You can see the tool setting crooked in the mock upper receiver here! http://i1383.photobucket.com/albums/ah294/TZLVredmist/Bore%20Tool%202_zpsbj7ocfqj.png Now lets see what we can see at the front, or the "Face" of our receiver in relation to our tool????? http://i1383.photobucket.com/albums/ah294/TZLVredmist/Bore%20Tool%203_zpsyetsgk0j.png What you see is a tiny gap at the bottom where the tool is off of the face of the receiver. If you were to spin this with a drill, it would remove material on one side only! just like the picture I posted above. If you were to keep going, eventually it would remove enough material to make your new upper "Lapped in" and it would be 100% now out of square with the bore. Thank you sir! Just what I was trying to wrap my noggin around. If you actually do the math, allowing for maximum variation of the upper bore both at the barrel extension and at the rear over the 5.5" distance, the worst deviations from "true" using the Wheeler or Brownells mandrel is only 3 MOA, usually much less. The theory above supports an angle error, but 3 MOA or less from true is very good, IMHO. |
|
Quoted:
If you actually do the math, allowing for maximum variation of the upper bore both at the barrel extension and at the rear over the 5.5" distance, the worst deviations from "true" using the Wheeler or Brownells mandrel is only 3 MOA, usually much less. The theory above supports an angle error, but 3 MOA or less from true is very good, IMHO. As for the utility of having a relatively flat surface for the barrel extension flange to seat against, its nice to have the barrel centered in the inside of a FF handguard, plus one can imagine how such a barrel has one less point of disturbance to a uniform vibration pattern. - CW |
AR Sponsor