


AR Sponsor

Posted: 3/18/2008 9:44:40 AM EDT
| I cannot get a good stake for the castle nut. It appears that the receiver plate I added so I could use a single point sling is hardened. I have tried everything: Staking tool, Hammer and punch, Hammer and Nail... None of them have been able to stake it. I even got a gunsmith to try, and he broker TWO staking tools trying to get it to stake. Has anyone else run into this problem? Anyone got any suggestions? |
|
You can loctite the castle nut, I know it's not as good as staking but it will work. I loctited a castle nut once. When I went to take it off I ended up mangling the threads on the receiver extension. The tube and the nut spun together and the alignment notch on the end plate cut through about 1" worth of threads. I heated it with a propane torch first but it didn't seem to matter. Yes, I used a lot of loctite. 
|
 Me neither.

|
I have never staked a castle nut with one, but I use one all the time at work. They are good tools that will put a nice, sharp punch where you want it. If you hit something hardened, though, the point will go flat. You can resharpen the point pretty quick, just don't let it heat up and soften it. Also, don't let it roll off the workbench. If you do, ther is a fair chance you'll be replacing the tip (once you get out the little broken stub of the old tip) |
|
Assemble dry, yes, no oil. Degrease parts. First test fit the buffer tube, aka receiver extension. If the tube is cut square on the threaded end, when you have threaded in far enough to properly hold down the buffer retainer detent (almost touching the "tit" but still allowing free movement of the detent) then the threads are exposed on the top side and the upper won't close. That is how cheap tubes are made. Properly made tubes have the top thread cut back. If yours is the cheap, square cut type of tube, don't hesitate to grind that top thread back. Make sure you dress the rough edges with emory cloth before installing. Put one drop of BLUE (service removable) Locktite on the tube threads and screw in the tube. If you put the drop of Locktite on the threads of the lower receiver as you screw in the tube it will push locktite forward, possibly getting into the buffer retainer detent. You don't want to do that. Next install the takedown pin, takedown pin detent, followed by the detent spring, and slide the plate forward. Put another drop of blue Locktite where the Castle Nut will end up, and thread the Castle Nut forward to retain the plate and detent spring. Now tighten with the spanner wrench. Tight. No, there is no way to measure torque on most spanner wrenches. You know tight, you don't need a torque wrench here. Wipe away any excess Locktite. Finished. |
|
EVEN in the event that the Locktite is broken loose somehow, your buffer tube is not going to fall off. It might move a hair in each direction of rotation, but it can't go round and round because (a) the plate keys into the lower receiver, so it can't rotate. (b) there is a little tab on the plate that goes into a slot on the bottom of the tube to keep the tube from from rotating. (c) the Castle Nut is not just going to keep unscrewing by itself due to the gummy nature of the blue Locktite. (There is also a purple colored Service Removeable Locktite that is also suitable for this job) So, at worst, you might be able to twist the tube a degree in each direction, but it is not going to come off, nor will it cause a malfunction. |
| The spring loaded center punch referenced before works best. You can determine the ammount of staking by how many times you do it. Its a must have around the shop anyway. Works great for punching out windows, center punching prior to drilling, and general divots in metal. |
That's what the Manufacture of the MOACK's recommended to me. |
|
I always stake my castle nuts. I don't like the idea incorrect assembly That said, if you are using a hardened end plate that you just can not hammer, then I guess I would use blue loctite as substitute.
There is nothing permanent about a staked castle nut. They can be removed at anytime without much effort. |
|
I don't understand why you would want to stake the castle nut....??? I have a carbine buffer tube with castle nut, and I never used loctite on it nor staked it, and run plenty of rounds through it, that castle nut did not budge. A good torque with a spanner wrench did the trick. If you REALLY need that castle nut to stay put 100%, use loctite. You don't need a stake because the buffer tube is not subject directly to the hot gas from the action cycling. Because it's not subject to high temperatures, you can use a simple chemical bond to keep things together. It's not like the gas key screws on the BCG...THOSE need staking because of the temperatures they are subject to. I know this is a thread about staking, not trying to convince you otherwise... But take this into consideration. Many folks do perfectly fine without staking that castle nut. |
| I stake the castle nut because that is how to properly assemble a carbine receiver extension. The TM calls for the tube threads, castle nut threads and receiver threads to be coated in molybdenum disulfide grease, torque the castle nut to 40 in. pounds (which is not much torque), and to stake the end plate into the notches on the castle nut, of which you can only stake 2 of. It's not difficult and the only thing that someone who has done several stake jobs can do is make them look pretty. After function testing to assure everything is where it should be and nothing is binding I lay the lower on a wooden table and stake the end plate with a center punch and a 4 oz. ball peen hammer. A couple of taps should give you a sufficient stake as there is no need to beat the flippin' thing with a hammer to move a sufficient amount of metal. I can't understand whether your life depends on it or not why you would intentionally assemble a rifle incorrectly. If you change stocks a lot just stake a milpec tube to the receiver seeing as most aftermarket stock use such tubes. If you must remove the tube very little torque is needed to break the stakes. The hot temps and gasses are not what will loosen the castle nut or the carrier key screws, it is the vibration caused by the repeated movement of internal parts which becomes more of an issue in hard use carbines than in you average civilians range rifle, which is why you don't often hear of them working loose. With that said, loctite should hold the OP's castle nut in position just fine, just be sure to clean the areas well to allow a good bond. Blue is the way to go as red will have to be heated to remove and will still be difficult to take off in the end. |
Geesh ya'd think just cause it's in the manual you're supposed to do it. I guess if you're turning it in for inspection after you're done, it's a good idea. I'll tell you why I don't even though it's in there. Because it reduces IMO the ease of field servicability of the weapon and NOT staking it has never negatively impacted my use of the weapon platform. That' why. |
All receiver end plates should be staked to the receiver extension nut if the weapon is going to see heavy use. Various methods can be used, but I have found that a prick punch works well. It can be followed up with a center punch. If you are so inclined you can touch it up with a bit of cold blue. 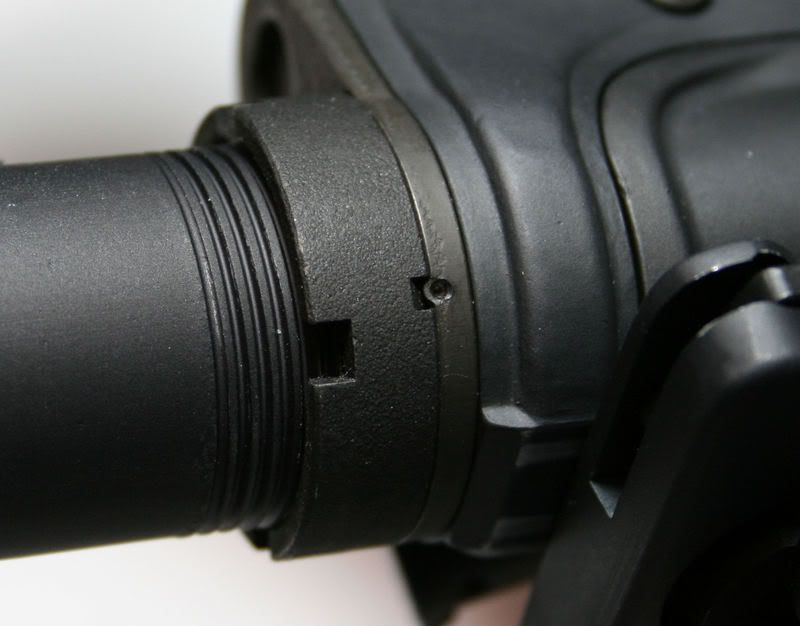
|
AR Sponsor