|
[#1]
I had already loaded some 95A TPU to print some feet for the printer, so went ahead & started printing tires for the 1/10 scale MKUltra Truggy
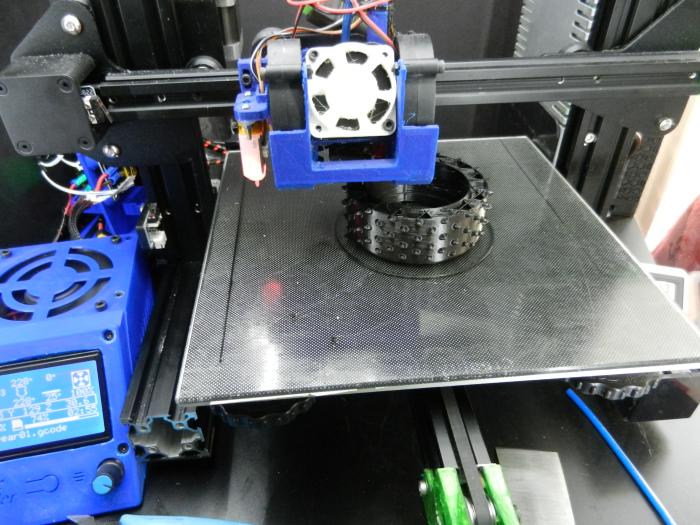
They are a bit stiff, even with a 2 layer skin/walls & 10% cubic subdivision pattern infill, but should be able to absorb some impact. (there are 4 layers on the inner-most portion of the top & bottom side wall) |
|
|
|
|
[#2]
I gotta get some of that too play with.
What kind do you use again? |
|
|
|
|
[Last Edit: nikdfish]
[#3]
Tianse TPU $25.99 on amazon (prime) https://www.amazon.com/gp/product/B07848C1DZ
I've had good luck so far with it & typically do my prints @ 228° C on an unheated bed. |
|
|
|
|
[Last Edit: nikdfish]
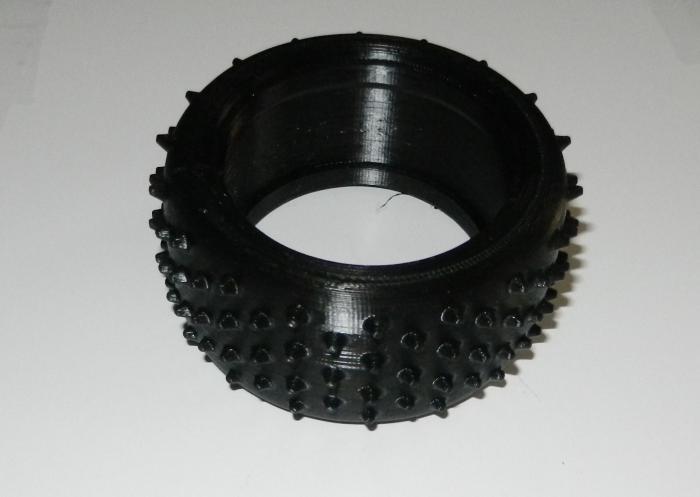
[#4]
Finished up one set of 1/10 scale Truggy tires
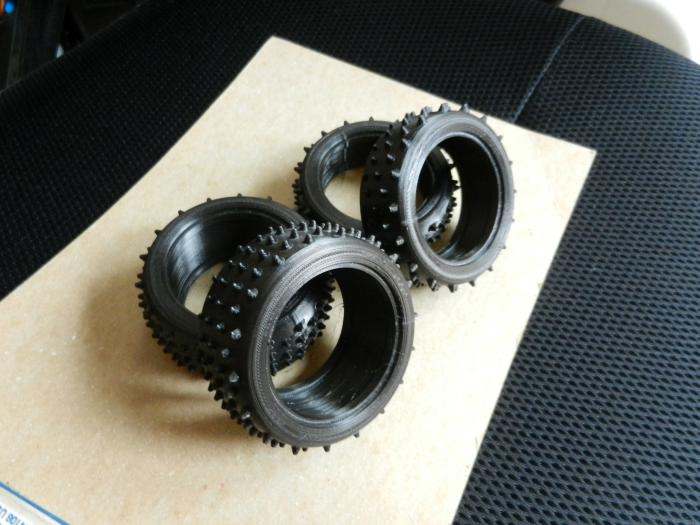
95A TPU, 2 wall sides, 10% infill |
|
|
|
|
[#5]
|
|
|
|
|
[#6]
My magazine rack for my XD45 magazines was just too flimsy, especially for loaded magazines. It depends on the .100" thick face for strength to keep the top row of magazines from sagging. I will have to add a support rib under the grooves. Same for the XD9 magazines, just because.
Also forgot to add space for the button on the M&P 22 pistol magazines. Will fix that too. |
|
|
|
|
[#7]
Originally Posted By nikdfish:
Tianse TPU $25.99 on amazon (prime) https://www.amazon.com/gp/product/B07848C1DZ I've had good luck so far with it & typically do my prints @ 228 C on an unheated bed. Thanks |
|
|
|
|
[#8]
Originally Posted By rcav8r:
My magazine rack for my XD45 magazines was just too flimsy, especially for loaded magazines. It depends on the .100" thick face for strength to keep the top row of magazines from sagging. I will have to add a support rib under the grooves. Same for the XD9 magazines, just because. Also forgot to add space for the button on the M&P 22 pistol magazines. Will fix that too. |
|
|
|
|
[#9]
I plan to upload them all when I'm satisfied with the designs. My buckmark rack is gtg, I want to refine my LC9 rack (overdesigned).
|
|
|
|
|
[#10]
|
|
|
|
|
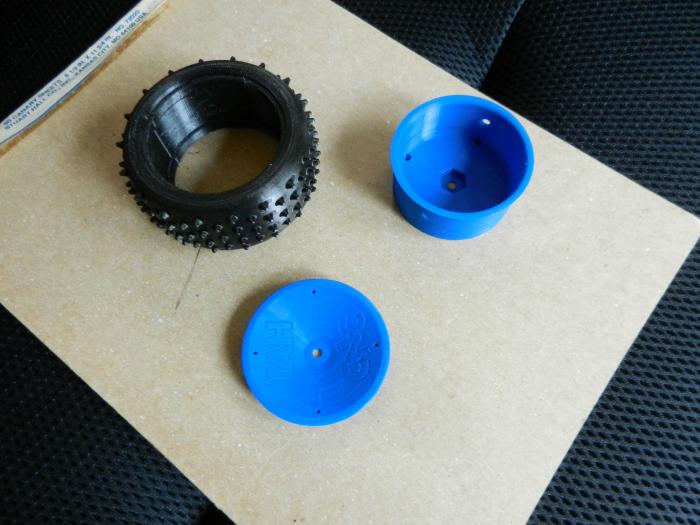
[#11]
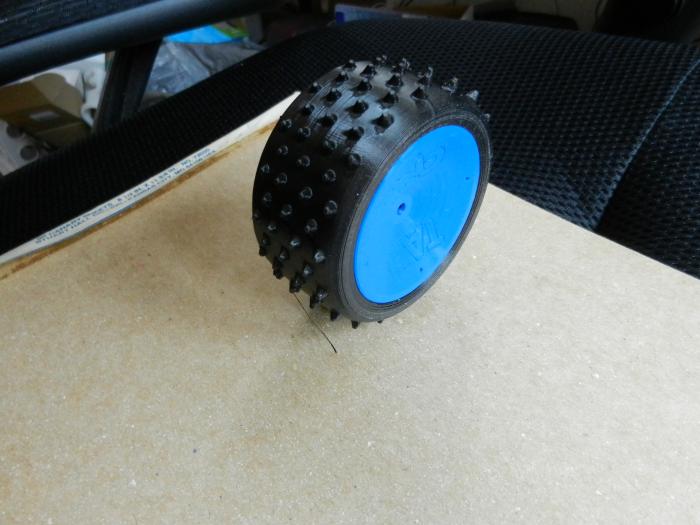
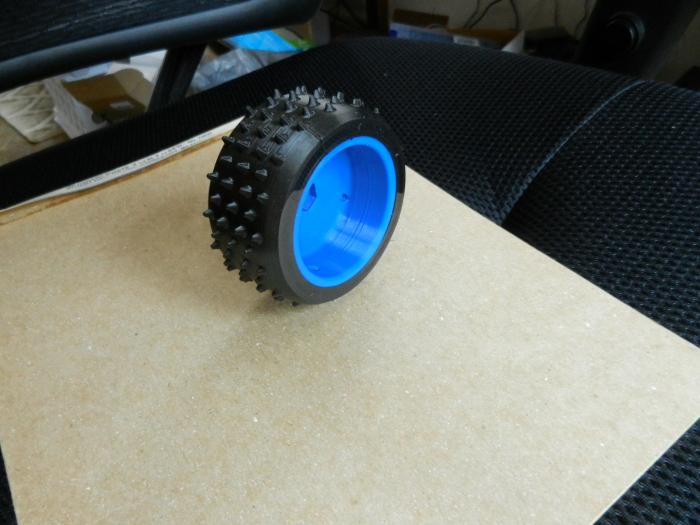
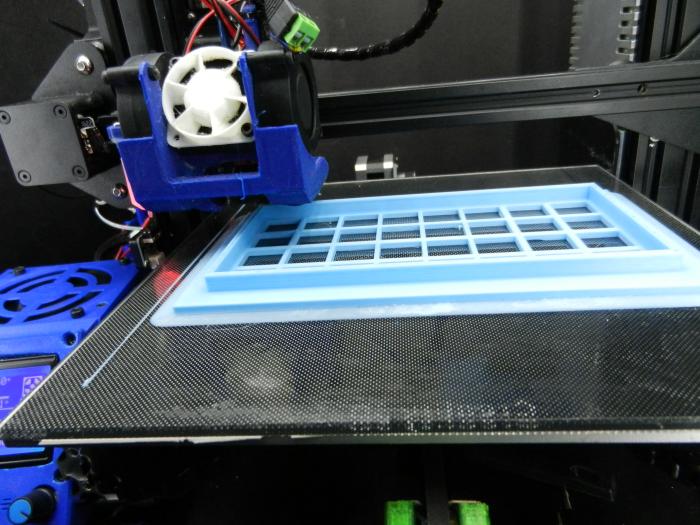
Started printing two part 1/10 scale wheels for the tires that just finished. These will be held together with 2mm screws, no glue required. Did a rear wheel as a first test print, using blue eSun PLA+ again.

|
|
|
|
|
[#12]
I finally got this to print mostly correct last night after four tries and a filament change. I was going to print it with some wood filament but I had a ton of problems with it and gave up.

|
|
|
|
|
[#13]
Originally Posted By nikdfish:
Started printing two part 1/10 scale wheels for the tires that just finished. These will be held together with 2mm screws, no glue required. Did a rear wheel as a first test print, using blue eSun PLA+ again. http://www.skhowell.com/images/DSCN6410.jpg http://www.skhowell.com/images/DSCN6412.jpg http://www.skhowell.com/images/DSCN6414.jpg http://www.skhowell.com/images/DSCN6416.jpg |
|
|
|
UT, USA
|
[#14]
Originally Posted By nikdfish:
Started printing two part 1/10 scale wheels for the tires that just finished. These will be held together with 2mm screws, no glue required. Did a rear wheel as a first test print, using blue eSun PLA+ again. http://www.skhowell.com/images/DSCN6410.jpg http://www.skhowell.com/images/DSCN6412.jpg http://www.skhowell.com/images/DSCN6414.jpg http://www.skhowell.com/images/DSCN6416.jpg |
|
|
|
[#15]
The only prop balance I have is too small to work, plus the offset nature of the wheel hub complicates things a bit.
I did take a closer look at things & decided the gyroid infill made more sense, as it is composed of curves & doesn't have any real XY orientation. I printed up a bunch of sample front tires to do some testing with 1 - 3 layers & no infill vs 6% gyroid. I'm still using Tianse 95A TPU, just a white version (it's easier to write notes on). 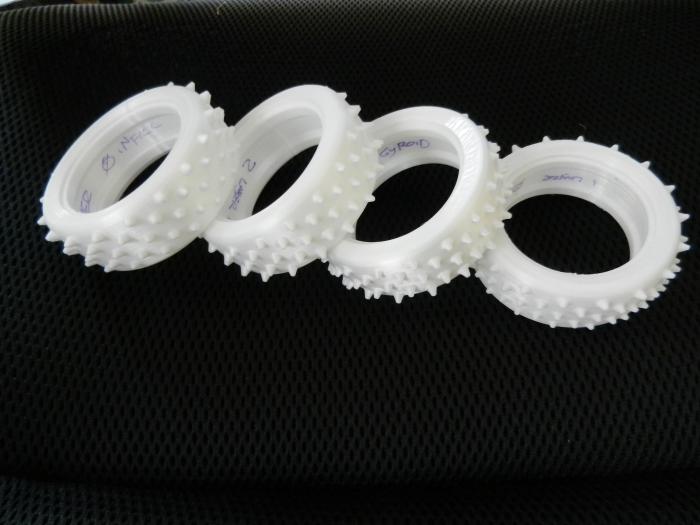
2 layers with 6% gyroid is very similar in squishyness to the 3 layer with 0 infill. Between the two, the 3 layer would be tougher/longer wearing so I'm currently printing a 3 layer 0 infill rear tire to see how it looks. Printing 3 layers & 0 infill, a front tire takes about 3 hours & a rear tire just under 4 hours. |
|
|
|
|
[#16]
Just getting back into 3d printing yet I did print the tad over sized 3cc powder scoop that gives me around 4.3-4.3 grains which is what I was looking for since I cannot find my 3cc powder scoop and the 5cc was way to much for the CFE Pistol I am loading for 9mm. It does exactly what I was looking for. Now looking for other shit to print. Yet did find out that the bed is smaller than what the docs said thus why several of my prints fucked up off the bed. Longer 4k. For shit that is inside the bed works yet does tell me why some of them fucked up cause per the docs the bed was bigger than it really is. Going to do a benchy with the real bed layout instead of the oversized one. All did great till they got to the top then it was way off base yet printing was great. And will redo the powder scoop with correct dimensions on it for the bed. Live and learn that the instructions do not always match what you got.
|
|
|
|
|
[#17]
This took about 30 hours to print.


|
|
|
|
|
[#18]
What goes inside?
|
|
|
|
|
[#19]
Originally Posted By nikdfish:
What goes inside? |
|
|
|
|
[Last Edit: Rat_Patrol]
[#20]
First try at flexible: the tpu that nikdfish recommended.
I turned off retraction, slowed it down, basically used my CopperFill profile. It's squishy, but certainly not overly so. I think I'll also try even more flexible filaments in the future. Interesting stuff. Wife gave it a 
 ETA: @nikdfish Your tires look great, while mine seem almost bubbly in the surface. I figure I need a temp tower, but any experience with this stuff where you know the issue? |
|
|
|
|
[Last Edit: nikdfish]
[#21]
Seeing a bubbly surface makes you think of moisture content going to steam while going through the hot end. I have never had that happen (so far). All my TPU prints are with a 0.4mm nozzle, 228°C & typically between 20mm (first layer) & 50mm (the remainder) per sec with my current extruder & profile. I have seen the surface finish change between matte & shiney depending on the print temps, but haven't had bubbly. All I can think is that maybe it needs to go in the dehydrator a bit. How well are the layers bonded? If you can force a tear along the print lines, it is too cold. TPU should have strong inter-layer adhesion.
|
|
|
|
|
[Last Edit: Rat_Patrol]
[#22]
Bonding is great, can squish the tire flat and no damage.
I'll try to dehydrate it. Happen to know dehydrating temps for tpu? Looks like my new reflow oven should fit spools of filament ETA: this link has a great spreadsheet on dehydrating temps and times https://www.printdry.com/how-to-dry-filaments/ |
|
|
|
|
[Last Edit: nikdfish]
[#23]
50°C > 4hrs. per the printdry table
|
|
|
|
|
[#24]
Beat like a rented mule.
|
|
|
|
MN, USA
|
[#25]
The tianse 95a isn't too bad to print with. I did some prints where I was cookin right along. Maybe 60-70mm/sec and 245c just to see if it would do it.
BIG diference between that and ninjaflex. The ninja flex is like trying to autograph a boob with a ballpoint pen. You have to move slow and support it to get good results. |
|
|
|
[#26]
Finally printed the revised XD45 magazine rack. Openings are still a bit tight, but I think it's due to the tolerances on the printer.
|
|
|
|
|
[#27]
Yup, moisture.
7 hours in the reflow oven at 50, used the same gcode, got this: 
|
|
|
|
|
[#28]
Kind of annoying to have to dry brand new filament though.
|
|
|
|
|
[#29]
Red spaghetti.
My printer was working fine for about a week, then all of a sudden layers aren't sticking together. Was out of town for most of a week so I tried something tonight. Bumped up the filament temp and the bed temp. It sticks to the bed initially, but none of the layers are sticking together. PLU+ from ebay. |
|
|
|
|
[#30]
Originally Posted By Rat_Patrol:
Kind of annoying to have to dry brand new filament though. |
|
|
|
|
[#31]
Originally Posted By jhereg:
Red spaghetti. My printer was working fine for about a week, then all of a sudden layers aren't sticking together. Was out of town for most of a week so I tried something tonight. Bumped up the filament temp and the bed temp. It sticks to the bed initially, but none of the layers are sticking together. PLU+ from ebay. |
|
|
|
|
[#32]
Originally Posted By rcav8r: Is it lifting from the bed? 2 solutions for not sticking to bed is cleaning the bed and adding a brim. |
|
|
|
|
[#33]
Originally Posted By nikdfish:
Sorry you got hit with that. I've been lucky so far & dodged that bullet... Originally Posted By nikdfish:
Originally Posted By Rat_Patrol:
Kind of annoying to have to dry brand new filament though. |
|
|
|
|
[#34]
Originally Posted By jhereg:
It seems to be sticking to the bed. I've tried a brim. I picked up some hairspray and tried it today. It seems like it sticks to the bed, then none of the layers stick to each other. Was printing fine at 200 w a 50 bed temp using some PLA+ earlier. Same spool now wasn't working, I bumped it to 215 and 55 tonight w/ no change. |
|
|
|
|
[#35]
Originally Posted By jhereg:
It seems to be sticking to the bed. I've tried a brim. I picked up some hairspray and tried it today. It seems like it sticks to the bed, then none of the layers stick to each other. Was printing fine at 200 w a 50 bed temp using some PLA+ earlier. Same spool now wasn't working, I bumped it to 215 and 55 tonight w/ no change. |
|
|
|
|
[#36]
Originally Posted By rcav8r: Is the room cold? |
|
|
|
|
[#37]
Originally Posted By RV8guy:
You might have a partial clog in the hot end. Get it warmed up then take it apart and clean it out real good. Originally Posted By RV8guy:
Originally Posted By jhereg:
It seems to be sticking to the bed. I've tried a brim. I picked up some hairspray and tried it today. It seems like it sticks to the bed, then none of the layers stick to each other. Was printing fine at 200 w a 50 bed temp using some PLA+ earlier. Same spool now wasn't working, I bumped it to 215 and 55 tonight w/ no change. |
|
|
|
|
[#38]
Set up to print a filter holder for a solder fume extractor out of PLA this AM. Watched as it laid down the first dozen layers & went off to run some errands. Came home to a screen saying 80% done, but there was a couple of inches of open air between hot end & print. Extruder still spinning, but nothing coming out.
A some remnant bit of overcooked material must have worked loose in the nozzle & morphed into a full clog. Not really that unusual as I've been swapping between PLA+, TPU & PLA (all at different temps) a few times since the last real hot end clean out. Backed out the filament, pulled the nozzle & ran tube through the hot end a few times. Not a whole lot of gunk getting removed but did notice a very tacky feel to the tube when it came out. The bowden tube end itself was not blocked, but was discolored (nearly black) & very sticky so I trimmed it back to a point of normal color then wiped it down with alcohol. I'm beginning to think I need to keep a 4mm bore brush with the machine for detail cleaning the hot end - .17 caliber would probably work. Any way, after cleaning things up, I put in a new nozzle, refitted the bowden & then reran the mesh build in case I jacked something up in the process. That done, I reloaded the filament & restarted the print. So far so good after about 3 hours ... but I still haven't passed the point where the last one failed (until it does, there's a nagging thought there might have been jacked up G-code that'll be rattling around the back of my head). |
|
|
|
|
[#39]
Is the bowden tube supposed to go all the way thru the hot end/heat break throat and touch the back side of the nozzle?
Took mine apart to clean out a clog and noticed that the hole in the heat break throat is tapered. It is too small at the nozzle end for the bowden to go all the way thru. Ender 3 Pro. Seems to be printing fine but just wondered. |
|
|
|
|
[#40]
Bowden tube end should butt up against the nozzle end unless you are running an "all metal" hot end where the heat break has a receiving "cup" for the Bowden tube. Some designs ( not ender) use heat breaks with an integral ptfe lining separate from the bowden.
|
|
|
|
|
[#41]
4 1/2 hours in & things looking OK.
Laying down regular solutech PLA for a filter holder (sheets of activated charcoal impregnated foam) for a solder fume extractor. It will get mounted to a plenum I was using with a couple of 80mm fans that is now surplus due to an upgrade on the enclosure. |
|
|
|
|
[#42]
Just finished the last of the parts for this today. Gonna go fly it tomorrow.
Parts for adding floats to it are printing now. |
|
|
|
|
[Last Edit: nikdfish]
[#43]
After finishing the filter box,
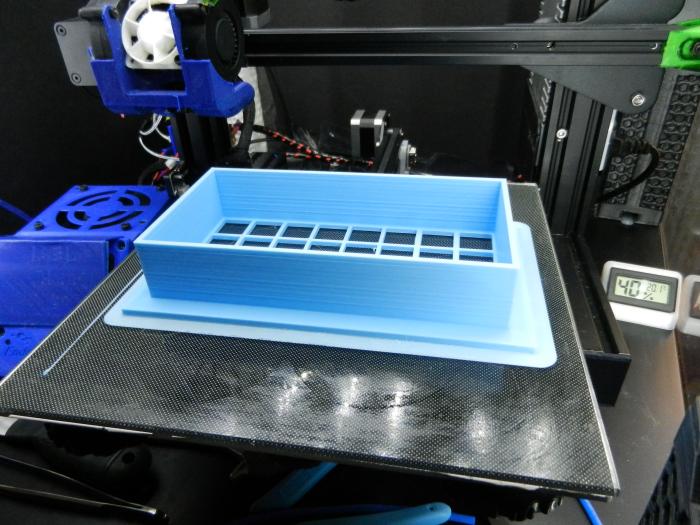
I did an inset retainer with the same grid pattern that holds the filter media in place. 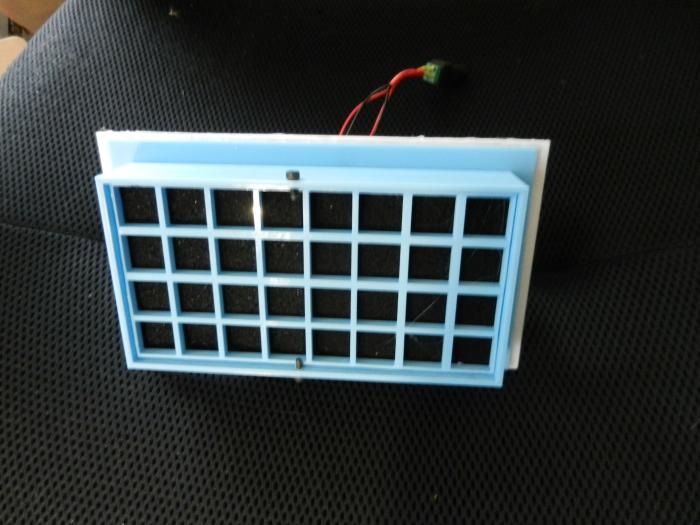
The assembly uses a dual 80mm fan plenum assembly with a couple high volume 12v fans. I previously used it to pull a negative pressure on the Ender 3 enclosure, blowing into a couple of stacked HEPA media. It became available surplus when I switched to a radial blower for better static pressure & less noise. 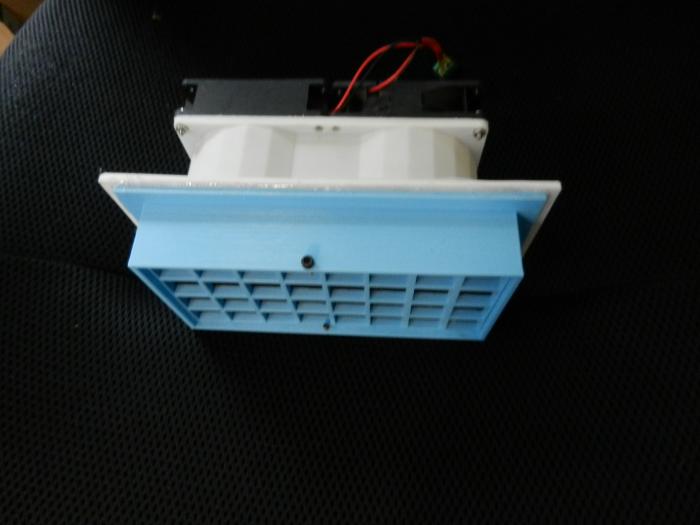
This does a really good job of pulling soldering smoke/fumes into the filter media when placed adjacent to the soldering operation. Between folding & stacking, there are 6 layers of activated charcoal impregnated foam sheet filter media. |
|
|
|
|
[#44]
Originally Posted By nikdfish:
I previously used it to pull a negative pressure on the Ender 3 enclosure, |
|
|
|
|
[Last Edit: nikdfish]
[#45]
Originally Posted By gman350:
What are you using for an enclosure? The wife had concerns about the UFP & "plastic dust" production so the blower/filter thing is to slow them down enough that they condense & fall out rather than get broadcast while still getting enough air flow to moderate the heat build up. It seems to do pretty well. Enclosure temps tend to stay below 30°C. 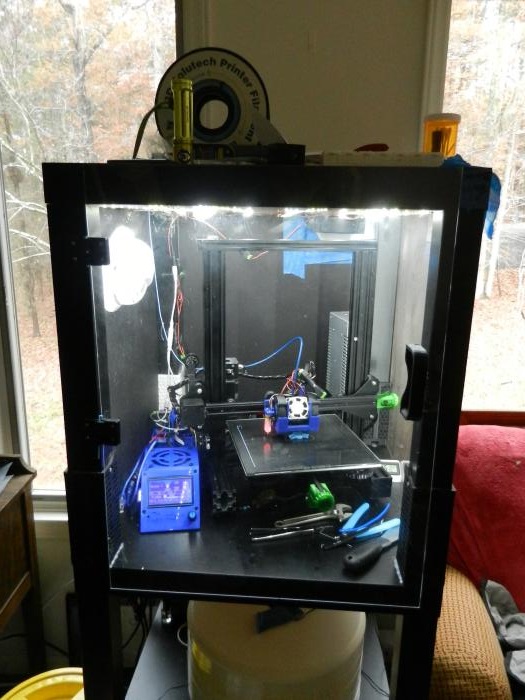
|
|
|
|
|
[#46]
pogo adapter for testing some of my PCBs. The pogo pins are 1mm diameter, pins drop in easily, but with enough resistance to have zero slop. Stuff like this is where ultra-precise printing comes into play for me, and why you never design circles into stuff that is meant to be 3D printed...

|
|
|
|
PA, USA
|
[#47]
If I need a tight tolerance hole, have had pretty good results friction reaming.
Pretty much just take a metal rod the size you need, round off one end a lil, chuck in drill, and let it do the work as you go through the hole. Basically melts and pushes the hole into size/shape without removing any material. |
|
|
|
[#48]
Almost! M&P .22 pistol magazine rack. it's actually functional as is, but not good enough for the feature photo when I upload it.
|
|
|
|
|
[#49]
I printed thing 3516599 last night while I was sleeping. I'll post pics when I can seek a couple of minutes.
|
|
|
|
|
[#50]
No more headphones on the desk or floor. Just occurred to me I have a printer sitting here, may as well print something functional. First dip in to Tinkercad.
|
|
|
|
 Win a FREE Membership!
Sign up for the ARFCOM weekly newsletter and be entered to win a free ARFCOM membership. One new winner* is announced every week!
You will receive an email every Friday morning featuring the latest chatter from the hottest topics, breaking news surrounding legislation, as well as exclusive deals only available to ARFCOM email subscribers.

AR15.COM is the world's largest firearm community and is a gathering place for firearm enthusiasts of all types.
From hunters and military members, to competition shooters and general firearm enthusiasts, we welcome anyone who values and respects the way of the firearm.

Subscribe to our monthly Newsletter to receive firearm news, product discounts from your favorite Industry Partners, and more.
Copyright © 1996-2024 AR15.COM LLC. All Rights Reserved.
Any use of this content without express written consent is prohibited.
AR15.Com reserves the right to overwrite or replace any affiliate, commercial, or monetizable links, posted by users, with our own.


