


Posted: 8/9/2014 3:43:08 PM EDT
|
What does the hive recommend for soldering surface mount components?
Is the hot air gun method a good option? |
I've used this, but on only one or two SMDs.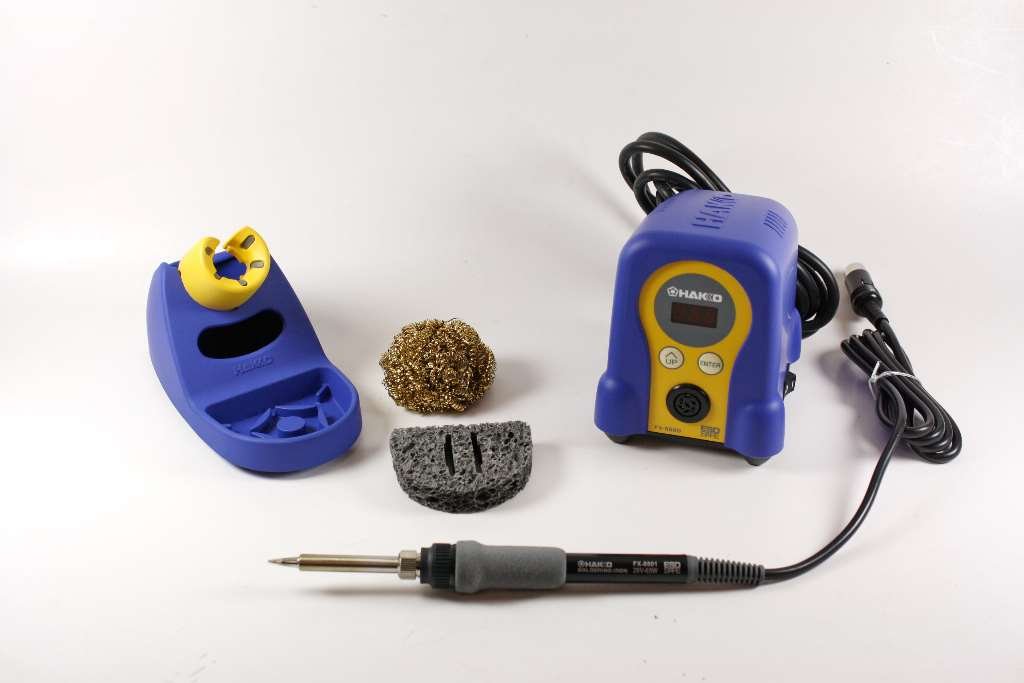 They had a video showing a technique wherein you would put flux all over the contacts, heat up a leg, then drag solder over it. The flux would move out of the way on that leg, and prevent a solder bridge. I just carefully heated each leg and used very thin solder. I found it wasn't nearly as hard as I was afraid it might be. ETA: I did purchase a very fine replacement tip as the one that comes with the station is for general soldering. |
|
Welcome to the old eyes club!
I use this: http://www.amazon.com/SE-Headband-Magnifier-Illuminated-Acrylic/dp/B000TT66E6/ref=sr_1_3?s=hpc&ie=UTF8&qid=1407630811&sr=1-3&keywords=head+visor+magnifier And this: http://www.amazon.com/Professional-Spring-Arm-Magnifier-Lamp-Extra-strong/dp/B00AO89Y7S/ref=sr_1_7?s=hpc&ie=UTF8&qid=1407630875&sr=1-7&keywords=magnify+lamp Sometimes BOTH at the same time! |
|
We had a hot air station at work for a while but I never got a lot of opportunity to use it. I believe it's the best option for removing IC's, but they can be taken with an iron.
If you have the budget, a 10x stereo microscope and metcal solder station is the top of the line. For those of us not made of money, a 5x Donegan opti visor with the little flip-down auxiliary lens, and temperature controlled station. I like Edsyn, and latest models from Weller are really good. Choose a tip and solder about as wide as the parts. A couple pair of fine tweezers. Get some straight ones and some right-angle ones. Also, a healthy dose of patience. Plan on giving up coffee.  . Don't sneeze. It's very easy to overheat these parts so take your time. . Don't sneeze. It's very easy to overheat these parts so take your time.
There's a system called ChipQuick that uses a low-temperature alloy trick to remove parts. They offer free samples on their web site. Say, your wife, GF, kids, friends, and buddies need samples, don't they? Some fine pitch solder wick is good for clean up and removing parts. It's VERY easy to burn pads off SMT boards since they are small and only have limited adhesion to the substrate. There are a few tricks I use: - Align the parts on their pads visually. They don't have to be perfect. But it sure looks nice when they are. - For 2 lead components like R's and C's, I LIGHTLY tin one pad. Then align the part and heat the tinned pad to anchor the part while pressing it down with your tweezer. Apply solder to the other lead, then re-solder the first lead to get a good fillet. Trying to solder one lead at a time leads to "tombstoning" (part stands up under solder surface tension) and frustration. - IC's are similar, tin one pad (one pad Vasili, one pad only) and use it to anchor the part while pressing down. This will keep the part flat on the pads. Now go around and solder each lead, and don't forget to add solder to the original anchor pad. Trying to tin all the pads will leave them at uneven heights and make it hard to get good fillets. - If you bridge a couple pins, use the fine pitch soder wick to clean up. To remove R's and C's, sometimes both pads can be heated with the iron by careful positioning. |
|
Yep, Optivisor.
I use the 2.5x, but sometimes wish it was a little stronger. |
|
Hot air station
Solder paste Magnification Board Holder I bought the cheap hot air station on amazon, one of those harbor freight circuit board, and a clip on magnifier (the head one posted earlier). Built a Peaberry and a Softrock with it with only a few issues, because I'm stupid and burned my fingers, lol. |
|
Small soldering iron.
http://www.ngineering.com/soldering.htm And you want the spade tip listed under the iron. |
|
Quoted:
Hot air station Solder paste Magnification Board Holder I bought the cheap hot air station on amazon, one of those harbor freight circuit board, and a clip on magnifier (the head one posted earlier). Built a Peaberry and a Softrock with it with only a few issues, because I'm stupid and burned my fingers, lol. And flux. Liquid based flux. Do not get water based flux, get a no-clean variety. Use it and your life soldering/reflowing IC's and other SMD devices will be much easier. Even though it says no-clean you will still want to clean up with some alcohol. Hot-air rework stations are the best but way pricey. A stereo-microscope is usually a requirement too. Oh, stay away from lead-free solder if possible. It has higher working temperatures and is a pain to get nice joints with. |
|
SOLDER WICK. Get it. You can then do a crap job soldering, suck up the excess, and have a perfect job soldering. A small iron is fine for onesie-twosie work. If you're doing a bunch, get some solder paste and toss the work into a toaster oven. That's how I make my boards as seen in this older thread. Every solder joint in the pics I posted is paste solder in a toaster oven, all done at once. From doing rework like swapping out resistors and such, I learned the braided solder wick trick works great. |
|
Best approach I've used is to solder just one SMD pin to the PC board, so that it holds the SMD in place until the rest of its pins can be soldered:
First, I melt a small droplet of solder on one pad on the PC board, before the SMD is there. Next, I place the SMD on the board, heating the solder droplet so that it wicks up on the SMD pin - and then remove heat so that the droplet can solidify. After the droplet solidifies, the rest of the SMD pins can be soldered to the board. |
|
Quoted:
Best approach I've used is to solder just one SMD pin to the PC board, so that it holds the SMD in place until the rest of its pins can be soldered: First, I melt a small droplet of solder on one pad on the PC board, before the SMD is there. Next, I place the SMD on the board, heating the solder droplet so that it wicks up on the SMD pin - and then remove heat so that the droplet can solidify. After the droplet solidifies, the rest of the SMD pins can be soldered to the board. This |
|
Quoted:
This Quoted:
Quoted:
Best approach I've used is to solder just one SMD pin to the PC board, so that it holds the SMD in place until the rest of its pins can be soldered: First, I melt a small droplet of solder on one pad on the PC board, before the SMD is there. Next, I place the SMD on the board, heating the solder droplet so that it wicks up on the SMD pin - and then remove heat so that the droplet can solidify. After the droplet solidifies, the rest of the SMD pins can be soldered to the board. This This - but with the additional note of putting flux on the PCB before you place the SMD part - it's a detail but an important one as it's what allows the solder to flow beautifully. |
|
Quoted:
I've used this, but on only one or two SMDs. http://ecx.images-amazon.com/images/I/5141xE98l0L._SL1500_.jpg http://www.amazon.com/Digital-FX888D-CHP170-bundle-cutter/dp/B00AWUFVY8/ref=sr_1_1?ie=UTF8&qid=1407628125&sr=8-1&keywords=hakko I have this exact soldering iron and love it. They had a video showing a technique wherein you would put flux all over the contacts, heat up a leg, then drag solder over it. The flux would move out of the way on that leg, and prevent a solder bridge. I just carefully heated each leg and used very thin solder. I found it wasn't nearly as hard as I was afraid it might be. ETA: I did purchase a very fine replacement tip as the one that comes with the station is for general soldering. Posted Via AR15.Com Mobile |