


Posted: 9/20/2011 6:06:28 AM EDT
|
Clamp N-connector
LMR-400 Coax Clamp connector specs Followed these instructions 
Okay, so I've got that antenna, coax and connectors. They're going at the top of a 40' collapsible/tilting Aluma tower that I got off of craigslist. I used the specs listed on the website for the clamp to try and install the connector. And when I went to tighten the connector together it just fell off. I'm thinking that I didn't do a good job of spreading out the braid on the shield? Is it the braid that is really getting clamped that holds it all together? Why do the dimensions for stripping the coax on the connector site not coincide with any measurements on the amphenol site? |
|
Quoted:
Clamp N-connector LMR-400 Coax Clamp connector specs Followed these instructions http://www.rfparts.com/diamond/picts/x500hna.jpg Okay, so I've got that antenna, coax and connectors. They're going at the top of a 40' collapsible/tilting Aluma tower that I got off of craigslist. I used the specs listed on the website for the clamp to try and install the connector. And when I went to tighten the connector together it just fell off. I'm thinking that I didn't do a good job of spreading out the braid on the shield? Is it the braid that is really getting clamped that holds it all together? Why do the dimensions for stripping the coax on the connector site not coincide with any measurements on the amphenol site? Could be different brands have a different clamping scheme. Use dimensions from the connector mfg. |
|
The braid goes over the little ring ring, the threaded nut pushes the ring up tight against the inside of the body of the connector locking the braid in place.
Pic from DigiKey showing the relationship of the parts without the cable... 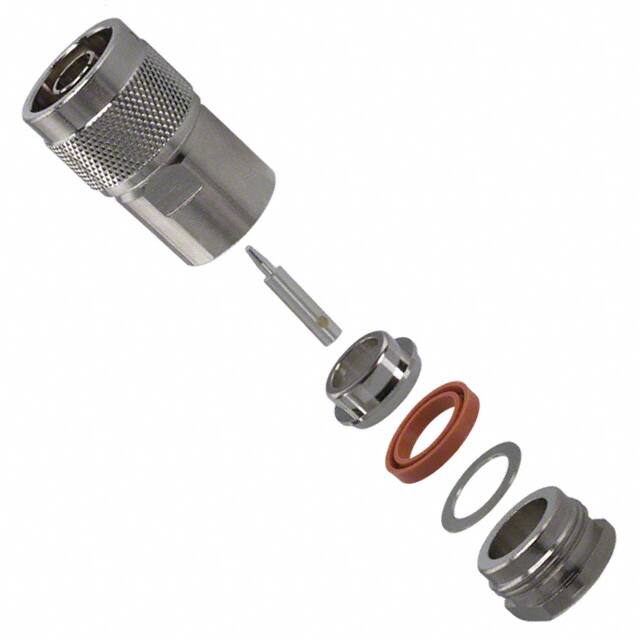
The braid should wrap over that top ring and go down the sides, you can see the space for it, but should not go over the lip towards the bottom of that ring. The cable will pull right out of the connector until the nut is fully tightened down - what attaches the connector to the cable is the clamping action between that clamp ring which is pushed into place by the threaded nut and the inside of the connector. |
| Thanks your picture and description helped me visualize it better when I went out tonight to fool with it. I cut off the end of the coax and will try again. I think the braid was too far gone after I played with it again. Will try and unsolder the tip and reuse? |
|
Quoted:
Thanks your picture and description helped me visualize it better when I went out tonight to fool with it. I cut off the end of the coax and will try again. I think the braid was too far gone after I played with it again. Will try and unsolder the tip and reuse? see the dimensioned diagrams about halfway down this thread: http://www.ar15.com/forums/t_10_22/646903_Iandapos_ve_realized_Iandapos_m_andamp________in_the_wind_trying_to_solder_ends_on_coax.html ar-jedi |
|
Quoted:
Thanks your picture and description helped me visualize it better when I went out tonight to fool with it. I cut off the end of the coax and will try again. I think the braid was too far gone after I played with it again. Will try and unsolder the tip and reuse? Yes, unsolder it but don't crack the hole sides or use excessive heat. |
|
The most common mistake people make when trying to install clamp type connectors is trimming too much jacket material, so that too much braid is exposed. The crimp ring sits on the cut end of the jacket then the braid folds over it... so you really only need like 3/16"-1/4" of exposed braid.
The way the typical instructions say to prep the cable ends up with the braid way to long, they say "trim the braid to length" but that is just a PITA. I take the opposite approach which I find to be much easier, which it to trim the center conductor to length as needed. I just cut through the jacket and braid with a cutter or sharp utility knife roughly 1/2" from the end of the cable, then go back ~3/16" and cut the jacket only. Pull all that apart, then I shake my head at forgetting to put the nut, washer and gasket on first, put them on carefully, then put on the crimp ring and fold the braid back over it and fan out the braid so that it's smooth around the ring. When that all looks right, I'll then have more than 1/2" of center conductor sticking out... so I trim the center conductor to the right length and put the center pin on and test fit it into the connector body to make sure everything is right. You can cut the center conductor a little long at first and test fit a few times to get it trimmed back to the right length if needed. Then pull it apart, solder on the center pin, then reassemble and tighten down the nut and it's done. |
|
Quoted:
The most common mistake people make when trying to install clamp type connectors is trimming too much jacket material, so that too much braid is exposed. The crimp ring sits on the cut end of the jacket then the braid folds over it... so you really only need like 3/16"-1/4" of exposed braid. The way the typical instructions say to prep the cable ends up with the braid way to long, they say "trim the braid to length" but that is just a PITA. I take the opposite approach which I find to be much easier, which it to trim the center conductor to length as needed. I just cut through the jacket and braid with a cutter or sharp utility knife roughly 1/2" from the end of the cable, then go back ~3/16" and cut the jacket only. Pull all that apart, then I shake my head at forgetting to put the nut, washer and gasket on first, put them on carefully, then put on the crimp ring and fold the braid back over it and fan out the braid so that it's smooth around the ring. When that all looks right, I'll then have more than 1/2" of center conductor sticking out... so I trim the center conductor to the right length and put the center pin on and test fit it into the connector body to make sure everything is right. You can cut the center conductor a little long at first and test fit a few times to get it trimmed back to the right length if needed. Then pull it apart, solder on the center pin, then reassemble and tighten down the nut and it's done. VERY good description. One more thing shown to me by a guy that does N's daily, after soldering the center pin, grip it with pliers and give it a light pull test. |
|
Quoted:
One more thing shown to me by a guy that does N's daily, after soldering the center pin, grip it with pliers and give it a light pull test. If you really want to be sure and you have the right crimp tool, you can crimp the center pin on before soldering. |
|
So, as a guy who has a lot of LMR240, am I pretty much screwed on hopes of getting a waterproof connection using N-type connectors, unless I want to apply coax-seal or something else to my connections?
http://www.mouser.com/catalog/catalogUSD/644/2462.pdf Amphenol's page only shows 82-6106 and 82-6152 being available for LMR240, and neither looks anything like what ar-jedi posted on that archived thread. Should I even bother ordering those N-connectors, or should I just fall back to using PL-259s? Some back history - I'm getting ready to install an antenna on my roof, and the only things I have to get yet are lightening arrestors and connectors. Due to my ability to read the descriptions of what I was actually ordering, I ended up getting 3 x N-type female ends, and 3 x N-type bulkhead female ends. If I would have caught that, I'd have 3 male ends, instead of 6 female ends.  O'well... It would have been those goofy 2-part soldering ends anyway, and not a normal N-type connectors.. But now it seems that even Amphenol doesn't make normal N-type ends for LMR240 anyway. O'well... It would have been those goofy 2-part soldering ends anyway, and not a normal N-type connectors.. But now it seems that even Amphenol doesn't make normal N-type ends for LMR240 anyway.
H. |
|
Quoted:
So, as a guy who has a lot of LMR240, am I pretty much screwed on hopes of getting a waterproof connection using N-type connectors, unless I want to apply coax-seal or something else to my connections? http://www.mouser.com/catalog/catalogUSD/644/2462.pdf Amphenol's page only shows 82-6106 and 82-6152 being available for LMR240, and neither looks anything like what ar-jedi posted on that archived thread. Should I even bother ordering those N-connectors, or should I just fall back to using PL-259s? Some back history - I'm getting ready to install an antenna on my roof, and the only things I have to get yet are lightening arrestors and connectors. Due to my ability to read the descriptions of what I was actually ordering, I ended up getting 3 x N-type female ends, and 3 x N-type bulkhead female ends. If I would have caught that, I'd have 3 male ends, instead of 6 female ends. O'well... It would have been those goofy 2-part soldering ends anyway, and not a normal N-type connectors.. But now it seems that even Amphenol doesn't make normal N-type ends for LMR240 anyway.
H. Both of those are "crimp" type connectors, not the clamp style previously discussed in this thread. I don't know about Amphenol but RF Industries does make clamp style connectors for LMR240 (RFN-1004-1SX). No connector in and of itself should be considered waterproof/weatherproof for long term outdoor use. |
|
Quoted:
So, as a guy who has a lot of LMR240, am I pretty much screwed on hopes of getting a waterproof connection using N-type connectors, unless I want to apply coax-seal or something else to my connections? http://www.mouser.com/catalog/catalogUSD/644/2462.pdf Amphenol's page only shows 82-6106 and 82-6152 being available for LMR240, and neither looks anything like what ar-jedi posted on that archived thread. Should I even bother ordering those N-connectors, or should I just fall back to using PL-259s? Some back history - I'm getting ready to install an antenna on my roof, and the only things I have to get yet are lightening arrestors and connectors. Due to my ability to read the descriptions of what I was actually ordering, I ended up getting 3 x N-type female ends, and 3 x N-type bulkhead female ends. If I would have caught that, I'd have 3 male ends, instead of 6 female ends. O'well... It would have been those goofy 2-part soldering ends anyway, and not a normal N-type connectors.. But now it seems that even Amphenol doesn't make normal N-type ends for LMR240 anyway.
H. In my opinion, sealing the connectors is orders of magnitude easier than installing the connectors themselves. So don't let the sealing aspect stop you from anything. |
|
Quoted:
So, as a guy who has a lot of LMR240, am I pretty much screwed on hopes of getting a waterproof connection using N-type connectors, unless I want to apply coax-seal or something else to my connections? Times-Microwave is the maker of LMR240. they also make N connectors for LMR240. for a clamp N plug (male end), you want TM part number TC-240-NMC = catalog number 3190-244. drawing http://www.timesmicrowave.com/downloads/drawings/3190-244.pdf installation http://www.timesmicrowave.com/downloads/install/in-244.pdf to seal, just use a piece of heat shrink tubing. ar-jedi |