


Posted: 12/27/2010 9:28:13 AM EDT
|
What to do with 10 shipping containers (8x40)? Lets say you guys have the the skillset to configure a new type of BOL, homestead, everyday home out of the shipping containers. how do you guys think you might set it up?
Example: would you configure a few as a main living quarters then some as out buildings, maybe bury a few as bunker types. or maybe set them on a traditional type basement9maybe a bit bunkwerfied), or slabs. Lets hear your ideas. this is just a kind of experment i been thinkin about. |
|
Make a square. On one side of the square use a couple to make a C which you can cover for parking and what not. Does not really have to be on the ends of the square either, could make it wider or shorter. Since 8 ft is narrow in my opinion I would probably use at least one or two to make either 2 16 ft deep living areas or one 24 ft living area. Since they are like big legos the rest probably go up on the others for a party deck, shooting deck, observation deck, or whatever. I also tend to like how 20ft containers go on 40 ft containers so might even buy a container. As far as burying one, I don't think they compare well to how easy it is to dig a hole, make some forms, and pour some concrete and the concrete can have a poured roof strong enough to park a truck on or whatever. If the containers were free and I had the equipment I could somewhat see digging a hole to sit one in or just earth berming it and stacking one on top of that one. Containers take a fair bit to water proof and the roofs are not made to support dirt, they are made to be stacked with other containers and the roof takes a lot of work to be able to just bury a container. Location and land layout determines burying stuff or digging holes and pouring concrete. And while people poo poo the open middle for a small yard and what not I rather like a well protected small yard for private time and the nice big woods for playing in. And this winter with all the winds we are having I would love the protected areas the C area would offer for parking and what not. To some extent I can't see needing that much storage room and I would use em more like legos at the end I guess but I always liked the square setup for a small yard and I like the C area with walls for the weather protection and because you can roof it over or whatever. |
| If selling them would net you $ for the building materials to create the same size structure out of wood.. maybe...If your using them as a secondary or remote home I say go for it...if you need to move it and know someone with a crane or excavator..you could move your dwelling to anothe rlocation on the property or just take it with you. I have seen several websights on people who use them for dwellings and they come out quite nice. Paint them with zinc cromate or another paint protective...bed liner?...it would be hard to beat the maintence free aspect. |
|
Quoted:
Quoted:
go to this site for some ideas...its not bad..containerbay.com Can't find this site... containerbay the container style living reminds me of the flats in all the commie countries. its amazing how well it is accepted here. |
|
Form square. Make a container roman villa, roofed with a pole-barn type structure over much of the courtyard, with an open center.
I was doodling ideas sometime back for container structures, after seeing the Haiti devastation and hit on an idea for a modular setup for using (4) containers to make a secure structure for a few dozen people (or more). Most of the plumbing and sewage was in the front unit, with adjacent units (sides of the squae) tying in for lavatory facilities. The back building is full dorm and stowage. These quad-buildings could be pre-made as sets and dropped on any disaster zone. Rig them along a 'company street', preferably with a slope, place a large water bladder at the top of the hill and a sewage catchment at the bottom. Let gravity do the distribution of potable and brown water. I've got some sketches around here, will scan them in a bit. eta - put some backflow preventers on the PVC plumbing, 200gal+ poly tanks on the roof, bulldoze / scrape an area clean, grade a road, dig a trench / gutter and lay down a small PVC water main and a larger sewer main. Backfill most of the thrench. Mostly to prevent idiot mischief or damage to the lines. Feed potable / purified water from a secured location. Use gutters on the roofing, feedign to poly cisterns on the interior corners. Build the roof at such a heigh and angle that cross breeze still get thru, but container-climbing intruders can't readilly menace the inhabitants without scaling onto the tin roof, those exposing themselves from below. Make exterior windows high narrow and small to maintain a secure perimeter. Make the entryway / foyer the young male dorm, so they can more readily detect / fight intruders. Put family units in partitioned areas in the side wings. single women's dorm to the rear of the courtyard. extra folk and storage in the enclosed courtyward. Food stores in the back corners to help keep them secure from a snatch and grab. Put the rudimentary kitchen in the front corner under the water tank. Gravity feed from the roof tank, which is gravity fed from the main supply. If the main supply is breeched or the supply lines cut, still plenty of water in the unit.  
You could house a lot of people in there, for a long time if necessary. Very rudimentary setup, maybe $1500 per quad for plastic sinks and toilets / showers. Plus the cost of the containers. A few hours with plasma cutter and a bit of machinery to create each unit. weld on hinges, cut windows and doors. Weld on some expanded metal mesh to keep anything from being thrown in the exterior windows. Cut much larger window-shutters on the interior, so the thing is much more 'airy' on the interior courtyard. They'd make an awwesome 'base camp' setup, or a deployable semi-permanent structure for base or hunting camps or medical relief operations, or refugee accomodations. The poor stupid fuckers in Haiti are still living and dying in tarp tents a year later. It's atrocious that they haven't done more for themselves, and that they haven't received more help in all this time. Meanwhile these containers lay fallow in ports all over the world. They should be put to good use by somebody. |
|
Quoted:
Quoted:
Quoted:
go to this site for some ideas...its not bad..containerbay.com Can't find this site... containerbay the container style living reminds me of the flats in all the commie countries. its amazing how well it is accepted here. (shrug) Maybe you should look past the superficial appearances and realize the difference is between mass govt coercion and preppers exploring options for low-budget / durable accomodations in an emergency. There is a LOT of difference between what is being discussed and shit like Soviet state apartments or Cabrini Green AND it is all relative, which is worse -     
There are awesome things being done with these containers, the only limit is imagination (and money). And intent. |
|
back to the OP's original question.
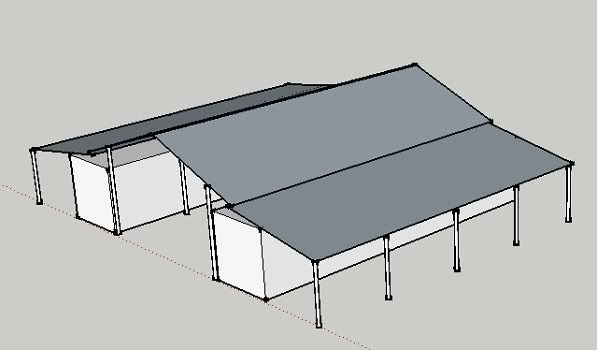
Quite some time ago I saw a topic about a guy that built a barn using a pair of shipping containers as the long side walls / storage wings, with a betn pole-barn roof structure. It looked really nice when it was done. IIRC the roof even extended beyond at least one side for more parking area under cover. Another idea is build a two-story 'fort'. Four containers on the ground butted up tight to each other. Second story aligned on the bottom four, but offset overhanging the exterior by 3'. Gives you an interior shelf for a walkway, put staircases in the interior atrium corners. Cover it all with a hip roof overhanging another foot or more, with a non-obvious open center. Overhung so that any flammable thrown on the roof which fall short of the opening wind up running off and onto the ground outside the walls. You'd have 3' gaps at the four corners of the second story, but those can be closed with material removed from atrium-facing walls for doorways and such. I've been farting around with Google's 'sketchup' application, it's got some real neat features and promised ease of use. I'll see if I can whip up some illustrations of these concepts. eta - 20mins of fumbling around with a tool I haven't got an hour's time on - 
That's about 2400sq' in container floorspace and nearly a 1000sq' as an atrium. Get real fancy and stand a container up on end and make a watchtower / keep out of it. (4) 20' containers, 1 at each corner would be a hoot. eta2 - use a railway freight car and you've got two sets of doors big enough for a vehicle to drive thru, as your 'castle gate'. eta3 - set the bottom deck into the earth ~2-3' and you've still got a structure tall enough to repel boarders, with a built in 'trench' on the bottom floor. Put in some firing loupes at ground level. Same as carpentry, the difference between a fine cabinet and a pile of tinder is where you make the cuts. You're grading anyway for a level base, just do it a foot lower and pile the removed soil back up around the exterior base. Same with stacking the containers. You've got to lift and fix them together anyway, so why not offset them and thereby creat a scaling obstacle as well as make possible 'murder holes' above your entrances. And create the interior walkway. (10) containers is 400 linear feet of 8' high steel wall. That's a lot of opportunity to do something interesting with. You could arrange them in a large outlined T-shape, three C-shaped courtyards which touch on their corners to create an even larger central space, with the tenth container where the fourth lobe would be, closing off the exterior wall. You could shelter a heck of lot of people and their goods in such a space. Roof it so all the drainage is towards the interior, to gutters and rain barrels or a larger tank buried as a cistern. |


|
Great ideas if $$$ is not an issue and winding up with a tight, difficult to use living space is acceptable.
Guys, an 8 foot container that works out to be less once you consider the corrigations and other things, is a really small dimension, unless you're a midget and not expecting much company. Trying to fit containers into an floorplan that involves the normal insulation, HVAC, electrical and plumbing, creates a multitude of problems that might be less expensive addressed using standard practices. Having said that, containers are wonderful for expedient space- for many purposes, if you don't want to and don't try to make the result look like what we 'generally think' of as 'normal' living space. If they were you would see them built up a lot more than you do now. |
|
I have been interested in containers for a long time. I have surfed the web and seen really neat things done with them. There was one house built entirely of containers in Ca that was very slick, with all kinds of decks and cantilevered design going on. Sides were dressed in stone and wood. I'm pretty sure it cost as much as any kind of traditional build, but it was pretty wicked.
In Germany I have seen modular work site headquarters made from 20' containers stacked around the work site. They had windows and wall unit heaters/air conditioners as well as steel catwalks and stairs (all external). I watched one day as they set up a two story container "office" around a work site. It only took four guys and a crane to get it set up and only took them about three hours to do the rough work. I'm sure it took longer to get all the wiring and plumbing dialed in. But it was very cool, and had me thinking about container structures for quite a while. Like building with Leggos. I think containers could be a very good vehicle for the skilled do it yourself type. And the variations are endless. You would only be limited by your budget, skills, and imagination. For instance, wider rooms could be had by welding two containers together and cutting out sections of the adjoining walls. There was a really good build thread here from a guy that built a shop and man cave under the guise of a "storm shelter". It was very nice work and I would not mind having it on my lot one bit, it looked that good. Was complete with solar and wind power. Read another article about an Australian who had designed a disaster shelter using 20' containers. Could be used to provide housing in Haiti like disasters and could house a family of four. It was done up much like a camper with a lot of folding and multi purpose stuff. The build out cost (less the container) was around 5K, a hell of a lot less than was spent on those FEMA trailers. They were fairly primitive, but better than using an old blanket for a tent. There is a crap load of stuff out there on containers, and they do seem to have a lot of potential. I would probably start out small, with a 20' one and build out a shed/man cave first. Just to get a feel for the work involved and the costs. stasiman |
|
i been toying with the idea of something RichR posted but with traditional type building materials for the second floor with the court yard being complely indoor. but with the first level of containers well below grade. the bottom containers wouldnt be completely buryied just below grade and used as storage and saftey rooms. and using the 2 other containers for a garage type described by another poster. one container on each side that would be brokin down into workshop space and cold storage inbetween. Edit: 20 20ft containers can be used or any combonation if 40 and 20 footers
|
The barn structure I mentioned earlier looked a little something like this:
I mistakenly used 16' lengths (width of the roof sections) in my sketch, seems a common length is 12'. The idea being to create a design that has a minum of cutting / zero waste. Depending on your desired roof clearance, desire for opening or vents along the edge of the peaked roof, above the less-sloped extensions, etc. etc. Trying to tie the idea together in a way that minimized the amount of supporting pole / beam structures. while providing sufficient exterior side spaces for vehicle parking, storage, paddocks, whatever. You could close the back with a container, forming a 'U' of containers. They are like legos. They ways they can be arranged are limitless. I really liked the other topic, about the hunting / bugout with the three containers side by side, the interior shielded by the closed and locked doors. Seemed casual-vandal resistant. nd yeah, no one wants to live in a square tube long term. I'm still coming at this from teh idea of them being rapidly deployable, or quick to stand up in an emergency or post-disaster scenario. They'd make excellent products for disaster relief. And good accomodations (again) for anyone who's lost everything. Sure, the modern fat and sassy american isn't going to like it. Or live like a prepackaged sandwich at the Automat, in a stack of the things. But again, look at them for what they are. FAST, fairly durable, within certain parameters and in certain areas inexpensive and readily used. Strucural enough to lend themselves to a variety of uses, quickly. They'd make a great tornado shelter, buried flush with the ground in dry soil / well above the water table. Just don't put any overburden on them. The flats of the sides / roof aren't meant to take any significant burden. But I could sure see temporarily shoring up the ceiling and pouring a reinforced concrete lid on one, in shallow lifts. Heck, cross-shore it side to side, dig out your trench with a foot of clear space on each side of the container, block each end up, and fill the side gaps with concrete. That's 12yds a side, ~10yds a truck / ~~$1000 / truck. Call it high $4000 to encase it in a foot of concrete on three long sides, to make a nice bunker. Then you can pile on your overburden. Sure, yeah, you can build comparable structures from scratch for the same money, maybe 20% less?? But can you do it as fast, or as readily, without a lot more help / intrusion / nosy neighbors? A Container is a form seeking a function. Particularly after it washes up on our shores and sits empty for a while. Re-using them has some appeal. I've read of them being used upside down as quarters in Iraq bases, dur to their heavy hardwood floors. Surround the walls in HESCOs cover the roof in a few layers of sandbags, and they're a cozy dugout. But that would be a real eyesore for the neighbors were one to try it stateside. |
|
I had three of them built up for disaster recovery- 2 bed rooms (intended for 2 persons/each), a common "bath" (space for a chemical toilet, and including a sink and shower going outside plus a 55 gallon water drum, electric tankless heater and sureflow pump. 100A service. Each bed room has a window AC window with shutter, blackout curtain, plus 2" slatted blinds, and the end of the container had a 6x8' storage room with work bench (one unit had 150A service for a (bring your own) welder and had a drill press, drill sharpener, and belt sander, drop light, extension cord reel, air compressor, battery charger and jumper cables.)
Each unit has a big SO cord so it could be wired to a generator or to a building. The reason to build this in a Conex container was to make maintainance easier. There are no axles or hidden mechanical equipment as on a travel trailer, it can't be stolen, and is more secure when installed. There are legal and organizational reasons why a Conex looks better on paper (no tag, title, no reason to capitalize it at full value, no fraud waste and abuse claims) The conex was build where it could be hosed out-Wood floors were painted, walls were FRP over plywood over furing strips with isonene foam. Bunk beads were SYP 2x4s, planed down to make square lumber, cabinets were all bich plywood with poly. (there was a locking cabinet and wardrobe for each person, and the assumption was the top bunk was really for suitcase storage. Much more durable construction than a travel trailer. Also one room in the one with the work shop was set up to be either a command room or bed room (military bunk beds + folding tables + white board and projection screen plus hanging shelf for projector, 2way radio on wall.) We still have a couple of RVs, and they are more self contained (onboard generator, cooking, propane heat, black and gray water), but more expensive, less secure, and every couple of years someone thinks they should be gotten rid of. Hurricane Ivan was the last time all have been in use. I lost the Conexes to Hati- we sent them over there for our people packed with gear. I'm not sure this would have been possable with a travel trailer. BTW, the breakdown was something like 14' for each room, 4' for the bath room, and 7' for the shop/storage. I've spend 2 weeks in one. |
|
That's an interesting way you fitted them CountryB.
Regarding the insulation of the walls, what was the thickness of the furring strips and what was the material? When we did ours not long ago, there was nothing I could find re a practical solution to insulation. So I ripped down pink rigid foam to fit the corrigations as best I could on a bandsaw and then inserted them and taped them in place with aluminum tape. Over the now somewhat insulated corrigations we placed 1/4" Astrofoil insulation and taped that. Then finished the sidewalls with 3/4" pink rigid foam and taped that in place. Wall coverings are simply 1/2" OSB, vertically, and attached to the walls with 1/4-20 screws located logically and used sparingly. The ceiling was similar, although I didn't use any OSB on it. I do get some condensation on the solid 'corners' that I left semi-exposed. This is when it gets below 25F. We've sort of solved that by putting 'collectors' under the corners and collect the water. I installed a nice sliding door in the front opening. A key objective was to maximize the width as it is narrow to begin with. We have lived in it for more than 4 months this year I'm guessing, comfortably. |
|
One more thing re furring strips.
I am a fan of them to improve the R factor of a space. The room I'm in right now I built about 10 yrs ago and used metal studs. I ran hat channel horizontally on the outside of the studs spaced 24" vertically. Then installed sheetrock. The R factor was dramatically increased over applying it directly against the metal studs, and the rooms are very comfortable. If we did another container, understanding the way we installed the insulation on the last one, I'd evaluate furring out the OSB about 1/4" with the Astrofoil strips to create another air space. I do get condensation on the ceiling 1/4-20 screws now and then but it hasn't been enough of an issue to put an insulated cap over them. |
|
seems very complicated / expensive. What sort of R-rating do you figure you got out of that? Could you get close to it just by furring with 1x3s on the interior peaks and laying something like simple R-11 between, accepting the compression adjacent to the furring to readily fill the 'valley' of the corrugation? Or if you were using metal studs, and already losing that much room-width, why not pack it with something higher like an R-19?
Or would a layer of radiant barrier be of use in such a sandwich? Likewise only furing on something like 32" centers and run the the OSB horizontally to span, thereby cutting the number of connections with the exterior skin in half. Or stick with the 1x3 furring and R-11, but cover it all with 1" of rigid foam before the OSB, as another way of breaking any heat conduction via more solid material contacts. Especially metals. 
I'm curious too, if you're using it in a vey cold environment, have you blacked the roof or walls? SImple paint would work, temp -wise, but a stretched / thin coat of something like Henry's asphalt emulsion would help with water-repelling and seal all the construction penetrations. (6) 5-gal buckets of that goo for a 1000sq' of walls and roof on a 40' container. Pretty spendy. Maybe half that if you go thin. Maybe just thick on the roof and paint the sides. /just throwing ideas out there. Not up to speed on prior efforts with these containers. Just looking for simple and cheap. |

|
Quoted:
seems very complicated / expensive. What sort of R-rating do you figure you got out of that? Could you get close to it just by furring with 1x3s on the interior peaks and laying something like simple R-11 between, accepting the compression adjacent to the furring to readily fill the 'valley' of the corrugation? Or if you were using metal studs, and already losing that much room-width, why not pack it with something higher like an R-19? Or would a layer of radiant barrier be of use in such a sandwich? Likewise only furing on something like 32" centers and run the the OSB horizontally to span, thereby cutting the number of connections with the exterior skin in half. Or stick with the 1x3 furring and R-11, but cover it all with 1" of rigid foam before the OSB, as another way of breaking any heat conduction via more solid material contacts. Especially metals. http://i875.photobucket.com/albums/ab319/richr1/shippingcontainerinsulation2.jpg I'm curious too, if you're using it in a vey cold environment, have you blacked the roof or walls? SImple paint would work, temp -wise, but a stretched / thin coat of something like Henry's asphalt emulsion would help with water-repelling and seal all the construction penetrations. (6) 5-gal buckets of that goo for a 1000sq' of walls and roof on a 40' container. Pretty spendy. Maybe half that if you go thin. Maybe just thick on the roof and paint the sides. /just throwing ideas out there. Not up to speed on prior efforts with these containers. Just looking for simple and cheap. Wow, where to start. The way you have it drawn isn't the way I did it. The corrigation 'pocket' is where the ~8 inch or so strip of pink insul is layed in and taped. The metal stud reference is to an entirely different location and I shouldn't have confused my post my mentioning it at this point. As far as putting fiberglass insul in the walls, I thought that would have cost an extra couple inches on both sides of the container. Possibly cutting strips of it [difficult precisely for the number needed but doable] and taping them to the corrigation pockets might be an alternative as you suggest, and an improvement over the way I did it. All construction penetrations are well sealed [my speciality The container shell is essentially a hermetic seal. There's no need for a coating with these containers and that would create a lot of problems on it's own. Best to make each penetration stand on its own. My goal was to make any furring do double duty as an insulating barrier and preserve interior dimensions. The screws do conduct heat and using SS would reduce that as well as a double block as you suggested. When I built it I was flying by the seat of my pants and I don't plan stuff like this out very far. 
My estimate is an R factor of 10 to 12. That might be optimistic. Furring out the inside flat of the corrigation 1/4" with a narrow piece of luaun or something has a lot of merit for the future. Bolt locations would have to be chosen carefully. IIRC, I did locate the OSB mtg bolts to the OUTSIDE of the corrigauions on the outside to use longer bolts and their reduced thermal conduction from being longer. Actually, I couldn't figure out how to make the cost any lower and still meet my objectives so I kinda threw $$$ at it and got 'er done. In about 1 week and a half for the walls, ceiling and insulation working out the details as I went. SO was a BIG help. It's very nice but still a work in progress. We just made a solar collector box for a 125 gallon poly farm type water tank and used a couple of window lights facing south to collect sun. Finished it about 3 1/2 weeks ago and have electronic IP temperature monitoring in the enclosure and in a 3/8" well inserted thru the cap into the tank. Now we have an ABUNDANT source of water during the snow time for showers, etc. I'm 1000's of miles away and just looked the temp monitoring system via the web and the tank is 40.5F, the enclosure inside is 39.7F and the container inside is 47.6F. I set the thermo for abt 45F. I'm going to start a topic on the solar box when I get around to it. I love this stuff... |

|
Here's what the window that allows monitoring over the web of the solar tank, solar box and inside of the container looks like.
The temperature readings are self explanatory. The two buttons on the bottom control 2 relays. They are wired to turn on and off the 110VAC inverter and to turn on and off an IP camera and an LED light to illuminate some backup thermometers and the inverter status, etc, via the video camera. All this anywhere in the world almost instantly. The control can email me if an exceedence is reached but I haven't been able to get that to work yet. 
|
|
I plan on starting a thread about remote monitoring of your SHTF stuff some day.
So, while I'm on the subject, there's another cam near the floor of the container just below my computer 'desk' where the power/battery/inverter stuff is located. Batteries are underground just outside to provide insulation from winter temps. There's a piece of pink foam over them and then a layer of snow -in the winter. They are well drained and protected. This pix is from that cam and has as it's purpose in life to show the status of the solar panels, the Outback FM60 solar charge controller, the electrical system in general, and a couple of temperatures. You can see today the solar panels collected 1 KWH of power, the peak voltage and current were 127 volts and 29.4 amps [from the charge controller into the batteries]. The max voltage was 15.2 and if the battery voltage exceeded 15.5 the Xantrex inverter would trip out and I'd either have to go to the mountain to reset it... Or push a couple keys on any keyboard in the world. The thermometer to the right shows the temperature outside and inside the container. [Ignore the clock at the top, I don't bother to set it] The OD temp is 23.5F and the container temp near the floor is 45.1F The camera is an inexpensive network cam and the lighting is from a HomeDepot LED landscape light. I'll remotely turn everything off now to conserve battery power since cloudy days may be ahead according to the forecast. [You can see that the batteries absorbed charge for abt an hour and then went to float mode indicating they are well charged.] 
With all these controls and others I haven't shown, I can turn on and off the wireless links, shut down the inverter and most everything else selectively, except critical components to ensure a connection, in order to save power during cloudy periods. Also this allows reconfiguring stuff in case of a single point failure, things like that. All remotely from the container. Much like a simple mars lander or something. |
|
Interesting. Is the primary purpose to protect against theft / vandalism? Or is it more a technology exercise. Certainly a neat install.
Is that a bugout location, or primarily used as a hunting base? Just for clarification, I was illustrating my idea for insulating the walls, not trying to diagram yours. As I look at container pics and builds some more, it seems a perfect target for the blow-in celulose insulating material. Mount the furring, spray the corrugations full, then screed it down to the furring before skinning with OSB. 
eta, R value for blow-in is about R4 per inch. The thickest part of my pink diagram would give about an R17 and R6ish at the thinnest. Call it an R-11 overall? |
|
Quoted:
Interesting. Is the primary purpose to protect against theft / vandalism? Or is it more a technology exercise. Certainly a neat install. Is that a bugout location, or primarily used as a hunting base? Just for clarification, I was illustrating my idea for insulating the walls, not trying to diagram yours. As I look at container pics and builds some more, it seems a perfect target for the blow-in celulose insulating material. Mount the furring, spray the corrugations full, then screed it down to the furring before skinning with OSB. http://mdinsulation.net/installing-cellulose-blow-in-insulation.jpg I realize afterwards upon futher study you were. The fiberglas in the pocket tipped me. The containers are so small maybe there would be a way install the cellulose DIY? Will it stick well? Wonder what R factor would be. Reasons are all above and more. We hang there mostly. |


|
Quoted:
That's an interesting way you fitted them CountryB. Regarding the insulation of the walls, what was the thickness of the furring strips and what was the material? When we did ours not long ago, there was nothing I could find re a practical solution to insulation. We used 1 1/2 SYP screwed from the outside with a high grade screw with a neoprene washer. The corrigations and space between the furring strips was sprayed with foam. 2 were then covered with 1/2" birch plywood, and the last one we did with glass rock for noise (drywall with fiberglass instead of the paper). The windows were an angle iron frame to whcih furing strips were screwed, and a heavy duty FRP outside corner (basically plastic angle) formed the trim and covered the edge of the FRP and plywood. I'll look in my Hatti pictures and see if I can find any pics. All we did was copy what the typical job site conex looked like, except set up for lodging, and easier to clean. The thought was you could have women secretaries staying in there after have a bunch of ex con laborers, so we wanted something that could be cleaned. We envisioned that these conexs might be the desired, or at least close and secure lodging, or they might be where we put the low men on the totem poles when there aren't enough hotel rooms. You don't know what to expect, I've stayed at the Ritz-Carlton hotel during one hurricane, and I've slept on a cot with only a roof and 3 walls during another. A lot of times, you weigh the travel time to an available hotel against the need for sleep. Some people really need the AC to get a good nights sleep. Security is often an issue with anything but the best hotels. Right as we finished them, I was promoted, and am no longer responsable for them. I don't know if we've started building anymore after we lost these. It was a fun project, and we did almost all of the work in house. The only second thoughts I had was on the FRP- It was expensive, time consuming to install, and everybody was itching. Next time, maybe everything would be abuse resistant drywall with epoxy paint. All of our wiring was surface mounted conduit, so it would be easy to re-cover the walls. Maybe something lighter for the ceiling. Since disaster response is pretty intertwined with OSHA, safety and industrial hygene folks, one of their concerns was nothing in the conex should be suceptable to mold. |
|
There's been a lot of discussion about insulation. If you're worried about keeping it climate controlled, why not by a refer container at the get-go and sacrifice the 5" of vertical space? These are already pre-insulated. Granted, they will cost more, but the work is already done for you! Here's some stuff I found at http://www.shipping-container-housing.com  |
|
Quoted:
There's been a lot of discussion about insulation. If you're worried about keeping it climate controlled, why not by a refer container at the get-go and sacrifice the 5" of vertical space? These are already pre-insulated. Granted, they will cost more, but the work is already done for you! Here's some stuff I found at http://www.shipping-container-housing.com Good idea! |