


Armory Sponsor
Sponge Camo Tutorial (Page 10 of 10)


|
I was wondering if you guys could give me an idea of what to do to mine. I'm not wanting to sponge the entire rifle . . . at least I don't think I do. I do want to sponge a different rifle at some point. I used Rust-Oleum - Khaki as my base coat Deep forest green for my first set of stripes Earth brown for my final stripes. I'm trying to get the technique down of feathering but I'm not doing it on my rifle. I don't want to keep adding layers if I don't have to.  Untitled by Kevin Wimer, on Flickr" />" /> Untitled by Kevin Wimer, on Flickr" />" /> Untitled by Kevin Wimer, on Flickr" />" /> Untitled by Kevin Wimer, on Flickr" />" />Someone also suggested to me using a paint brush. I am looking at a thread now that used a paint brush and it looks interesting too. I think I want to blend the brown and greens into the tan. The pics of the rifle were right after painting it, so the tan has toned down some. |
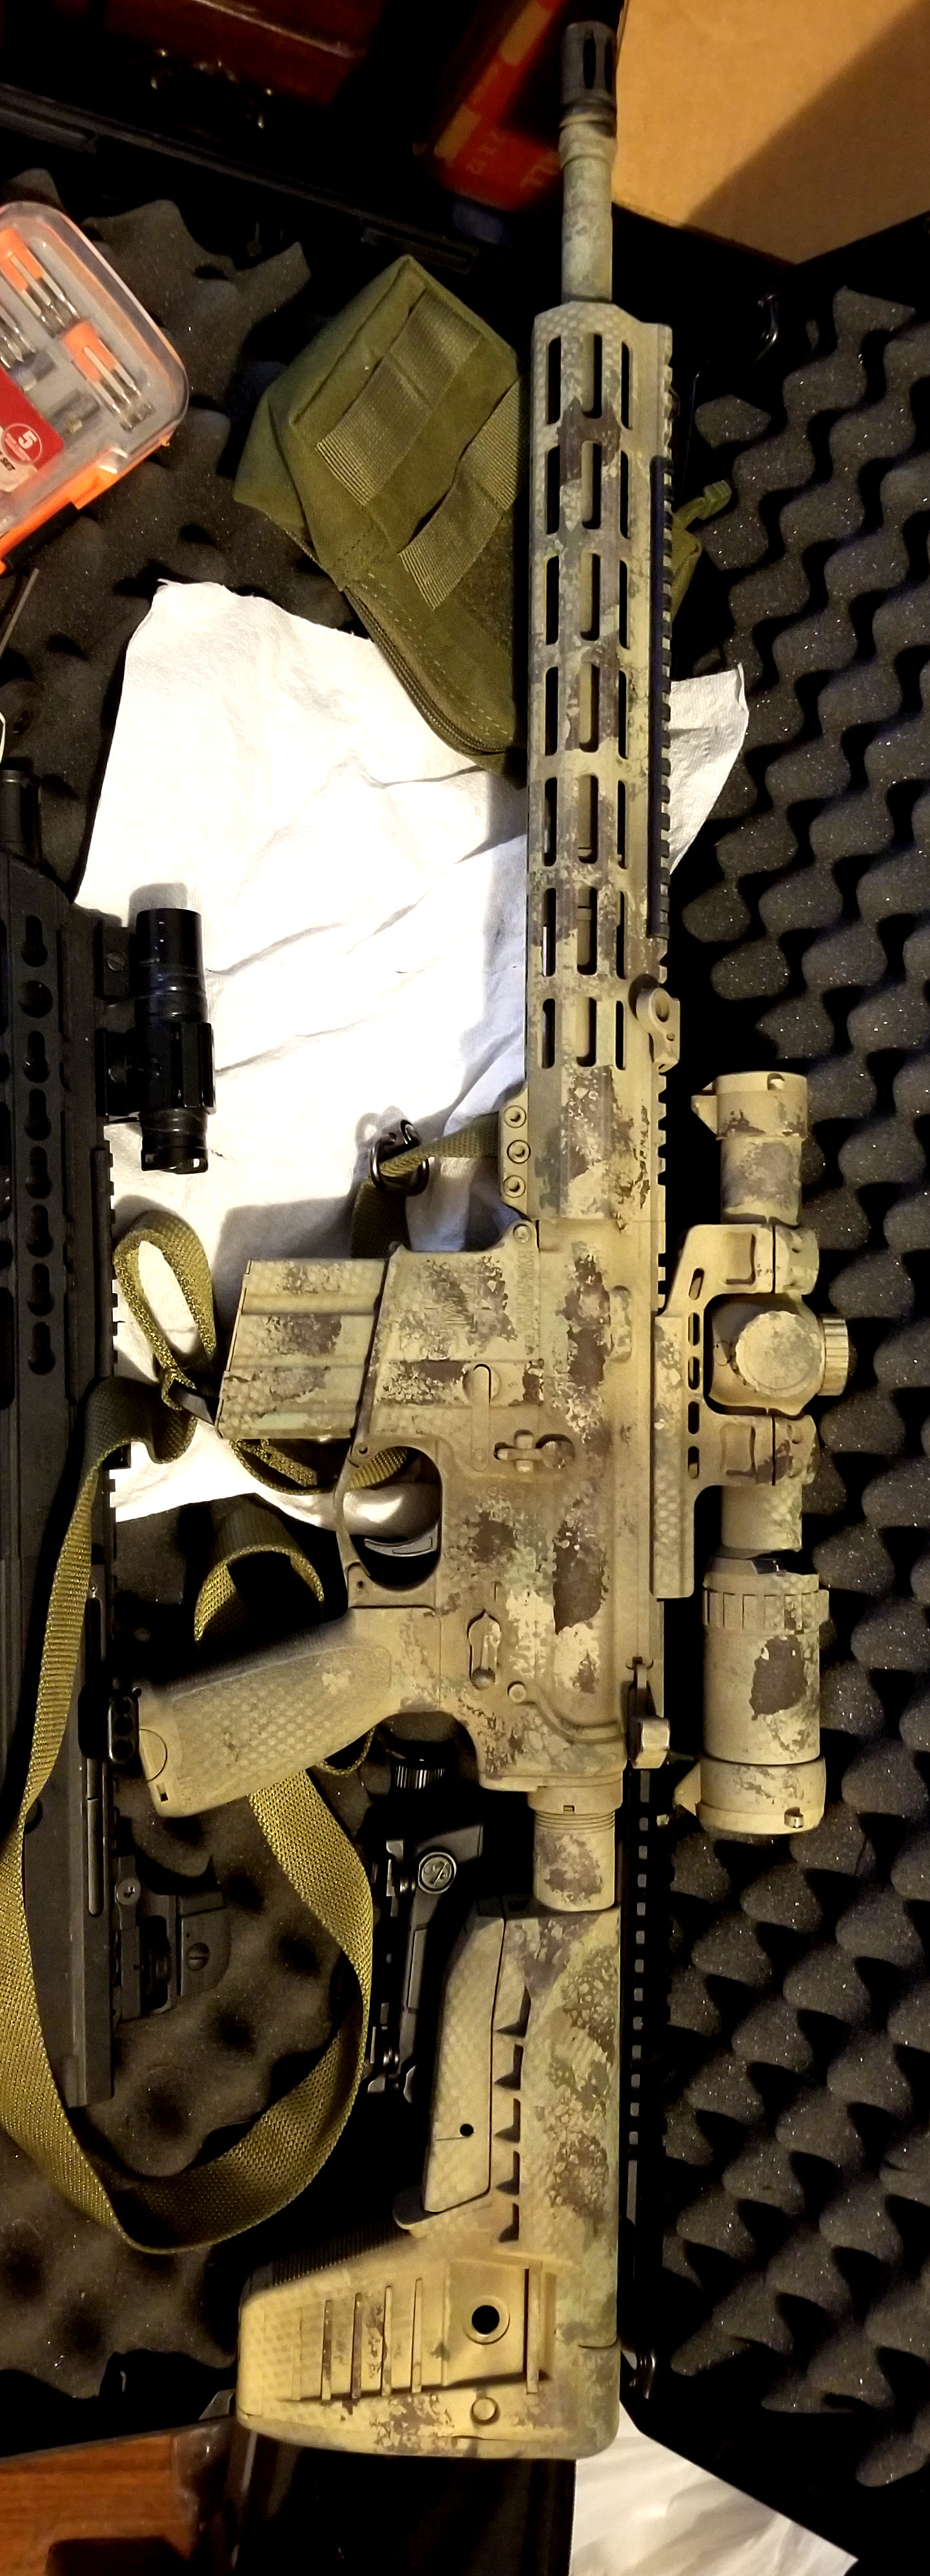

|
Here's my recent effort. I used Krylon Camoflage colors - Khaki, Olive, Forest Green, Brown. My local area is North Alabama, so I didn't want to go too dark. I degreased and blue taped anything I didn't want painted beforehand. First let's spray the rifle in a broad pattern:  No interim photos since I was having too much fun doing it! Final overview view:  Final closeup view: 
|
Another proud كافر
|
Brownells has a free shipping on Aluma Hyde II promo running right now. You can stack with an additional discount code, TA10 = 10% off 150 or more. GIFT10 = $10 off $100. https://www.brownells.com/tools-cleaning/paint-metal-prep/paint-finishing/aluma-hyde-ii/ For what it's worth there's a thread where a guy bought a can on Amazon and had problems and then posted that one Brownells rep said there was a problem with some of the cans. https://www.ar15.com/forums/Armory/Aluma-Hyde-is-putting-out-bad-cans-confirmed-by-Brownells/19-548639/ Another user here, @Baron_Von_Savant , responded in that thread: Originally Posted By Baron_Von_Savant: Let me just start by apologizing on behalf of individual that gave you that information, it was incorrect. As the actual Aluma-Hyde II Tech Guy, I can confirm that there are currently no known issues with Aluma-Hyde II and that's not to say you didn't get a bad can, obviously you did and Brownells will take care of it. I use Aluma-Hyde II straight from inventory almost weekly in the Brownells studio and can assure you that Brownells is not knowingly sending out bad product to customers. Also, for those curious...In my experience, Aluma Hyde II, applied by spraying from the can directly on parts, as well as sponge applied, will adhere to all of the typical firearms finish surfaces if you clean them properly. Despite some reports of it not adhering to Cerakote, in my experience it will adhere to backed on Cerakote so long as you clean the Cerakote with 90% alcohol and let it cure once applied for at least a week. I also have had great results with spraying multiple colors onto mixing surface and custom blending colors for sponge application. |
|
I am sure this has already been covered. But one tip I have learned is to use very light pressure with the paint covered sponge. Or at least if you want the "sponge" texture on the rifle use light pressure. If you press the sponge into the rifle it will collapse all the little voids and you will get a blob of color. Also "less is more" in my opinion. You can always add more but it is hard to remove or cover a color so work slowly. The other tip I have will be harder to explain. I tend to like to make random shapes rather than blocks of shape with the sponge pattern. Think of a lot of camo patterns. They are made up of odd shapes not just round or square blobs. So if i want to make a "Y" shape with one color I would use multiple different pieces of sponge rather than try to make a "Y" shaped sponge. Then just work slowly adding to the shape as i go. Dont overlap your pattern when applying the same color building the "Y" shape. If you do it will just fill in the nice voids that the sponge leaves behind and look too solid. Also if you work slowly you can change your mind as you go along. For example if you plan to make the "Y" shape and start sponging it on. You might decide to stop that color with only the to "V" potion done. Or you might get the "V" portion done and decide you want a "X" shape rather than a "Y" shape. Also after I thought I was done I went back with some unplanned colors like white and flat black. I added very very small shapes with these high lights. Think the chocolate chip camos. Mostly this was just because i was having fun. Sorry guys, its really hard to describe what I am saying. main things is use light pressure so you get the sponge pattern. You can use multiple small dabs of the same color to build a shape. But use different peices of sponge or you will get a repeating pattern. Also dont overlap dabs with the same color or it just forms a solid blob of that color. |





Here's a couple of hunting rifle stocks I did today. The first was typical carbon fiber and the second was grey/light blue splatter finish before I started.   I did both with DuroCoat and natural sponges. The inspiration for these was my Seekins 7PRC. I really liked the orange accents and wanted to carry it over to both of these. 
|
SAF Life Member-GOA Life Member-JPFO Charter Member-MSF Life Member
FPC Member-VCDL Member-BFA Member-NRA Benefactor Life Member
Sir RobertL, Charter Member of the Knights of Wonder
FPC Member-VCDL Member-BFA Member-NRA Benefactor Life Member
Sir RobertL, Charter Member of the Knights of Wonder



Sponge Camo Tutorial (Page 10 of 10)
Armory Sponsor