


Armory Sponsor


Posted: 1/2/2017 8:04:47 PM EDT
[Last Edit: JamesP81][Edited]
|
Often times, 223 cases will fall onto the shell plate when ejecting instead of falling into the cartridge bin. I've recorded a video to demonstrate what's happening. Apologies for the quality, it's a cell phone video and I didn't have a stand for the phone. Seen here: Video
What I have tried so far: 1) Thoroughly cleaned everything on the subplate and the shell plate. Relubricated bottom of shell plate lightly. 2) Replaced case retainer spring (the one I had was worn out anyway). 3) Paid special attention to the ejector itself when cleaning. 4) Ensured shell plate was tightened down (I've never found Hornady's instruction to finger tighten only to be wise). I was having somewhat worse issues before replacing the case retention spring. The spring had a kink in it, and ejection from the slot where the spring's kink was was consistently worse. Replacing the spring hasn't fully solved the issue, but has reduced the rate of failure a little. I would say ejection failure runs between 10 and 20 percent. Usually once per full shellplate, sometimes twice. I don't think there is necessarily one bad slot on the shell plate. I have noted that the slots one and two positions counter clockwise from the shell plate number imprinted on the plate seem to be slightly worse. However, these don't fail *every* time, and ejection failures can happen on any slot in the shell plate. It's just that those two seem every so slightly more likely to choke. The press also generates a number of "near failures" where you can tell by the way the cartridge falls it almost fell the wrong way. I do not have this problem with 9mm or 45 ACP. I do have ejection issues with 357 magnum, but they are of a different nature: sometimes the shell plate gets stuck trying to eject a finished 357 cartridge. It looks like the rim sometimes rides over the ejector instead of being pushed out, but I'll try to fix that later, I only care about getting ejection on my 223 cartridges working right now. |
| On the sup plate there is a small nub that sticks up that ejects the round. If it is rounded off it will allow the brass to ride up and not eject smoothly. Mine started to round off and I had the same problem you are having. I took a small jewelers file and filed it until it had a sharp right angle. That solved the problem for me. |
|
Originally Posted By DRAINSMITH:
On the sup plate there is a small nub that sticks up that ejects the round. If it is rounded off it will allow the brass to ride up and not eject smoothly. Mine started to round off and I had the same problem you are having. I took a small jewelers file and filed it until it had a sharp right angle. That solved the problem for me. Mine looks pretty darned sharp to me. Hard to get a close up photo that will focus, so this is just getting down to eye level with the plate and eye balling it. |

|
Originally Posted By DRAINSMITH:
On the sup plate there is a small nub that sticks up that ejects the round. If it is rounded off it will allow the brass to ride up and not eject smoothly. Mine started to round off and I had the same problem you are having. I took a small jewelers file and filed it until it had a sharp right angle. That solved the problem for me. Yep, make sure that the numb is sharp and square up and down on the ejection side edge, so when the rim hits the ejector tab, the case rim is not forced upwards against the shell holder bottom surface to bind it in place. Hence this one is a nightmare, and if one does not want to clean the mess up, then have Hornady send you a new sub plate instead. 
Note, since the sub plate carrier with new ejector tab is a PITA to lap the top of the sub plate on a lapping plate, I would tend to find the older sub plates that someone still has when upgrading the machine (the old plates did not have the tab), and just milled in a receiver slot for a HSS ejector tab that was installed via bolting that held it in place in the milled out channel in the sub plate. I bring this up, since enough people start sending back sub plates with worn out ejector tabs, maybe at some point, they just start milling the plates for a stronger bolt in type ejector tab instead. This is how it will come new, and even this one could use some addressing on the bottom of the tab to sqaure that edge (with just a touch of negitive taper top to bottom. Hence you don't want the rim to start climbing up the tab, to cause the wear like in the first photo. 
As for why the wear, it's mostly due to the shell plate coming loose, which allows the case rim to start hitting the top of the tab isntead. If you have not added a Lock washer and standard washer to under the shell carrier bolt, now is the time to do so. It will keep the shell plate nut tighter longer, and a semi solution to the problem. 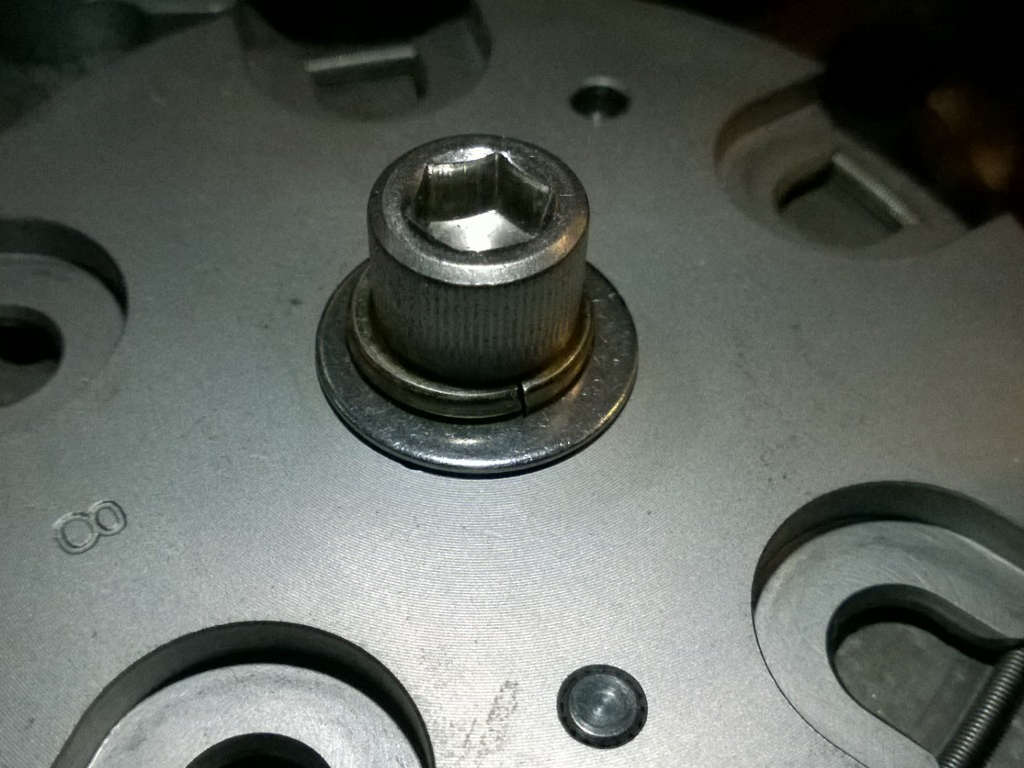
As for the better solution, chuck the bolt over your shoulder, install a threaded shaft to the indexer hub blue loctite in place, then add a nylon aircraft nut with washer and lock washer to hold the sub plate in place isntead. The nylon lock nut will last for a long time to hold it postion on the threaded shaft, and cheap to replace it when the nylon wears out instead. your bolt sizes are 3/8 by 16. On the shell plate, go through all the slots, and make sure that the outside edge of U has no burs, and is slightly rounded. Hence you want nothing binding up on the case as it's now being forced out of the U on the carrier by the cleaned up ejector tab. |
Posted By PlaymoreMinds:
'Twas not the <cough> sweet and innocent <cough> PlaymoreMinds...
<---skips away in frilly skirts to Candyland, leaving gutters and snorkels FAR behind.
'Twas not the <cough> sweet and innocent <cough> PlaymoreMinds...
<---skips away in frilly skirts to Candyland, leaving gutters and snorkels FAR behind.
|
Originally Posted By Dano523:
Yep, make sure that the numb is sharp and square up and down on the ejection side edge, so when the rim hits the ejector tab, the case rim is not forced upwards against the shell holder bottom surface to bind it in place. Hence this one is a nightmare, and if one does not want to clean the mess up, then have Hornady send you a new sub plate instead. http://www.salsaspirit.net/images/ezject/worn_ejector_2.png Note, since the sub plate carrier with new ejector tab is a PITA to lap the top of the sub plate on a lapping plate, I would tend to find the older sub plates that someone still has when upgrading the machine (the old plates did not have the tab), and just milled in a receiver slot for a HSS ejector tab that was installed via bolting that held it in place in the milled out channel in the sub plate. I bring this up, since enough people start sending back sub plates with worn out ejector tabs, maybe at some point, they just start milling the plates for a stronger bolt in type ejector tab instead. This is how it will come new, and even this one could use some addressing on the bottom of the tab to sqaure that edge (with just a touch of negitive taper top to bottom. Hence you don't want the rim to start climbing up the tab, to cause the wear like in the first photo. https://i2.wp.com/rangehot.com/wp-content/uploads/2013/08/e3.jpg As for why the wear, it's mostly due to the shell plate coming loose, which allows the case rim to start hitting the top of the tab isntead. If you have not added a Lock washer and standard washer to under the shell carrier bolt, now is the time to do so. It will keep the shell plate nut tighter longer, and a semi solution to the problem. http://bani.anime.net/pics/hornady%20lnl%20loose%20shellplate%20fix/fixed%20shellplate.jpg As for the better solution, chuck the bolt over your shoulder, install a threaded shaft to the indexer hub blue loctite in place, then add a nylon aircraft nut with washer and lock washer to hold the sub plate in place isntead. The nylon lock nut will last for a long time to hold it postion on the threaded shaft, and cheap to replace it when the nylon wears out instead. your bolt sizes are 3/8 by 16.On the shell plate, go through all the slots, and make sure that the outside edge of U has no burs, and is slightly rounded. Hence you want nothing binding up on the case as it's now being forced out of the U on the carrier by the cleaned up ejector tab. Mine is not galled or rounded off like that. Looks more like your second picture. There are no visible wear marks. |
|
"EJECTOR TAB" I knew someone knew the name for that damn thing.
Now if your tab is in good shape I want you to watch your brass when you are seating the primer for up and down movement. If it moves up to much you may have a warped plate. If that is the case it will act just like a loose plate, causing ejector problems. |
|
Originally Posted By DRAINSMITH:
"EJECTOR TAB" I knew someone knew the name for that damn thing. Now if your tab is in good shape I want you to watch your brass when you are seating the primer for up and down movement. If it moves up to much you may have a warped plate. If that is the case it will act just like a loose plate, causing ejector problems. I assume you mean the case in the priming position? Not in a position right this second to actually seat a primer. I can, however, take a loaded cartridge and put it in the priming position and move the handle as if to ram the primer. In this circumstance, I find that the case doesn't seem to move up much in the shell plate, but it does visibly tilt towards the center of the shell plate. |
|
Originally Posted By DRAINSMITH:
Call Hornady in the morning, and let them know what you have found . It sounds like a warped shell plate to me. Brass should not tip in the shell plate. Im betting that your shell plate is the issue and is an easy fix. Ive run my LnL at least 30k cycles between prepping brass and loading, and I never have this problem, and my ejector is less than perfect condition. |
|
Called Hornady. They wanted me work with the case retainer spring, which I did. Basically they wanted me to press the spring into its grove a certain way.
Since that didn't work they say they want to look at replacing the drive hub. However, I'm noticing that I'm getting a lot of high primers with my current batch of brass; I think this is caused by inconsistent crimp swaying. That's another thread. Anyone think it's possible high primers could be causing my issues? |
|
Could be that the shell plate is bent, but I'm banking that the problem is in the drive hub instead.
Maybe the drive hub is out of spec, but would bank more that its the sub plate lip for the drive hub that is the problem isntead. Here is a pretty good write up on shimming the drive hub down so it gets the shell plate down correctly to the top of the sub plate. http://www.m4carbine.net/showthread.php?144901-How-to-tune-the-Hornady-Lock-N-Load-AP-progressive-press Also, while you have the sub plate off the machine to check clearance, and even shim the drive hub if needed, you may have to shim the sub plate to top of ram as well. Basically, when you put the sub plate on the top of the ram and push it tight downward, take a good look at the centers of the bolt channels tapers in the sides of the ram against the actual thread channels in the sides of the sub plate . Here, you want the taper head bolts to suck the ram tight down to the top of the ram when tightened, instead of when the bolts are installed, a gap between the bottom of the sub plate to top of ram instead. http://www.ar15.com/forums/t_6_42/349532_Hornady_OAL_issue_fixed_.html |
Posted By PlaymoreMinds:
'Twas not the <cough> sweet and innocent <cough> PlaymoreMinds...
<---skips away in frilly skirts to Candyland, leaving gutters and snorkels FAR behind.
'Twas not the <cough> sweet and innocent <cough> PlaymoreMinds...
<---skips away in frilly skirts to Candyland, leaving gutters and snorkels FAR behind.
|
I agree, sub par priming and weak ejection tells me the drive hub world benefit from the shimming treatment.
Do cases stand up straight when indexing? If they flop around, the shell plate has to much play, courtesy of the drive hub having too much clearance. The cases should have enough wiggle to not bind the shell plate to the top plate, and allow a small degree of self-centering in the die, and no more. |
|
FYI, flip your sub plate over, and make sure that the dents are correctly set in them as well.
Some times the detent housing are not set deep enough, this cause the plate to drag off the top of the sub plate, and you end up with the bolt too loose to allow the shell plate to rotate correctly instead. P.S, too bad your not in the Denver area, or I would have you bring it over to go through the machine to get it right from the start. There is some clean up and tweaks that the machine really needs, and the problem is that most guys that buy them from the start are novices/don't have enough time on the AP to know the needed tweaks from the start. And yes, it funny when guys bring there brand new machines over, Since tear them completely apart to begin with (just a pile of individual pieces), and then do the needed clean up/shimming/polishing and lubing as I putting them back together. Hence not only does this get them running from the start correctly, but the indexing and tune on them last a lot longer as well. |
Posted By PlaymoreMinds:
'Twas not the <cough> sweet and innocent <cough> PlaymoreMinds...
<---skips away in frilly skirts to Candyland, leaving gutters and snorkels FAR behind.
'Twas not the <cough> sweet and innocent <cough> PlaymoreMinds...
<---skips away in frilly skirts to Candyland, leaving gutters and snorkels FAR behind.

|
The drive hub has to keep the shell plate parallel with the sub plate. If it doesn't, you get priming problems AND ejection problems. You'll also get inconsistent sizing and seating, but those problems are kind of disguised by "oh, I just need to tinker with the die a little" though processes.
I have a 16xxx serial number press. I upgraded to EZ-Ject a while ago. While you can't lap the sub plate, you can polish it, and I did polish the entire area that case heads ride, including the "working side" of the ejector tab. Between that and using a split lock washer to keep the shell plate held consistently, I haven't had any problems with ejection that are due to the EZ-Ject system. I claim responsibility for the occasional inconsistent handle upstroke at just the wrong time, causing the loaded round to slip out of the shell plate and then topple over ONTO the shell plate. 
|
"--you can't conquer a free man; the most you can do is kill him."
Heinlein
NRA Life Member
Glock Certified Armorer
Certified AR15 Armorer
Certified M1911 Armorer
Heinlein
NRA Life Member
Glock Certified Armorer
Certified AR15 Armorer
Certified M1911 Armorer
|
There's something else I'm noticing.
When I prime a cartridge, my sub plate comes into contact with the sheet metal bracket that holds my completed cartridge bin and flexes it a little. Does anyone else's LnL AP do this, or is something out of spec here? ETA: Two other things popped up while I was examining the press. I had one complete ejection failure where a completed cartridge was pushed out by the ejector, but the cartridge didn't fall at all. It ended up blocking the path for the next case trying to get into station 1 from the case feeder. I also find that when I operate the ram very slowly on the downstroke, many of my complete cartridges start out tipping towards the shellplate rather than towards the bin. Most of these end up falling the correct direction, but not all of them. I'm going to call Hornady tomorrow morning and see about getting work done or replacement of the drive hub. |
|
Originally Posted By 1stGenCRXer:
I agree, sub par priming and weak ejection tells me the drive hub world benefit from the shimming treatment. Do cases stand up straight when indexing? If they flop around, the shell plate has to much play, courtesy of the drive hub having too much clearance. The cases should have enough wiggle to not bind the shell plate to the top plate, and allow a small degree of self-centering in the die, and no more. Interesting that you mention this. My 223 cases do seem to stand up fairly straight...my 45 ACP and 357s do not. And maybe my 223's don't either but the issue is masked by the bottleneck case. Anyhow, it's not too rare for me to have a 357 or a 45 case mouth impact on the edge of the mouth of the sizing die, and I have to back the ram out and align the case manually to get it into the sizing die. I would say this happens about 5% of the time. with 357 and 45. It's never been an issue with 223. |
|
Originally Posted By Dano523:
Could be that the shell plate is bent, but I'm banking that the problem is in the drive hub instead. Maybe the drive hub is out of spec, but would bank more that its the sub plate lip for the drive hub that is the problem isntead. Here is a pretty good write up on shimming the drive hub down so it gets the shell plate down correctly to the top of the sub plate. http://www.m4carbine.net/showthread.php?144901-How-to-tune-the-Hornady-Lock-N-Load-AP-progressive-press Also, while you have the sub plate off the machine to check clearance, and even shim the drive hub if needed, you may have to shim the sub plate to top of ram as well. Basically, when you put the sub plate on the top of the ram and push it tight downward, take a good look at the centers of the bolt channels tapers in the sides of the ram against the actual thread channels in the sides of the sub plate . Here, you want the taper head bolts to suck the ram tight down to the top of the ram when tightened, instead of when the bolts are installed, a gap between the bottom of the sub plate to top of ram instead. http://www.ar15.com/forums/t_6_42/349532_Hornady_OAL_issue_fixed_.html The explanation on M4C is thorough, but the terms don't mean anything to me. I'll have to do some more google searching before I'll be able to understand what he's saying. |
The drive hub in the center of the ram,

The bottom of the sub plate, , can see the lip that the drive hub lip will mate up against on the sub plate to dictate height of the drive hub section above the top plate when the shell plate is bolted to it (bottom of sub plate to top flat of drive hub). 
So when you install the center bolt and pull all the way up on the drive hub, you are looking for the top of drive hub to be only a few thousands proud of the surface of the sub plate. 
Hence most of the time, the top flat of drive hub is way too far above the sub plate surface, meaning that the shell plate bolts is place is going to be tilting all over the fuck/ not tight to the sub plate, and going to cause problems. So what is done, is between the drive hub flange and the bottom mating surface of the sub plate gets shimmed so the sub plate top shell plate mounting surface is not way to proud of the sub plate isntead. Here is a good write up on shimming, and where to get the shimmed needed to shim the drive hub correctly. http://www.ar15.com/forums/t_6_42/414607_How_to_tune_the_Hornady_Lock_N_Load_AP_progressive_press.html Same goes for the sub plate against the top of the ram (so the sub plate is not wigling/canting on the top of the ram when it comes under side force around the tool head), and where is where you can get the needed shims for that. http://www.ar15.com/forums/t_6_42/414607_How_to_tune_the_Hornady_Lock_N_Load_AP_progressive_press.html As for my old AP when I was running one, said screw the drive gear shim crap and just mod'd the sub plate for a needle bearing to remove the slop between the side of the drive hub to the sub plate, and bottom thrush bear for the bearing surface against the bottom of the sub plate when the drive hub turned, and milled up a SS drive hub to work with the system instead. On the SS drive hub, I used a roll pin for the shear pin , and if the machine crashed, and twisted the roll pin off, easy enough to extract the remains of the roll pin, and install a new roll pin instead. Note, thought about using a key, but would be too strong and cause other problems if the machine crashed, instead of just taking out the roll pin/ the drive hub in the case of a stock machine. Also, since the weak link to keeping the pawls timed correctly is that the drive rod is just going through a loose bottom of ram channel (way too much slop that only gets worse), bearing mod the bottom of rod channel to keep the rod tight to the ram channel (and still able to turn cleanly), as well as thrush bearing between the drive gear to bottom of ram plate as well. For some that will not use the machine that much, a simple solution is to just mill and install a bronze bearing in the channel to take up the slop between it and the drive rod instead. Go to page 5 on the below link, and you start to see areas that are metal against metal (with not replaceable bearing sleeves), and when some of the metal parts are just cheap cast parts, you start to see why the machine wants to come out of tune so fast isntead. Grease will help slow down the wear once the areas are debured, but only for so long isntead. http://www.hornady.com/assets/files/manuals-current/metalic-reloading/LNL_AP.pdf |
Posted By PlaymoreMinds:
'Twas not the <cough> sweet and innocent <cough> PlaymoreMinds...
<---skips away in frilly skirts to Candyland, leaving gutters and snorkels FAR behind.
'Twas not the <cough> sweet and innocent <cough> PlaymoreMinds...
<---skips away in frilly skirts to Candyland, leaving gutters and snorkels FAR behind.
|
Since I have already show you pandora's box, and start to crack the lip, may as well take what is really needed to get the machine up and running from the start.
Again, print page 5 of the manual, so you can follow along. Starting with the machine completely pulled apart, we start with the ram and work up from that. The channel in the ram for the drive rod get top and bottom edge chamfered, so we don't have loose metal breaking off and causing problems down the line. On the top of the channel, you have the C clip and wave washer that will pull the entire rod upwards to take out that slack, then you have the cross pin Index wheel and bottom C clip that the top wave washer will be pulling the index wheel up against the bottom of the ram. So minimum, you want to at last polish the top of the index wheel and the bottom of the ram where the two will make contact, and make sure that you are using a good grease that will last a while. If the difference between the drive rod to ram channel for it is say BB in a box car, now would be a good time to at least add a sleeve to the rod so it fits a hell of lot tighter in the ram through channel instead. Ideally, you only want about .001" clearance, but anything under say .006" is tolerable. Hence the pawls will be pushing the index wheel fore and aft in the channel, and the more slop you are dealing with, the harder it is keeping the index system in tune isntead. If the slop gets to bad, then you have cam over biniding problems isntead. Top of sub plate gets first polished, then with a shim kit, figure out what the drive hub will need to be shimmed to get it's top flange surface for the shell plate just few thousands proud of the top of sub plate. Also, if you have not take a good look at the shell carrier (like the detent housing sitting correctly in them, as well as the over all conditions of the end of U's for a clean release of the case on ejection, now would be a good time to do so. Next, dry fit the sub plate to top of ram, and figure out if the two need to be shimmed so you have no gap between the bottom of sub plate to top of ram when the side taper head bolts are installed. Note, before you install the shell plate down the line during tuning, make sure that you have the washer and lock washer to keep the bolt tight as least (still prefer the threaded stud with nylon lock nut instead) Now on the rest of the channels that will have a bearing pin through them on the machine, lightly chamfer the entrance and exit channels on them. Again, these channels are going to wear, and you do not want sharp edge of channel material to break off and start trying to embed back in the channels isntead. On the primer slider, it has a few problem to start with. On the top of the channel that the primer is going to drop into, lightly polish the chamfer section on it. This allows for a cleaner primer drop if the slide channel is just slightly off. The next problem, is that the front of the side mates up with the end of channel as it stop point, and any debris trapped here, means that the slide is going be stopped from going all the way forward with the primer correctly above the primer ram. Some will just taper the front of the slide to get them so relief if the debris build up slowly until the channel as to be cleaned, but I go the other way, with adding in a releif channel at the front of the slot on the bottom, and then a angle drain hole out that relief to the bottom of the sub plate isntead. Hence the slide will push the debries forward into the bottom releif area, and they will fall out the added angled releif channel instead. Primer primer housing body, primer tube,primer tube shield and top plastic retainer. https://www.thehighroad.org/proxy.php?image=http%3A%2F%2Fi233.photobucket.com%2Falbums%2Fee232%2Flongdayjake%2FCIMG3852.jpg&hash=25a69e5d6ae18eff6242c0706d8c02ad 
Since the housing channel does not have a positive stop for primer tubes into the channel of the housing, your at the mercy of the top plate shield cap holding the tubes to the top of the primer slider gently, and the bottom of the tube to gently ride on top of the primer slider . Some with do the set screw mod to hold the primer tube in place to swap primer tubes in it (got be be careful that you don't over tighten the set screw and bulge the inside of the tube), 
but I opt for just buying another primer housing, and epoxying the tubes into them instead. With a housing set up for large and one set up for small with the tubes glued in place, allows me to lap the bottom of the housing to get it smooth as well as the end of primer tube exit smooth with the bottom of the housing as well. 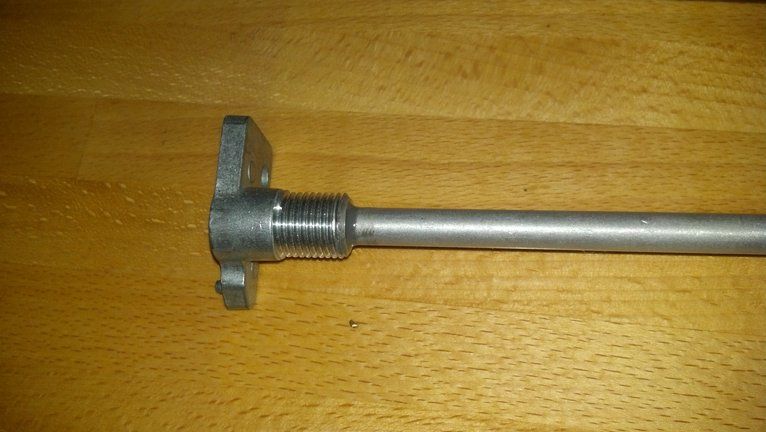
Note, one have done the mod to the housing, install the housings and there sliders, and make sure that the slider is not binding up in the slider channel of the sub plate. Most of use will just polish the slider slot at the same time as we polish the top plate, but some times you have to polish the top and bottom of slider on a lapping plate if there is any binding on it going on. From here with the above cleaned up and mod'd to just the basic level, then your ready to put the machine back together with a good grease to get it ready for reloading. Hence lean into using a lot of grease on both the channels and on the pins and bearing parts like the index parts, and what every does seep out during install, it can be wiped off instead. Also, on the roll pins that inter lock with the drive wheel and drive hub, you want these pins tight to the channel. Hence slop there, translates back to slop in the index system, and more time spend having to re-adjust the pawls again from normal use of the machine. Also, the more stearder the bend the machine is bolted to, the better off your going to be. As for getting the case feeder dialed in, as well as the bullet feeder system, novels in themselves on the needed mods to get them to run long term without crashing left and right, and with some quick internet searching, should be able to come up with ways to skin these cats to get the systems working instead. |
Posted By PlaymoreMinds:
'Twas not the <cough> sweet and innocent <cough> PlaymoreMinds...
<---skips away in frilly skirts to Candyland, leaving gutters and snorkels FAR behind.
'Twas not the <cough> sweet and innocent <cough> PlaymoreMinds...
<---skips away in frilly skirts to Candyland, leaving gutters and snorkels FAR behind.
|
Originally Posted By Dano523:
The drive hub in the center of the ram, http://i155.photobucket.com/albums/s306/goldeneagle76/IMG_0360.jpg The bottom of the sub plate, , can see the lip that the drive hub lip will mate up against on the sub plate to dictate height of the drive hub section above the top plate when the shell plate is bolted to it (bottom of sub plate to top flat of drive hub). http://www.salsaspirit.net/images/ezject/sub_plate_1.png So when you install the center bolt and pull all the way up on the drive hub, you are looking for the top of drive hub to be only a few thousands proud of the surface of the sub plate. http://www.salsaspirit.net/images/ezject/drive_hub_high.png Hence most of the time, the top flat of drive hub is way too far above the sub plate surface, meaning that the shell plate bolts is place is going to be tilting all over the fuck/ not tight to the sub plate, and going to cause problems. So what is done, is between the drive hub flange and the bottom mating surface of the sub plate gets shimmed so the sub plate top shell plate mounting surface is not way to proud of the sub plate isntead. Here is a good write up on shimming, and where to get the shimmed needed to shim the drive hub correctly. http://www.ar15.com/forums/t_6_42/414607_How_to_tune_the_Hornady_Lock_N_Load_AP_progressive_press.html Same goes for the sub plate against the top of the ram (so the sub plate is not wigling/canting on the top of the ram when it comes under side force around the tool head), and where is where you can get the needed shims for that. http://www.ar15.com/forums/t_6_42/414607_How_to_tune_the_Hornady_Lock_N_Load_AP_progressive_press.html As for my old AP when I was running one, said screw the drive gear shim crap and just mod'd the sub plate for a needle bearing to remove the slop between the side of the drive hub to the sub plate, and bottom thrush bear for the bearing surface against the bottom of the sub plate when the drive hub turned, and milled up a SS drive hub to work with the system instead. On the SS drive hub, I used a roll pin for the shear pin , and if the machine crashed, and twisted the roll pin off, easy enough to extract the remains of the roll pin, and install a new roll pin instead. Note, thought about using a key, but would be too strong and cause other problems if the machine crashed, instead of just taking out the roll pin/ the drive hub in the case of a stock machine. Also, since the weak link to keeping the pawls timed correctly is that the drive rod is just going through a loose bottom of ram channel (way too much slop that only gets worse), bearing mod the bottom of rod channel to keep the rod tight to the ram channel (and still able to turn cleanly), as well as thrush bearing between the drive gear to bottom of ram plate as well. For some that will not use the machine that much, a simple solution is to just mill and install a bronze bearing in the channel to take up the slop between it and the drive rod instead. Go to page 5 on the below link, and you start to see areas that are metal against metal (with not replaceable bearing sleeves), and when some of the metal parts are just cheap cast parts, you start to see why the machine wants to come out of tune so fast isntead. Grease will help slow down the wear once the areas are debured, but only for so long isntead. http://www.hornady.com/assets/files/manuals-current/metalic-reloading/LNL_AP.pdf Just took my shell plate off and screwed the bolt in, pulling up and sure enough, my drive hub is riding proud of the subplate. I don't have a tool appropriate to measure it, but you can easily see and feel it. |
Time to pick up a pack of these,
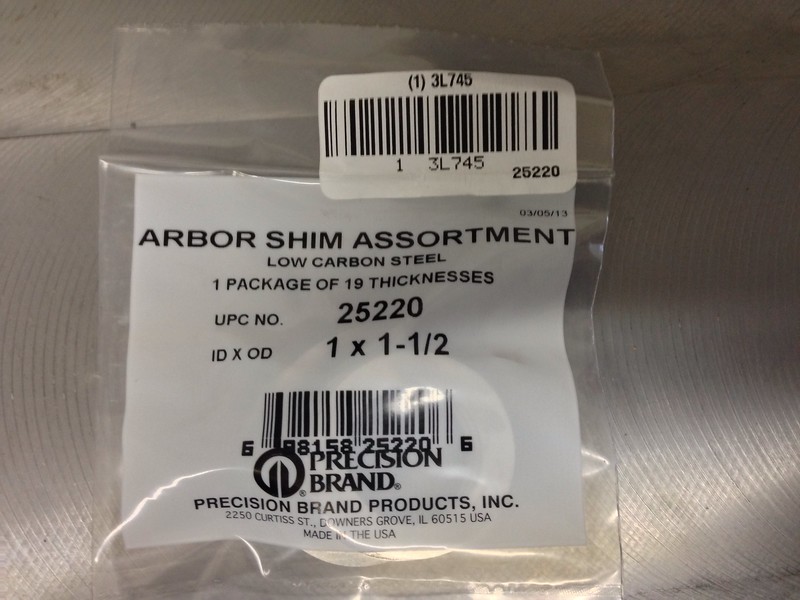
And if you need a shim for the ram to sub plate if it has a gap, Hornady will send you them for free. Note on later machines with this problem, Hornady was installing the shim as they where assembling the machine. On a older machine, or someone assembly a new machine on say a Friday, may have missed installing a shim is needed, and why Hornday will just send you the shim for free instead. I bring this up, since it sounds like you may have a recent machine, and when you pull the sub plate, it may already be shimmed to remove the gap. |
Posted By PlaymoreMinds:
'Twas not the <cough> sweet and innocent <cough> PlaymoreMinds...
<---skips away in frilly skirts to Candyland, leaving gutters and snorkels FAR behind.
'Twas not the <cough> sweet and innocent <cough> PlaymoreMinds...
<---skips away in frilly skirts to Candyland, leaving gutters and snorkels FAR behind.
|
Originally Posted By Dano523:
Time to pick up a pack of these, http://farm8.staticflickr.com/7420/11656897056_a07881a0c0_c.jpg And if you need a shim for the ram to sub plate if it has a gap, Hornady will send you them for free. Note on later machines with this problem, Hornady was installing the shim as they where assembling the machine. On a older machine, or someone assembly a new machine on say a Friday, may have missed installing a shim is needed, and why Hornday will just send you the shim for free instead. I bring this up, since it sounds like you may have a recent machine, and when you pull the sub plate, it may already be shimmed to remove the gap. I'll look for the subplate to ram shim when I disassemble. My press's serial number is in 25xxx range. I bought it about 6 years ago, but only recently have I really put it through it's paces. That's why I'm starting to notice these little issues. Kind of wish some days I still had my Lee Classic Turret. That thing was bulletproof, and you can mod them with a tube based, manually loaded bullet feeder and auto ejector now. As it is, even when my LnL AP is running smoothly I probably only load 150 rds / hour, because I tend to want to watch everything as it's working. On a Turret, you're only watching one thing at a time instead of 5. |
|
Originally Posted By JamesP81:
There's something else I'm noticing. When I prime a cartridge, my sub plate comes into contact with the sheet metal bracket that holds my completed cartridge bin and flexes it a little. Does anyone else's LnL AP do this, or is something out of spec here? ETA: Two other things popped up while I was examining the press. I had one complete ejection failure where a completed cartridge was pushed out by the ejector, but the cartridge didn't fall at all. It ended up blocking the path for the next case trying to get into station 1 from the case feeder. I also find that when I operate the ram very slowly on the downstroke, many of my complete cartridges start out tipping towards the shellplate rather than towards the bin. Most of these end up falling the correct direction, but not all of them. I'm going to call Hornady tomorrow morning and see about getting work done or replacement of the drive hub. The bin holder bracket may also have some influence on how well your cases eject. If it keeps the sub plate from moving all the way down (as mine did) it can change how the cases run into the eject tab. Complete failures to eject, as you describe yours, are a rare problem that is related to the design of the press. Re-bending the bin holder bracket, as I described above, may fix this problem for you, since cases eject onto the bracket. It may not guarantee each case falls into the bin every time, but it should help. With this in mind, you can picture the angle you want for the bracket: it should point downward and to your left of the press. The stock bracket is typically either level with the shell plate or even tilted a little upward. A word of caution: that bracket is STOUT. It's very thick for a stamped piece of sheet metal, and it's tough to bend by hand. I'm not suggesting you run over to the 15 ton press brake, but it will take some concerted effort to change that bend angle. Your rounds tilting inward is not normal, and I concur that your sub plate may not be particularly square, flat and level. Mine all stay standing straight up until they hit the eject tab. When you call Hornady, bring up the issue of the bracket interfering with the sub plate. Tell them the angle the top of the bracket stands in relation to horizontal (I'll bet it's higher at the left side). That might bring up some "interesting" questions from them... |
"--you can't conquer a free man; the most you can do is kill him."
Heinlein
NRA Life Member
Glock Certified Armorer
Certified AR15 Armorer
Certified M1911 Armorer
Heinlein
NRA Life Member
Glock Certified Armorer
Certified AR15 Armorer
Certified M1911 Armorer



|
I'm glad to see this thread is still helping folks.
How to tune the AP I still believe that the AP will not run correctly without the timing set spot on and the shell plate clearance set correctly. I still hope to find the time to install a Torrington bearing in the sub-plate. |
.
Remember to kick it over, no one will guide you through armagideon time...
.
Remember to kick it over, no one will guide you through armagideon time...
.
|
I've got the recommended shim pack ordered and on the way.
I did re-bend my cartridge bin bracket so that the sub plate doesn't press into it. Ran some 357 after that, 100 rounds. No ejection problems with 357, and no priming problems. Historically, I've not had much priming issues with 357 so this was not a surprise, and doesn't really constitute an improvement. I did have the usual issues with the case feeder; 357 magnum and the LnL case feeder are known to not get along (I am considering some home brew mods to fix these issues, if they work I'll post them up here). My calculated rounds per hour sat at almost exactly 200. I think my pace was slowed by 1) no bullet feeder and 2) having to babysit the case feeder to get cases to fall correctly. This is not needed in other calibers, but is in 357. I also had issues with some 357 cases not aligning with the sizing die correctly and catching the mouth of the die rather than feeding into the die. I've had this problem since owning the press with straight wall cases; 357 and 45 seem to be the worst about it. I expect my shell plate riding too high might be a contributor to this, so my hope is that once my shims get here (early next week) that they will also correct this issue. I'll post an update when it's available. My goal, once I have the kinks worked out of this thing, is to be able to run reliably at 400 rds / hr. If I can't ultimately achieve that I'll sell the press and go back to a Lee Classic Turret. |

|
Originally Posted By JamesP81:
Just took my shell plate off and screwed the bolt in, pulling up and sure enough, my drive hub is riding proud of the subplate. I don't have a tool appropriate to measure it, but you can easily see and feel it. It has to be proud to a degree or the subplate will bind on the shell plate. Get a set of feeler gauges from an autoparts store, put on your shell plate as you would normally and lift it up. It will move up slightly because of the hub arrangement. See how thick a feeler gauge you slip between the sub plate and the shell plate. Somewhere from 0.003 to 0.007 is optimum. Under .003 and you'll start to get binding, the further north of 0.007 you go and you'll have issues with slop and case shake. I'll just add, seems to me with the LNL and many other progressives if you creep slowly through the cycle things don't work well. My subplate hits the bin bracket if you install it all the way in. I moved the bracket around until it no longer interferes with the subplate. |
|
High primers and inconsitent case ejection? I have both those crop up when my shell-plate gets loose. You might have a problem with your shell-plate.
Regardless, Hornady customer service is excellent, call them. For while I was a away for vacation, I boxed up all my Hornady Press's and sent them back to Hornady for refurb. They paid the shipping both ways, and replaced a bunch of parts for free, and then tuned them, and shipped them back with a bag of additional spare parts, faster than I got back from my Christmas holiday. |
|
Originally Posted By johnh57:
It has to be proud to a degree or the subplate will bind on the shell plate. Get a set of feeler gauges from an autoparts store, put on your shell plate as you would normally and lift it up. It will move up slightly because of the hub arrangement. See how thick a feeler gauge you slip between the sub plate and the shell plate. Somewhere from 0.003 to 0.007 is optimum. Under .003 and you'll start to get binding, the further north of 0.007 you go and you'll have issues with slop and case shake. I'll just add, seems to me with the LNL and many other progressives if you creep slowly through the cycle things don't work well. My subplate hits the bin bracket if you install it all the way in. I moved the bracket around until it no longer interferes with the subplate. I think I've got some feelers, so I'll check this evening. That said, I can just about guarantee clearance is well above 0.007. I can tell from eyeballing it it's not that tight. I just find it unlikely I got two bad shellplates. |
|
OK, used my feeler gauges. Unfortunately, my smallest feeler was 0.012".
With that said, my shellplate, when tightened down, will rock back and forth visibly slightly. Between station 4 and 5, if it's rocked away from me, the 0.012 feeler gauge will get between the shell plate and subplate. Not without some resistance, but not a large amount. Leaving the plate straight, the 0.012 feeler can still get in between the sub plate and shell plate, but with more resistance. So I can't say what the exact clearance is, but in a condition of tilting, it can rise as high as 12 thousandths. That's all I can say for certain. If clearance is 6 thousandths that seems to be in spec, but on the edge. I think I will still try the shims. If that doesn't work, I will call Hornady again and see what they say. Last I talked to them they were talking about replacing the drive hub. If the shims don't work, maybe that will. |
|
Originally Posted By lazyengineer:
High primers and inconsitent case ejection? I have both those crop up when my shell-plate gets loose. You might have a problem with your shell-plate. Regardless, Hornady customer service is excellent, call them. For while I was a away for vacation, I boxed up all my Hornady Press's and sent them back to Hornady for refurb. They paid the shipping both ways, and replaced a bunch of parts for free, and then tuned them, and shipped them back with a bag of additional spare parts, faster than I got back from my Christmas holiday. As discussed in my last post, my shellplate has some back and forth play. Apparently it's an issue with all my shell plates...which makes me think it isn't a shellplate problem. It would be unlikely for all my shell plates to be defective. |
|
Originally Posted By JamesP81:
OK, used my feeler gauges. Unfortunately, my smallest feeler was 0.012". With that said, my shellplate, when tightened down, will rock back and forth visibly slightly. Between station 4 and 5, if it's rocked away from me, the 0.012 feeler gauge will get between the shell plate and subplate. Not without some resistance, but not a large amount. Leaving the plate straight, the 0.012 feeler can still get in between the sub plate and shell plate, but with more resistance. So I can't say what the exact clearance is, but in a condition of tilting, it can rise as high as 12 thousandths. That's all I can say for certain. If clearance is 6 thousandths that seems to be in spec, but on the edge. I think I will still try the shims. If that doesn't work, I will call Hornady again and see what they say. Last I talked to them they were talking about replacing the drive hub. If the shims don't work, maybe that will. Rocking is probably all about the drive hub. It's job isn't just to hold and turn the shell plate, it's to keep the plate centered and level. If the shell plate is tightened down, the only thing I can think of that would let it move is the hub not staying centered - and firmly attached to the driving rod - in the press. |
"--you can't conquer a free man; the most you can do is kill him."
Heinlein
NRA Life Member
Glock Certified Armorer
Certified AR15 Armorer
Certified M1911 Armorer
Heinlein
NRA Life Member
Glock Certified Armorer
Certified AR15 Armorer
Certified M1911 Armorer
|
Originally Posted By GHPorter:
Rocking is probably all about the drive hub. It's job isn't just to hold and turn the shell plate, it's to keep the plate centered and level. If the shell plate is tightened down, the only thing I can think of that would let it move is the hub not staying centered - and firmly attached to the driving rod - in the press. Let me ask this then. How much tilt play should the drive hub have? I can understand how you might not want it to be absolutely tight to accommodate cartridge casings of varying dimensions, but that's just a guess on my part. How much is acceptable, how much is too much? |
|
Originally Posted By JamesP81:
I did have the usual issues with the case feeder; 357 magnum and the LnL case feeder are known to not get along (I am considering some home brew mods to fix these issues, if they work I'll post them up here). For those who don't have a Lock N Load AP with the case feeder, Hornady's instructions tell you that all you need is the right size tube from the collator, and the cases will feed just fine. Well yeah, if... These cases often stick on the outside of the pivot that sequences the brass to drop into position to start loading, and require more than a little nudge to get 'em to feed. My prior .38/.357 loading on the LnL was prior to getting the case feeder, so I ran into the same issue as you, but I had a fix already. I'd made a plastic adapter to go on top of the pivot so I could get .30 Carbine brass to feed consistently. Later, ARFCOM member LutzNutz used his 3D printer smarts to create custom pivot adapters for a lot of calibers that had specific issues, including 300 Blackout. That adapter works perfectly for .30 Carbine, so my little gadget wasn't needed anymore. Now for the cool part: a .30 Carbine case is 33mm long. So is a .357 case. AH HA!!! Here's my adapter: 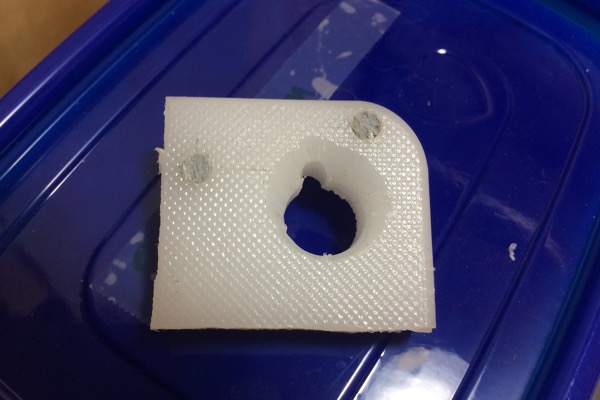
I opened up the top part to get the rim of a .357 case to drop in every time, and it works, every time. Here's the adapter in position on the pivot: 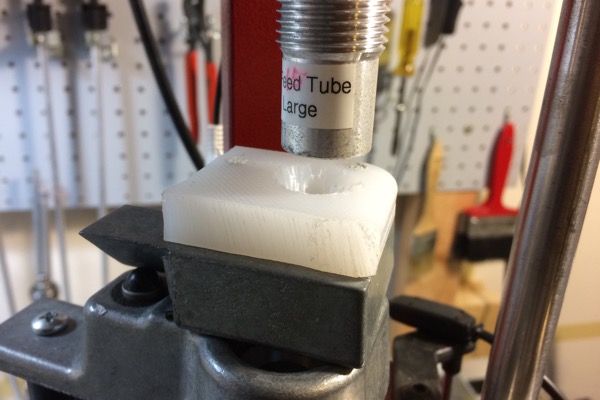
With one case on the adapter: 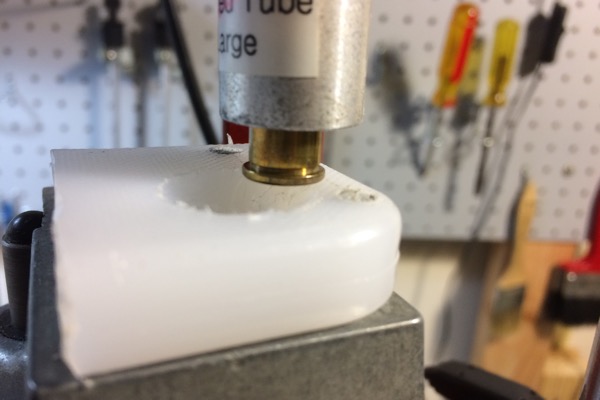
And with one case in the pivot and the next one "on deck": 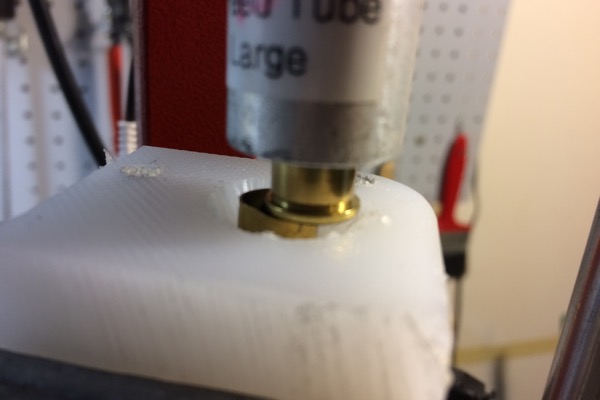
Note that these are .38 Special cases; it works for them exactly as well as .357 cases. The high tech part: this is cut off of a 3/8" thick (and cheap) cutting board. I basically traced the outline of the Hornady pivot adapter, then cut out a (yes, rough) chunk of the plastic stuff to cover the same space. I used some plastic rod for the alignment pegs, then drilled the hole through the block. Today, I used an RCBS deburring tool to open up and funnel the top, then I used a hobby knife to open it up a little more on the side that the case needed to slip into the adapter from. I'm not sure if I'm going to get motivated enough to clean up this little gadget to make it all smooth and pretty, but I'm very, very pleased with how well it works as is. And maybe this is one Lock N Load AP issue I have helped you with! |
"--you can't conquer a free man; the most you can do is kill him."
Heinlein
NRA Life Member
Glock Certified Armorer
Certified AR15 Armorer
Certified M1911 Armorer
Heinlein
NRA Life Member
Glock Certified Armorer
Certified AR15 Armorer
Certified M1911 Armorer
|
Originally Posted By GHPorter:
It seems that I hadn't done too much with my case feeder and .357 brass in the past. Today I sized about 150 .357 cases and had a big lightbulb pop up over my head. "AH! This is what he was talking about!" For those who don't have a Lock N Load AP with the case feeder, Hornady's instructions tell you that all you need is the right size tube from the collator, and the cases will feed just fine. Well yeah, if... These cases often stick on the outside of the pivot that sequences the brass to drop into position to start loading, and require more than a little nudge to get 'em to feed. My prior .38/.357 loading on the LnL was prior to getting the case feeder, so I ran into the same issue as you, but I had a fix already. I'd made a plastic adapter to go on top of the pivot so I could get .30 Carbine brass to feed consistently. Later, ARFCOM member LutzNutz used his 3D printer smarts to create custom pivot adapters for a lot of calibers that had specific issues, including 300 Blackout. That adapter works perfectly for .30 Carbine, so my little gadget wasn't needed anymore. Now for the cool part: a .30 Carbine case is 33mm long. So is a .357 case. AH HA!!! Here's my adapter: http://www.ghporter.com/PubPics/Arfcom/Casefeeder/adapter1.jpg I opened up the top part to get the rim of a .357 case to drop in every time, and it works, every time. Here's the adapter in position on the pivot: http://www.ghporter.com/PubPics/Arfcom/Casefeeder/adapter2.jpg With one case on the adapter: http://www.ghporter.com/PubPics/Arfcom/Casefeeder/adapter_with_case.jpg And with one case in the pivot and the next one "on deck": http://www.ghporter.com/PubPics/Arfcom/Casefeeder/adapter_2cases.jpg Note that these are .38 Special cases; it works for them exactly as well as .357 cases. The high tech part: this is cut off of a 3/8" thick (and cheap) cutting board. I basically traced the outline of the Hornady pivot adapter, then cut out a (yes, rough) chunk of the plastic stuff to cover the same space. I used some plastic rod for the alignment pegs, then drilled the hole through the block. Today, I used an RCBS deburring tool to open up and funnel the top, then I used a hobby knife to open it up a little more on the side that the case needed to slip into the adapter from. I'm not sure if I'm going to get motivated enough to clean up this little gadget to make it all smooth and pretty, but I'm very, very pleased with how well it works as is. And maybe this is one Lock N Load AP issue I have helped you with! Interesting idea, though I'm not set up to make something like this. In all truth, I think if you could use the small drop tube instead of the large one, that'd solve the issues...the reason you can't is the small plastic tube that fits the small drop tube won't feed 357 cases because the rim is too big. I like your idea though...it accomplishes the same thing from a different direction. IMO, the case feeder really is the weakest designed component in the LnL AP system. If I had it to do over again I think I'd have preferred to buy a bullet feeder instead. Even the case feeder on the Lee Loadmaster is better than this. |

|
Originally Posted By AR-Bossman:
http://www.ebay.com/itm/38-Special-357-Magnum-pistol-pivot-adapter-for-Hornady-LNL-Case-Feeder-/321966118795?hash=item4af6ad178b:g:bIgAAOSwhOVXf8Q5 http://i.ebayimg.com/images/g/bIgAAOSwhOVXf8Q5/s-l1600.jpg |
"--you can't conquer a free man; the most you can do is kill him."
Heinlein
NRA Life Member
Glock Certified Armorer
Certified AR15 Armorer
Certified M1911 Armorer
Heinlein
NRA Life Member
Glock Certified Armorer
Certified AR15 Armorer
Certified M1911 Armorer
|
I got my shims in the mail today, but I can't install them.
The subplate retaining screws on each side of the ram are STUPID tight. I've applied as much force to the allen wrench as I'm willing to apply. Anymore and the heads are going to strip. ETA: Nevermind, got them loose. Used a heat gun and a hammer to tap on the allen wrench. Finally broke them loose. Going to have to 1) figure out how to remove the spent primer drop tube and 2) wait for the subplate to cool off
|
Shimming is causing additional problems. At first I tried a 5 thousandths shim. This froze the indexing pretty solid. I eventually ended all the way down to a 2 thousandths shim. Indexing was not frozen, but there was more resistance in the indexing...you could tell it just wasn't quite right. Took the 2 thousandths shim out and I see this:

I've pretty much arrived at WTF now. I guess I'll call Hornady and see if their proposed replacement drive hub will help any. |
|
Originally Posted By AR-Bossman:
Then it was shimmed already. What could a new drive hub do that a properly shimmed one couldn't? I didn't see a shim in there already. To answer your question, I have no idea. It's going to be Hornady's problem from this point forward. |
|
Originally Posted By TZ250:
Did you lube the shim when you assembled it? Yes. I used grease. It looks like the the subplate is folding the outer part of the shim down over the shoulder on the drive hub. Doesn't happen with thicker, stronger shims. However, the thicker shims freeze up indexing. The shim pushes the subplate retaining screws out of line with the holes for them in the ram. The downward pressure the screws then exert against the shim is too much, and the works won't move. |
| Talked to Hornady over lunch. I think the guy didn't seem to think much was actually wrong, but I finally explained all the problems I was having (case ejection failures in 223, shell plate jamming upon ejection with 357, 45 and 357 cases not aligning with sizing die always, high primers especially in 223, but also in 45 and 357) and he either decided that 1) something was wrong or 2) he was tired of listening to my crap. Either way, they are going to send out a replacement subplate. We will see if this fixes the issues. |
Armory Sponsor