


Armory Sponsor
GSG General - Contact Info, Breakdown (Page 1 of 6)

Posted: 2/9/2008 2:23:27 PM EDT
[Last Edit: jackal2001][Edited]
|
The GSG-5 is made by a German Company called German Sport Guns. It is a .22lr Heckler and Koch MP5 Clone. It has a selling price starting at $500.00 MSRP and extra magazines have a strating price of about $30.00.
There has been so much discussion about these weapons that I though it would be nice to get a thread started that combines information from all over the internet. Contact ATI for all Tech Service, Repair and Parts: [email protected] Michael Swoboda has been great when it comes to customer service for the GSG-5. He works for GSG and has helped numerous amount of people by shipping replacement parts that are needed. I would suggest contacting him if all other options are exhausted. His email address is [email protected] Please Note: When cleaning your rifle you need to de-cock the weapon, which means to dry fire it. Do not throw away the red plastic piece that ships in the breech. Use this to dry fire to de-cock before cleaning as to not damage the firing pin. Dry firing without this plastic piece or snap caps can damage the firing pin. First of all lets just get into the promo pic of the weapon and official accessories offered by GSG. 
Some places that have official accessories: Cope's Distributing 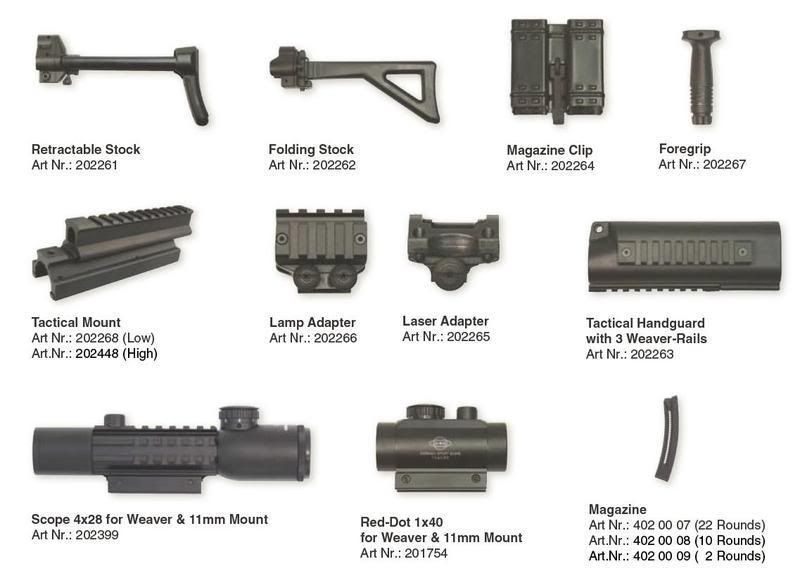
Click Here for the full size version of the exploded view diagram. 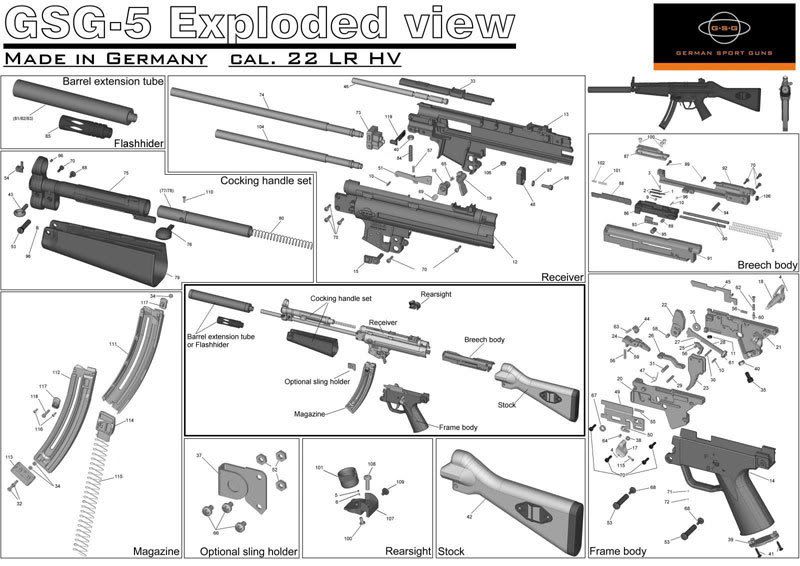
Parts Breakdown PDF Click Here for a complete PDF diagram of parts. Gen1 or Gen2? Below is a pic on how to tell if you have a Gen1 or Gen2 GSG-5. The only difference is some slight changes to the front end of the rifle where the cocking tube is. The front sight is also removable. 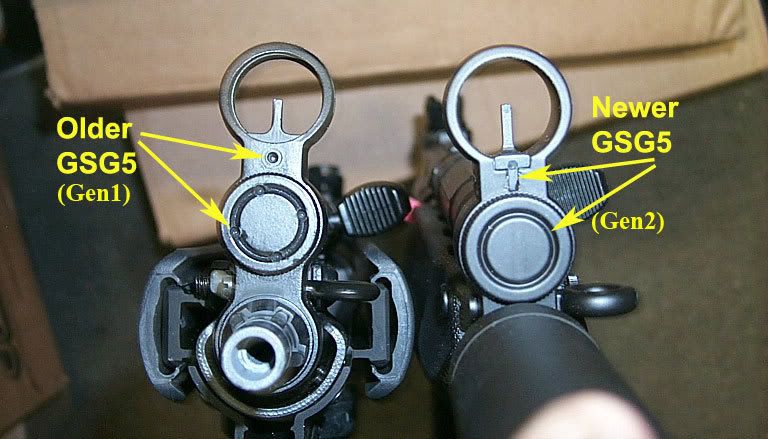
|
|
Breakdown by Simplegreen
Please note you should use the ORANGE HANDLE TOOL that ships with the rifle to remove all "phillips type" screws. They are not a standard phillips head and you will strip them using the wrong driver. Make sure the weapon is unloaded and dry fire it. The hammer must released before proceeding. 1. Remove the 3 takedown screws. One at the stock, one at the lower, and one at the handguard. 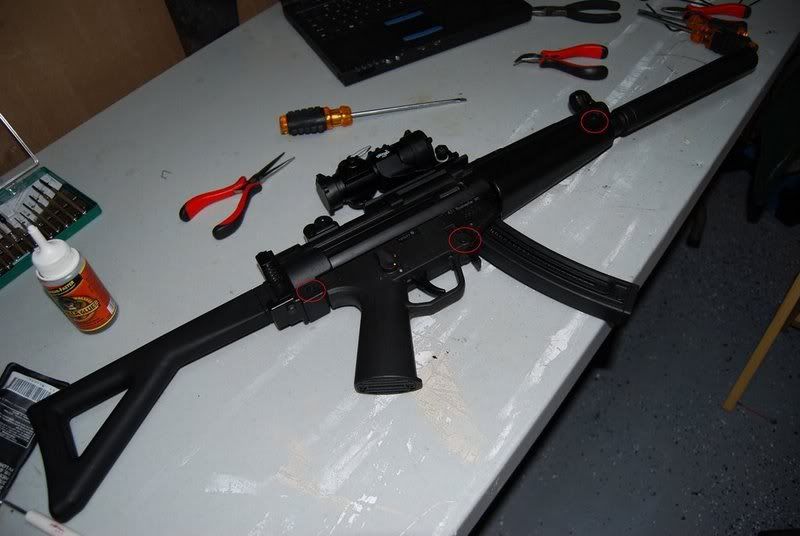
2. Picture with the stock and forearm removed. 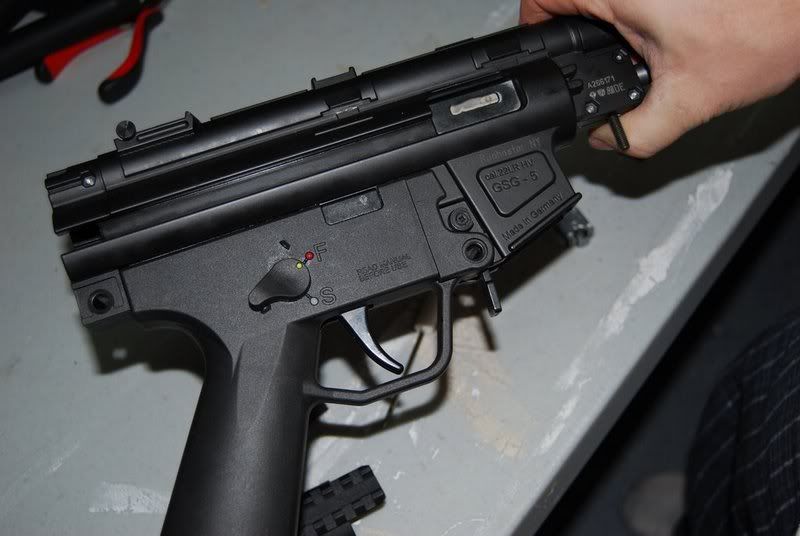
3. Remove the hex screw from inside the back of the upper receiver and be careful not to lose the lock washer. Simply side down the block and remove it. 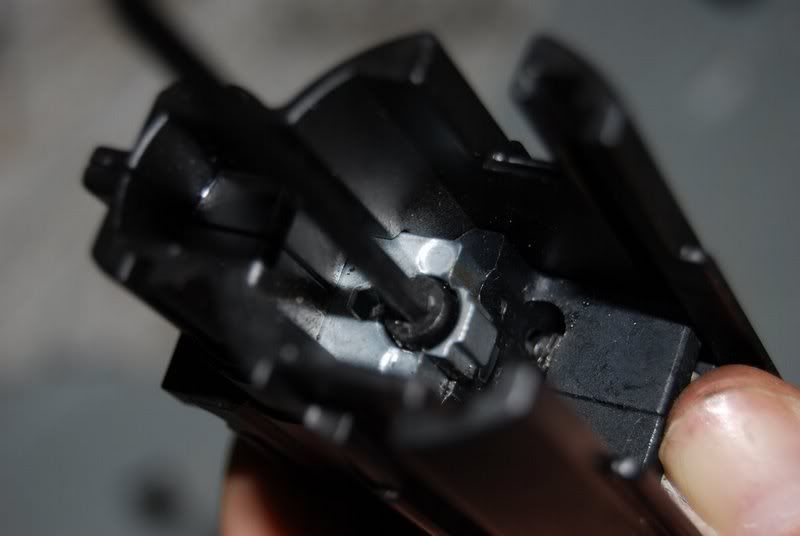
4. Start to slide back the lower receiver from the upper. A slight twisting may be necessary if it is too hard to slide back. 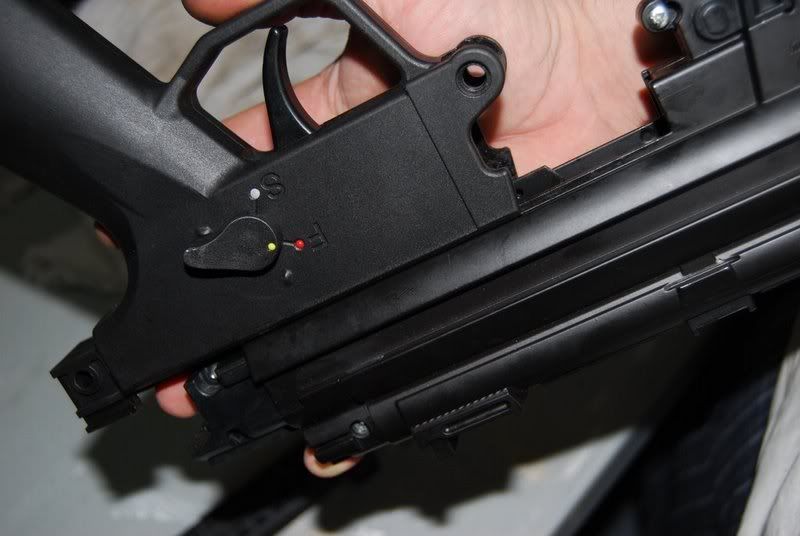
5. While getting it almost off, take note how the breech-block slides back with the lower assembly. Once you have the lower removed, you can slide the breech-block completely out the rear. 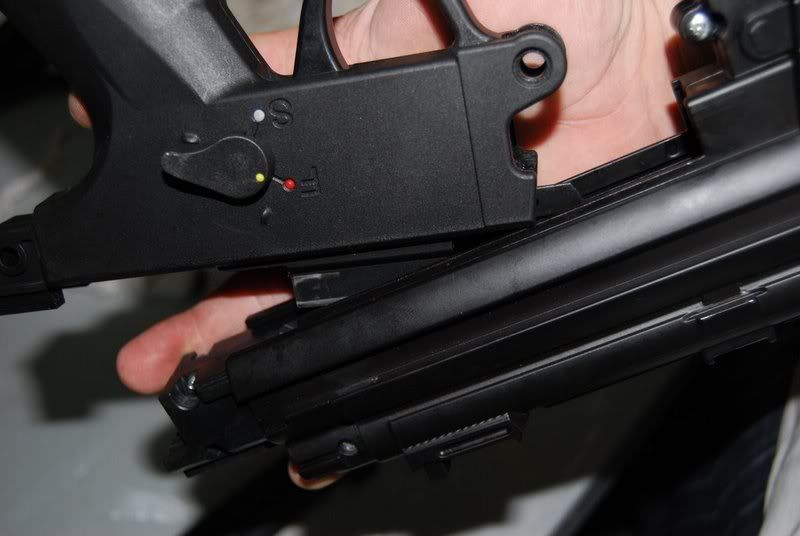
6. If you want to take the weapon down further, start by taking out the screw below the rear sight at the back of the upper receiver. 
7. Take out the screw that holds the rear sight on. 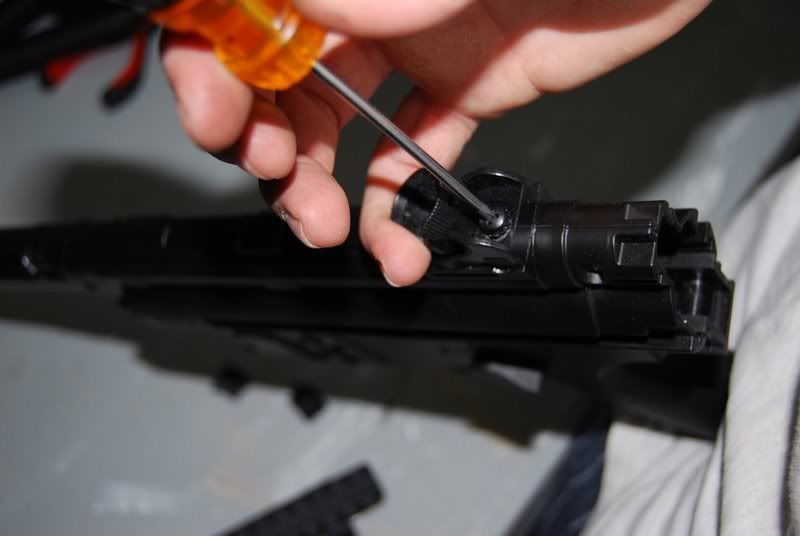
8. Remove ALL 3 screws and the set screw at the bottom of the barrel block area. Once ALL screws are removed you can slide the front end off the weapon. 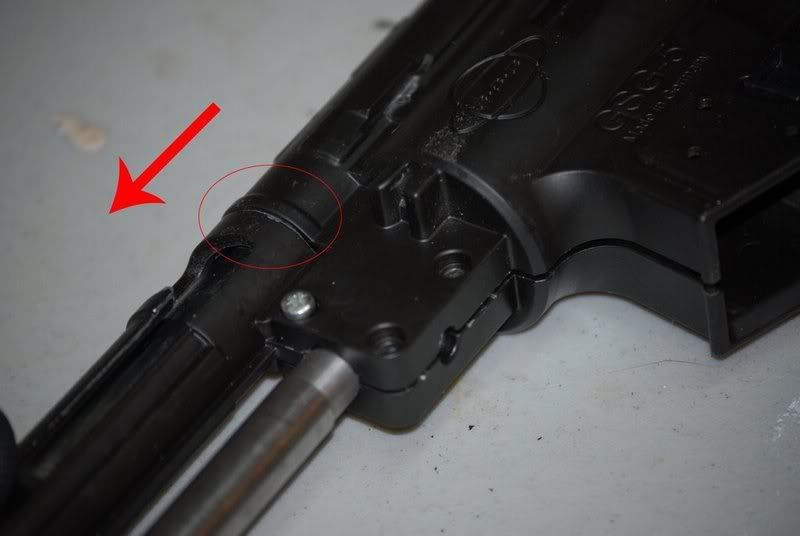
9. Once you have the front end off, you can slowly and carefully split the receiver shell apart. There is the bolt hold open spring in there so be careful you don't lose it. See the Troubleshooting Section for info on that spring if you don't know where it goes. 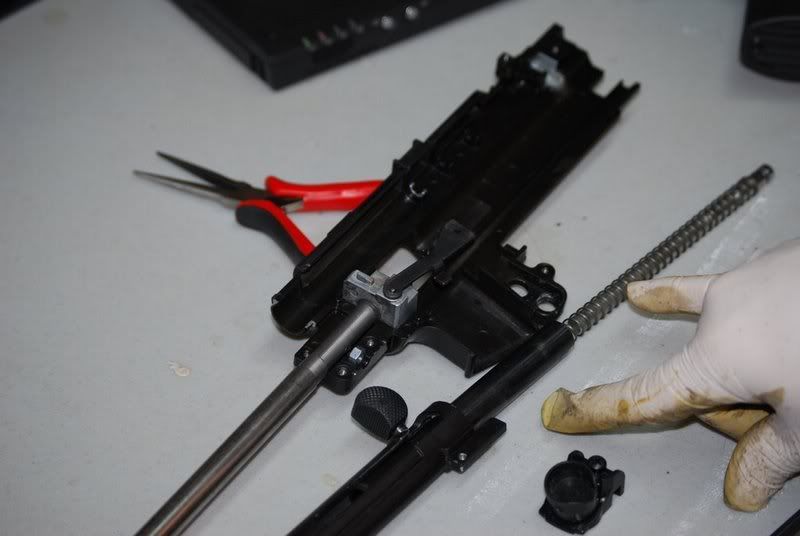
10. You can remove the barrel and block assembly then. 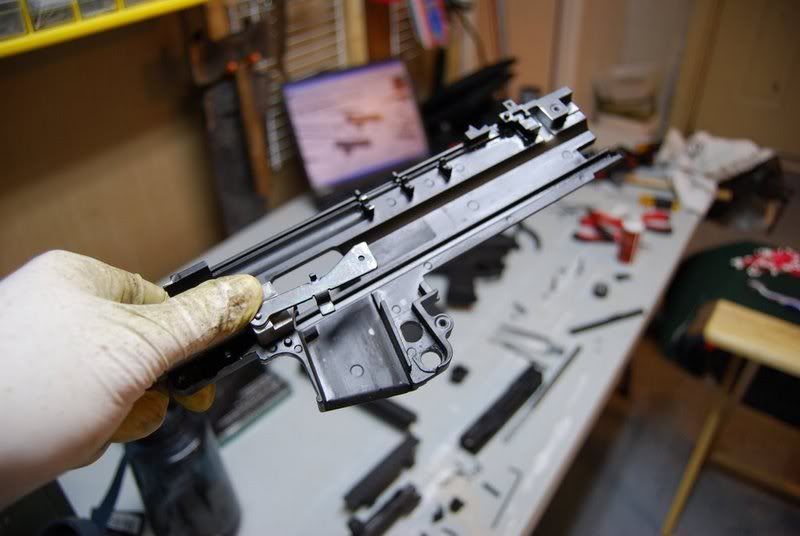
|
|
Remove 5 screws. Use the high torque phillips type driver that ships with the rifle to remove the 3 screws on the left and a T9 torx for the other 2. 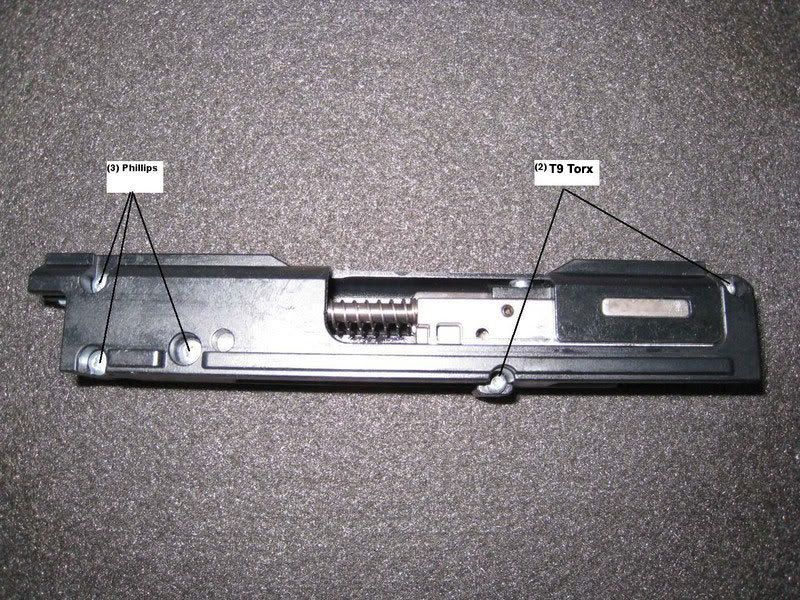 Remove top cover of bolt. The firing pin spring is captured underneath this cover. It will not be removable at this point but keep you hand over it just in case. Also take note when removing the 2 main springs. There is a narrow end and a wider end to the springs. The narrow end goes in and touches the breech-housing. If you put them on backwards the springs may bind in the breech housing. 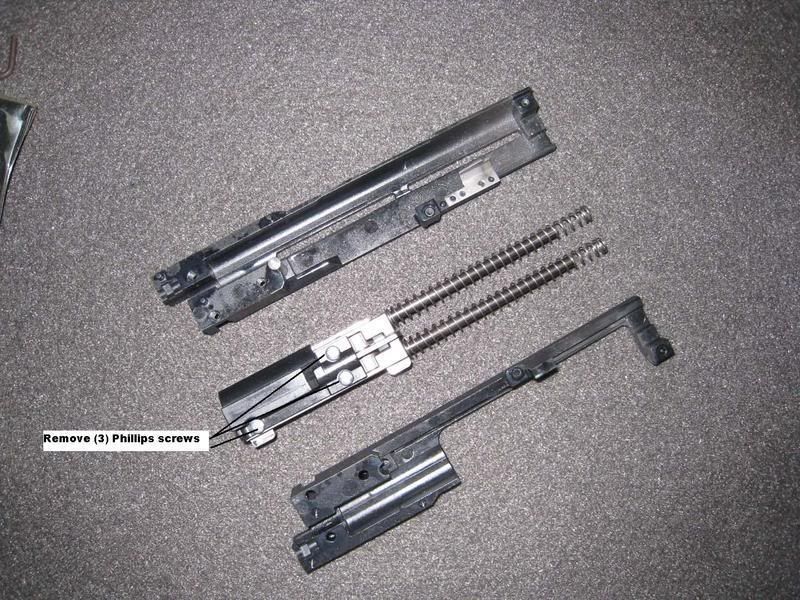 This is looking down from the back side of the bolt. Spring is captured and firing pin is marked in picture. 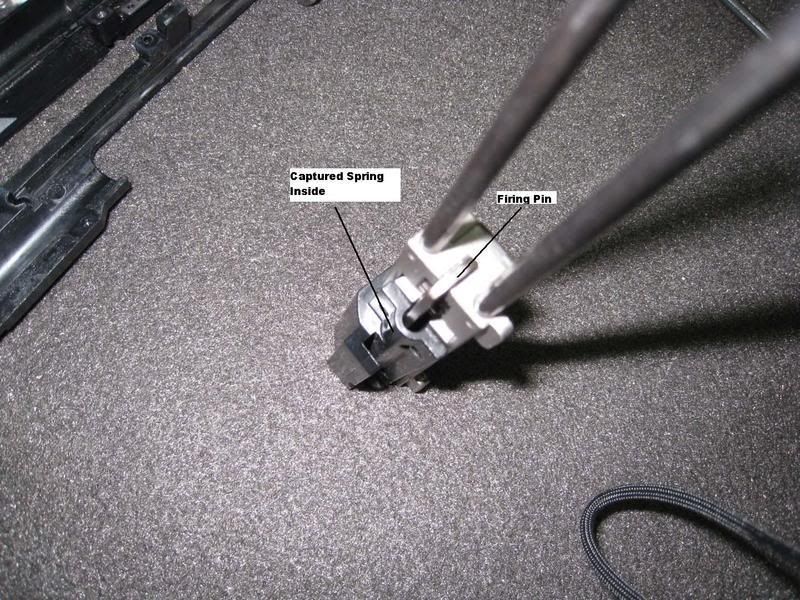 Remove the set screw in order to get at the pin that holds firing pin. It is a 1.5mm hex wrench. 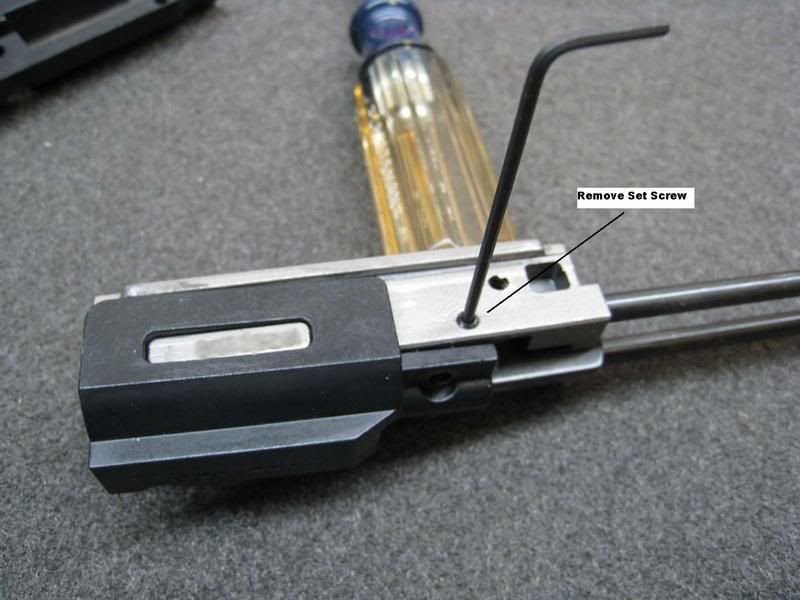 Flip the bolt over. I needed to push the pin out and used a modified paperclip. Before pushing pin out, you need to hold the top cover, the rounded button, and rear of the firing pin. Once the pin (holding firing pin) is removed, the firing pin will want to jump out the back. Using a combination of your fingers, thay can all be captured and eased out. 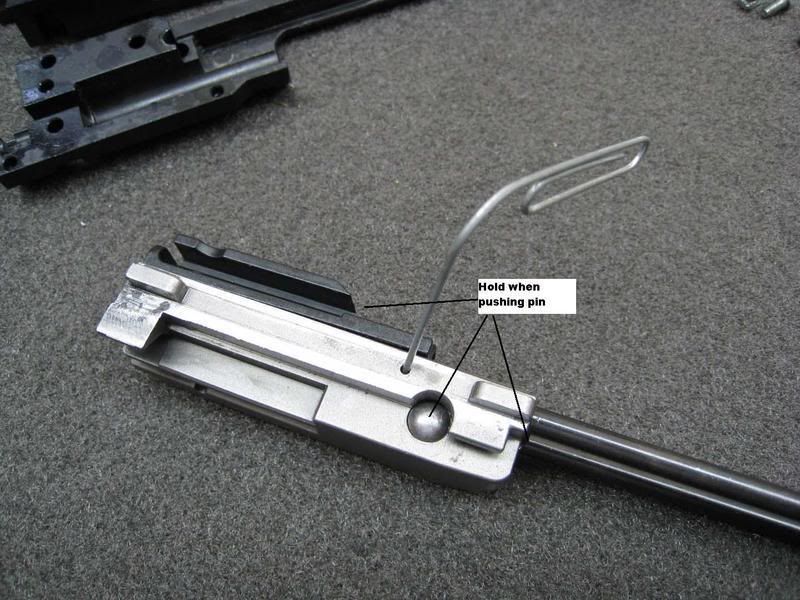 Disassembled bolt. You can see the spring laying in the top cover housing. 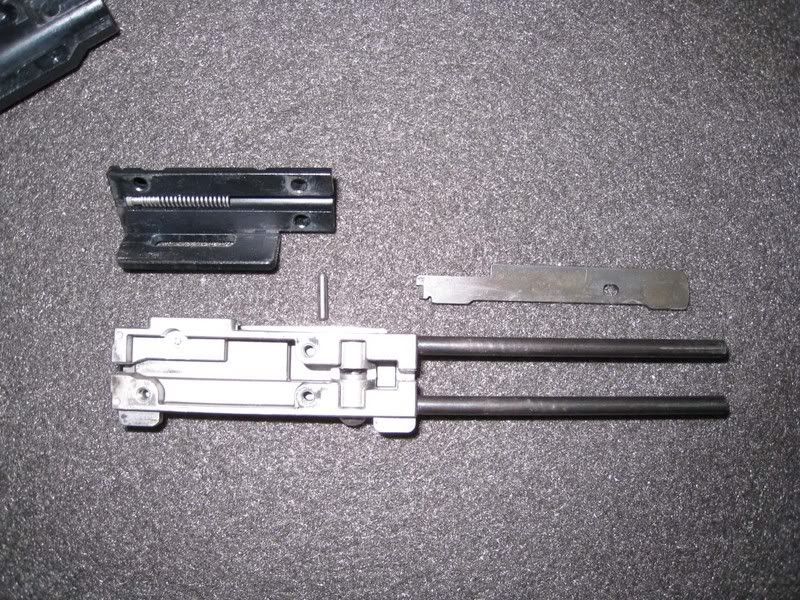 Upon reassembling: I used some moly lube on the two points in the picture. I found it best to assemble upside down. Lay the spring in the top cover. Lay the upside down bolt onto the top cover. Press in the rounded button until you see the groove. At this point you can insert the firing pin from the rear side. You will feel the top part of the pin contact the spring and you will need to compress until the hole in the pin lines up with the hole in the bolt housing body. At this point, insert the small retaining pin from the side and push it in all the way with the paperclip. Insert the set-screw. At this point you can now insert the (3) phillips screws to secure the top cover. 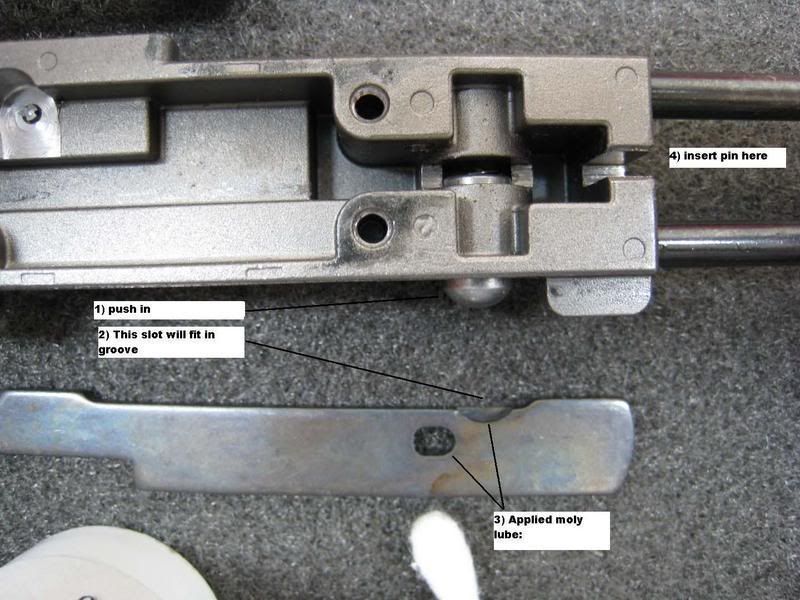 You are now ready to capture the main springs. Do one side at a time and slowly put the halves together. Don't forget to capture the nut on the rear of the bolt assembly. If that nut is not in correctly, the two halves will not meet. At this point I upgraded the phillips drives with the metric socket head cap screws. I also used a nut on the other side. The same size that works for the barrel work on the bolt. I left the Torx drives alone. 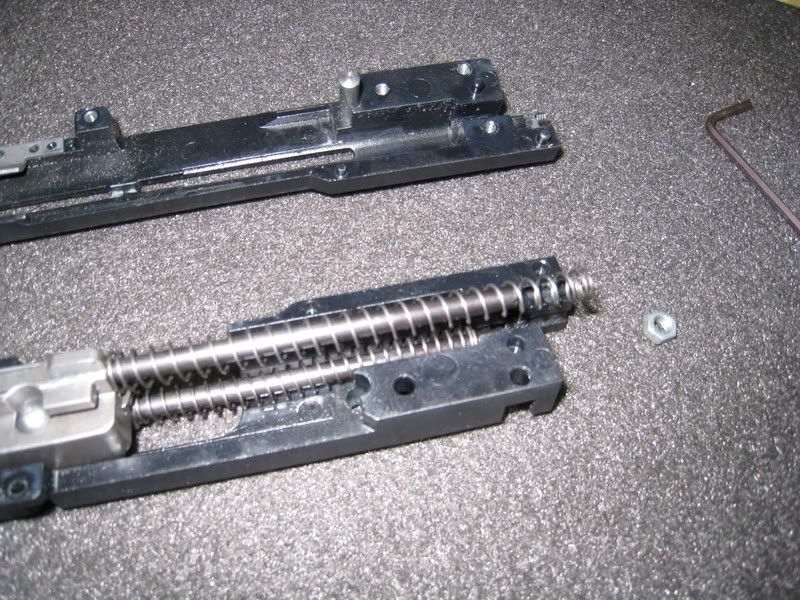
|
|
Take the phillips screw out from the safety lever and then take this side of the lever off. You may need to pry it strait up with a thin flat screwdriver. 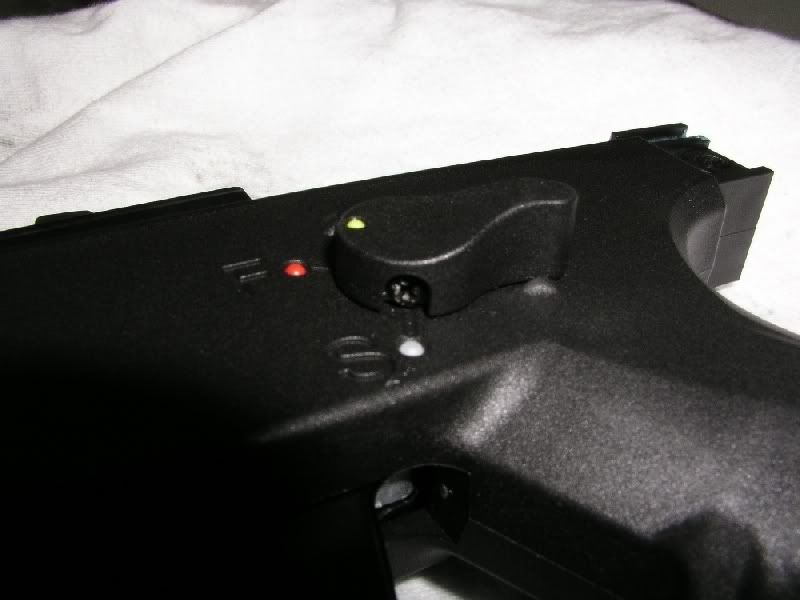 Next push the safety lever through the right side and remove it.  Remove the 2 screws from the bottom of the grip and pull the plate off.  Remove the 4mm hex bolt that holds in the trigger housing to the frame. 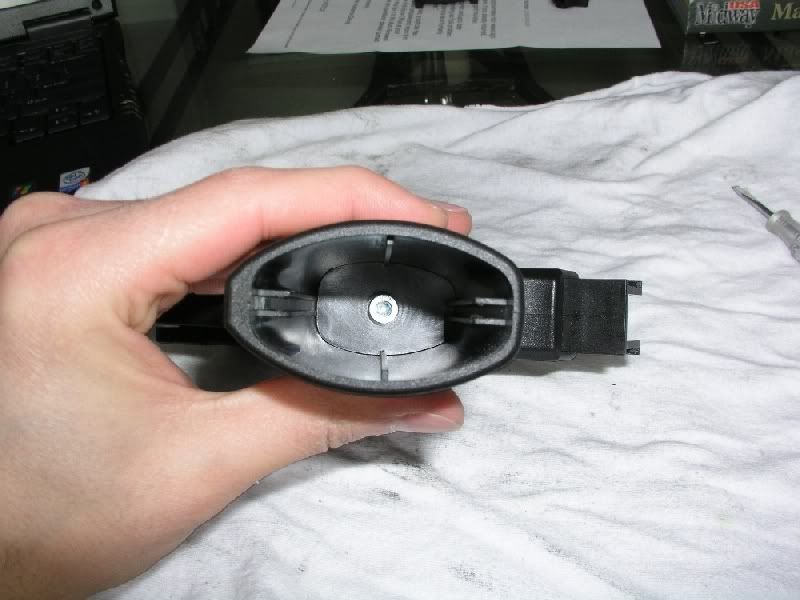 Carefully start to remove the trigger housing from the frame. I used a screwdriver to slowly pry it out. You can start to see the brass bushings showing. 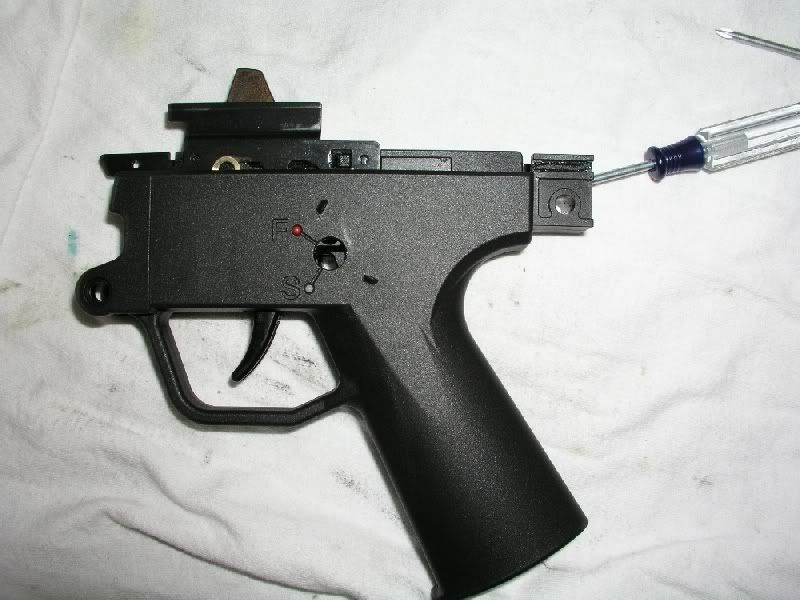 Here is a top down view of the 2 brass bushings that are setting in there. 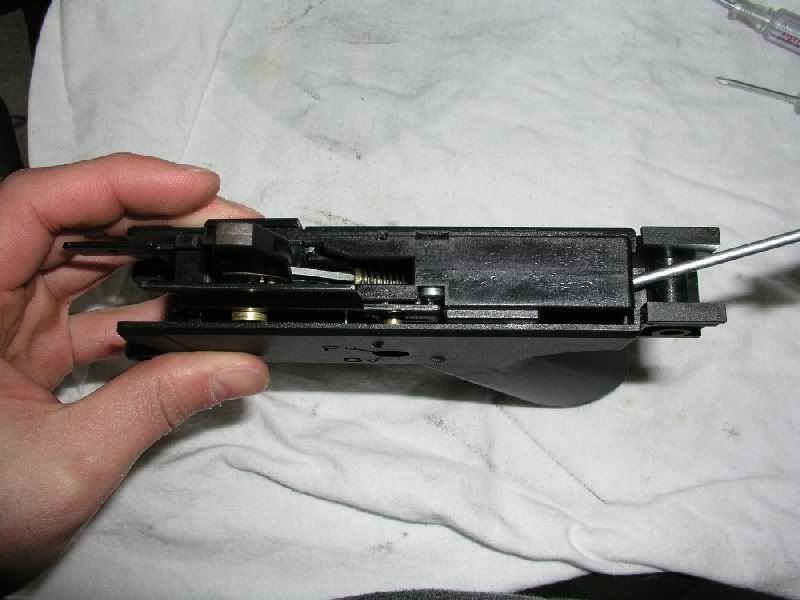 It is best to lay it flat as shown and slowly pry the trigger housing out. You can see the 2 brass bushings. If you do this slowly without any rapid jerking motions, nothing will fly out.  Completely removed from the frame. 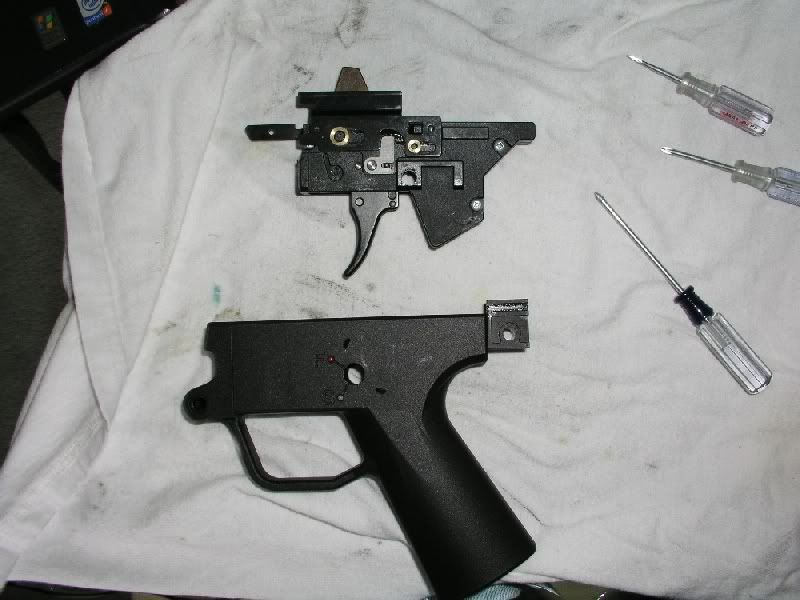 Remove the 2 brass bushings and set them aside. 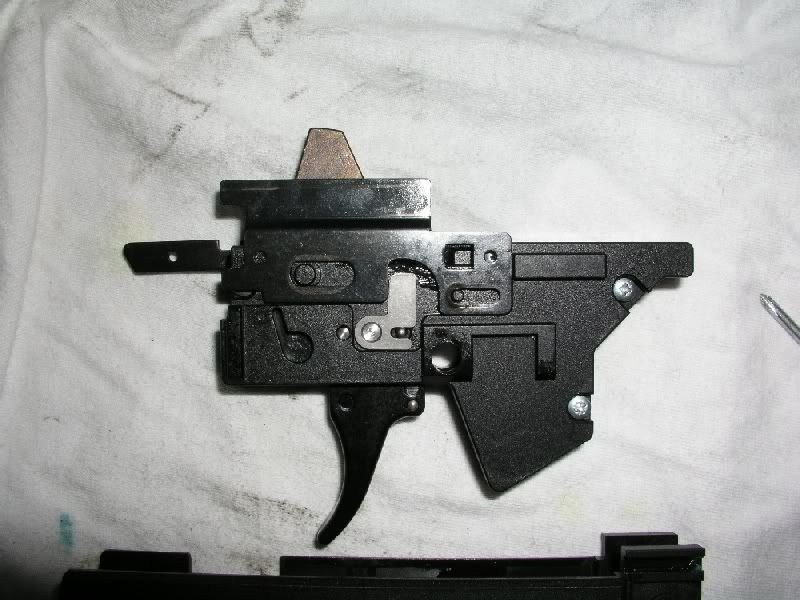 Start to pull off this metal piece, this is the drop safety, and you will see how the spring sets in there.  Pull off the metal bracket being careful that the spring doesn't go flying off. 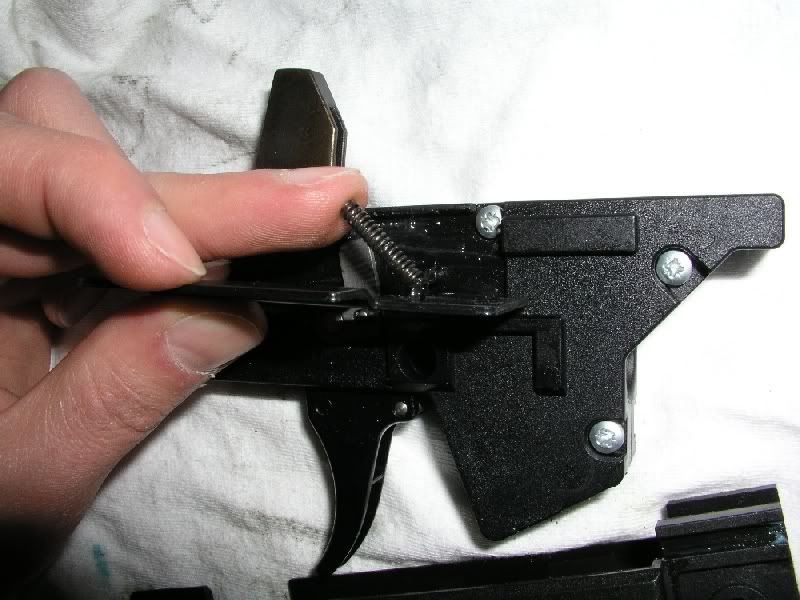 Flip the trigger housing over. We will be removing this spring only. This spring is the one that is used for the magazine safety disconnect. We won't be putting this spring back in. 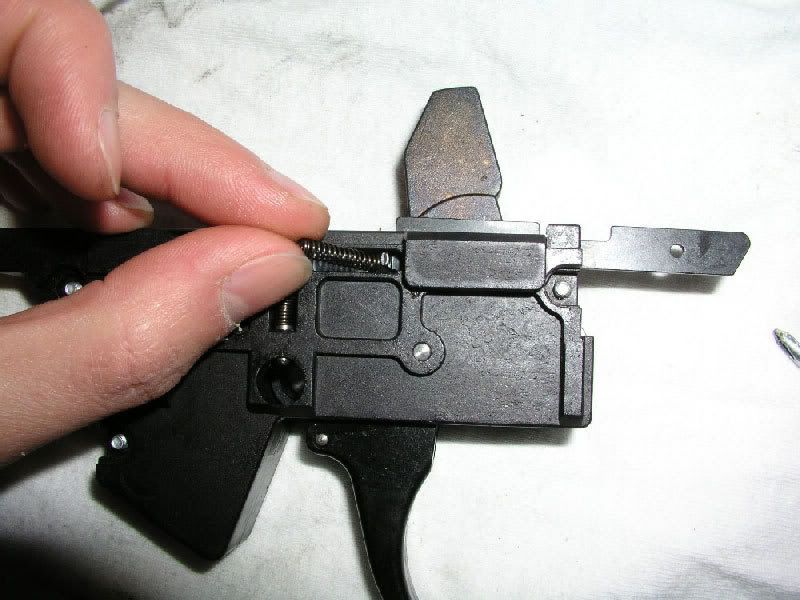 This spring is not removed. Just leave it there. 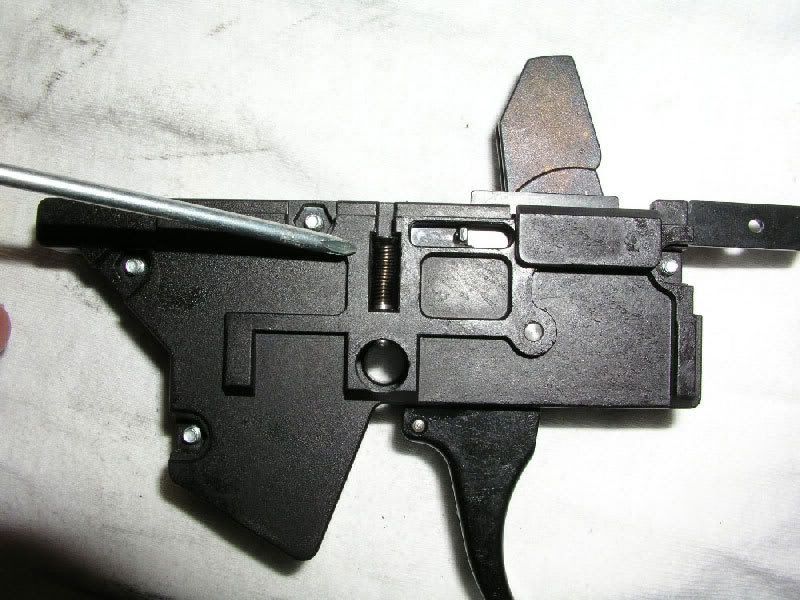 This shows the spring that sits in the front of the trigger housing. You will need to be careful when seperating the 2 halfs of the assembly so this doesn't go flying. 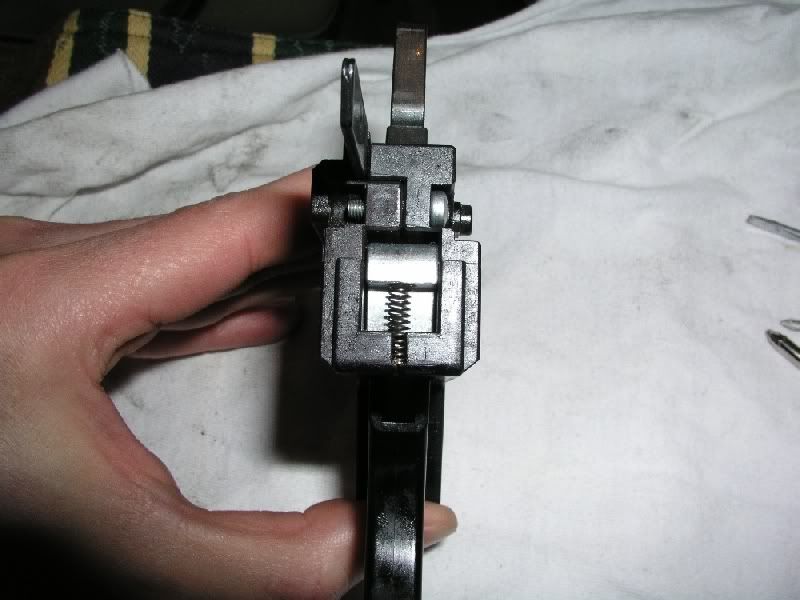 Remove the 4 screws with the high torque phillips provided with the weapon. 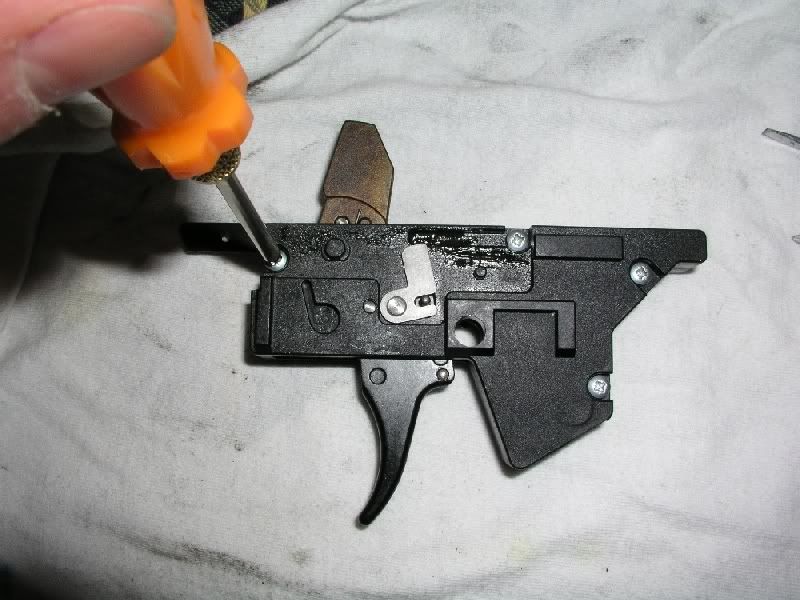 Carefully start the seperate the halves from the front first, and remove the spring.  Carefully remove the top half. Notice the coil spring in the top half. That will be laying on the hammer guide pin. You will need to put in the upper half as shown for reassembly. 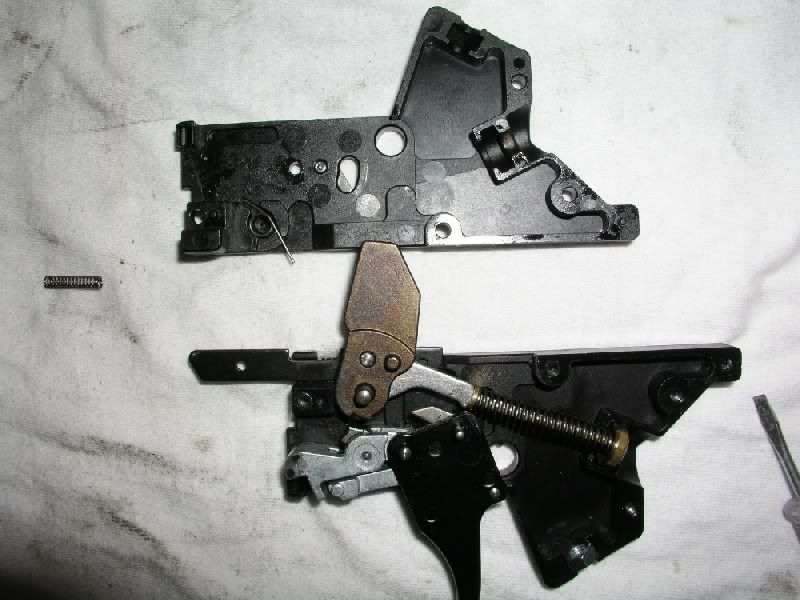 I used a small phillips screwdriver to pull push in and pull up on the hammer spring assembly. The brass bushing won't go flying if you do this.  Remove the hammer assembly by pulling it strait off. Set is aside. 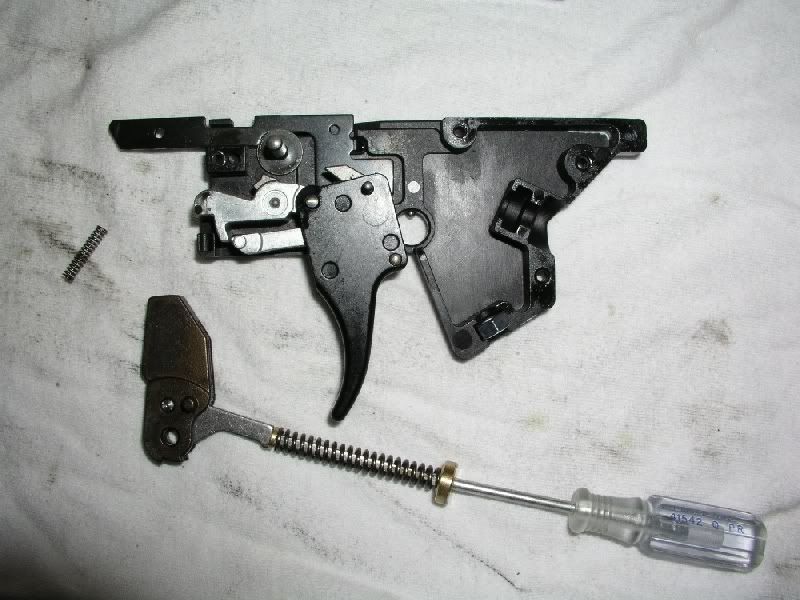 You can now wiggle out the magazine safety disconnect. We won't be reinstalling this. 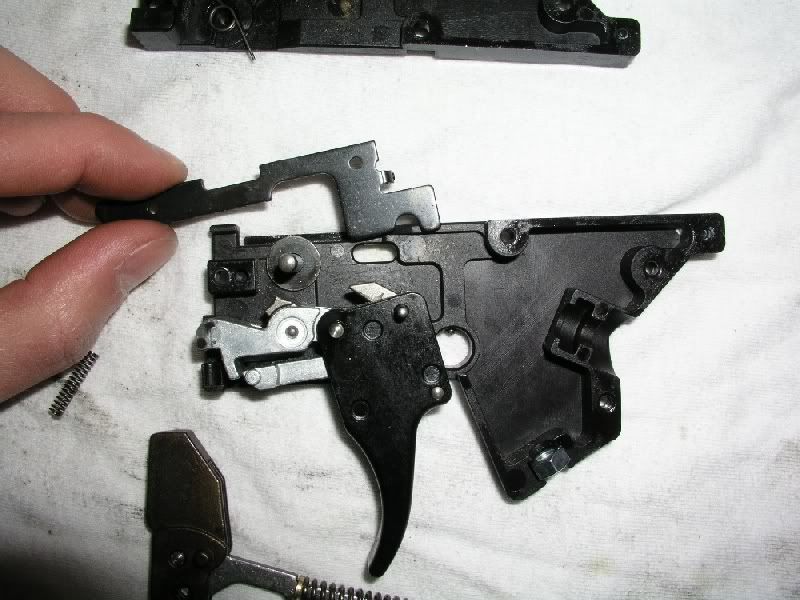 Put the hammer assembly back in. Note the orientation of the hammer teeth/disconnect. 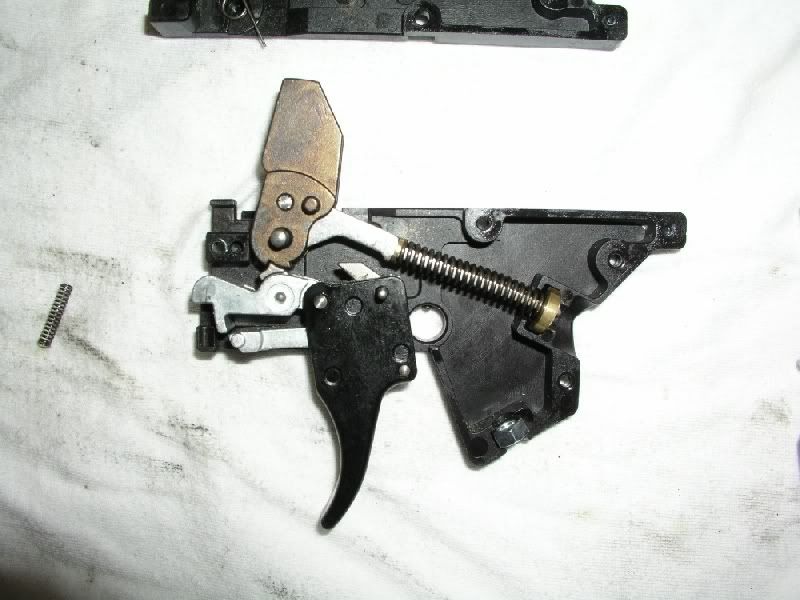 Put this spring back in making sure it doesn't fly out on you. Also make sure you have the nut in the bottom right corner. 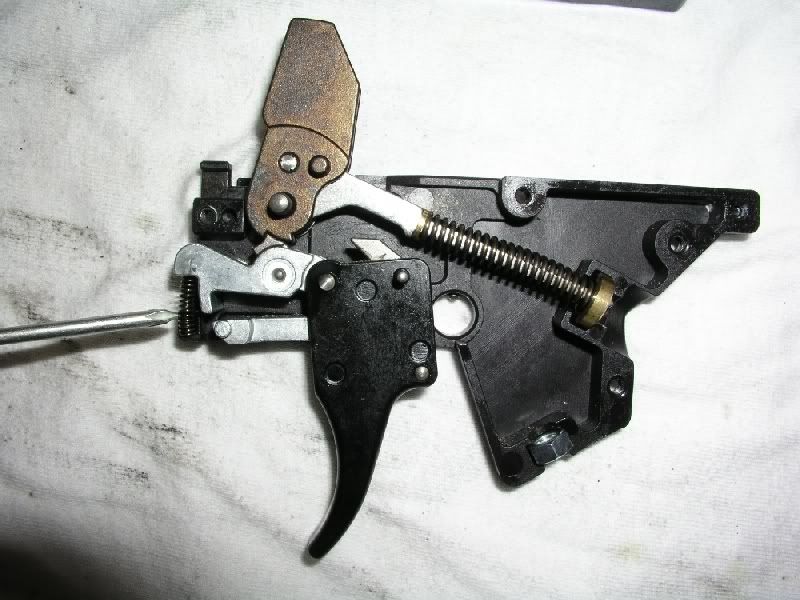 Put the top cover back on. When you do so you will need to put the spring leg to the left of the hammer notch as shown at the top. I replaced my screws at this point with stainless steel hex screws and nuts. 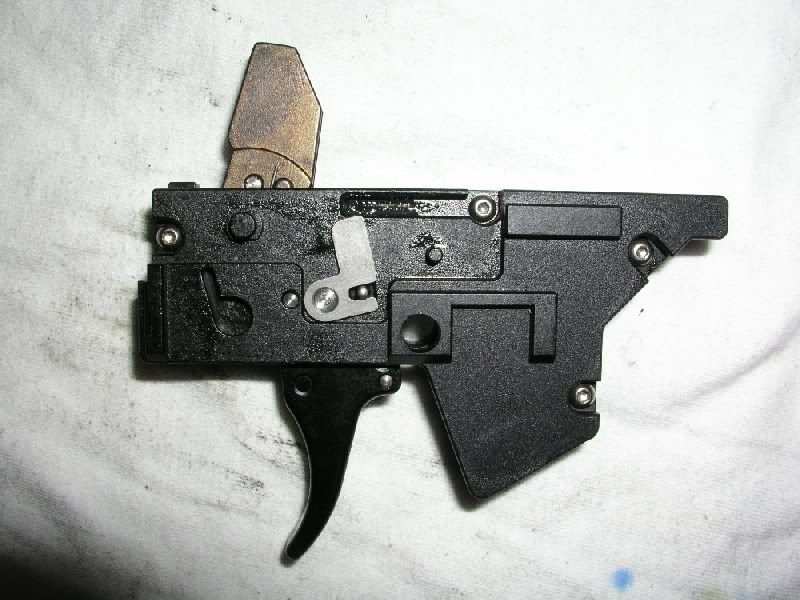 Carefully reassembly this metal bracket, making sure the spring is in there correctly. It should lay flat against the trigger housing.  Put on the 2 brass bushings. 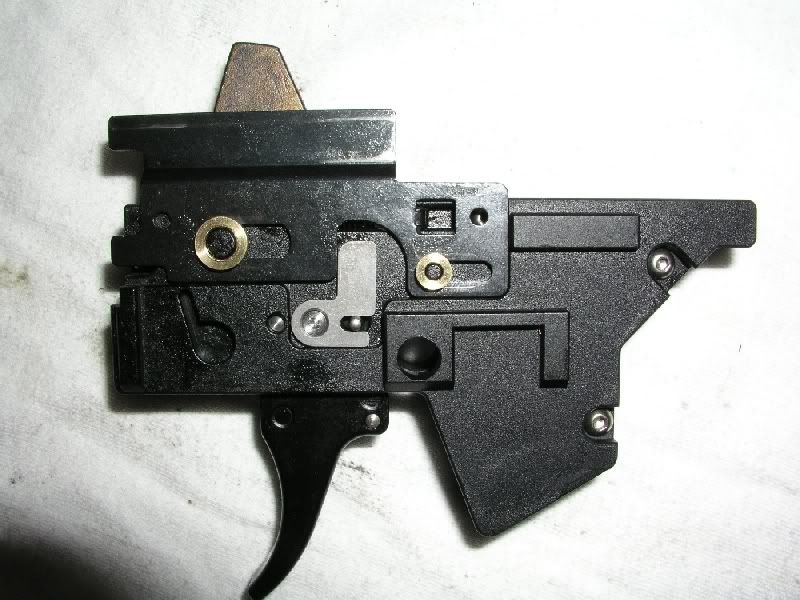 Holding the metal plate as I am, start to slide the trigger housing in the frame. If you apply pressure here, it will not pop out. 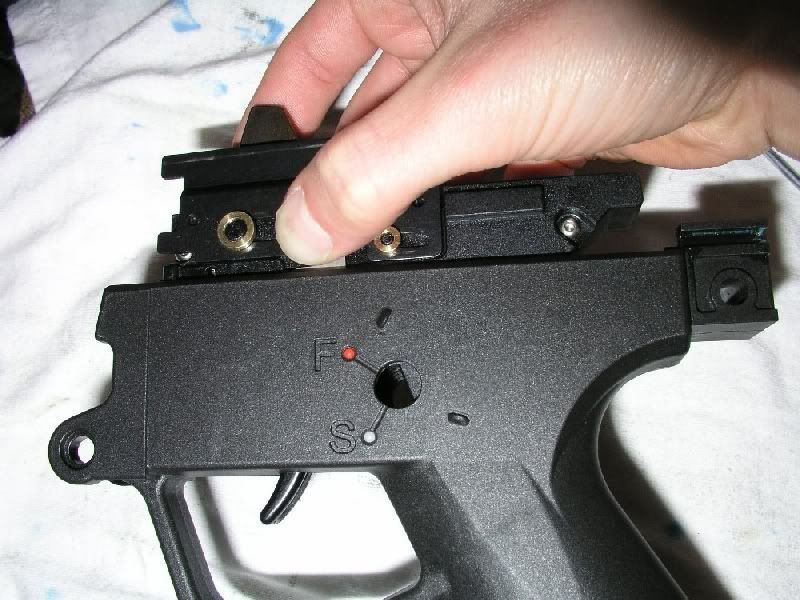 Completely slide the trigger housing back in the frame. Replace the 4mm hex bolt in through the grip. Replace the grip plate and 2 screws. Replace the safety and the safety screw. 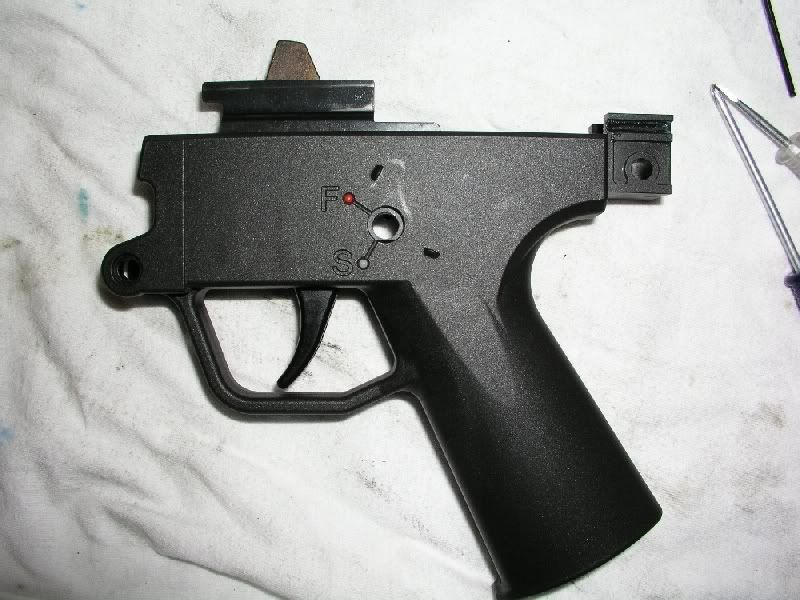 |
|
GSG5 Parts List by Regular122
GSG5 Parts Groups 
A = Receiver Group B = Breech Body Group C = Frame Body Group D = Cocking Handle Set E = Rear Sight F = Stock G = Barrel Extension Tube or Flashhider H = Magazine I = Optional Sling Holder 
A = Receiver Group Parts List Diagram# - Description – [ATI Part #] 10 – Trigger Bar & Firing Pin Retainer Pin – [400.20.40.3] 12 – Receiver Side (Left) – [402.20.01.1] 13 – Receiver Side (Right) – [402.20.02.1] 15 – Magazine Catch – [402.20.04.1] 16 – Magazine Lever Cam – [402.20.05.1] 19 – Magazine Release Lever – [402.20.08.1] 33 – Receiver Cap – [402.20.25.1] 40 – Trigger Housing Nut – [402.20.32.1] 46 – operating Rod Spring Guide – [402.20.39.1] 48 – Bolt Carrier Stop Block – [402.20.41.1] 51 – Bolt Stop – [402.20.45.1] 57 – Bolt Stop Spring – [402.20.52] 65 – Safety Spring Cap Screw – [402.20.69.3] 69 – Magazine Catch Spring – [402.20.65.1] 70 – Bolt Carrier Screw (Rear) – [402.20.68.3] 73 – Breech Block – [402.30.01.1] 74 – Barrel 16” – [402.30.02.1] 84 – Barrel Lock Stud [402.30.16.3] 97 – Lock Washer – [402.40.21.3] 98 – Bolt Carrier Stop Block Screw – [402.40.22.3] 104 – Barrel Short – [402.30.15.1] 106 – Bolt Carrier Stop Block Nut – [402.50.04.3] 119 – Level Indicator (Dry Fire Cap) – [402.90.01.1] 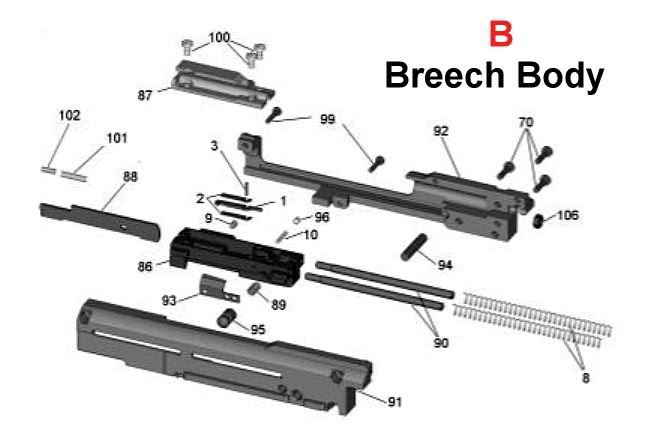
B = Breech Body Group Parts List Diagram# - Description – [ATI Part #] 1 – Extractor – [400.40.06.1] 2 – Extractor Spacer (2-Req) – [400.40.23.1] 3 – Extractor Pin – [400.40.19.3] 8 – Bolt Return Springs – [400.40.10.1] 9 – Extractor Spring – [400.40.21.1] 10 – Trigger Bar & Firing Pin Retainer Pin – [400.20.40.3] 70 – Bolt Carrier Screw (Rear) – [402.20.68.3] 86 – Breech Bolt – [402.40.01.1] 87 – Breech Bolt Cover – [402.40.02.1] 88 – Firing Pin – [402.40.03.1] 89 – Firing Pin Stop Spring – [402.40.04.1] 90 – Bolt Return Spring Guide ( 2-Req ) – [402.40.05.1] 91 – Breech Bolt Carrier ( Left) – [402.40.07.1] 92 – Breech Bolt Carrier ( Right ) – [402.40.08.1] 93 – Ejector – [402.40.09.1] 94 – Breech Bolt Carrier Locator Pin – [402.40.20.3] 95 – Firing Pin Safety – [402.40.11.1] 96 – Firing Pin Retainer Set Screw – [402.40.15.3] 99 – Bolt Carrier Screw ( Front ) – [402.40.23.3] 100 – Bolt Cover Screw – [402.40.24.3] 101 – Firing Pin Spring – [402.40.25.1] 102 – Firing Pin Plunger – [402.40.26.1] 106 – Bolt Carrier Stop Block Nut – [402.50.04.3] 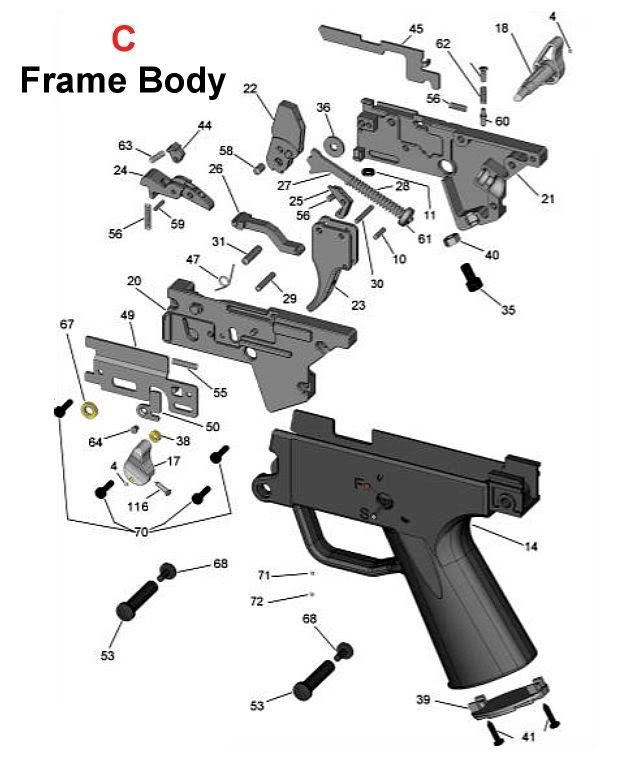
C = Frame Body Parts List Diagram# - Description – [ATI Part #] 4 – Safety Marker Button (yellow) – [400.50.08.3] 10 – Trigger Bar & Firing Pin Retainer Pin – [400.20.40.3] 11 – Hammer Strut Washer (Small) – [400.20.52.1] 14 – Trigger Housing – [402.20.03.1] 17 – Safety Lever (Left) – [402.20.06.1] 18 – Safety Lever (Right) – [402.20.07.1] 20 – Trigger Plate (Left) – [402.20.09.1] 21 – Trigger Plate (Right) – [402.20.10.1] 22 – Hammer – [402.20.11.1] 23 – Trigger – [402.20.12.1] 24 – Sear Housing – [402.20.13.1] 25 – Disconector – [402.20.14.1] 26 – Trigger Bar [402.20.15.1] 27 – Hammer Strut – [402.20.16.1] 28 – Hammer Spring – [402.20.17.1] 29 – Trigger Pin – [402.20.19.3-01] 30 – Disconector Pin – [402.20.66.3] 31 – Hammer Pivot Pin – [402.20.21.3-01] 35 – Trigger Housing Bolt – [402.20.27.3] 36 – Hammer Pivot Washer – [402.20.28.3] 38 – Trigger Housing Spacer Washer (Small) – [402.20.30.1] 39 – Pistol Grip Cap – [402.20.31.1] 40 – Trigger Housing Nut – [402.20.32.1] 41 – Pistol Grip Cap Screws ( 2-Req ) – [402.20.33.3-01] 44 – Sear – [402.20.37.1] 45 – Magazine Safety – [402.20.38.1] 47 – Hammer Return Spring – [402.20.40.1] 49 – Firing Pin Safety Lever – [402.20.43.1] 50 – Trigger Return Lever – [402.20.44.1] 53 – Stock Bolt – [402.20.48.1] 55 – Trigger Return Spring – [402.20.50.1] 56 – Sear and Magazine Safety Spring – [402.20.51.1-01] 58 – Sear Housing Pin – [402.20.54.3] 59 – Sear Pin – [402.20.55.3] 60 – Safety Spring Plunger – [402.20.56.1] 61 – Hammer Strut Washer (Large) – [402.20.57.1] 62 – Safety Spring – [402.20.58.1] 63 – Sear Spring – [402.20.59.1] 64 – Trigger Return Lever Rivet – [402.20.60.1-01] 67 – Trigger Housing Spacer Washer (Large) – [402.20.63.1] 68 – Stock Bolt Screw – [402.20.67.3] 70 – Bolt Carrier Screw (Rear) – [402.20.68.3] 71 – Safety Off Marker Button (Red) – [402.20.70.1] 72 – Safety On Button (White) – [402.20.71.1] 116 – Safety Screw – [402.60.07.3] 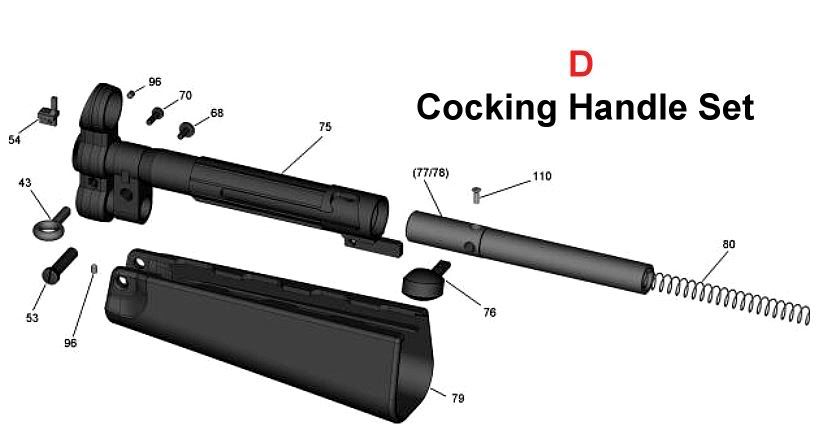
D = Cocking Handle Set Parts List Diagram# - Description – [ATI Part #] 43 – Sling Loop – [402.30.25.1] 53 – Stock Bolt – [402.20.48.1] 54 – Front Sight Blade – [402.50.08.1] 68 – Stock Bolt Screw – [402.20.67.3] 70 – Bolt Carrier Screw (Rear) – [402.20.68.3] 75 – Cocking Tube Housing – [402.30.23.1] 76 – Cocking Tube Handle – [402.30.24.1] 77 – Cocking Tube (Front) – [402.30.13.1] 78 – Cocking Tube (Rear) – [402.30.21.1] 79 – Handguard – [402.30.06.1] 80 – Cocking Tube Spring – [402.30.07.1] 96 – Firing Pin Retainer Set Screw – [402.40.15.3] 110 – Cocking Handle Screw – [402.30.22.3] 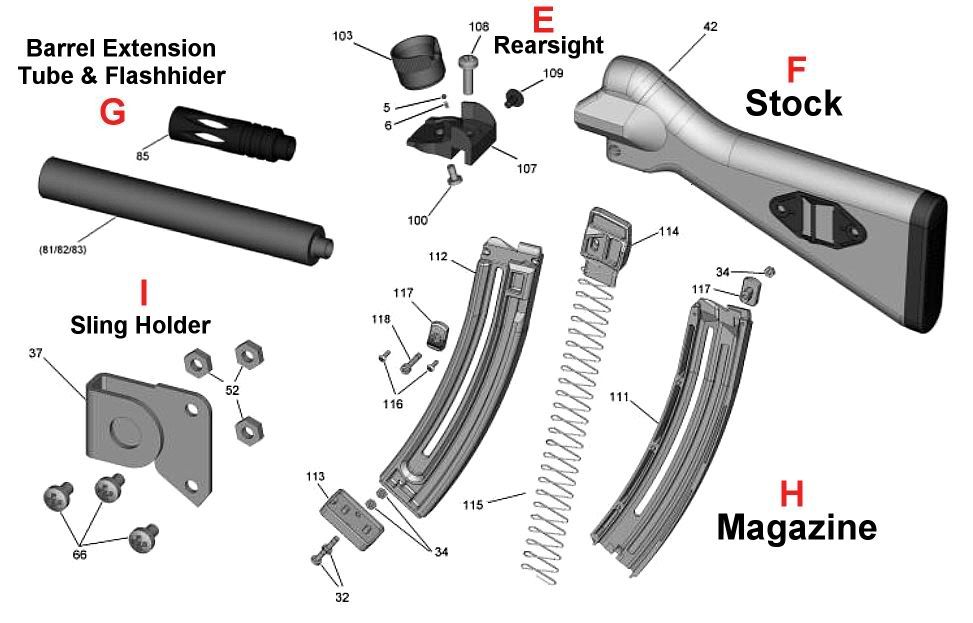
E = Rear Sight Assembly– [402.50.0050] Diagram# - Description – [ATI Part #] 5 – Rear Sight Spring Plunger – [400.40.15.3] 6 – Rear Sight Spring – [400.40.14.1] 100 – Bolt Cover Screw – [402.40.24.3] 103 – Rear Sight Tower – [402.50.0101] 107 – Rear Sight Body – [402.50.05.1] 108 – Rear Sight Install Screw – [402.50.06.3] 109 – Rear Sight Windage Screw – [402.50.07.1] F = Stock 42 – Butt Stock Complete – [402.20.34.1] G = Barrel Extensions & Flash Hider Parts List Barrel Extension Tube [402.30.01] 81 – Barrel Cover Tube (Faux Suppressor) – [402.30.10.1] 82 – Barrel Cover Tube Muzzle Cap – [402.30.11.1] 83 – Barrel Cover Tube Threaded Cap – [402.30.12.1] Flash Hider 85 – Flash Hider – [402.30.17.1] H = Magazine Parts List 32 – Magazine Bottom Screws – [402.20.24.3] 34 – Magazine Follower Nut – [402.20.26.3] 111 – Magazine (Right Side) – [402.60.01.1] 112 – Magazine (Left Side) – [402.60.02.1] 113 – Magazine Bottom – [402.60.04.1] 114 – Magazine Follower – [402.60.05.1] 115 – Magazine Spring – [402.60.06.1] 117 – Magazine Follower Thumb Piece – [402.60.09.1] 118 – Magazine Thumb Piece Screw – [402.60.10.3-01] I = Optional Sling Holder – [Accessory GER202545] 37 – Sling Bracket – [402.20.29.1] 52 – Sling Bracket Nut – [402.20.46.3-01] 66 – Sling Bracket Screw (3-Req) – [402.20.62.3] |




|
Careful when cleaning your GSG-5 When cleaning your GSG-5 be careful when you remove the bolt carrier from the reciever. The bolt carrier holds in place the last round bolt hold open spring. Pay attention to that it is still there after you remove the bolt carrier and fire control group and before you put it back in. I was taking mine apart and that spring went down into the fire control group and i had to shake it for about 5 minutes before it fell out. To remove the magazine disconnect: You will want to be in a uncluttered room with lots of open space or a blanket hanging all around you, some springs may come flying out. 1. Disassemble firearm like shown in the manual to get the frame separated from the receiver. 2. Remove the small screw from the safety lever on the left side of the frame. Pull that side of the safety lever off and pull the safety lever through from the right side. Don't loose the screw, its pretty small. 3. Remove the 2 screws on the bottom of the grip and take off the cover. 4. Use a 4mm Allen Wrench and remove the bolt that holds the FCG into the frame. 5. De cock the hammer and CAREFULLY pull the FCG out of the frame. Careful of the left side, there are 2 brass washers and the firing pin safety that like to fly out. 6. Take off the brass washers, the firing pin safety, firing pin safety spring and magazine safety spring and set them off to the side. The firing pin safety spring is longer and covered in grease. 7. Using the screwdriver provided with the firearm (Its a high torque phillips, you can see the extra slots on the bit and on the screws on the FCG) look at the left side of the FCG and take out the 4 screws that hold it together. These are in kind of tight so press hard and turn slow, you don't want to strip these out. 8. Carefully pull the 2 halves apart. Be careful, the brass washer on the end of the hammer spring will want to go flying off to your right and the small spring on the left side under the silver thing will slip out. Note where all the parts are for when you put it back together. 9. Remove the hammer spring, guide and washer noting how they are assembled. 10. Remove the hammer and shim. 11. Take out magazine disconnect. 12. Put it all back together in the reverse order leaving out the magazine disconnect. Notes: The hardest part for me was getting the hammer spring to stay in place while i put the cover back on. Looking at the picture of the FCG above helps a lot. The round spring with 2 prongs on it goes on the left side of the FCG cover with the shorter end fitting into the notch in the casting. When putting the side cover back on this will butt up against a bump on the hammer. Take a screwdriver and put it in front of the bump on the hammer. Edited for clarity and spelling. More to come. |



AR Variants Mod and Juris Doctor (in training)!
Joined:
Oct 2003
Posts:
5678
EE: 100% (480)
 USA
USA


This will be a thread just for facts. Keep the discussions to the other threads. Since the GSG-5 just hit the streets, it is hard to say what will and what won't work at the time of the guns release. I will be continually updating this thread as more people try stock options, forearms options, and optics. When new info becomes available about SBR and aftermarket Shorty Barrels, that will be posted as well. I am trying to see if matt2496 would be willing to take detailed pics and instructions on how to just remove the barrel as well. The more info you guys give me, the better this thread will become. Please email me if you have information and pictures. Thanks |


Jackal, When is gemtech set to release the adapter? I have someone that's going to cut the barrel down for me, but want to get the adapter. Thanks Ken |
Recession is when your neighbor loses his job. Depression is when you lose yours, and recovery is when Jimmy Carter loses his. -- Ronald Reagan


Mine was being packed up, along with 16 others, when I spoke to GM yesterday. I think it will ship Monday.  About the mags: I already have some in and loaded them. They feel a little...odd. Sticky, even. Do they need to be loaded and unloaded a few times to break them in? |


|
Awesome rifle. Shot it today. Here is a video of me firing it. www.youtube.com/watch?v=YCjEuqyOgRU ps. Great Thread you started. |

|
I took mine apart to clean and oil it and when I put it back together, The Bolt hold open is acting finicky. When I remove the magazine and try to sent the bolt home it stays back and seems hung up. Any ideas? |
Plays well with self, and cleverly disguised as a responsible adult.

| Who makes this sling? Well i can see the tag, but had no luck finding one on the net. http://i184.photobucket.com/albums/x124/jackal2001/gsg5/gandrtactical.jpg |
+1 |
www.drudgereport.com
www.arizonashooting.com
www.tannerite.com
www.arizonashooting.com
www.tannerite.com
Check and make sure that the spring that pushes the bold hold open lever down is still there, you should be able to see the spring when you have the bolt latched back. If you just see a gap with no spring there look around on the floor for it and check and see if it fell into the grip frame by shaking it violently upside down. (happened to me once) I believe the spring is like 1/8 inch in case you need to pick one up at the hardware store. Let me know if thats turns out to be the problem. |
do a search for gear sector, the guys name is jtrusty. |
Gear Sector - It's on the sling.  Adapter  Sling |

(Edited by EdSr Please do not plug companies that heve been thrown off the site for serious violations) |

well the gun is made by an airsoft company.... |
Imagine giving birth to a cactus, out of your penis

|
I spoke to Gemtech last week about the thread adapter. $45 for the adapter. It will come with instructions on the exact length to cut the barrel. The adapter will thread in to the front sight base in the same location as the fake suppressor. The barrel is too small in diameter to thread, so it will only need to be cut/crowned. $150 for Gemtech to do the cut/crown and provide the adapter. The guy said 2-3 weeks for availability. The barrel will be about 7.8". So by the time you get your Form 1's back, the adapters should be ready. |
I don't see why the barrel is to small to thread, just look at the Walther P22. Why cant the GSG-22 be threaded to those threads? |
www.drudgereport.com
www.arizonashooting.com
www.tannerite.com
www.arizonashooting.com
www.tannerite.com
Do you have to send in the entire weapon to gemtech or just the barrel? |
All you can see in the pic is the word "GEAR". Thanks for the follow up tho. |
www.drudgereport.com
www.arizonashooting.com
www.tannerite.com
www.arizonashooting.com
www.tannerite.com
GSG General - Contact Info, Breakdown (Page 1 of 6)
Armory Sponsor