


AR Sponsor


Knights URX II install.......doing it the hard way (revisiting the project 4/9 update) (Page 5 of 6)


|
I have another question. After the installation the barrel? Rifle length guard ? isn´t exactly in the middle. Is it normal and okay? May I am a little bit to angry. I think the reason for this is the torching of the barrel nut, or not ?
What are you think? Regards http://www7.pic-upload.de/06.02.11/plovzq93m68i.jpg http://www7.pic-upload.de/06.02.11/ziv8262pqit.jpg |

|
So the rail was off center even after you torqued the barrel nut? I don't think mine is off center, but I know the rail will flex a decent amount if you try to push it and the barrel towards one another. |
"Now see, I just respond to this sort of stuff by striking the keyboard repeatedly with my genitals and hollering really loud." - Swindle1984
Machinist for hire - IM me if interested
Machinist for hire - IM me if interested

| Frankly, I'm surprised it took 70ft Lbs, considering that is the higher end of the spectrum. Looks to me like a bit too much torque, and it snapped the wrench. It should have taken it though. To be blunt, I think the reason the barrel is "crooked" is that it may be over torqued, even though 70ft lbs is within spec. |
"Putting a cheap scope on a good rifle is like asking to have one nut gold plated and the other crushed in a rusty vise." - HeavyMetal
"Fear the man with one gun, he will know how to use it."
"Fear the man with one gun, he will know how to use it."
|
Originally Posted By EHilderbrand: Frankly, I'm surprised it took 70ft Lbs, considering that is the higher end of the spectrum. Looks to me like a bit too much torque, and it snapped the wrench. It should have taken it though. To be blunt, I think the reason the barrel is "crooked" is that it may be over torqued, even though 70ft lbs is within spec. I would think it would have more to do with a part being out of spec. Maybe the threads on the rail, receiver, or barrel nut weren't cut right. It could even have to do with the barrel extension not being to spec. |
"Now see, I just respond to this sort of stuff by striking the keyboard repeatedly with my genitals and hollering really loud." - Swindle1984
Machinist for hire - IM me if interested
Machinist for hire - IM me if interested

|
Originally Posted By WERWOLF79:
The manual said 50-75 ft lbs. Anywhere between 35-80 Foot Pounds is per the book. So it can fluctuate anywhere in there. But yes, an out of spec upper could also be part of the problem as well. It's hard to say without physically seeing it in hand as to why it's canted. Good thought on the barrel extension. |
"Putting a cheap scope on a good rifle is like asking to have one nut gold plated and the other crushed in a rusty vise." - HeavyMetal
"Fear the man with one gun, he will know how to use it."
"Fear the man with one gun, he will know how to use it."
|
Originally Posted By TacticalConcepts: Anyone have an e-copy or scanned copy on the urx manual they could send me? Mark From page 6  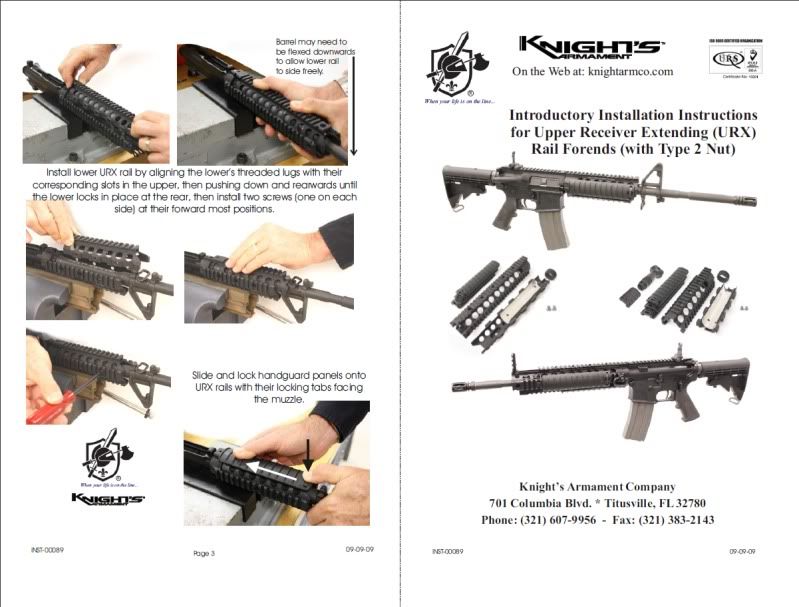 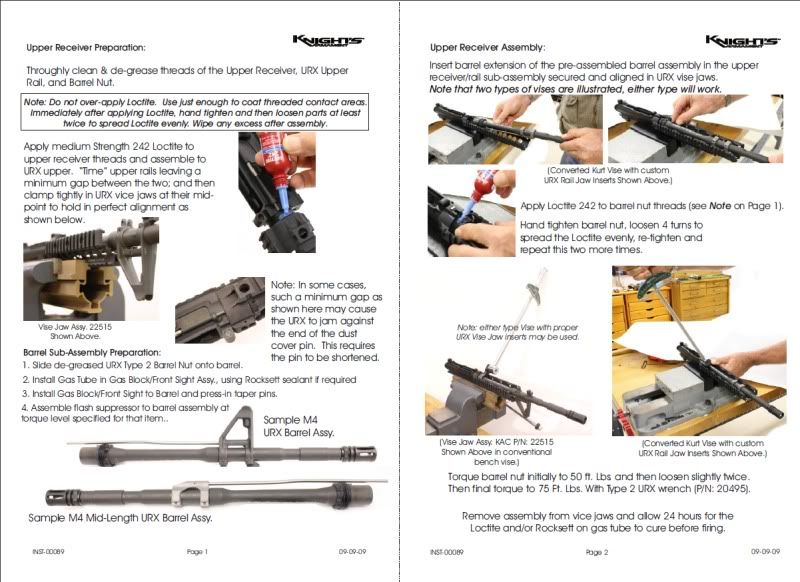 |
"Now see, I just respond to this sort of stuff by striking the keyboard repeatedly with my genitals and hollering really loud." - Swindle1984
Machinist for hire - IM me if interested
Machinist for hire - IM me if interested
|
That is for the original URX, the URX II uses a different barrel nut. |
"Now see, I just respond to this sort of stuff by striking the keyboard repeatedly with my genitals and hollering really loud." - Swindle1984
Machinist for hire - IM me if interested
Machinist for hire - IM me if interested
|
Originally Posted By WERWOLF79: My upper is an La Rue Stealth Upper, the Barrel 14,5" Bushmaster M4 Barrel If you are using a Larue receiver, I doubt the receiver is the problem. I would be suspect of the barrel extension next. |
"Now see, I just respond to this sort of stuff by striking the keyboard repeatedly with my genitals and hollering really loud." - Swindle1984
Machinist for hire - IM me if interested
Machinist for hire - IM me if interested
|
OSHA and UM,
thanks for the manuals. funny, once KAC had them on their site, then they had them under the pswd protected area then they have them available again....shoulda checked there first. Werewolf, all seem like good components....check the bushy bbl first though. although they make reasonably good stuff, they can be spotty occassionally with the QC - then I would go the other route with the larue - although their QC is usually right up there, but like it was already stated, sometimes things slip through. Mark |
1*
|
Originally Posted By unclemoak:
That is for the original URX, the URX II uses a different barrel nut. The early URX II's came with that nut. |
|
For the engineers out there, I have a stump the dummy type question :)
Say, for example, I were to install the nut without the use of a wrench, and instead used linear blows by dead-weight to tighten the nut. So - I was able to hand tighten the nut, and then from that position I was able to tighten it about 1 inch of travel in a circular path. What would you calculate the torque to have been that caused the nut to travel 1 inch on it's edge? This is my problem...I have the nut on by using a punch and hammer, but I was only able to "drive" the nut around about an inch...so was this enough torque? (plus somebody said 30 lbs was enough, but the manual says 75!) hmmmm mathcad? matlab ? anybody out there have an idea? |
|
Originally Posted By SOFgearGuy:
For the engineers out there, I have a stump the dummy type question :) Say, for example, I were to install the nut without the use of a wrench, and instead used linear blows by dead-weight to tighten the nut. So - I was able to hand tighten the nut, and then from that position I was able to tighten it about 1 inch of travel in a circular path. What would you calculate the torque to have been that caused the nut to travel 1 inch on it's edge? This is my problem...I have the nut on by using a punch and hammer, but I was only able to "drive" the nut around about an inch...so was this enough torque? (plus somebody said 30 lbs was enough, but the manual says 75!) hmmmm mathcad? matlab ? anybody out there have an idea? Forget it - I did a practical example....loosen a tire stud nut, made a mark - hand tightened it, then adjusted it with a torque wrench. Since the diameter of the studd nut is similar to the URX rail nut, 1 inch of travel is well passed 50 ft lbs of torque :) |
It only took three weeks to finally get a barrel nut  Progress to continue shortly.  |
"Now see, I just respond to this sort of stuff by striking the keyboard repeatedly with my genitals and hollering really loud." - Swindle1984
Machinist for hire - IM me if interested
Machinist for hire - IM me if interested
|
I made a solid model of the nut to overlay the wrench I drew up on to check the fit. There is a little bit of slop in there. I have to figure out if it's because of my measuring or from something else.   |
"Now see, I just respond to this sort of stuff by striking the keyboard repeatedly with my genitals and hollering really loud." - Swindle1984
Machinist for hire - IM me if interested
Machinist for hire - IM me if interested

|
Originally Posted By unclemoak: It only took three weeks to finally get a barrel nut Progress to continue shortly. http://i43.photobucket.com/albums/e398/unclemoak/IMG_22241.jpg Maybe you need to start machining your own barrel nuts as well! |
ΜOΛΩΝ ΛΑΒΕ
“The object of war is not to die for your country but to make the other bastard die for his.” - Gen. GS Patton
Pie Fixes Everything
03FFL
PACK LARUE
TEAM RANSTAD
“The object of war is not to die for your country but to make the other bastard die for his.” - Gen. GS Patton
Pie Fixes Everything
03FFL
PACK LARUE
TEAM RANSTAD

|
Originally Posted By Leonidas01:
Has anyone heard anything about a Noveske / Knights Armament project in the works? Thanks for your input. No I haven't. Why you heard of something? I think it's highly unlikely, but I've been wrong before. |
illegitimi non carborundum, post proelia praemia

|
Originally Posted By unclemoak:
I made a solid model of the nut to overlay the wrench I drew up on to check the fit. There is a little bit of slop in there. I have to figure out if it's because of my measuring or from something else. http://i43.photobucket.com/albums/e398/unclemoak/Wrench_NutOverlay1.jpg Wouldn't you want some slope there for ease of use? You know like installation and removal of the wrench? |
“A government big enough to give you everything you want, is strong enough to take everything you have.” Thomas Jefferson
"Show a prisoner the world and he will still only see the bars."
"Show a prisoner the world and he will still only see the bars."
|
Originally Posted By Gimpy_AK:
Originally Posted By unclemoak:
I made a solid model of the nut to overlay the wrench I drew up on to check the fit. There is a little bit of slop in there. I have to figure out if it's because of my measuring or from something else. http://i43.photobucket.com/albums/e398/unclemoak/Wrench_NutOverlay1.jpg http://i43.photobucket.com/albums/e398/unclemoak/Wrench_NutOverlay2.jpg Wouldn't you want some slope there for ease of use? You know like installation and removal of the wrench? Im not a machinist or anything but wouldn't a lil slop be a good thing just in case of a nut that is slightly outta spec? Scott |
|
Originally Posted By Scotts556: Originally Posted By Gimpy_AK: Originally Posted By unclemoak: I made a solid model of the nut to overlay the wrench I drew up on to check the fit. There is a little bit of slop in there. I have to figure out if it's because of my measuring or from something else. http://i43.photobucket.com/albums/e398/unclemoak/Wrench_NutOverlay1.jpg http://i43.photobucket.com/albums/e398/unclemoak/Wrench_NutOverlay2.jpg Wouldn't you want some slope there for ease of use? You know like installation and removal of the wrench? Im not a machinist or anything but wouldn't a lil slop be a good thing just in case of a nut that is slightly outta spec? Scott Yes, a little slop is desirable to account for variation in tolerances. I have to get my ass in gear and get one of these machined to see how well the actual machined wrench fits the nut. |
"Now see, I just respond to this sort of stuff by striking the keyboard repeatedly with my genitals and hollering really loud." - Swindle1984
Machinist for hire - IM me if interested
Machinist for hire - IM me if interested
|
Originally Posted By matt58:
Originally Posted By Falar:
What gas block did you use? Is it a modified one? No gas blocks will fit under the URX II rail without modifications, correct? If I am not mistaken, a KAC, VLTOR, or PRI gas bloack will fit w/o modification. But I have been wrong before.... I did a dry assembly on mine last night to see how everything fits and very front of the PRI gas block contacts the inside of the URX rail. It is not enough that it would prevent you from assembling it, but I don't know how much pressure is on the barrel now. I will take it to my shop and measure everything up and will just take some material off the top of the gas block where the contact is. The URX rail I have is an older model as it does not have any of the KAC writing on the sides and came with the steel nut. I believe the newer URX setups have had a design change so they are more gas block friendly. Maybe someone from KAC could comment on whether this is the case or not. |
Chips are flying and an aluminum beta prototype is being run in the CNC currently  |
"Now see, I just respond to this sort of stuff by striking the keyboard repeatedly with my genitals and hollering really loud." - Swindle1984
Machinist for hire - IM me if interested
Machinist for hire - IM me if interested

You just hatin' cause I'm stylin' on you
Joined:
Nov 2008
Posts:
4729
EE: 100% (159)
 TX, USA
|
Well after working until the wee hours of the morning, I was able to get my beta prototype done. There were a few programming changes I made while I was machining to cut down on the time it takes to make one, mainly with the 1/8" end mill. Like I mentioned previously, this one was done out of aluminum just to check my dimensions and making sure the machine wasn't going to crash or anything crazy like that.    One thing I really hate about how most people CNC parts is the distinct lines that are left from each depth of cut. What I did was use a rougher for my initial passes leaving 0.01" still on the walls. Then came back in with a finish end mill and made the final pass to eliminate the ridges.  As you can see, it's a good thing I did this because my dimensions were a tad off. I'm going to have to adjust things today and hopefully run another aluminum one tonight. ETA - I just checked my program, apparently I left 0.01" on the walls of the teeth, no wonder it doesn't fit    I'll be be sure to highlight all the steps involved to setting up the CNC in a later post. |
"Now see, I just respond to this sort of stuff by striking the keyboard repeatedly with my genitals and hollering really loud." - Swindle1984
Machinist for hire - IM me if interested
Machinist for hire - IM me if interested
|
Originally Posted By Ryo: That looks nice. Looks like your getting that dialed in.. Finally! Yep! I'm certainly getting reeeaaaalllly close    |
"Now see, I just respond to this sort of stuff by striking the keyboard repeatedly with my genitals and hollering really loud." - Swindle1984
Machinist for hire - IM me if interested
Machinist for hire - IM me if interested
 ), but this thread sure is interesting to follow.
|
Since the 2nd Beta prototype fits pretty well, I went ahead and ordered some tool steel this morning to machine a few testing wrenches from. The plan is to machine some then make sure they are going to hold up to the 75 ft lbs of torque. This will also help me to determine whether or not I'm going to need to heat treat the wrenches. |
"Now see, I just respond to this sort of stuff by striking the keyboard repeatedly with my genitals and hollering really loud." - Swindle1984
Machinist for hire - IM me if interested
Machinist for hire - IM me if interested
|
My tool steel came in yesterday. Sadly, since I had to work last night, I wasn't able to machine anything until today. As mentioned earlier, I'm going to give a quick and dirty tutorial about how to set up a CNC. There are going to be some things left out and obviously since I'm very novice to CNCing parts, I may not be able to answer extremely detailed questions about the process. This is the dinosaur CNC I use. It's a Bridgeport TorqCut 22. It's a 7.5hp machine that run up to 7500 rpm and has a magazine that will hold 22 tools.  The First thing is to turn the power and air on for the machine.  The air supply is needed for the tool changer.  As you can see, this thing is pretty old, but it works well for all I need it for.  The First thing to do after starting the machine is to get the spindle warmed up, but first you have to turn off all those pesky lawyer features. By entering the Set Parameters screen  It allows you to turn off the perimeter door guard, to you can let the machine warm up with the door open.  Next is setting the spindle to run in the tool change screen  Then you open the S_T_M (whatever in the hell that is) screen which allows you to set the rpm and whatnot.  Then you enter your rpm, tool number, and command (3 makes it spin and a 6 will change the tool)   While it took the 15 or so minutes to warm up, I cut my piece of stock. Here's my nice shiny 12" piece of A2 tool steel. I should be able to get three wrenches out of this piece.  I set up my program to use a 4" piece and there is enough forgiveness in the program that the size doesn't need to be that exact.  It's an easy job for a horizontal bandsaw.  Get the blade lined up.  Turn on the coolant and let it does it's thing.  The next thing that needed to be done was to put all the tools in tool holders. So you find the tool you want to use (this is an arbitrary tool just for demonstration purposes with a rougher on one end and a finisher on the other)  Then you look through all the collets to find one that fits the tool.  You want it to be snug on the tool, the holder will tighten it up later.  Then you get your actual tool holder. This is how the machine holds the tool and is able to change out the tools easily. I think this machine uses what are called CAT40 holders. There are a few different styles out there, so you need to find the specific ones that your machine uses.  Put it in a holding fixture that allows you to tighten the nut  The collet snaps in to the nut.   Then you hand tighten everything up  Then you tighten everything with a wrench. The first time I did this my mentor said you tighten that up as tight as you can...then tighten it more. The reason that you want things to be tight is because any wobble will cause crappy parts because your endmill won't run true.  Now that I had all the tools in holders, I could load them into the machine. Tool #1 is a 38" carbide rougher. You'll notice that it's serrated to help it remove material aggressively. I used this for the profile of the part and since it leaves a course finish, I'll follow up with a finish end mill later in the process to leave a smooth finish.  Next was the carbide 3/8" ball end mill. This is for the fillet between the teeth portion of the wrench and the body.  This is the 1/8" Carbide endmill for the teeth and the drive square of the wrench. Obviously these little guys are pretty fragile, so you want to be careful and run your programs conservatively.  And last is the 3/8" carbide endmill for the finishing pass.  Put your hunk of material in the vise  Again, tighten that thing like a mofo.  Setting the tool offsets is next on the list. This is done so the machine knows where the end of the drill/reamer/endmill/facer is so it can go to the correct depth. This needs to be set for each tool. First you go into the job screen which allows you to move all three axises.  Then you do what's called paper gauging. You take a piece of paper and slide it around on your piece of material while lowering the endmill towards the piece of material. Once the endmill pinches the piece of paper against the material and you are unable to keep sliding the paper around, you know your endmill is .003" above your material and you can set the machine accordingly. You have to use some caution because if you crash the endmill into the material it'll crack/chip and be worthless.    Enter the tool number and verify it's diameter   Since this machine is a little dated, it still uses the good old 3.5" floppy drive. Some of the newer machines are USB or can even be hooked up to your network via CAT5.  You can then load your program.  Since the program is not on the C:\ drive, it needs to know it's going to read the file from the floppy.  Enter the file name. I'll be running URX1 through URX5 all in different stages all done by tool so I can adjust the coolant hoses between operations.  I want to overwrite the program currently loaded on the machine, so I click (Y)  Hit F4 to run it.  Press the run button.  And there she blows.  I'll update it in a bit as the different operations finish running so you can see each step of the machining process. |
"Now see, I just respond to this sort of stuff by striking the keyboard repeatedly with my genitals and hollering really loud." - Swindle1984
Machinist for hire - IM me if interested
Machinist for hire - IM me if interested


Here's the results of the first operation with the 3/8" rougher. You can see it makes the profile of the wrench and faces the flat areas. Operation #2 with the 3/8" ball endmill is in the works. |
"Now see, I just respond to this sort of stuff by striking the keyboard repeatedly with my genitals and hollering really loud." - Swindle1984
Machinist for hire - IM me if interested
Machinist for hire - IM me if interested
The results of operation #2  Operation #3 roughing out the drive square with the 3/8" rougher.  |
"Now see, I just respond to this sort of stuff by striking the keyboard repeatedly with my genitals and hollering really loud." - Swindle1984
Machinist for hire - IM me if interested
Machinist for hire - IM me if interested
|
Well there goes 1/8" endmill #1 ETA - It some how managed to chip a flute then fall out of the tool holder. I put in a new endmill, re-zeroed it, now everything is back up and running. ETA 2 - Operation #4 finishing the drive square and cutting the teeth.  Here you can see how rough the exterior profile is from the rougher. I'll take another picture after the finisher does its pass.  |
"Now see, I just respond to this sort of stuff by striking the keyboard repeatedly with my genitals and hollering really loud." - Swindle1984
Machinist for hire - IM me if interested
Machinist for hire - IM me if interested
Notice how much smoother the surface finish is after the finishing pass. Next was taking the block out of the CNC and putting it in the standard Bridgeport to face it to remove all the excess material.     Bead blast it and it looks pretty damn good.  Aluminum on the left, tool steel on the right.  |
"Now see, I just respond to this sort of stuff by striking the keyboard repeatedly with my genitals and hollering really loud." - Swindle1984
Machinist for hire - IM me if interested
Machinist for hire - IM me if interested



Knights URX II install.......doing it the hard way (revisiting the project 4/9 update) (Page 5 of 6)
AR Sponsor