


AR Sponsor
BCA bolt action upper for $350? (Page 21 of 21)

Joined:
May 2025
Posts:
45
EE: 0% (0)
 WV, USA
|
Originally Posted By Tersoth: It looks like BCA has the gen 1's back on the website for sale. The two lug version got pushed back to an August release Good to know. I sent BCA a text a week ago asking about the newer bolt action receiver and got back a bunch of generic bull crap the had nothing to do with my question. |

|
Originally Posted By PreacherOfGadget: I now have 100% ejection on live rounds. Here's the "bearing surface" issue that means significant changes to the geometry of the bottom of the ejection port is a no-go. This bearing surface is so high because the carrier must rotate and not be interfered with by magazine lips. https://i.imgur.com/72KZxOG.jpeg Here's another image showing both the bearing issue and where rounded and smoothed (1000 grit) part of the edge. https://i.imgur.com/62Qz3PR.jpeg I realized after seeing the pictures that I needed to do a better job cleaning, lol. Anyway, another picture of that surface, with bolt closed and locked: https://i.imgur.com/7l003rm.jpeg And that's the mod of the bottom of the ejection port. Now to the upper side: https://i.imgur.com/i3VDhoh.jpeg The cam pin absolutely is impacting the surface. I rounded the corners of the cam pin head on a grinder after taking this picture to reduce this issue. After doing that, I also stopped having issues with the carrier occasionally catching when I tried to cycle the gun while upside down. I think this platform would benefit from cam pin with a rounded or heavily-radiused rectangular head. https://i.imgur.com/HQH2qwQ.jpeg The last modification I made was to the bottom of the front of the bolt carrier. As I tried more mags, I found a couple of my SOCOM mags seated the rounds a little high and the front of the carrier was catching on the top round. The front of the carrier was a little rough, and had a couple nicks. I rounded the edge and gave it a slight ramp, and now the carrier glides over rounds in that mag smoothly. You can see the mod to the top of the ejection port from below in this view, too. https://i.imgur.com/uFRU43s.jpeg I built a .300BO last year and somehow totally missed this thread. I noticed the cam pin issue with mine and replaced it with a POF roller cam pin. Roller pin You only need the pin, not the kit with gas key |
"All of a sudden, I found myself in love with the world. So there was only one thing that I could do, ding a ding dang my dang a long ling long "
| I 3d printed the “gas key” for a more smoother bearing surface and it’s perfect because it don’t get hot and there is no pressure, it’s just a guide. Couple that with a POF roller cam pin it’s the smoothest you can get without going at it with sand paper and polish. |
|
I just got one of the new batch of uppers from BCA today. The differences between the .300 BO bolt upper I got in 2025 and this one are pretty stark QC wise. The newer upper is better finished. The barrel nut was reasonably torqued and the bolt seems to have a stronger spring behind it. They did indeed change the carrier which is now longer and chamfered on the end. And they did leave the diameter slightly reduced on the tail, so if you need to cut it to work with a 1913 adapter it's not a big deal. Nothing has changed about firing unlocked, it can still happen. This one will be a 12.5" 6.5 Grendel in a few weeks.    "Gen 1" carrier for comparison (pic stolen from this thread)  |
"All of a sudden, I found myself in love with the world. So there was only one thing that I could do, ding a ding dang my dang a long ling long "

|
That's still the old style bolt and receiver with the ar bolt. Granted it's v1.5 with the tapered carrier. The new version has a two lug bolt with completely different bolt handle receiver interface. Apparently the new design is running behind or off the table because all the old ones are back on the website. |
I'm not here because I make sound financial decisions.
|
Originally Posted By bendigo78: That's still the old style bolt and receiver with the ar bolt. Granted it's v1.5 with the tapered carrier. The new version has a two lug bolt with completely different bolt handle receiver interface. Apparently the new design is running behind or off the table because all the old ones are back on the website. I am aware of the new 2 lug version that was/is said to be coming, and I have zero interest in it. It will look interesting, but it will still be a BCA product, with BCA accuracy, and BCA QC in the end. Making an upper with all proprietary BCA parts is a HARD PASS from me.  . I will also take a pass on swapping a BCA extension on to a quality barrel, juice is not worth the squeeze. . I will also take a pass on swapping a BCA extension on to a quality barrel, juice is not worth the squeeze. The draw for me in the original design is the parts compatibility with standard AR-15. Not only can I fix it with parts I have on hand, but I can improve on BCA substandard machining, manufacturing processes, and quality control by replacing pretty much everything. With the only two proprietary BCA parts in the original version being the upper and carrier, everything else can be replaced to greatly improve accuracy and cycling. |
"All of a sudden, I found myself in love with the world. So there was only one thing that I could do, ding a ding dang my dang a long ling long "

|
Originally Posted By Digger440: I am aware of the new 2 lug version that was/is said to be coming, and I have zero interest in it. It will look interesting, but it will still be a BCA product, with BCA accuracy, and BCA QC in the end. Making an upper with all proprietary BCA parts is a HARD PASS from me. . I will also take a pass on swapping a BCA extension on to a quality barrel, juice is not worth the squeeze. The draw for me in the original design is the parts compatibility with standard AR-15. Not only can I fix it with parts I have on hand, but I can improve on BCA substandard machining, manufacturing processes, and quality control by replacing pretty much everything. With the only two proprietary BCA parts in the original version being the upper and carrier, everything else can be replaced to greatly improve accuracy and cycling. My thoughts exactly. When they pulled all the "old" style from the website I panic bought one off gunbroker. It was a 308 that got a 6.5c barrel. It had the tapered carrier. Still working up a 123grn SST load for it. The pocket sniper is doing much better in 338 than it did in 300. Have a sub load that gets real close to an inch at 100. I'm going to try to put a 300grn makers REX bullet through a deer this year. Probably do some water jug testing this weekend. |
I'm not here because I make sound financial decisions.

|
My on sale 10.5?” 7.62x39 barreled upper came in. Wanted the upper for a 9mm build and the barrel for my KS47. Managed to ruin my wheeler vice block trying to loosen the barrel nut. No joy. Suggestions? |
Being willing to die to complete the mission didn't mean He's a pacifist, just tougher than nails. see also J3:16
Joined:
May 2025
Posts:
48
EE: 0% (0)
WV, USA
| If you don't care about the barrel cosmetics put that in a vise, lots of heat on the barrel nut, and a BFW or some before said get a block of wood drill a hole a little smaller than the barre, cut in half then use those as a barrel clamp in a vise. |

|
Stumbled across this thread last week, just finished up reading everything (so far). Bought a BCA 6.5 Grendel complete upper last December, took everything apart, cleaned it, slapped it on a home brew 80% lower and headed to the range. Only ammo I had at that time was a few old boxes of Wolf Military Classic lacquer coated crap that I had picked up a few years ago on clearance. I was only able to fire one round that day. Looked like I was having a light primer strike issue. Headed home and started doing my homework. I really wish I had seen this thread back then.  A few days later, and with more ammo from different manufacturers, and, the addition of a Wolfe extra power hammer spring I had in the parts box, I headed back to the range and that took care of that. I've had it out 4 times now, I have 220 rounds through it so far with no issues, other than the fact that the Ace Skeleton stock was kicking the crap out of my shoulder, so, I added a Boyd's wood stock to it this week in an attempt to mitigate that issue. Shoulder surgery years ago has made things a little sensitive. Other than the goofy different bolt operation (for want of a better way to explain it), I love it. Now I need to add a YHM suppressor mount, which I may do later today. I've had a buddy fire up his 3D printer for some parts I want to try on this critter and I've ordered a different bolt handle and knob. I've having a blast with this. I knew what I was getting into, I just wish I had seen this thread earlier, but, after reading it, I now know I am not crazy and some of the issues I thought I had identified have (now) been confirmed after reading what you guys have already figured out . That being said, I will be buying more.  First pic is from firest range attempt back on 31 Dec 2025. Second pic is from a few days ago after new stock install. First pic is from firest range attempt back on 31 Dec 2025. Second pic is from a few days ago after new stock install.  
|
|
Originally Posted By AL1EN: Welcome to the club, there is a lot of improvements you can do, just know it’s never going to be smooth lol If you need the stl file for both Handel spacer or gas key ping me and I can email them to you. I've held off on buying one due to the "newness" of the product. Plenty has been documented and done by users to enhance it's operation, and it looks like it's being redesigned. |
Joined:
Sep 2026
Posts:
1
EE: 0% (0)
TX, USA
Found a solution for keeping the bolt closed. I used a spring plunger on the left side of the receiver and milled a corresponding detent in the bolt to match. It now takes 2.5# of force to lift the bolt, as a comparison most of my other bolt guns take 2# to initiate bolt lift. If anyone is interested I can list the parts needed and procedure. I would post pics but I'm not starting an account with a host just so I can post a couple of pics to a forum I rarely post on ( I rarely post on any forum). Just thought I would add back to this thread as it did help me resolve most of the issues I had with my BCA bolt upper. 
|

I'll stick with my bolt action 5.56. A little more expensive, but it's a tack driver.  Attached File Attached File |
All men are created equal. All guns are not.
Joined:
May 2025
Posts:
49
EE: 0% (0)
WV, USA
|
"Found a solution for keeping the bolt closed. I used a spring plunger on the left side of the receiver and milled a corresponding detent in the bolt to match. It now takes 2.5# of force to lift the bolt, as a comparison most of my other bolt guns take 2# to initiate bolt lift. If anyone is interested I can list the parts needed and procedure. I would post pics but I'm not starting an account with a host just so I can post a couple of pics to a forum I rarely post on ( I rarely post on any forum). Just thought I would add back to this thread as it did help me resolve most of the issues I had with my BCA bolt upper. " Welcome Boxc, would you please provide the procedure, this sounds like a great addition to the upper. |
|
Originally Posted By Tersoth: "Found a solution for keeping the bolt closed. I used a spring plunger on the left side of the receiver and milled a corresponding detent in the bolt to match. It now takes 2.5# of force to lift the bolt, as a comparison most of my other bolt guns take 2# to initiate bolt lift. If anyone is interested I can list the parts needed and procedure. I would post pics but I'm not starting an account with a host just so I can post a couple of pics to a forum I rarely post on ( I rarely post on any forum). Just thought I would add back to this thread as it did help me resolve most of the issues I had with my BCA bolt upper. " Welcome Boxc, would you please provide the procedure, this sounds like a great addition to the upper. +1 I use an Azure account with blob storage for hosting photos and still haven't gotten to a point where I'm being charged. |
|
Originally Posted By KonsKripteD: +1 I use an Azure account with blob storage for hosting photos and still haven't gotten to a point where I'm being charged. Originally Posted By KonsKripteD: Originally Posted By Tersoth: "Found a solution for keeping the bolt closed. I used a spring plunger on the left side of the receiver and milled a corresponding detent in the bolt to match. It now takes 2.5# of force to lift the bolt, as a comparison most of my other bolt guns take 2# to initiate bolt lift. If anyone is interested I can list the parts needed and procedure. I would post pics but I'm not starting an account with a host just so I can post a couple of pics to a forum I rarely post on ( I rarely post on any forum). Just thought I would add back to this thread as it did help me resolve most of the issues I had with my BCA bolt upper. " Welcome Boxc, would you please provide the procedure, this sounds like a great addition to the upper. +1 I use an Azure account with blob storage for hosting photos and still haven't gotten to a point where I'm being charged. I wonder if you could put the spring plunger in from the top through the rail. Then have it interface with a plate where the gas key would go on a standard BCG. |
|
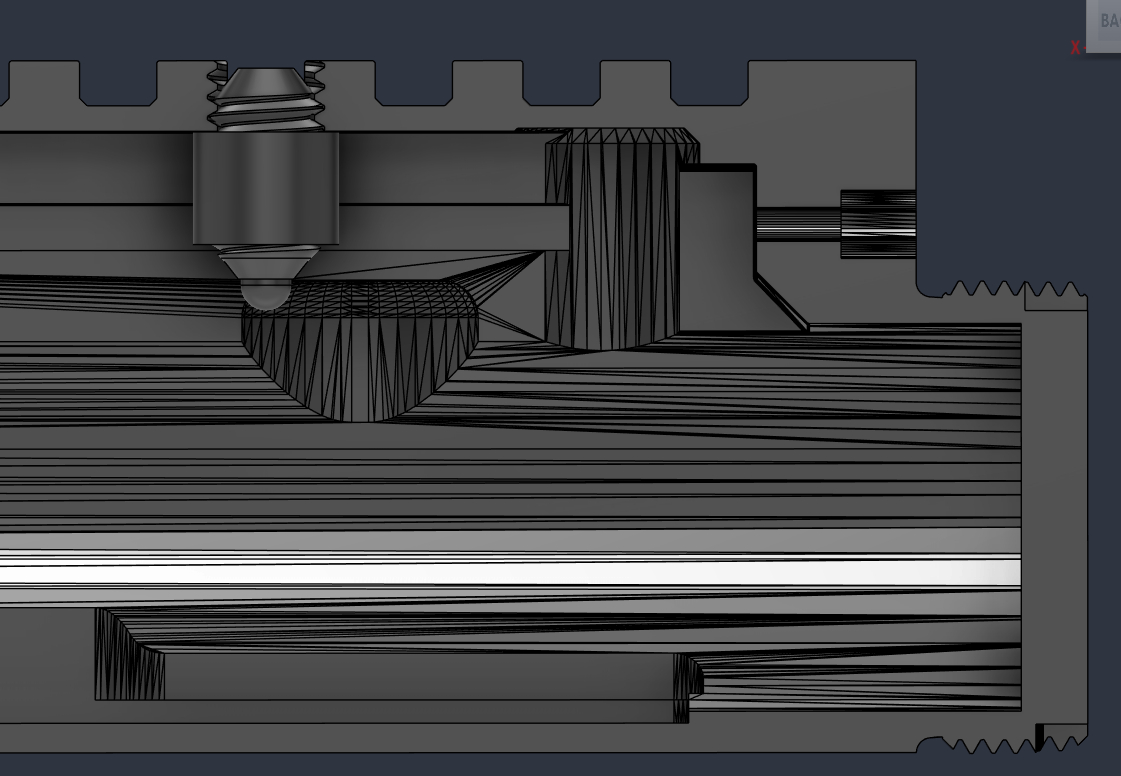
Originally Posted By boxc: Found a solution for keeping the bolt closed. I used a spring plunger on the left side of the receiver and milled a corresponding detent in the bolt to match. It now takes 2.5# of force to lift the bolt, as a comparison most of my other bolt guns take 2# to initiate bolt lift. If anyone is interested I can list the parts needed and procedure. I would post pics but I'm not starting an account with a host just so I can post a couple of pics to a forum I rarely post on ( I rarely post on any forum). Just thought I would add back to this thread as it did help me resolve most of the issues I had with my BCA bolt upper. https://www.mcmaster.com/mvD/Library/CAD2/20260602/5B280A7E/3126A139_Long-Nose%20Steel%20Spring%20PlungerX.GIF Would like to know more on this... Great idea!!! |
|
Originally Posted By boxc: Found a solution for keeping the bolt closed. I used a spring plunger on the left side of the receiver and milled a corresponding detent in the bolt to match. It now takes 2.5# of force to lift the bolt, as a comparison most of my other bolt guns take 2# to initiate bolt lift. If anyone is interested I can list the parts needed and procedure. I would post pics but I'm not starting an account with a host just so I can post a couple of pics to a forum I rarely post on ( I rarely post on any forum). Just thought I would add back to this thread as it did help me resolve most of the issues I had with my BCA bolt upper. https://www.mcmaster.com/mvD/Library/CAD2/20260602/5B280A7E/3126A139_Long-Nose%20Steel%20Spring%20PlungerX.GIF @boxc Just like the other guys, I am also really interested in what you did. I would gladly host your photos, if you are interested IM me for my email. |
"All of a sudden, I found myself in love with the world. So there was only one thing that I could do, ding a ding dang my dang a long ling long "
Joined:
Sep 2026
Posts:
2
EE: 0% (0)
TX, USA
|
Originally Posted By KonsKripteD: Until @boxc replies with how his was done, here's my idea using a spring plunger. Come in from the top rail and have it interface with a divot drilled into the gas key "plate" that's on the BCA BCG. I don't think it would work. The gas key rotates too far to the right when the bolt is locked. You can see this by looking down the channel where the charging handle should be. |
Joined:
Sep 2026
Posts:
3
EE: 0% (0)
TX, USA
|
My new account won't let me post more than 2000 characters so I will have to break this up. I also wrote this in word and it doesn't want to copy over properly. Like most of you, I liked the possibilities of the customizable BCA upper but was leary of how easily the bolt lifted. I tried the over sized nylon bushing trick but it seemed to wear too quickly and could cause the bolt to not fully lock unless you cut reliefs. I have a couple of slicked up bolt actions that rotated too easily and were fixed by placing a magnet in the stock under the bolt handle to help hold it closed. Unfortunately with the BCA upper, there isn't enough meat in that area to drill and place a magnet. Maybe someone else can figure that out as a magnet is really the easiest method. Spring plungers are commonly used for indexing so that's the direction I went. This mod can be done with tools a lot of people have in their garages, obviously a CNC machine would be the ideal choice but I don't have one of those. I ordered most everything from McMaster-Carr and here is everything you'll need. Drill press with clamp(I wouldn't try this by hand) Dremel tool MAP or propane torch level or angle finder 2 button head 10-32 x 0.5" screws (heads turned down to 0.290) 2 bushings or bearings part# 6391K858 or 57155K16 (will also need shims if using bearings, part #98126A028) Long nose 0.93 steel plunger part# 3126A83 10/32 locknut part# 92087A140 (this style won't leve visible marks when tightened) 3/32 cobalt drill bit part# 27995A513 0.93 ball burr part #4290A182 #21 drill bit part # 2901A194 10-32 tap |
Joined:
Sep 2026
Posts:
4
EE: 0% (0)
TX, USA
|
part 2 The first thing that needs to be done is to anneal the carrier in the area you want to drill. I tried to do it without annealing and the drill bit just marred the finish. Strip it completely down as you don't want to anneal the bolt or firing pin. I used my plumbers torch for about a minute and it got to 700F. Let it cool on it's own and it will be soft enough to drill a dimple. Since the bolt is doing all the work on the bolt action upper, having a softer carrier isn't an issue. We're also not totally destroying the temper, a file still has trouble biting into it. The next step is too make the bolt repeatable on closing. No nylon bushings here or steel bolts that will wear on the aluminum. Installation is simple, turn the heads of your 10-32 x 0.5" screws down to 0.290 so that they are smaller than the 0.3125 diameter of the bushing/bearing. Next slip the bushing/bearings onto the screws and screw the bolt handle on. If your using the bearing it will need a couple of shims under it as it's slightly too narrow when bolted flush to the handle. I really liked the bearing I used and it opens and close like butter. Unfortunately while reinstalling the handle for the 20th time I caught the lip of the bearing on the receiver and separated it from the race. I'm using the bronze oilite bushings I also ordered in the meanwhile but they aren't as smooth. |
Joined:
Sep 2026
Posts:
5
EE: 0% (0)
TX, USA
|
part 3 Now for the precision part. The easiest place to put the plunger would be on the side of the receiver but I didn't want it sticking out or causing snags. I place mine on the 45 between the side and the top rail and it's mostly unobtrusive. Don't make my mistake of trying to use the 45's to clamp to, the opposite 45 under the bolt handle is too narrow and the receiver will slip. My drill press clamp wont rotate so I used a smaller clamp to hold the sides of the receiver and clamped that clamp into my drill press clamp at a 45 degree angle. Make sure the receiver is level in both X and Y directions, you need the locks nut to fit flush to the receiver. Also make sure the bolt handle stays closed, I used several rubber bands tied to the handle and front receiver lug. I drilled my hole dead center of the 45 flat and 1.25" from the end. Use the 3/32 drill bit and drill through the receiver until you hit the bolt, you'll know when it hits because the aluminum is soft and the bolt is still hard. Make a note of the depth on your drill press gauge and continue another 1/32 of an inch. Anything deeper than 0.045" will not allow the plunger to ramp out of the dimple smoothly, too shallow and it won't hold well. It's hard to measure this but I ended up around 0.035 deep. I took my carrier out a few times to check my depth.I then cleaned it up with the ball burr so the hole was rounded and not V shaped like the drill bit point. Once your happy with the dimple depth you can remove the bolt, enlarge the hole in the receiver with the #21 drill bit and thread it with the 10-32 tap. Stop short of going all the way through so there's some tension on the plunger. I went slightly too far so the plunger adjustment moved too easily. I just went back and deformed a couple of threads to inhibit movement and then used the lock nut to make sure it doesn't move and for a cleaner look. |
Joined:
Sep 2026
Posts:
6
EE: 0% (0)
TX, USA
|
part 4 The last step is too make a relief cut for the plunger. Originally I just made a ramp at the end of the carrier so the plunger could ride back onto the carrier when cycling the action closed. As others have noted, it sometimes takes left pressure to cycle the action and with the plunger pressing the carrier to the right it became a requirement. I then cut a full length trench for the plunger to ride in and that solve my binding issues. To figure out where to cut this line, I lifted the bolt and pulled it just far enough back so the bolt was in between the barrel lugs and then marked this point on the carrier through the plunger hole. The trench needs to be just deep enough that the plunger doesn't impart any side ward pressure on the carrier. If you keep it not much wider than the 0.093 width of the plunger then it will act as a guide for even smoother operation. You will need to cut a slight ramp to allow the plunger to transition from the trench back to the bolt lock dimple hole. |
Joined:
Sep 2026
Posts:
7
EE: 0% (0)
TX, USA
|
part 5 You can adjust the plunger in or out for more or less pressure which affects how much effort it takes to pop the bolt free. As a side bonus, because of the trench, the action cycles without needing any side pressure. Simply pop the bolt up, wait a fraction of a second, and it pulls straight back without getting hung up on the barrel lugs. The only downside to this mod (besides having to do machining) over the nylon bushing is the bolt makes a loud clank when hitting the end stop. I've partially solved this by putting a large stopper between my cut down carrier and the buffer. It still needs some work but I'm thinking I may just lengthen the relief cut in the side of the receiver. I plan on running it through it's paces with the current 350 legend setup. If I'm happy with it, it will get swapped out to my 458 socom. I've been trying to make a super quiet load with the 500gr Maker but the gas system isn't liking it. I'm taking Digger440 up on his offer so pics will be forth coming. |


|
Originally Posted By boxc: I don't think it would work. The gas key rotates too far to the right when the bolt is locked. You can see this by looking down the channel where the charging handle should be. Below is what I'm thinking of trying. I'm going to make my own gas key cover plate and have a chamfer push up on the ball detent when the bolt starts to rotate. 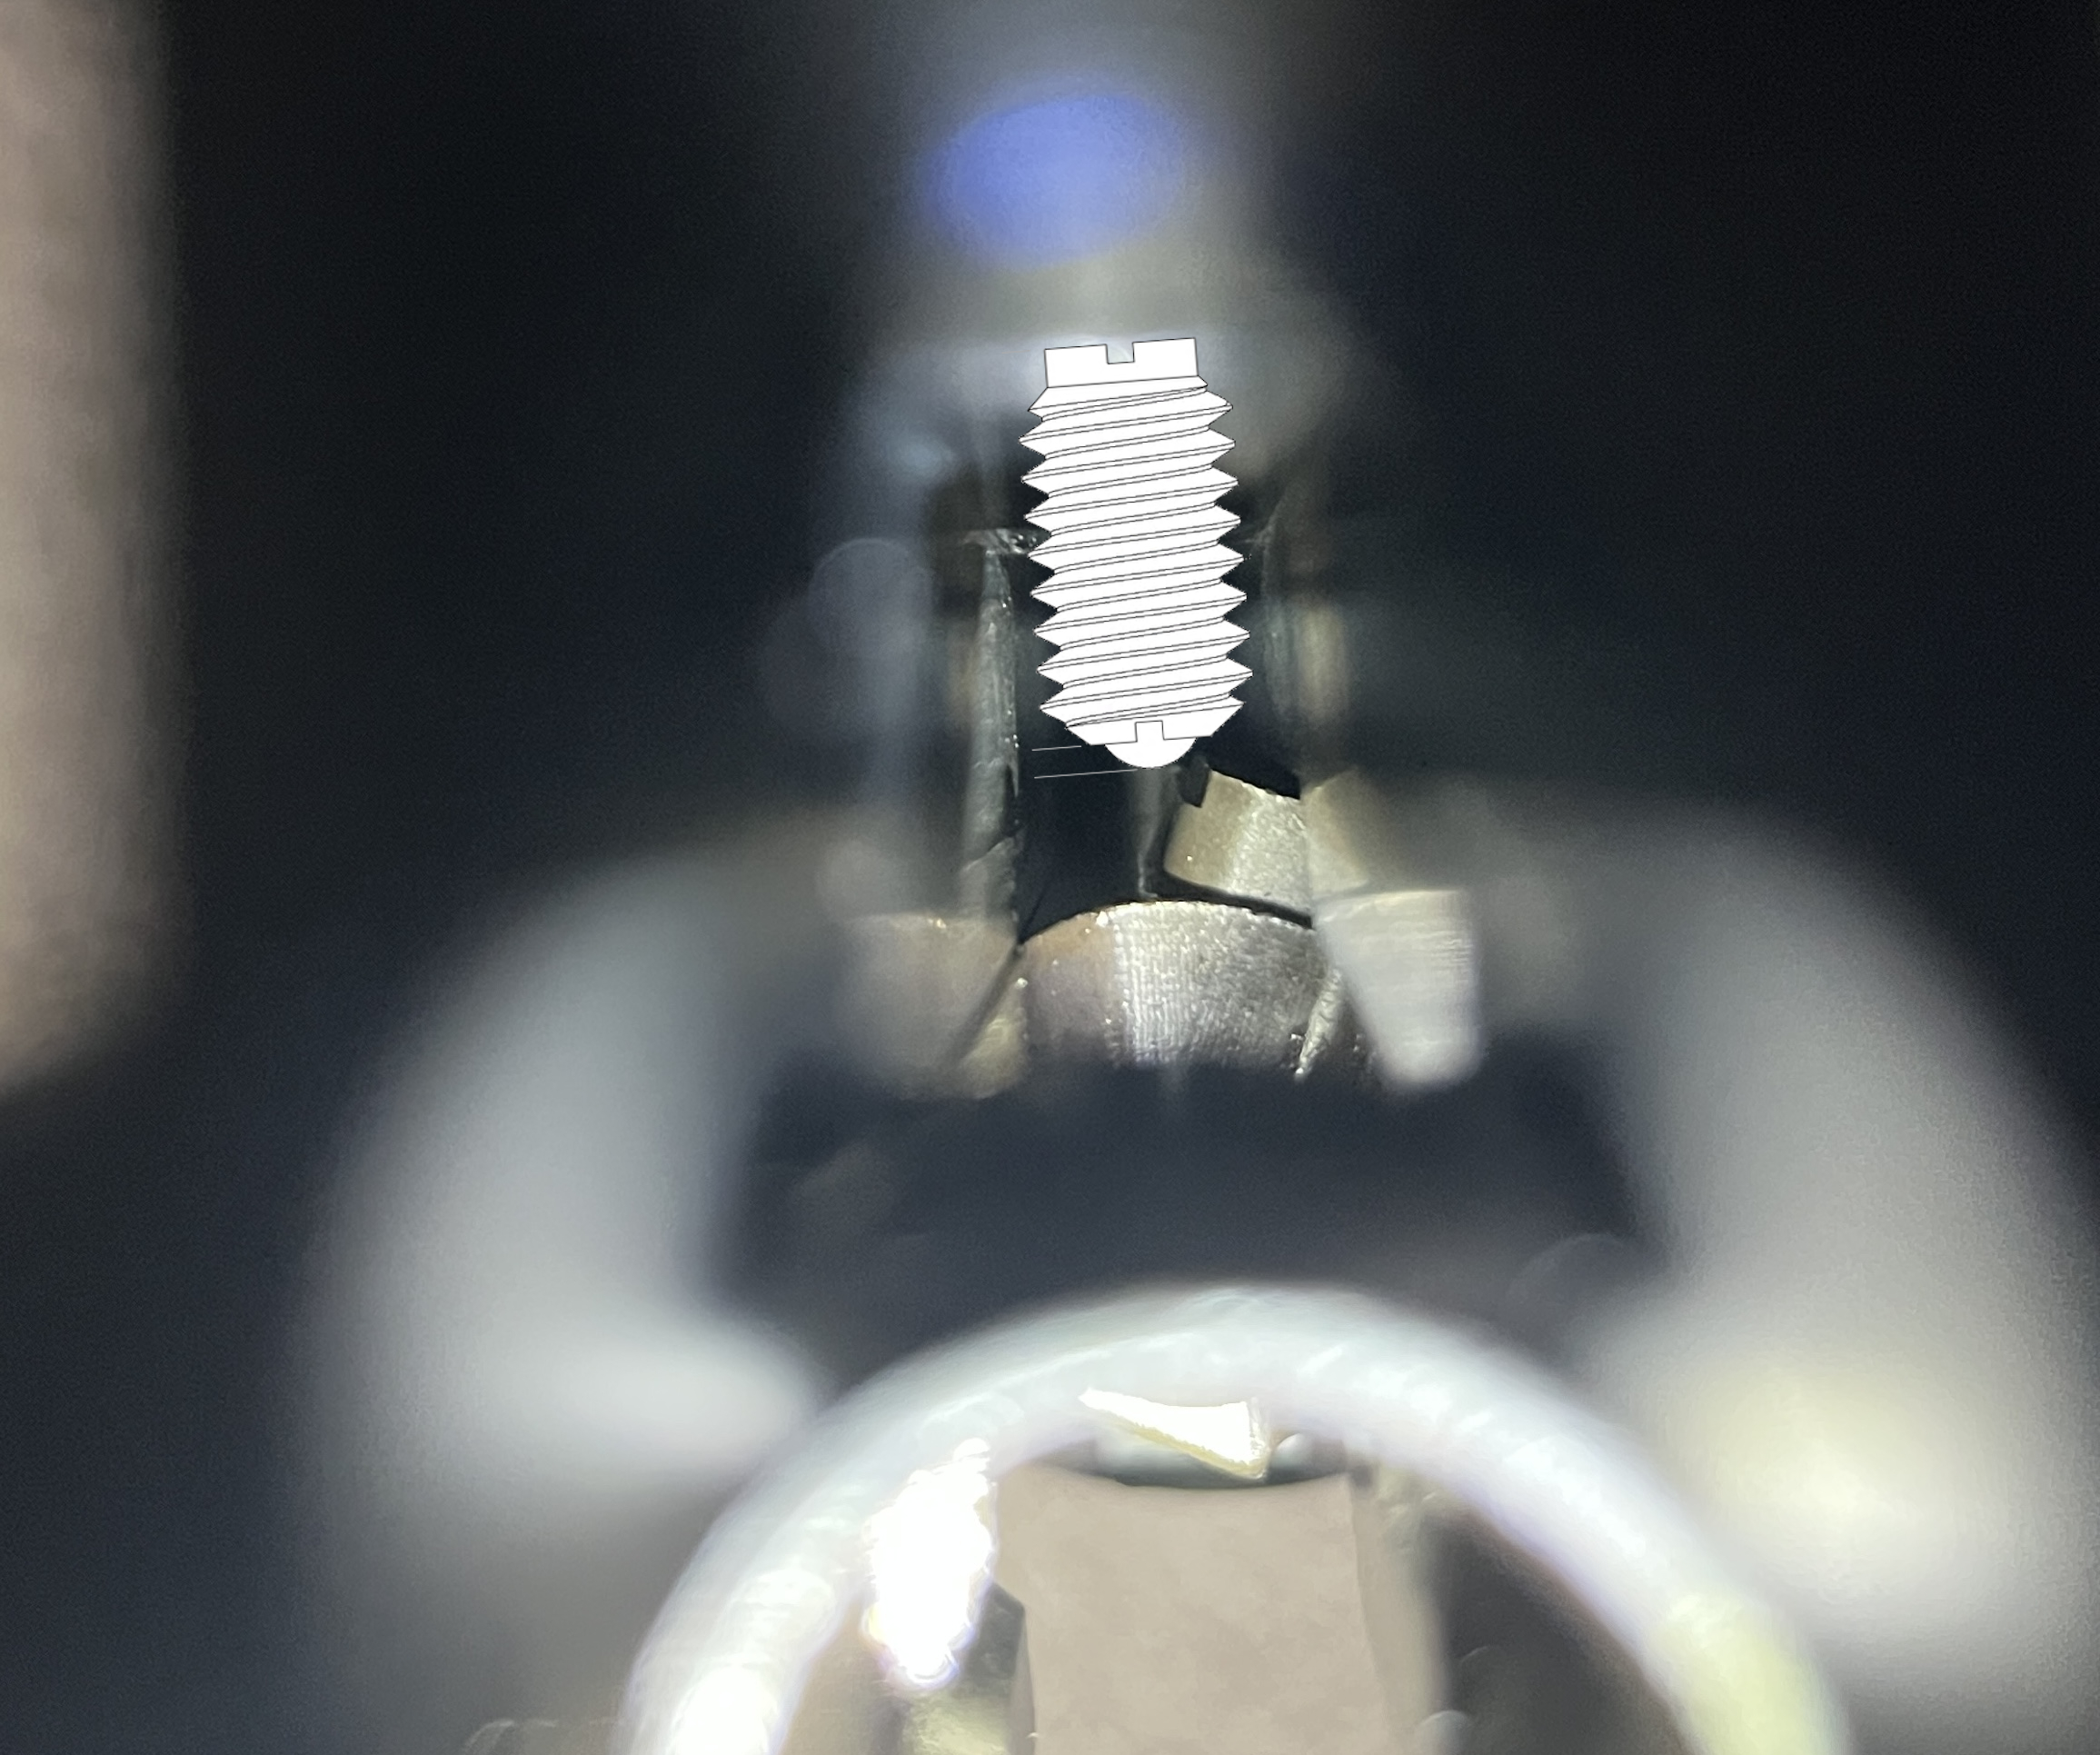
|
|
Attached File Took mine to 200yds the other day (338 ARC subs). Extremely satisfying to hear that on steel. Not getting great ejection so far, and feeding seems pretty dependent on mag and OAL. |
|
Originally Posted By bluedog82: https://www.ar15.com/media/mediaFiles/499242/IMG_2213_jpeg-3825900.JPG Took mine to 200yds the other day (338 ARC subs). Extremely satisfying to hear that on steel. Not getting great ejection so far, and feeding seems pretty dependent on mag and OAL. @bluedog82 I dig the stock who makes it? The tubes aren't connected near the hinge like a Doublestar/Ace AKFX |
"All of a sudden, I found myself in love with the world. So there was only one thing that I could do, ding a ding dang my dang a long ling long "
|
Originally Posted By Digger440: @bluedog82 I dig the stock who makes it? The tubes aren't connected near the hinge like a Doublestar/Ace AKFX It’s a CNC Warrior, same mfg as the brace on the BCA pistol. They sell stocks that are blems (the rear portion, up to the folding hinge) for $35. So I just swapped it in once the F1 cleared. |
BCA bolt action upper for $350? (Page 21 of 21)
AR Sponsor