UPDATE 05-06-17 NEW PICS PAGE 3!! Finally back at it. 72 Kawasaki triple 93 ZX7 hybrid build thread (Page 2 of 3)

|
UPDATE! 4-19-16
OK, did some carb rebuilding today. I had the carbs powder coated and got some new bit to overhaul them with. Here's a look at the powder coating. I just rough assembled them to put the new hardware on clean up the threads and whatnot that had a bit of overcoating. I replaced all the screws with stainless allen head bolts, they sent the wrong size for the bowls, so they are on order. 

OK, here are some new parts and the old bits they are replacing. Some parts I'm replacing for function, some for cosmetics. 
1. Choke plungers, old one on the right. It would have worked but it looked like crap and I updated it to a cable operation. 2. Floats. These set the fuel level in the float bowl of all places. 3. Float arm pin holds the float arm. 4. Float arm sets the level for the floats. The little tab under the #4 ride on the float needle and closes the valve when fuel gets to the correct level. 5. Float valve, old on the right new on the left. The screw and fork shaped tab hold it on the carb. 6. Pilot jet. Controls low speed fuel delivery. 7. Air screw, meters air to the pilot circuit. 8. Main jet below and the long brass tube thingy above is the needle jet and or emulsion tube. Main jet controls fuel above 3/4s throttle, needle jet is half of the team that controls midrange fuel. Not shown is the jet needle. 
Here is the carb bell mouth, the emulsion tube/needle jet goes in here, in that big hole in the center of the venturi. The two holes directly in from air air bleed holes for the pilot jet and the emulsion tube. On the left, half way up the venturi is another squarish hole and farther down a little dot is another hole. Those are both ends of the choke circuit, in and out. 
Needle jet going in. It can only go in one way, there's a locating pin on the side. That little hole in the front receives air from the large hole in the bellmouth and helps emulsify the fuel as it is drawn into the venturi. 
Heres where it comes out the other end, top of the float chamber. The small hole is where the pilot jet goes. 
Hello! The bottom of the emulsion tube and to the left you can see the float valve installed. 
This little hexagonal thing on top of the plastic thingy is the main jet, it holds the ET in. 
Float arm going in. 
Air screw. This meters air in the pilot or low speed fuel circuit. 

Choke plunger. 


One other thing got done, I installed the spacers I had made for the calipers. I hate the anodizing color, something will have to be done. 

|
|
UPDATE! 4-20-16
Built a rack for the carbs, here you can see they normally mount individually. I made the rack to facilitate the tuning process. When i'm jetting the bike, it will be easier to re and re the carbs as a unit. 
Here's the top bar I fabbed out of .5" angle aluminum. 
Here you can see a cheap piece of angled plastic I used to form out the bottom bar. 
Here's the bottom bar roughed in. 
Had to clearance the cases for the larger carbs and the rack mount. The rack prevents wiggle fitting the carbs one by one so i had to do some alu-carving. 
Test fitted. 
Finished racks mounts, front and rear view. 


|

|
Originally Posted By Striker:
What are you...a bike mechanic or something? 
Can't wait for the "on the road" video.. I was, but honestly, I was just a wrench turner. I never was into building custom stuff and fab work. Sure I built race engines and stuff for people but my bread and butter was run of the mill wrenching. I have to admit, I'm loving this project. 
|
|
UPDATE 4-27-16
Take a drool at these pics. Transmission was undercut, coated, and shimmed by Mark at R&D Motorsports in Clearwater FL. http://www.r-dmotorsports.com It's been hiding inside the cases lo these many months. Beautiful huh? It looks better in person. The work is amazing but it was not cheap, about 1500 bucks. Keep in mind this was used 40 year old gear set when I gave it to him. 


|
|
Originally Posted By captainpooby: UPDATE 4-27-16 Take a drool at these pics. Transmission was undercut, coated, and shimmed by Mark at R&D Motorsports in Clearwater FL. http://www.r-dmotorsports.com It's been hiding inside the cases lo these many months. Beautiful huh? It looks better in person. The work is amazing but it was not cheap, about 1500 bucks. Keep in mind this was used 40 year old gear set when I gave it to him. http://i1054.photobucket.com/albums/s496/captainpooby/Kawasaki%20H2/IMG_0001%207_zpsnfwcu3dd.jpg http://i1054.photobucket.com/albums/s496/captainpooby/Kawasaki%20H2/IMG_0002%205_zpswgqw66pm.jpg http://i1054.photobucket.com/albums/s496/captainpooby/Kawasaki%20H2/IMG_0003%206_zpsmld3psgh.jpg http://i1054.photobucket.com/albums/s496/captainpooby/Kawasaki%20H2/IMG_0004%206_zpsk1aetsta.jpg |
Arms wide open, I stand alone. I'm no hero, and I'm not made of stone.
Right or wrong, I can hardly tell. I'm on the wrong side of heaven, and the righteous side of hell.
Right or wrong, I can hardly tell. I'm on the wrong side of heaven, and the righteous side of hell.
|
so..what do you mean by undercut? See the "fingers" between the gears? Those are called dogs. Some of the gears freewheel on the shaft, some are splined on the shaft and some are part of the shaft. By sliding them back and forth with the shift forks engaging those dogs, you select different gear sets to interact. All that holds the gears together is the shift forks. If the dogs are undercut, when there is load on the gear, like when it's engaged, the load forces the gearset together instead of holding it with the fork. Like so: 
|

|
Originally Posted By g3_ultra:
NICE!!! Seeing that first pic brought back memories of when I stripped down my 93 ZX7, polished the frame and put a 94 ZX9 motor in it. I loved that bike but after that, I swore I'd never polish another frame! That black frame looks awesome!!! Mine was polished when I bought it. I said nope. |

|
Great build! Can't wait to see and hear it when it's done. I have ridden and driven extensively up in your area (Mid-Florida Ridge) the last 40 years. Great riding area.
Keep up the great work! |
Every time I make an extrusion and flush, it makes me long for 1/20/17
|
Originally Posted By captainpooby: See the "fingers" between the gears? Those are called dogs. Some of the gears freewheel on the shaft, some are splined on the shaft and some are part of the shaft. By sliding them back and forth with the shift forks engaging those dogs, you select different gear sets to interact. All that holds the gears together is the shift forks. If the dogs are undercut, when there is load on the gear, like when it's engaged, the load forces the gearset together instead of holding it with the fork. Like so: http://kawtriple.com/mraxl/tips/undercut/undercut.jpg Originally Posted By captainpooby: so..what do you mean by undercut? See the "fingers" between the gears? Those are called dogs. Some of the gears freewheel on the shaft, some are splined on the shaft and some are part of the shaft. By sliding them back and forth with the shift forks engaging those dogs, you select different gear sets to interact. All that holds the gears together is the shift forks. If the dogs are undercut, when there is load on the gear, like when it's engaged, the load forces the gearset together instead of holding it with the fork. Like so: http://kawtriple.com/mraxl/tips/undercut/undercut.jpg  |
Arms wide open, I stand alone. I'm no hero, and I'm not made of stone.
Right or wrong, I can hardly tell. I'm on the wrong side of heaven, and the righteous side of hell.
Right or wrong, I can hardly tell. I'm on the wrong side of heaven, and the righteous side of hell.

|
Make sure and bring snacks into your welding instructor.
Tig and expensive, thin and irreplaceable product would make me ask for extra special time spent On me and my TIG skill set. Looks great so far.
|
Bad men need nothing more to compass their ends, than that good men should look on and do nothing.
John S. Mill
John S. Mill
|
UPDATE 5-8-16!!
Want to see how OCD I am? 


Before these go to powder coating I had to get those casting marks off. I thought it would be quick and easy but it's not. That's not just casting flash, the friggin molds aren't even aligned right. I went over the cases too and removed a bunch of casting imperfections and stuff on them. Stuff you probably will never see.
|

|
Originally Posted By fla556guy:
Not really my style of bike and you are making me want one. That's how good this thread is. (and yes, that really is a massive complement). Originally Posted By fla556guy:
Not really my style of bike and you are making me want one. That's how good this thread is. (and yes, that really is a massive complement). Thank you very much. 
Originally Posted By fttam:
What color will they be after powder? I'm vacillating. Seriously, two years and I haven't decided yet. The heads could be "anodized gold" and the rest of the engine satin black, 70s old school style. OR, all satin black, a la Z1 engine style with polished fins. OR satin black heads with "blasted aluminum" jugs and satin cases. "Anodized gold" and "blasted aluminum" are actual powder coat colors. There are several color that mimic anodizing. This is soooooo 70s but I'm inspired by these DG heads from years ago: 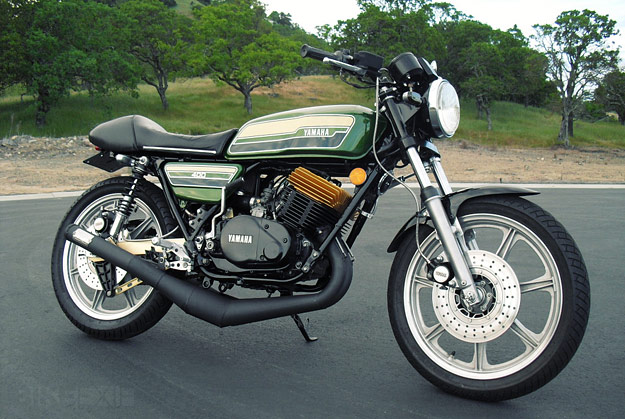
|

601 601 601 601 601 601 601 601 601 601 601 601
Joined:
Aug 2003
Posts:
71200
EE: 100% (42)
 WA, USA
|
Originally Posted By captainpooby:
This is soooooo 70s but I'm inspired by these DG heads from years ago: My long gone Yamaha Daytona RD400 had a set of DG heads and Spec II pipes. |
Google, it's a motherfucker.
One does not drive a motorcycle, one RIDES a fucking motorcycle!
One does not drive a motorcycle, one RIDES a fucking motorcycle!
|
Here's some pics of I forgot to post.
I matched up the transfers, the intake manifolds and the exhaust spigots. I'm getting close to sending the engine out for powder. :P Not the best pics you can see whats going on I hope. After Jyrg's little adventure with the cracked sleeves. I also smoothed up the transfer corners next to the intake ports in an effort to minimize any stress risers there. Here's hoping mine don't crack. :eye: A little sharpie applied. 
These next two are out of sequence but I fitted the jug and scribed the cases. 

Took a little 'loominum off. 
Let's see how they fit. 
Not bad. Good enough for gubmint work as they say. 
Matched the intake manifold to the port. 
Now for the exhaust spigots. A little sharpie applied and a line scribed. 
Test fit, needs a little more. 
A bit more. 
Looks good! In the pic it looks like a step in the port but it's just a difference in the finish its actually a nice smooth transition. 
|
|
Originally Posted By KA3B:
My long gone Yamaha Daytona RD400 had a set of DG heads and Spec II pipes. Originally Posted By KA3B:
Originally Posted By captainpooby:
This is soooooo 70s but I'm inspired by these DG heads from years ago: My long gone Yamaha Daytona RD400 had a set of DG heads and Spec II pipes. What do you think? Should I go with gold? |

| Nice work. I really like the carb work as well...fantastic stuff brother! |
<font size=2>I'd Rather Be A Free Man In My Grave...Than Living As A Puppet Or A Slave</font id=s2> -Jimmy Cliff
<font size=2>The Strong Take From The Weak...The Smart Take From The Strong</font id=s2>
<font size=2>The Strong Take From The Weak...The Smart Take From The Strong</font id=s2>

601 601 601 601 601 601 601 601 601 601 601 601
Joined:
Aug 2003
Posts:
71277
EE: 100% (42)
WA, USA
|
Originally Posted By captainpooby:
What do you think? Should I go with gold? Originally Posted By captainpooby:
Originally Posted By KA3B:
Originally Posted By captainpooby:
This is soooooo 70s but I'm inspired by these DG heads from years ago: My long gone Yamaha Daytona RD400 had a set of DG heads and Spec II pipes. What do you think? Should I go with gold? Can you still get them? I know DG is still making pipes, a guy at work had one on his Grom. |
Google, it's a motherfucker.
One does not drive a motorcycle, one RIDES a fucking motorcycle!
One does not drive a motorcycle, one RIDES a fucking motorcycle!
|
Originally Posted By KA3B:
Can you still get them? I know DG is still making pipes, a guy at work had one on his Grom. Originally Posted By KA3B:
Originally Posted By captainpooby:
Originally Posted By KA3B:
Originally Posted By captainpooby:
This is soooooo 70s but I'm inspired by these DG heads from years ago: My long gone Yamaha Daytona RD400 had a set of DG heads and Spec II pipes. What do you think? Should I go with gold? Can you still get them? I know DG is still making pipes, a guy at work had one on his Grom. There are some repros out there, but only for the RD. DG only made those heads for the Yamahas. There are billet heads out of Germany that I could get anodized, but they are pretty pricy. Too much for mainly a cosmetic thing. They also make a dry clutch conversion I'm seriously thinking about. It almost a bolt on that uses Ducati clutch parts but we're talking 1800 euros if you supply the clutch. That's another 700 bucks. For some reason, I have always loved the look and sound of a dry clutch.
Originally Posted By The_Emu:
Have you thought of hiring an illustrator to draw out the different color schemes your are concidering? It might help you decide and save you from having to have things done twice because you didn't like it the first time. The thought has crossed my mind. Are you one? |
|
UPDATE 05-24-16
Some of the brake hardware needed drilling for safety wire and it was looking a little sad as well so I broke out my zinc plating stuff. Here's some of the hardware, left to right: plated one layer and carded bolt, raw plated bolt, and two bolts media blasted and ready for plating. "Carding" the bolt is buffing the zinc plating with a scotchbrite pad. 
A different angle. 
Here's what you need to zinc plate: zinc sulphate, Epsom salts, vinegar, a zinc anode, apower source from .5 to 5 volts and a little sugar. The sugar helps the plating coat evenly. There are formulas on the web of how much vinegar to how much other stuff but after doing this a few times I just fill a container with vinegar, add some Epsom salts and zinc sulphate, a bit of sugar, hook up the anode and go. It's really that easy. If the reaction looks like it's slowing down, I just add some more zinc sulphate. Plate each bolt for about ten minutes, remove and buff a bit with a scotchbrite and put it back in for another ten minutes. Repeat until you get your desired effect. Usually twice will do on small parts like this.The bolts must be absolutely clean of any dirt or grease. I rinse the in denatured alcohol after media blasting and any time I remove them from the electrolyte. 
The positive from the battery hooks to the zinc anode in the electrolyte, the negative to the part you're plating. You can just make out the anode in the container with yellow wire clipped to it. 
Here's how they turned out. Keep in mind these were 25 year bolts that had seen some abuse. All in all, for about 25 bucks worth of plating stuff I've saved a ton of money not having to buy new hardware. 
|
|
OP...
Just saw this on the Portland Craigslist...have no clue if it's anything you're interested in but I thought I'd post... 2 Vintage Kawasaki H1 500 triple fuel tanks w/ caps - $120 Kawi Tanks |
Be Prepared...
|
Originally Posted By ORARGB:
OP... Just saw this on the Portland Craigslist...have no clue if it's anything you're interested in but I thought I'd post... 2 Vintage Kawasaki H1 500 triple fuel tanks w/ caps - $120 Kawi Tanks You should buy em and flip em on eBay. |


|
Originally Posted By captainpooby: UPDATE 6-17-16 Visited my powder coater today. http://i1054.photobucket.com/albums/s496/captainpooby/engine%20powder%20coat5_zpscto3vxbl.jpg http://i1054.photobucket.com/albums/s496/captainpooby/engine%20powder%20coat3_zpsmssntgzn.jpghttp://i1054.photobucket.com/albums/s496/captainpooby/engine%20powder%20coat2_zpsesfweyzr.jpghttp://i1054.photobucket.com/albums/s496/captainpooby/engine%20powder%20coat1_zpsbsjm5bo0.jpg |
Arms wide open, I stand alone. I'm no hero, and I'm not made of stone.
Right or wrong, I can hardly tell. I'm on the wrong side of heaven, and the righteous side of hell.
Right or wrong, I can hardly tell. I'm on the wrong side of heaven, and the righteous side of hell.
|
Originally Posted By Striker:
wearing your summer time full length skirt I see..
Originally Posted By Striker:
Originally Posted By captainpooby:
UPDATE 6-17-16 Visited my powder coater today.
http://i1054.photobucket.com/albums/s496/captainpooby/engine%20powder%20coat5_zpscto3vxbl.jpg http://i1054.photobucket.com/albums/s496/captainpooby/engine%20powder%20coat3_zpsmssntgzn.jpghttp://i1054.photobucket.com/albums/s496/captainpooby/engine%20powder%20coat2_zpsesfweyzr.jpghttp://i1054.photobucket.com/albums/s496/captainpooby/engine%20powder%20coat1_zpsbsjm5bo0.jpg
It's really hot down here. 
|

|
UPDATE 06-23-16
A couple pics of what I hope will be the "electronics bay" of the bike. Since there is a ton of wasted space above the engine and under the tank, I'm hoping to utilize it and the non-functional ram air system to provide a "cool" environment for the electronics. I cut and fitted this piece of aluminum plate that will separate the engine from the electronics and fuel tank. I'll use some insulating material as well. Not sure yet just how I'll mount everything but I'm planning on Dzus fasteners and a couple of quick release access panels to the engine bay for spark plug and carb access. 

|
|
Originally Posted By die-tryin:
you going with POD Air cleaners ? otherwise, might be cool to make a true Ram-Air.... Pods. Already have them in my pile of parts. I did consider your idea though, but I think it may have caused me huge headaches in jetting the bike down the road so I canned it. |