


[ARCHIVED THREAD] - Kitchen Table Science Project - 80% Lower Electro Etching Starting a New Lower Page 4 (Page 1 of 5)
Posted: 3/27/2021 11:49:36 PM EDT
|
I got this A2 80% receiver, and figured I outta do something cool with it. The Mattel Marauder thing is so A1 and 1960s. The Mattel Commando is the new hotness. I'm going to electrotech all the decorative markings on this lower. All of the actual markings will be inside the trigger well. I'll have those professionally engraved with a laser. There are several techniques I've seen to do the actual etching. Some look really time consuming and don't yield consistent results. Others take a lot of time to setup and yield fantastic results. I'm going to do something in between. I'm going to post this live as I do it. So if I fail, you get to see it. If I succeed, you get to see it. If you like it, cool. If not, go fuck yourself. I ordered a set of custom stencils. This is what comes in the package. There's a bit of scrap in there. Save that. You might need it in case you accidentally nick or burn through the stencil later and need to patch it. Attached File Attached File This is a bit different then the other sets I ordered, because it I had the right side selector markings deleted. I'll do the selector markings and faux manufacturer info in one shot. I'll do the magwell markings in one shot as well, but it will require some trimming to place it where I want it. First, separate the sections of the stencil. Pay close attention to the tops and sides. You will likely use them later to help line up the stencil. For the selector, you will need to cut out the oval where the stops for the selector go. Use a fresh blade. Not one you've only used once or twice. Use one that just came out of the package. Trim until it fits over the stop. Attached File Attached File |
|
Note that the lettering does not interfere with the hammer pin location. Attached File Now time to get the magwell markings trimmed. I want it centered from left to right on the magwell area. So I'll start by finding the center, and marking a line down it. Attached File It's 7/8" wide, so 14/16". Half of that is 7/16". So I'll make a small mark there. Attached File |
|
I measured across the logo. The line is just a shade off center. Close enough. Attached File Now I mentioned I wanted the markings up higher on the magwell. I want them to sit about like this. Attached File It's about 5/16" from high. I'll need to make two marks 5/16" from the top, and put a line across it. Attached File |
|
New top line marked. I'll use this line to help line the stencil up across the top of the magwell when I lay it down. Attached File The area on the magwell is approximately 1 3/8" wide. So that's 16/16" + 6/16" = 22/16" = 11/16". So the centerline of the magwell is 11/16" from either side of the markable area. Attached File Edit: My math was wrong. I read it as 1 7/8" when it was 1 3/8". Fixed. |
|
Made a mark at the top of the magwell at 11/16 for reference. Attached File Looks close enough. Attached File I'm going to use the right side of the magwell area as a guide for placement. I put two markings on the stencil 11/16" off from the centerline, and then made a mark across to guide when I trim. Attached File Attached File Attached File |
|
Trimmed. Looks like what I wanted. Time to start prepping the receiver and laying down the stencils. Attached File |
|
It's important that the stencils stick really well. So, use denatured alcohol to wipe off any oxidation, skin oils, cutting fluid, etc. Attached File Attached File Attached File |

|
cThe stencils have two sides. The back, which has a waxy feeling paper, and the front, which holds everything together. Carefully peel about half of the back off. Use the top and right sides to help line it up and make sure it's square with the magwell. Gently lay it down and ensure it's exactly where you want it before applying any pressure. When you're happy, press down at the top, then slowly peel the rest of the back off, pressing the stencil down as you go. Attached File Attached File Success! Attached File Now, use the slick paper off the back of the stencil to burnish the stencil down really well. You want everything stuck hard to the receiver to keep the etching fluid from seeping under it. Attached File |
|
Next, we'll plug in the hot glue gun to build a dam around the area we're gonna etch. I picked up a fine tip Gorilla brand hot glue gun and a couple bags of glue sticks from the craft section at Walmart. You're gonna want to buy the big bags of glue sticks. You'll need them. We'll plug it in now so it's hot when we're ready to use it. Keep it on the low setting to help prevent accidentally melting through the stencil. Attached File While the glue gun is heating up, I'll very gently separate the top layer of the stencil, and very very gently peel it away. You want to check constantly to ensure that nothing separates from the receiver. If it does, gently lay it down and burnish that area. |
|
Used the razor blade I cut out the opening for the selector markings to gently lift the corner of the top layer of the stencil. Attached File Very gently pull the top layer away, checking constantly that none of the red vinyl lifted away from the receiver. Attached File Attached File Success! I didn't fuck this up. The thread can continue. Attached File |
|
So I want to build a wall of hot glue around the area I want to etch to contain the etching solution. It has to be leak proof, because if it's not it'll make a mess, and any place the fluid touches and completes a circuit will get etched. I'll go around in circles with the glue gun, and build a wall around the stencil about a half inch high. Keep a pile of glue sticks handy. Stop when you need to so the glue can cool and harden. Look for any bubbles that might let etching solution leak. Attached File Attached File This is about one stick worth. It's still soft and tacky, so I'll let it cool before I add a couple more levels to it. |

|
So, about a half inch high. Forgot to mention that when you do this, you want to work away from the stencil. Don't touch it, and when you pull the glue gun away, pull it away from the stencil so you don't get tiny strings of hot glue across the stencil. Attached File It's pretty warm, so while that cools, let's talk about the etching solution and power source. The etching solution is just plain old Walmart white vinegar with as much kosher salt as I could possibly get to dissolve in it. I have an empty Elmer's bottle to fill and refill the etching solution. Now, some of you may remember the Crabmeat Carbine thread. That was my second attempt at etching that lower. The first attempt was a failure. It discolored the metal and barely etched it. I think the problem was 1) not enough salt in the solution, and 2) not enough amperage to get the job done. To solve the amperage problem, I picked up an old dumb (not smart) battery charger off Craigslist for $20 bucks. It'll pass 6/12 volts, and 2/6 amps. Plenty! Attached File Now that I've finished typing all that, the glue is cool enough for me to check for leaks. I'll do that in the bathroom. BRB. |
No leaks. Beetlejuice - It's Showtime |

|
Ok, so set the lower on a towel. You want to be able to keep the lower level, and if you spill, not make your counter the shittiest of potato chip flavors. Attached File Positive lead connects to the lower. Attached File Negative lead connects to whatever this thing is called. I just wanted a lump of copper from the hardware store, and this was good enough. Attached File Fill with etching solution, and set the power supply to 12v, 2a. You should immediately see some science happening when you dip the copper electrode in. Attached File |
|
Now, you notice a few letters didn't immediately discolor. This is because some of the adhesive from the top layer of the stencil has stuck to the lower. You need to cut through this, but be very careful not to disturb the stencil. Don't worry about scratching your lower. You're going to remove that metal anyway. So, wash out the solution, and grab your Xacto knife. Attached File Attached File |
I was lucky enough to find one of these pre-made for a future marauder type A1 build but doing it yourself is cool AF.  eta- Didn't want my image to take away from OPs thread but this is the one I need to get off my ass and build some day: Click To View Spoiler What are your plans on the rifle build one the receiver is ready? |
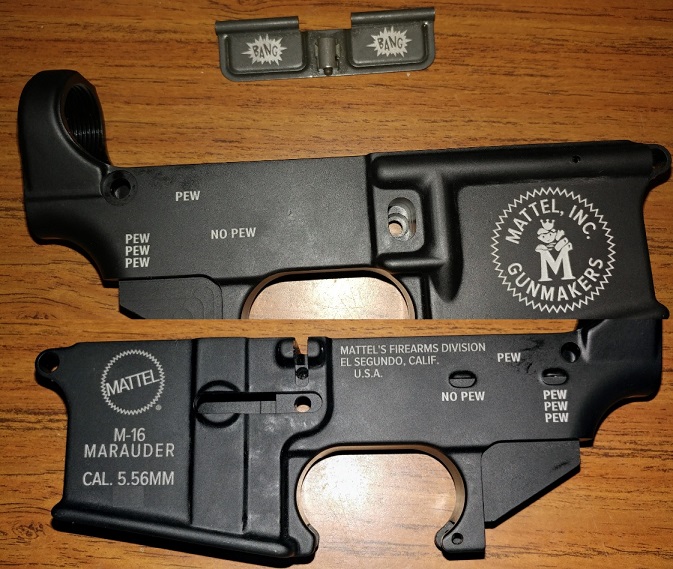
|
Quoted: For future reference, you can use a sponge over the stencil and put your electrode on top of the sponge. This allows the enchant solution to conduct, and no worries pissing around with a hot glue dam. Knife makers will concur. |
|
Ok, now that I'm sure everything is good to go, time to science. I set the timer on my phone for two minutes. After two minutes, I'll check my progress and replace the etching fluid. As it's etching, move the electrode up and down and sort of swirl it around in the fluid to help keep everything nice and even. Do not let it rest on the lower. Keep it in there as deep as you can without actually contacting the lower. Attached File After two minutes. Attached File |
|
Round two, fight! I'll etch for two more minutes. I'm basing this on my experience with the Crabmeat Carbine lower. Going for only two minutes keeps from getting the stencil too warm and having the adhesive underneath it soften, and keeps you from fucking up everything. The Mattel logo has lots of sharp corners, so I don't want to screw that up and have it turn into a fucked up looking cookie. Attached File |

|
After the second two minute session, I washed the fluid out, checked my progress, and refilled it. I was feeling good about how it was going, so for the third session, went only one minute. After a total of 5 minutes of etching, the edge of the stencil was just barely starting to curl, and when I checked with a fine point, I could feel good depth to the etching. Attached File It's easy to pop off the wall and most of the stencil. Attached File |
|
Attached File I didn't fuck this up. The thread can continue.You can see good depth to the etching, but the edges of the logo are still nice and crisp. Attached File Attached File |

|
I prepped the manufacturer info and selector markings with a paper towel and alcohol, same as I did for the magwell. I peeled off part of the stencil, and gently laid it down on the lower. I tried the best I could to make sure it was straight. Keeping this one straight was critical because of the dots and apostrophes at the top. It's not perfect. There looks like just a shade more space above the D in Division than the M in Mattel's. I folded the excess material across the top of the lower after I removed the top layer. Attached File Attached File Attached File Attached File |


|
So I very carefully sealed up around the SAFE marking. You do not want leaks there. I also went around and built up a half inch or so of hot glue all around that area. I filled it and made sure there were no leaks, and gave it some power. Again, a few spots that needed the adhesive cut through. No big deal. Steady hand and an Xacto knife. Attached File Attached File Attached File Attached File Attached File |