


Kayfun micro coil build tutorial (pic heavy) (Page 4 of 7)

2012 Arfcockalypse Survivor...callsign Hooligan
Joined:
Feb 2011
Posts:
2210
EE: 100% (14)
 FL, USA
|
Originally Posted By lcoates33:
Thought i would leave this link to a colored kayfun tank combo. You get both the standard tank section and the M tank. Linkage. Holy fuck not you again with this shit!! 
|
Due to the rising cost of ammunition, I will no longer be able to provide a warning shot. Thank you for understanding.

|
Originally Posted By Keith1980:
Holy fuck not you again with this shit!! Originally Posted By Keith1980:
Originally Posted By lcoates33:
Thought i would leave this link to a colored kayfun tank combo. You get both the standard tank section and the M tank. Linkage. Holy fuck not you again with this shit!! 
|
AKA Mouse.
I am the parts fairy....[img]smiley_abused.gif[/img]....x27
Parts fairy is the tits. The EE is for losers -FaucetFace-
Thank you Compass!!
I am the parts fairy....[img]smiley_abused.gif[/img]....x27
Parts fairy is the tits. The EE is for losers -FaucetFace-
Thank you Compass!!
Get this. I roll a micro-coil last night with the new 28ga wire that I just got. Coils looks good (granted, not "Keith" good. ) Slap it into the Kayfun. I go to check resistance, and it reads .1ohms.

I dick around with it, and it still reads .1ohms. Just to make sure I'm not crazy, I throw the coil into my RSST and it reads 1.6ish ohms, and fires fine. Then, with no coil at all in the Kayfun, with the base attached to my Vamo..........I get a reading of 1 ohms.
Any ideas? The Vamo normally reads 9.9ohms with nothing to fire on it. How am I getting an ohm reading with no coil in the Kayfun base? Like I said, it did get knocked over onto a hard table top while mounted on my Vamo. Looking at the deck, and how it's sort of in two sections, one section is crooked, and is touching the other. Not sure if it was like that before or not. Here's an MS Paint scribble sketch done on a generic Google pic, of what I'm talking about: 
Maybe those 2 bases touching is causing a glitch in the matrix and giving me weird ohm readings? |

|
that was the problem i had with my first build on the R91. I had to lower the 510 pin and it threads into the positive post pin. they were locked together so when i lowered the 510 connector the deck came loose and shorted and batteries got hot. Checked ohms and they were jumping all over. I took it apart...tighted the deck down good and then put the 510 center pin in and all was right again.
|
2012 Arfcockalypse Survivor...callsign Hooligan
Joined:
Feb 2011
Posts:
2240
EE: 100% (14)
FL, USA
|
Will do. Thanks guys.
I did try to tighten the shit out of the 510 connection when I first got it, to get it more flush, because I didn't want to push the pin on the Vamo in. (That's what I did with my old Vamo that took it out of commission for awhile.) I didn't realize it had moved that little block on the deck. |
|
OK, straightening out the deck worked.
Just finally just built my first coil on this Kayfun generously donated to me by Keith (thanks again  ). 28ga, I think 10 wraps, 1.7ohms. Running it at 12 watts right now. ). 28ga, I think 10 wraps, 1.7ohms. Running it at 12 watts right now.
I can see what all the hype is about. This thing hits like a beast and spits clouds! I may even break down and get myself the EHPro version. I've only been using it for about 20 minutes, but so far, no gurgles, no flooding. Whistles like a sumbitch, but that doesn't bother me at all. 


|
2012 Arfcockalypse Survivor...callsign Hooligan
Joined:
Feb 2011
Posts:
2305
EE: 100% (14)
FL, USA
|
Originally Posted By NY_Shooter:
OK, straightening out the deck worked. Just finally just built my first coil on this Kayfun generously donated to me by Keith (thanks again ). 28ga, I think 10 wraps, 1.7ohms. Running it at 12 watts right now.
I can see what all the hype is about. This thing hits like a beast and spits clouds! I may even break down and get myself the EHPro version. I've only been using it for about 20 minutes, but so far, no gurgles, no flooding. Whistles like a sumbitch, but that doesn't bother me at all. http://i.imgur.com/AIAjqt4.jpg http://i.imgur.com/GWnhiHH.jpg
About damn time!!!! Looks good!!! Even more importantly, glad you like it!!! Enjoy!! |
Due to the rising cost of ammunition, I will no longer be able to provide a warning shot. Thank you for understanding.
2012 Arfcockalypse Survivor...callsign Hooligan
Joined:
Feb 2011
Posts:
2306
EE: 100% (14)
FL, USA


2012 Arfcockalypse Survivor...callsign Hooligan
Joined:
Feb 2011
Posts:
2323
EE: 100% (14)
FL, USA
|
Originally Posted By Keith1980:
So you still liking the tank NY after a day of use?? Any burnt hits or anything? Yep. Still running great. Refilled earlier today. No issues so far. No flooding, gurgling or dry hits. It gets the titties approval, no doubt. Posted Via AR15.Com Mobile |
2012 Arfcockalypse Survivor...callsign Hooligan
Joined:
Feb 2011
Posts:
2324
EE: 100% (14)
FL, USA
|
Originally Posted By NY_Shooter:
Yep. Still running great. Refilled earlier today. No issues so far. No flooding, gurgling or dry hits. It gets the titties approval, no doubt.
Posted Via AR15.Com Mobile Originally Posted By NY_Shooter:
Originally Posted By Keith1980:
So you still liking the tank NY after a day of use?? Any burnt hits or anything? Yep. Still running great. Refilled earlier today. No issues so far. No flooding, gurgling or dry hits. It gets the titties approval, no doubt.
Posted Via AR15.Com Mobile 
|
Due to the rising cost of ammunition, I will no longer be able to provide a warning shot. Thank you for understanding.

|
Do you use the coil until it physically fails. I pull the wick and heat it and scrape all the black crap off and then replace the wick. I am getting a lot of black crap on the coil. I have read this is do to the juice you use but is this true? Pg/vg percent?
I run 1.5 ohm coils at 10-11 watts on vv/vw units. I keep looking at mech mods but am afraid I will blow myself up one night when I am tired and not paying attention. |
Stupid has reached critical mass.
An easy way to never violate your morals is to simply not have any.
An easy way to never violate your morals is to simply not have any.
|
Originally Posted By WVNed:
Do you use the coil until it physically fails. I pull the wick and heat it and scrape all the black crap off and then replace the wick. I am getting a lot of black crap on the coil. I have read this is do to the juice you use but is this true? Pg/vg percent? I run 1.5 ohm coils at 10-11 watts on vv/vw units. I keep looking at mech mods but am afraid I will blow myself up one night when I am tired and not paying attention. You can get a long time out of a coil, if you keep it clean, like you are. The thicker and/or darker a juice is, the more it will gunk up a coil. When you're doing your dry burns to clean the coil with no wick in it, heat it up until it's red and then stick into a stream of water from your faucet (careful not to get water inside or all over your mod ). I saw Rip Trippers do it in one of his videos, and it gets it way cleaner than simply dry burning it.
|
2012 Arfcockalypse Survivor...callsign Hooligan
Joined:
Feb 2011
Posts:
2336
EE: 100% (14)
FL, USA
|
Originally Posted By WVNed:
Do you use the coil until it physically fails. I pull the wick and heat it and scrape all the black crap off and then replace the wick. I am getting a lot of black crap on the coil. I have read this is do to the juice you use but is this true? Pg/vg percent? I run 1.5 ohm coils at 10-11 watts on vv/vw units. I keep looking at mech mods but am afraid I will blow myself up one night when I am tired and not paying attention. Higher VG will gunk up your coils quicker. The key to mechs is good batteries, double check your resistance, and know ohms and watts laws. Or get a DNA30. But you should really get both.
|
Due to the rising cost of ammunition, I will no longer be able to provide a warning shot. Thank you for understanding.
2012 Arfcockalypse Survivor...callsign Hooligan
Joined:
Feb 2011
Posts:
2338
EE: 100% (14)
FL, USA
|
Originally Posted By NY_Shooter:
Day 2 with the Kayfun. 3rd tankful right now. Still no issues. I'm really liking this thing. It is like a big ass titty in your face!!!!
|
Due to the rising cost of ammunition, I will no longer be able to provide a warning shot. Thank you for understanding.
|
Originally Posted By Keith1980:
It is like a big ass titty in your face!!!!Originally Posted By Keith1980:
Originally Posted By NY_Shooter:
Day 2 with the Kayfun. 3rd tankful right now. Still no issues. I'm really liking this thing. It is like a big ass titty in your face!!!! I must have built mine wrong.......
|
AKA Mouse.
I am the parts fairy....[img]smiley_abused.gif[/img]....x27
Parts fairy is the tits. The EE is for losers -FaucetFace-
Thank you Compass!!
I am the parts fairy....[img]smiley_abused.gif[/img]....x27
Parts fairy is the tits. The EE is for losers -FaucetFace-
Thank you Compass!!
|
I do 70% or more VG so I guess that is doing it. I will try the sink thing. I have 2 kayfun clones and love them both. I run 4 mods and have 2 with kayfun clones and 2 with Iclear 30s. I just ordered an SVD. I wussed out on the mech mod again. I had an SVD before and really liked it until I broke it.
No more mods that have 1 button for everything. |
Stupid has reached critical mass.
An easy way to never violate your morals is to simply not have any.
An easy way to never violate your morals is to simply not have any.
|
Originally Posted By Keith1980:
It is like a big ass titty in your face!!!!Originally Posted By Keith1980:
Originally Posted By NY_Shooter:
Day 2 with the Kayfun. 3rd tankful right now. Still no issues. I'm really liking this thing. It is like a big ass titty in your face!!!!Its like motorboating a set of D sized tits, then slapping said tits and one of them coming back rocking you in the face! Posted Via AR15.Com Mobile |
|
Originally Posted By WVNed:
I do 70% or more VG so I guess that is doing it. I will try the sink thing. I have 2 kayfun clones and love them both. I run 4 mods and have 2 with kayfun clones and 2 with Iclear 30s. I just ordered an SVD. I wussed out on the mech mod again. I had an SVD before and really liked it until I broke it. No more mods that have 1 button for everything. Yeah, the water trick works really good. I did it to a few old coils and they looked brand new. Posted Via AR15.Com Mobile |
|
The KFL is still going strong, and has taken the "favorite tank" spot, for sure.
The fill screw finally went, though. When I try to loosen it, it won't unthread and back out. It just spins. But it will still tighten. So I tightened it down real good, and now fill from the top. Filling this way, I get a tad bit of leaking from the airhole right after and will gurgle if you try to take a draw, but blowing it out resolves that immediately. I'll admit, when first getting it, all the pieces, the weight and the size kinda made me think that it would stay as a home-only piece. But the damn thing hits so good and is so easy to build. Thanks again, Keith. You da man. |
2012 Arfcockalypse Survivor...callsign Hooligan
Joined:
Feb 2011
Posts:
2431
EE: 100% (14)
FL, USA
|
Originally Posted By NY_Shooter:
The KFL is still going strong, and has taken the "favorite tank" spot, for sure. The fill screw finally went, though. When I try to loosen it, it won't unthread and back out. It just spins. But it will still tighten. So I tightened it down real good, and now fill from the top. Filling this way, I get a tad bit of leaking from the airhole right after and will gurgle if you try to take a draw, but blowing it out resolves that immediately. I'll admit, when first getting it, all the pieces, the weight and the size kinda made me think that it would stay as a home-only piece. But the damn thing hits so good and is so easy to build. Thanks again, Keith. You da man. I try to do what I can do whenever I can do it however it can be done. |
Due to the rising cost of ammunition, I will no longer be able to provide a warning shot. Thank you for understanding.
|
I have an HCigar KFL and like it. Rebuilding seems easy enough but I keep getting between 2.0 and 2.8 ohms when I test it on my Provari.
Set to 5.3V. just tested it and it said 2.8 ohms. 10 wraps of 30 guage kanthal on a 3/32 drill bit. Any advise on how to get the ohms lower? |

|
Originally Posted By LilTate:
I have an HCigar KFL and like it. Rebuilding seems easy enough but I keep getting between 2.0 and 2.8 ohms when I test it on my Provari. Set to 5.3V. just tested it and it said 2.8 ohms. 10 wraps of 30 guage kanthal on a 3/32 drill bit. Any advise on how to get the ohms lower? Lower gauge wire. I build exclusively with 28 right now. 8-10 wraps of 28 will be 1-1.4 ohms. |
|
Originally Posted By Keymaster4225:
Lower gauge wire. I build exclusively with 28 right now. 8-10 wraps of 28 will be 1-1.4 ohms. Originally Posted By Keymaster4225:
Originally Posted By LilTate:
I have an HCigar KFL and like it. Rebuilding seems easy enough but I keep getting between 2.0 and 2.8 ohms when I test it on my Provari. Set to 5.3V. just tested it and it said 2.8 ohms. 10 wraps of 30 guage kanthal on a 3/32 drill bit. Any advise on how to get the ohms lower? Lower gauge wire. I build exclusively with 28 right now. 8-10 wraps of 28 will be 1-1.4 ohms. Just rebuilt one with 8 wraps. It first says 1.3 then switches to 2.3 within a split second. Not sure what that means. Anyone? Just tried it again and showed 2.1 then switched to 2.3 3rd ohm test it was 2.3 then went to 2.3 |
|
Originally Posted By LilTate:
Just rebuilt one with 8 wraps. It first says 1.3 then switches to 2.3 within a split second. Not sure what that means. Anyone? Just tried it again and showed 2.1 then switched to 2.3 3rd ohm test it was 2.3 then went to 2.3 Originally Posted By LilTate:
Originally Posted By Keymaster4225:
Originally Posted By LilTate:
I have an HCigar KFL and like it. Rebuilding seems easy enough but I keep getting between 2.0 and 2.8 ohms when I test it on my Provari. Set to 5.3V. just tested it and it said 2.8 ohms. 10 wraps of 30 guage kanthal on a 3/32 drill bit. Any advise on how to get the ohms lower? Lower gauge wire. I build exclusively with 28 right now. 8-10 wraps of 28 will be 1-1.4 ohms. Just rebuilt one with 8 wraps. It first says 1.3 then switches to 2.3 within a split second. Not sure what that means. Anyone? Just tried it again and showed 2.1 then switched to 2.3 3rd ohm test it was 2.3 then went to 2.3 Make sure the screws are very tight and make sure the removable block on the deck is straight and not touching the rest. I have that issue before on my Russian 91%. |
|
I guess Murphy read my last post saying how happy I was with the KFL, and decided to say "Aw hell naw!".
Apparently the 510 threads on my Vamo and the 510 threads on the KFL decided to not like eachother anymore. I can wiggle the KFL almost fully seated into my Vamo without ever actually screwing it in. It just wobbles. Now the kicker; The KFL screws in nice and tight into my old busted Vamo, and my two Bolt mods..........and every other tank I've tried still screws in nice and tight into my good Vamo. Go fucking figure. 
|
|
Originally Posted By NY_Shooter:
I guess Murphy read my last post saying how happy I was with the KFL, and decided to say "Aw hell naw!". Apparently the 510 threads on my Vamo and the 510 threads on the KFL decided to not like eachother anymore. I can wiggle the KFL almost fully seated into my Vamo without ever actually screwing it in. It just wobbles. Now the kicker; The KFL screws in nice and tight into my old busted Vamo, and my two Bolt mods..........and every other tank I've tried still screws in nice and tight into my good Vamo. Go fucking figure. Ouch, sorry to hear that. Had a problem with the first VTR I bought. During the second day I had it, my AeroTank just started spinning in the 510 connection. Like it was stripped. Took it back to the shop where I bought it, where they tested it with the extension tube and a couple other atomizers, and they all screwed down tight. Luckily, they exchanged it for a new one, and a couple months later all is well. |
|
Originally Posted By victorvito:
Make sure the screws are very tight and make sure the removable block on the deck is straight and not touching the rest. I have that issue before on my Russian 91%. Originally Posted By victorvito:
Originally Posted By LilTate:
Originally Posted By Keymaster4225:
Originally Posted By LilTate:
I have an HCigar KFL and like it. Rebuilding seems easy enough but I keep getting between 2.0 and 2.8 ohms when I test it on my Provari. Set to 5.3V. just tested it and it said 2.8 ohms. 10 wraps of 30 guage kanthal on a 3/32 drill bit. Any advise on how to get the ohms lower? Lower gauge wire. I build exclusively with 28 right now. 8-10 wraps of 28 will be 1-1.4 ohms. Just rebuilt one with 8 wraps. It first says 1.3 then switches to 2.3 within a split second. Not sure what that means. Anyone? Just tried it again and showed 2.1 then switched to 2.3 3rd ohm test it was 2.3 then went to 2.3 Make sure the screws are very tight and make sure the removable block on the deck is straight and not touching the rest. I have that issue before on my Russian 91%. what is the removable block? |
|
Originally Posted By LilTate:
what is the removable block? Originally Posted By LilTate:
Originally Posted By victorvito:
Originally Posted By LilTate:
Originally Posted By Keymaster4225:
Originally Posted By LilTate:
I have an HCigar KFL and like it. Rebuilding seems easy enough but I keep getting between 2.0 and 2.8 ohms when I test it on my Provari. Set to 5.3V. just tested it and it said 2.8 ohms. 10 wraps of 30 guage kanthal on a 3/32 drill bit. Any advise on how to get the ohms lower? Lower gauge wire. I build exclusively with 28 right now. 8-10 wraps of 28 will be 1-1.4 ohms. Just rebuilt one with 8 wraps. It first says 1.3 then switches to 2.3 within a split second. Not sure what that means. Anyone? Just tried it again and showed 2.1 then switched to 2.3 3rd ohm test it was 2.3 then went to 2.3 Make sure the screws are very tight and make sure the removable block on the deck is straight and not touching the rest. I have that issue before on my Russian 91%. what is the removable block? Back one page.... http://www.ar15.com/forums/t_1_175/1581435_Kayfun_micro_coil_build_tutorial__pic_heavy_.html&page=7#i46155764 |

|
I feel stupid for asking this question but I need to know. There are three screws on the bottom of my Kayfun lit plus. The center, a flat head. And two on the sides, one small flat head and a larger Philips head. Is the Philips head to fill the tank and the small flathead air flow control? If the small one is air control how far do I loosen it?
Keith maybe you should sticky this for us newbes to reference from. Thanks in advance. |
|
Originally Posted By fmkenner:
I feel stupid for asking this question but I need to know. There are three screws on the bottom of my Kayfun lit plus. The center, a flat head. And two on the sides, one small flat head and a larger Philips head. Is the Philips head to fill the tank and the small flathead air flow control? If the small one is air control how far do I loosen it? Keith maybe you should sticky this for us newbes to reference from. Thanks in advance. Correct. The large flathead in the middle is the center pin adjustment. The phillips is the fill hole. The smaller flathead is your airflow adjustment. As for how far you should loosen it, i really can't tell you that due to our inhale styles most likely being different. You'll have to play with that one a bit. I like mine flush with the bottom of the device. |
Lateral aspiration of a rodent is illegal in most states.
Parts Fairy. x27
Parts Fairy. x27
|
Originally Posted By lcoates33:
Correct. The large flathead in the middle is the center pin adjustment. The phillips is the fill hole. The smaller flathead is your airflow adjustment. As for how far you should loosen it, i really can't tell you that due to our inhale styles most likely being different. You'll have to play with that one a bit. I like mine flush with the bottom of the device. Originally Posted By lcoates33:
Originally Posted By fmkenner:
I feel stupid for asking this question but I need to know. There are three screws on the bottom of my Kayfun lit plus. The center, a flat head. And two on the sides, one small flat head and a larger Philips head. Is the Philips head to fill the tank and the small flathead air flow control? If the small one is air control how far do I loosen it? Keith maybe you should sticky this for us newbes to reference from. Thanks in advance. Correct. The large flathead in the middle is the center pin adjustment. The phillips is the fill hole. The smaller flathead is your airflow adjustment. As for how far you should loosen it, i really can't tell you that due to our inhale styles most likely being different. You'll have to play with that one a bit. I like mine flush with the bottom of the device. Thanks. Now is there a need to adjust the center pin? How will I know the adjustment on it? |
|
Originally Posted By fmkenner:
Thanks. Now is there a need to adjust the center pin? How will I know the adjustment on it? Originally Posted By fmkenner:
Originally Posted By lcoates33:
Originally Posted By fmkenner:
I feel stupid for asking this question but I need to know. There are three screws on the bottom of my Kayfun lit plus. The center, a flat head. And two on the sides, one small flat head and a larger Philips head. Is the Philips head to fill the tank and the small flathead air flow control? If the small one is air control how far do I loosen it? Keith maybe you should sticky this for us newbes to reference from. Thanks in advance. Correct. The large flathead in the middle is the center pin adjustment. The phillips is the fill hole. The smaller flathead is your airflow adjustment. As for how far you should loosen it, i really can't tell you that due to our inhale styles most likely being different. You'll have to play with that one a bit. I like mine flush with the bottom of the device. Thanks. Now is there a need to adjust the center pin? How will I know the adjustment on it? I've not had to adjust any of my kayfun's center pins yet. But If you put it on your mod and get nothing (it won't fire because it's not making contact) then back the center pin out a little bit and try again. |
Lateral aspiration of a rodent is illegal in most states.
Parts Fairy. x27
Parts Fairy. x27



|
Originally Posted By fmkenner:
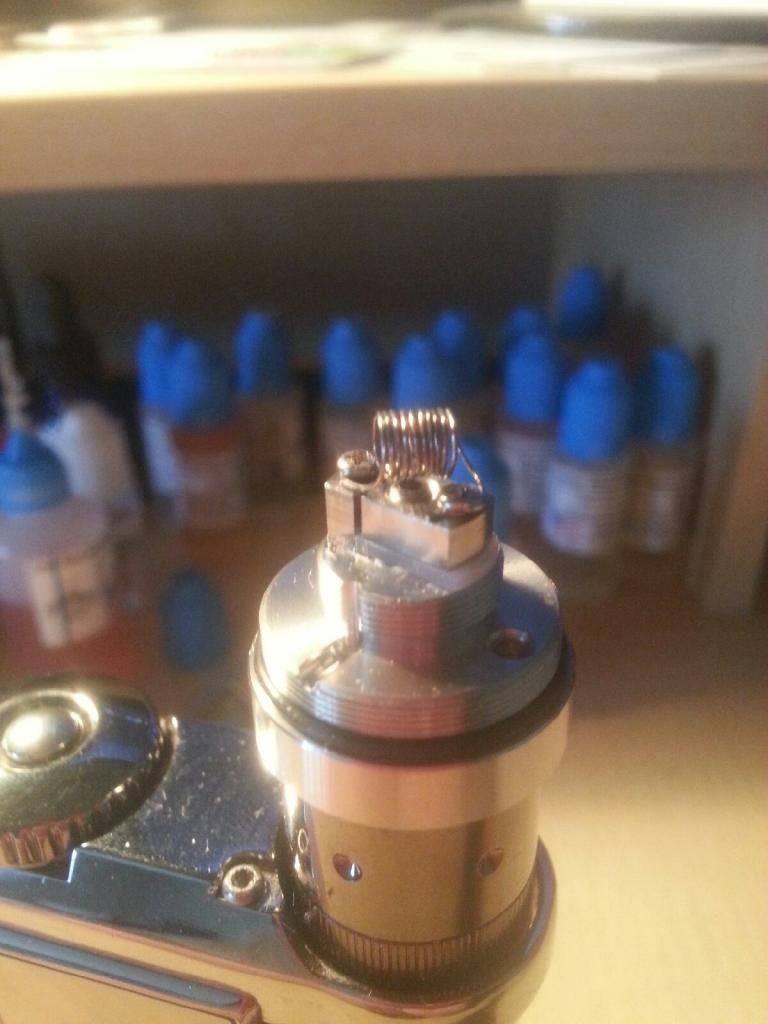
My first coil, came out to 2.4 ohms. About the same as my I-clear 30s. Will wick it when I get a charge on my batteries. I will get the ohms down, just want to see what it feels like with cotton and a coil build. What do you think. http://i601.photobucket.com/albums/tt96/fmkenner/1stcoil_zps6058a796.jpg Looks good. Make sure it glows from the center out with no hot spots as you fire it and you should be good to go. |
Si vis pacem, para bellum
|
Originally Posted By JAGERBOMBER:
Looks good. Make sure it glows from the center out with no hot spots as you fire it and you should be good to go. Originally Posted By JAGERBOMBER:
Originally Posted By fmkenner:
My first coil, came out to 2.4 ohms. About the same as my I-clear 30s. Will wick it when I get a charge on my batteries. I will get the ohms down, just want to see what it feels like with cotton and a coil build. What do you think. http://i601.photobucket.com/albums/tt96/fmkenner/1stcoil_zps6058a796.jpg Looks good. Make sure it glows from the center out with no hot spots as you fire it and you should be good to go. +1 Looks good. Fire it until it glows, let off the fire button, use tweezers to squeeze that coil a little tighter. (Don't touch the coil while it's actually firing, or else it might pop the coil.) And what size bit did you use to make the wrap? Looks larger than most, or maybe it's just the picture. |
|
Originally Posted By NY_Shooter:
+1 Looks good. Fire it until it glows, let off the fire button, use tweezers to squeeze that coil a little tighter. (Don't touch the coil while it's actually firing, or else it might pop the coil.) And what size bit did you use to make the wrap? Looks larger than most, or maybe it's just the picture. Originally Posted By NY_Shooter:
Originally Posted By JAGERBOMBER:
Originally Posted By fmkenner:
My first coil, came out to 2.4 ohms. About the same as my I-clear 30s. Will wick it when I get a charge on my batteries. I will get the ohms down, just want to see what it feels like with cotton and a coil build. What do you think. http://i601.photobucket.com/albums/tt96/fmkenner/1stcoil_zps6058a796.jpg Looks good. Make sure it glows from the center out with no hot spots as you fire it and you should be good to go. +1 Looks good. Fire it until it glows, let off the fire button, use tweezers to squeeze that coil a little tighter. (Don't touch the coil while it's actually firing, or else it might pop the coil.) And what size bit did you use to make the wrap? Looks larger than most, or maybe it's just the picture. I used a 3/32 allen wrench. Im going to use a 5/64 allen next time. |


2012 Arfcockalypse Survivor...callsign Hooligan
Joined:
Feb 2011
Posts:
2516
EE: 100% (14)
FL, USA
|
Originally Posted By x300blkx:
I second the sticky. Originally Posted By x300blkx:
Originally Posted By timpryor:
Can we get this stickied? I second the sticky. Ask and you shall receive. |
Due to the rising cost of ammunition, I will no longer be able to provide a warning shot. Thank you for understanding.