


Armory Sponsor



Posted: 10/11/2012 10:49:00 PM EDT
[Last Edit: BIGGDAWG][Edited]
|
Well guys i thought i would tackle making my own annealing machine. did a bunch of research and found a guy on castboolits that was selling the blades for a reasonable price along with a copy of his plans.
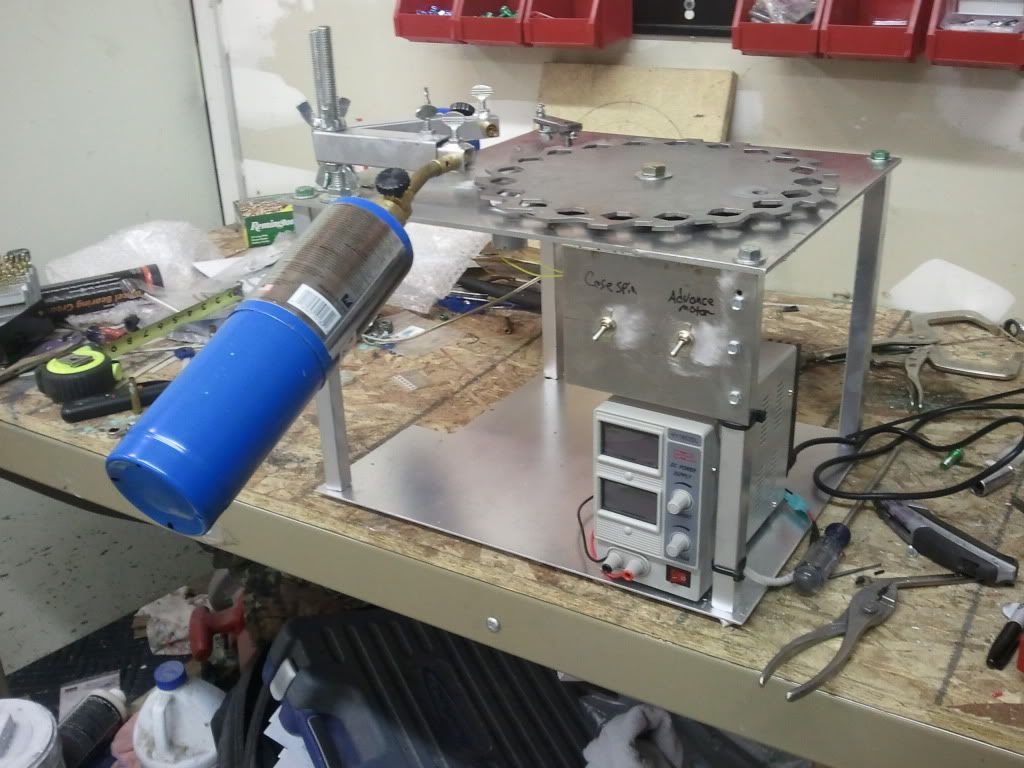
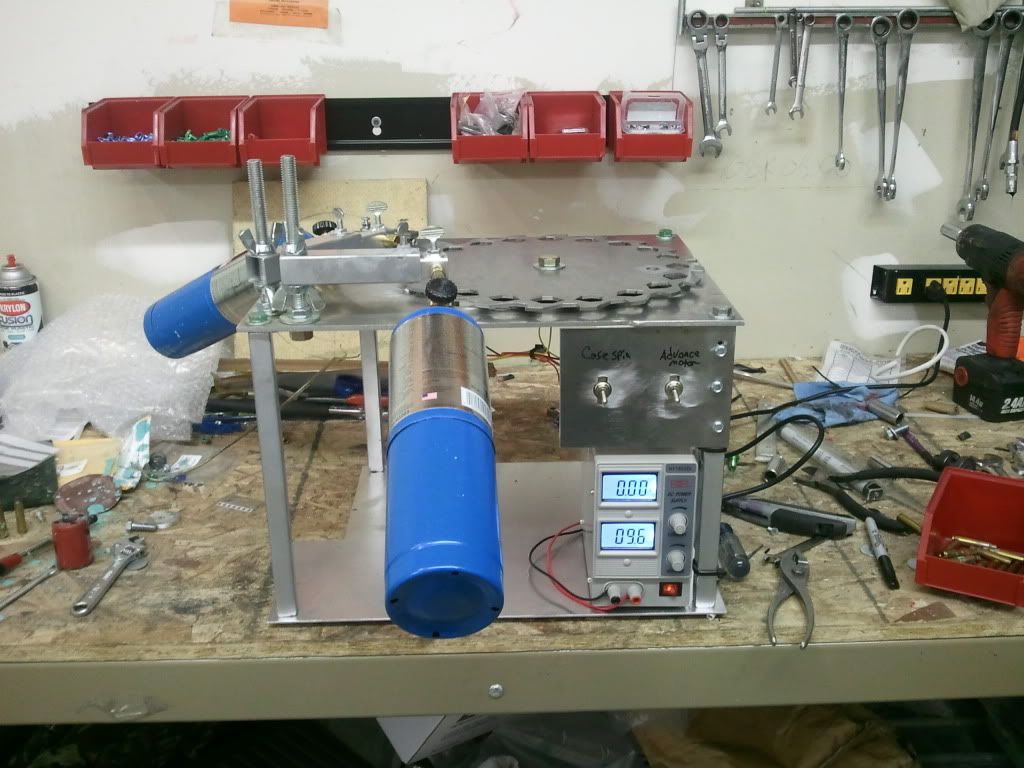
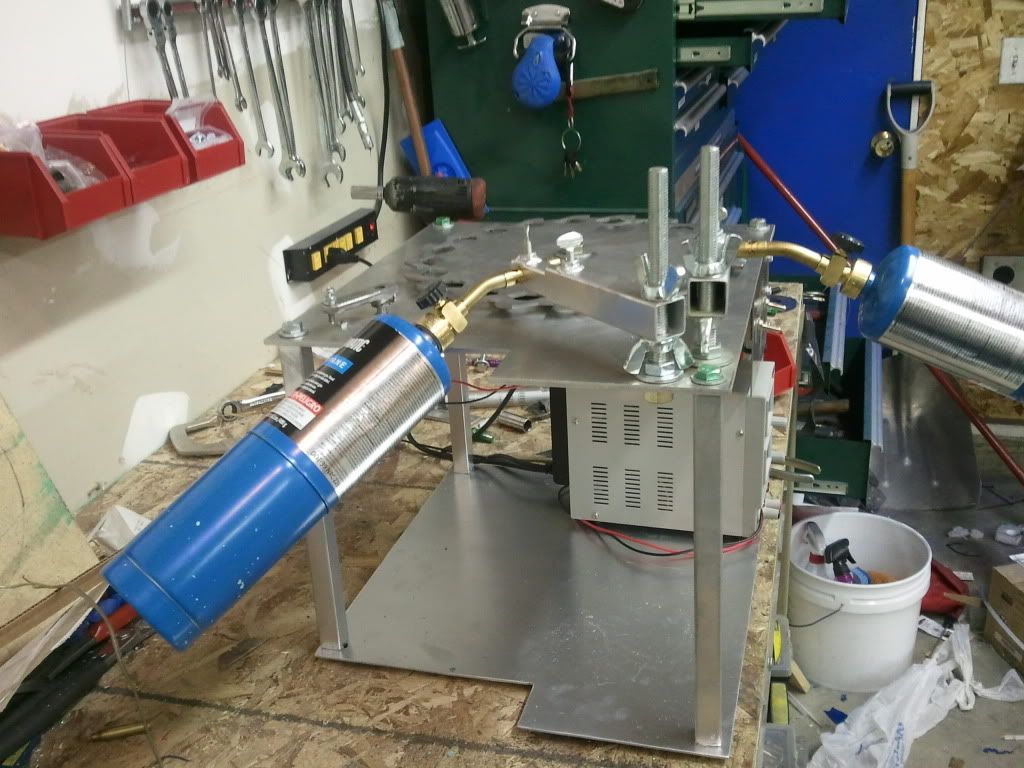
so i ordered the blade and picked up the rest of the supplies locally. it is far from done but i did my first assy. to test the fit of the parts i made and see what else i might need i think things are coming a long nicely, going to have to figure out how to put some tension on the blade. i mounted it on a bearing and it moves a little too freely. Other than that i just have to make up the braces and get them welded to the legs then clean every thing up and give it a coat of paint drill and tap the cam arm and then fab up the case turner –– got another little motor that i am going to try to rig up so the cases will turn in the flame. will see how that goes. ETA: here is the partial parts list will get rest in a day or 2 Annealer parts list: Blade assy – purchased from jmorris on cast boolits 5-Foot ¾ inch thin wall square tubing for the legs and inner part of adjustable arms –– purchased at menards or you can get at lowes and homedepot and farm stores 1-foot 1 inch thin wall square tubing for outer part of adjustable arms –– purchased at menards or you can get at lowes and homedepot and farm stores Aluminum plate 1/8th to 3/16 inch thick 14”x18” The top ––- purchase at local welding shop 20.00 16 gauge steel plate 14”x18” the bottom ––- purchase from local junk yard that handles scrap steel cost 3.00 2L009 dayton electric motor –– puchased on ebay 3 inches 3/4x3/16 flat bar for arm on motor –– had laying around 5/16” collar with set screw – weld to flat bar to make actuating arm on motor –– purchased at local hardware store 3- 1/4x1” carriage bolts and flange nuts –– purchased at local hardware store 2- 6” pieces of ½” threaded rod –– purchased at local hardware store 4- ½” wing nuts –– purchased at local hardware store MASTECH VARIABLE DC POWER SUPPLY 0-18 V/ 0-3A (HY1803D) –– you really don't need to go this extreme you just need a 12v 2a power supply and a variable resistor. Tru-pitch brand bearing #SA201-8 for 1/2 inch shaft ––- bought at local farm store Tru-pitch brand 3 bolt flange #PF203 ––- bought at local farm store 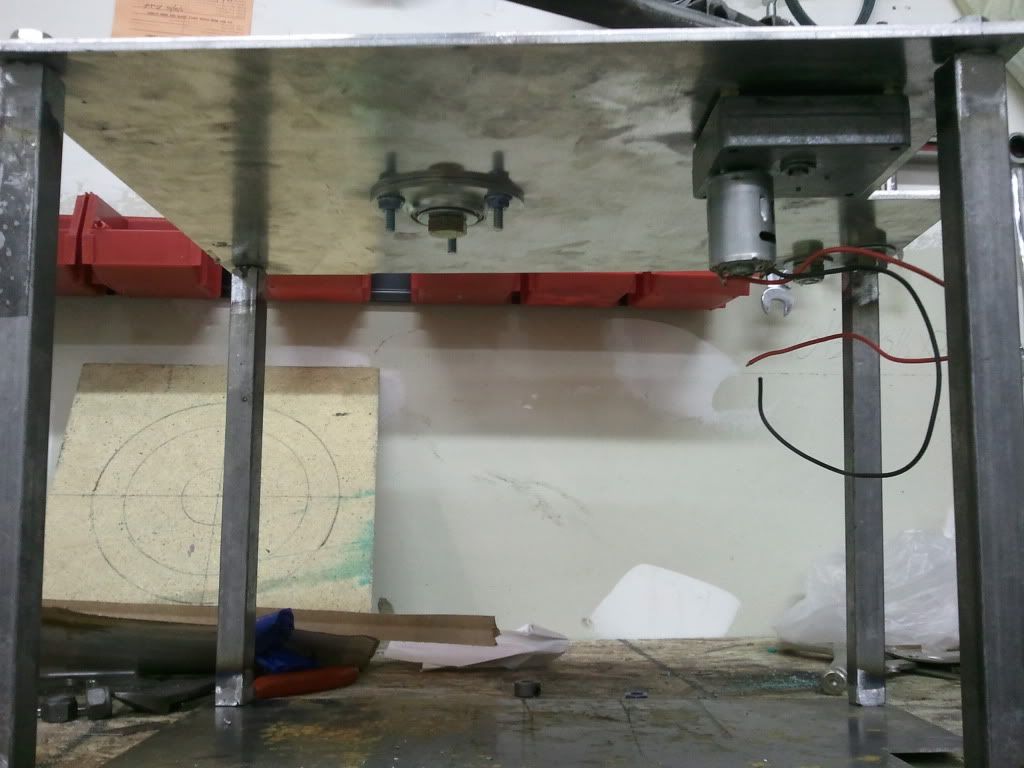
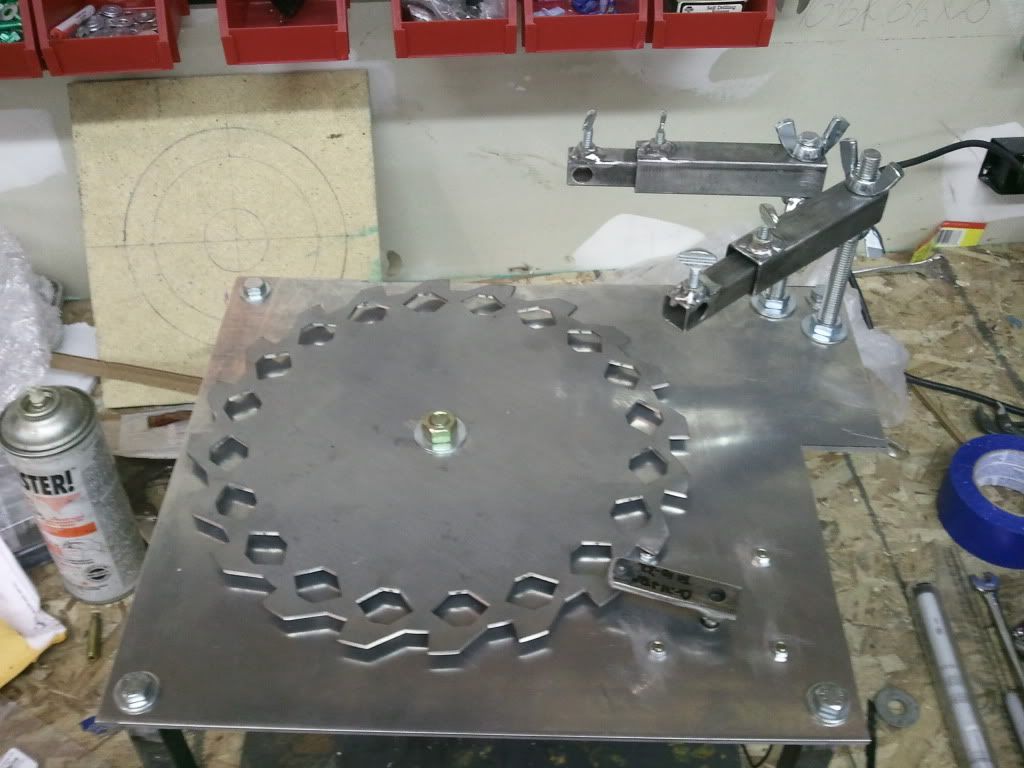
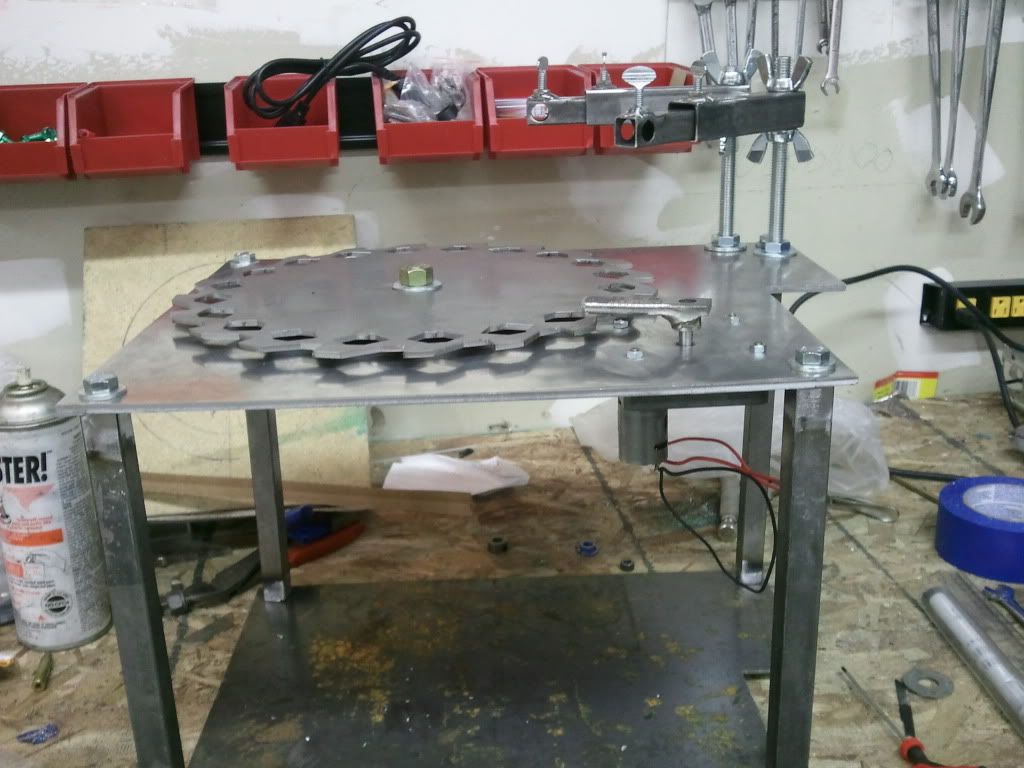
I am going to power it with this power supply it will let me get everything set then i can jot the numbers down so i can repeat for each caliber/ brand case i am annealing. MbMwEWk~$(KGrHqYOKjgEwRZ79CPqBMKiLHt+Iw~~_12.JPG)
edit 10/16/12 adding pictures of progress with measurements 


on the arms for the torches i shortened one arm and extension arm 1 inch each it just gave me more adjustment. i use this arm on the outside one that is not on the side of the plate with the cut out or motor. these pictures are of the original length so subtract and inch for one of the arms. 


This is the motor i will be using for turning the cases it is a 30 rpm motor. [edit: the 30 rpm motor works fine but i was only getting 1 revolution per heat cycle and i wanted more so i went with a 200 rpm motor but it is too fast so i installed 2 10 ohm 10 watt resistors to slow it down now i get 2.5-3 revolutions and i am running it off the same power supply as the advance motor.] i am going to start out hooking it up to the variable power supply but if it slows down too much i will just get a small 12 volt power supply of some sort. 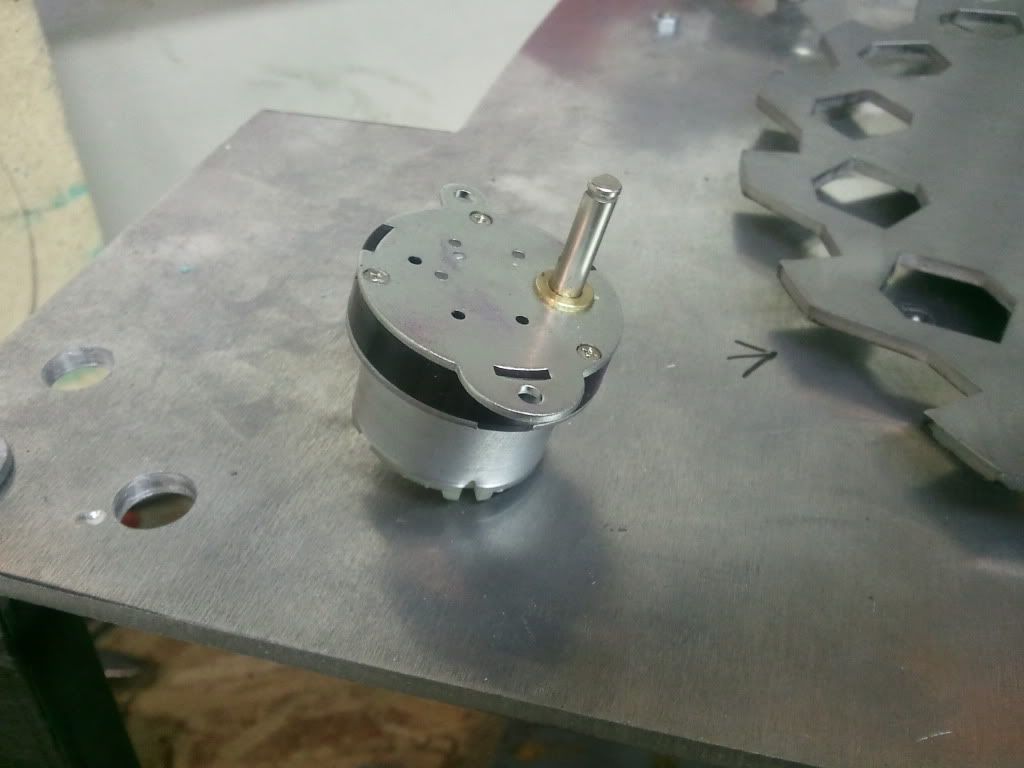
these are pics of the tension plastic i am using it is an old skid plate from a snowmobile it just happened to be the right thickness and works perfect 

. hornady case feeder add on edit 10/26/12 some of the parts used are 3/4" electrical conduit –– less than a foot 1/4" round bar –– for the arms and stops 1/2" steel tube –– id is 3/8 –– pivot for feeder mechanism 1 1/4 x1/8 flat bar 3/8 threaded rod ––- 6 inches 3/8 lock nut and 2 –– 3/8 flange nuts –– for the threaded rod that holds the feed linkage/ mechanism 2 – 3/4x ½ bronze flange bushings for the pivot arm lik this one bronze bushing 1 –– 1” to ¾” top link bushing that is for a tractor 3 point hitch system – got it at my local farm store 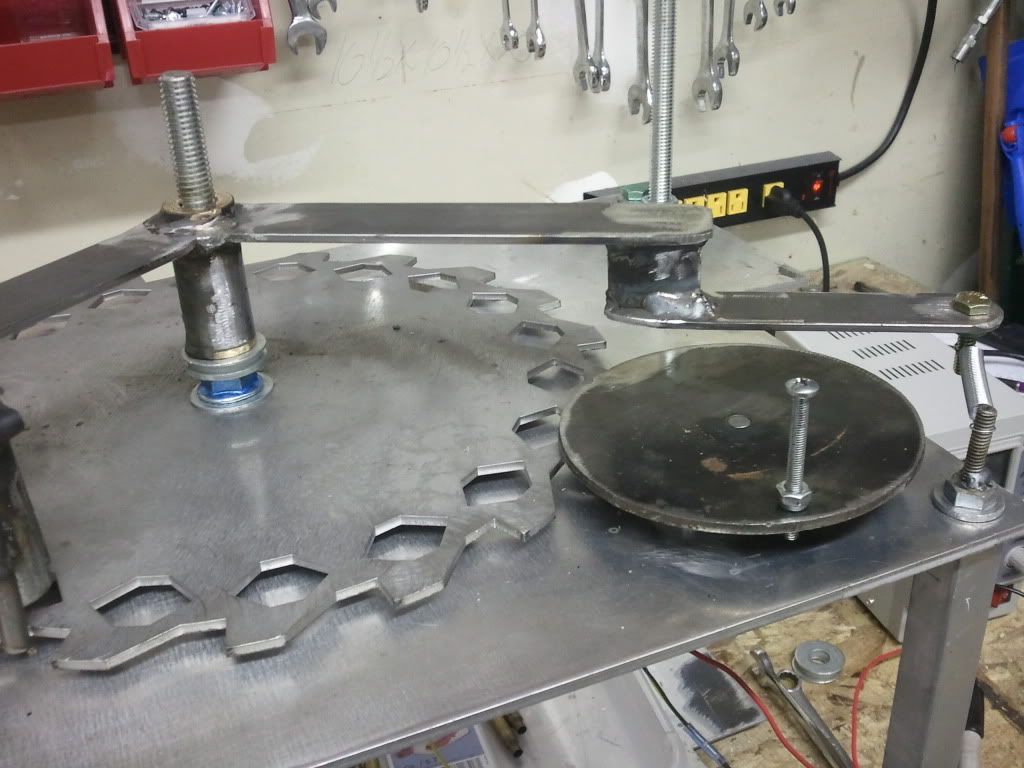
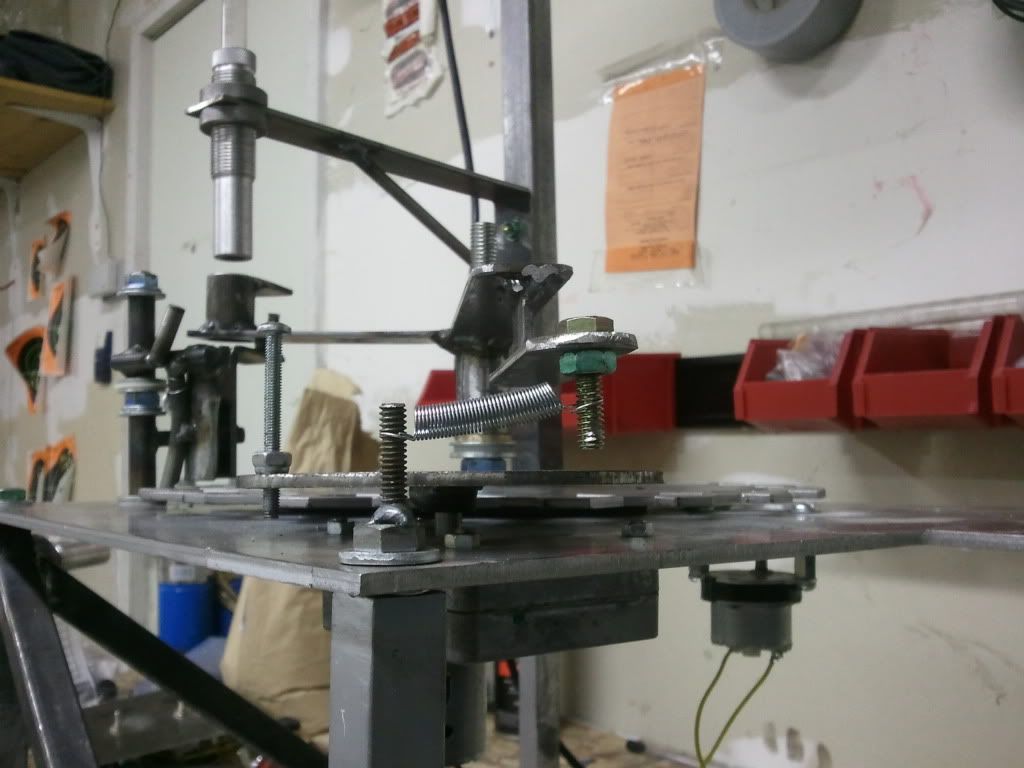
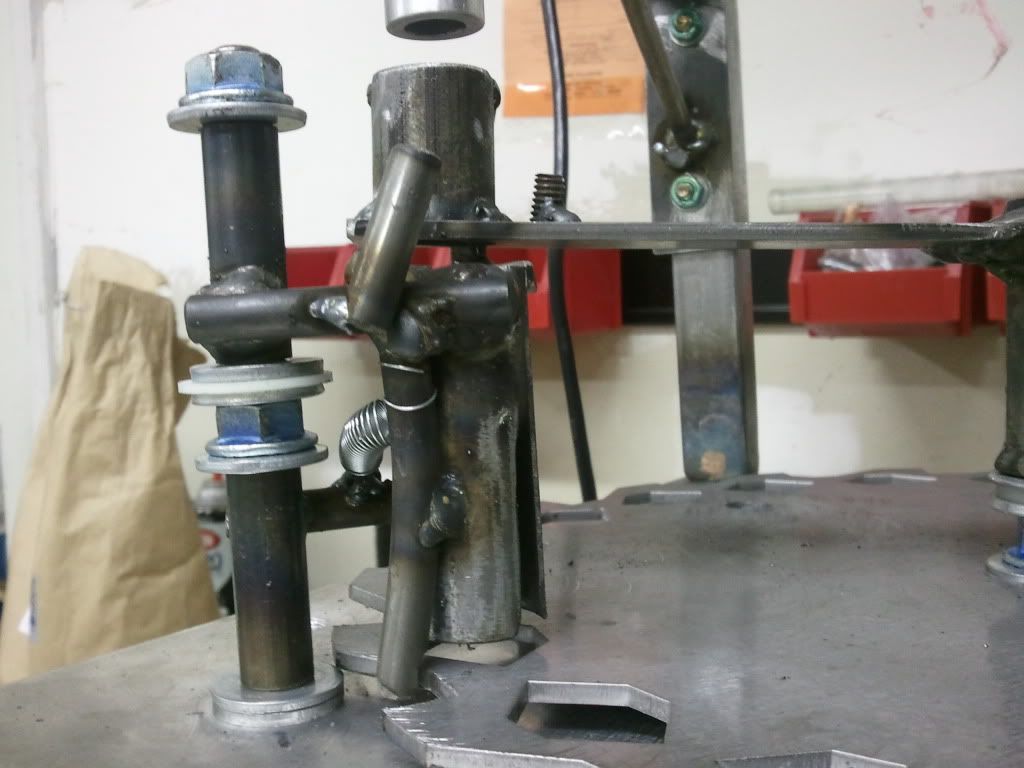
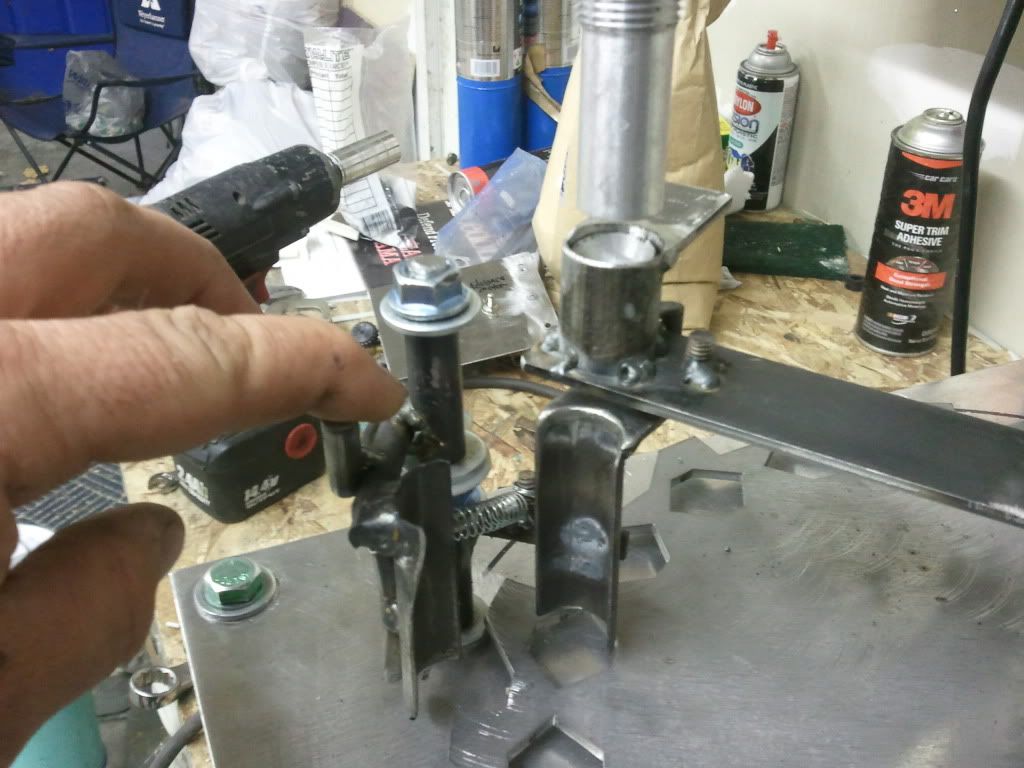
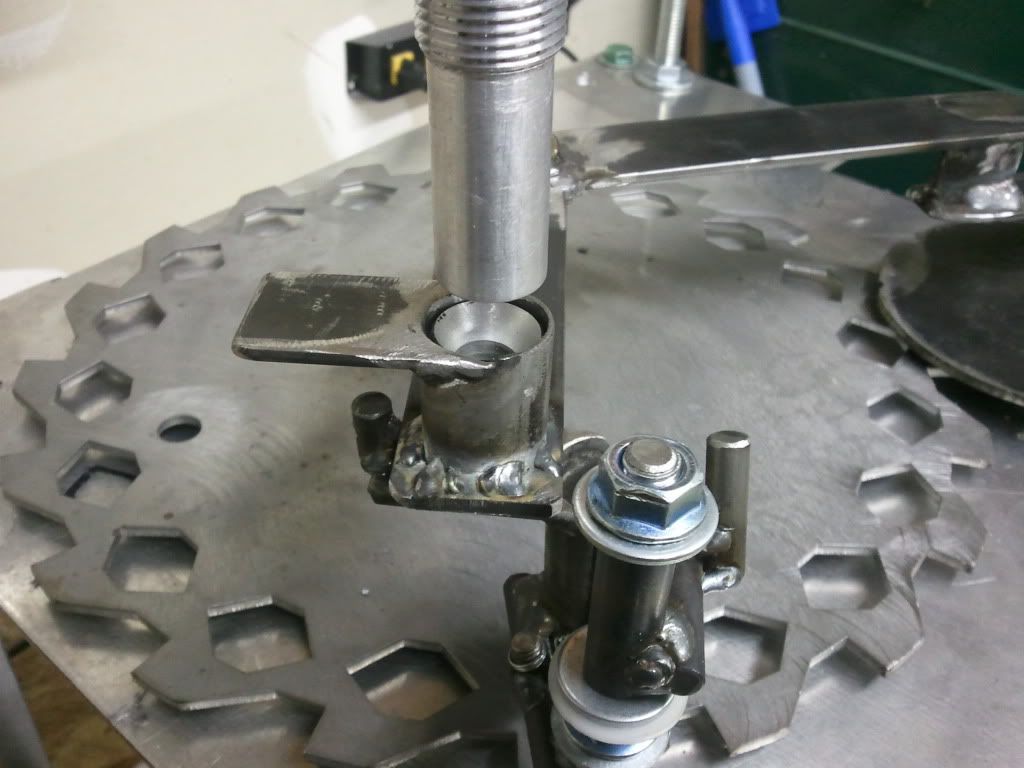
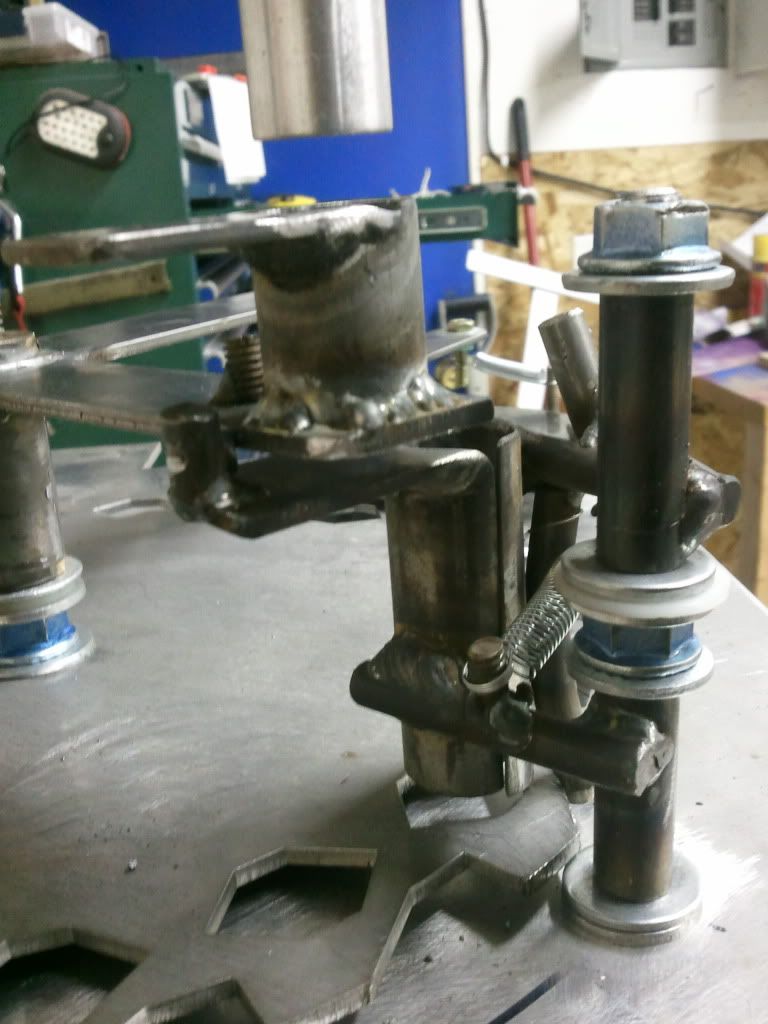
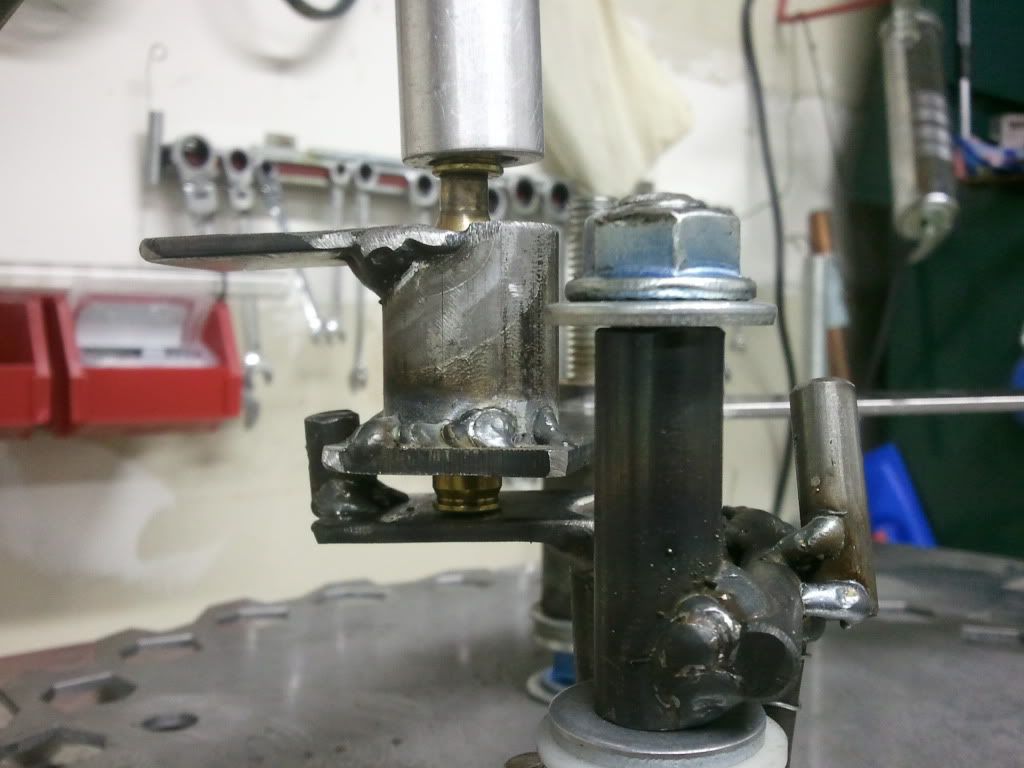
Completed final product updated 10/28/12 here are the final pics of everything with it painted an set up for 223 along with a video of it in action. 


Edit 11/8/12 I also wanted to show you the parts i ordered from hornady to use on the annealer. on the arm where the cases drop down to i needed a bushing like on the actual feeder on the press. so i ordered 1 each of the drop tubes and cut them to length and they fit perfectly into the 3/4 conduit. part 22 - large drop tube 398305 part 53 - small drop tube 398306 
this is where the tube goes. in this pic which is an old one i was trying to use one of the small bushings that came with the kit and they were too smalla few more pics of the cut hornady bushings and of the new 25 ohm 3 watt potentiometer i put on the case turn motor to slow it down 


comparing before and after cutting to length 


|

Global Warming Hoax Skeptic before it was cool
Joined:
Jun 2007
Posts:
20493
EE: 100% (1)
 WA, USA
|
Originally Posted By dryflash3:
Looks like another epic thread in the making. Off to set the toggle. I will put together a full list of parts and pics of the parts at a later date. too many irons in the fire 
hope it will inspire others to make their own. hopefully i will have it done by next weekend. I have a lot of x40 and 6.5pcc brass to anneal |



|
Ahh, BIGDAWG, you read my mind! I was about to start building my own annealer at the same time I was building up my rotary tumbler! I'm going with a different design though...I like the idea of spinning the brass in the flame, so I'm going with a turntable with holes drilled in it. I'm trying out a couple motors now, but they don't seem geared up the way I want them to be. |
|
Originally Posted By LonelyRaven:
Ahh, BIGDAWG, you read my mind! I was about to start building my own annealer at the same time I was building up my rotary tumbler! I'm going with a different design though...I like the idea of spinning the brass in the flame, so I'm going with a turntable with holes drilled in it. I'm trying out a couple motors now, but they don't seem geared up the way I want them to be. I am going to try and make it so the cases turn in the flame. i have a really small motor i plan to use then weld an aluminum collar to the aluminum that is cut out and shim so it is flat with the top and polish to a mirror finish that will take a bit if time to perfect. i think of my builds as fluid projects changing till i have them right. |

|
Originally Posted By stevos758:
Let me know the cost. I am thinking of purchasing a kit from him myself. Let me know what you all find for diffrent cost effective motors. the blade with plans shipped was 60.00 my motor shipped was like 50 i used the 2l009 dayton motor. i updated the op with a parts list it isn't all done yet |


|
In.
I've been contemplating building one of these myself for several years. I'm leaning closer to the new Giraud design though. |
"Rome's glory by way of the Greeks came,
America's by cutting the English cord,
But Texas was sired by Fighters,
And a nation was born of the Sword"
Anonymous 1836
America's by cutting the English cord,
But Texas was sired by Fighters,
And a nation was born of the Sword"
Anonymous 1836
|
Originally Posted By usmc0331tamu00:
In. I've been contemplating building one of these myself for several years. I'm leaning closer to the new Giraud design though. i almost went with the giraud just didn't want to spend the money i am cheap, then i thought about building it like his and thought it would be more difficult so i went this way i will have less than 200 in it and i opted for an expensive power supply compared to what you could use. never know i may try to put a case feeder on it but that is down the road. Jmorris did so i know it can be done |


 Watching

|
I love to build my own stuff, don't get me wrong, I wish I had the time, I'd have to take shortcuts.
I got mine from Doug, I followed his instructions to the T, put a couple in to make sure it's set right, load the feeder and go to town. Never an issue, I do keep an eye on it, never leave it alone. The pic is from when it was new, I have a video of it in action that anyone can prolly find and I don't know where or how to post mine. I love this thing. When I retire and have more time, I'll build one from a kit. I would be surprised if it worked better than what Doug offers. 
Danny 
|
Watch yer cornhole, the gubment likes the back door.كافر This post is worth what you paid for it. I sign my posts just to piss you off.


The original DoHS:fighting terrorism since 1492
Joined:
Aug 2004
Posts:
20242
EE: 0% (0)
OK, USA
|
Originally Posted By BIGGDAWG:
Originally Posted By usmc0331tamu00:
In. I've been contemplating building one of these myself for several years. I'm leaning closer to the new Giraud design though. i almost went with the giraud just didn't want to spend the money i am cheap, then i thought about building it like his and thought it would be more difficult so i went this way i will have less than 200 in it and i opted for an expensive power supply compared to what you could use. never know i may try to put a case feeder on it but that is down the road. Jmorris did so i know it can be done I'm cheap too. Can't justify $450 for the Giraud for a hobbie. I like the vertical hopper better than any other design I've seen. Jmorris' feeder is very cool but my experience with case feeders similar to that is they are finicky. That's why I'm shying away from it. |
"Rome's glory by way of the Greeks came,
America's by cutting the English cord,
But Texas was sired by Fighters,
And a nation was born of the Sword"
Anonymous 1836
America's by cutting the English cord,
But Texas was sired by Fighters,
And a nation was born of the Sword"
Anonymous 1836

|
Ever since seeing Jmorris's Anealer on THR.com, I've been wanting to have one similar. It's more than twice as fast using two torches. I didn't know he sold his plate. I also like Doug's commercial one, but the money is always going to be hard to justify and it is slower.
Anyway I didn't see any links to videos of these two annealers so I thought I'd help the thread. First, Doug's product: http://www.youtube.com/watch?v=tCWni2nNNeE Then, the jmorris unit:http://www.youtube.com/watch?v=CWCNoFDCdLA&feature=relmfu
jmorris refined his further with a Dillon case feeder and a better gas supply.....he put the whole build on photobucket: Jmorrismetal |
|
Originally Posted By GWhis:
Ever since seeing Jmorris's Anealer on THR.com, I've been wanting to have one similar. It's more than twice as fast using two torches. I didn't know he sold his plate. I also like Doug's commercial one, but the money is always going to be hard to justify and it is slower. Anyway I didn't see any links to videos of these two annealers so I thought I'd help the thread. First, Doug's product: http://www.youtube.com/watch?v=tCWni2nNNeE Then, the jmorris unit:http://www.youtube.com/watch?v=CWCNoFDCdLA&feature=relmfu  http://www.youtube.com/watch?v=tCWni2nNNeE http://www.youtube.com/watch?v=CWCNoFDCdLA&feature=relmfu http://www.youtube.com/watch?v=tCWni2nNNeE http://www.youtube.com/watch?v=CWCNoFDCdLA&feature=relmfuthanks for the videos. i haven't got much more accomplished had a bunch of irons in the fire. but got that stuff all done so going to work on it tonight and take a bunch more pics to put up before i paint everything. i did get the tension set on the plate with some plastic from an old snowmobile skid plate. and i actually hooked up the power supply lastnight and made sure i didn't have too much tension. it worked great. now i have to locate and drill the drop hole and experiment with the case turning set up i want to try. |
|
Giraud slower? Not really.
You can turn up the speed and torch and get them out in 4 sec and get rotation on the case, less gas used, and not have to sit there and feed one case at a time. The Jmorris is a good idea, and is geared to smaller amounts and is probably better for most loaders. But if you load 25-100 K a year, the Giraud is better suited. And, yes, I have both. 'Borg |
|
Originally Posted By BIGGDAWG:
Originally Posted By GWhis:
Ever since seeing Jmorris's Anealer on THR.com, I've been wanting to have one similar. It's more than twice as fast using two torches. I didn't know he sold his plate. I also like Doug's commercial one, but the money is always going to be hard to justify and it is slower. Anyway I didn't see any links to videos of these two annealers so I thought I'd help the thread. First, Doug's product: http://www.youtube.com/watch?v=tCWni2nNNeE Then, the jmorris unit:http://www.youtube.com/watch?v=CWCNoFDCdLA&feature=relmfu http://www.youtube.com/watch?v=tCWni2nNNeE http://www.youtube.com/watch?v=CWCNoFDCdLA&feature=relmfuthanks for the videos. i haven't got much more accomplished had a bunch of irons in the fire. but got that stuff all done so going to work on it tonight and take a bunch more pics to put up before i paint everything. i did get the tension set on the plate with some plastic from an old snowmobile skid plate. and i actually hooked up the power supply lastnight and made sure i didn't have too much tension. it worked great. now i have to locate and drill the drop hole and experiment with the case turning set up i want to try. Case turning setup? Please take pics. I have my motor cleaned up and ready to go when my materials arrive. |
|
Borg, as I said above (obviously edited in after you read my post, sorry), Jmorris did refine his with a Dillon feeder. That makes it more suitable for volume, but that also, of course, ups the price, unless you make your own. (If you make his annealer you probably could just as easily make your own.)
If you turn the gas up on Doug's to make it anneal faster, you obviously would use more gas than at the 10 second speed, but how such usage compares to the other method....I wouldn't know. So did you actually turn up the speed for your use, or just leave it as designed? |
|
Originally Posted By stevos758:
Case turning setup? Please take pics. I have my motor cleaned up and ready to go when my materials arrive. my idea is this : at the station where the case sits when annealing cut out a hole then take and weld a collet to the piece you just cut out and set it on this little motor i got . polish up the top and align it and the case should turn while being annealed. the hard part will be getting it exactly centered where the case stops when the plate turns. then i was planing on having my drop out hole right after that so you don't have the problem of the case trying to get back up on the main plate. will take pics when i get that far have to make a little mock up one to test on first. here is link to the motor i purchased for the case turning case turn motor |
|
Originally Posted By BIGGDAWG: This setup you describe is exactly how the BenchSource turn the case at the heating location.Originally Posted By stevos758: Case turning setup? Please take pics. I have my motor cleaned up and ready to go when my materials arrive. my idea is this : at the station where the case sits when annealing cut out a hole then take and weld a collet to the piece you just cut out and set it on this little motor i got . polish up the top and align it and the case should turn while being annealed. the hard part will be getting it exactly centered where the case stops when the plate turns. then i was planing on having my drop out hole right after that so you don't have the problem of the case trying to get back up on the main plate. will take pics when i get that far have to make a little mock up one to test on first. here is link to the motor i purchased for the case turning case turn motor |
|
Sounds like a good plan!
Originally Posted By BIGGDAWG:
Originally Posted By stevos758:
Case turning setup? Please take pics. I have my motor cleaned up and ready to go when my materials arrive. my idea is this : at the station where the case sits when annealing cut out a hole then take and weld a collet to the piece you just cut out and set it on this little motor i got . polish up the top and align it and the case should turn while being annealed. the hard part will be getting it exactly centered where the case stops when the plate turns. then i was planing on having my drop out hole right after that so you don't have the problem of the case trying to get back up on the main plate. will take pics when i get that far have to make a little mock up one to test on first. here is link to the motor i purchased for the case turning case turn motor |
|
Originally Posted By GWhis:
Borg, as I said above (obviously edited in after you read my post, sorry), Jmorris did refine his with a Dillon feeder. That makes it more suitable for volume, but that also, of course, ups the price, unless you make your own. (If you make his annealer you probably could just as easily make your own.) If you turn the gas up on Doug's to make it anneal faster, you obviously would use more gas than at the 10 second speed, but how such usage compares to the other method....I wouldn't know. So did you actually turn up the speed for your use, or just leave it as designed? He had just put the Dillon feeder on his when I bought from him, and no, I didn't put one on mine. My Jmorris runs about 6 sec each for 223 with the two torches to get the temp I want. With Dougs, you can adjust the speed. I did speed it up and turned the torch up, takes about 4 sec to get the same heat. It still does use less gas. Another thing, it's easier to adjust for different sized cases, especially with just one torch. Don't get me wrong, the Jmorris does work good, just not as fast or easy as the Giraud. The price difference is big, unless you use the Dillon case feeder, then not so much. |
|
Originally Posted By stevos758:
Can you get me measurements on the wheel? I want to start building my base but I need the measurements of the full diameter of the wheel and the slightly smaller diameter where the arm engages the wheel to turn it. i can get those for you tonight. i did some work on my case turning set up last night. made the disc and got the collar fastened to it. tonight i am going to set it up on a test piece and see how it works ––- i don't want to cut the hole out in the plate and have it not work and have to buy another plate to start over with. 
|
|
Originally Posted By BIGGDAWG:
Originally Posted By stevos758:
Can you get me measurements on the wheel? I want to start building my base but I need the measurements of the full diameter of the wheel and the slightly smaller diameter where the arm engages the wheel to turn it. i can get those for you tonight. i did some work on my case turning set up last night. made the disc and got the collar fastened to it. tonight i am going to set it up on a test piece and see how it works ––- i don't want to cut the hole out in the plate and have it not work and have to buy another plate to start over with. I hear ya. Thats why i'm letting you try it first!
|
| I built one just like that with the same blade assembly from jmorris. It works but I had issues with the brass falling as its turned by the assembly and it needed constant tweaking. It's also a pain to have to sit there and manually load each case throughout the whole session. This year I broke down and bought a Giraud annealer. Wow, what a luxury that thing is... At the end of the day this type of annealer will work but if you want to splurge I'd reccomend a Giraud. It was a fun project though and you can make it much cheaper than what a Giraud goes for or the other annealers on the market. |
|
Originally Posted By Dan46n2:
I built one just like that with the same blade assembly from jmorris. It works but I had issues with the brass falling as its turned by the assembly and it needed constant tweaking. It's also a pain to have to sit there and manually load each case throughout the whole session. This year I broke down and bought a Giraud annealer. Wow, what a luxury that thing is... At the end of the day this type of annealer will work but if you want to splurge I'd reccomend a Giraud. It was a fun project though and you can make it much cheaper than what a Giraud goes for or the other annealers on the market. that is just it i can't afford a giraud and this will work for me i may down the road try and make one like the giraud i just thought it would be easier to make this one. and while playing with fire i would like to be there to see what is going on. to load a giraud and not watch it would be foolish you never know what can happen. and it is by far easier than the way i was doing it. |
| For the comment about the Giraud being slower I haven't found that to be the case, at least nothing significant IMO. However the advantage of the Giraud is that it heats evenly, the homemade annealer does not heat as even as the Giraud, it still does the job though. |
|
Originally Posted By stevos758:
Can you get me measurements on the wheel? I want to start building my base but I need the measurements of the full diameter of the wheel and the slightly smaller diameter where the arm engages the wheel to turn it. here they are 


|
|
Originally Posted By BIGGDAWG:
Originally Posted By stevos758:
Can you get me measurements on the wheel? I want to start building my base but I need the measurements of the full diameter of the wheel and the slightly smaller diameter where the arm engages the wheel to turn it. here they are http://i4.photobucket.com/albums/y124/BIGGDAWG800/main%20album/2012-10-17114532.jpg http://i4.photobucket.com/albums/y124/BIGGDAWG800/main%20album/2012-10-17114548.jpg http://i4.photobucket.com/albums/y124/BIGGDAWG800/main%20album/2012-10-17114556.jpg http://i4.photobucket.com/albums/y124/BIGGDAWG800/main%20album/2012-10-17114633.jpg Cool Thanks! |
|
Originally Posted By Dan46n2:
For the comment about the Giraud being slower I haven't found that to be the case, at least nothing significant IMO. However the advantage of the Giraud is that it heats evenly, the homemade annealer does not heat as even as the Giraud, it still does the job though. My slower comment was only based on watching the two videos.....if someone would make a video to show otherwise...it might be more convincing. As for more even heat, that's a doubtful. On the jm unit, looking at the flame spread encircling the case while the brass is stopped and hit from two sides.....it appears to me all the case is heated at once. This observation may be unscientific, but the heat coloration around the brass appears pretty uniform to me. As I understand annealing there's a temperature range between 700 and 800 degrees that is the target. It's a simple matter to use chemical indicators to test...maybe with vertical stripes painted around the case. So if the temperature range is reached....its annealed...period...whether or not every bit of the shoulder was at 752.55 degrees. (that number came out of thin air.  ) )
The comment about unstable brass would depend on how well the builder built the unit. Height of the blade, and smoothness of the sliding surface is everything. As for the Giraud, the simplicity of his feeding system is the best part of his design....no arguing that. The price is the worst part of his design, simply because it prevents a lot of folks from having one. With the jmorris's $60 blade in hand, I'm betting a non-welder like me can make a frame out of wood, with a slick 1/8" UHMW-PE sheet over a plywood top. I also think the case feeder part of it is cool, but it doesn't speed it uop.....and it's only necessary if you are going to leave while the annealing is going on.......I doubt I'd want to leave a that hot of a flame alone too long, just me.
I thought about that UHMW-PE statement for a minute.....don't think that's necessary either. Anybody have a sink cut-out from a smooth Formica kitchen counter top? That, with a little Johnson's paste wax would work just as good. |
|
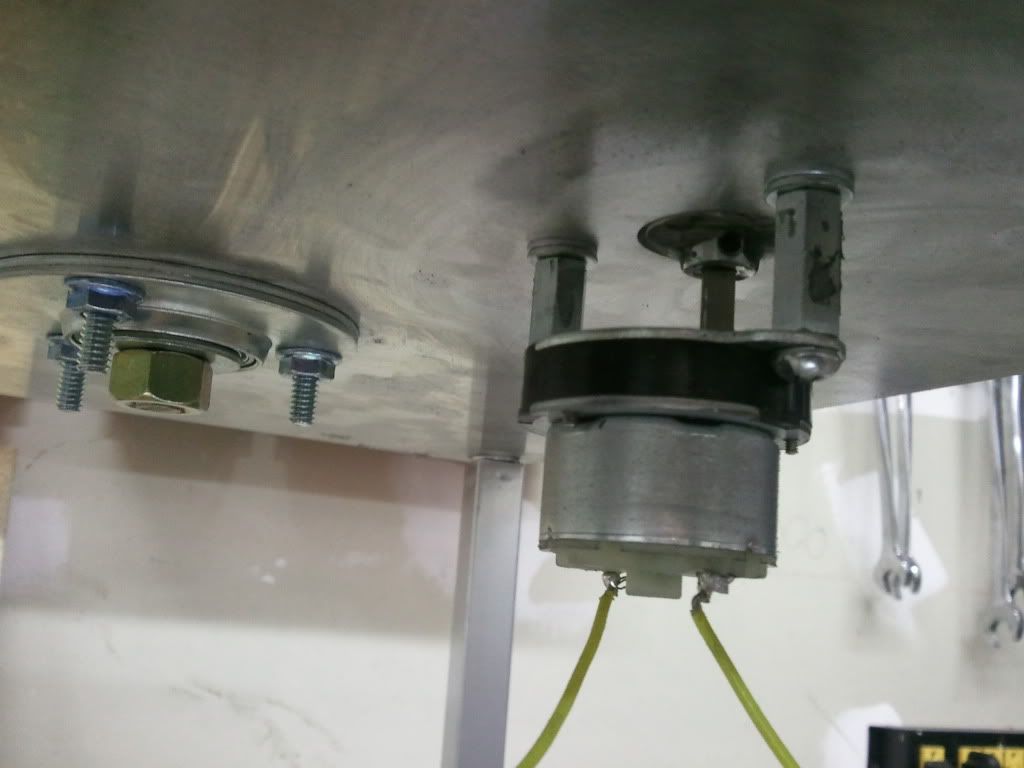
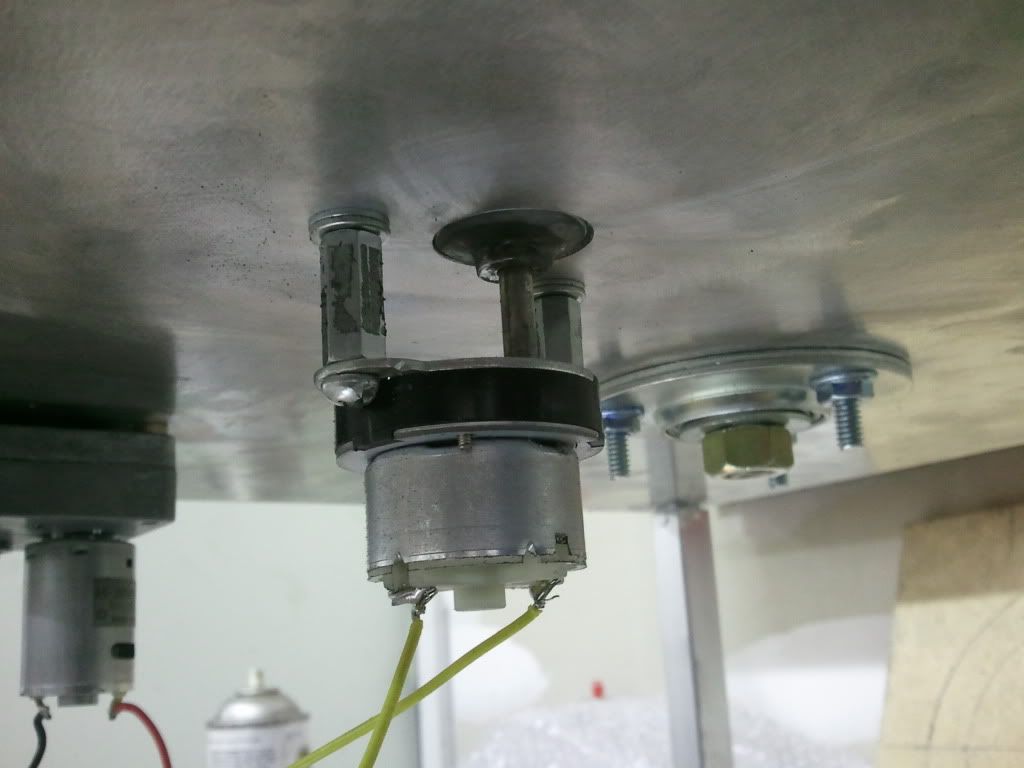
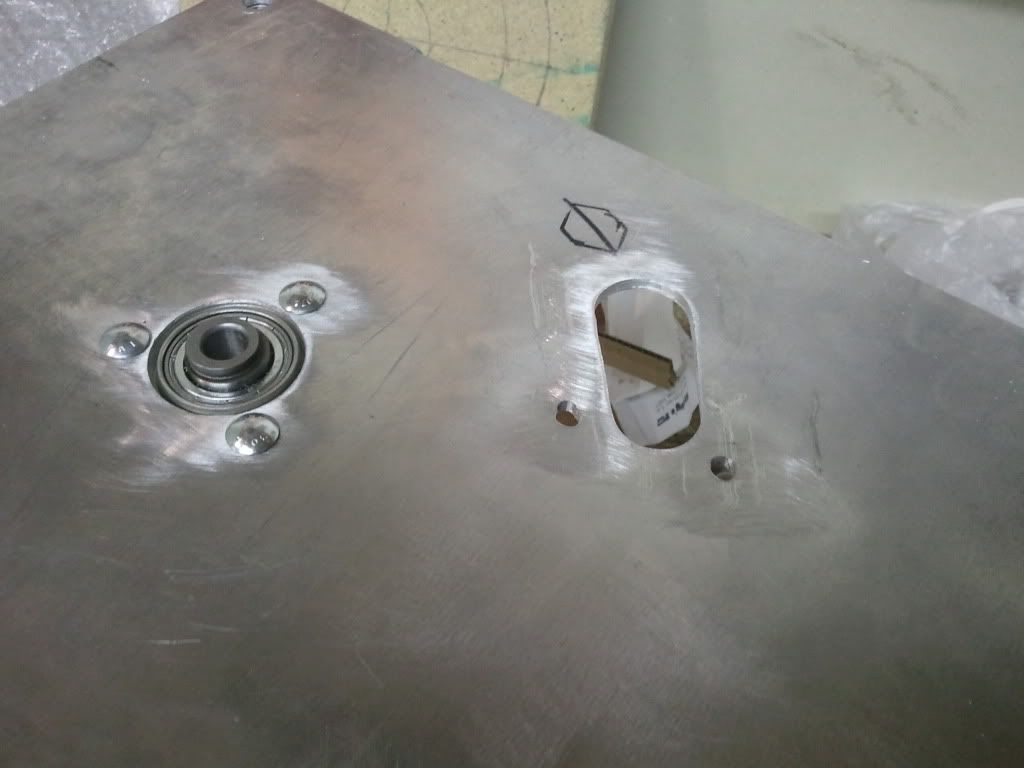
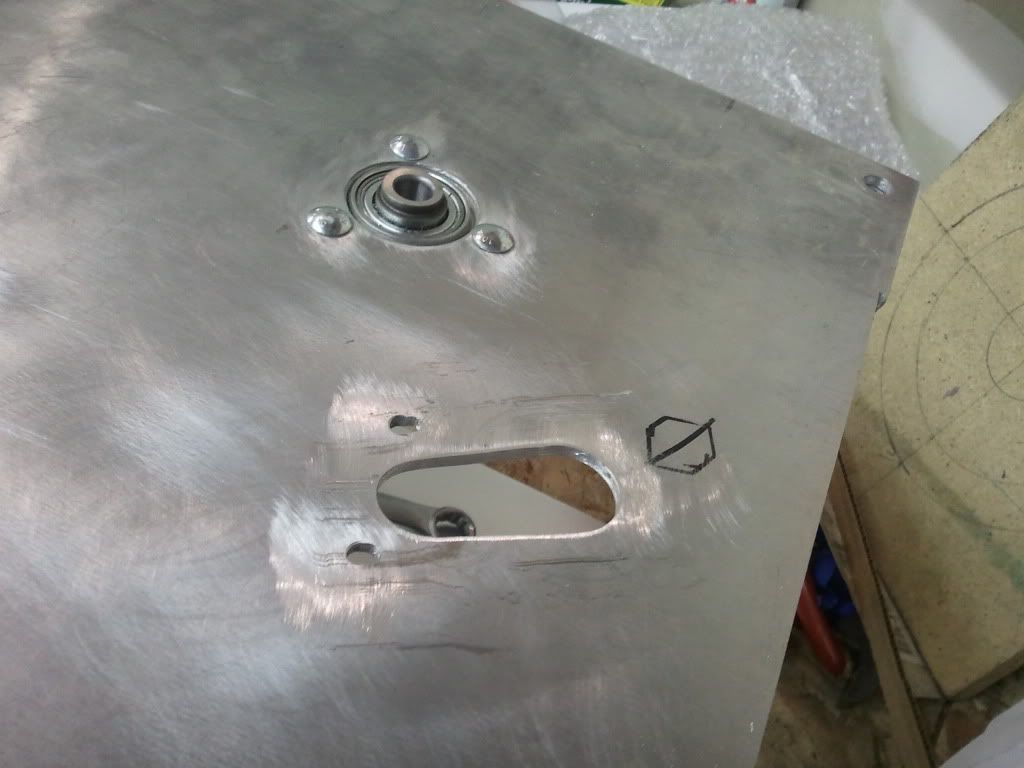
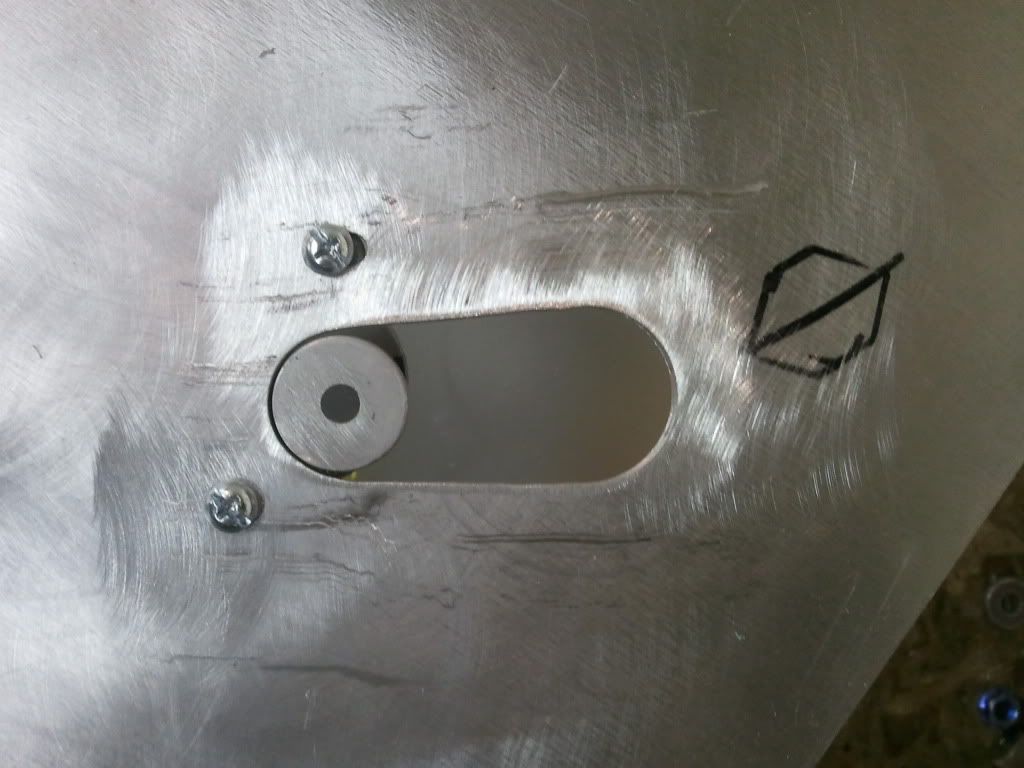
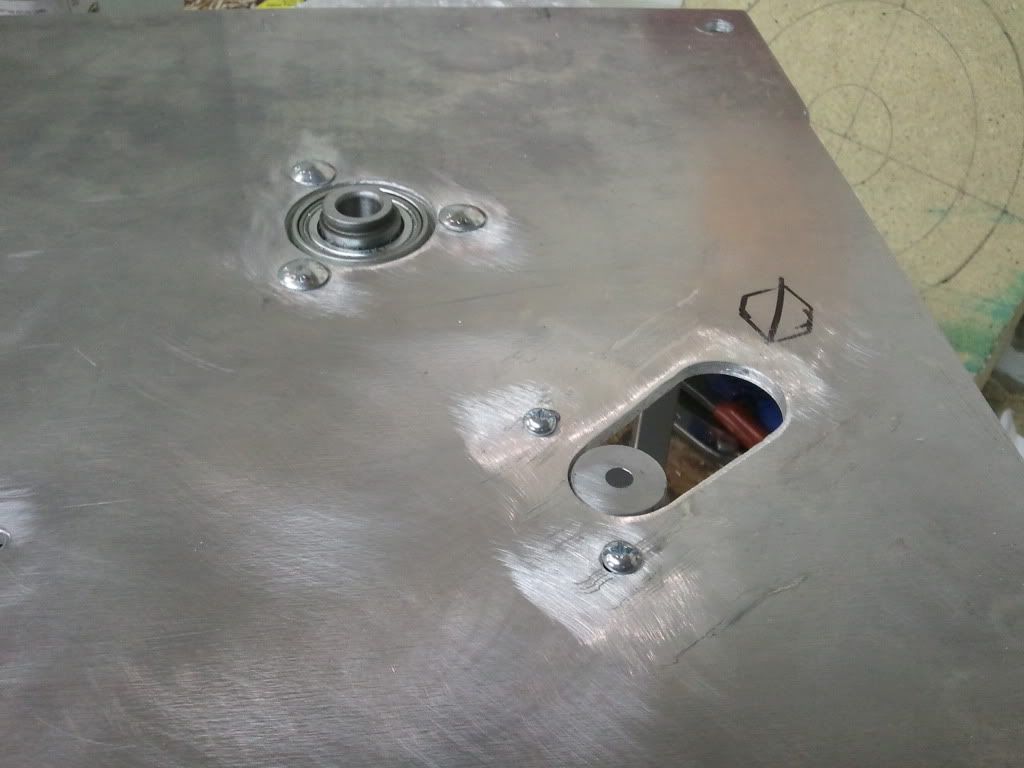
Well i worked on the case turning set up and learned quite a bit. then i bit the bullet and cut the holes and installed it on the build.
here is what i learned: you have to have the motor set up adjustable unless you are going to only do one size case head. so what i did is made a jig bolted it to the bearing and used it to guide the drill bit as i slotted the mounting holes i then just barely tightened the inside bolt –– you can't get to it with the plate on–– and i made my adjustments with the outboard screw. i do need to slot it a bit more so it will work a little better with 308 cases but it will do 223 base cases perfectly as you can see in the video below. it also does grendel cases when i adjust the motor and it will do 308's but sometimes they move a little. also it is best to have the drop out slot right after the case spin to avoid tipping cases getting back on to the plate.
|
|
Originally Posted By stevos758:
Awesome!. I picked up my top plate today. I see I need to order a motor for the case turning. Great work! Thanks, it is coming together nicely. i think i will be able to finish it up tonight. i am going to install a switch so i can shut the case turn off if i want to and i am going to get it wired up. also see how i can mount the power supply under it. so final pictures should come tonight. |
|
Well here is the first test run after i got it set to run 223. it moves along pretty fast. i may go to a one torch set up to slow down a bit.
all seems to be working pretty good. these cases are going to go in the trash i used them to set it up and some got hot so please no flack this is a trial and error deal and i know better than to reload them.
|
|
Originally Posted By We-rBorg:
Now you've got that working like a Swiss watch. You need to send Jmorris that vid. With the case feeder on that, would be perfect. 'Borg thanks, yes i am now thinking of how i can use my lnl case feeder on it. my calculation for 223 is 3-4 seconds per case so that would be 900-1200 cases an hour i have posted on castboolits they don't let you embed video that i could see but i posted the link. |
Global Warming Hoax Skeptic before it was cool
Joined:
Jun 2007
Posts:
20583
EE: 100% (1)
WA, USA
Armory Sponsor