


Armory Sponsor


|
Originally Posted By Milsurpninja: Got the trimmer together. Pros: -It works! -It's fast -Length seemed consistentish on the ~20 cases I was using to dial it in (+/- 1-2 thou, based on a handful of measurements; no Cpk yet, boys) Cons: -There is more slop in the system than I like, leading to some squareness issues -Some chatter in the finish on the case mouth Conclusion: I think this is a keeper for processing a lot of brass for loading up range ammo. Those chasing accuracy won't be satisfied. I plan to print a spacer for the bushing because the end mill has flutes in contact with the bearing instead of shaft, so I need to shift it up ~.2". I will continue to play around with this, but it's usable as is, and has room for improvement. I just got a standard shaft collar and don't feel e need for the fancy adjustable one at this time. https://www.ar15.com/media/mediaFiles/102025/D8FF9A41-CAF4-4FEE-9FBC-1AD03AE77B21_jpe-1801290.JPGhttps://www.ar15.com/media/mediaFiles/102025/39EB7175-F8A5-44A1-8121-963C34289978_jpe-1801291.JPGhttps://www.ar15.com/media/mediaFiles/102025/38059A07-78E0-4600-B227-852AB8EB9FB2_jpe-1801292.JPG Those are the reasons I'm designing my own. There's a dilemma with the bushing fit - you can't simply scale it because the bushing fit within the bearing and shell case fit in the bushing both need to be correct. One of the reasons I bumped up the bearing size on that end is because you have a wider inner race for the bushing which should provide less angular play (as well as allowing enough wall thickness for an O-ring groove in the bushing and also accommodating short mag cases). The end mill length of cut and overall length work for his particular end mill (1/2" length of cut), but it needs to be different with a standard end mill. My design is already done, but I'm just waiting on parts now! The Giraud and WFT are certainly nicer trimmers, but cost significantly more. Also the Giraud seems to be caliber specific so it's going to cost you an additional $100 for each different type - in the case of the 3D printed version, it's a matter of printing a 12 cent bushing. I think I'm in for about $25 in parts right now, which includes an American made carbide end mill (that doesn't even come standard on the WFT). |

|
Originally Posted By KPtexan: Very nice, glad to see you got it put together! Those are the reasons I'm designing my own. There's a dilemma with the bushing fit - you can't simply scale it because the bushing fit within the bearing and shell case fit in the bushing both need to be correct. One of the reasons I bumped up the bearing size on that end is because you have a wider inner race for the bushing which should provide less angular play (as well as allowing enough wall thickness for an O-ring groove in the bushing and also accommodating short mag cases). The end mill length of cut and overall length work for his particular end mill (1/2" length of cut), but it needs to be different with a standard end mill. My design is already done, but I'm just waiting on parts now! The Giraud and WFT are certainly nicer trimmers, but cost significantly more. Also the Giraud seems to be caliber specific so it's going to cost you an additional $100 for each different type - in the case of the 3D printed version, it's a matter of printing a 12 cent bushing. I think I'm in for about $25 in parts right now, which includes an American made carbide end mill (that doesn't even come standard on the WFT). Your design sounds promising, can’t wait to see it! Could you explain the o-ring? Is it going in the ID of the bushing to center the case? My redesigned .223 bushing should be done in an hour or so. Tightened everything up and moved endmill forward. |
Verbum caro, panem verum, verbo carnem efficit.

|
Printed a one-piece primer catcher for my RCBS from Thingverse. Attached File |
However, it's not the odds that make me carry. It's the stakes. - Jayne_Cobb
Dremel - the answer to, and cause of, most of gunsmithing's problems.
Dremel - the answer to, and cause of, most of gunsmithing's problems.
|
Originally Posted By Milsurpninja: Your design sounds promising, can't wait to see it! Could you explain the o-ring? Is it going in the ID of the bushing to center the case? My redesigned .223 bushing should be done in an hour or so. Tightened everything up and moved endmill forward. Attached File Attached File |

|
Originally Posted By KPtexan: The O-ring I'm putting in the design goes between the bushing and the bearing to help retain it - that being said, the bushing still needs to be a tight fit since a single O-ring won't fix that. Maybe I'll decide it's not needed though, but it's just a feature I was thinking about. Here's a photo that shows the O-ring groove in one of my prototypes: https://www.ar15.com/media/mediaFiles/274749/IMG_3747_jpg-1801925.JPG https://www.ar15.com/media/mediaFiles/274749/trim_JPG-1801936.JPG Originally Posted By KPtexan: Originally Posted By Milsurpninja: Your design sounds promising, can't wait to see it! Could you explain the o-ring? Is it going in the ID of the bushing to center the case? My redesigned .223 bushing should be done in an hour or so. Tightened everything up and moved endmill forward. https://www.ar15.com/media/mediaFiles/274749/IMG_3747_jpg-1801925.JPG https://www.ar15.com/media/mediaFiles/274749/trim_JPG-1801936.JPG I got everything set up yesterday but the case is so loose in my bushing I'd say it barely usable. I could do a single wrap of friction tape on the exterior to tighten the bushing within the large bearing, but the interior just simply isn't tight enough to hold the case for a square cut. In fact I'd expect more uneven cuts from mine than milsurpninja's photo on prior page. Bummer. |
|
Originally Posted By TGE: Looks good. I got everything set up yesterday but the case is so loose in my bushing I'd say it barely usable. I could do a single wrap of friction tape on the exterior to tighten the bushing within the large bearing, but the interior just simply isn't tight enough to hold the case for a square cut. In fact I'd expect more uneven cuts from mine than milsurpninja's photo on prior page. Bummer. |
|
Originally Posted By KPtexan: Are you using any 3D design software (Fusion360,etc.)? I can try to redesign a bushing for you that works in that trimmer. Wouldn't take more than a couple minutes. Which caliber are you trimming? Originally Posted By KPtexan: Originally Posted By TGE: Looks good. I got everything set up yesterday but the case is so loose in my bushing I'd say it barely usable. I could do a single wrap of friction tape on the exterior to tighten the bushing within the large bearing, but the interior just simply isn't tight enough to hold the case for a square cut. In fact I'd expect more uneven cuts from mine than milsurpninja's photo on prior page. Bummer. The 3d design is an entirely new world for me, and all I'm using now is TinkerCad. I've designed a few very basic parts and pieces, but it's pretty laborious. I've gotten semi-decent at slicing away pieces from existing files to use for my own stuff and beyond that my skill level is low. I looked at a couple real programs but everything I saw was too expensive to be worth it for me. It looked like Fusion360 would be free for 1 year, then jumps to a subscription service of $500/yr or something like that. |

|
Originally Posted By TGE: Just 223, I'll do my lower volume stuff on my current little trimmer I think. That would be awesome if you could turn one out without much trouble! The 3d design is an entirely new world for me, and all I'm using now is TinkerCad. I've designed a few very basic parts and pieces, but it's pretty laborious. I've gotten semi-decent at slicing away pieces from existing files to use for my own stuff and beyond that my skill level is low. I looked at a couple real programs but everything I saw was too expensive to be worth it for me. It looked like Fusion360 would be free for 1 year, then jumps to a subscription service of $500/yr or something like that. Check out Onshape Cad. It's free and what I've been using. I like it for what I've been doing. |
|
I've been working on a new bullet tray design for the Hornady LNL. Dropped tray down lower and sloped sides for more volume. Makes it easier to grab bullets down lower. I'm going to have a tray larger than this too. Something was off on my dovetail on this one but once I get that worked out I'll upload to thingiverse.    
|
|
Originally Posted By memsu: Check out Onshape Cad. It's free and what I've been using. I like it for what I've been doing. Originally Posted By memsu: Originally Posted By TGE: Just 223, I'll do my lower volume stuff on my current little trimmer I think. That would be awesome if you could turn one out without much trouble! The 3d design is an entirely new world for me, and all I'm using now is TinkerCad. I've designed a few very basic parts and pieces, but it's pretty laborious. I've gotten semi-decent at slicing away pieces from existing files to use for my own stuff and beyond that my skill level is low. I looked at a couple real programs but everything I saw was too expensive to be worth it for me. It looked like Fusion360 would be free for 1 year, then jumps to a subscription service of $500/yr or something like that. Check out Onshape Cad. It's free and what I've been using. I like it for what I've been doing. |
|
Originally Posted By TGE: Just 223, I'll do my lower volume stuff on my current little trimmer I think. That would be awesome if you could turn one out without much trouble! The 3d design is an entirely new world for me, and all I'm using now is TinkerCad. I've designed a few very basic parts and pieces, but it's pretty laborious. I've gotten semi-decent at slicing away pieces from existing files to use for my own stuff and beyond that my skill level is low. I looked at a couple real programs but everything I saw was too expensive to be worth it for me. It looked like Fusion360 would be free for 1 year, then jumps to a subscription service of $500/yr or something like that. The reason I ask if you use any design software is because I could possibly send you a file where the inner and outer bushing are separate bodies and then you could tweak them each individually and then merge. Fusion 360 is free for a year, but then you just have to renew your hobby license each year. No cost involved as far as I know. |
|
Originally Posted By memsu: I've been working on a new bullet tray design for the Hornady LNL. Dropped tray down lower and sloped sides for more volume. Makes it easier to grab bullets down lower. I'm going to have a tray larger than this too. Something was off on my dovetail on this one but once I get that worked out I'll upload to thingiverse. https://i.imgur.com/Fz2eZGj.jpg https://i.imgur.com/xBgxHHo.jpg https://i.imgur.com/OlTDre9.jpg https://i.imgur.com/vl2c11g.jpg |
|
Originally Posted By KPtexan: Give this one a shot: https://www.prusaprinters.org/prints/54892-modified-223-trimmer-bushing . As far as I can tell from looking at the original STL, the designer did not include any sort of body taper for the .223 case (goes from 9.00 mm to 9.58mm down by the extractor groove). I've tightened up the dimensions and used the proper case profile. Another thing to consider is whether or not the brass has been resized or if it is formed to the chamber, but these are things we'll just have to play with. Also, the taper on the outside of the original bushing is a nice design touch, but I got rid of it because I don't like to constrain wall thickness on things like this - FDM printing tolerances start to vary even more as the wall thicknesses get small. It will be a tight fit depending on your printer/settings (I left .1mm clearance), but let me know how it works and I can modify as needed. The reason I ask if you use any design software is because I could possibly send you a file where the inner and outer bushing are separate bodies and then you could tweak them each individually and then merge. Fusion 360 is free for a year, but then you just have to renew your hobby license each year. No cost involved as far as I know. Originally Posted By KPtexan: Originally Posted By TGE: Just 223, I'll do my lower volume stuff on my current little trimmer I think. That would be awesome if you could turn one out without much trouble! The 3d design is an entirely new world for me, and all I'm using now is TinkerCad. I've designed a few very basic parts and pieces, but it's pretty laborious. I've gotten semi-decent at slicing away pieces from existing files to use for my own stuff and beyond that my skill level is low. I looked at a couple real programs but everything I saw was too expensive to be worth it for me. It looked like Fusion360 would be free for 1 year, then jumps to a subscription service of $500/yr or something like that. The reason I ask if you use any design software is because I could possibly send you a file where the inner and outer bushing are separate bodies and then you could tweak them each individually and then merge. Fusion 360 is free for a year, but then you just have to renew your hobby license each year. No cost involved as far as I know. And now I'll re-check Fusion360 as well. I wonder how well my old Mac laptop will handle these programs, and in fact I'm sure I'll be forced to update my OS too  It'd probably be worth it to be able to do this kind of thing though. And again, thank you! |
| So an update, that bushing fits the case absolutely perfectly without any wiggle at all. I've still got to make some adjustments and reprint the locking collar so I couldn't actually test it, but this new bushing seems like a yuuuuge upgrade from the original design. |

|
Originally Posted By memsu: I've been working on a new bullet tray design for the Hornady LNL. Dropped tray down lower and sloped sides for more volume. Makes it easier to grab bullets down lower. I'm going to have a tray larger than this too. Something was off on my dovetail on this one but once I get that worked out I'll upload to thingiverse. https://i.imgur.com/Fz2eZGj.jpg https://i.imgur.com/xBgxHHo.jpg https://i.imgur.com/OlTDre9.jpg https://i.imgur.com/vl2c11g.jpg Damn, I like that. Now I need to print that one. Link? I wonder if it will interfere with the inline fab handle? |
3-7-77
Proud Member of the Leather Head Mafia
“In my opinion, the M1 Rifle is the greatest battle implement ever devised” - George S. Patton
Proud Member of the Leather Head Mafia
“In my opinion, the M1 Rifle is the greatest battle implement ever devised” - George S. Patton

|
Originally Posted By memsu: I've been working on a new bullet tray design for the Hornady LNL. Dropped tray down lower and sloped sides for more volume. Makes it easier to grab bullets down lower. I'm going to have a tray larger than this too. Something was off on my dovetail on this one but once I get that worked out I'll upload to thingiverse. https://i.imgur.com/Fz2eZGj.jpg https://i.imgur.com/xBgxHHo.jpg https://i.imgur.com/OlTDre9.jpg https://i.imgur.com/vl2c11g.jpg @memsu Have you considered a version with the tray moved closer to the spot where the case would be when seating the bullet? I don't have the skills to design this, but would be cool if you could move it closer to how I have it below? Could even put a support brace that makes contact with the top surface of the press? Would reduce your shoulder fatigue from having to reach back and forth from the front of the press to the side when grabbing/seating the bullet. Attached File |
We're living in an episode of Who's Line is it Anyway.
Where everything's made up and the points don't matter.
Where everything's made up and the points don't matter.
|
Originally Posted By TOTHEMAX: Damn, I like that. Now I need to print that one. Link? I wonder if it will interfere with the inline fab handle? I don't have an inline fab handle, so can't test for clearance there. I might could move the dovetail to the left some more if it does interfere. I'll need someone to test it and get some measurements how far over it needs to move. Files not quite ready yet. Something wasn't right with my drop down dovetail. I double checked my drawing file and can't figure it out. Tray fit perfect on my other dovetails so don't think it's the tray part. Maybe for some reason it didn't print to the right dimensions? I travel for work Mon-Thurs, so can't do more testing till later in the week. The biggest tray will be about 6.25 inches x 4.25 inches. I could probably go bigger, but that's the size of boxes I have for shipping them out when I'm going to sell them later. I have no doubt this thing can handle the weight of a few hundred 45 acp bullets. Best thing I did was move away from the clip on design for the tray clip. The new screw on design opens up a whole new world of options. |
|
Originally Posted By drfroglegs: @memsu Have you considered a version with the tray moved closer to the spot where the case would be when seating the bullet? I don't have the skills to design this, but would be cool if you could move it closer to how I have it below? Could even put a support brace that makes contact with the top surface of the press? Would reduce your shoulder fatigue from having to reach back and forth from the front of the press to the side when grabbing/seating the bullet. https://www.ar15.com/media/mediaFiles/322543/20210201_215313_jpg-1807159.JPG That's actually a very good idea. I'll see what I can come up with. This will give me something to work on when I'm in the hotel this week. I was thinking it stuck out too far too, but made best sense for ease of printing. Hornady has some weird angles to work around to get it to line up where the tray appears straight from the front of the press. Then to complicate matters they have 2 different bar designs. |
|
Originally Posted By memsu: That's actually a very good idea. I'll see what I can come up with. This will give me something to work on when I'm in the hotel this week. I was thinking it stuck out too far too, but made best sense for ease of printing. Hornady has some weird angles to work around to get it to line up where the tray appears straight from the front of the press. Then to complicate matters they have 2 different bar designs. @memsu You could make the brace have a triangular cutout region that fits in the corner of the press. Might help index it and provide some lateral support too? Possibly add some double stick tape to the sides and it would be rock solid. I have the inline fabrication mount with double bins and have always kept the bullets in the far left bin. After a few hundred rounds my shoulder is killing me from all the movement. This is the corner I was talking about. Attached File I might have to modify your version a little bit so my ufo light kit will still fit! Attached File |
We're living in an episode of Who's Line is it Anyway.
Where everything's made up and the points don't matter.
Where everything's made up and the points don't matter.

|
Originally Posted By drfroglegs: @memsu You could make the brace have a triangular cutout region that fits in the corner of the press. Might help index it and provide some lateral support too? Possibly add some double stick tape to the sides and it would be rock solid. I have the inline fabrication mount with double bins and have always kept the bullets in the far left bin. After a few hundred rounds my shoulder is killing me from all the movement. This is the corner I was talking about. https://www.ar15.com/media/mediaFiles/322543/20210202_003703_jpg-1807310.JPG I might have to modify your version a little bit so my ufo light kit will still fit! https://www.ar15.com/media/mediaFiles/322543/Screenshot_20210202-003502_Gallery_jpg-1807312.JPG That looks alot nicer than the hot trash one hornady sells. I bought one at a local gunshop just to have bought "something" from them to give them a little business. Instant regret. |
Never confuse faith that you will prevail in the end—which you can never afford to lose—with the discipline to confront the most brutal facts of your current reality, whatever they might be. - Adm James Stockdale
|
Originally Posted By drfroglegs: @memsu You could make the brace have a triangular cutout region that fits in the corner of the press. Might help index it and provide some lateral support too? Possibly add some double stick tape to the sides and it would be rock solid. I have the inline fabrication mount with double bins and have always kept the bullets in the far left bin. After a few hundred rounds my shoulder is killing me from all the movement. This is the corner I was talking about. https://www.ar15.com/media/mediaFiles/322543/20210202_003703_jpg-1807310.JPG I might have to modify your version a little bit so my ufo light kit will still fit! https://www.ar15.com/media/mediaFiles/322543/Screenshot_20210202-003502_Gallery_jpg-1807312.JPG I think it will be strong like it is and if it needs support best place may be some bracket off the tray. The weight of the bullets holds it solid with the tapered dovetail design. More weight means more solid lock. I'll try it with my larger tray design and see how it does. Your light should fit over the clip. The clip is 5mm thick. I tried to keep it thin but strong there. |
|
@TOTHEMAX I don't have the drop down universal dovetail uploaded yet, but I went ahead and put 2 new tray designs on thingiverse. https://www.thingiverse.com/thing:4699476 |
|
Originally Posted By memsu: @TOTHEMAX I don't have the drop down universal dovetail uploaded yet, but I went ahead and put 2 new tray designs on thingiverse. https://www.thingiverse.com/thing:4699476 Cool. 
|
3-7-77
Proud Member of the Leather Head Mafia
“In my opinion, the M1 Rifle is the greatest battle implement ever devised” - George S. Patton
Proud Member of the Leather Head Mafia
“In my opinion, the M1 Rifle is the greatest battle implement ever devised” - George S. Patton
|
I finally got my trimmer design built and ran a few .223 cases through it - seems pretty consistent and each one was within a thousandth. Cut quality seems good too, and it should require little chamfer work. Also, I decided to design my own stop clamp and that design holds well - I was really trying to keep width at a minimum to ensure plenty of shank for the drill chuck. All of that being said, I've got the idea to eliminate the bearing where that cartridge case bushing sits. I don't think it's really needed, and the O-ring does a great job of holding and centering that case bushing. I'll post up STL and parts links for anyone that wants to make it. Attached File Attached File Attached File |


|
Originally Posted By KPtexan: I finally got my trimmer design built and ran a few .223 cases through it - seems pretty consistent and each one was within a thousandth. Cut quality seems good too, and it should require little chamfer work. Also, I decided to design my own stop clamp and that design holds well - I was really trying to keep width at a minimum to ensure plenty of shank for the drill chuck. All of that being said, I've got the idea to eliminate the bearing where that cartridge case bushing sits. I don't think it's really needed, and the O-ring does a great job of holding and centering that case bushing. I'll post up STL and parts links for anyone that wants to make it. https://www.ar15.com/media/mediaFiles/274749/IMG_3754_jpg-1809540.JPG https://www.ar15.com/media/mediaFiles/274749/IMG_3755_jpg-1809542.JPG https://www.ar15.com/media/mediaFiles/274749/IMG_3759_jpg-1809543.JPG @kptexan Your trimmer looks great. I would like to try to print your version. Post up a link and parts list and I’ll get to work on it. Thanks! |
|
Originally Posted By KPtexan: I finally got my trimmer design built and ran a few .223 cases through it - seems pretty consistent and each one was within a thousandth. Cut quality seems good too, and it should require little chamfer work. Also, I decided to design my own stop clamp and that design holds well - I was really trying to keep width at a minimum to ensure plenty of shank for the drill chuck. All of that being said, I've got the idea to eliminate the bearing where that cartridge case bushing sits. I don't think it's really needed, and the O-ring does a great job of holding and centering that case bushing. I'll post up STL and parts links for anyone that wants to make it. https://www.ar15.com/media/mediaFiles/274749/IMG_3754_jpg-1809540.JPG https://www.ar15.com/media/mediaFiles/274749/IMG_3755_jpg-1809542.JPG https://www.ar15.com/media/mediaFiles/274749/IMG_3759_jpg-1809543.JPG |
|
Originally Posted By memsu: @drfroglegs How does this look for an offset dovetail bracket? I still may need to tweak a few things, but should be easy to make changes if needed. I won't get to print a trial piece until this weekend. https://i.imgur.com/9J4Dx6f.jpg That looks cool, but I had another idea in mind. The main problem is the position of the tray. The tray needs to be directly in front of station 4, that's where most people would be seating a bullet (and crimping in station 5). I had thought it would be cool to have the dovetail coming off the left side of how you have it now rather than the front. Please don't take my ideas a critique or criticism, we are all very grateful for your work! If I had the skills, though, this is what I had in mind to try to make based on your design. Attached File |
We're living in an episode of Who's Line is it Anyway.
Where everything's made up and the points don't matter.
Where everything's made up and the points don't matter.
|
Originally Posted By Shoe3: @kptexan Your trimmer looks great. I would like to try to print your version. Post up a link and parts list and I'll get to work on it. Thanks!Ple This is the end mill I bought. Made in Canada, and it seems really nice for the price: https://www.ebay.com/itm/3-8-Carbide-Endmill-4-Flute-Flat-Bottom-Regular-TiAlN/133414909772?ssPageName=STRK%3AMEBIDX%3AIT&_trksid=p2057872.m2749.l2649 If anyone already has a 3/8" end mill though, my design should work just fine with it. Additionally, it uses the same R6-2RS bearing that the Thingiverse design does. |
|
Originally Posted By TGE: Looks excellent. Wish I had 10% of your skills on the cad side. |
|
So I finally got my Case Trimmer MK2 designed and printed, and initial testing is very good. Consistency is every bit as good as the first one I made, and it should theoretically be even better since any additional slop coming from the front bearing is no longer there. The only noticeable variation in the system now is the R6-2RS bearing that the end mill rides in - the clearance within the bearing allows very slight changes in angular alignment when inspecting it, but all the brass I've trimmed appears to be quite square. I'll post a download link to everything shortly. I also pulled up the SAAMI specs online and went a little crazy with bushing designs, since those are pretty easy to draw up. Let me know if there are any good casings you're interested in. I also made a little tool to pop the bushings out since the O-ring grabs well in the bore (you could actually get away with no O-ring, but I like the way it positively holds the bushing in). Attached File Attached File Attached File Attached File |
|
And here's the download link with all the info and files you need for the trimmer: https://www.prusaprinters.org/prints/55282-cartridge-case-trimmer-mk2 |
|
Originally Posted By KPtexan: And here's the download link with all the info and files you need for the trimmer: https://www.prusaprinters.org/prints/55282-cartridge-case-trimmer-mk2 |
|
Originally Posted By drfroglegs: That looks cool, but I had another idea in mind. The main problem is the position of the tray. The tray needs to be directly in front of station 4, that's where most people would be seating a bullet (and crimping in station 5). I had thought it would be cool to have the dovetail coming off the left side of how you have it now rather than the front. Please don't take my ideas a critique or criticism, we are all very grateful for your work! If I had the skills, though, this is what I had in mind to try to make based on your design. https://www.ar15.com/media/mediaFiles/322543/20210203_230150_jpg-1810063.JPG I'll see what I can come up with regarding that. I'm trying to avoid printing anything that needs supports. Everyone is giving me great ideas which only make the final product better. Just got in from a long week of work. Printing my offset dovetail and my largest tray design just to see how it mocks up tomorrow. Nearly a 9 hour wait now and that's with a 0.6mm nozzle. With a 0.4mm nozzle it would be 18 hours. |
|
Just completed and uploaded the MK4 version of my trimmer! I doubled up the R6 bearing, which made a huge difference in angular alignment of the endmill. Not that the previous version was bad - the trimmed cases seemed to be quite square in the jaws of my caliper and they were very consistent in length. It's just that a C3 rated ball bearing has a bit of slop, and I could see more angular movement than I liked. Files here: https://www.prusaprinters.org/prints/55282-cartridge-case-trimmer Attached File Attached File |
|
AkroBin end covers for y'all: https://www.prusaprinters.org/prints/56300-akrobin-end-cover/files Attached File Attached File |
|
Originally Posted By KPtexan: AkroBin end covers for y'all: https://www.prusaprinters.org/prints/56300-akrobin-end-cover/files https://www.ar15.com/media/mediaFiles/274749/IMG_3801_jpg-1822574.JPG https://www.ar15.com/media/mediaFiles/274749/IMG_3802_jpg-1822575.JPG That is awesome! Finally got my printer up and running. Time to print some stuff! So far I've printed replacement parts for my fridge, a light fury (for my daughter), and a sword end from game of thrones (for my brother). They all turned out shockingly well. Time to move on to some more advanced stuff! |
We're living in an episode of Who's Line is it Anyway.
Where everything's made up and the points don't matter.
Where everything's made up and the points don't matter.
|
Originally Posted By KPtexan: Just completed and uploaded the MK4 version of my trimmer! I doubled up the R6 bearing, which made a huge difference in angular alignment of the endmill. Not that the previous version was bad - the trimmed cases seemed to be quite square in the jaws of my caliper and they were very consistent in length. It's just that a C3 rated ball bearing has a bit of slop, and I could see more angular movement than I liked. Files here: https://www.prusaprinters.org/prints/55282-cartridge-case-trimmer https://www.ar15.com/media/mediaFiles/274749/IMG_3791_jpg-1821675.JPG https://www.ar15.com/media/mediaFiles/274749/IMG_3792_jpg-1821676.JPG Will be able to try it all out tomorrow and report back, assuming I don't freeze to death in my garage 
|
|
Originally Posted By TGE: I've had company in town, then under the weather for a few days and haven't done any printing. Popped back in this afternoon, downloaded this, and have printed out a couple bushings and the lock collar already, and have the main body going right now to run overnight. Will be able to try it all out tomorrow and report back, assuming I don't freeze to death in my garage |
|
Originally Posted By KPtexan: Nice! Let me know how it works out, and if I need to adjust bushing sizing for the case. Originally Posted By KPtexan: Originally Posted By TGE: I've had company in town, then under the weather for a few days and haven't done any printing. Popped back in this afternoon, downloaded this, and have printed out a couple bushings and the lock collar already, and have the main body going right now to run overnight. Will be able to try it all out tomorrow and report back, assuming I don't freeze to death in my garage Everything is a nice tight fit, I can say that at least. I printed both versions of the 223 bushing and the tight one is a hair too tight for me, but the other seems dead nuts. Bearings are solid as well. I did the mk4 btw. Will work on the snip now and then reprint this baby! |

|
Originally Posted By KPtexan: AkroBin end covers for y'all: https://www.prusaprinters.org/prints/56300-akrobin-end-cover/files https://www.ar15.com/media/mediaFiles/274749/IMG_3801_jpg-1822574.JPG https://www.ar15.com/media/mediaFiles/274749/IMG_3802_jpg-1822575.JPG <removed> please keep the memes in GD. dryflash3 Have you made or seen any one else make them for some of the larger size bins? |

|
Finally got the 6.5 Creedmoor setup running at least on the bench. Got the 6.5 Creedmoor bullet feeder die working now also. 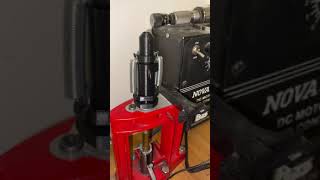 New 7mm Die I'll be doing a dry run on my Hornady LnL AP Progressive this afternoon. I think that my 12mm diameter spring tube may be too big. |

|
Originally Posted By TGE: Ran down to autozone and grabbed some orings this morning, but found one fatal flaw in my parts list - your design uses a 2 1/2" end I'll, and I got a 2" one. I think even my meager skills can trim the trimmer body down by 1/2" and try again though, so not a big deal. Everything is a nice tight fit, I can say that at least. I printed both versions of the 223 bushing and the tight one is a hair too tight for me, but the other seems dead nuts. Bearings are solid as well. I did the mk4 btw. Will work on the snip now and then reprint this baby! |
Armory Sponsor