


Armory Sponsor

Pro chucker 5 mini review (Page 5 of 6)

|
Short version, remove the set screws, get the tool plate centered via a few sizer's around the tool plate with cases in the shell plate/ the handle down to center the tool plate correctly, mark where the detent channels should be, and make new detent channels for the set screws instead.
But we can back it up, and is it a sub plate rotation problem with indexing clocking of the shell plate to tool plate the problem, or the shell plate not being even close to center wise against the top plate instead. I ask, since on a 650, if you pull the sub plate, you have to use the index tool to install the sub plate to clock it correctly against the tool head. Hence if a clocking problem alone on the pro chucker, maybe that the sub plate just needs to be clocked correctly against the tool head instead (don't know if RCBS has tool for such, but would not be hard to make). Hence photo of how far out the head is against shell plate would answer a lot of questions (if just a clocking rotation problem, or the head off to one side of the shell plate below instead). |
Posted By PlaymoreMinds:
'Twas not the <cough> sweet and innocent <cough> PlaymoreMinds...
<---skips away in frilly skirts to Candyland, leaving gutters and snorkels FAR behind.
'Twas not the <cough> sweet and innocent <cough> PlaymoreMinds...
<---skips away in frilly skirts to Candyland, leaving gutters and snorkels FAR behind.

|
Originally Posted By Xanthin:
A big thanks to everyone who has participated in this thread, especially bm3. There are a lot of good answers to questions throughout. I purchased a Pro Chucker 5 and am in the process of setting it up. But I'm finding that the die plate doesn't seem to align with the shell holders. I installed the die plate as instructed (securing top left set screw/divot first, then bottom right, then bottom left), and I'm sure the set screws are centered in the divots. But when I put in 5 empty cases and raise the shell plate, they are nowhere near the center of the holes for the dies. I called support and they seemed surprised, but recommended just not using the divots and trying to align the die plate manually before locking it down with the set screws. Has anyone else run into a similar situation? I guess there's nothing magical about using the divots vs not using them, but it seems odd that the alignment is significantly off. As a sanity check, I ordered another die plate (thinking the divots in the original may have been bad), but the new one fits the same way. Regards Xanthin On the top of the die plate you will see a 1 , the 1 will set back over the number 1 position on the shell plate. It the set screws aren't set in the divits it's not lined up right. At 12 o'clock you have a divit at 8 o'clock no divit and at 5 o'clock another divit. 
|
|
To index the sub plate with the tool head.
Step one, lock the tool head down via the three set screws. Now for grins put a hull in shell plate position 1, but a sizer in the tool plate for that position, lower the handle down until you get the top of the case close to entering the sizer, and take a photo and post it of how far off the case is from cleanly entering the sizer die. Now depending on the nightmare of just how far off the indexing if from the sub plate/shell plate to the tool head, this could be a quick fix with just re-indexing the sub plate to the top of the ram correctly. Simply, the sub plate is bolted to the top of the ram via bolts, and the sub plate has more than a few primer relief channels in it that we can use to index the sub plate to the top of the ram when the sub plate bolts are being tightened down. So on that note, we take three pieces of 7/8" rod, thread them 7/8" 14tpi (if 7/8 14tpi all-thread or bolts are not being used as the pre-threaded stock to being with), then we taper post the bottom of them to use as indexing tools to lock into the primer releif channels on the sub plate. So, Tool head locked in place with the set screw, sub plate Allen bolts loose so the sub plate is loose against the top of the ram and can move in the needed direction from the indexing tools to hold it index position as the sub plates are tightened, handle all the way down, we are going to screw the 3 new made index tools into the head channels cross cornered so the taper posts on the bottom of the index tools draws the sub plate into alignment with the tool head via the primer releif channels on the sub plate, then tighten the sub plate bolts to lock the sub plate into the indexed position with the head. 

Short of correctly indexing the sub plate this way to the tool head, then the other way is to re-drill the detent's on the tool head tabs to index to the tool head to what ever indexing the sub plate is now to the ram/machine instead. Hence sub plate indexing on install via a index'g tool to get the indexing perfect is normal on the 650 (why you need the indexing tool if you ever remove the sub plate on a 650 to put it back on fine tuned indexed correctly), and since the pro chucker sub plate installs pretty much the same method with draw down bolts, indexing tools needed on the pro chucker to index it's sub plate correctly to the tool head in play (read if your tool plates are not all detent indexed the same, then you may have to re-index the sub plate for all the different tool head each, or back to remaking the tool head plate indent tabs to unify them all to the machines indexing instead). And yes, Pro Chucker sub plate indexing tools are still vaporware at this point, so you will need to either have to make them or have some one make them for you instead. Hence even with the new sub plates being issued for replacements of the old sub plates, have yet to see any of them come with indexing tools to get the new sub plated fine tuned to the tool heads on the machine when the new sub plates are being installed. |
Posted By PlaymoreMinds:
'Twas not the <cough> sweet and innocent <cough> PlaymoreMinds...
<---skips away in frilly skirts to Candyland, leaving gutters and snorkels FAR behind.
'Twas not the <cough> sweet and innocent <cough> PlaymoreMinds...
<---skips away in frilly skirts to Candyland, leaving gutters and snorkels FAR behind.

|
Thank you for the replies, Dano523 and bm3.
Dano523, great information on indexing the sub plate. This is my first progressive, so I hadn't thought of that as an option. I took some pictures to clarify. If you they are within the realm of normal, that's fine too (again, first progressive), but I am able to get a better centering at each station by manual alignment/abandoning the detents. All of the pictures below are with the die plate installed with the set screws centered in the detents (per the instruction manual). It seems pretty aligned at Station #1, but gets a little more off center as you go around. 
Station #1 looked to be the most centered (fine actually). A sizing die in that station appears to work fine. 
Station #2 was pretty good as well. An expander die worked without issue. 
Station #3 has a more significant misalignment. 
(more below) |
Station #4 has a similar misalignment. I tried the sizing die here as a check, and while the 45acp case usually entered the die by itself, the case always tilted/canted to enter the die (i.e. no longer perfectly vertical and the base of the case was no longer flat against the shell plate). Assuming this is the bullet seating station, I'm guessing that would lead to canted bullets.

Station #5 is similar to #3 and #4. 
I'm fairly new to reloading in general, so any thoughts/advice, even if elementary, is welcome. Thanks again, Xanthin |
|
Certainly no expert on this new press, and I'm 99 percent sure you have it all set up right, but I have to ask the basic simple questions anyway...or we haven't addressed everything:
1. Make sure the correct shell plate is used. Different calibers have different dia. heads. (I know, duh....but I've put on the wrong one before and didn't notice until things started going south.) 2. Make sure the little springs around the sub plate are adjusted so that they push case heads all the way in in each case head hole. 3. Loosen the set screws in the die head and rotate the head.....is there ANY position where ALL the cases (having addressed 1 & 2) line up perfectly. If the answer to #3 is no, then you have bigger problems that only RCBS can solve.......bad shell plate....bad die plate or even worse.....warped casting, sort of things........they do happen in manufacturing....especially true on new assembly lines. I could understand a little deviation radially.....that is the direction on a line from shell plate center to case hole center....outward from the center.....but not sideways...that has to be aligned. I saw some of that when the Hornady AP came out..... Email RCBS your pictures and what you did to test alignment, and ask (nicely) for a fix. They have a pretty good track record of listening to rational non-screaming but firm customers.  You may be due a new press...... You may be due a new press......
|
|
Originally Posted By GWhis:
Email RCBS your pictures and what you did to test alignment, and ask (nicely) for a fix. They have a pretty good track record of listening to rational non-screaming but firm customers. You may be due a new press......
Ditto with this, and add that if they did offer sub plate indexing tool set (a set of at least 3 of them, with 5 being better) as I pointed out above on how to make them, it would allow you to index to the sub plate to the tool head in one easy step as it being bolted down to solve the problem. Hence the bolts to the sub plate channel do offer a little wiggle room when they are tightened to drift the sub plate in the needed direction, and with the tools to hold the sub plate indexed to the tool head, allows for the sub plate to be bolted to the ram in prefect alignment instead. |
Posted By PlaymoreMinds:
'Twas not the <cough> sweet and innocent <cough> PlaymoreMinds...
<---skips away in frilly skirts to Candyland, leaving gutters and snorkels FAR behind.
'Twas not the <cough> sweet and innocent <cough> PlaymoreMinds...
<---skips away in frilly skirts to Candyland, leaving gutters and snorkels FAR behind.
Ok I see what your talking about , mine is the same way

You will find that the retainers on the tool head that the shell plate rides on have some play in them. On the down stroke as the shell plate comes up the shells will self align in the die. It's a non issue. |
|
Retainers on the toolhead?......picture? Are you talking about the retaining springs on the subplate? If so that's the give in the direction I was referring to....from the center of the shell plate, through the center of each case head hole in the same shell plate....out from the center. Are we talking about the same thing? If so then yes probably a non issue.
I can see more serious problems if cases are sideways of center around the circumference, or in other words, not equal-distant around it. |
|
Ditto, the case retainer springs on the sub plate will allow the cases to move centered outwards without problems in the shell plate, but your sub plate/shell holder looks to be clocked towards the 1:00 clock position at station one /slightly canted off dead center for the #3 tool instead.
Draw a imaginary line from the center of the tool head, then on the top of each of the centers of the webs outwards , and look straight down to see if the primer flash holes are on this line. Note, make sure that the case retention springs are pushing the cases inwards dead center of the shell plate U slots and not off to one side of the U instead.
So if the press is mounted level and its just the shell plate case retainer springs are are causing the visual problem with the flash hole off the imaginary line, no harm, no foul since there is enough slop in the U's to allow the cases to self center against the above tools. But looks more like the sub plate needs to slightly rotated back counter clockwise on the ram at station one to center that case/flash hole to the imaginably line, with the sub plate needed to be moved to the right against the ram at station 3 to pull the rest of the cases/ flash holes to the imaginary center line instead. Hence as stated, there is some slop between the sub plate bolt channels and the bolts to correct this by re-setting the sub plate to the ram, and although indexing tools would make this quickly work, you may be able to do this by eye by using the primer relief channels in the sub plate as you retighten the sub plate to the ram isntead. Note, take a good look at the sub plate primer relief channels/primer ram against the case plate U slots to make sure that they are centered to begin with, and not a problem in either the shell plate or sub plate indexing ball channel not correctly positioned on the sub plate to begin with. Hence with this alignment off between just the sub plate and shell plate, then the primer ram will not be centered on the shell plate to start with, and could cause some priming problems as well. _________________________________ Or just pull the tool head in the needed direction, and just re-do the tool plate detent's isntead (would be the better option if you have another tool head that is indexing differently than the one in play, with all the tools heads set screw detent indexed to the sub plate that way it is on the ram now). |
Posted By PlaymoreMinds:
'Twas not the <cough> sweet and innocent <cough> PlaymoreMinds...
<---skips away in frilly skirts to Candyland, leaving gutters and snorkels FAR behind.
'Twas not the <cough> sweet and innocent <cough> PlaymoreMinds...
<---skips away in frilly skirts to Candyland, leaving gutters and snorkels FAR behind.
|
Originally Posted By GWhis:
Retainers on the toolhead?......picture? Are you talking about the retaining springs on the subplate? If so that's the give in the direction I was referring to....from the center of the shell plate, through the center of each case head hole in the same shell plate....out from the center. Are we talking about the same thing? If so then yes probably a non issue. I can see more serious problems if cases are sideways of center around the circumference, or in other words, not equal-distant around it. Yes we are talking about the same thing. |
|
Originally Posted By GWhis:
1. Make sure the correct shell plate is used. Different calibers have different dia. heads. (I know, duh....but I've put on the wrong one before and didn't notice until things started going south.) 2. Make sure the little springs around the sub plate are adjusted so that they push case heads all the way in in each case head hole. 3. Loosen the set screws in the die head and rotate the head.....is there ANY position where ALL the cases (having addressed 1 & 2) line up perfectly. If the answer to #3 is no, then you have bigger problems that only RCBS can solve.......bad shell plate....bad die plate or even worse.....warped casting, sort of things........they do happen in manufacturing....especially true on new assembly lines. I could understand a little deviation radially.....that is the direction on a line from shell plate center to case hole center....outward from the center.....but not sideways...that has to be aligned. I saw some of that when the Hornady AP came out..... Email RCBS your pictures and what you did to test alignment, and ask (nicely) for a fix. ... Good suggestions. I verified the correct shell plate for 45 ACP was used (I have plates for a couple, so it was definitely worth the double-check). The springs around the sub-plate are engaging properly, pushing the shells towards the center of the shell plate. After verifying that, the same offset from the prior pictures was there. The flash holes of the shells are definitely not in the center of the die holes, but are instead all off-center in the clockwise direction. I was able to rotate the die head and get a near exact line-up, which is good (a little tricky as the set screws still want to catch the divots and rotate the die head as I tighten them, but I can get it secured). (more below) |
|
As I play with it more, I think Dano523 is correct, that the sub plate is rotated just a bit clockwise of where it should be. At the bottom of the stroke the shell plate is aligned to the post sticking out of the press body. At the top of the stroke, the shells enter the dies at an angle, and drag/rotate the shell plate counter-clockwise as the shells continue into the dies. Upon returning the sub plate to the bottom of the stroke (manually disengaging the auto-index), the shell plate is forced to rotate clockwise again by the alignment post, pushing it slightly out of alignment with the die holes.
I tried to show it in a video, though please forgive the shaky camera (the second stroke shows the shell plate shifting more clearly). I don't have enough experience with progressives to know if it's really an issue or not. My first thought is it's probably not good to start through the sizing die (and likely bullet seating die) with the shell canted/tilted, but I don't know if it will have a practical affect. I'll try sending the info/pics to RCBS early this week and see what their recommendation is. Thank you all for the continued help. Regards, Xanthin |
|
Keep in mind that the sub plate can be both, out of rotation direction to start with on the ram, as well as the sub plate not centered front to back/side to side against the tool plate on the ram as well.
Hence on your machine, see both being the problem now, but should be able to adjust the sub plate bolted to the ram to resolve the problem. Run it past RCBS, and they might just have some indexing tools that they can send you to remount the sub plate to index it against the tool head. |
Posted By PlaymoreMinds:
'Twas not the <cough> sweet and innocent <cough> PlaymoreMinds...
<---skips away in frilly skirts to Candyland, leaving gutters and snorkels FAR behind.
'Twas not the <cough> sweet and innocent <cough> PlaymoreMinds...
<---skips away in frilly skirts to Candyland, leaving gutters and snorkels FAR behind.
|
Maybe Dano is right and an alignment tool can line up the plates....we will see what RCBS says. The other end of that are the indexing holes (divots). They must be drilled precise to make lining up the shell plate and die plate alignment quick and sure. If the indexing holes aren't drilled perfect...they are worse than no indexing holes, forcing the plate out of alignment not in. that would be a manufacturing glitch that needs their attention fast.....before there are hundreds out there, out of align, and making an expensive product recall certain in their near future.
You could fill in the indexing divots with a strong epoxy, and redrill.....but that's RCBS's problem not yours.....they might need to replace the casting with one tested to be right. Like I said, early production lines have to be tweaked....some tweaks are more serious than others....this may be a serious one unless the sub plate can indeed be adjusted the direction you need. |
|
FYI, sub plate index tuning on the 650, Hence since the bottom of the sub plate is recessed channled on the 650 to fit snugly on the top of the ram OD, all the alignment tuning needed is just the rotation alignment alone.
Skip to to 13:50 to see how the aligment tool slips through the powder die to align the the sub plate via the primer ram channel in the sub plate, so the sub plate is not dragging on the tool when the sub plate has been correctly index on the ram/sub plate to the tool head correctly aligned together. https://youtu.be/rxe8xt_u1NI On the 1050, there is enough slop in the tool head to the center ram to just rotate tweak the tool head into the correct rotation aligment before the tool head bolt is tightened isntead. So on the pro chucker, since you have a flat plate on top of the flat top ram bolt down to it, so both the rotation and X/Y axis's need to be aligned both when the sub plate is installed. Hence why you need at least three or more alignment tools down through the tool plate to the sub plate to hold the sub plate both axis's when the sub plate bolts are being tightened down. But on a positive note, at least the plate can be easily aligned with indexing tools, unlike say a LNL instead. Hence on the LNL, the sub plate is held to the ram via two side counter head type bolts into counter sunk channels, and if you have a problem here, then no easy fix, short of re-tapering the counter sunk channels in the side of the ram so the bolt heads will seat to pull the sub plate into the correct rotation index instead. Worst yet, since the sub plate bolts are only left and right on the sides, if you have a alignment problem front to back, kind of SOL trying to fix that problem on the LNL. 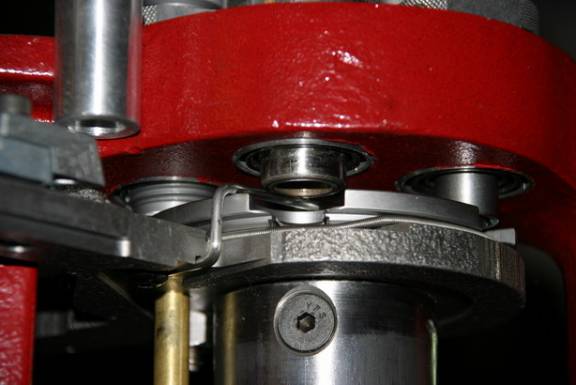
So to sum it up again, the Pro chucker has a lot of needed upgrades over the LNL that I really like the machine for it's over all potential, but it's just a matter of RCBS getting with the program fast enough to finishs refining the machine to correct all the know flaws it has now. Fact is, I can see the Pro Chucker as having the potential as being a better machine than the 650, but it just a matter of if RCBS is going to get it to there before 2017 rolls around/ the end of the machines life span instead. |
Posted By PlaymoreMinds:
'Twas not the <cough> sweet and innocent <cough> PlaymoreMinds...
<---skips away in frilly skirts to Candyland, leaving gutters and snorkels FAR behind.
'Twas not the <cough> sweet and innocent <cough> PlaymoreMinds...
<---skips away in frilly skirts to Candyland, leaving gutters and snorkels FAR behind.


|
Originally Posted By ChevelleDave:
I missed one, here is the 5 in action loading .223. Epic, With the dial indicator all over the map from case to case (brass lot not uniformly trimmed to begin with), and using a combo bullet seater/crimper, his bullet crimp tensions are all over the map as well. Hence pull the case length indicator die ,and use the open station for a Lee FCD so you end up with uniform bullet crimps on the varying case lengths instead. Really, if there was a reason to have a 7 station chucker press, using a case lenght indicator on the tool set up would make sense for at least one of the open stations (bullet feeder would take up the last open station instead).. |
Posted By PlaymoreMinds:
'Twas not the <cough> sweet and innocent <cough> PlaymoreMinds...
<---skips away in frilly skirts to Candyland, leaving gutters and snorkels FAR behind.
'Twas not the <cough> sweet and innocent <cough> PlaymoreMinds...
<---skips away in frilly skirts to Candyland, leaving gutters and snorkels FAR behind.
|
Originally Posted By ChevelleDave:
I think a lot of people disagree with some of His methods. To Me, it's just a way to see some new reloading products in action. He must know somebody, He got His hands on a RPR in 6.5 and .243. I agree with you on the point of seeing some new stuff . I would never shoot his ammo tho. |


Global Warming Hoax Skeptic before it was cool
Joined:
Jun 2007
Posts:
38370
EE: 100% (1)
 WA, USA
|
That's a lot of flex in that press. Not sure if it's that mount or his bench. I prefer to load prepped brass myself. First time that I've heard anyone say Varget was a good metering powder. One positive was the Hornady seater, but don't use it for crimping. |
Selling agent for Algores carbon credit scam.
Shooting and Reloading, one hobby feeds the other.
Shooting and Reloading, one hobby feeds the other.
It's the flex in the RCBS pot metal mounting plate bolted to the bench, that the press is bolted to, that is flexing.

Note, before anyone rushes out to buy a strong mount (and end up with the machine too high off the bench instead) if you just install a 1/2 cold roll plate to the bench and get it bolted down correctly with the press mounted to it, will solve the problem as well. 
|
Posted By PlaymoreMinds:
'Twas not the <cough> sweet and innocent <cough> PlaymoreMinds...
<---skips away in frilly skirts to Candyland, leaving gutters and snorkels FAR behind.
'Twas not the <cough> sweet and innocent <cough> PlaymoreMinds...
<---skips away in frilly skirts to Candyland, leaving gutters and snorkels FAR behind.
|
Originally Posted By Dano523:
It's the flex in the RCBS pot metal mounting plate bolted to the bench, that the press is bolted to, that is flexing. http://cdn1.cheaperthandirt.com/ctd_images/bgprod/64540.jpg Note, before anyone rushes out to buy a strong mount (and end up with the machine too high off the bench instead) if you just install a 1/2 cold roll plate to the bench and get it bolted down correctly with the press mounted to it, will solve the problem as well. http://i1303.photobucket.com/albums/ag142/boolits/50%20BMG/RCBS%20AmmoMaster%202/RCBSAmmoMaster2-Installed05_zps8e77b1bb.jpg 2 things. The plate is aluminum not pot metal. If the plate was mounted properly to the bench and not to a sub plate riding on his bench rails it wouldn't flex. |
Global Warming Hoax Skeptic before it was cool
Joined:
Jun 2007
Posts:
38373
EE: 100% (1)
WA, USA

|
Originally Posted By Dano523:
FYI, sub plate index tuning on the 650, Hence since the bottom of the sub plate is recessed channled on the 650 to fit snugly on the top of the ram OD, all the alignment tuning needed is just the rotation alignment alone. Dano, thank you for the video, it was very helpful and made what you were discussing clearer. A couple of the RCBS tech support staff and one of their technicians tried helping me out. They've all seemed surprised with the issue (so likely uncommon), and the end result has been a recommendation to setup all the dies, undo the set screws and let the die plate float into an aligned position, and then lock it back down. The alignment does get closer that way, but not spot on (possibly good enough though, no major brass tipping like before). For giggles, I tried unscrewing the sub plate and manually realigning it. But as best as I can figure, there isn't any real play in how the sub plate attaches to the ram. There are two tight fitting holes on the sub plate that keep it in a fixed position (rotational and side/side/front/back). The first being in the center of the sub-plate/ram where you screw on shell plates, and the second being one for the alignment post on the press body. Both shown here: 
The technician (who also conferred with the product line manager) sort of brushed off the idea of realigning the sub plate. Maybe this is a way the Pro Chucker differs from the Dillon, but I think the post on the body just doesn't allow significant changes in sub plate alignment/rotation since both of these hole points are fixed and fit so tight into the sub plate. That all leads me to believe there is some other structural oddity in this particular unit causing the misalignment. More below. |
|
Originally Posted By Xanthin:
Dano, thank you for the video, it was very helpful and made what you were discussing clearer. A couple of the RCBS tech support staff and one of their technicians tried helping me out. They've all seemed surprised with the issue (so likely uncommon), and the end result has been a recommendation to setup all the dies, undo the set screws and let the die plate float into an aligned position, and then lock it back down. The alignment does get closer that way, but not spot on (possibly good enough though, no major brass tipping like before). For giggles, I tried unscrewing the sub plate and manually realigning it. But as best as I can figure, there isn't any real play in how the sub plate attaches to the ram. There are two tight fitting holes on the sub plate that keep it in a fixed position (rotational and side/side/front/back). The first being in the center of the sub-plate/ram where you screw on shell plates, and the second being one for the alignment post on the press body. Both shown here: http://i1324.photobucket.com/albums/u610/Xanthin323/Ram%20Head%202_zpspufdf4kx.jpg The technician (who also conferred with the product line manager) sort of brushed off the idea of realigning the sub plate. Maybe this is a way the Pro Chucker differs from the Dillon, but I think the post on the body just doesn't allow significant changes in sub plate alignment/rotation since both of these hole points are fixed and fit so tight into the sub plate. That all leads me to believe there is some other structural oddity in this particular unit causing the misalignment. More below. Originally Posted By Xanthin:
Originally Posted By Dano523:
FYI, sub plate index tuning on the 650, Hence since the bottom of the sub plate is recessed channled on the 650 to fit snugly on the top of the ram OD, all the alignment tuning needed is just the rotation alignment alone. Dano, thank you for the video, it was very helpful and made what you were discussing clearer. A couple of the RCBS tech support staff and one of their technicians tried helping me out. They've all seemed surprised with the issue (so likely uncommon), and the end result has been a recommendation to setup all the dies, undo the set screws and let the die plate float into an aligned position, and then lock it back down. The alignment does get closer that way, but not spot on (possibly good enough though, no major brass tipping like before). For giggles, I tried unscrewing the sub plate and manually realigning it. But as best as I can figure, there isn't any real play in how the sub plate attaches to the ram. There are two tight fitting holes on the sub plate that keep it in a fixed position (rotational and side/side/front/back). The first being in the center of the sub-plate/ram where you screw on shell plates, and the second being one for the alignment post on the press body. Both shown here: http://i1324.photobucket.com/albums/u610/Xanthin323/Ram%20Head%202_zpspufdf4kx.jpg The technician (who also conferred with the product line manager) sort of brushed off the idea of realigning the sub plate. Maybe this is a way the Pro Chucker differs from the Dillon, but I think the post on the body just doesn't allow significant changes in sub plate alignment/rotation since both of these hole points are fixed and fit so tight into the sub plate. That all leads me to believe there is some other structural oddity in this particular unit causing the misalignment. More below. So I have to ask , have you actually set up all your dies and tried to run the press or is this just what you are seeing ? Also are you sure you have the SP secure enough . I know that if the SP isn't tight enough it will cause issues . |
|
So I reassembled everything, cleverly breaking my first primer slide post in the process, and continued on with the float/align/re-secure die plate method and got stuck on primer seating malfunctions.
Most primer seating is requiring a LOT of force on the handle (the table would literally fall over if it wasn't against the wall), and even then some primers will only partially seat, and others will seat at a slight angle (one edge of the primer sticking out past the case base. So as I dug into it more, there are two things that look to be different from the few videos on you-tube I can find. The primer post is really hugging/scraping one side of the primer hole: 
And the shell plate has a lot of rocking to it, allowing the case to raise up/angle during the priming. Below is an example of the rocking: Shell Plate Wiggle This was with the nut holding the shell plate down as tight as possible while still letting the auto indexing occur, through it was still tight enough for the indexing to be very rough. Any tighter and indexing (auto or manual) cannot occur. |
|
Sorry for the broken up posts, I'm still working with the 2k character max limit.
I did find a solution to the shell plate rocking, in case anyone else runs into a similar problem. There is a spring-loaded, retracting post on the sub-plate. I assume the purpose is to provide some lift and minimize friction between the sub-plate and the shell plate as the indexing occurs. See below: 
The post screws in from the bottom of the sub plate, and I believe mine was screwed in too far at the factory, such that even when compressing the spring loaded part all the way, the shell plate was still held significantly above the sub plate (I assume the intended design is for the shell plate to be able to rest flat on the sub plate). Here's my attempt to show that it couldn't be compressed enough to be flush with the sub plate: 
Unscrewing the post from the bottom of the shell plate (allowing only the retractable part of the post to extend above the sub plate) greatly reduced the rocking and lessened the frequency of angled primers. Though I'm still only getting primers successfully seated ~60% of the time (and still requiring lots of force). |
|
Originally Posted By bm3:
So I have to ask , have you actually set up all your dies and tried to run the press or is this just what you are seeing ? Also are you sure you have the SP secure enough . I know that if the SP isn't tight enough it will cause issues . With all the dies setup and letting the die plate float everything aligns well enough, abandoning the counter sinks. I've been running the shell plate as tight as possible. Basically I tighten it down as far as it will go, back it off the 1/4 turn per the instruction manual. I've experimented with tightening it further until just before it will no longer index fully (trying to eliminate the shell plate rocking I discussed above, that is now fixed), but it didn't affect the rotational alignment. -Xanthin |
|
On the bottom of the subplate you will find a set screw for primer depth adjustment .
Here's a crappy pic of it. 
Minor adjustment should help with primer depth. Also it looks like you have a bad sub plate judging on how the primer plunger is off center 
Or you could have a bad SP. either way it isn't right and would make RCBS replace them. |
|
bm3, thanks for the photos and the suggestion. I think you're correct. I swapped in a #10 shell plate and have the same results, so likely the sub plate. I'll try RCBS again on Monday.
Thank you to everyone for helping and the advice. I'm looking forward to moving at a faster pace than my single stage press will allow. -Xanthin |
|
Alright, one more oddity I'm seeing. Not sure it's contributing to anything previously discussed or not. On the handle down stroke, I'm getting slight binding near the end, and it jumps the last little bit. Two parts of the ram linkages are rubbing/wearing away where they shouldn't be touching, and it causes some of the linkages to shift to the right suddenly at the bottom of the stroke. Tried to capture it below:
Video Picture from the side showing the edge being shaved off, with some of the resulting debris on the intended bearing surface: 
-Xanthin |
|
Detailed list of all the problem written into a letter, get RCBS on the phone to send you a mailing tag, and send the entire press back with letter to them (on their dime) to let them deal with the problems themselves.
Lever ram ledge not milled far enough over to cause a bind problem, Fail. Sub plate not indexing to the tool head is bad enough (could even be the top of ram that was not milled correctly), but with the shell plate not centering on the primer ram too (and no way to adjust that problem out), even worse fail with more parts not milled correctly to start with . With any luck, you will get a new machine back that is indexed correctly, the new updated sub plate on it, and maybe even some other tweaks that RCBS has in the works like the new primer sliders (that supposed to be better than the current plastic units). |
Posted By PlaymoreMinds:
'Twas not the <cough> sweet and innocent <cough> PlaymoreMinds...
<---skips away in frilly skirts to Candyland, leaving gutters and snorkels FAR behind.
'Twas not the <cough> sweet and innocent <cough> PlaymoreMinds...
<---skips away in frilly skirts to Candyland, leaving gutters and snorkels FAR behind.
|
Originally Posted By Xanthin:
Alright, one more oddity I'm seeing. Not sure it's contributing to anything previously discussed or not. On the handle down stroke, I'm getting slight binding near the end, and it jumps the last little bit. Two parts of the ram linkages are rubbing/wearing away where they shouldn't be touching, and it causes some of the linkages to shift to the right suddenly at the bottom of the stroke. Tried to capture it below: Video Picture from the side showing the edge being shaved off, with some of the resulting debris on the intended bearing surface: http://i1324.photobucket.com/albums/u610/Xanthin323/4aa88eac-67a5-4003-ae26-bb05f79dd69e_zps28m4lf0d.jpg -Xanthin Mine does the samething as your vid and I have the same wear spot. 
I've pushed 30k in brass through this machine and that spot shows little wear. I'm not sure why it's like that but I never noticed it untill now. I'm gonna knock it down with a file tomorrow. |
|
This is my first progressive press. I can only think of the 6 stations to use the press for doing pistol rounds which is why I am getting it.
I don't know with out having my hands on the press but I don't see where a swagger could be incorporated into the press design with the priming taking place in station 2. This will definitely be a learning adventure for me. |
|
They put that there to slow you down. Once you have run enough rounds, it starts to wear out and you can go faster. They don't want you going too fast with a new press.
OK... that was all BS. I just wanted to pop this back up to the top to see if anyone got any resolution on these issues as I just ordered my PC7 today... (is there already an agreed upon abbreviation for these? If not, that is my recommendation). Originally Posted By bm3:
Mine does the samething as your vid and I have the same wear spot. http://i1176.photobucket.com/albums/x332/Mike_Boles/4DE8916F-9FFD-4CAC-AF1A-CC0A65DA4EC1_zps9eteqwoc.jpg I've pushed 30k in brass through this machine and that spot shows little wear. I'm not sure why it's like that but I never noticed it untill now. I'm gonna knock it down with a file tomorrow. Originally Posted By bm3:
Originally Posted By Xanthin:
Alright, one more oddity I'm seeing. Not sure it's contributing to anything previously discussed or not. On the handle down stroke, I'm getting slight binding near the end, and it jumps the last little bit. Two parts of the ram linkages are rubbing/wearing away where they shouldn't be touching, and it causes some of the linkages to shift to the right suddenly at the bottom of the stroke. Tried to capture it below: Video Picture from the side showing the edge being shaved off, with some of the resulting debris on the intended bearing surface: http://i1324.photobucket.com/albums/u610/Xanthin323/4aa88eac-67a5-4003-ae26-bb05f79dd69e_zps28m4lf0d.jpg -Xanthin Mine does the samething as your vid and I have the same wear spot. http://i1176.photobucket.com/albums/x332/Mike_Boles/4DE8916F-9FFD-4CAC-AF1A-CC0A65DA4EC1_zps9eteqwoc.jpg I've pushed 30k in brass through this machine and that spot shows little wear. I'm not sure why it's like that but I never noticed it untill now. I'm gonna knock it down with a file tomorrow. |
|
I was reading through this today in order to prepare for my unboxing of the Pro Chucker 7. I received it last week but have been away for the holiday. Thanks to everyone for contributing.
One thing I didn't see a solution to was the stuck primer in the shell plate at deprime. I wanted to add one "fix" I have found through my searching. It was mentioned (sorry, I am not going to quote it because it's late and I don't want to flip back) that the Lee universal primer was leaving deprimed primers in the shell plate.. During my fiddling on my Dillon 1050, I have also found some sizing die or deprime die tend to not push the primer down the hole. At first, I did everything to adjust the depth of the decapping pin. Nothing helped. When the primer doesn't drop down on a 1050, the result is the primer travels with the case to the next station (for a 1050, that is normally the swaging station). The swaging station then reseats the primer. The spent primer then travels to the primer station where crushed primers can thus happen. The fix I have found (from a bit of web searching) is to reshape the tip of the decapping pin. I really have trouble with the Lee decapping pin (universal) and the RCBS decapping pins on my 1050 (and to less extent on the LNL). If you reshape the tip with a dremel to the form of a hypodermic needle, you will be GTG. No, I don't know why the stock blunt tip sticks to the primer while the hypodermic needle shape tends to let the primer drop. It just does. Hope this tip helps someone. |
The problem is the Lee Universal Depriming and Decapping Die Pin itself.

Hence chances are it not centering itself in the die to find the flash channel to begin with, or worse the rod/pin may not be long enough to adjust it lower so the bottom of the main rod is just short of the web to make sure that the primer is fully punched out the primer pocket. Why Lee does not make the pins slightly longer so you can set the rod deeper to be just short of the webbing I don't have a clue. Hence works fine if you have the die itself set deep enough to kiss a single stage shell plate, but the problem comes in on the progressive presses where you will bind out on the shell plate before you can adjust it low enough to fully knock out a primer from the case primer pocket isntead. If you look on ebay, you can find decaping rods that the pin tip is longer as well as the rods being made out of harden steel that will not bend so stays centered (plus the rods are longer to be able to set the rod lower in the die to make sure that the primers are being punched all the way out of the pockets to begin with). http://www.ebay.com/itm/HARDENED-STEEL-Decapping-Pin-Upgrade-for-Lee-90783-90292-universal-decap-die-/221946800846 Or just swap the de-priming rod and pin with one from a Hornday depriming die instead. The lee rod is smooth, while the Hornady pin is groove, but it will fit the lee die, the rod is longer so you can adjust it deeper, and the de-priming pin sticks down farther as well. Or, just make a new longer de-priming rod with pin instead out of some A-1 tool steel instead. |
Posted By PlaymoreMinds:
'Twas not the <cough> sweet and innocent <cough> PlaymoreMinds...
<---skips away in frilly skirts to Candyland, leaving gutters and snorkels FAR behind.
'Twas not the <cough> sweet and innocent <cough> PlaymoreMinds...
<---skips away in frilly skirts to Candyland, leaving gutters and snorkels FAR behind.
|
I respectfully disagree with your theory that the pins are not finding the flash channel. All my pins are adjusted to travel well below the shellplate. Unless you think they bend and snap back in perfect shape, they must be going through the brass. At least this is my experience as i am getting complete travel on the ram. I believe the tip is just not releasing the primer. Somehow it sticks to the tip of factory designed pin.
I do agree that a longer Lee pin might help for other things. But nit convinced it would help here. Originally Posted By Dano523:
The problem is the Lee Universal Depriming and Decapping Die Pin itself. http://i.ebayimg.com/images/g/5RQAAMXQVERS5m1o/s-l1600.jpg Hence chances are it not centering itself in the die to find the flash channel to begin with, or worse the rod/pin may not be long enough to adjust it lower so the bottom of the main rod is just short of the web to make sure that the primer is fully punched out the primer pocket. Why Lee does not make the pins slightly longer so you can set the rod deeper to be just short of the webbing I don't have a clue. Hence works fine if you have the die itself set deep enough to kiss a single stage shell plate, but the problem comes in on the progressive presses where you will bind out on the shell plate before you can adjust it low enough to fully knock out a primer from the case primer pocket isntead. If you look on ebay, you can find decaping rods that the pin tip is longer as well as the rods being made out of harden steel that will not bend so stays centered (plus the rods are longer to be able to set the rod lower in the die to make sure that the primers are being punched all the way out of the pockets to begin with). http://www.ebay.com/itm/HARDENED-STEEL-Decapping-Pin-Upgrade-for-Lee-90783-90292-universal-decap-die-/221946800846 Or just swap the de-priming rod and pin with one from a Hornday depriming die instead. The lee rod is smooth, while the Hornady pin is groove, but it will fit the lee die, the rod is longer so you can adjust it deeper, and the de-priming pin sticks down farther as well. Or, just make a new longer de-priming rod with pin instead out of some A-1 tool steel instead. |
|
Originally Posted By Dano523:
The problem is the Lee Universal Depriming and Decapping Die Pin itself. http://i.ebayimg.com/images/g/5RQAAMXQVERS5m1o/s-l1600.jpg Hence chances are it not centering itself in the die to find the flash channel to begin with, or worse the rod/pin may not be long enough to adjust it lower so the bottom of the main rod is just short of the web to make sure that the primer is fully punched out the primer pocket. Why Lee does not make the pins slightly longer so you can set the rod deeper to be just short of the webbing I don't have a clue. Hence works fine if you have the die itself set deep enough to kiss a single stage shell plate, but the problem comes in on the progressive presses where you will bind out on the shell plate before you can adjust it low enough to fully knock out a primer from the case primer pocket isntead. If you look on ebay, you can find decaping rods that the pin tip is longer as well as the rods being made out of harden steel that will not bend so stays centered (plus the rods are longer to be able to set the rod lower in the die to make sure that the primers are being punched all the way out of the pockets to begin with). http://www.ebay.com/itm/HARDENED-STEEL-Decapping-Pin-Upgrade-for-Lee-90783-90292-universal-decap-die-/221946800846 Or just swap the de-priming rod and pin with one from a Hornday depriming die instead. The lee rod is smooth, while the Hornady pin is groove, but it will fit the lee die, the rod is longer so you can adjust it deeper, and the de-priming pin sticks down farther as well. Or, just make a new longer de-priming rod with pin instead out of some A-1 tool steel instead. A solution to this problem: http://leeprecision.com/223-ez-x-exp-decapper.html Run this in your universal decap die |
|
I got the Pro Chucker 7 installed last night. It was missing one screw but got it working enough to give it a whirl. I was very impressed with how basic it is. All seems to function well but the priming system definitely needs help. Those transfer bars are so dang rough. Amazed it was designed like that.. I also had a question about why the press doesn't come with a following rod for the primers. All Dillon and Hornady presses have them (indicates primer level.
So, I called RCBS. They were very helpful. She is sending me the screw and also extra primer transfer bars. She also said they are now recommending a different spring for the transfer bar. She is sending me that. In addition, she is going to send me a primer follower rod from the Pro 2000 tube primer conversion which she said should be compatible. She was not aware why the Pro Chucker didn't have one. She also said the primer transfer bar is being redesigned but they are not ready yet. Once available, we can get them. I am super impressed with how easy the conversions take on this. The conversion die plates are way too expensive on this thing but I did get some of the on sale ones from Amazon last week. Hope they come out with die plate alone. Not overly impressed with the RCBS powder measure. Much happier with the Hornady. |

| Primers not being pushed clear is from them hanging on the pin, switch to a Lyman pin which is thinner and the problem goes a way I bet, at least it did with my 1050 and dies that I was having problems with |
Please tell me that all 6.5 gerbil owners aren't as insecure as our resident trolls
Global Warming Hoax Skeptic before it was cool
Joined:
Jun 2007
Posts:
38496
EE: 100% (1)
WA, USA
|
Originally Posted By djryan13: I got the Pro Chucker 7 installed last night. It was missing one screw but got it working enough to give it a whirl. I was very impressed with how basic it is. All seems to function well but the priming system definitely needs help. Those transfer bars are so dang rough. Amazed it was designed like that.. I also had a question about why the press doesn't come with a following rod for the primers. All Dillon and Hornady presses have them (indicates primer level. So, I called RCBS. They were very helpful. She is sending me the screw and also extra primer transfer bars. She also said they are now recommending a different spring for the transfer bar. She is sending me that. In addition, she is going to send me a primer follower rod from the Pro 2000 tube primer conversion which she said should be compatible. She was not aware why the Pro Chucker didn't have one. She also said the primer transfer bar is being redesigned but they are not ready yet. Once available, we can get them. I am super impressed with how easy the conversions take on this. The conversion die plates are way too expensive on this thing but I did get some of the on sale ones from Amazon last week. Hope they come out with die plate alone. Not overly impressed with the RCBS powder measure. Much happier with the Hornady. Could you do me and all of the RCBS fans a favor and start a Pro Chucker 7 thread. This is a Pro Chucker 5 thread. It will help in the future for folks looking for Pro Chucker 5 info and not have to sort through Pro Chucker 7 posts. Also the Pro Chucker 7 guys can find info for their press easier. |
Selling agent for Algores carbon credit scam.
Shooting and Reloading, one hobby feeds the other.
Shooting and Reloading, one hobby feeds the other.
|
Originally Posted By djryan13:
I got the Pro Chucker 7 installed last night. It was missing one screw but got it working enough to give it a whirl. I was very impressed with how basic it is. All seems to function well but the priming system definitely needs help. Those transfer bars are so dang rough. Amazed it was designed like that.. I also had a question about why the press doesn't come with a following rod for the primers. All Dillon and Hornady presses have them (indicates primer level. So, I called RCBS. They were very helpful. She is sending me the screw and also extra primer transfer bars. She also said they are now recommending a different spring for the transfer bar. She is sending me that. In addition, she is going to send me a primer follower rod from the Pro 2000 tube primer conversion which she said should be compatible. She was not aware why the Pro Chucker didn't have one. She also said the primer transfer bar is being redesigned but they are not ready yet. Once available, we can get them. I am super impressed with how easy the conversions take on this. The conversion die plates are way too expensive on this thing but I did get some of the on sale ones from Amazon last week. Hope they come out with die plate alone. Not overly impressed with the RCBS powder measure. Much happier with the Hornady. Ha I told them that spring was weak months ago. |
|
Originally Posted By djryan13:
Not overly impressed with the RCBS powder measure. Much happier with the Hornady. Find this funny as hell, since RCBS leased the design from Hornady and they are pretty much the same (short of the taller bottle on the 7, than the shorter bottle on the 5). 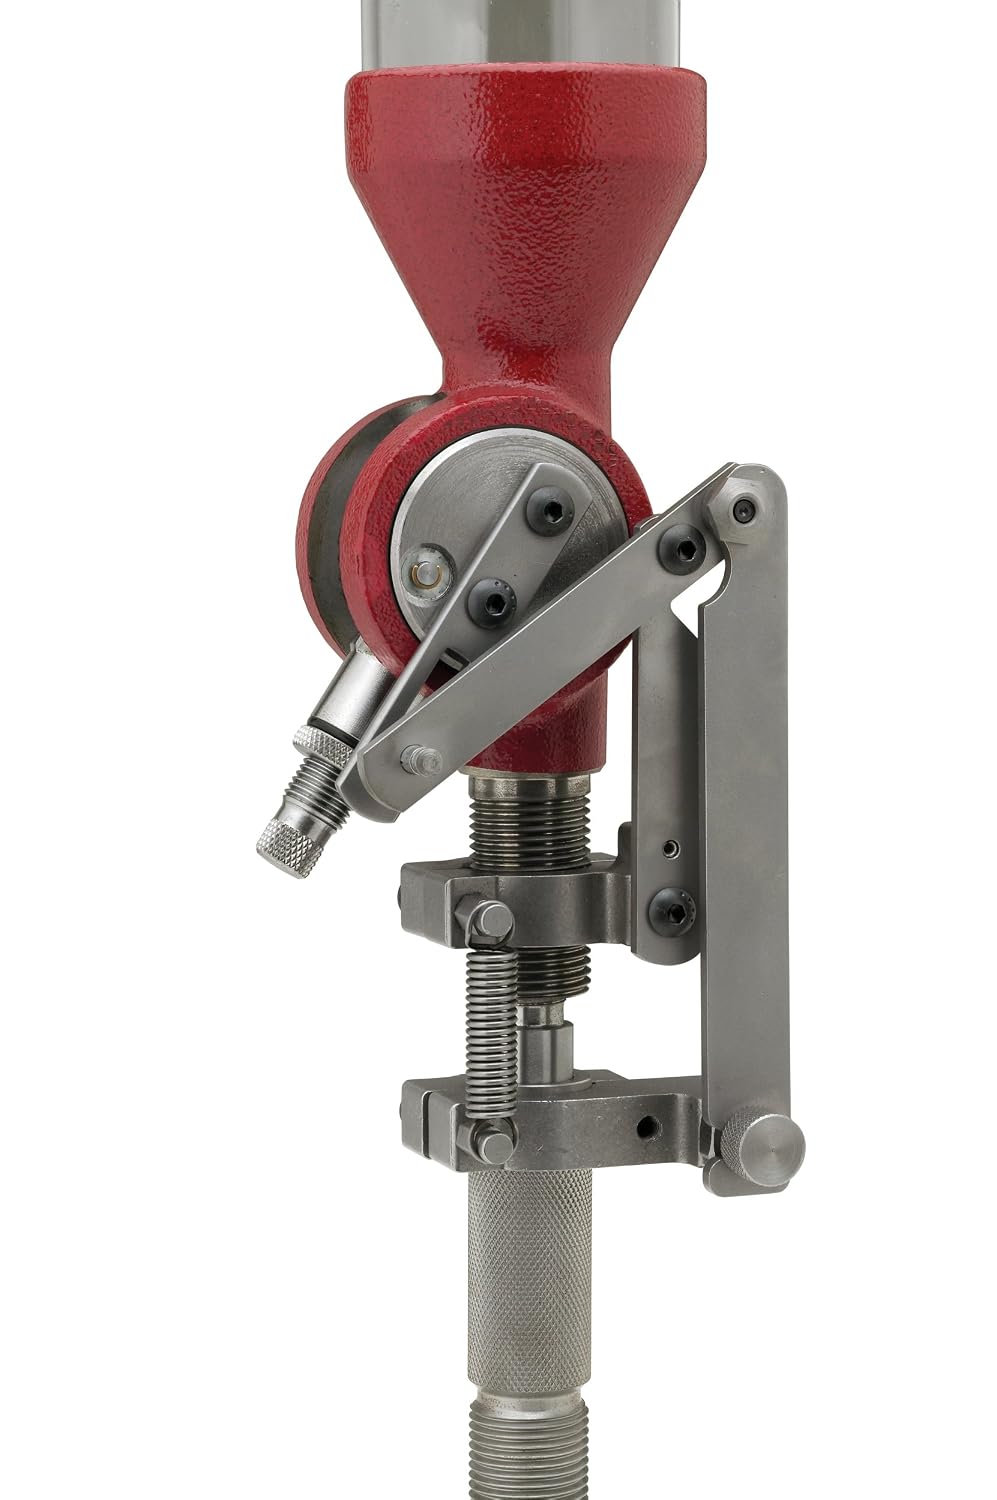

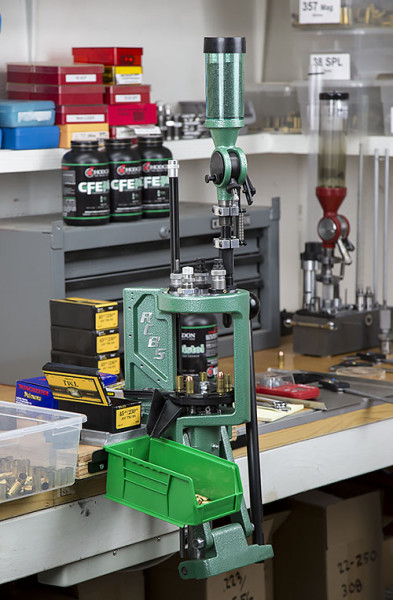
If anything, RCBS has not come out with a powder stop yet to use on their dispensers with a RCBS Case Activated Linkage Kit Pistol Powder Expander in play so the adjustment handle is not making hard contact to the top of the slot on the up stroke to dance the power in the hopper (Hornady powder stop to the rescue here) 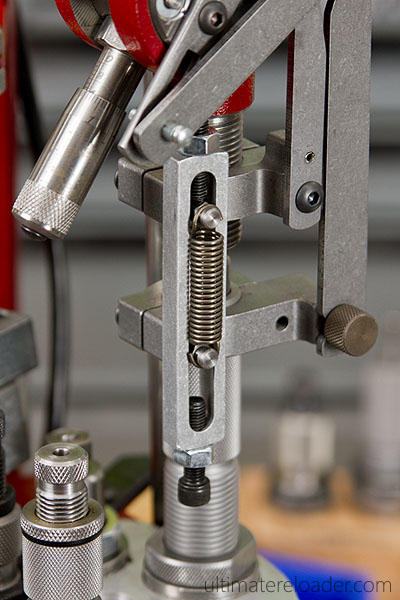
If it's just the adjustment screw that you don't like, then change it out to a micro meter instead, 
|
Posted By PlaymoreMinds:
'Twas not the <cough> sweet and innocent <cough> PlaymoreMinds...
<---skips away in frilly skirts to Candyland, leaving gutters and snorkels FAR behind.
'Twas not the <cough> sweet and innocent <cough> PlaymoreMinds...
<---skips away in frilly skirts to Candyland, leaving gutters and snorkels FAR behind.
Pro chucker 5 mini review (Page 5 of 6)
Armory Sponsor