


Armory Sponsor


 " />
" /> " />
" /> " />
" /> " />
" />
|
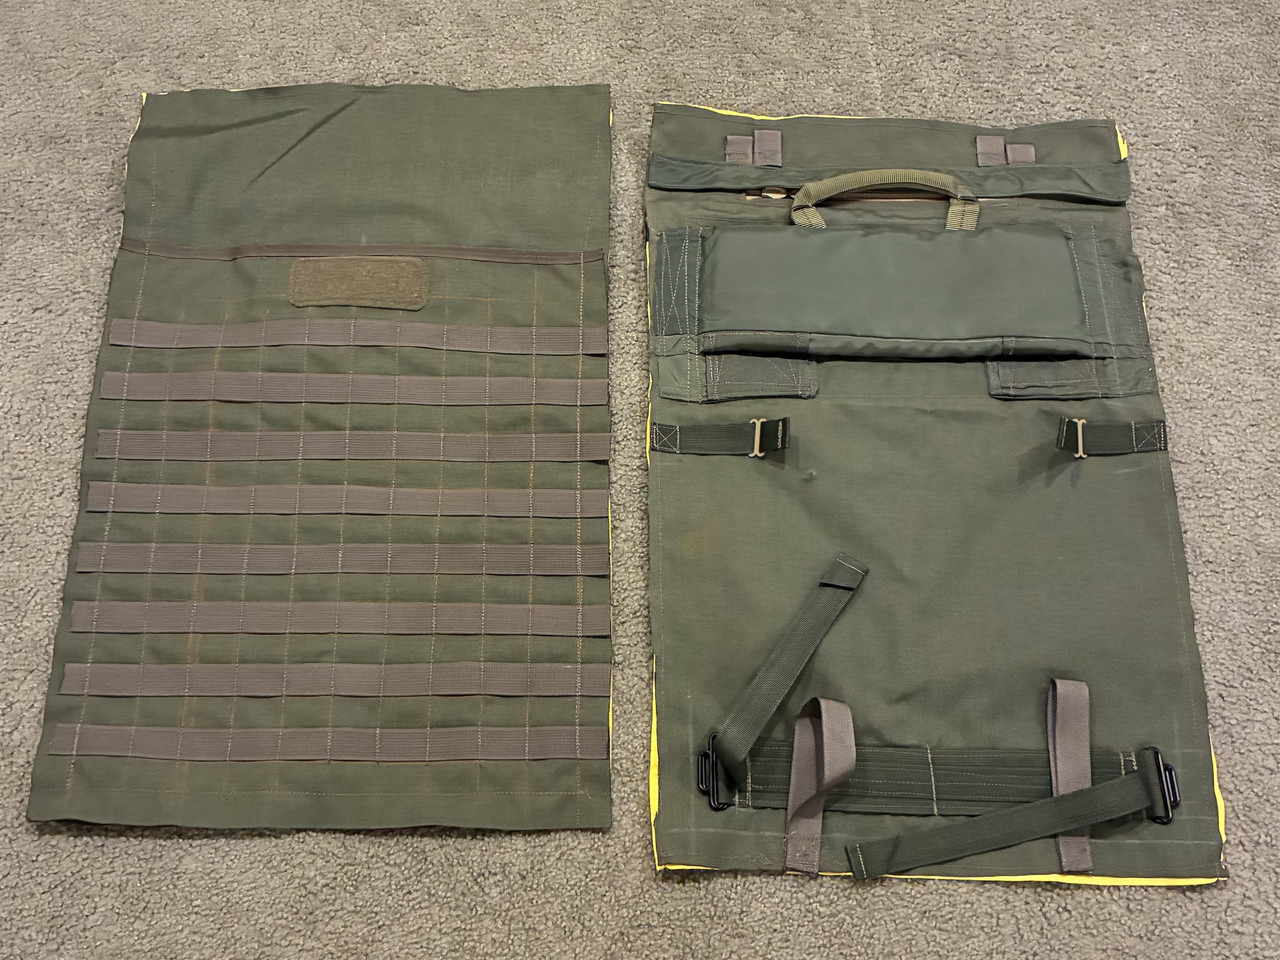
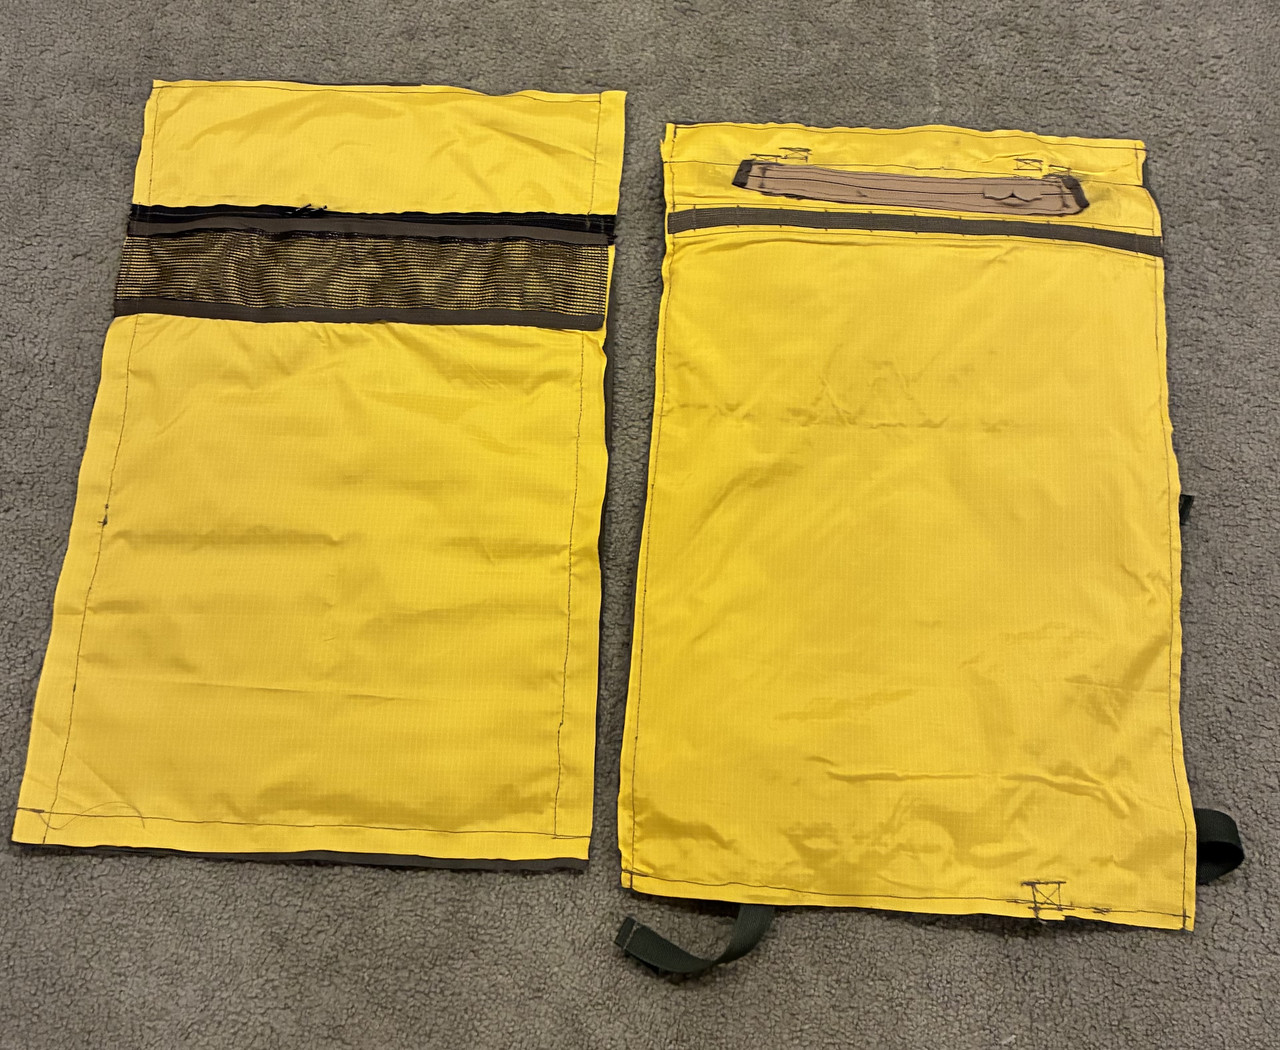
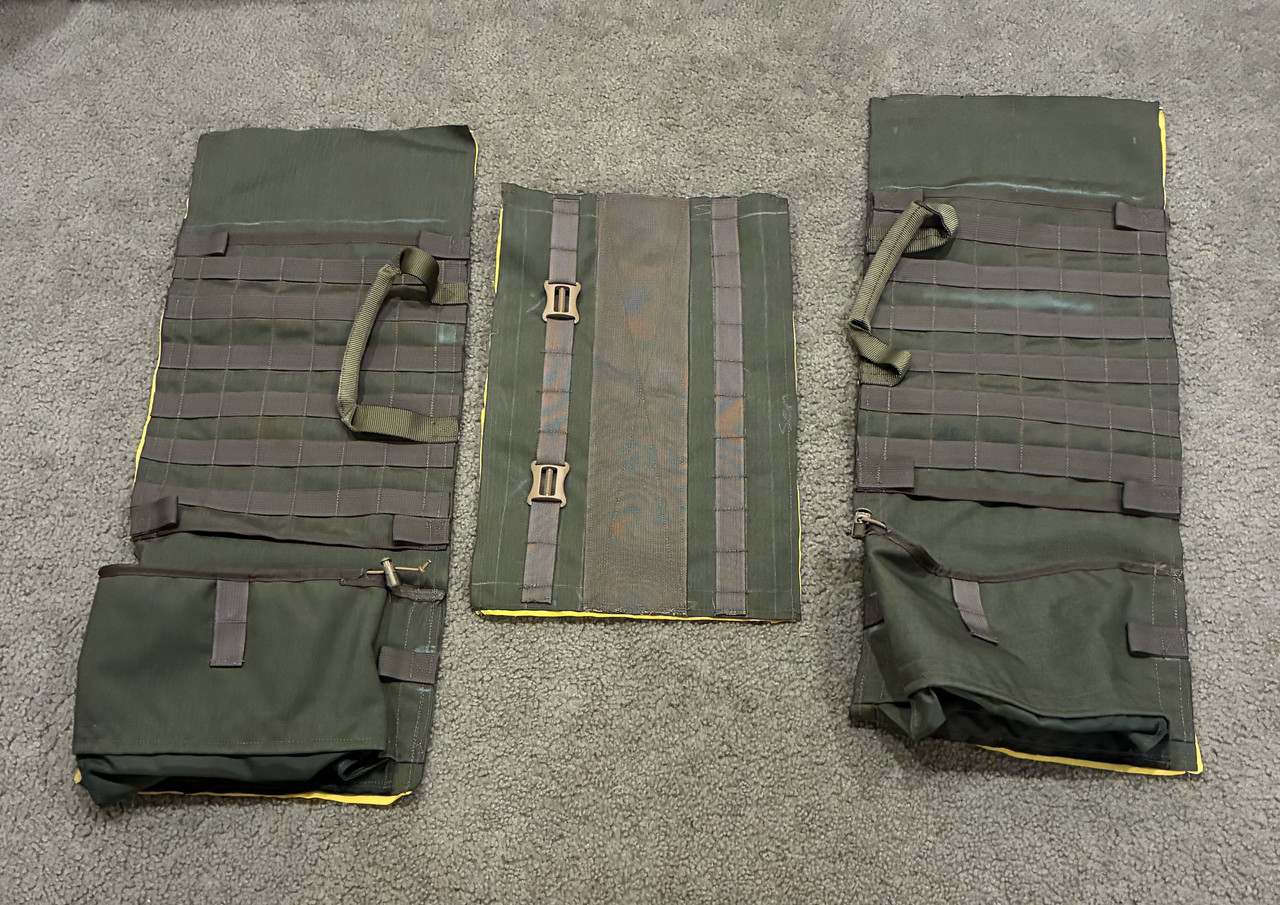
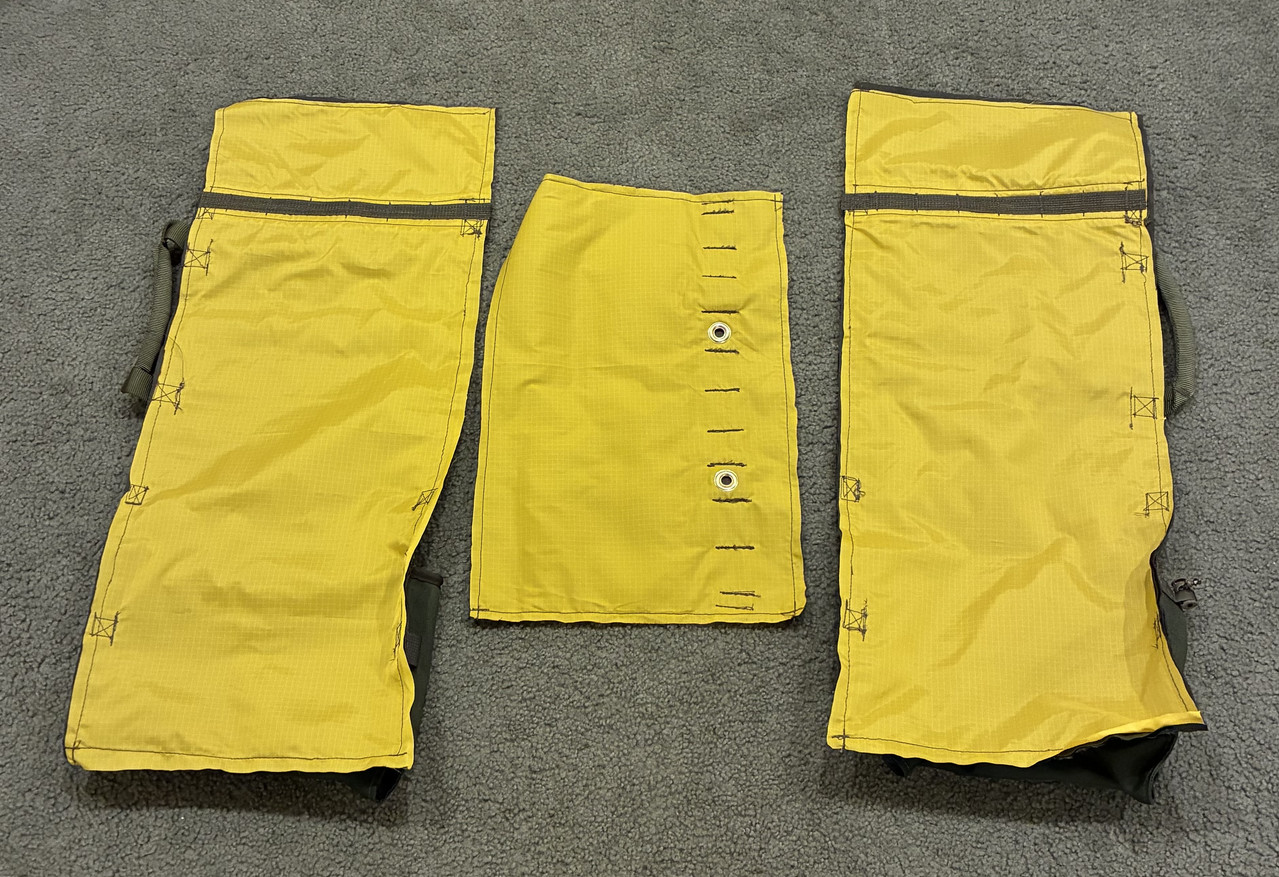
Originally Posted By cap6888: Progress on my new pack. Front and back panels https://i.postimg.cc/TYvbXJ71/IMG_0350.jpg https://i.postimg.cc/CLCqMnXw/IMG_0351.jpg Sides and bottom panels https://i.postimg.cc/021Sq0t4/IMG_0353.jpg https://i.postimg.cc/hPRmq1yS/IMG_0354.jpg Fixed them. |
|
Originally Posted By cap6888: Progress on my new pack. Front and back panels https://postimg.cc/pykrfztM,https://i.postimg.cc/TYvbXJ71/IMG_0350.jpg https://postimg.cc/ykddvx7G,https://i.postimg.cc/CLCqMnXw/IMG_0351.jpg Sides and bottom panels https://postimg.cc/6TzqrnxV,https://i.postimg.cc/021Sq0t4/IMG_0353.jpg https://postimg.cc/K4QjPBhV,https://i.postimg.cc/hPRmq1yS/IMG_0354.jpg Looking good. I can tell you're getting better at sewing. When you do v3 of the pack, try doing the front, bottom, and back panel all in one piece. This will make your seams inside much cleaner and easier to deal with - you won't have those corners to deal with. IT will also allow you to skip dealing with 2 seams, and make the pack stronger. |
|
Fixed the images. Not sure what happened. I know what you mean about making one piece for the front/sides/back (just like a pouch). I would imagine that would be touch to on my machine. Its already hard enough to with some of the sizes of material. I'm in the home stretch now. Assemble the pieces and add the storm collar. Just shy of 24 hours into this project total now. I've been keeping track just so I can have a final total at the end. |
|
Originally Posted By cap6888: Fixed the images. Not sure what happened. I know what you mean about making one piece for the front/sides/back (just like a pouch). I would imagine that would be touch to on my machine. Its already hard enough to with some of the sizes of material. I'm in the home stretch now. Assemble the pieces and add the storm collar. Just shy of 24 hours into this project total now. I've been keeping track just so I can have a final total at the end. It shouldn't be any harder on your machine than what you are doing now. It wouldn't add any thickness to it at all. I mean turn the 3 panels (front, bottom, and back) into one long single piece. It creates a U shape basically. But with a flat bottom. Then sew the sides into the sides of the U. It's how I do my buttpacks. The body is one long continuous piece, front bottom and back, with 2 pieces, one on each side, for the sides. this creates a Horseshoe shaped single seam on each side of the inside of the pack. And yea. Most people don't understand how long it takes to make a single item like a pack. If you were paying yourself $20 / hour, that pack would have cost $480 in labor alone at this point. This is why making a single one-off item is $$$$$$$$$$. However, if you are making gear for yourself, and you do it in your spare time, it's worth it. Once you get decent and you spend TV time or whatever sewing, your cost for that pack is suddenly like, what, $100 in materials? I actually like sewing, so it's not a burden to turn on some mindless show (or podcast, audio book, news, whatever) and sew for fun. It's why I always make myself gear while making gear for others - it makes the job more fun for me. |
| I’m tracking now.I was thinking sides and front panel as one piece. One long piece would require a little bit of management of the slack, but totally doable. I misunderstood. The width is where I struggle with my machine. I am gonna have a few tough spots where there is multiple layers of webbing. I did well making sure the exterior PALS and other loops overlapped as little as possible. I didn’t take into account where the rows of PALS on the interior (and the backer webbing) overlapped. I foresee a couple of broken needles in my future. |
|
Originally Posted By cap6888: I’m tracking now.I was thinking sides and front panel as one piece. One long piece would require a little bit of management of the slack, but totally doable. I misunderstood. The width is where I struggle with my machine. I am gonna have a few tough spots where there is multiple layers of webbing. I did well making sure the exterior PALS and other loops overlapped as little as possible. I didn’t take into account where the rows of PALS on the interior (and the backer webbing) overlapped. I foresee a couple of broken needles in my future. Go slow and don't be afraid to use the hand wheel over tough spots. |
| Received my pack today. Very pleased with it. As high a quality as I had hoped. Got it mounted on my surplus frame with my Twin Needle straps and belt. Just need to get it packed and figure out what other pouches I want to put on it and get it out on the trail/road for a shake down. Thanks @marnsdorff! |
“Always love your country — but never trust your government!" - Robert Novak
|
Originally Posted By Paulie771: Received my pack today. Very pleased with it. As high a quality as I had hoped. Got it mounted on my surplus frame with my Twin Needle straps and belt. Just need to get it packed and figure out what other pouches I want to put on it and get it out on the trail/road for a shake down. Thanks @marnsdorff!  Don't forget to post pics of it after you get it all set up! Best picture posted by one of you guys of the packs gets a free medical insert for a mag pouch or cordura grocery bag or wallet. |
|
Originally Posted By Paulie771: Received my pack today. Very pleased with it. As high a quality as I had hoped. Got it mounted on my surplus frame with my Twin Needle straps and belt. Just need to get it packed and figure out what other pouches I want to put on it and get it out on the trail/road for a shake down. Thanks @marnsdorff! Mine is due Thursday. Thanks for braving the weather, Marns. |
|
Originally Posted By marnsdorff: Living far enough out of town that DOT doesn't deal with your road even in the mountains has it's pros and it's cons. Going back to page 11 in the thread it looks like you were almost dead-nuts 11mos from opening orders to delivering the first pack 
|
|
Originally Posted By Ex_Sanguine_Nation: Going back to page 11 in the thread it looks like you were almost dead-nuts 11mos from opening orders to delivering the first pack Bunch of delays I couldn't avoid. Plus I did 3 OEM contracts during that time. I could probably bang out a batch now in a month if I get left alone. |
|
Originally Posted By marnsdorff: Bunch of delays I couldn't avoid. Plus I did 3 OEM contracts during that time. I could probably bang out a batch now in a month if I get left alone. No hate, no shade. Just an observation now that we have packs moving. Personally, I would say that's about what I expected. |
I can tell you from my current project, I am over two months in. In that time I’ve spent 26 hours on my latest pack. Like Marnsdorff, I am juggling this around work and life in general. It’s no small task. Not to mention I guarantee his work is much prettier than mine. Fortunately most of my hideous seams are on the inside of the pack. I was doing good on visible seams, that is until I added the storm collar. But it’s not terrible. Once I finish up and post pics, I’ll post pics. But you have to promise not to zoom in.
|
|
Ok, need advice from the more knowledgeable in the thread: PALICE frame vs. DEI 1606-MC? This video came across my feed and it's impressive:  palice frame VS BigTruck The PALICE is about 1/4# lighter, but at least twice as expensive (~$50 for the 1606MC vs ~$100 for the PALCE). Anyone have any experience w/ both and comment which is more comfortable under load? |
“Always love your country — but never trust your government!" - Robert Novak
|
Originally Posted By Ex_Sanguine_Nation: No hate, no shade. Just an observation now that we have packs moving. Personally, I would say that's about what I expected. Yea I didn't take it as shade. I WAS hoping for 6 months time frame. But yea, from initial concept to delivered product for something of this scale - I did 24 total packs, and the packs are relatively complicated, plus in different colors - 12 months isn't horrible. I'm still relatively new at designing and working on products of this size and orders of this scale on my own products. I've been doing OEM contracts of up to 200 units at a time, but I also end up doing a half dozen prototypes ahead of time on those and know what I'm doing by the time I start production. (Usually) It's a learning process, and I'm learning alot. It doesn't help I'm being self-taught on this and not having learned this stuff by working in another shop that already knows what they are doing
|
|
Originally Posted By cap6888: I can tell you from my current project, I am over two months in. In that time I’ve spent 26 hours on my latest pack. Like Marnsdorff, I am juggling this around work and life in general. It’s no small task. Not to mention I guarantee his work is much prettier than mine. Fortunately most of my hideous seams are on the inside of the pack. I was doing good on visible seams, that is until I added the storm collar. But it’s not terrible. Once I finish up and post pics, I’ll post pics. But you have to promise not to zoom in. Bro. Your work has improved immensely from your first project. Don't feel bad about it at all. Pretty work comes from experience. I've used up 12 whole industrial sized spools of thread already. Once you stitch that much, your stitching will look at better too. Someone on here once compared my stitching to early Tactical Tailor stitching. (Which I consider a compliment). I pulled out one of my early TT MAV's this last week to finish setting it up - I got it back when I was a dealer for them back in 2005. I feel alot better with my stitching after comparing my stitching to the stitching on that and a half dozen pouches I had had on it from that same time period. (I still use alot of those early TT pouches btw. Their gear is really good, even their old stuff is worth picking up if you run across it. It's hard to beat a MAV honestly) |
|
Originally Posted By Paulie771: Ok, need advice from the more knowledgeable in the thread: PALICE frame vs. DEI 1606-MC? This video came across my feed and it's impressive:  https://www.youtube.com/shorts/gYVOudCvP3M https://www.youtube.com/shorts/gYVOudCvP3MThe PALICE is about 1/4# lighter, but at least twice as expensive (~$50 for the 1606MC vs ~$100 for the PALCE). Anyone have any experience w/ both and comment which is more comfortable under load? I don't know anyone who has one of the PALICE frames. The DEI frame is kinda the standard 'go to' frame. However, they do eventually crack if continuously dropped onto concrete and such (honestly any frame will fail eventually doing that) It's also cheaper than the others. They really shine if you get the Mountain Straps and Belt set from DEI - they come with the frame. It's a good deal for the money. The next options I recommend is the Tactical Tailor frame - specifically, get it from Grey Ghost Gear. It's the same frame (they're kinda a sister company) and retail for $150. If you wait, you can get them on sale during major events - I think I got mine for less than $100 shipped over the 4th of July? Took a couple months for them to ship them all out, a bunch of us bought them at the same time. I think we overwhelmed their production capability. I also know that Tactical Tailor themselves are selling a ton of MALICE packs, so probably a ton of frames too. As for the PALICE specifically? I mean it looks ok. A number of companies uses them. I haven't heard anything bad about them, but also no one I know uses them, nor are there alot of reviews talking about them. Personally, I'd prefer to spend my money on something with ALOT of that item in regular real world use. The DEI frame is on it's 2nd gen - they fixed most of the cracking issues. And there are probably hundreds of thousands of them out there in use. Same idea with the Tactical Tailor frame. |
|
Originally Posted By wsix: Cap, cool looking design, what are the lower pockets on the sides? They look like 2qt pouches. Yup. Sized to actually fit a 2 quart with the pouch. That way I can remove the canteen and still be able to carry it separate from the pack. I’m in the home stretch. Hopefully will finish it this weekend. |

|
The "PALICE" frame is interesting, but personally would like some long-term reviews, particularly in extremely cold temps where some plastics become brittle. The DEI "Alice-specific" frame is rock-solid and relatively inexpensive since inexpensive MOLLE load bearing waistbelt and very decent shoulder straps can be used. Personally, I'll never be without an original Alice frame. Why? Because it will accept cheap GI metal "shelves" in order to carry multiple ammo cans or a 5-gal can. AFAIK, none of the alternatives can be inexpensively be set up to do these things, some not at all. Same USGI frame will accept MOLLE loadbearing waistbelt and shoulder straps. One thing that users of GI metal frames can do is to proactively drill out existing pop rivets and replace them with much larger diameter pop rivets, which are much stronger. Always aluminum-bodied Pop rivets (since frame metal is aluminum) to prevent differential metal corrosion. |
|
The "PALICE" frame is interesting, but personally would like some long-term reviews, particularly in extremely cold temps where some plastics become brittle. The DEI "Alice-specific" frame is rock-solid and relatively inexpensive since inexpensive MOLLE load bearing waistbelt and very decent shoulder straps can be used. Personally, I'll never be without an original Alice frame. Why? Because it will accept cheap GI metal "shelves" in order to carry multiple ammo cans or a 5-gal can. AFAIK, none of the alternatives can be inexpensively be set up to do these things, some not at all. Same USGI frame will accept MOLLE loadbearing waistbelt and shoulder straps. One thing that users of GI metal frames can do is to proactively drill out existing pop rivets and replace them with much larger diameter pop rivets, which are much stronger. Always aluminum-bodied Pop rivets (since frame metal is aluminum) to prevent differential metal corrosion. Backing washers on both sides of the pop rivets optional, but, in this specific case, always aluminum. |

|
Originally Posted By _rory_: Got my TS pack in yesterday, the build quality is incredible! https://i.ibb.co/gbz0Rgt5/PXL-20260204-235012892-2.jpg Waiting for some sustainment pouches to come in. I have a few suggestions/recommendations but I'll hold them until I use it.  Those tiger stripe packs looked pretty sweet. I'm glad someone did one in tiger stripe. |
|
Originally Posted By _rory_: Got my TS pack in yesterday, the build quality is incredible! https://i.ibb.co/gbz0Rgt5/PXL-20260204-235012892-2.jpg Waiting for some sustainment pouches to come in. I have a few suggestions/recommendations but I'll hold them until I use it. Ugh, I knew I should have gotten M81 Marns, got mine the other day but been busy with work and tendonitis and fun stuff like that. Question for you: these loose straps at the center - are they receivers for a cinch strap? |
|
Originally Posted By Ex_Sanguine_Nation: Marns, got mine the other day but been busy with work and tendonitis and fun stuff like that. Question for you: these loose straps at the center - are they receivers for a cinch strap? Originally Posted By Ex_Sanguine_Nation: Marns, got mine the other day but been busy with work and tendonitis and fun stuff like that. Question for you: these loose straps at the center - are they receivers for a cinch strap? Loose straps at the center? You mean on the sides? They are extra attachment points for the pack to the frame. They are placed at the right place for the DEI and Frontier Resolve main attachment points on the side. (Look at the DEI frame, see the side attachment points that are on the 'wings' that jut out on the sides? That's the level those straps are at) There are two triglides I included to use to cinch it down. It's not a really important load bearing attachment point, but it helps to keep the swaying of the pack down and hug it down onto the frame. That's also the point where I'd run an 'across the pack' cinch down strap. You can do both the attachment to the frame from those loose straps and run a cinch down strap if you run the webbing pieces correctly. Originally Posted By Ex_Sanguine_Nation: Ugh, I knew I should have gotten M81 The M81 ones look pretty sweet too. I mean, yall were paying for custom packs. I wondered why more of yall didn't pick some cool off the wall camo pattern you never see. I mean, I get why you guys got ranger green, but hey. The Splinter pack that I've got for sale looks especially cool. Ain't many packs out there in splinter period. And the Medium ALICE almost looks like a period correct pack for the camo. It's got that same cool retro vibe. |

|
Originally Posted By Ex_Sanguine_Nation: Yes, sides, vertical center. That makes sense with the tris. There was no corresponding ladder buckle sewn on so I wasn't sure. Yea, since it isn't a load bearing strap, the triglide works fine to hold it in place, especially if you route the webbing correctly. I run it through the frame, around the center bar of the triglide, back down through the frame, in towards the center of the pack (between the frame and the pack) then out the next slot in the frame. Then thread through the triglide twice. This leaves room to attach another strap to cinch around the whole pack. |
|
Originally Posted By cap6888: Aside from TIgerstripe and Splinter, any other cool camos? Would love to see the variety. Couple of woodland, couple of tiger stripe, a Splinter, a couple ATACS ix (one of them mine), a multicam, and a cool ranger green with multicam pockets, two-tone. |

|
Just got an email from Platatac. Looks like they copied Marnsdorff’s idea. Platatac “Updated” Alice |
|
Originally Posted By cap6888: Just got an email from Platatac. Looks like they copied Marnsdorff’s idea. Platatac “Updated” Alice You beat me! I just saw the email and came to say the same thing. |
|
I'm not going to say that Platatac read this thread and made that. Definitely not. Also. Mine has a floating lid, 4 rows of MOLLE on the sides instead of 3, rain skirts in the pockets, and is made in the USA instead of Vietnam. It is cool seeing that other companies are doing the same thing though. I do like that lid they did. I just wish it was floating. |


|
Originally Posted By Ex_Sanguine_Nation: I haven't had much time to play, but hoping to get it set-up with something tonight. In the mean time I thought some people would like to see the work Marns has been putting in: https://i.imgur.com/4S8eZQt.jpeg https://i.imgur.com/LQOwFHh.jpeg https://i.imgur.com/KJruPZA.jpeg https://i.imgur.com/QXWUyr9.jpeg https://i.imgur.com/OgeZQ6E.jpeg https://i.imgur.com/7NZebVY.jpeg https://i.imgur.com/Zw28009.jpeg https://i.imgur.com/8zrt3AQ.jpeg https://i.imgur.com/cbDGIzd.jpeg Needless to say, he's not bullshitting when he says he builds things to hold-up. Yup. I don't skimp on stitching. Honestly, I probably overdo it. But I make it like I would want it made. Also, I can probably clean up the stitching a little. |
|
Originally Posted By cap6888: That is OUTSTANDING! Quality construction like that makes me realize why I’m struggling with my Singer home sewing model compared to a commercial machine. That is high quality, heavy duty construction. Yea, I actually maxed out the capabilities of my machine with this. I'm probably ordering my new machine this next week. You can do alot with a home sewing machine if you are careful, but if you are serious about it, a basic industrial machine at the minimum is worth it. Seriously though, a home sewing machine can make a TON of different gear items for yourself. It's totally worth having one on hand. |
|
Originally Posted By Mountaineer82: Got a Platatac pack as a gift for myself for Christmas. It’s nice but the main compartment is not as big as the large ALICE. Unfortunately they didn’t have a matching waist belt in Tropic. I've dabbled with the idea of doing some custom straps and belts to go with custom packs for people who want matching oddball camo large ALICE packs. Enough people do modded out Large ALICE packs, I don't really want to just retread what other people do, and trying to figure out something to set myself apart. I don't know if there is a big enough market for that though, especially with the already high price that stuff goes for. I'll eventually do a small run of large ALICE packs, mostly because I want a couple for myself, but I don't know if I'm going to make it a regular. Everyone and his mother already do modded modern large ALICE packs. Also. I was surprised that no one got one of these packs in Multicam Tropic - it's a pretty banger color for a pack I'd think, and not many people do them. Which Platatac pack did you get @Mountaineer82 ? |
|
So I did a thing. Just what I needed - another set of shoulder straps for a pack! Crossfire has a few of these shoulder straps up for sale on their ebay page. I'm 95% sure they will work with most ALICE frames and packs, I'll let yall know. But if they do, they would be a really good deal for the money. https://www.ebay.com/itm/357744566442 |
|
Lets see if I can get my pics right the first time..... OK. After 30 hours of haphazard sewing, I am done with my second pack. Although I only took a short walk up and down the block with it due to the horrifically cold weather, the DEI Mountaineering frame carries VERY comfortably and better than my first pack. Pack suspension is definitely a tricky beast. Using a commercial fame set is definitely easier. But digress..... The pack is made of 1000D nylon with a cheap nylon ripstop material for the liner. The storm collar is pack cloth nylon. It is 25 inches tall, 15 inches wide, and 9 inched deep (3375 cubic inches or 55 liters). The storm collar is 12 inches tall, so there is some extra storage in there. I used a roll top type closure on the storm flap for that reason. I have buckles on the sides of the pack to secure the top down, or it can just be rolled and buckled conventionally. I'll try to hit the high points here, and hopefully order them correctly to correspond with the pictures below. It is very similar in size to my PLCE Short Back Bergen. The Bergen is not filled all the way and my pack is stuffed almost all the way up with Mark 1 Mod 0 throw pillows. There is a large slip pocket on the front with a small strip of velcro to fasten it. I sized the pockets on the side to fit 2 quart canteens and their pouches. That way if I want to just grab a canteen to take it to a water point, or to supplement me when I leave the pack its easy enough to do. There is a compression strap on there, but it isn't needed as snug as the pouch is. There is also a top strap for over engineering. The frame set came with a grab handle, but it was just a simple, single piece of webbing. I prefer the grab handles I make with tubular webbing and fuel line. These make for a much more stout handle. I used these same handle for the sides to help put the pack on over the head. I added a zipper to the back to access the pack if need be. Totally stole this idea from Marnsdorff. Luckily I hadn't gotten that far when I saw the addition he made to his packs. I used an old riot baton to show the sleeves on the sides. Nothing fancy, but if I put something long enough, I can rest it in the pouch on the bottom. Or if need be, a larger piece of equipment like a tripod, can just be put in the pouch and secured with the compression straps. The strap in the bottom pouch is attached via a Slik Clip on one small piece of PALS inside. The top of the sleeves have a row of PALS just below the top. You can see how I attached the buckles for the roll top here. All of this extra PALS, as well as the rows inside the pack are made of 3/4 inch webbing. I made small retention straps to secure it to the pack frame similar to the "yib yab" tabs the FILBE uses. I have rows of PALS on the two sides and back of the interior pack just below the zipper. For demonstraion, I have some Tuff Possum Gear pouches that I am hanging through the interior webbing with a Duraflex Molle Tee Mount. On the interior of the front, I made a small pocket out of a mesh fabric I had on hand (should have made it wider though). Lastly, I made it adaptable to put the Crossfire Daypack lid I was gifted by our very own Diz. I believe this one is an early prototype as the features are a little different from the current production. It is definitely over stuffed because I actually have the lower compartment stuffed with a green bag from a MSS and the top pocket filled with a woobie. The one major problem I ran into with my Singer home model sewing machine is that the interior seams are too thick for me to run binding tape on them. Its not the end of the world, but its the one finishing touch that would have been nice to do. I also ran into some uneven sewing when sewing on the storm collar. Its just hard to maneuver that large pack with the machine. A bit ugly, but still serviceable. I have to give a shout out to @Diz and @Marnsdorff for their help, suggestions, and support for my projects. 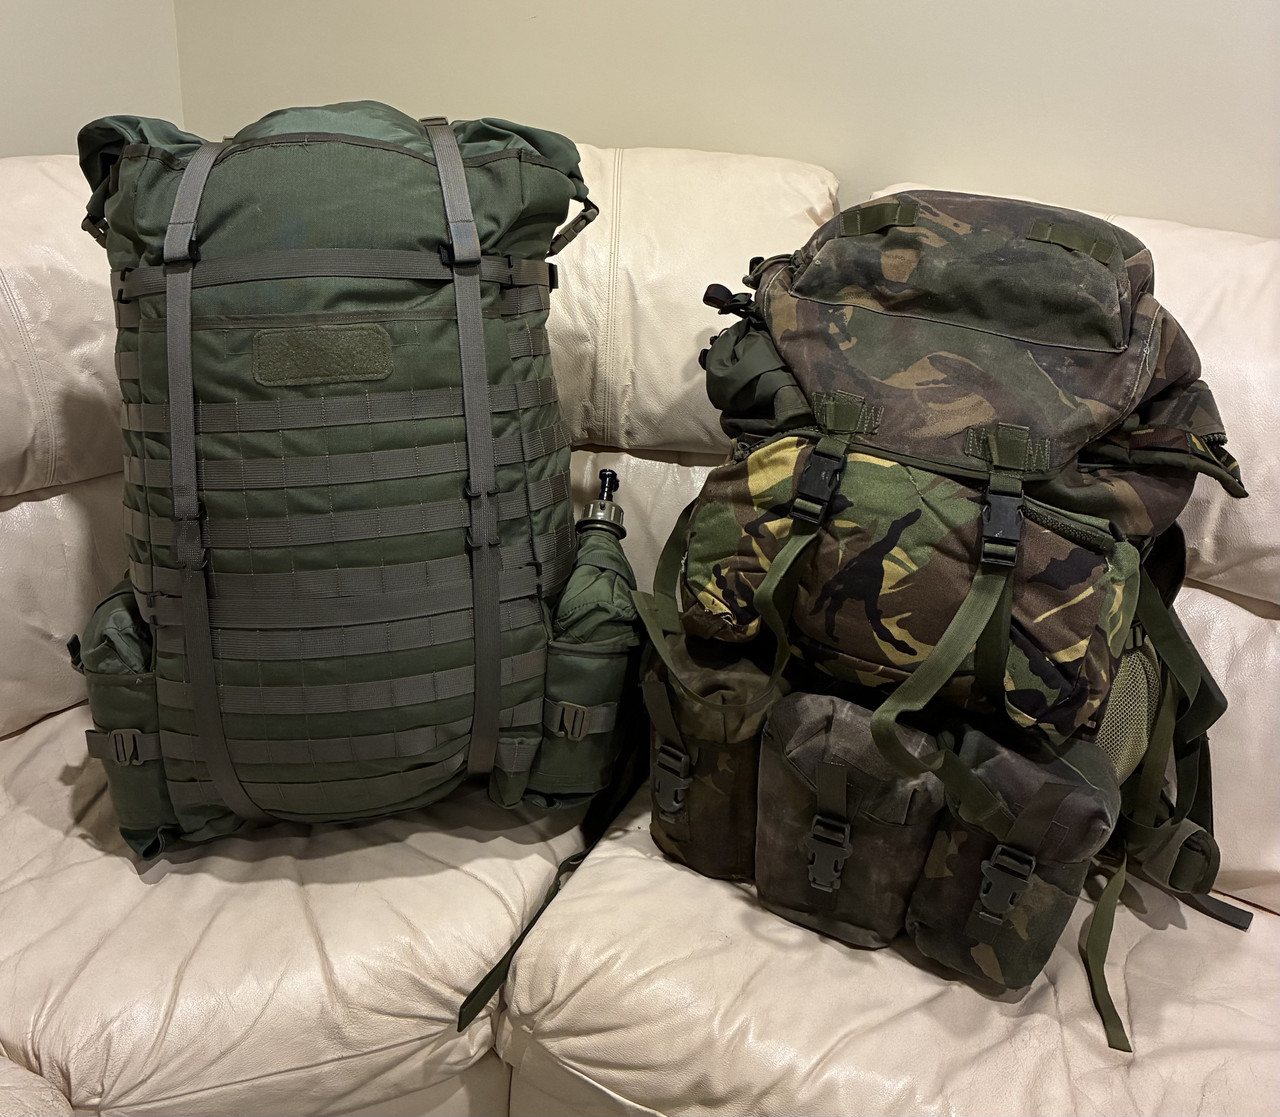 " /> " />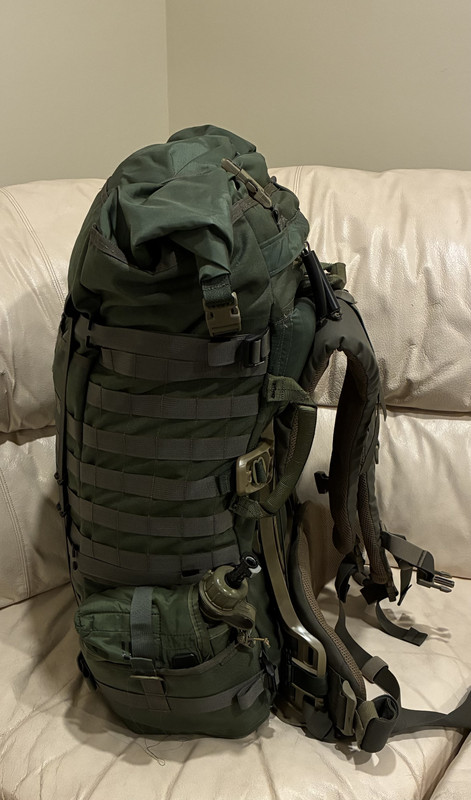 " /> " />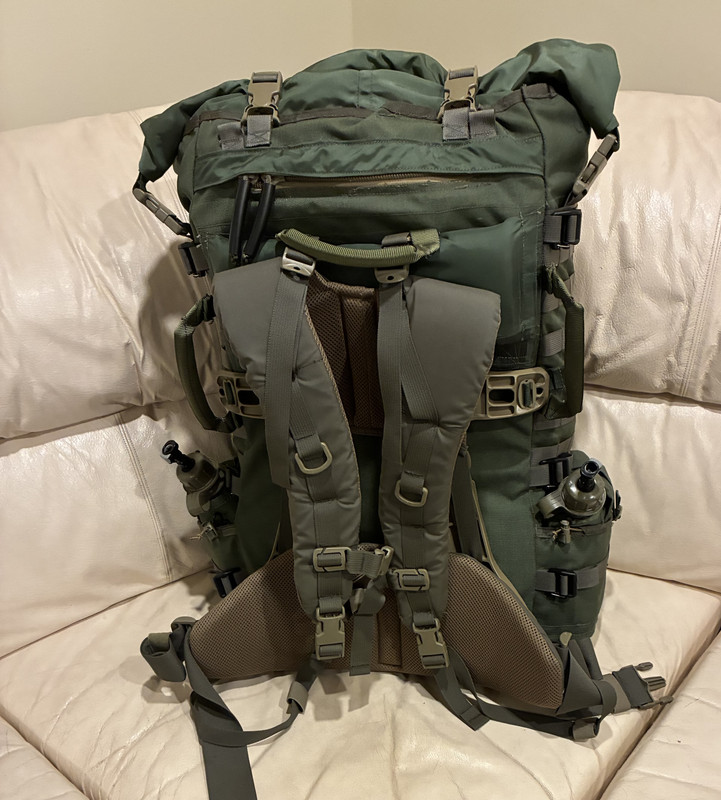 " /> " />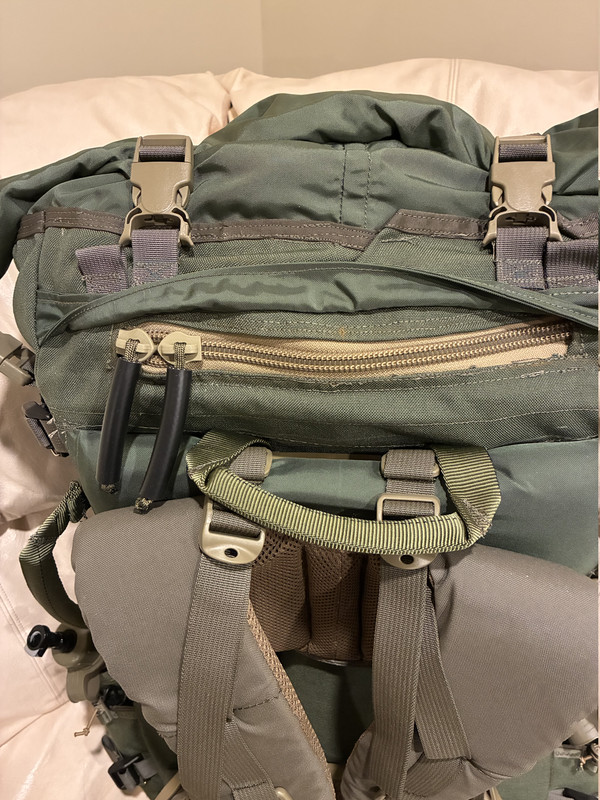 " /> " />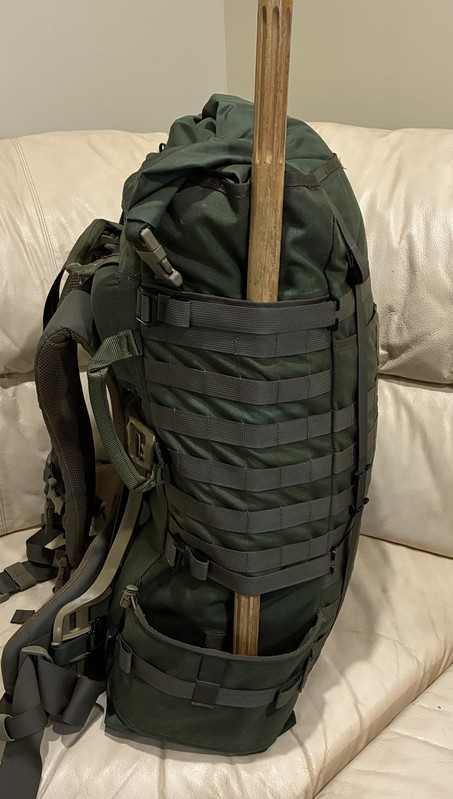 " /> " />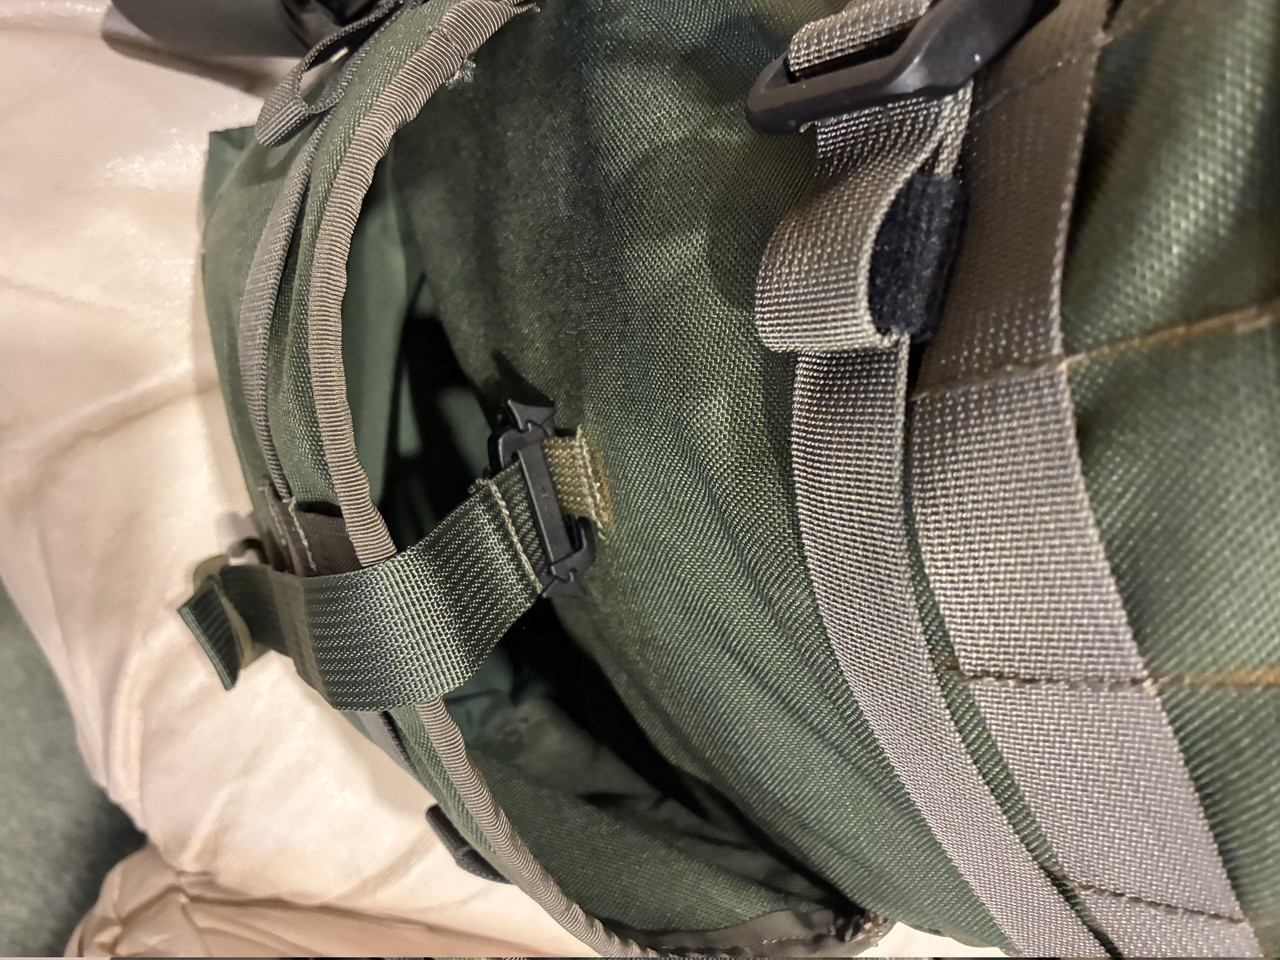 " /> " />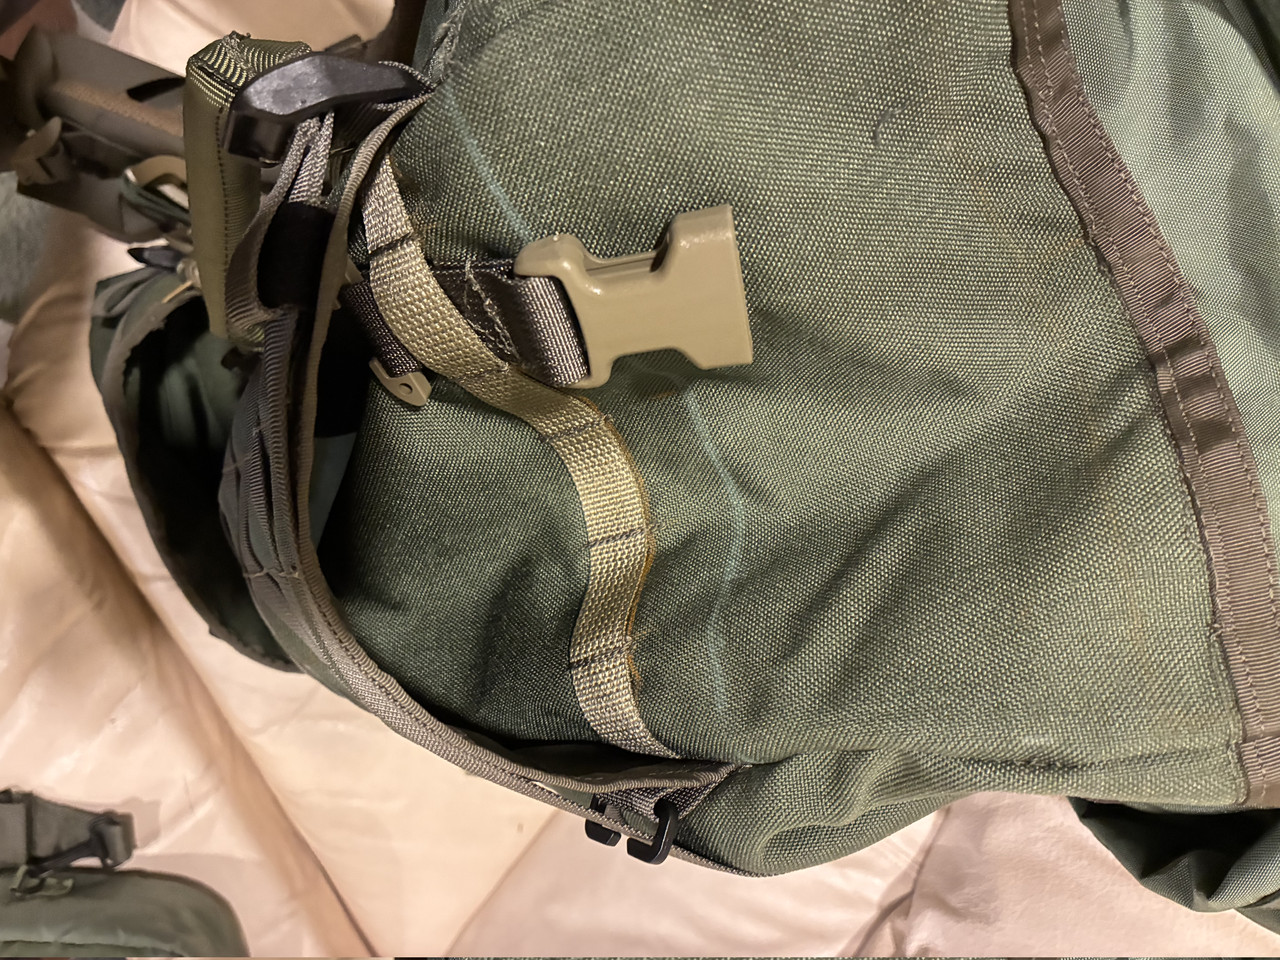 " /> " />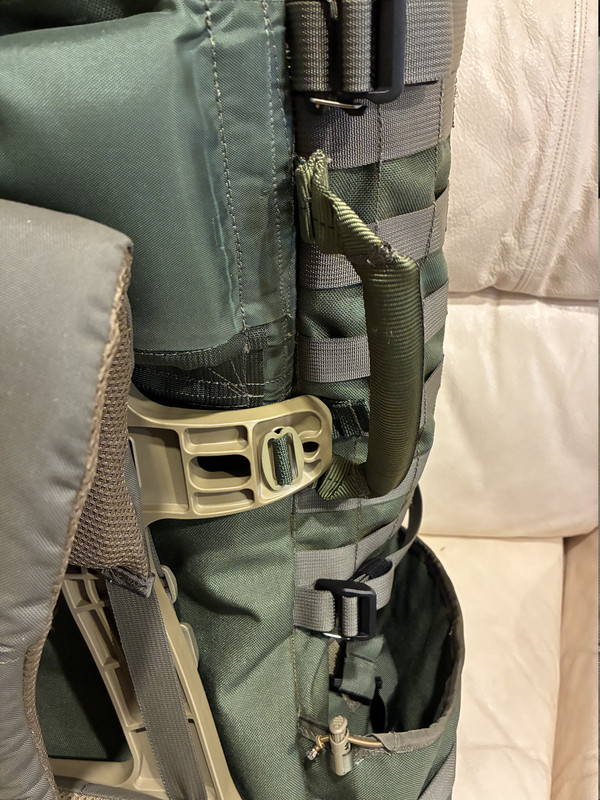 " /> " />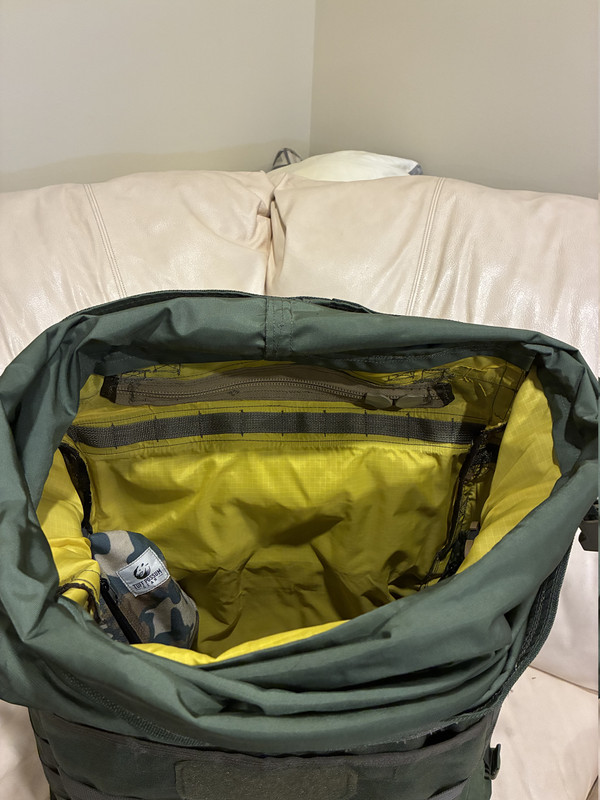 " /> " />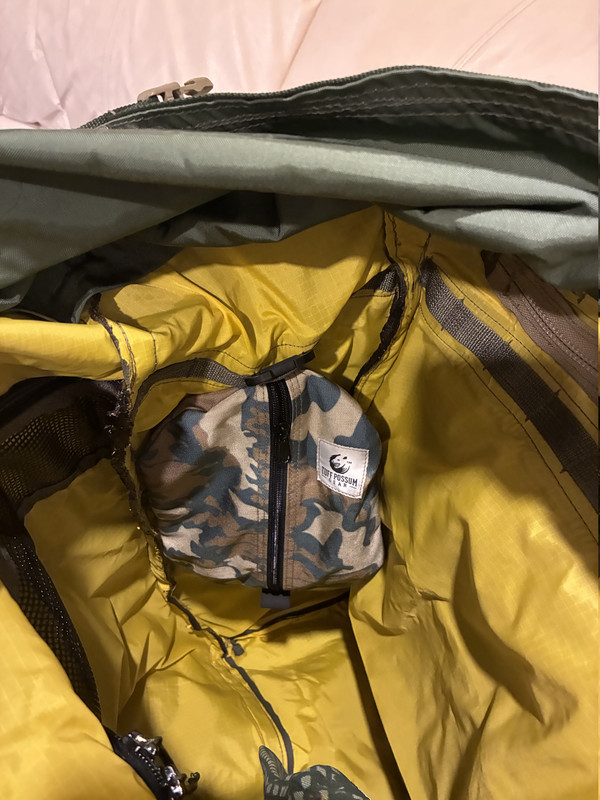 " /> " />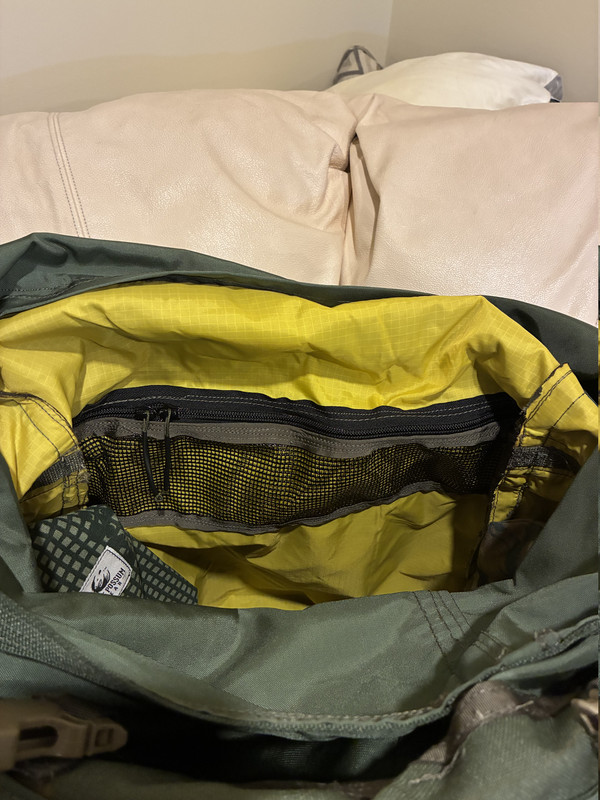 " /> " />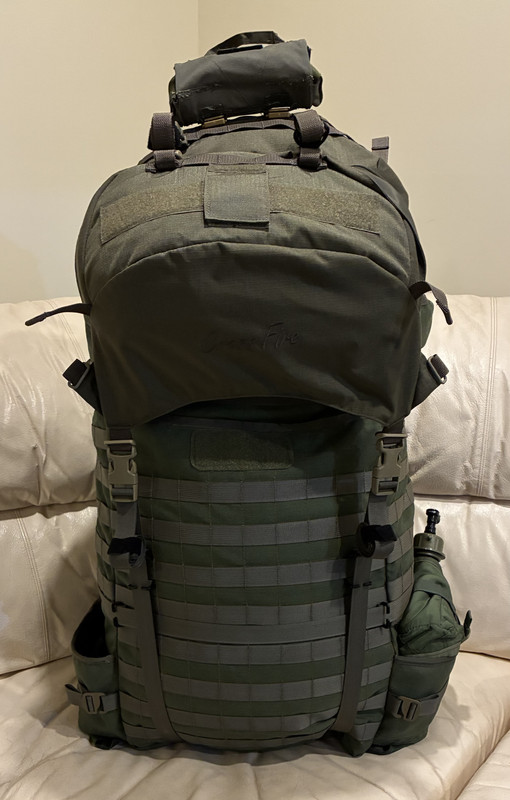 " /> " />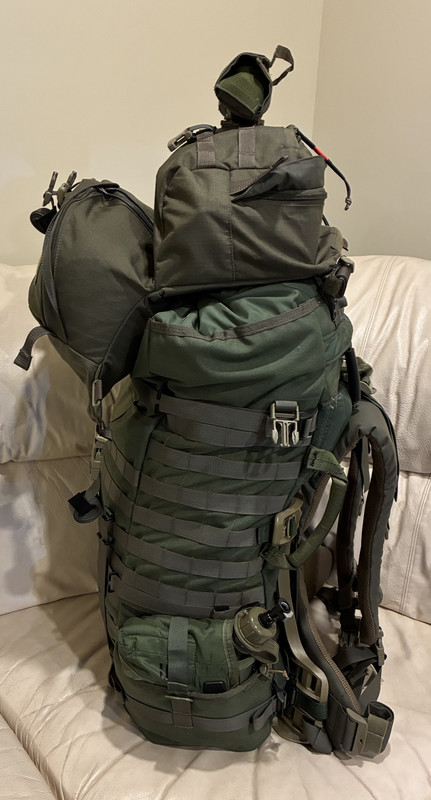 " /> " />
|
|
Originally Posted By cap6888: Lets see if I can get my pics right the first time..... OK. After 30 hours of haphazard sewing, I am done with my second pack. Although I only took a short walk up and down the block with it due to the horrifically cold weather, the DEI Mountaineering frame carries VERY comfortably and better than my first pack. Pack suspension is definitely a tricky beast. Using a commercial fame set is definitely easier. But digress..... The pack is made of 1000D nylon with a cheap nylon ripstop material for the liner. The storm collar is pack cloth nylon. It is 25 inches tall, 15 inches wide, and 9 inched deep (3375 cubic inches or 55 liters). The storm collar is 12 inches tall, so there is some extra storage in there. I used a roll top type closure on the storm flap for that reason. I have buckles on the sides of the pack to secure the top down, or it can just be rolled and buckled conventionally. I'll try to hit the high points here, and hopefully order them correctly to correspond with the pictures below. It is very similar in size to my PLCE Short Back Bergen. The Bergen is not filled all the way and my pack is stuffed almost all the way up with Mark 1 Mod 0 throw pillows. There is a large slip pocket on the front with a small strip of velcro to fasten it. I sized the pockets on the side to fit 2 quart canteens and their pouches. That way if I want to just grab a canteen to take it to a water point, or to supplement me when I leave the pack its easy enough to do. There is a compression strap on there, but it isn't needed as snug as the pouch is. There is also a top strap for over engineering. The frame set came with a grab handle, but it was just a simple, single piece of webbing. I prefer the grab handles I make with tubular webbing and fuel line. These make for a much more stout handle. I used these same handle for the sides to help put the pack on over the head. I added a zipper to the back to access the pack if need be. Totally stole this idea from Marnsdorff. Luckily I hadn't gotten that far when I saw the addition he made to his packs. I used an old riot baton to show the sleeves on the sides. Nothing fancy, but if I put something long enough, I can rest it in the pouch on the bottom. Or if need be, a larger piece of equipment like a tripod, can just be put in the pouch and secured with the compression straps. The strap in the bottom pouch is attached via a Slik Clip on one small piece of PALS inside. The top of the sleeves have a row of PALS just below the top. You can see how I attached the buckles for the roll top here. All of this extra PALS, as well as the rows inside the pack are made of 3/4 inch webbing. I made small retention straps to secure it to the pack frame similar to the "yib yab" tabs the FILBE uses. I have rows of PALS on the two sides and back of the interior pack just below the zipper. For demonstraion, I have some Tuff Possum Gear pouches that I am hanging through the interior webbing with a Duraflex Molle Tee Mount. On the interior of the front, I made a small pocket out of a mesh fabric I had on hand (should have made it wider though). Lastly, I made it adaptable to put the Crossfire Daypack lid I was gifted by our very own Diz. I believe this one is an early prototype as the features are a little different from the current production. It is definitely over stuffed because I actually have the lower compartment stuffed with a green bag from a MSS and the top pocket filled with a woobie. The one major problem I ran into with my Singer home model sewing machine is that the interior seams are too thick for me to run binding tape on them. Its not the end of the world, but its the one finishing touch that would have been nice to do. I also ran into some uneven sewing when sewing on the storm collar. Its just hard to maneuver that large pack with the machine. A bit ugly, but still serviceable. I have to give a shout out to @Diz and @Marnsdorff for their help, suggestions, and support for my projects. https://i.postimg.cc/Y02MLW76/IMG_0359.jpg" target="_blank">https://i.postimg.cc/Y02MLW76/IMG_0359.jpg https://i.postimg.cc/QCNhKTDH/IMG_0360.jpg" target="_blank">https://i.postimg.cc/QCNhKTDH/IMG_0360.jpg https://i.postimg.cc/RFLv0TkM/IMG_0362.jpg" target="_blank">https://i.postimg.cc/RFLv0TkM/IMG_0362.jpg https://i.postimg.cc/0j5PKwv0/IMG_0363.jpg" target="_blank">https://i.postimg.cc/0j5PKwv0/IMG_0363.jpg https://i.postimg.cc/Z5Xbsn8s/IMG_0365.jpg" target="_blank">https://i.postimg.cc/Z5Xbsn8s/IMG_0365.jpg https://i.postimg.cc/Z5WYLpd6/IMG_0366.jpg" target="_blank">https://i.postimg.cc/Z5WYLpd6/IMG_0366.jpg https://i.postimg.cc/ncchC6cx/IMG_0373.jpg" target="_blank">https://i.postimg.cc/ncchC6cx/IMG_0373.jpg https://i.postimg.cc/mZSrZb40/IMG_0374.jpg" target="_blank">https://i.postimg.cc/mZSrZb40/IMG_0374.jpg https://i.postimg.cc/qMbMnjz2/IMG_0369.jpg" target="_blank">https://i.postimg.cc/qMbMnjz2/IMG_0369.jpg https://i.postimg.cc/PfMqftH2/IMG_0370.jpg" target="_blank">https://i.postimg.cc/PfMqftH2/IMG_0370.jpg https://i.postimg.cc/jddSLGq1/IMG_0372.jpg" target="_blank">https://i.postimg.cc/jddSLGq1/IMG_0372.jpg https://i.postimg.cc/Yqnqgbhg/IMG_0367.jpg" target="_blank">https://i.postimg.cc/Yqnqgbhg/IMG_0367.jpg https://i.postimg.cc/MKPKRdvn/IMG_0368.jpg" target="_blank">https://i.postimg.cc/MKPKRdvn/IMG_0368.jpg Outstanding. |
Armory Sponsor