


Armory Sponsor


How i built my own rotary tumbler (Page 8 of 31)

|
Originally Posted By Husky79:
What am I doing wrong here? Just finally got my tumbler done yesterday did a maiden run with first batch of 3 lbs .223 cases that have already been tumbled, sized, and trimmed. Still had lube on it. Threw it in with a .45 acp full of lemishine, and a little over a second worth of dawn squirt, that was way too much, and 5 lbs of media. Turned out good. Now second batch of the same lot of .223, again 3 lbs brass, 1 full .45 acp and less than 1/4 xtra in with 2 45 acp full of dawn, full cold water. The first run alot of water leaked out, so there was about little over half tank of water there when it was done. 2nd run no water leaked. First run no film of black grime at all, 2nd run had really thick film of black grime, cases came out terrible worse than what it looked like when it went into. First batch ran for about 3 hours 2nd batch ran for exactly 2 hours. Tube is 12 inches long 6 inch PVC tube. Tumbler http://i1169.photobucket.com/albums/r515/Walleye05/uploads/IMAG0793.jpg Picture of what it looks like after 2nd batch. http://i1169.photobucket.com/albums/r515/Walleye05/uploads/IMAG0798.jpg On left is the 2nd batch, on right is the first batch from yesterday. http://i1169.photobucket.com/albums/r515/Walleye05/uploads/IMAG0801.jpg your container is 1.4 gallons. i would be using at least 2 45 acp cases of lemi shine more towards 3. i have been using 2 45 acp cases in my 1 gallon drum with superb results. also when you are tumbling lube off you need to use more soap it is the surfactant and keeps the stuff off the cases. i only use dawn and use a 2 second squirt or 3 tbs. yes it is sudsy but it works. 
|

|
Originally Posted By BIGGDAWG:
Originally Posted By Husky79:
What am I doing wrong here? Just finally got my tumbler done yesterday did a maiden run with first batch of 3 lbs .223 cases that have already been tumbled, sized, and trimmed. Still had lube on it. Threw it in with a .45 acp full of lemishine, and a little over a second worth of dawn squirt, that was way too much, and 5 lbs of media. Turned out good. Now second batch of the same lot of .223, again 3 lbs brass, 1 full .45 acp and less than 1/4 xtra in with 2 45 acp full of dawn, full cold water. The first run alot of water leaked out, so there was about little over half tank of water there when it was done. 2nd run no water leaked. First run no film of black grime at all, 2nd run had really thick film of black grime, cases came out terrible worse than what it looked like when it went into. First batch ran for about 3 hours 2nd batch ran for exactly 2 hours. Tube is 12 inches long 6 inch PVC tube. Tumbler http://i1169.photobucket.com/albums/r515/Walleye05/uploads/IMAG0793.jpg Picture of what it looks like after 2nd batch. http://i1169.photobucket.com/albums/r515/Walleye05/uploads/IMAG0798.jpg On left is the 2nd batch, on right is the first batch from yesterday. http://i1169.photobucket.com/albums/r515/Walleye05/uploads/IMAG0801.jpg your container is 1.4 gallons. i would be using at least 2 45 acp cases of lemi shine more towards 3. i have been using 2 45 acp cases in my 1 gallon drum with superb results. also when you are tumbling lube off you need to use more soap it is the surfactant and keeps the stuff off the cases. i only use dawn and use a 2 second squirt or 3 tbs. yes it is sudsy but it works. http://a5.sphotos.ak.fbcdn.net/hphotos-ak-ash4/457388_394454023930642_100000981434319_1093311_1882245839_o.jpg On the first batch i did like over a second probably 2 seconds, and that was ALOT of soap, when I opened the cap after tumbling, it was very foamy more of cream puff foamy, it did look delicous lookiing at that foam lol  I will give that batch another run with more soap and lemishine. I will give that batch another run with more soap and lemishine.
|
|
Originally Posted By Husky79:
On the first batch i did like over a second probably 2 seconds, and that was ALOT of soap, when I opened the cap after tumbling, it was very foamy more of cream puff foamy, it did look delicous lookiing at that foam lol I will give that batch another run with more soap and lemishine.that is what mine looks like also that is the point it keeps stuff suspended. good luck and let us know your results on a side note are you using a o ring on your cap? you need an o ring to keep it from leaking. |
|
Originally Posted By BIGGDAWG:
Originally Posted By Husky79:
On the first batch i did like over a second probably 2 seconds, and that was ALOT of soap, when I opened the cap after tumbling, it was very foamy more of cream puff foamy, it did look delicous lookiing at that foam lol I will give that batch another run with more soap and lemishine.that is what mine looks like also that is the point it keeps stuff suspended. good luck and let us know your results on a side note are you using a o ring on your cap? you need an o ring to keep it from leaking. Its still not here yet, thats the only thing I'm waiting on for. I couldn't wait any longer so I'm using telfon plumber tape and it works, no leaks with that at all. |

Global Warming Hoax Skeptic before it was cool
Joined:
Jun 2007
Posts:
18671
EE: 100% (1)
 WA, USA
|
I put in 3, 45 acp cases of lemishine in, 2 seconds squirt of dawn, water is full to bottom of the threads of the clean out cap. Tumbled for 2.5 hour came out beautifully! Will take pictures of it tomorrow in a better natural lighting.
I have another problem, the cylinder is eating the rubber hose. I guess it is not matching the speed with the shaft, like slipping, I made sure it was all dry and it is. Are you guys that are using cleanout having that too? I think I need to make a different tank without the raised part the clean out has for the cap. That part is eating the hose up and then the other end is not flat so its eating up also at the far corner area. |
|
Originally Posted By Husky79:
I have another problem, the cylinder is eating the rubber hose. I guess it is not matching the speed with the shaft, like slipping, I made sure it was all dry and it is. Are you guys that are using cleanout having that too? I think I need to make a different tank without the raised part the clean out has for the cap. That part is eating the hose up and then the other end is not flat so its eating up also at the far corner area. Which way does your motor spin if you are looking down at the shaft? Are both hoses wearing or just the hose on the shaft with the pulley? |
|
Originally Posted By Husky79:
I put in 3, 45 acp cases of lemishine in, 2 seconds squirt of dawn, water is full to bottom of the threads of the clean out cap. Tumbled for 2.5 hour came out beautifully! Will take pictures of it tomorrow in a better natural lighting. I have another problem, the cylinder is eating the rubber hose. I guess it is not matching the speed with the shaft, like slipping, I made sure it was all dry and it is. Are you guys that are using cleanout having that too? I think I need to make a different tank without the raised part the clean out has for the cap. That part is eating the hose up and then the other end is not flat so its eating up also at the far corner area. yes the rubber wears when you are using that fitting, i now cut the rubber a little short so that part don't ride on rubber then it is fine. |
|
Originally Posted By 808state:
Originally Posted By Husky79:
I have another problem, the cylinder is eating the rubber hose. I guess it is not matching the speed with the shaft, like slipping, I made sure it was all dry and it is. Are you guys that are using cleanout having that too? I think I need to make a different tank without the raised part the clean out has for the cap. That part is eating the hose up and then the other end is not flat so its eating up also at the far corner area. Which way does your motor spin if you are looking down at the shaft? Are both hoses wearing or just the hose on the shaft with the pulley? its rotating towards the motor, there is more wear on the drive shaft than the free roll shaft. I will need to cut notches off from each shaft for the clearance and see how it works. Tonight i got time to gather the 2nd batch from where I left it to dry. I noticed that it has much darker tint than the first batch, 2nd batch had more lemishine than the first batch did. here is a picture, left one is 2nd batch, right one is first batch. What causes that? too much lemishine? or what? They all came from the same lot that I have lubed, sized, trimmed all piled up in a bucket ready to be wet tumbled. 
|

|
Tonight i got time to gather the 2nd batch from where I left it to dry. I noticed that it has much darker tint than the first batch, 2nd batch had more lemishine than the first batch did. here is a picture, left one is 2nd batch, right one is first batch. What causes that? too much lemishine? or what? They all came from the same lot that I have lubed, sized, trimmed all piled up in a bucket ready to be wet tumbled.
http://i1169.photobucket.com/albums/r515/Walleye05/IMG_0753.jpg I get the darker colored brass more often than I get the lighter result. I've tried a bunch of different combinations and nothing seems to make sense. I'm over the bling factor, as long as they are clean, load 'em and shoot em. Once they are loaded, they go into ammo boxes, then into guns, so no one, even myself sees them for much time before they get dirty again 
|
|
Originally Posted By Husky79:
Originally Posted By 808state:
Originally Posted By Husky79:
I have another problem, the cylinder is eating the rubber hose. I guess it is not matching the speed with the shaft, like slipping, I made sure it was all dry and it is. Are you guys that are using cleanout having that too? I think I need to make a different tank without the raised part the clean out has for the cap. That part is eating the hose up and then the other end is not flat so its eating up also at the far corner area. Which way does your motor spin if you are looking down at the shaft? Are both hoses wearing or just the hose on the shaft with the pulley? Tonight i got time to gather the 2nd batch from where I left it to dry. I noticed that it has much darker tint than the first batch, 2nd batch had more lemishine than the first batch did. here is a picture, left one is 2nd batch, right one is first batch. What causes that? too much lemishine? or what? They all came from the same lot that I have lubed, sized, trimmed all piled up in a bucket ready to be wet tumbled. http://i1169.photobucket.com/albums/r515/Walleye05/IMG_0753.jpg it all boils down to how much lemi shine you use and how much/well you rinse. the better you rinse the better the shine for me along with using enuff lemi shine. i am now using 2 45 acp cases in my 1 gallon tumbler and haven't had a bad batch yet. i can't emphasize the importance of rinsing enuff. i rinse mine in the container by running water with it tiped on its side for a couple of minutes then i fill the container stick my hand in and agitate. dump and repeat. then i fill my separator pale with water and poor brass in separator and rinse some more as pale is filling. tumble in the water to get pins out then towel dry and air dry with fan. its rotating towards the motor, there is more wear on the drive shaft than the free roll shaft. I will need to cut notches off from each shaft for the clearance and see how it works. |
|
Originally Posted By GitRdone:
Rubber cap question. how are you guys getting a 4" rubber end cap to fit on the 6 x 4 reducer without adding a 4" pipe? The pics "look" like you all are not adding a short piece. Thanks my caps go right onto the reducer. the first time it has to stretch a little but it works just fine. can't tell ya how many times i have had mine on and off. |
|
Originally Posted By GitRdone:
My reducer has a 4.5" ID and 5.0" OD.. Rubber cap ID is like 4 5/8" .. Bigger hammer I guess. that explains it you are using schedule 40 pipe and not sdr 35 drain pipe. mine measures 4.25 id and 4.5 od you may want to try something like this |
|
Originally Posted By GitRdone:
nope, says "drain reduc coupling". oh well, will just add a short section I guess.. could try section of old rubber tube and hose clamp first. where do you get your reducers? had to go online and wait a week :( i buy mine at my local lowes or menards home improvement stores. |
| Biggdawg thanks for posting this and inspiring so many of us to try and build a wet tumbler for ourselves. I've built mine based off of your design and have been using it almost non-stop. So much so that I think I may need something larger than the 4"x20" barrel I initially made. Our local Lowes has the 2'x6" section of drain pipe (greenish colored one) that I see you using on your medium sized barrels. As luck would have it our Home Depot, Lowes, and Ace Hardware don't stock the 6"x4" reducer and 6" endcap. Also I'm a fan of using the drain test plug similar to the one you linked above which is what I use on my current barrel. Do you know anywhere online I can get the endpieces, especially the type of reducer which will allow me to use the drain test plug instead of the rubber cap? If you yourself have something on hand please IM me and maybe we can work something out. I've found a few pieces on Amazon but the descriptions on the dimensions are lacking and shipping is too high for me to "buy and try". |
|
I'd like to add my thank you to Biggdawg also. I pretty much lifted his updated design directly, and am excited to try it out.
Today, I finished and painted my frame... 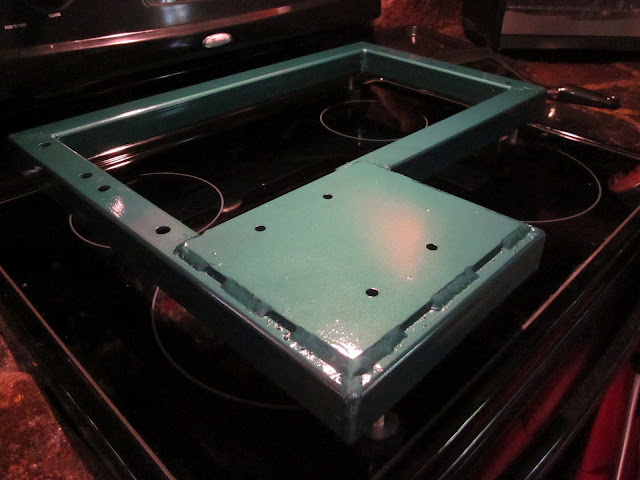
Unfortunately I'm going to have to wait until tomorrow for the paint to cure enough to reassemble and run my first load. |
I shall never misuse Rex Kwon Do. I shall be a champion of freedom and justice.
|
Originally Posted By rosejackets67:
I'd like to add my thank you to Biggdawg also. I pretty much lifted his updated design directly, and am excited to try it out. Today, I finished and painted my frame... https://lh6.googleusercontent.com/-KOT5MeMSRo0/UBGlfMPctRI/AAAAAAAADVI/7O_Bg-ucRHA/s640/IMG_0525.JPG Unfortunately I'm going to have to wait until tomorrow for the paint to cure enough to reassemble and run my first load. your welcome!! looks great. glad i could help to inspire |
Global Warming Hoax Skeptic before it was cool
Joined:
Jun 2007
Posts:
19577
EE: 100% (1)
WA, USA
|
Originally Posted By rosejackets67: I'd like to add my thank you to Biggdawg also. I pretty much lifted his updated design directly, and am excited to try it out. Today, I finished and painted my frame... https://lh6.googleusercontent.com/-KOT5MeMSRo0/UBGlfMPctRI/AAAAAAAADVI/7O_Bg-ucRHA/s640/IMG_0525.JPG Unfortunately I'm going to have to wait until tomorrow for the paint to cure enough to reassemble and run my first load.  This is one of the better threads running here. You did good BIGGDAWG.
In for finished pic. |
Selling agent for Algores carbon credit scam.
Shooting and Reloading, one hobby feeds the other.
Shooting and Reloading, one hobby feeds the other.
|
Originally Posted By dryflash3:
Originally Posted By rosejackets67:
I'd like to add my thank you to Biggdawg also. I pretty much lifted his updated design directly, and am excited to try it out. Today, I finished and painted my frame... https://lh6.googleusercontent.com/-KOT5MeMSRo0/UBGlfMPctRI/AAAAAAAADVI/7O_Bg-ucRHA/s640/IMG_0525.JPG Unfortunately I'm going to have to wait until tomorrow for the paint to cure enough to reassemble and run my first load. This is one of the better threads running here. You did good BIGGDAWG.
In for finished pic.
I was, in fact, trying to match the finish on my old RCBS single stage, and think I got pretty close. I ran out of patience and assembled it and gave it a try last night. Everything seemed to run good. Need to work on my bearing alignment and belt tension just a bit, and work on my drums a some more. I used 6" cpvc (not the green sewer pipe), a 6" cap, a 6" threaded adapter and cap all from Lowes, and I am getting leaks from the cap (as expected). Will the #437 o-ring mentioned here fix my problem? My concern is that my adapter and cap are NPT (tapered) thread, so the cap doen't bottom out in the adapter, and presumably wouldn't put the needed pressure on an o-ring to actually seal. With the price of the fititngs, I'd hate to scrap my drums. |
I shall never misuse Rex Kwon Do. I shall be a champion of freedom and justice.
|
Originally Posted By rosejackets67:
Originally Posted By dryflash3:
Originally Posted By rosejackets67:
I'd like to add my thank you to Biggdawg also. I pretty much lifted his updated design directly, and am excited to try it out. Today, I finished and painted my frame... https://lh6.googleusercontent.com/-KOT5MeMSRo0/UBGlfMPctRI/AAAAAAAADVI/7O_Bg-ucRHA/s640/IMG_0525.JPG Unfortunately I'm going to have to wait until tomorrow for the paint to cure enough to reassemble and run my first load. This is one of the better threads running here. You did good BIGGDAWG.
In for finished pic.
I was, in fact, trying to match the finish on my old RCBS single stage, and think I got pretty close. I ran out of patience and assembled it and gave it a try last night. Everything seemed to run good. Need to work on my bearing alignment and belt tension just a bit, and work on my drums a some more. I used 6" cpvc (not the green sewer pipe), a 6" cap, a 6" threaded adapter and cap all from Lowes, and I am getting leaks from the cap (as expected). Will the #437 o-ring mentioned here fix my problem? My concern is that my adapter and cap are NPT (tapered) thread, so the cap doen't bottom out in the adapter, and presumably wouldn't put the needed pressure on an o-ring to actually seal. With the price of the fititngs, I'd hate to scrap my drums. that o ring should solve your problem. if you need one i have one i will give you just get me your mailing address and i will drop it in the mail. |
|
Originally Posted By BIGGDAWG:
that o ring should solve your problem. if you need one i have one i will give you just get me your mailing address and i will drop it in the mail. [/div] Great. Glad I'll be leak free in a little while. Thanks for your generous offer, but I've already ordered up a 5-pack of o-rings as I plan on doing some experimenting with my drums and may very well need all five. I'll get pics of my tumbler all assembled and running posted up tonight. |
I shall never misuse Rex Kwon Do. I shall be a champion of freedom and justice.
Global Warming Hoax Skeptic before it was cool
Joined:
Jun 2007
Posts:
19582
EE: 100% (1)
WA, USA
|
It's just Rustoleum "Hammered Green" over Rustoleum hi build primer. Two primer coats laid on heavy and sanded after each. One very thin coat and then one heavy coat of the hammered green. The color is a pretty damn good match, the texture is just slightly off.
Ran my first load in the tumbler using a 6" long 6" drum with 5lbs media, around 70 30-30 cases and around 100 30-06 cases, plus three .308 cases that somehow got missed in the first round of brass sorting. Can't believe how good they turned out. I didn't really measure anything... long squirt of Dawn, a shake of lemishine, a random quantity of brass that looked like 'enough' and filled slightly below capacity with hot water. Little things had always bugged me about my corn cob tumbled brass, such as dirty, black letters and crud built up around the rim on rimmed cartridges. That sort of thing is not an issue here. Sparkling clean. Couldn't be happier. I spent a lot of more money than I had planned, but it was totally worth it. |
I shall never misuse Rex Kwon Do. I shall be a champion of freedom and justice.
Global Warming Hoax Skeptic before it was cool
Joined:
Jun 2007
Posts:
19601
EE: 100% (1)
WA, USA
|
Originally Posted By rosejackets67:
I'd like to add my thank you to Biggdawg also. I pretty much lifted his updated design directly, and am excited to try it out. Today, I finished and painted my frame... https://lh6.googleusercontent.com/-KOT5MeMSRo0/UBGlfMPctRI/AAAAAAAADVI/7O_Bg-ucRHA/s640/IMG_0525.JPG Unfortunately I'm going to have to wait until tomorrow for the paint to cure enough to reassemble and run my first load. What do you mean his "updated design"? |
|
Originally Posted By coues7:
Originally Posted By rosejackets67:
I'd like to add my thank you to Biggdawg also. I pretty much lifted his updated design directly, and am excited to try it out. Today, I finished and painted my frame... https://lh6.googleusercontent.com/-KOT5MeMSRo0/UBGlfMPctRI/AAAAAAAADVI/7O_Bg-ucRHA/s640/IMG_0525.JPG Unfortunately I'm going to have to wait until tomorrow for the paint to cure enough to reassemble and run my first load. What do you mean his "updated design"? he means this –– link to start of updated design 
|
Some finished pictures of mine:
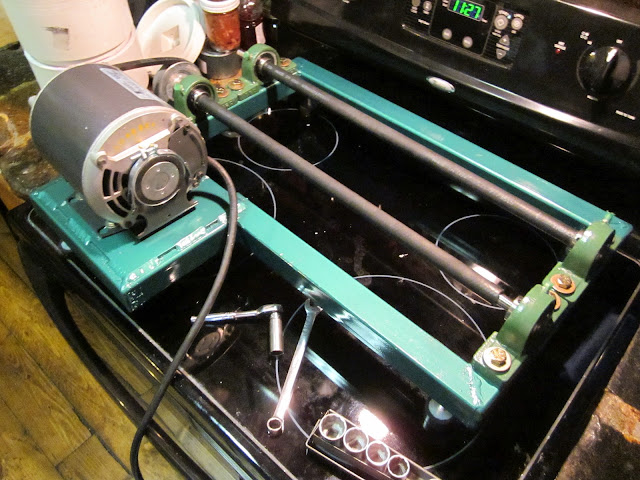

I'm still having sealing issues with my caps, even with the 437 o-rings in place. After looking at Biggdawg's threaded adapters back on page 6 or 7, the threads are cut much shallower into the depth of the adapter allowing his cap to contact the o-ring much sooner than mine. No Menards in GA, but I'm going to order the adapter he used from them online and redo my drums to see if I can get a better seal. |
I shall never misuse Rex Kwon Do. I shall be a champion of freedom and justice.
|
Originally Posted By rosejackets67:
Some finished pictures of mine: https://lh6.googleusercontent.com/-ifPuzd975Js/UCKJrfXO2KI/AAAAAAAADW4/nP0d5M-qR_0/s640/IMG_0552.JPG https://lh6.googleusercontent.com/-Jct6kQlpYv4/UCKJrhPtDJI/AAAAAAAADW8/Tao6CyFu958/s640/IMG_0553.JPG I'm still having sealing issues with my caps, even with the 437 o-rings in place. After looking at Biggdawg's threaded adapters back on page 6 or 7, the threads are cut much shallower into the depth of the adapter allowing his cap to contact the o-ring much sooner than mine. No Menards in GA, but I'm going to order the adapter he used from them online and redo my drums to see if I can get a better seal. Looking great!!!! if i was you and going to build another drum i would use the 6-4 reducer they work so much nicer when you are rinsing. i quit using my threaded drum and now it just sits in the basement. the reducer style works so much easier for me. if you have to order the fitting any how go to lowes and get the reducer and cap. |
|
Originally Posted By BIGGDAWG:
Originally Posted By rosejackets67:
Some finished pictures of mine: https://lh6.googleusercontent.com/-ifPuzd975Js/UCKJrfXO2KI/AAAAAAAADW4/nP0d5M-qR_0/s640/IMG_0552.JPG https://lh6.googleusercontent.com/-Jct6kQlpYv4/UCKJrhPtDJI/AAAAAAAADW8/Tao6CyFu958/s640/IMG_0553.JPG I'm still having sealing issues with my caps, even with the 437 o-rings in place. After looking at Biggdawg's threaded adapters back on page 6 or 7, the threads are cut much shallower into the depth of the adapter allowing his cap to contact the o-ring much sooner than mine. No Menards in GA, but I'm going to order the adapter he used from them online and redo my drums to see if I can get a better seal. Looking great!!!! if i was you and going to build another drum i would use the 6-4 reducer they work so much nicer when you are rinsing. i quit using my threaded drum and now it just sits in the basement. the reducer style works so much easier for me. if you have to order the fitting any how go to lowes and get the reducer and cap. That's just what I did, and you're 100% correct on the reducer/rubber cap/hose clamp being superior. I built a 6"x8" and a 6"x16" using a section of the green -35 pipe from Lowes. Way nicer than the threaded versions. I'll be giving the threaded drums to a guy locally who saw my tumbler and expressed interest. |
I shall never misuse Rex Kwon Do. I shall be a champion of freedom and justice.
|
Originally Posted By coues7:
So you are going from the threaded style to the rubber cap style? Yep. The threaded style is a pain compared to the reducer and rubber cap. I've now run multiple loads through my new drums, and they're good to go. |
I shall never misuse Rex Kwon Do. I shall be a champion of freedom and justice.
|
Originally Posted By coues7:
So you are going from the threaded style to the rubber cap style? the reducer style seals better and is easier to rinse the brass in. the threaded style has the bigger opening for getting stuff in and out of the drum. but i like the reducer style the best. |
|
I'm gonna get in on this too. I want bling !!!
My 2 drums are finished, a 1 gal and a 2 gal based off of Bigdawg's design and they look great ! Painted them red. I'm getting the other parts together for the frame but have a couple questions to get this right the first time. How do you keep the shafts from sliding out of the pillow bearings? Is there a set screw or a collar ? The set screw would be included, but if I need a collar what is the proper name of that ? The 3/4'' bearing on the end to keep the drum from walking...what is the name for that ? I'm looking at usa bearings web site and don't see anything that looks like it. Any help you can give to help me locate these few parts is greatly appreciated. Thanks. |
|
Originally Posted By Forty5Cal:
I'm gonna get in on this too. I want bling !!! My 2 drums are finished, a 1 gal and a 2 gal based off of Bigdawg's design and they look great ! Painted them red. I'm getting the other parts together for the frame but have a couple questions to get this right the first time. How do you keep the shafts from sliding out of the pillow bearings? Is there a set screw or a collar ? The set screw would be included, but if I need a collar what is the proper name of that ? the pillow block bearings from usa bearing and belt have set screws that hold the shafts in place this is the link to the bearings i use pillow block bearings The 3/4'' bearing on the end to keep the drum from walking...what is the name for that ? here is the link to the bearings i use this is the name R4A RS New Bearing.25x.75x .281 bearings I'm looking at usa bearings web site and don't see anything that looks like it. Any help you can give to help me locate these few parts is greatly appreciated. Thanks. |
|
Originally Posted By Forty5Cal:
Thanks Biggdawg, that's the last items on my list. Going to order them now. BTW, your latest tumbler looks fantastic ! I hope mine turns out as good. take your time measure twice cut once
and yours will turn out great too. post up some pics when you get it done. |
|
I finally finished my tumbler last night. Took some pics of it today.
Here's the tumbler and the drums. 
This is the 1 gallon drum. 
This is the 2 gallon drum. I finished it at about 6pm last night and couldn't wait to try it out. Not being exactly sure of the ingredient proportions I decided to do a test batch using some brass from the scrap bucket. They turned out great ! This is a pic of the scrap brass next to the scrap I tumbled for only 2 hours in the 1 gallon unit. 
I'm very impressed with this stainless tumbling idea. I never would have thought you could get brass so clean. It looks brand new and makes spotting defective cases much easier. I had 45 ACP brass in the scrap bucket, after tumbling them in SS I found some of them are not defective. When they were dirty they looked like they had cracks, etc. so, into the bucket they went. Today I'm running 10 lbs of .223 brass in the 2 gallon drum with 10 lbs of media. I'll let it go for 3 hours and check it. No leaks on either drum. This is great. I love shiny brass. Thanks to Biggdawg for answering questions, posting his pics and explaining how to do this. Also, thanks to everybody else for posting pics of their tumblers. I took a little from them all to make mine. ETA: I'm using a 1'' and a 4'' pulley and by counting the actual revolutions it's at 87 RPM's drum speed. |
|
Originally Posted By We-rBorg:
I've been looking for some 8" or 10" DWV, but am having a hard time finding it locally. I feel like the 8" and 10" pipe is too expensive to be worth it in this application. How much capacity do you really need? I'd love to hear biggdawg's opinion on the larger drums. I've read the whole thread a couple of times, but don't recall pros/cons of different diameters being discussed. I've now built four drums, but all have been either DWV or SDR-35 6" pipe. |
I shall never misuse Rex Kwon Do. I shall be a champion of freedom and justice.
|
for the average person the 6" drums are fine.
the larger 8" drum is more efficient because it has a taller/larger fall to make the brass and media tumble. i do agree the 10" is just way too much money to be worthwhile. the 8" stuff i can source locally for reasonable money but it is still 3 times as much as 6" stuff. but it gives you more capacity in a smaller space and i also think 16-24" long 6" drum is as long as you want to go and that gives you 2-2.5 gallons capacity. or 8-12lbs brass capacity in the same space you can get a 3.5 gallon drum out of 8" and it is more efficient –– cleans faster than a 6" no for most reloaders 2 gallons is enuff and the 6" drum is a good fit. i personally use my 1gallon drum the most now that i have all my 20,000 + cases cleaned. |
|
I used schedule 40 in 6'' for both of mine. It's very expensive. If I had known how much the end caps were ($30 each) I would have went with a cheaper pipe. This stuff is 1/4'' thick, it keeps the noise down but for that price I can live with the noise.
If I have to make another it'll be cheaper pipe. The caps in the end that come out are called ''test plugs''. They have rubber inside, when you tighten the nut it compresses the rubber creating a tight seal. They work very well. No leaks. My 1st batch of brass in the 2 gal drum turned out great today, but there was something strange waiting for me inside. 
There were only 2 of these out of 10 lbs of brass. They are pinkish color with black blobs on them. What did this and how do I keep it from happening again ? I used a 5 second squirt of Dawn and 3 .45ACP cases of Lemishine in 2 gallons of water. Too much or not enough of something ? |
How i built my own rotary tumbler (Page 8 of 31)
Armory Sponsor