|
Posted: 4/30/2011 9:25:23 PM EDT
[Last Edit: TheGrayMan]
Difficulty rating: Medium
Materials required: network camera (appropriately rated for environment) electrical box power supply PoE adapter brick Wireless bridge Connector N-male to RPSMA adapter Antenna miscellaneous tools basic networking know-how A common request from forum members is for a wireless camera setup. Multiple posters have asked me the best way to put a camera or three out in their barn... or their detached garage... or in their storage building... or their shed... or at the end of their driveway... or across the street. It's usually a situation where running actual network cable would be either prohibitively expensive, or beyond the skill/interest of the basic arfcommer. This presents a problem, as the entire world isn't one big LAN. There is a solution... and that is to use a wifi camera. There are pre-made wifi cameras that you can purchase... Linksys, Dlink, Panasonic, Logitech, dropcam... they come in all sorts of shapes, sizes, and configurations. Unfortunately, the consumer-grade stuff is often lacking in the picture quality dept (most are VGA or less in resolution)... they're basically glorified webcams. Their wireless implementations can also be spotty, lose connection to the Access Point and have to re-associate... etc. They often use integrated antennas, which greatly limits your ability to direct the signal where you want it to go. Fortunately, the DIY-type can do far better. Bending a prosumer-grade wireless bridge to the task, and using the camera of their choice (including vandal-resistant high-end multi-megapixel network cameras with built-in DVRs, etc). 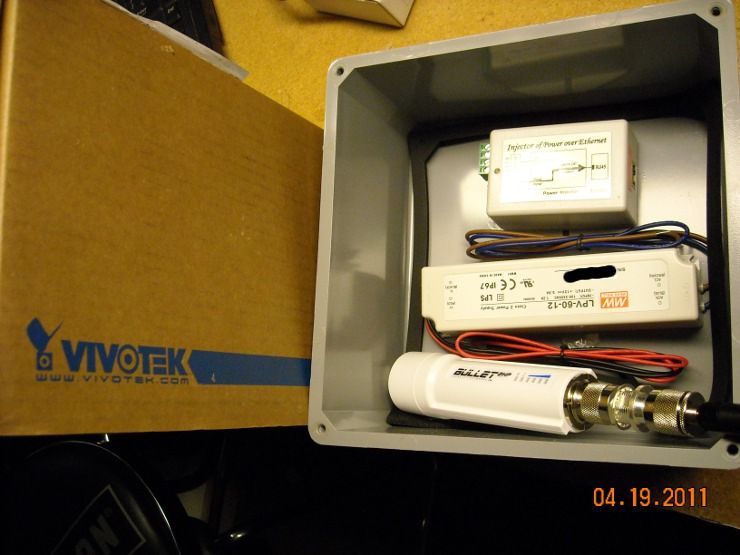
We'll start by mounting the wireless bridge in the waterproof enclosure. We're going to want it mounted close to the bottom and out-of-the way of the rest of the hardware. The bulkhead N-female-to-N-female connector will pass the signal through to the external antenna: 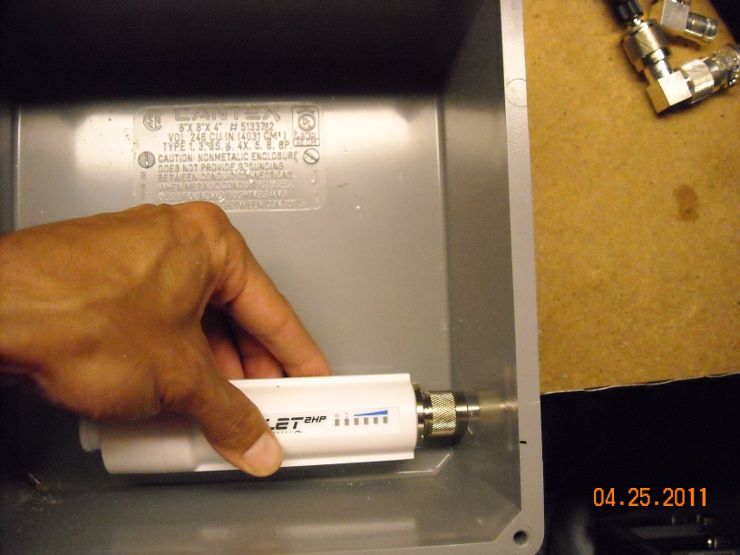
Drill the appropriate hole (slightly larger than 1/2"): 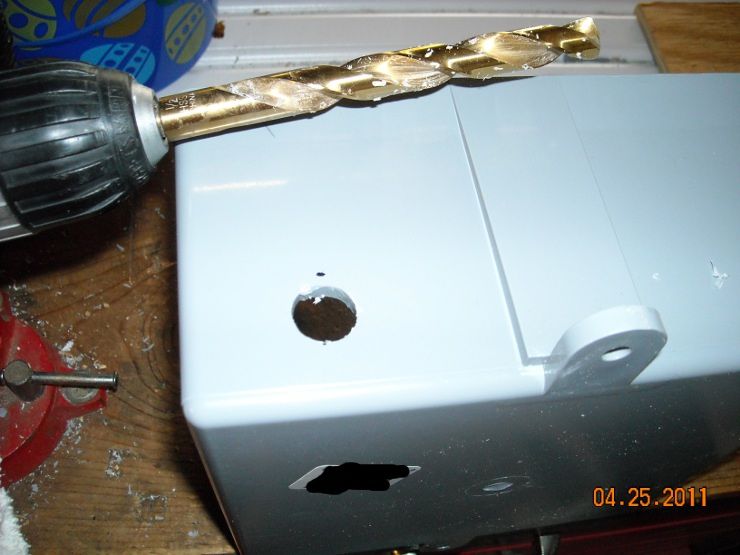
Put the bulkhead N-female-to-N-female connector through the hole, tighten the lock-nut on the inside, and hook it up: 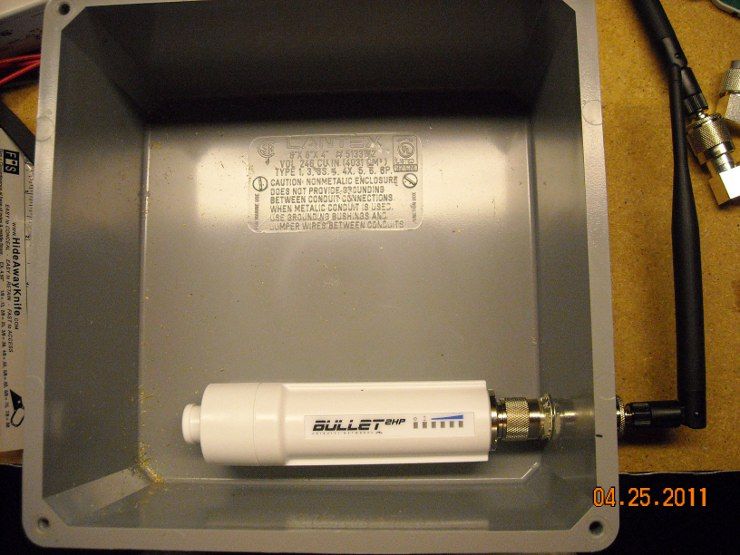
Power it up with a PoE power brick (the black one you see is made by Ubiquiti for that exact purpose... I only use it for testing/configuring. The bridge requires "passive" PoE... it does NOT follow the standard 802.3af spec, so plugging that bridge into a standard PoE switch will not work): 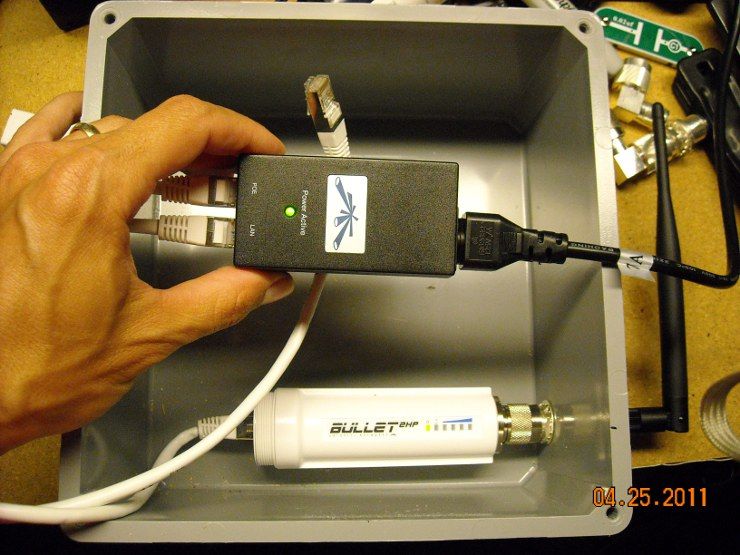
Now we attach a laptop to the other port on that black PoE power brick. This will allow us to log into the bridge and configure it for our purposes. Ubiquiti hardware comes from the factory with an IP address of 192.168.1.20, so you'll need to set your laptop's wired LAN connection to some format of 192.168.1.x (with "x" being a number between 2 and 254). Once you've done that, use your browser to connect to 192.168.1.20, and use the login/pass of ubnt/ubnt (hard-coded from the factory). 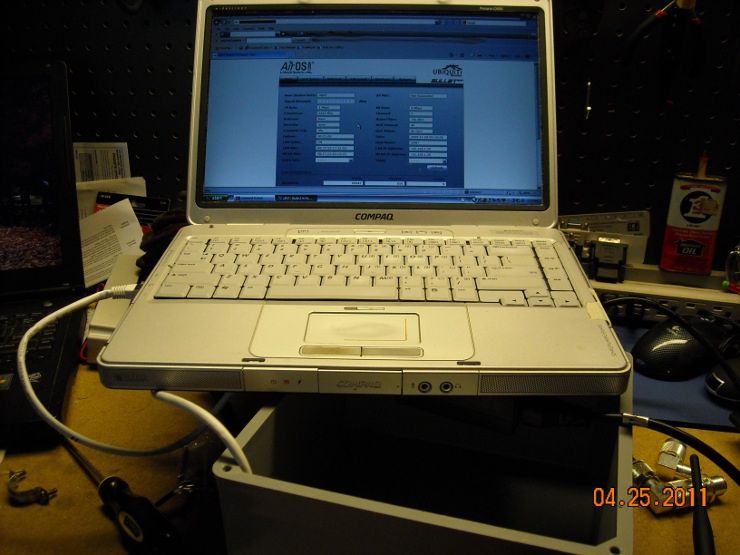
You'll know it's working if the second light on the AP/bridge lights up (the first light is the power light... the second is the LAN light... the rest are signal-strength for the WLAN) 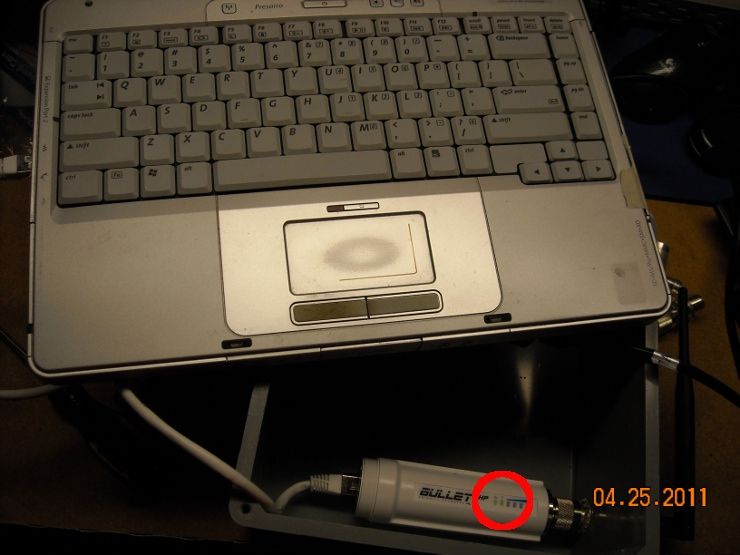
Set an appropriate IP address for your LAN... in this case, we set it to 192.168.0.10, since our camera has an IP address of 192.168.0.137. Once you do this, and apply the change, you'll have to change the IP address of your laptop to something in the 192.168.0.x format in order to access the bridge again. 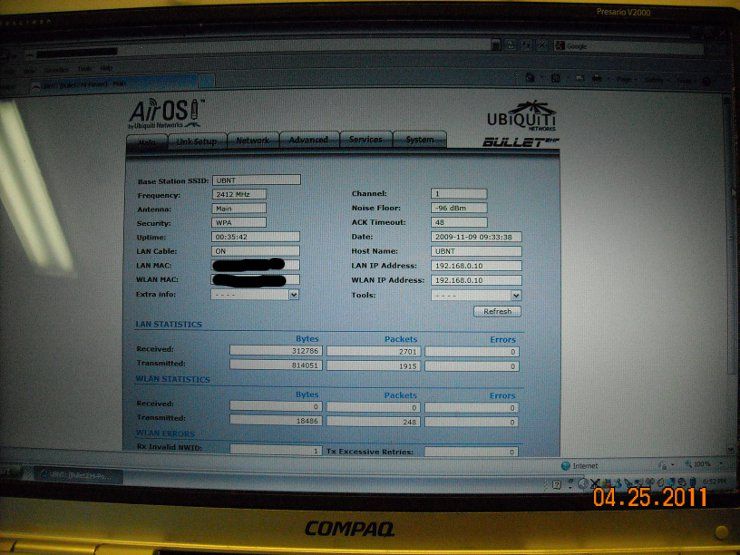
Depending on your wireless network setup, you will probably want the Ubiquiti bullet in "bridge" mode. This will allow the device to connect to your existing wireless LAN, or to any other computer with the appropriate wireless key. 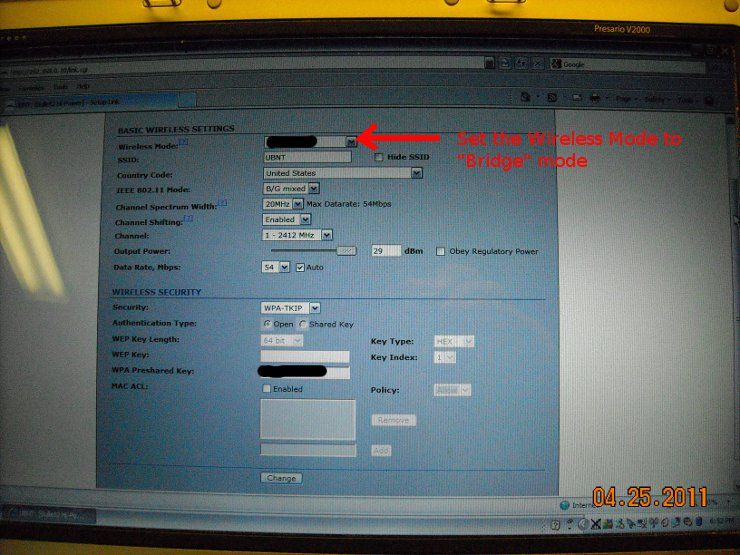

Once that's done, we'll move on to the rest of the build. |
|
|
|
|
[Last Edit: TheGrayMan]
[#1]
Continued from prior post:
Now that we have the network hardware configured the way we want, we can continue constructing our wireless box. The PoE power brick we chose is a DC-to-DC converter, and turns 12VDC into 48VDC. 48VDC is the precise voltage called-for in the 802.3af spec, and is what a PoE security camera will be expecting. The little white box takes 12VDC through little, green screw-down connectors: 
And here's a close-up: 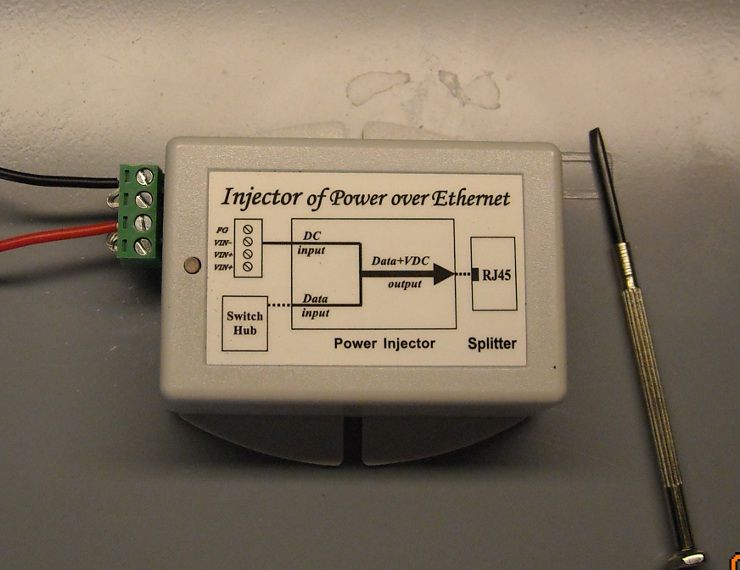
The next thing we need to do is make a power/network cable for the Ubiquiti bridge. The bridge only runs at 100MB speed, and thus two of the twisted-pairs are left unused for data. Instead, the AP uses those twisted pairs to draw power. We start by making a "shorty" network cable, of the standard B-type on one end, and a slightly different config on the other: 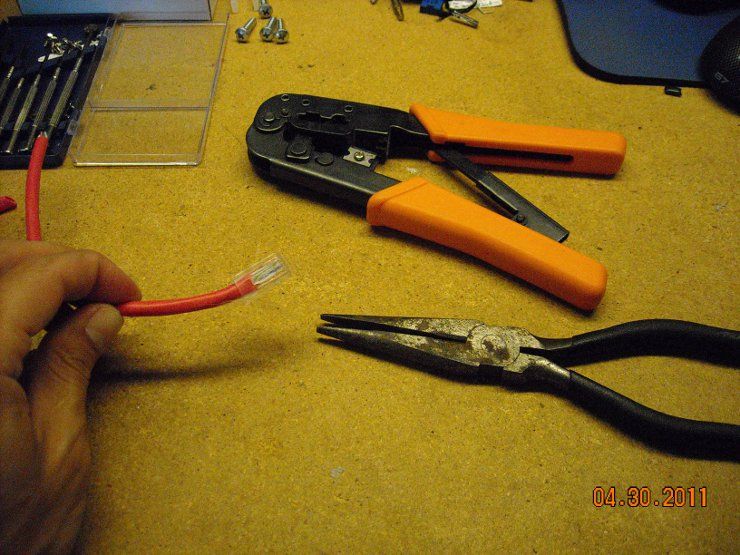
The blue and brown pairs are going to deliver power to the AP. Consequently, on the other end of that short cable, we make a regular B-type cable... except we leave the brown and blue pairs hanging out. We put the orange and green pairs in their usual places in the RJ-45 connector. You can't really tell from this picture, but the blue pair goes to the positive output from that Meanwell PSU (we just poke them into the same screw-down terminals that are connected to the PoE brick, and screw them down tight), and the brown pair goes to the negative screw-down terminals. Easy as pie. The camera is a Panasonic NF-302 (I think), and has an SD card to store its own images (circled in the picture). The camera essentially acts as its own DVR... which will be important to this camera. It will be running completely autonomously, and not connected to a LAN. The owner will be using a laptop to log into it remotely and see if anything has transpired. 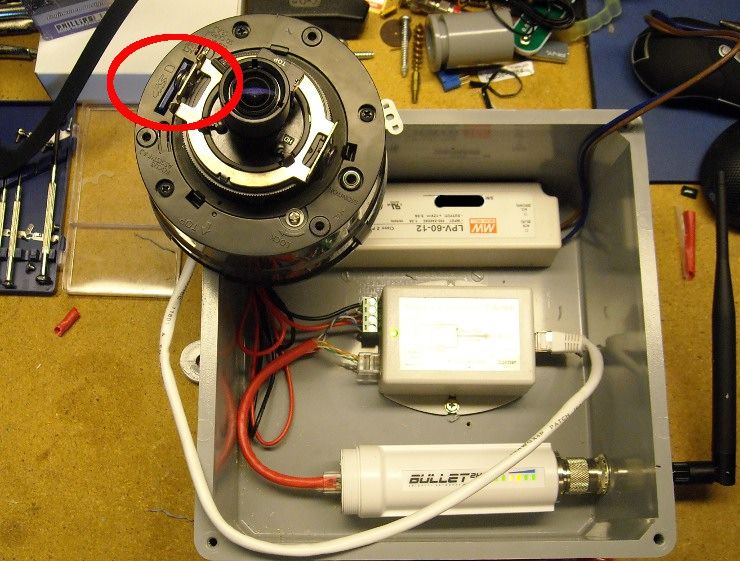
Here's the camera pointing at a random website on another laptop: 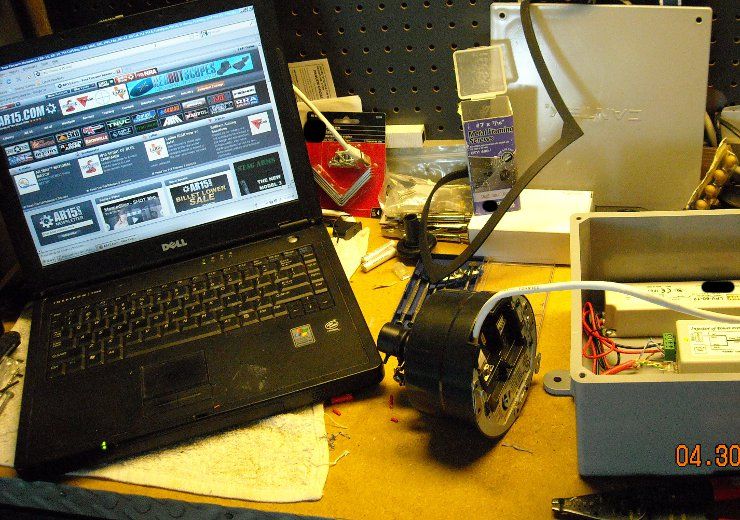
And here's the view through that camera from another laptop across the room, accessing that video stream across the wifi link. 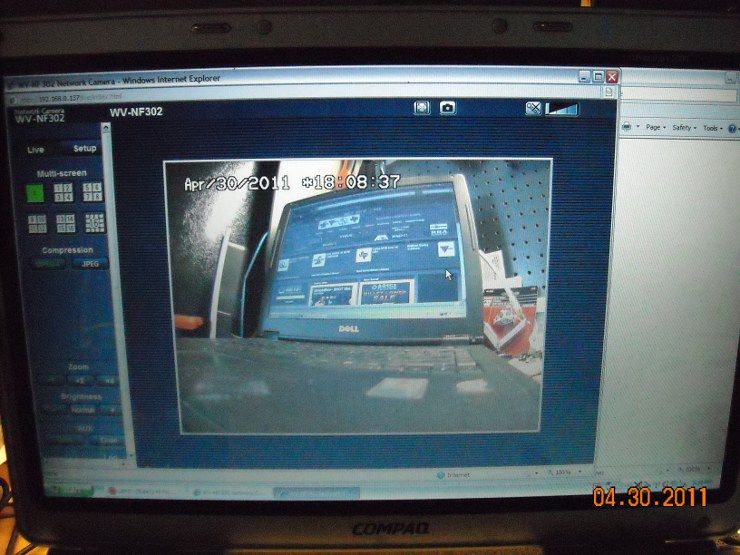
|
|
|
|
|
[#2]
Excellent info - thanks for the tutorial
|
|
|
|
|
[#3]
OST
|
|
|
|
|
[#4]
Thanks
Txl |
|
|
|
|
[#5]
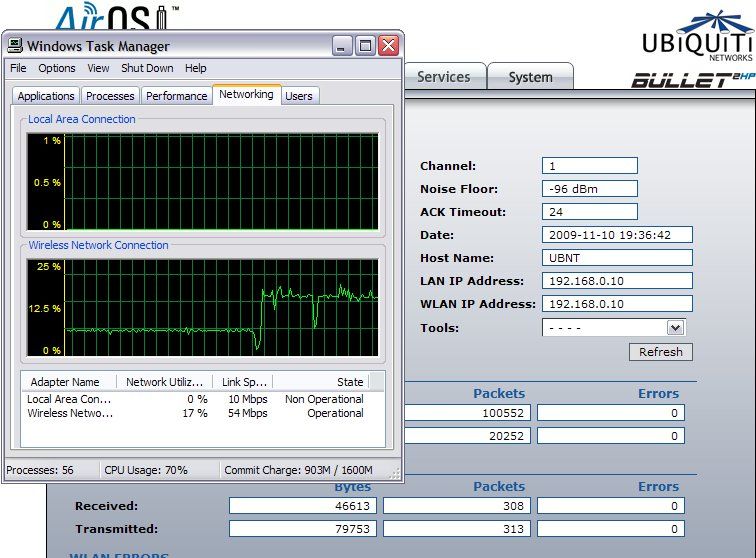
And just to give you an idea of the network utilization between different types of camera streams...
These screenshots are taken from the same Panasonic NF-302 camera. The Pano does MPEG4 and JPEG streams, and here you see listed the network utilization percentages for both. The lower network utilization is obviously the MPEG4 stream at 640x480 (VGA). Bumping the resolution up to 1280x960 and using JPEG compression uses quite a bit more network pipe... and that's something in short supply on a wireless network (more protocol overhead and interference than a hard-wired network). Just something to consider before you start putting up wireless cameras willy-nilly. 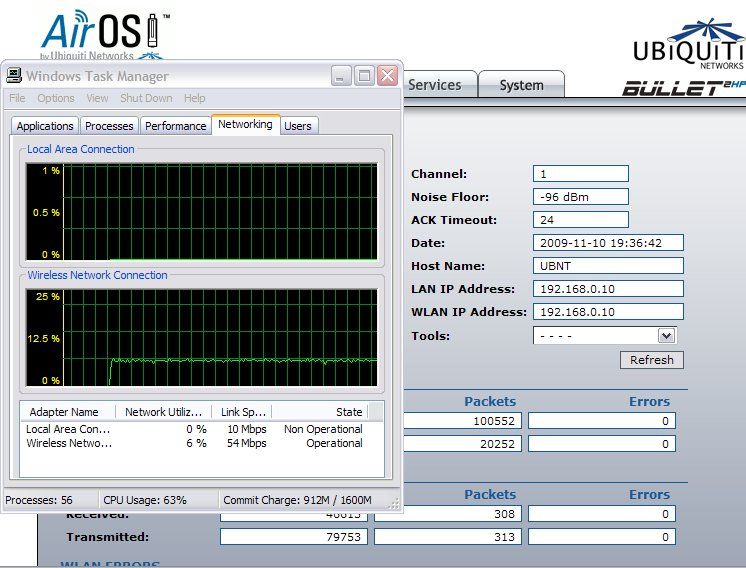
|
|
|
|
VA, USA
|
[Last Edit: chrismartin]
[#6]
Originally Posted By TheGrayMan:
And just to give you an idea of the network utilization between different types of camera streams... These screenshots are taken from the same Panasonic NF-302 camera. The Pano does MPEG4 and JPEG streams, and here you see listed the network utilization percentages for both. The lower network utilization is obviously the MPEG4 stream at 640x480 (VGA). Bumping the resolution up to 1280x960 and using JPEG compression uses quite a bit more network pipe... and that's something in short supply on a wireless network (more protocol overhead and interference than a hard-wired network). Even better is when the camera supports H.264 streams. When you get into the megapixel cameras, it's almost a must. I have a camera here at my house that I'm testing that will go up to 2048x1536@20fps (1920x1080@30fps). When you start recording megapixel surveillance, you'll need MPEG4 or H.264 just to keep from filling up your hard drives. I would also note that if you combine your generic wireless bridge with a small switch, you can hook up multiple cameras to those remote locations. Also, if you need more cameras on wireless and don't really have the bandwidth, you can also reduce the frames per second to help accommodate the extra cameras. Not optimal, but could be better than nothing for those remote locations. I'm not a fan of the NF-302's and similar models from Panasonic. Nice cameras, but a pain in the ass when you have 30-40 of them. Just way too hard to deal with in bulk (firmware updates, bulk configuration, etc) AXIS and IQ Invision are a ton better dealing with tons of cameras all at once. I wish other companies were on the ball with the IP software. For those wondering about IP cameras. Don't skimp. Most of the consumer IP cams that are cheap are crap. All the ones that I've messed with from DLink, Linksys, Trendnet, etc. have all been mediocre at best and total crap at worst. My personal favorite for home use is AXIS. |
|
|
|
[#7]
tag
|
|
|
|
|
[#8]
Originally Posted By chrismartin:
Originally Posted By TheGrayMan:
And just to give you an idea of the network utilization between different types of camera streams... These screenshots are taken from the same Panasonic NF-302 camera. The Pano does MPEG4 and JPEG streams, and here you see listed the network utilization percentages for both. The lower network utilization is obviously the MPEG4 stream at 640x480 (VGA). Bumping the resolution up to 1280x960 and using JPEG compression uses quite a bit more network pipe... and that's something in short supply on a wireless network (more protocol overhead and interference than a hard-wired network). Even better is when the camera supports H.264 streams. When you get into the megapixel cameras, it's almost a must. I have a camera here at my house that I'm testing that will go up to 2048x1536@20fps (1920x1080@30fps). When you start recording megapixel surveillance, you'll need MPEG4 or H.264 just to keep from filling up your hard drives. I would also note that if you combine your generic wireless bridge with a small switch, you can hook up multiple cameras to those remote locations. Also, if you need more cameras on wireless and don't really have the bandwidth, you can also reduce the frames per second to help accommodate the extra cameras. Not optimal, but could be better than nothing for those remote locations. I'm not a fan of the NF-302's and similar models from Panasonic. Nice cameras, but a pain in the ass when you have 30-40 of them. Just way too hard to deal with in bulk (firmware updates, bulk configuration, etc) AXIS and IQ Invision are a ton better dealing with tons of cameras all at once. I wish other companies were on the ball with the IP software. For those wondering about IP cameras. Don't skimp. Most of the consumer IP cams that are cheap are crap. All the ones that I've messed with from DLink, Linksys, Trendnet, etc. have all been mediocre at best and total crap at worst. My personal favorite for home use is AXIS. My experience mirrors yours. Axis makes good stuff, though I went big on Mobotix around the casa... amazing capabilities. |
|
|
|
TX, USA
|
[#9]
So thats +12V DC powering the WiFi bridge straight off the PSU, and then +48V DC PoE to the camera? Is the camera network configured before or after connection the bridge?
|
|
|
|
[Last Edit: TheGrayMan]
[#10]
Originally Posted By 0100010:
So thats +12V DC powering the WiFi bridge straight off the PSU, and then +48V DC PoE to the camera? Is the camera network configured before or after connection the bridge? Correct. That meanwell PSU delivers 12VDC to the screw-down terminals on the left-hand side of the PoE power brick. The Wifi bridge grabs 12VDC from those same terminals through that modified Cat6 cable I made. The right-hand side of that PoE brick delivers network connectivity and 48VDC. The 12VDC PSU powers the whole shebang... the PoE injector merely turns some of it into 48VDC, since that's what the bulk of PoE-capable cameras require. ETA: I configured the camera before I plugged it in. |
|
|
|
|
[#11]
Excellent thread!
|
|
|
|
|
[#12]
My little Coolpix just doesn't do closeups... so I got out the D90 and a Macro lens:
Here is a better picture the left side of that PoE brick. It takes in 12VDC and runs standard PoE-spec 48VDC out the other end (on the appropriate twisted pairs for the 802.3af spec... so it should run any PoE camera). Note the blue and brown twisted pairs that are plugged into the same terminals? Those are taking some of that 12VDC down that "shorty" cable to the Ubiquity bridge (which takes "passive PoE," and can run on 12VDC). Other than having the blue and brown pairs pulled out, that ethernet cable-end to the right has all the other pairs in their standard slots (1,2,3, and 6). 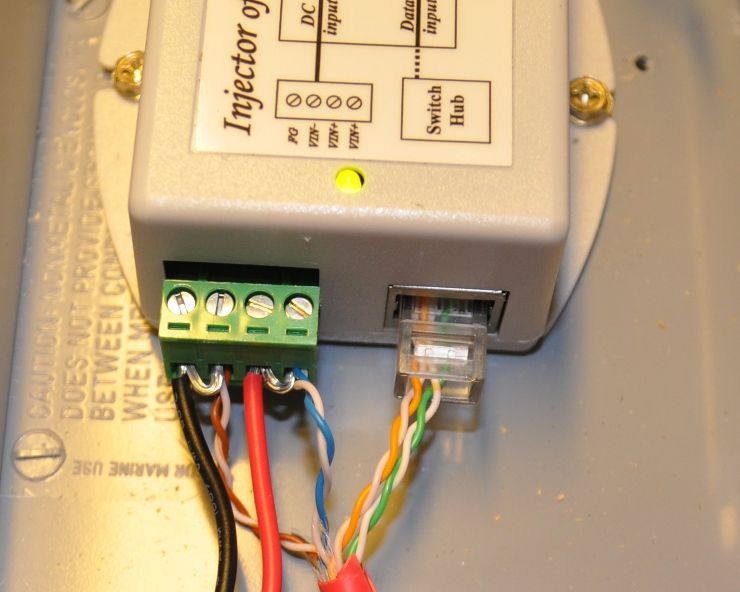
Clearer? |
|
|
|
|
[#13]
And just to complete the info for anyone thinking of running one of these off-the-grid:
Here is the power consumption of that entire box, plus a Vivotek 2MP camera. The camera is streaming across that wifi bridge, without fan, heater, or IR LEDs turned on. That's 10W at 120VAC. 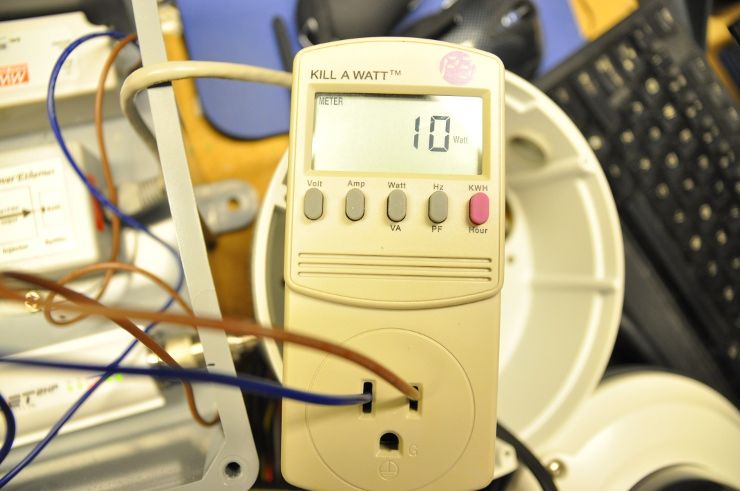
Here it is with the cooling fan running... it's pulling another whole watt: 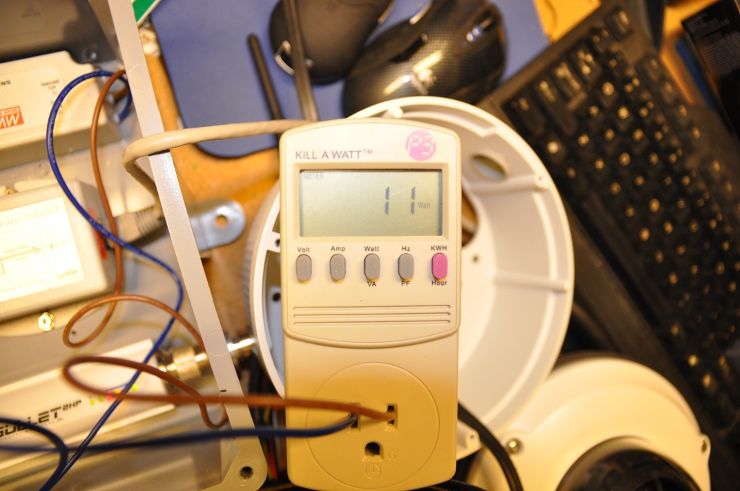
Here it is in the dark, with IR LEDs activated on the camera, plus the fan running: 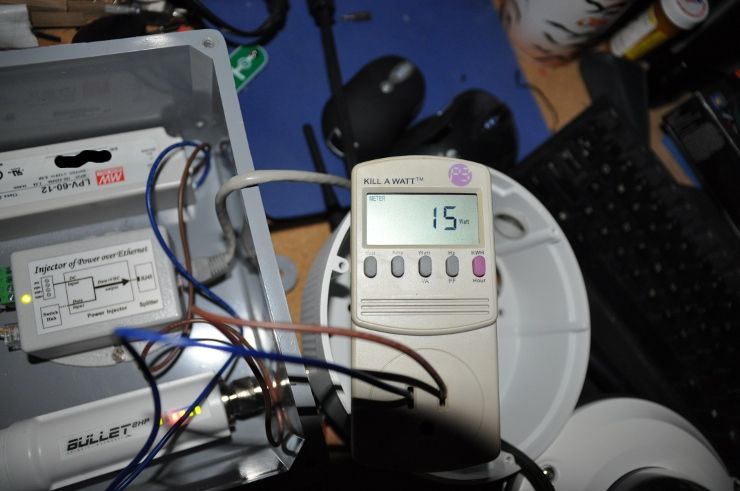
So a grand total of 15W of power consumption when connected to 120VAC... about 0.20 Amps on the Kill-A-Watt. |
|
|
|
|
[#14]
great thread OP.
tag for future reference. |
|
|
|
TX, USA
|
[#15]
Close up pic is great, thanks! Very awesome design - small, rugged, low power, tightly integrated; will have to build a couple one of these days...
|
|
|
|
[#16]
OK... now we get to the installation phase of this project.
Our planned site is a second home owned by a friend of mine. He stays there sometimes when traveling, and hopes to rehab it at some point. The immediate neighbors are reasonable people, but some of the rest of the neighborhood isn't the greatest, and random people sometimes come up to the house and pound on the door, despite the fact that nobody has lived there for >10 years. Things have been stolen, etc. The home has no internet access, and no phone... but does have power. Working with that, an autonomous camera solution was felt to be the answer. Planned mounting site is in a carport, that also covers the home's only entrance door: 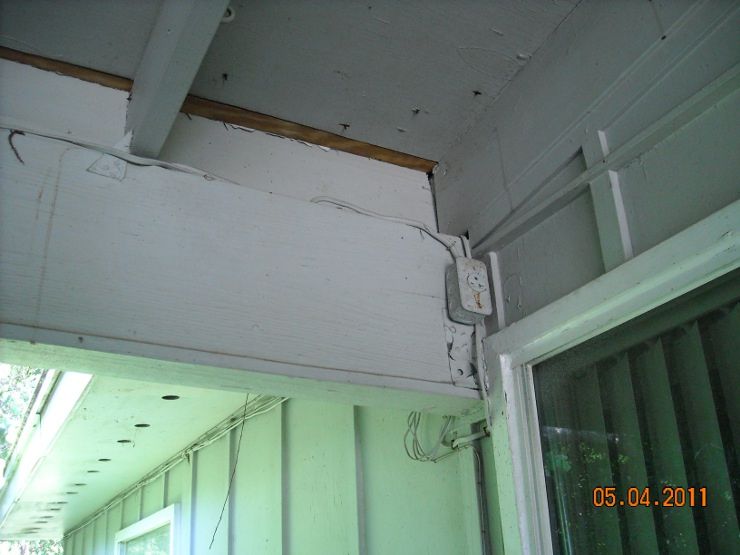
Here's a side view of that beam... the power/network box will be mounted on the other side of that beam, out of sight: 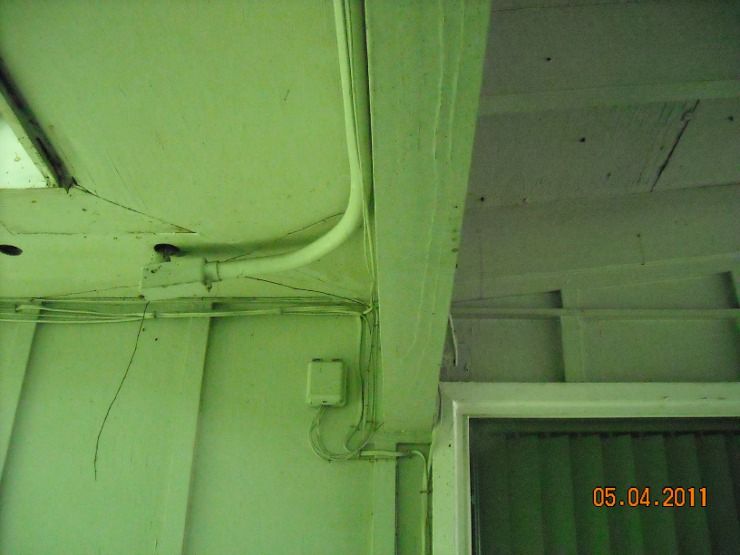
The gray box should blend in well with the gray paint, and be very inconspicuous: 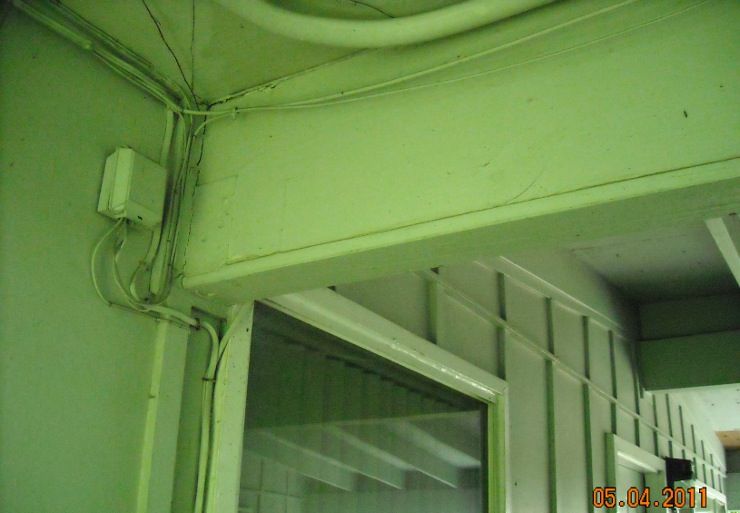
Notice that outlet in the first picture? We're going to tap into that to power our camera box. Here we're confirming it's live, and that we need to shut off the power to work on it (NEVER, EVER work on live circuits if you can help it... ALWAYS turn off the breaker first) 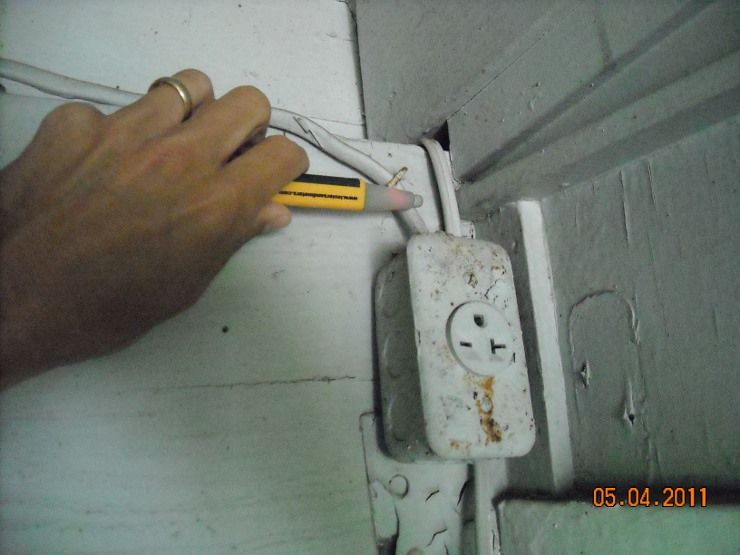
Except this place doesn't have a breaker box... this place is so old that is actually has a fuse box. You don't see this kind of thing in modern homes... and you have to be extra careful. 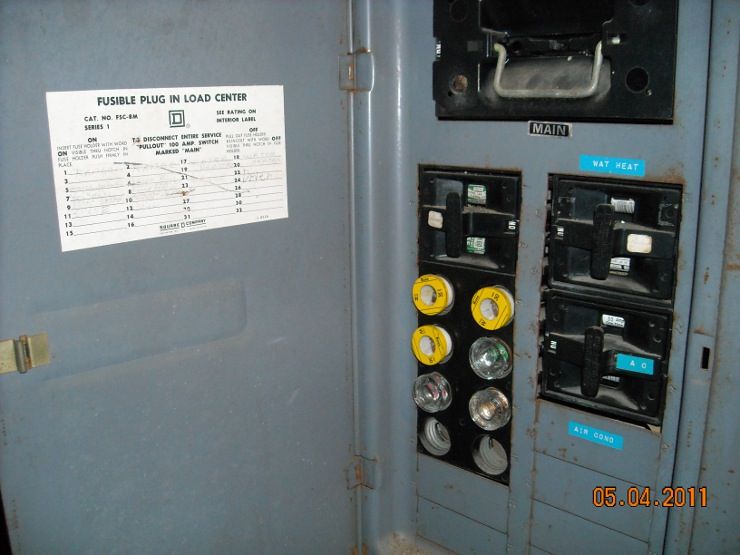
Unscrewing individual fuses didn't kill the power to that outlet, so I had to kill the mains. Killing the main power required pulling the big fuses at the top of that ... big buggers, they are... 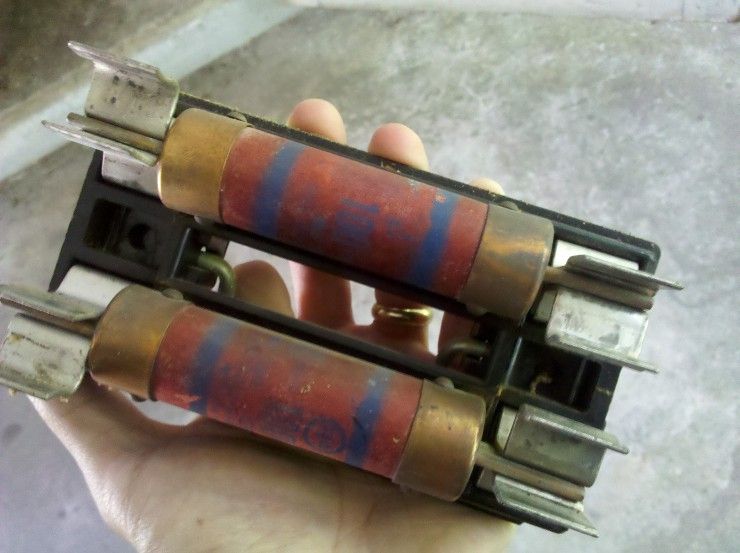
Pulling that outlet down and taking it apart took some doing... it was completely corroded (naturally, since it was not an outdoor-rated wet location outlet). It was full of spiders and debris... F*cking electrical safety... how does it work? 
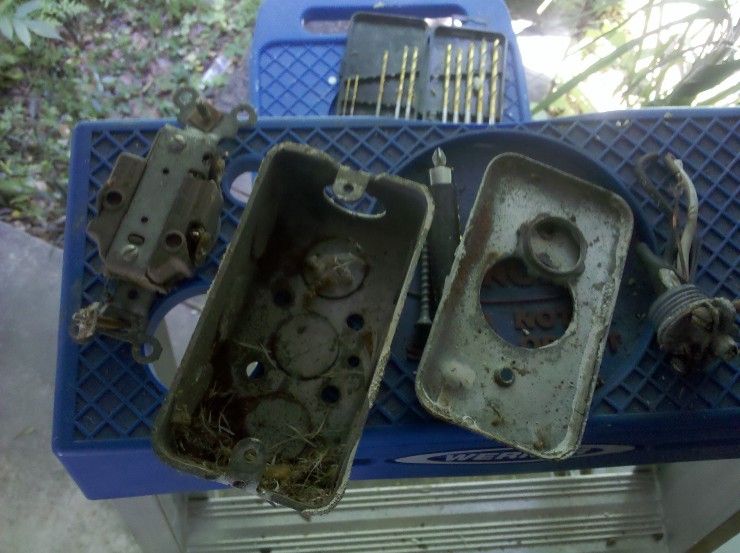
That's better... with an actual outdoor-rated box, and rubber-grommetted connectors. Neatness counts. 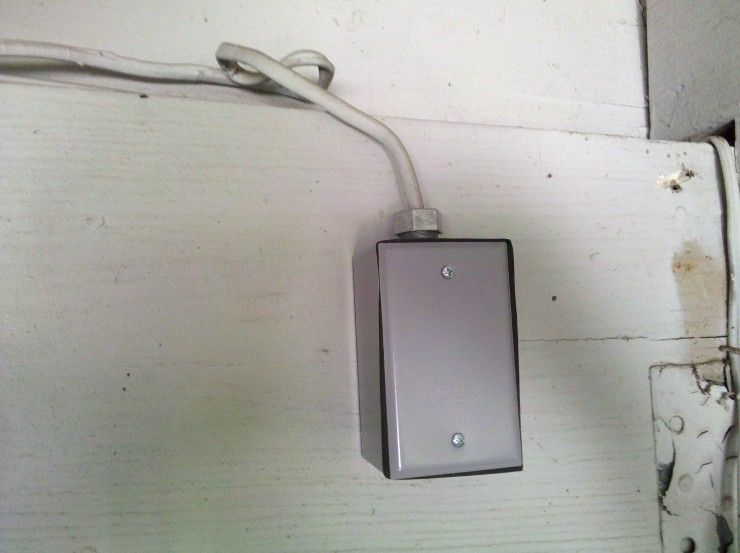
Here's power being run to that box, through the beam: 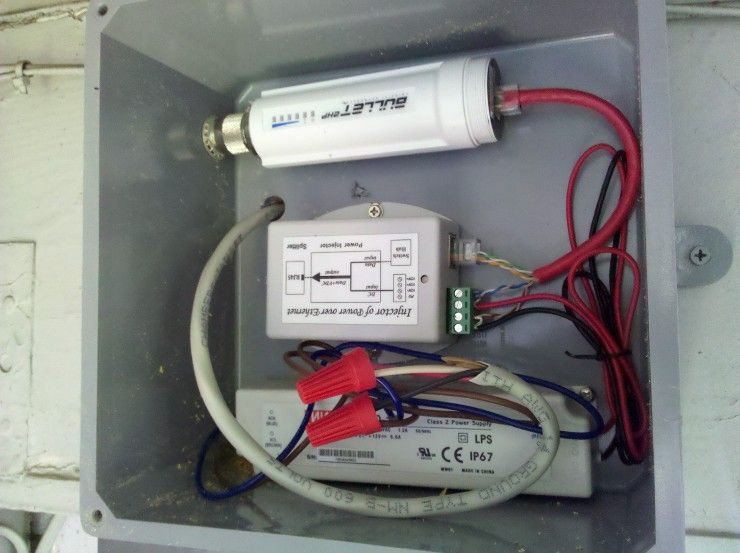
Here it is powered up, with cat5 running through the upper corner of that box to the camera on the other side/top of the beam. I'll have to seal that hole with silicone, since it took an odd angle to get the cat5 where it needed to be: 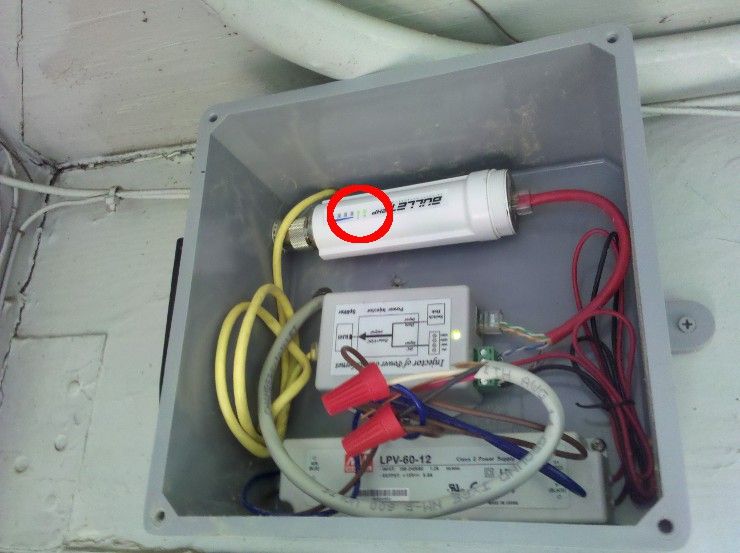
Final mounted camera... very low-profile, and only visible if you actually walk into the carport. 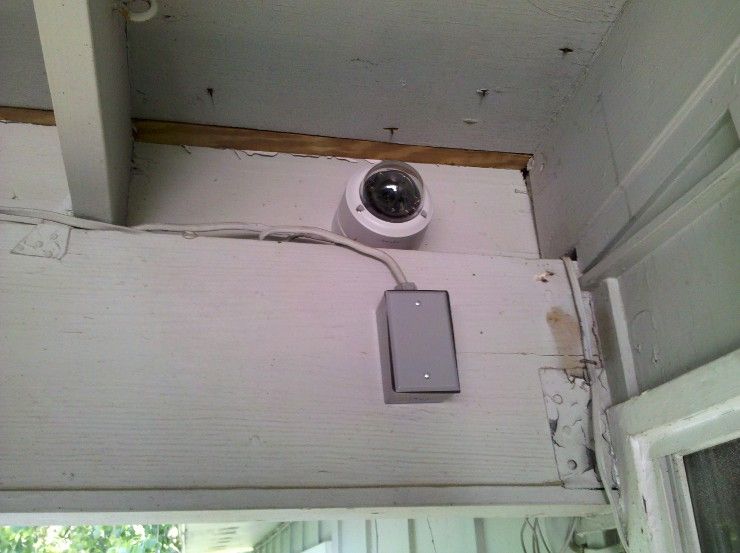
And here's what it sees during the daytime. There is a motion-activated porch light out there at night (added specifically for this project), so this day-only camera is also usable at night. That picture was pulled off my Droid phone from out in the street, via that wireless bridge... the blurred area you see is where I was sitting. 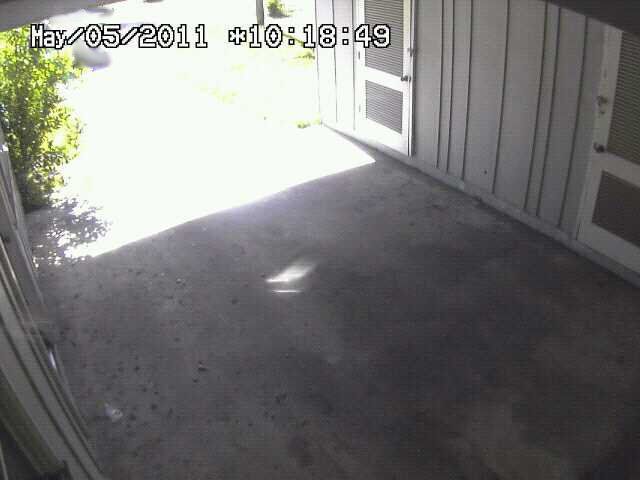
|
|
|
|
OH, USA
|
[#17]
Wow! Thanks for the info man!
|
|
|
|
[#18]
Originally Posted By GunSafeHaven:
Wow! Thanks for the info man! No problem. The next requested how-to is for a home-brew DVR, so I'll get on that one next. It will be a separate thread. I plan to do some more of these... quick survey: would the posters in this thread prefer them be tacked, or simply marked "no archive?" |
|
|
|
|
[#19]
Originally Posted By TheGrayMan:
Originally Posted By GunSafeHaven:
Wow! Thanks for the info man! No problem. The next requested how-to is for a home-brew DVR, so I'll get on that one next. It will be a separate thread. I plan to do some more of these... quick survey: would the posters in this thread prefer them be tacked, or simply marked "no archive?" Tag for homebrew DVR, I have a few boxes sitting here unused. |
|
|
|
|
[#20]
Originally Posted By jeffco55:
Originally Posted By TheGrayMan:
Originally Posted By GunSafeHaven:
Wow! Thanks for the info man! No problem. The next requested how-to is for a home-brew DVR, so I'll get on that one next. It will be a separate thread. I plan to do some more of these... quick survey: would the posters in this thread prefer them be tacked, or simply marked "no archive?" Tag for homebrew DVR, I have a few boxes sitting here unused. Here toy go! |
|
|
|
|
[#21]
Originally Posted By jeffco55:
Originally Posted By TheGrayMan:
Originally Posted By GunSafeHaven:
Wow! Thanks for the info man! No problem. The next requested how-to is for a home-brew DVR, so I'll get on that one next. It will be a separate thread. I plan to do some more of these... quick survey: would the posters in this thread prefer them be tacked, or simply marked "no archive?" Tag for homebrew DVR, I have a few boxes sitting here unused. The how-to is up. Question: should I add an Operating-System how-to section for those who have never built a PC before? |
|
|
|
|
[#22]
Originally Posted By GunSafeHaven:
Wow! Thanks for the info man! +1 |
|
|
|
|
[#23]
Great thread, can we tack it?
|
|
|
|
|
[#24]
OP, great thread! So there are no bandwidth licenses to buy for you wireless?
|
|
|
|
|
[#25]
Originally Posted By UNDERTOW4507:
OP, great thread! So there are no bandwidth licenses to buy for you wireless? Nope... uses standard wifi |
|
|
|
|
[#26]
Originally Posted By TheGrayMan:
Originally Posted By UNDERTOW4507:
OP, great thread! So there are no bandwidth licenses to buy for you wireless? Nope... uses standard wifi I see. |
|
|
|
|
[#27]
Bump to keep thread outa archives
|
|
|
|
|
[#28]
Good power supply link?
|
|
|
|
|
[#29]
Originally Posted By nikroft:
Good power supply link? I get 'em off amazon. I prefer the Meanwell brand... they seem to be bulletproof, and I've yet to have one fail. Link |
|
|
|
OH, USA
|
[Last Edit: chronium76]
[#30]
This needs to be tacked
|
|
|
OH, USA
|
[#31]
Originally Posted By BlackOps_1:
Great thread, can we tack it? |
|
|
|
[#32]
Tagged for future use (and the general level of expertise)
|
|
|
|
|
[#33]
Originally Posted By chronium76:
Seriously Originally Posted By chronium76:
Originally Posted By BlackOps_1:
Great thread, can we tack it? |
|
|
|
IN, USA
|
[#34]
This is really great!
I'm borderline incompetent, but have both an unsed bullet with antenna and a nanostation. I haven't made it work yet... Can the next Tutorial be about setting up a wireless network from an existing router? My situation. Wireless router in house. Shop 200' away with line of sight. Would like to set up shop with it's own wireless router, for cell phones, tablets and desktop, from the internet already in the house. The settings on IP's and flowing through the routers has limited my success I believe. |
|
|
 Win a FREE Membership!
Sign up for the ARFCOM weekly newsletter and be entered to win a free ARFCOM membership. One new winner* is announced every week!
You will receive an email every Friday morning featuring the latest chatter from the hottest topics, breaking news surrounding legislation, as well as exclusive deals only available to ARFCOM email subscribers.

AR15.COM is the world's largest firearm community and is a gathering place for firearm enthusiasts of all types.
From hunters and military members, to competition shooters and general firearm enthusiasts, we welcome anyone who values and respects the way of the firearm.

Subscribe to our monthly Newsletter to receive firearm news, product discounts from your favorite Industry Partners, and more.
Copyright © 1996-2024 AR15.COM LLC. All Rights Reserved.
Any use of this content without express written consent is prohibited.
AR15.Com reserves the right to overwrite or replace any affiliate, commercial, or monetizable links, posted by users, with our own.


