


Armory Sponsor


Posted: 9/12/2026 11:06:09 AM EDT
[Last Edit: katzma][Edited]
Got my Jordanian SCs70 kit. Here's first pics. Overall im very happy with the kit. Receivers are still being made and should have mine soon. This will be a build thread but also open to discussion and comments. Manual is in English. Kits painted and received one mag thats parkerized and one mag thats painted.       
|
FCG disassembly. First. Pull back on the hammer strut and lift out. Next with the selector in the semi position press down on the sear trip spring and wiggle the selector out, you'll have to cock the hammer to completely remove it. Next lift up on the pin retaining plate and remove the sear trip pin then hammer pin. Remove the hammer, sear trip and spacer. Next remove the trigger, sear catch and disconnector.    All the assemblies laid out           
|
Demilling the trunnion is fairly straightforward. First I cut a slit through the top of the receiver, then hit the sides with a dotco so I could see the spot welds. Using a dremel I ground the welds till I almost went through the receiver then peeled away the shell. Theres 5 spot welds on each side and 1 on the bottom.     |
Next I removed the rear sight. Thers 5 spot welds on each side and 2 on the top. These i drilled and ground the insides with the dremel till i could peel the shell away. Next is the dust cover mount. This piece is extremely thin and flimsy. Take are drilling the 5 spot welds. As with the rear sight I drilled the welds then ground them from the inside.   
|
Here's my take on semi mods/ denials. First you remove the "automatic fire lever" (aka sear trip) its spring also retains the safety. Then I welded in a 1/4" rod that would block the lever but also hold the leg of the spring. Next i cut the tail off the rear of the "pawl" (aka disconnector)   
|
For another denial I flipped the "automatic fire lever tooth" (aka sear) and welded it in 2 places, creating a denial and spacer for the trigger. Make sure you trim the sear so that you can still install the trigger spring. Found that out the hard way. When I welded it in place I didn't get it snug against the receiver so I had to remove material from the "trigger bushing" so that the "pins retaining plate" would capture the trigger pin.     
|

Now i have a semi only fcg. Its safe-semi-semi. I dont plan on adding a blocker to stop the safety from going into the "A" position since itll only fire semi auto. Last couple pics are the lower after I sand blasted everything and cold blued them. The original finish on these Jordanian SCS70s is black semi gloss paint.   
|


|
Parts Kits are GONE from what i see. My very first Black Rifle was a AR70. Paid and walked with it in "California" in 1989. paid $1300 for it. Which back then was a fuck ton of money. I pumped 10k rounds of chi-com YELLOW BOX thru that gun while i owned it- never skipped a beat. Mags were $150 back then. (i owned 4- 30s) Mags are very high quality for the AR70 model. It's light ,accurate and reliable , it was of very high quality manufacture, IIRC. I missed out on those current shorty kits- living here. 
|


First I started with welding the bottom of the receiver. Squeezing the shell, using a caliper to make sure is the correct thickness and straight. Using vice grips i held the tabs together and tacked them. Next i welded on the rear sight base. It's located at the tail lend of the charging handle slot. Notice the beveled edge for the dust cover detent. I used C clamps to hold it in place while I TIG welded it. Theres 5 spots on each sides and 2 on top.   Welding in the rails was fairly easy. First i ground off the sear trip on the bolt cartier. Next i had to drill out all the rivet holes with a 1/8" bit to use the supplied rivets. I forgot to take pics of the rails before I welded then in place. On the wider semi blocker rail there is 2 holes for the ejector rivets. First i located the ejector with the rivets and welded it to the rail like the originals. Then I used the rivets to locate the rails in the receiver and used C clamps and needle nose vice grips to hold it in place.       |
Next its a good idea to rivet in the ejector and rail stiffener block. After the railes are welded in and the bolt moves freely (my receiver slightly bowed but straightened easily) I clamped the shell onto the trunnion and bore sighted it while checking the sights. After I was satisfied, I clamped it and welded it together. Next you fold down the ears and weld them.    DO NOT DEMIL THE REAR LUG LIKE I DID. I thought the receiver shell had the tabs but it didnt. To locate it i lined up the edge of the lug with the receiver and tacked it in place. Test fit then fully welded. Last to do was weld on the dust cover bracket. Talk about a pain. Its paper thin. Tried my tog and just melted it so I drilled the holes a little bigger and mig welded them. Worked good and took a lil adjusting to get the dust cover to move freely.    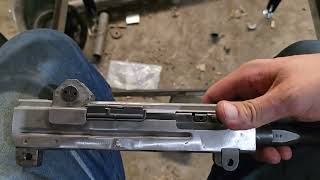 SCS70 dust cover test |
All complete and test fired. Receiver build took about 3.5 hours. Does not like tulammo. It will eject but not pick up the next round. Shot great with regular 556. Very soft shooting and not too loud.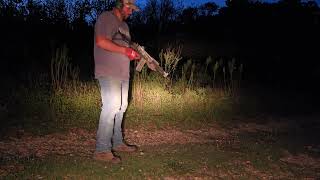 Beretta SCS70 build test fire       
|


Armory Sponsor