


Armory Sponsor



Posted: 2/13/2023 9:23:29 PM EDT
After saving for the last year, I finally made the move and bought a compressor. One that should last me a lifetime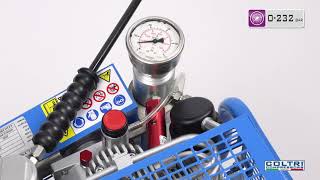 Refilling DRV Cylinders using the MCH 6 Should be here in a few weeks. |
Just Drop... Buckethead!

|
Originally Posted By VillageIdiot2: Glad to see you got compressor. You've been talking about saving for it for a while now. What did it cost you out the door? For the longest time I was stashing for a W31 Alkin, cause everybody on the air gun forums told me there the best. I had looked at the Coltri MCH 6's before and they seemed solid. Air Guns of Arizona even sold a Daystate branded MCH-6 for 110v. Apparently, the bad rap came from the 110 v models. The motors worked too hard with higher RPMS. The Single Phase 60Hz 220V were no issues. Then Alkin started going up in price and they decided to make the Auto Moisture purge and Auto Shut off features now mandatory instead of an option. So, there were climbing to $4200 and then add another $350 for shipping. Nuvair out in Oxnard CA started blowing out the MCH6 to get ready for a newer version (The ICON) so the price was $2500 plus shipping to WI was. $2950 Alkins is made in Turkey. Coltri in Italy. The New Icons are making the pump out of Aluminum castings vs. the older and lower cost Sand casting of the pump housing. The rest of the compressor is identical. I have a 30amp 220v circuit open on my panel left over from an electric water heater we replaced with Gas a long time ago, So I just need to add a plug. Filling my 74CF SCBA tank from 3000psi to 4500 psi will take about 6-8 mins. No auto shut off (They all have safety relief valves to keep you safe) needed and it takes a second to open two purge valves to release moisture during the fill. And the simpler design means less to go wrong. Sorry Alkin, you priced yourself out of the running. |
Just Drop... Buckethead!

| I have the Daystate 120V version. It, of course, does not have the filters for breathing air, but for my needs it is more than just adequate. I still will only have my SCUBA tank filled by the dive shop, however, for I don't want anyone to perhaps use it for diving in the future breathing oil in the air. |
If I were a hedonist, I'd be a hermit.
You need a good airgun if you don't have one already.
You need a good airgun if you don't have one already.


|
Originally Posted By Harv24: https://i.imgur.com/f5MMKw2.jpg Arrived yesterday. Be firing it up tonight after work once I wire the plug to it. That thing is plum sexy. Are you going to wire up an extension cord? Also. |
Chicken Farmer by choice hunter of shade tree's and hiding spots by nature.
  I have it sitting on my target stand for now. But I'm going to invest in a small cart so I can roll it to the receptacle when it's time to fill and then place a cover on it and wheel it out of the way. I think I may also build a tank holder onto the side of the cart to hold my tank during refill. Definitely glad I got it. And yes, the oil and filters were also in mine when it came with 1 hr run time on the hour meter. If you remove the top of the filter and your filter does not pop up, just reach in with a needle nose and give it a quick little upward tug, Craig told me that sometimes the filter cartridge, which may not be perfectly round, can get wedged in. I did that and mine popped right up for removal and inspection. I also got a brand-new bottle of oil as well, so I will be set for quite some time in the oil dept. I do like the fill fitting configuration. It has its own on/off valve knob, plus the bleeder valve. When I start a fill, - Make sure both drains on unit are open - screw fitting to bottle, then close the off knob on the fitting - Open the on/off valve on my tank (No back pressure on the compressor as it stops at the fill fitting on/off knob), plus now I can see the tank pressure. - Start compressor - close both drain valves. - Watch gauge on compressor until it reaches my fill psi of 4500 (I go a bit over) - turn off valve on fill fitting - close valve on tank - open both drain valves on compressor - open bleed valve on fill fitting and then remove fitting from tank - let the compressor run for a few minutes with drain valves open to let fan cool down motor - shut off compressor. I did not have to open drain valves during fill as it was only around 7-8 mins to fill from 3200 psi to 4600psi. If I was filling from empty, I would. That's been my experience so far on fill #1 |
Just Drop... Buckethead!

|
Originally Posted By Harv24: https://i.imgur.com/ctVbmBS.jpg https://i.imgur.com/TknfnFG.jpg I have it sitting on my target stand for now. But I'm going to invest in a small cart so I can roll it to the receptacle when it's time to fill and then place a cover on it and wheel it out of the way. I think I may also build a tank holder onto the side of the cart to hold my tank during refill. Definitely glad I got it. And yes, the oil and filters were also in mine when it came with 1 hr run time on the hour meter. If you remove the top of the filter and your filter does not pop up, just reach in with a needle nose and give it a quick little upward tug, Craig told me that sometimes the filter cartridge, which may not be perfectly round, can get wedged in. I did that and mine popped right up for removal and inspection. I also got a brand-new bottle of oil as well, so I will be set for quite some time in the oil dept. I do like the fill fitting configuration. It has its own on/off valve knob, plus the bleeder valve. When I start a fill, - Make sure both drains on unit are open - screw fitting to bottle, then close the off knob on the fitting - Open the on/off valve on my tank (No back pressure on the compressor as it stops at the fill fitting on/off knob), plus now I can see the tank pressure. - Start compressor - close both drain valves. - Watch gauge on compressor until it reaches my fill psi of 4500 (I go a bit over) - turn off valve on fill fitting - close valve on tank - open both drain valves on compressor - open bleed valve on fill fitting and then remove fitting from tank - let the compressor run for a few minutes with drain valves open to let fan cool down motor - shut off compressor. I did not have to open drain valves during fill as it was only around 7-8 mins to fill from 3200 psi to 4600psi. If I was filling from empty, I would. That's been my experience so far on fill #1 Been over a year now since your purchase, any updates on experiences with it? |
|
Originally Posted By VillageIdiot2: Been over a year now since your purchase, any updates on experiences with it? Originally Posted By VillageIdiot2: Originally Posted By Harv24: https://i.imgur.com/ctVbmBS.jpg https://i.imgur.com/TknfnFG.jpg I have it sitting on my target stand for now. But I'm going to invest in a small cart so I can roll it to the receptacle when it's time to fill and then place a cover on it and wheel it out of the way. I think I may also build a tank holder onto the side of the cart to hold my tank during refill. Definitely glad I got it. And yes, the oil and filters were also in mine when it came with 1 hr run time on the hour meter. If you remove the top of the filter and your filter does not pop up, just reach in with a needle nose and give it a quick little upward tug, Craig told me that sometimes the filter cartridge, which may not be perfectly round, can get wedged in. I did that and mine popped right up for removal and inspection. I also got a brand-new bottle of oil as well, so I will be set for quite some time in the oil dept. I do like the fill fitting configuration. It has its own on/off valve knob, plus the bleeder valve. When I start a fill, - Make sure both drains on unit are open - screw fitting to bottle, then close the off knob on the fitting - Open the on/off valve on my tank (No back pressure on the compressor as it stops at the fill fitting on/off knob), plus now I can see the tank pressure. - Start compressor - close both drain valves. - Watch gauge on compressor until it reaches my fill psi of 4500 (I go a bit over) - turn off valve on fill fitting - close valve on tank - open both drain valves on compressor - open bleed valve on fill fitting and then remove fitting from tank - let the compressor run for a few minutes with drain valves open to let fan cool down motor - shut off compressor. I did not have to open drain valves during fill as it was only around 7-8 mins to fill from 3200 psi to 4600psi. If I was filling from empty, I would. That's been my experience so far on fill #1 Been over a year now since your purchase, any updates on experiences with it? It has been great. The compressor has been flawless. I shot all winter and filled my 74 CF tank from 3000 to 4500 PSI with no issues. The compressor really has been the best investment. I did not want to become a compressor repair/rebuilt guy and spend hours on line watching videos of how to fix it. I didn't want to have to create an entire water-cooling system. With this compressor, I pull the cover off, check the oil level. turn it on for a few minutes to warm it up with the drain valve open.... Plug in the line, close the drain valve and build up the pressure in the line to the tank until it equals 3000 psi, open the tank main valve. and boom, full tank. I close the main valve on the tank and then open the drain valve. I let the compressor run for a few minutes to let the fan run and cool the unit down. and shut off. My wife will most like sell this compressor about 25 years from now after I kick off to somebody for like $100.... 
|
Just Drop... Buckethead!
Armory Sponsor