


AK Sponsor

Official Wood refinishing thread (Page 5 of 5)

|
Alright, did some more playing around with pine tar this weekend. Tried to match a Bulgarian 74 stock to some Polish milled hand guards. Don't have a plan for the stock, but the hand guards may go on a frankenbuild project.
New stock I had lying around 
New hand guard 
Mmmm BBQ. 
After two days of sitting in pine tar. I wrapped them in plastic and put them on top of my stainless grill for 24 hours. It was about 95 degrees and even hotter where they sat. 
After 4 thin coats of shellac. I used about a 1.5 # cut of garnet from shellac.net. That place rules. It got to my doorstep about two days after ordering it. 
|

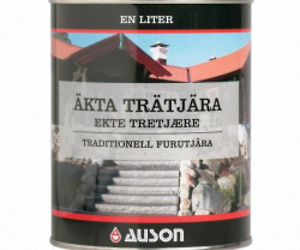
Auson, although that may be the distributor's name. It's the only word on the can that I can pronounce. 
Just go back one page and look where I have it pictured. I found it on Amazon. I think this is the "dark" variety, and I ordered it based on the picture on the label. The one with the house. It seems to be what everyone else is using. It makes your garage smell badass. 
|

|
Did my hand guards today, they almost looked painted when I started, cleaned them with acetone, and then sanded. I used Cabot autumn glow, about 7 coats and steel wool in between at the end. Took maybe 2 hours total. I was wanting a mix of Russian red and weathered wood. I'm happy with the results.
I wish I could put the fixed stock on and do it also, but will probably just get a triangle folder. 
20130929_181809_resized by tb5252, on Flickr 
20130929_181555_resized by tb5252, on Flickr 
20130929_182337_resized by tb5252, on Flickr |


Got a grade B WW from classic firearms, tried my hand at some wood refinishing with some minwax. Used prestain, red mahogany stain and gloss polly coat. There's a couple little spots that need some touch up but I'm pretty happy with it otherwise. |
|
My wife is out of the country on business and has the Canon camera with her, but when she gets back,
I will post some photos of my Yugo O-PAP I just refinished ... Anyway, here are the steps I used: ______________________________________ Re-Finishing Wood Gun Furniture Polyurethane provides a very hard durable finish and is easier to apply than many coats of Tru-Oil. Note: If the wood has a previously applied finish, remove completely with a strong paint remover. 1. After removing any finish, soak the wood in lacquer thinner for a couple of hours and let dry. 2. Heat oven to 220 degrees. Leave wood in oven for about 30 minutes. 3. Wipe off all the cosmoline that seeps out of the wood with a rag soaked in lacquer thinner. 4. Repeat as many times as necessary until no oils seeps out of the wood. 5. If you need to remove any heavy markings in the stock, first block-sand with 80 sandpaper. 6. Sand with 120 sandpaper. 7. Now sand with 220 sandpaper (with the grain) until smooth. Wipe lightly with a tack cloth. 8. Apply a heavy coat of an oil-base stain on the wood and let dry for about 5 minutes. 9. Completely wipe all excess stain off the wood with a dry cloth, and allow to dry for 24 hours. 10. Buff with 0000 steel wool. Then wipe with a dry-clean cloth, followed with a tack cloth. 11. Spray a medium 1st coat of "Minwax" clear semi-gloss polyurethane 'rattle-can' coating. 12. Let dry for 1 hour and spray a wet 2nd coat of the polyurethane (avoid runs if possible). 13. Let dry for 1 hour and spray a wet 3rd coat of the polyurethane (avoid runs if possible). 14. Let dry a minimum of 48 hours. 15. Wet-sand with 800 'wet or dry' sandpaper (any runs can now be smoothed). Do this in the sink. 16. Wash clean with water and dry. If you see any shiny spots, wet-sand the shiny spots until all the finish is very smooth and completely dull (no little shiny spots remain). Wash clean again. 17. Spray a 4rd wet coat of the polyurethane and let dry 1 hour. Then spray the final 5th wet coat. 18. Let dry a minimum of 48 hours. 19. Wet-sand again with 800 'wet or dry' sandpaper. Wash with water and dry. 20. Buff using 0000 steel wool. Wash with water and dry again. 21. Buff with automotive rubbing compound and finish with wax. Note: When buffing with the steel wool, do it outside over the grass .... no mess that way. Note: You may think that 5 coats of polyurethane is a lot, but remember, you are wet-sanding much of the first 3 coats off prior to applying the last 2 coats. |
|
Here is my Wasr refinish, took one weekend to do.
http://i126.photobucket.com/albums/p112/marksale05/IMG_9402.jpg |
|
Originally, I used Orange Shellac on the MAK90 stock handguards and IWD birch stock but I wasn't happy with it. I also forgot that the Shellac would bubble and blister with the heat off the barrel. Stripped it back down and went with 3 coats of Minwax Gunstock stain and a coat of Tung Oil.
Orange Shellac: 

Current Stain: 

|
|
Originally Posted By Turbo6ta:
My wife is out of the country on business and has the Canon camera with her, but when she gets back, I will post some photos of my Yugo O-PAP I just refinished ... Anyway, here are the steps I used: ______________________________________ Re-Finishing Wood Gun Furniture Polyurethane provides a very hard durable finish and is easier to apply than many coats of Tru-Oil. Note: If the wood has a previously applied finish, remove completely with a strong paint remover. 1. After removing any finish, soak the wood in lacquer thinner for a couple of hours and let dry. 2. Heat oven to 220 degrees. Leave wood in oven for about 30 minutes. 3. Wipe off all the cosmoline that seeps out of the wood with a rag soaked in lacquer thinner. 4. Repeat as many times as necessary until no oils seeps out of the wood. 5. If you need to remove any heavy markings in the stock, first block-sand with 80 sandpaper. 6. Sand with 120 sandpaper. 7. Now sand with 220 sandpaper (with the grain) until smooth. Wipe lightly with a tack cloth. 8. Apply a heavy coat of an oil-base stain on the wood and let dry for about 5 minutes. 9. Completely wipe all excess stain off the wood with a dry cloth, and allow to dry for 24 hours. 10. Buff with 0000 steel wool. Then wipe with a dry-clean cloth, followed with a tack cloth. 11. Spray a medium 1st coat of "Minwax" clear semi-gloss polyurethane 'rattle-can' coating. 12. Let dry for 1 hour and spray a wet 2nd coat of the polyurethane (avoid runs if possible). 13. Let dry for 1 hour and spray a wet 3rd coat of the polyurethane (avoid runs if possible). 14. Let dry a minimum of 48 hours. 15. Wet-sand with 800 'wet or dry' sandpaper (any runs can now be smoothed). Do this in the sink. 16. Wash clean with water and dry. If you see any shiny spots, wet-sand the shiny spots until all the finish is very smooth and completely dull (no little shiny spots remain). Wash clean again. 17. Spray a 4rd wet coat of the polyurethane and let dry 1 hour. Then spray the final 5th wet coat. 18. Let dry a minimum of 48 hours. 19. Wet-sand again with 800 'wet or dry' sandpaper. Wash with water and dry. 20. Buff using 0000 steel wool. Wash with water and dry again. 21. Buff with automotive rubbing compound and finish with wax. Note: When buffing with the steel wool, do it outside over the grass .... no mess that way. Note: You may think that 5 coats of polyurethane is a lot, but remember, you are wet-sanding much of the first 3 coats off prior to applying the last 2 coats. you can use a hot iron on high steam to get out a lot of dents/dings if the wood didn't splinter. |
|
I bought one of those Northridge Bulgarian surplus stocks. I got it nice and clean and now I don't know what to do with it. I bought some 100% pure tung oil and thought that I would leave it as is color wise but put tung oil on to protect the wood. Does the tung oil add color or just a clear finish? any thoughts?
Here is the stock set.  " /> " />
Here it is on the rifle unstained and unfinished 
|

|
When my draco shows up I think I'm going to try my hand at a darker stain.
I've done the orange / iodine / reddish colors many times but never a good darker color. |
Tennessee Colonel
DanTSX is among us, safer than ever.
Visit my photo collection - http://www.flickr.com/photos/the-dorsal-fin
DanTSX is among us, safer than ever.
Visit my photo collection - http://www.flickr.com/photos/the-dorsal-fin

|
Originally Posted By hodgescl:
you can use a hot iron on high steam to get out a lot of dents/dings if the wood didn't splinter. Originally Posted By hodgescl:
Originally Posted By Turbo6ta:
My wife is out of the country on business and has the Canon camera with her, but when she gets back, I will post some photos of my Yugo O-PAP I just refinished ... Anyway, here are the steps I used: ______________________________________ Re-Finishing Wood Gun Furniture Polyurethane provides a very hard durable finish and is easier to apply than many coats of Tru-Oil. Note: If the wood has a previously applied finish, remove completely with a strong paint remover. 1. After removing any finish, soak the wood in lacquer thinner for a couple of hours and let dry. 2. Heat oven to 220 degrees. Leave wood in oven for about 30 minutes. 3. Wipe off all the cosmoline that seeps out of the wood with a rag soaked in lacquer thinner. 4. Repeat as many times as necessary until no oils seeps out of the wood. 5. If you need to remove any heavy markings in the stock, first block-sand with 80 sandpaper. 6. Sand with 120 sandpaper. 7. Now sand with 220 sandpaper (with the grain) until smooth. Wipe lightly with a tack cloth. 8. Apply a heavy coat of an oil-base stain on the wood and let dry for about 5 minutes. 9. Completely wipe all excess stain off the wood with a dry cloth, and allow to dry for 24 hours. 10. Buff with 0000 steel wool. Then wipe with a dry-clean cloth, followed with a tack cloth. 11. Spray a medium 1st coat of "Minwax" clear semi-gloss polyurethane 'rattle-can' coating. 12. Let dry for 1 hour and spray a wet 2nd coat of the polyurethane (avoid runs if possible). 13. Let dry for 1 hour and spray a wet 3rd coat of the polyurethane (avoid runs if possible). 14. Let dry a minimum of 48 hours. 15. Wet-sand with 800 'wet or dry' sandpaper (any runs can now be smoothed). Do this in the sink. 16. Wash clean with water and dry. If you see any shiny spots, wet-sand the shiny spots until all the finish is very smooth and completely dull (no little shiny spots remain). Wash clean again. 17. Spray a 4rd wet coat of the polyurethane and let dry 1 hour. Then spray the final 5th wet coat. 18. Let dry a minimum of 48 hours. 19. Wet-sand again with 800 'wet or dry' sandpaper. Wash with water and dry. 20. Buff using 0000 steel wool. Wash with water and dry again. 21. Buff with automotive rubbing compound and finish with wax. Note: When buffing with the steel wool, do it outside over the grass .... no mess that way. Note: You may think that 5 coats of polyurethane is a lot, but remember, you are wet-sanding much of the first 3 coats off prior to applying the last 2 coats. you can use a hot iron on high steam to get out a lot of dents/dings if the wood didn't splinter. Also, you can speed the process and lessen the amount of trips to the oven if you run hot as you can stand water and dish detergent in the sink, and wash the stock in it after the laquer thinner or mineral spirits bath, it helps float the oil out, and opens up the pores of the wood so the deep down oil can flow out when you heat it in the oven, as the pores heat up and close they literally squeeze the oil out. |
Crunchbang 64 Waldorf if you're a minimalist, Snowlinux Glacier 64 if you liked Gnome 2 and were waiting for Mate to mature. Best i've tried lately, Debian-based distros FTW.

|
Originally Posted By hodgescl:
you can use a hot iron on high steam to get out a lot of dents/dings if the wood didn't splinter. Exactly, a steam iron works great if you have any dents in the wood. ... In my case, when I used the 80 sandpaper, it was not to remove dents. This course sandpaper was used to remove the S/N and Serbian flag insignia that was imprinted on the side of my stock (Yugo M70 O-PAP). ________________________________________________________ Originally Posted By Dragynn:
Also, you can speed the process and lessen the amount of trips to the oven if you run hot as you can stand water and dish detergent in the sink, and wash the stock in it after the laquer thinner or mineral spirits bath, it helps float the oil out, and opens up the pores of the wood so the deep down oil can flow out when you heat it in the oven, as the pores heat up and close they literally squeeze the oil out. Exactly ... I didn't mention it in my post, but in my situation, I soaked the wood in very hot water and bleach for about 2 hours prior to putting the wood into the oven. And the soaking of the wood really did open the pours of the wood which helped seep out so much of the cosmoline when heated in the 220 degree oven. Again, I am really surprised at just how much cosmoline came out of the handguards when they were heated in the oven. |
|
You may have noticed in my post that the way I finish to wood is a lot like you would finish paint on a car:
After sanding, the oil base stain is like the color coat on a car finish The spray polyurethane is like the clear coat sprayed over the color coat on a car finish Then the polyurethane is wet sanded much the same as the clear coat would be on a car finish And then the wood is compounded out like the new finish on a car would be machine polished prior to waxing ____________________________________ There is nothing wrong with hand rubbed oil finishes on gun furniture, but this is just another way of doing it. Again, I will post some photos as soon as my wife gets back home with the camera. Ron, |

|
didn't refinish the pistol grip wasn't sure if I was going to use it
http://img694.imageshack.us/img694/4964/73wy.jpg |
I still think Polish NOS wood > Soviet Wood

DSC_1884-1 by The Dorsal Fin, on Flickr Someone on here got my second NOS set, but I've not seen it posted on anything. 
|
Tennessee Colonel
DanTSX is among us, safer than ever.
Visit my photo collection - http://www.flickr.com/photos/the-dorsal-fin
DanTSX is among us, safer than ever.
Visit my photo collection - http://www.flickr.com/photos/the-dorsal-fin

|
Originally Posted By Finslayer83:
I still think Polish NOS wood > Soviet Wood <a href="http://www.flickr.com/photos/the-dorsal-fin/9991557163/" target="_blank">http://farm8.staticflickr.com/7356/9991557163_6b256c582c_b.jpg</a> DSC_1884-1 by The Dorsal Fin, on Flickr Someone on here got my second NOS set, but I've not seen it posted on anything. I dig that Polish laminate in the pic! |
Combloc Customs
Official Wood refinishing thread (Page 5 of 5)
AK Sponsor