NE, USA
|
Posted: 10/26/2014 8:09:22 PM EDT
[Last Edit: tstuart34]
I love DIY projects. SO I set out to find a DIY case annealer project. I came up pretty dry. A lot of people showing how to use hand drills and so on. No real plans on this is what I used this is what worked and so on. While on Youtube I found a great looking project that an Aussie gentleman was building up. He ended up making 5 prototypes before getting things the way he liked it. I started sketching things up and trying to figure things out. I joined his local forum so I could ask some questions and he has been very helpful. My plan is to share my plans once I get everything figured out prints made and a final product debugged.
My goal for this project is to be sub $100. The kicker with this is I work in manufacturing and I have accesses to some machines and scrap materials. So the machined parts are going to be no cost. Also I have a propane torch set up. I do not have Templiaq so that is included in the budget. So far I have purchased two 12v DC gear motors off eBay and two 12v DC PWC Speed controllers with Digital Displaces. Both of these are from China so lead time is about 1-3 weeks. I am about a week in so far. I really need the motors so I can finish the layout. I choose not to order a power supply to help keep my cost down. I started to do some research and an old computer power supply can easily use. So I asked around till I found a friend with an old PC tower that said I could have it. Right now I have that torn down and awaiting a power switch and some soldering. Now for 15 bucks on eBay you can pick up a 12vdc power supply but I am being CHEAP! I will have 3 bucks into a switch that I really don’t need but decided I thought it would be nice to be able to turn and off the power supply without having to plug and unplug it. So.... now I wait! It’s my plan to give updates as I get thing put together! Youtube Inspiration Pictures of the 3D Model 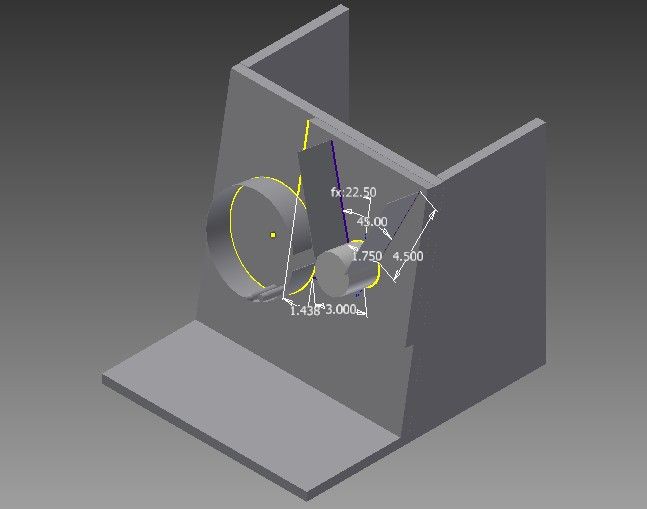


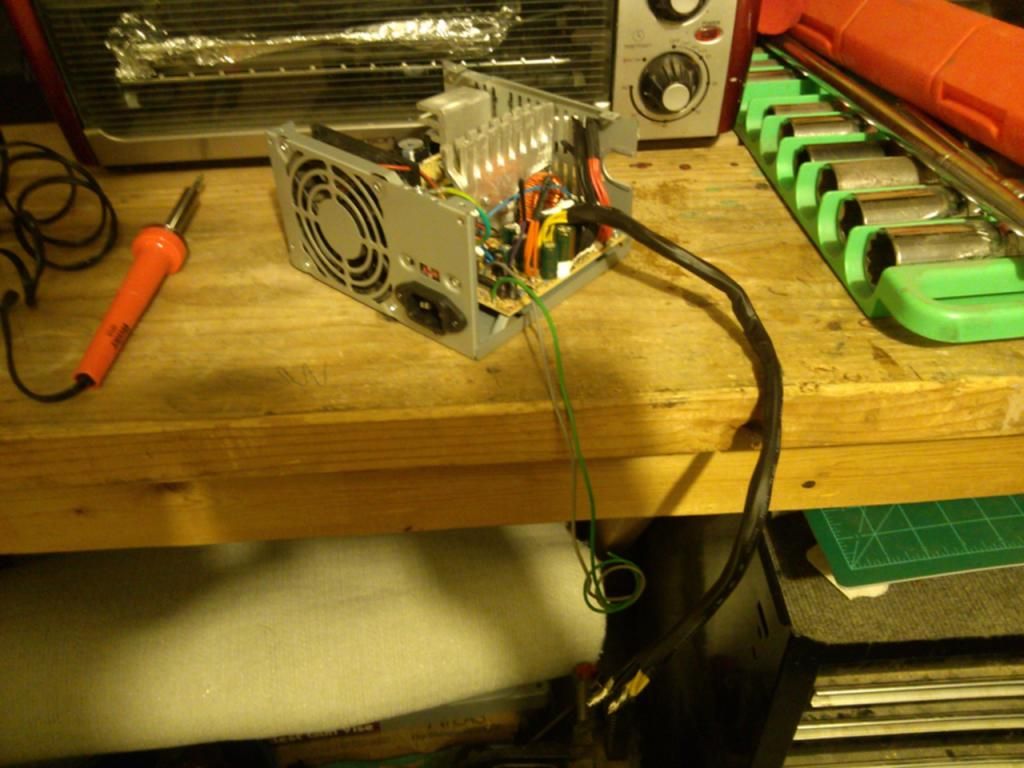
I posted this later in the thread but decided to move it to the OP. I will update this as I continue to purchase items and make sure that I use them. I do not want to post something and have it not be used. It’s bad enough I am wasting my money I don’t want to waste anyone else’s. So far these are only the long lead time parts from China. Parts list for tstuart34 Build 2x Motor 2x Controls If you choose to control feeder and drum with separate controls. (I will be testing to see if one controller can be used to control both motors.) Power Supply (This power supply is only needed if you choose not to build your own.) Qty will vary based on what you are annealing Cake Pans These were the cheapest I could find at the time and they all had free shipping from China. Purchase at your own risk since these are still untested by me but are the same as SKIP used in his build. My first step is to convert a ATX computer power supply into a 12v DC. You can buy a Power Supply off ebay which i have listed in the parts list but offten enough peole have accuess to a oppsoelte computer that they can pull the power supply out of and discard the rest. What you will need.... 1. Side cutters or Wire Strippers 2. Small Torch or Heat gun 3. Soldering equipment or wire connectors. 4. Heat shrink tape or electrical tape. 5. 12V On/off Switch Optional. I am not going to get super detailed on this because the YouTube Video I have Linked below gives a very step by step on how to do it. I Grouped my yellow and black wires together matched the length and soldered the ends together. A person could use wire nuts or connectors but I am not a big of splicing groups of wires together like this but it can be done. I also went to Harbor Freight and bought a 127 Piece heat shrink tube kit for covering my wires. Electrical tape could be used but I like the finished look of the tubing. I am going to drill a hole above the power cord and add a on off switch and wire the grey and green wire to the switch. This will allow me to turn the power on and off to the Annnealer without having to plug and unplug the machine. This is total a optional thing! DIY how to build 12vdc power supply Pictures of my finished power supply. I am waiting for my switch to show up. I ordered off Ebay since I am pretty busy right now and it saves me the time of going to Radio Shack or the Parts Store. 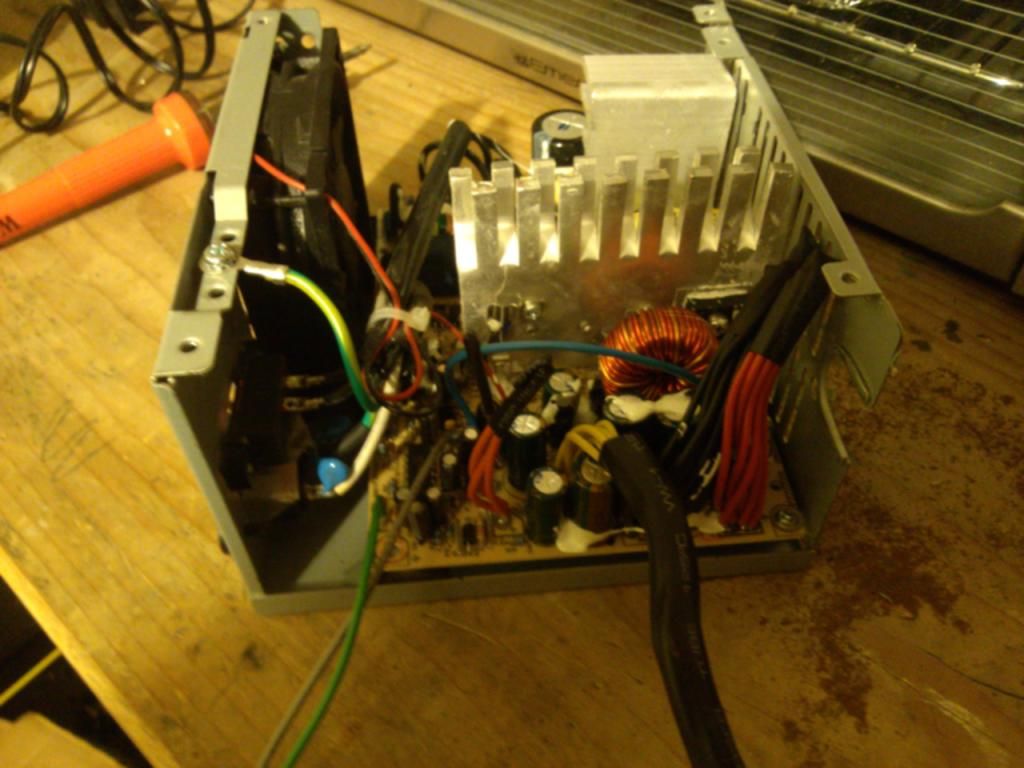
Next week I am planning on getting the frame put together. I am still waiting on Motors and controls :(. |
|
|
NE, USA
|
[#1]
hold
|
|
|
NE, USA
|
[#2]
hold
|
|
|
|
[Last Edit: dryflash3]
[#3]
This should be a good thread, please continue OP.
eta, I've set the "toggle" on this thread to keep it out of the Archives. |
|
|
|
|
[#4]
All of the DIY's I've seen before have had carousels that move cases standing upright. I've never seen a DIY annealer like this before. Looking forward to updates.
|
|
|
|
|
[#5]
Tag for the interesting
|
|
|
|
|
[Last Edit: drfroglegs]
[#6]
Definitely interested in this. I've been wanting to build one too.
Tagged! Please keep a detailed list of parts with links, this could turn out to be an excellent thread! |
|
|
|
|
[#7]
I'm liking this , wished I'd seen this before building the other style
|
|
|
|
AK, USA
|
[#8]
That is awesome! I am going to build one, too.
|
|
|
NE, USA
|
[#9]
Originally Posted By drfroglegs:
Definitely interested in this. I've been wanting to build one too. Tagged! Please keep a detailed list of parts with links, this could turn out to be an excellent thread! My plans is to make a complete set of prints for everything. We shoot 223, 6.8, 300BO, and 357sig. I want to have this this to be diverse as possible and even if it doesnt work for what you have it is very clear on how to make it fit your need. |
|
|
|
[#10]
sweet. I still have to finish mine...
|
|
|
|
IA, USA
|
[#11]
I find this thread interesting.
|
|
|
|
[#12]
The Force is strong with this one.
|
|
|
|
MO, USA
|
[#13]
Tag I'm interested.
|
|
|
AUS
|
[Last Edit: El-Skippo]
[#14]
Glad you like my annealer mate, bit more of a fancy drawing then me just winging it for the better part :) If memory serves i mentioned that I have updates to add also the hole locations etc to post up. Also a bit more to add to the build in the way of cheap easy sourced components, for the case stopper and torch holder etc. thumbs up for your drawing .... Bit more fancy then my piss poor attempt :D
I went around my build to keep costs under $150 aud ( you guys in America can build this for less quids at say around $100 or under pending on how well your scavenging is. The annealer can do pretty much any sized caliber ( pending of your case feeder arbor and your drum. ( mine is based around a 125mmx50mm drum tins for all my cases I use from .223 all the way up to 300 win mag. ( I haven't tried any other cases larger as I live in a very strictly firearm controlled state in Australia. I mainly use .223 308 and 6.5x47 so the build was mainly set around the main cases I use. .223 predominately as I use them for kangaroo harvesting. Regards Skip I've mainly posted in the NV section of this forum as NV is not a big thing over here in Aus we are a small bunch of guys compared to you guys. |
|
|
|
[Last Edit: drfroglegs]
[#15]
Originally Posted By El-Skippo:
Glad you like my annealer mate, bit more of a fancy drawing then me just winging it for the better part :) If memory serves i mentioned that I have updates to dad also the hole locations etc to post up. Also a bit more to add to the bud in the way of cheap easy sourced components for the case stopper and torch holder. I went around my build to keep costs under $150 aud ( you guys in America can build this for less quids at say around $100 or under pending on how well your scavenging is. Regards Skip The master himself, we are not worthy! 
Do you have any type of parts list Skip? I'm mostly interested in the motors, controllers, knobs, etc.. Thanks! Josh |
|
|
|
|
[#16]
Originally Posted By Pumpkinheaver:
Tag I'm interested. |
|
|
|
AUS
|
[#17]
I'll leave that up to the OP
I've got a build parts and list etc on our forum that still needs to be added too. But I do not want to take over the ops thread. My build was a open source to for everyone. I've done all types of annealing over the years from the socket to even making a few bench types. I wanted my build to be as compact as it could be also as cheap as it could be. As buying a annealer from someone else around the world, like the benchsource will cost $750 aud that's crazy money for something that just anneals the case. The Gurard ( don't know if spelt right ) wouldn't ship due to ITAR regs. So I went about my build. Sure mines not pretty and or made to factory standards, but mine I built with mainly hand tools, apart from the couplers/arbors that I turned up on a mates lathe and mill. I'm looking forward to the op's build and looking forward to seeing the end result. As I mentioned its a open source build for everyone. We as a forum got togeather in a thread for a big long brain storm after a member posted up MrLongranges annealer. Mine was built around his simple annealer and just added my own touch. It would be good to see new builds and see what others come up with or add to the build to make it the best DIY build for cheap. So everyone that can't buy or don't have the funds to buy a top quality factory made annealer can still get the same results for cheap and have them selves a auto annealer. As mentioned I do not wish to over take the thread, but I'll watch it ( now I've seen it ) with anticipation to see how all you guys as a forum can come up togeather and make it even better. I'll pop my 2 bob worth in now and then. Regards Skip |
|
|
IA, USA
|
[#18]
Originally Posted By El-Skippo:
I'll leave that up to the OP I've got a build parts and list etc on our forum that still needs to be added too. But I do not want to take over the ops thread. My build was a open source to for everyone. I've done all types of annealing over the years from the socket to even making a few bench types. I wanted my build to be as compact as it could be also as cheap as it could be. As buying a annealer from someone else around the world, like the benchsource will cost $750 aud that's crazy money for something that just anneals the case. The Gurard ( don't know if spelt right ) wouldn't ship due to ITAR regs. So I went about my build. Sure mines not pretty and or made to factory standards, but mine I built with mainly hand tools, apart from the couplers/arbors that I turned up on a mates lathe and mill. I'm looking forward to the op's build and looking forward to seeing the end result. As I mentioned its a open source build for everyone. We as a forum got togeather in a thread for a big long brain storm after a member posted up MrLongranges annealer. Mine was built around his simple annealer and just added my own touch. It would be good to see new builds and see what others come up with or add to the build to make it the best DIY build for cheap. So everyone that can't buy or don't have the funds to buy a top quality factory made annealer can still get the same results for cheap and have them selves a auto annealer. As mentioned I do not wish to over take the thread, but I'll watch it ( now I've seen it ) with anticipation to see how all you guys as a forum can come up togeather and make it even better. I'll pop my 2 bob worth in now and then. Regards Skip Very ingenious, simple, and thrifty. I like. Thanks for sharing with everyone. I think this will be on my winter indoor project list. |
|
|
NE, USA
|
[#19]
Originally Posted By El-Skippo:
I'll leave that up to the OP I've got a build parts and list etc on our forum that still needs to be added too. But I do not want to take over the ops thread. My build was a open source to for everyone. I've done all types of annealing over the years from the socket to even making a few bench types. I wanted my build to be as compact as it could be also as cheap as it could be. As buying a annealer from someone else around the world, like the benchsource will cost $750 aud that's crazy money for something that just anneals the case. The Gurard ( don't know if spelt right ) wouldn't ship due to ITAR regs. So I went about my build. Sure mines not pretty and or made to factory standards, but mine I built with mainly hand tools, apart from the couplers/arbors that I turned up on a mates lathe and mill. I'm looking forward to the op's build and looking forward to seeing the end result. As I mentioned its a open source build for everyone. We as a forum got togeather in a thread for a big long brain storm after a member posted up MrLongranges annealer. Mine was built around his simple annealer and just added my own touch. It would be good to see new builds and see what others come up with or add to the build to make it the best DIY build for cheap. So everyone that can't buy or don't have the funds to buy a top quality factory made annealer can still get the same results for cheap and have them selves a auto annealer. As mentioned I do not wish to over take the thread, but I'll watch it ( now I've seen it ) with anticipation to see how all you guys as a forum can come up togeather and make it even better. I'll pop my 2 bob worth in now and then. Regards Skip Hey Skip I see I got ratted out! I was curious if you made it to Arfcom HAHA You are the man on this build! Thank you for your help with doing the ground work on this. R&D sucks! You had a great idea and I can't wait to get my build done and try to help out some other guys. You will get copies of all my prints for you to post up in your forum. I have enjoyed looking around on it and seeing your beautiful country form the locals! Thanks again and I am sure I will speaking with you soon! |
|
|
|
[Last Edit: medicmandan]
[#20]
I'm not mechanically inclined so I probably won't phrase this right, but why do you need something spinning to feed the cases in? Couldn't they just be setup in a hopper of some kind that stacks them up and feeds down to the annealing drum? It looks like the timing is controlled by the annealing station.
|
|
|
|
NE, USA
|
[Last Edit: tstuart34]
[#21]
I moved the parts list to OP.
|
|
|
NE, USA
|
[#22]
Originally Posted By medicmandan:
I'm not mechanically inclined so I probably won't phrase this right, but why do you need something spinning to feed the cases in? Couldn't they just be setup in a hopper of some kind that stacks them up and feeds down to the annealing drum? It looks like the timing is controlled by the annealing station. The big issue with that is timing of the feed cases. When the drum would rotate by there is nothing stopping 5 cases from falling into the drum when you only want one. If you wanted to keep things really simple you could place one case on the ramp at a time and let it fall in. At that point you might as well just use a drill. This design uses two motors and two speed controls you set your drum speed based on how long to anneal the brass and you set the feeder speed to insure that a case is ready when the slot rotates by. I wanted something that i could load a number of cases and let it run while I keep a eye on it. If I can trim brass and anneal at the same time that just makes me twice as productive kinda.... 
|
|
|
|
[Last Edit: medicmandan]
[#23]
Originally Posted By tstuart34:
The big issue with that is timing of the feed cases. When the drum would rotate by there is nothing stopping 5 cases from falling into the drum when you only want one. If you wanted to keep things really simple you could place one case on the ramp at a time and let it fall in. At that point you might as well just use a drill. This design uses two motors and two speed controls you set your drum speed based on how long to anneal the brass and you set the feeder speed to insure that a case is ready when the slot rotates by. I wanted something that i could load a number of cases and let it run while I keep a eye on it. If I can trim brass and anneal at the same time that just makes me twice as productive kinda.... Originally Posted By tstuart34:
Originally Posted By medicmandan:
I'm not mechanically inclined so I probably won't phrase this right, but why do you need something spinning to feed the cases in? Couldn't they just be setup in a hopper of some kind that stacks them up and feeds down to the annealing drum? It looks like the timing is controlled by the annealing station. The big issue with that is timing of the feed cases. When the drum would rotate by there is nothing stopping 5 cases from falling into the drum when you only want one. If you wanted to keep things really simple you could place one case on the ramp at a time and let it fall in. At that point you might as well just use a drill. This design uses two motors and two speed controls you set your drum speed based on how long to anneal the brass and you set the feeder speed to insure that a case is ready when the slot rotates by. I wanted something that i could load a number of cases and let it run while I keep a eye on it. If I can trim brass and anneal at the same time that just makes me twice as productive kinda.... That makes sense. Told you I'm not very mechanically inclined.
|
|
|
|
MS, USA
|
[#24]
|
|
|
AUS
|
[#25]
Originally Posted By tstuart34:
Hey Skip I see I got ratted out! I was curious if you made it to Arfcom HAHA You are the man on this build! Thank you for your help with doing the ground work on this. R&D sucks! You had a great idea and I can't wait to get my build done and try to help out some other guys. You will get copies of all my prints for you to post up in your forum. I have enjoyed looking around on it and seeing your beautiful country form the locals! Thanks again and I am sure I will speaking with you soon! Originally Posted By tstuart34:
Originally Posted By El-Skippo:
I'll leave that up to the OP I've got a build parts and list etc on our forum that still needs to be added too. But I do not want to take over the ops thread. My build was a open source to for everyone. I've done all types of annealing over the years from the socket to even making a few bench types. I wanted my build to be as compact as it could be also as cheap as it could be. As buying a annealer from someone else around the world, like the benchsource will cost $750 aud that's crazy money for something that just anneals the case. The Gurard ( don't know if spelt right ) wouldn't ship due to ITAR regs. So I went about my build. Sure mines not pretty and or made to factory standards, but mine I built with mainly hand tools, apart from the couplers/arbors that I turned up on a mates lathe and mill. I'm looking forward to the op's build and looking forward to seeing the end result. As I mentioned its a open source build for everyone. We as a forum got togeather in a thread for a big long brain storm after a member posted up MrLongranges annealer. Mine was built around his simple annealer and just added my own touch. It would be good to see new builds and see what others come up with or add to the build to make it the best DIY build for cheap. So everyone that can't buy or don't have the funds to buy a top quality factory made annealer can still get the same results for cheap and have them selves a auto annealer. As mentioned I do not wish to over take the thread, but I'll watch it ( now I've seen it ) with anticipation to see how all you guys as a forum can come up togeather and make it even better. I'll pop my 2 bob worth in now and then. Regards Skip Hey Skip I see I got ratted out! I was curious if you made it to Arfcom HAHA You are the man on this build! Thank you for your help with doing the ground work on this. R&D sucks! You had a great idea and I can't wait to get my build done and try to help out some other guys. You will get copies of all my prints for you to post up in your forum. I have enjoyed looking around on it and seeing your beautiful country form the locals! Thanks again and I am sure I will speaking with you soon! Hi mate Hahah not ratted out, like I mentioned above I joins this forum mainly for the night vision section. I've only post I think a few times out of that section. I stumbled across this while browsing :) this morning. I'm sure we will too, you have my personal email ( to which I prefure you to keep and not pass out ) . So I'll try and help out as best I can :) I tried all manner of ways to keep a second motor off the build. By just having a mechanical means of case feeding, but I had too many issues with double feeds and or no feeds or the whole lot being sent to the main drum. So I nailed off the idea, and the above is my build I'm happy with. I use it for cases from .223 upto 300 win mag. I haven't tried larger due to not owning anything larger. But I'm happy with mine :) it took me 4 hrs to build ( took that long as I had to put what was in my head down in the build ) I had no real plans. I've mentioned in email I will be happy to help you out with all the sizes and hole locations etc. once I have a spare day I'll stop mine down and jot down the required info then pass it onto you so you can add to your drawings. :) You still have to watch the whole process, once the main drum is set for timing of anneal time ( you then have to adjust the time for the case hopper ) it also takes some minor adjustment during on the case feeder motor. Due to a number of varibiles ( it's not a set and forget machine ) but it dosnt take long to do a few hundred cases. I use 750f tempilaq as I have always done. It hits this temp a fraction before it falls out of the flame. Then the next case follows suit. Also mentioned. I won't over take this thread this is your BBQ mate, so I'm not going to tell you how to cook it. But you know where to go should you need any more help. I'll be happy to see this go as intended a build for one and all who are on a tight budget :) DIY was always the plan, as building them and then I selling would just increase the price to a silly amount which in turn contradicts my whole point of building it. :) The annealer will be much cheaper to build if one widgets to Manuel feed only ( cost is roughly halved ) going Manuel feed over auto feed. Anyway that's enough of my ramblings. I'll take a chair and sit and watch see how this goes :) as said I would love to see others builds and or modifications added to it. Kind regards Skip |
|
|
AUS
|
[Last Edit: El-Skippo]
[#26]
True but costs $350 odd more then building the like of mine. Also the reason I built my own for quids was that nice little ITAR problem that now causes a lot of issues trying to buy anything without having to apply for expencive export lic, tax, shipping, import dutys. The cost becomes crazy stupid for anyone out the US. By no means I'm knocking anyone's product I quite like his annealer. Just a explanation as to why I built my own. |
|
|
MS, USA
|
[#27]
Originally Posted By El-Skippo:
True but costs $350 more. Also the reason I built my own for quids was that nice little ITAR problem that now causes a lot of issues trying to buy anything without having to apply for expencive export lic, tax, shipping, import dutys. The cost becomes crazy stupid for anyone out the US. By no means I'm knocking anyone's product. Just a explanation as to why I've done what I've done. Originally Posted By El-Skippo:
True but costs $350 more. Also the reason I built my own for quids was that nice little ITAR problem that now causes a lot of issues trying to buy anything without having to apply for expencive export lic, tax, shipping, import dutys. The cost becomes crazy stupid for anyone out the US. By no means I'm knocking anyone's product. Just a explanation as to why I've done what I've done. I think his oatent would be useful for a DIY project with no infringement. |
|
|
|
[#28]
Maybe I'm thinking about this wrong, but do you really need 2 controllers and two motors?
Think about it, you only want one case to fall from the right motor every time the left motor drops it's case. These two should be timed perfectly (why you have two motors/controllers). So why don't you just have one motor and a belt? This will make sure they are both timed the same every time no matter what speed you set. It may take some R&D to get exactly the right belt/distance so that they are timed perfectly, but it seems like it would make the build much easier in the long run? |
|
|
|
IL, USA
|
[Last Edit: Brassaholic13]
[#29]
Originally Posted By drfroglegs:
Maybe I'm thinking about this wrong, but do you really need 2 controllers and two motors? Think about it, you only want one case to fall from the right motor every time the left motor drops it's case. These two should be timed perfectly (why you have two motors/controllers). So why don't you just have one motor and a belt? This will make sure they are both timed the same every time no matter what speed you set. It may take some R&D to get exactly the right belt/distance so that they are timed perfectly, but it seems like it would make the build much easier in the long run? Chain over belt. Doesn't have to be tight like a belt, and a really small chain could be used. For that matter, with all the more load it'll have, you could use an o-ring for a belt. Have the motor drive the case dropper, then use the o-ring to drive the spinning mechanism. But yes, I agree with you. They would need to be timed, and trying to screw around with two variable speed motors would be frustrating. |
|
|
|
[Last Edit: angus6]
[#30]
variable speed motors allow easy adjustment for time in flame , I used a control like this cheap, can be found in ac or dc , not sure why not tied together, sure there is a reason
|
|
|
|
|
[#31]
Originally Posted By angus6:
variable speed motors allow easy adjustment for time in flame , I used a control like this cheap, can be found in ac or dc , not sure why not tied together, sure there is a reason Skip, Any reason you didn't just do one motor/controller and tie the two together with a belt/chain? Seems like it would complicate things a little bit with two controllers/motors that you have to synchronize. Thanks for your feedback. |
|
|
|
OH, USA
|
[#32]
have you given any thought to using induction to anneal your brass?
|
|
|
|
[Last Edit: RocketmanOU]
[#33]
Originally Posted By KEA:
I think his oatent would be useful for a DIY project with no infringement. Originally Posted By KEA:
Originally Posted By El-Skippo:
True but costs $350 more. Also the reason I built my own for quids was that nice little ITAR problem that now causes a lot of issues trying to buy anything without having to apply for expencive export lic, tax, shipping, import dutys. The cost becomes crazy stupid for anyone out the US. By no means I'm knocking anyone's product. Just a explanation as to why I've done what I've done. I think his oatent would be useful for a DIY project with no infringement. Link To Patent There is no personal use exemption for patent infringement in the US. Making one for yourself is just as much infringement as selling them. If your device consists of anything found in their claims, it infringes on their patent, and you are open to litigation. Example: your design in the OP looks like it probably infringes on claim 17 already, although I am no lawyer. |
|
|
|
IL, USA
|
[#34]
Originally Posted By RocketmanOU:
Link To Patent There is no personal use exemption for patent infringement in the US. Making one for yourself is just as much infringement as selling them. If your device consists of anything found in their claims, it infringes on their patent, and you are open to litigation. Example: your design in the OP looks like it probably infringes on claim 17 already, although I am no lawyer. Originally Posted By RocketmanOU:
Originally Posted By KEA:
Originally Posted By El-Skippo:
True but costs $350 more. Also the reason I built my own for quids was that nice little ITAR problem that now causes a lot of issues trying to buy anything without having to apply for expencive export lic, tax, shipping, import dutys. The cost becomes crazy stupid for anyone out the US. By no means I'm knocking anyone's product. Just a explanation as to why I've done what I've done. I think his oatent would be useful for a DIY project with no infringement. Link To Patent There is no personal use exemption for patent infringement in the US. Making one for yourself is just as much infringement as selling them. If your device consists of anything found in their claims, it infringes on their patent, and you are open to litigation. Example: your design in the OP looks like it probably infringes on claim 17 already, although I am no lawyer. Pretty sure that it's going to be damn near impossible for Girard to hold anyone crafting something for themselves as patent infringement. What's the reimbursement going to be? The cost of an annealer? Not worth the time or effort for them to go after each individual do-it-yourself guy. It's like going after each ant on the driveway instead of a nest. But yes, it is a violation of patent law. http://en.wikipedia.org/wiki/United_States_patent_law |
|
|
|
[#35]
Originally Posted By Brassaholic13:
Pretty sure that it's going to be damn near impossible for Girard to hold anyone crafting something for themselves as patent infringement. What's the reimbursement going to be? The cost of an annealer? Not worth the time or effort for them to go after each individual do-it-yourself guy. It's like going after each ant on the driveway instead of a nest. But yes, it is a violation of patent law. http://en.wikipedia.org/wiki/United_States_patent_law Originally Posted By Brassaholic13:
Originally Posted By RocketmanOU:
Originally Posted By KEA:
Originally Posted By El-Skippo:
True but costs $350 more. Also the reason I built my own for quids was that nice little ITAR problem that now causes a lot of issues trying to buy anything without having to apply for expencive export lic, tax, shipping, import dutys. The cost becomes crazy stupid for anyone out the US. By no means I'm knocking anyone's product. Just a explanation as to why I've done what I've done. I think his oatent would be useful for a DIY project with no infringement. Link To Patent There is no personal use exemption for patent infringement in the US. Making one for yourself is just as much infringement as selling them. If your device consists of anything found in their claims, it infringes on their patent, and you are open to litigation. Example: your design in the OP looks like it probably infringes on claim 17 already, although I am no lawyer. Pretty sure that it's going to be damn near impossible for Girard to hold anyone crafting something for themselves as patent infringement. What's the reimbursement going to be? The cost of an annealer? Not worth the time or effort for them to go after each individual do-it-yourself guy. It's like going after each ant on the driveway instead of a nest. But yes, it is a violation of patent law. http://en.wikipedia.org/wiki/United_States_patent_law Still illegal, indeed, regardless of whether he's likely to be sued. |
|
|
|
IL, USA
|
[#36]
Thats why (not to hijack the thread), I went a different direction.
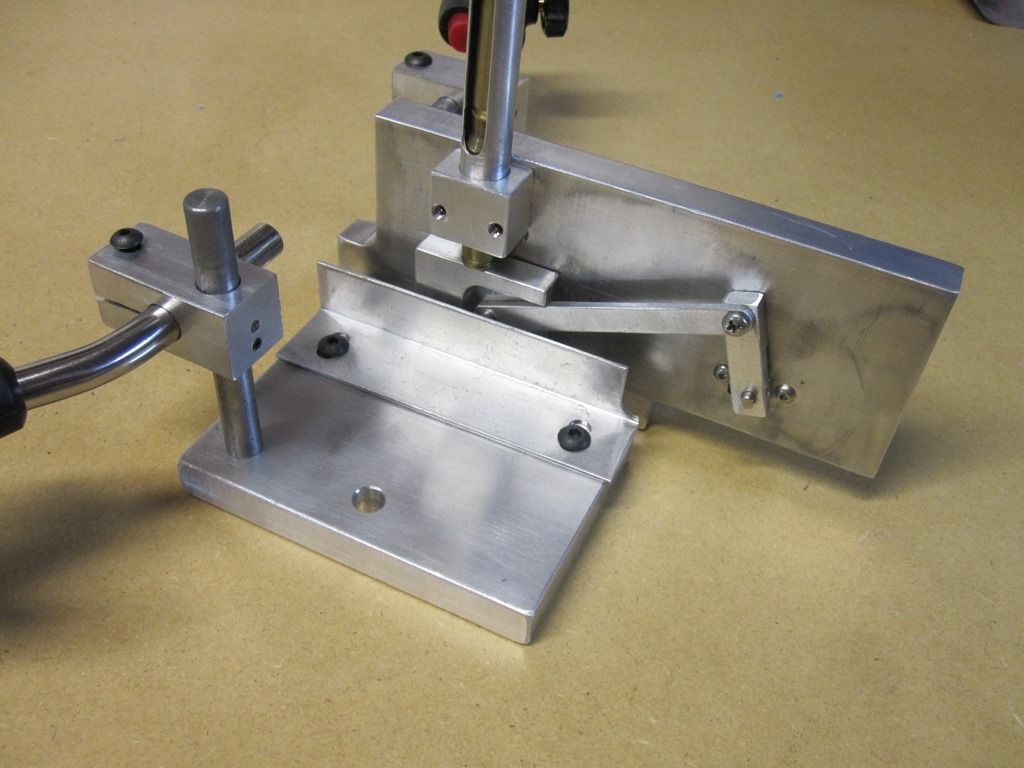
I have since added a motorized platform at the point the case sits, so that it spins. I have about $25.00 in materials, $10.00 in the 12V DC motor, and $3.xx in the power jack I added after taking this photo. Of course... There's about $10k in equipment to be able to make it. 
|
|
|
|
[#37]
Originally Posted By RocketmanOU:
Link To Patent There is no personal use exemption for patent infringement in the US. Making one for yourself is just as much infringement as selling them. If your device consists of anything found in their claims, it infringes on their patent, and you are open to litigation. Example: your design in the OP looks like it probably infringes on claim 17 already, although I am no lawyer. Originally Posted By RocketmanOU:
Originally Posted By KEA:
Originally Posted By El-Skippo:
True but costs $350 more. Also the reason I built my own for quids was that nice little ITAR problem that now causes a lot of issues trying to buy anything without having to apply for expencive export lic, tax, shipping, import dutys. The cost becomes crazy stupid for anyone out the US. By no means I'm knocking anyone's product. Just a explanation as to why I've done what I've done. I think his oatent would be useful for a DIY project with no infringement. Link To Patent There is no personal use exemption for patent infringement in the US. Making one for yourself is just as much infringement as selling them. If your device consists of anything found in their claims, it infringes on their patent, and you are open to litigation. Example: your design in the OP looks like it probably infringes on claim 17 already, although I am no lawyer. Nope. These clearly have a different mechanism for rotating the case. Claim 17 says "a linear slide mechanism disposed adjacent the rotatable feed wheel assembly defining a portion of a case receiving region" where as this design uses a rotating drum to turn the brass.. It's a moot point, There is already at least 20 people interested in this thread alone, not to mention the other few dozen that will just look at the info and not subscribe. I doubt he is in the business of hunt-pecking individual DIY guys that kind of used his idea that has already been used many times before (before his patent)... I'm not saying it's right, but I wasn't planning on buying it anyways. So my options are 1) use my current methods (free) or 2) spend $50 and build this one... Neither of those involve buying a $400 version... His trimmer, on the other hand, I love that shit and it was well worth the money.... |
|
|
|
|
[Last Edit: RocketmanOU]
[#38]
Originally Posted By drfroglegs:
Nope. These clearly have a different mechanism for rotating the case. Claim 17 says "a linear slide mechanism disposed adjacent the rotatable feed wheel assembly defining a portion of a case receiving region" where as this design uses a rotating drum to turn the brass.. It's a moot point, There is already at least 20 people interested in this thread alone, not to mention the other few dozen that will just look at the info and not subscribe. I doubt he is in the business of hunt-pecking individual DIY guys that kind of used his idea that has already been used many times before (before his patent)... I'm not saying it's right, but I wasn't planning on buying it anyways. So my options are 1) use my current methods (free) or 2) spend $50 and build this one... Neither of those involve buying a $400 version... His trimmer, on the other hand, I love that shit and it was well worth the money.... Originally Posted By drfroglegs:
Originally Posted By RocketmanOU:
Originally Posted By KEA:
Originally Posted By El-Skippo:
True but costs $350 more. Also the reason I built my own for quids was that nice little ITAR problem that now causes a lot of issues trying to buy anything without having to apply for expencive export lic, tax, shipping, import dutys. The cost becomes crazy stupid for anyone out the US. By no means I'm knocking anyone's product. Just a explanation as to why I've done what I've done. I think his oatent would be useful for a DIY project with no infringement. Link To Patent There is no personal use exemption for patent infringement in the US. Making one for yourself is just as much infringement as selling them. If your device consists of anything found in their claims, it infringes on their patent, and you are open to litigation. Example: your design in the OP looks like it probably infringes on claim 17 already, although I am no lawyer. Nope. These clearly have a different mechanism for rotating the case. Claim 17 says "a linear slide mechanism disposed adjacent the rotatable feed wheel assembly defining a portion of a case receiving region" where as this design uses a rotating drum to turn the brass.. It's a moot point, There is already at least 20 people interested in this thread alone, not to mention the other few dozen that will just look at the info and not subscribe. I doubt he is in the business of hunt-pecking individual DIY guys that kind of used his idea that has already been used many times before (before his patent)... I'm not saying it's right, but I wasn't planning on buying it anyways. So my options are 1) use my current methods (free) or 2) spend $50 and build this one... Neither of those involve buying a $400 version... His trimmer, on the other hand, I love that shit and it was well worth the money.... I was responding to the idea that DIY projects don't infringe on patents. They very well can. |
|
|
|
|
[#39]
Why post this link? This is a home made annealer thread. Please stay on topic. If you want to discuss your Giruad annealer, please start your own thread. |
|
|
|
AUS
|
[#40]
Well hasn't this thread gone off like a forg in a sock.
If you would like to know where my insperation for my annealer came from. Look up MrLongrange on you tube and look at his case annealing vids. As to comparing the Giraud ( how ever you spell it ) my annealer are well far apart to be infringing there are other you tube annealer builds that are far more resembling to the Giraud annealer then my poor mans auto annealer. My build is open source as in not selling plans or DIY kits the info is there for all for free, now if someone decided to take the my open source build and decided to make them for profit. Then there would be a problem, as my intention of my build was to provide those that don't have the coin to spend a option to build one themselfs for as little as possible. Outside the US there are not many if any avenues to buy a factory made annealer. The only one I know off you can buy in Australia is the Benchsorce and that fetches a price tag of $800 AUD. So a lot of people find other means to anneal there brass. I've done all kinds of ways of annealing, I'm happy with what I got and I'm even more happy that I built it with my own two hands. As to just using 1 motor and run a pully gear or what ever was mentioned. I did think of it by running a shaft and bearing in a bearing housing with a 8mm toothed gear, for a toothed belt. In the end I just went the two motors and digi read outs, I watch my machine when I anneal. So I make adjustments when needed on the case feeder motor. For a few hundred cases its probably tweaked 4-5 times a digit or two slower or faster. I find it no biggie. The thing about DIY is you make it to how you want it. If you want to run only one motor go for it if you want to run two sure, want to change the feed set up sure go for it. It's your builds after all. Make them how you want them. |
|
|
AUS
|
[#41]
Here is the link to mine and a few others on our forum inspiration to which the end result ( skips v1.6 ) is what it is after 5 odd months of playing with ideas.
http://youtu.be/tvI40Rl8Z3k As to my further input in the section and thread. I'll continue to help the OP via Email as we were prior to the thread poping up. I wish you all good luck with your builds and your ideas, similar to the brain storms we had on our forum for the build/s I'm going back to just looking at the forum and just participate in the NV section when I need too, the Nv section was why I joined AR15.com. I'll poke my head in from time to time on the thread if it is still around and see others builds. Regards Skip |
|
|
|
[#42]
Originally Posted By Brassaholic13:
Thats why (not to hijack the thread), I went a different direction. http://i204.photobucket.com/albums/bb199/onebadgmc/IMG_0730_zps6eb0fd28.jpg I have since added a motorized platform at the point the case sits, so that it spins. I have about $25.00 in materials, $10.00 in the 12V DC motor, and $3.xx in the power jack I added after taking this photo. Of course... There's about $10k in equipment to be able to make it. Yours is great looking too , turn the case feeder , slip it under it and go |
|
|
|
NE, USA
|
[#43]
Originally Posted By drfroglegs:
Maybe I'm thinking about this wrong, but do you really need 2 controllers and two motors? Think about it, you only want one case to fall from the right motor every time the left motor drops it's case. These two should be timed perfectly (why you have two motors/controllers). So why don't you just have one motor and a belt? This will make sure they are both timed the same every time no matter what speed you set. It may take some R&D to get exactly the right belt/distance so that they are timed perfectly, but it seems like it would make the build much easier in the long run? It would make things easier for set up but I personally do not know if the if the timing is always the same between all the different cases. By making it a direct drive you are locked into to one ratio. No fine tuning to make sure the feeding is correct. It seem to work with other annealers but I personally dont want to do that much R&D and motors and controllers are cheap. compared to buying sprockets and chain belts or o rings. One Motor and and controller is $16 pretty cheap when it comes to versatility. Once you figure out basic settings you should be able to set everthing to the displaces each time you anneal a specific case. |
|
|
|
[#44]
Tag. This is something I've been thinking about building one of these days.
Especially with that nice expensive Lapua 6.5 Grendel brass...
|
|
|
|
NE, USA
|
[#45]
Originally Posted By alemonkey:
Tag. This is something I've been thinking about building one of these days. Especially with that nice expensive Lapua 6.5 Grendel brass... You can come use mine if you want ale |
|
|
|
[#46]
Originally Posted By tstuart34: You can come use mine if you want ale Originally Posted By tstuart34: Originally Posted By alemonkey: Tag. This is something I've been thinking about building one of these days. Especially with that nice expensive Lapua 6.5 Grendel brass... You can come use mine if you want ale |
|
|
|
NE, USA
|
[#47]
Originally Posted By Brassaholic13:
Pretty sure that it's going to be damn near impossible for Girard to hold anyone crafting something for themselves as patent infringement. What's the reimbursement going to be? The cost of an annealer? Not worth the time or effort for them to go after each individual do-it-yourself guy. It's like going after each ant on the driveway instead of a nest. But yes, it is a violation of patent law. http://en.wikipedia.org/wiki/United_States_patent_law Originally Posted By Brassaholic13:
Originally Posted By RocketmanOU:
Originally Posted By KEA:
Originally Posted By El-Skippo:
True but costs $350 more. Also the reason I built my own for quids was that nice little ITAR problem that now causes a lot of issues trying to buy anything without having to apply for expencive export lic, tax, shipping, import dutys. The cost becomes crazy stupid for anyone out the US. By no means I'm knocking anyone's product. Just a explanation as to why I've done what I've done. I think his oatent would be useful for a DIY project with no infringement. Link To Patent There is no personal use exemption for patent infringement in the US. Making one for yourself is just as much infringement as selling them. If your device consists of anything found in their claims, it infringes on their patent, and you are open to litigation. Example: your design in the OP looks like it probably infringes on claim 17 already, although I am no lawyer. Pretty sure that it's going to be damn near impossible for Girard to hold anyone crafting something for themselves as patent infringement. What's the reimbursement going to be? The cost of an annealer? Not worth the time or effort for them to go after each individual do-it-yourself guy. It's like going after each ant on the driveway instead of a nest. But yes, it is a violation of patent law. http://en.wikipedia.org/wiki/United_States_patent_law I am not trying to get into some stupid pissing match with anyone in the forum or any manufacture. I do not understand legalise and I do try but my brain just doesn't compute opened end BS very well. When i read through the patent i read the same basic thing over and over again.... they are talking about the mechanism that rotates the case around and the reference the case feeder a lot. I do not see any issue with the part of the machine that rotates the case. It is totally different then what they are offering. Now the case feeder.... I guess i do not understand the lanuage in the patent well enough to say that i would be infringement or not. They call about angled sides tapering down.... I guess if someone came translate it would be great! |
|
|
|
[#48]
Please stop with mentioning any legal issues and other attempts to derail this thread.
This is the Reloading Forum, not the legal forum. If you have problems with the thread, stop clicking on it. dryflash3 Please continue with your thread OP.
|
|
|
|
IA, USA
|
[#49]
Originally Posted By tstuart34:
It would make things easier for set up but I personally do not know if the if the timing is always the same between all the different cases. By making it a direct drive you are locked into to one ratio. No fine tuning to make sure the feeding is correct. It seem to work with other annealers but I personally dont want to do that much R&D and motors and controllers are cheap. compared to buying sprockets and chain belts or o rings. One Motor and and controller is $16 pretty cheap when it comes to versatility. Once you figure out basic settings you should be able to set everthing to the displaces each time you anneal a specific case. This. Adding a belt or chain, pulleys or cogs, another shaft and bearing to turn the second wheel on, figuring out the ratio and alignment... Just easier and likely cheaper to use two motors. |
|
|
|
[#50]
Originally Posted By jasonsbeer:
This. Adding a belt or chain, pulleys or cogs, another shaft and bearing to turn the second wheel on, figuring out the ratio and alignment... Just easier and likely cheaper to use two motors. Originally Posted By jasonsbeer:
Originally Posted By tstuart34:
It would make things easier for set up but I personally do not know if the if the timing is always the same between all the different cases. By making it a direct drive you are locked into to one ratio. No fine tuning to make sure the feeding is correct. It seem to work with other annealers but I personally dont want to do that much R&D and motors and controllers are cheap. compared to buying sprockets and chain belts or o rings. One Motor and and controller is $16 pretty cheap when it comes to versatility. Once you figure out basic settings you should be able to set everthing to the displaces each time you anneal a specific case. This. Adding a belt or chain, pulleys or cogs, another shaft and bearing to turn the second wheel on, figuring out the ratio and alignment... Just easier and likely cheaper to use two motors. Agreed. I made a pretty complicated blade design with case feeder - in fact just did a couple hundred 308 yesterday. Two motors and independent controls makes timing it easier. Since all the kinks are worked out it ones flawless and easily changeable between 308, 223 and 300, but without the two speed controls it would be a pain. However, because I like building and tinkering, one of these will probably be in my future. it is a much simpler design. Here is a video of the overly complicated, but very functional one I built: wood annealer |
|
|
|
 Win a FREE Membership!
Sign up for the ARFCOM weekly newsletter and be entered to win a free ARFCOM membership. One new winner* is announced every week!
You will receive an email every Friday morning featuring the latest chatter from the hottest topics, breaking news surrounding legislation, as well as exclusive deals only available to ARFCOM email subscribers.

AR15.COM is the world's largest firearm community and is a gathering place for firearm enthusiasts of all types.
From hunters and military members, to competition shooters and general firearm enthusiasts, we welcome anyone who values and respects the way of the firearm.

Subscribe to our monthly Newsletter to receive firearm news, product discounts from your favorite Industry Partners, and more.
Copyright © 1996-2024 AR15.COM LLC. All Rights Reserved.
Any use of this content without express written consent is prohibited.
AR15.Com reserves the right to overwrite or replace any affiliate, commercial, or monetizable links, posted by users, with our own.


