|
Posted: 3/25/2012 8:51:31 PM EDT
I'd like for this to become a How to Guide on using this Dillon Trimmer.
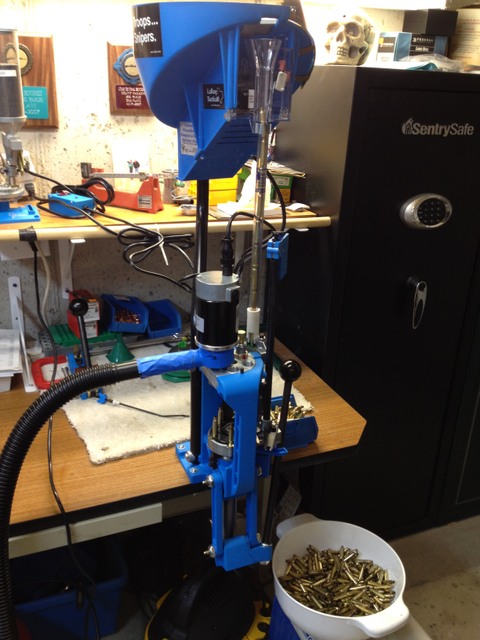
What I have: 1) new Dillon RT 1200 2) .223 die 3) Unique-Tek tool head clamp (added after pics) 4) Dillon XL 650 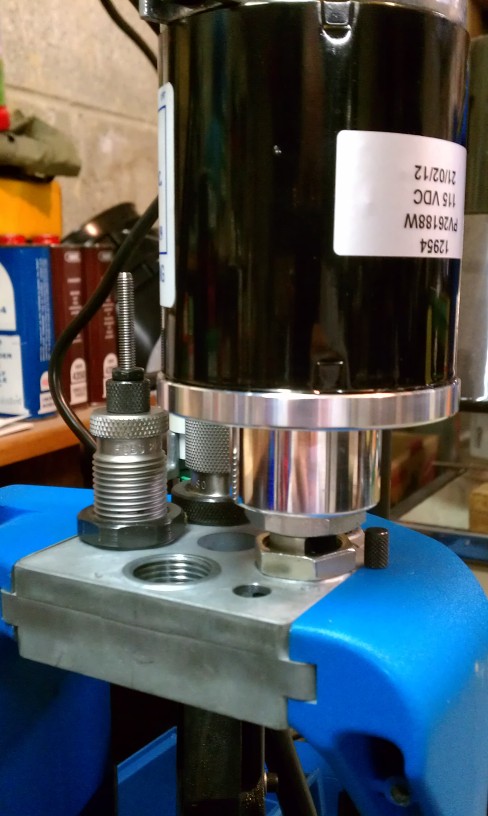
First thing I noticed when doing the initial set up was deciding what station to place the size/trim die into. Station 1: FL Resize and decap die Station 2: Blank Station 3: Size/Trim Die Station 4: Blank Station 5: Lyman M Expander The Trimmer motor is much larger in diameter than I had envisioned and cannot be placed in Station 2 for two reasons. 1) It hits the FL resizer die and 2) the motor hits the primer feed tube. I quickly determined that the trimmer motor cannot sit next to any die because it will not fit. The next thing I came to understand is that the trimmer die on the .223 setup has to be set VERY low in the tool head, so low that the lock nut that comes with the die has to be backed up...way up into the cleanout window such that only partial threads are in contact with the die. This is very weak and looks to restrict the size of the clean out window. Dillon instruction guide says to install the size/trim die into the tool head and run it down until it contacts the shellplate and then back it out 1/2 turn. Be careful not to run the die down to low or this will set the shoulder back too far on your case. Use of a case gage is strongly recommended here. After the size/trim die is set, size a case and check it for shoulder length, adjust as necessary. Once the correct case length is achieved, tighten the size/trim die lock nut. 
At this point I noticed that there was precious little neck sticking out of the trim die into the trim area. I would say .015"-.020" if that. After sizing several pieces of brass and checking this it always seemed about the same. This made me very nervous.... having the carbide cutter run down this close to the die would be real bad. If the carbide cutter made contact with the bottom of the port window in the size/trim die could shatter the cutter and cause serious harm. With a brass case in the size/trim die lower the handle to run the brass all the way into the die. Screw the trim motor onto the die until the carbide cutter makes contact with the brass. Lower the shell plate and turn the cutter motor down another 1/4 turn. Lock motor jam nut. Keep in mind that the threads are not fine and 1/4 turn down could put you into contact with the die. I have found that there is no way of knowing how close you are to that die with the cutter. Can't see it, can't measure it... you are operating on blind luck here. I recommend that prior to plugging in the trimmer motor you take a small instrument and attempt to rotate the cutter blade to insure it is not touching anything and is free spinning. Trim a case and check it with your calipers for total case length. Adjust the motor up or down until the right length is achieved. Lock the motor jam nut. Again, be VERY careful when adjusting down. There is very little room for error on these .223 cases. Not sure about the adjustments for other calibers. For discussion and further comment consider the following: 1. The motor is not that loud but does generate some vibration that will walk unsecured items right off your bench. Having the tool head clamp kit helps with the toolhead vibrating. 2. With the Trimmer placed in Station 3, there is no way to get the tool head pin or clamp bolt out without unthreading the motor from the die. I find this unacceptable, especially after all the nerve wracking adjustments that had to be made to set the proper trim length. 
3. With the Trimmer placed in Station 3 the vacuum assembly has to be cut or trimmed to allow clearance for the tool head pin and/or clamp bolt. 4.This motor is not light, it has some weight to it. Given that die lock nut is backed out so far that only the threads on the sides of the chip exhaust port are contacting, how stable is this set up gonna be over time 5. The Carbide cutter is three sided, if the cutter becomes damaged or dull simply remove from the motor rotate to a new side and reinstall. Walla, like new again. You have three lifes before you need to order a new carbide cutter. Dillon users, please chime in with your set ups, adjustment suggestions or anything else that relates to the Dillon RT1200. |
|
|
|
[#1]
1st, in this case you should mount the die lock nut under the toolhead, not on top. I find that this is necessary on the 223, however, both the .308 and 30-06 cases are long enough that the die lock nut will work on top of the toolhead.
2nd, the trimmer was intended to be mounted in station 4 of your 650, not station 3 as you've mounted it. |
|
|
|
[#2]
Thanks for the advice.
Would it hurt to have a lock nut on the top and bottom with this. 223 set up? Station 4 huh...that works but I can't use the expanded die then with this prep station. Only the size and trim. Have to move the expander into the load toolhead. Good stuff... thanks. I think I'll call Dillon on that .223 die setup...why would the design and build a die that cant be used like the. 308 or. 06?? Doesn't make sense for what we pay for these tools. |
|
|
|
[#3]
I think it safe to say Steve knows more about XL650 operation than anyone on this board.
My initial set up was Dillon carbide sizer die in station one, sizer trimmer in three and M die in station five. That doesn't work with vacuum ring. RT1200 clogs without vacumm to draw off shavings. Making it necessary to move sizer trimmer to station four. M die now resides in station one on loading tool head. RT1200 torques hard enough when motor starts to knock lock ring loose from toll head. Answer for me was Hornady lock ring top and Lee llock ring bottom. Motor secured. |
|
|
|
[#4]
I have 550, and use a Dillon ring on top, a Lee ring on the bottom, and I've added thread locker to them so the motor torque doesn't spin the motor on startup, which throws your adjustment all to whack.
I run my trimmer in station #1 and a conventional Lee resizer in station #3, backed out a couple of turms so all that gets sized is the neck. I like running an expander ball back through the case to bring the neck up a bit –– the Dillon really squeezes them down. Lastly, I deprime and tumble all of my cases on a SS prior to prepping them on the Dillon, so I don't worry about dealing with spent primers there. |
|
|
|
[#5]
Sounds like lock rings are recommended on the top and bottom of the size/trim die to hold the die in place and then the lock ring on the top of the die to lock the motor to the die.
I can see using a Lee ring on the top of the toolhead, it has a rubber "O" ring to help hold it in place. The RCBS lock ring on the bottom of the tool head has a set screw that holds it in place once the die is set. Is anyone using a lock nut with set screw to lock the motor to the die? Has anyone else noticed how dangerously close the carbide cutter blade is to the bottom of the port window in the size/trim die? |
|
|
|
[#6]
On my .223 die I only use a Dillon lockring on the bottom because one on the top, 1) won't grab enough threads and 2) will interfere with the airflow to suck the brass shavings away from the trimmer. It works just fine there and I've trimmed over 20,000 cases with it that way.
My setup for .223, .308, and 30-06 is to use a Dillon deprime/resize die in station 1 and the trimmer in station 4 of my 650. I don't find the 'extra squeeze' the trim die adds to be an issue with any of the three as good, consistent neck tension is a plus. Besides, I only touch the case mouth with the FCD when I reload them. |
|
|
|
[#7]
I had the same trouble when using my trimmer in station 3. I fixed that problem with this:
 Found a nail with the same dia as the tool head pin. Works like a charm PS: I sure wish my trimmer looked new again. |
|
|
|
[#8]
You can believe me on this one. That carbide cutting blade will cut right into the die with no problem at all. When the bearing went bad in one of my trimmer motors . It failed in less than 25 case's. When I was doing QC on the processed brass one came out at 1.37. WOH stop the press kill the trimmer !. Pulled up the vac connection and sparks were a flying. I ended up fixing the die no big deal. In fact it was a help as I don't use the trimmer die to size anyway.
|
|
|
|
[#9]
This thread is relevant to my interests.
|
|
|
|
[#10]
I run standard Dillon die nuts on the bottom of my 223 and 300 Blackout trim dies. I have well over 50k of 223 brass and over 25k pieces of 300 blackout sized and trimmed with the dies secured in this way.
|
|
|
|
[#11]
I use mine exclusively for trimming .223, so I bought a used Rock Chucker and mounted mine to it, so as to maintain the adjustment. It's worked very well for 15+ years.
|
|
|
|
[#12]
This is yet another great post in the reloading section. I would like to thank BUSHMAN and everyone else for adding there ideas also.
Thanks Guys, Kirch |
|
|
|
[#13]
Quoted: I use mine exclusively for trimming .223, so I bought a used Rock Chucker and mounted mine to it, so as to maintain the adjustment. It's worked very well for 15+ years. As I've said before, I must admit that I'm a bit on the lazy side and so anything that can streamline a process without giving up on the quality, I'm all for. That said, the real beauty of Dillon's trimmer is it's use on a progressive press as part of the case prep cycle. Using it on a single stage press, while fine, does mean that you have a separate trimming cycle where you have to handle each and every case to trim it and that's after you've resized and deprimed them as well. So, with the trimmer mounted along with your resizing / depriming die, as casefeeder, and a auto advance press like a 650 or LnL, all you do is lube em, drop em in the hopper, and crank. Without even touching a single case, you can resize, deprime, and trim 1,000 cases in an hour with ease. Then all you have to do is drop them in the tumbler for 10-15 minutes to remove the lube (and any tiny burs left on the case mouth) and you've got your rifle brass processed and ready to handload. Now that's what I call labor savings and I'm willing to spend the money to make the job more streamlined. |
|
|
|
[#14]
Quoted:
Quoted:
I use mine exclusively for trimming .223, so I bought a used Rock Chucker and mounted mine to it, so as to maintain the adjustment. It's worked very well for 15+ years. As I've said before, I must admit that I'm a bit on the lazy side and so anything that can streamline a process without giving up on the quality, I'm all for. That said, the real beauty of Dillon's trimmer is it's use on a progressive press as part of the case prep cycle. Using it on a single stage press, while fine, does mean that you have a separate trimming cycle where you have to handle each and every case to trim it and that's after you've resized and deprimed them as well. So, with the trimmer mounted along with your resizing / depriming die, as casefeeder, and a auto advance press like a 650 or LnL, all you do is lube em, drop em in the hopper, and crank. Without even touching a single case, you can resize, deprime, and trim 1,000 cases in an hour with ease. Then all you have to do is drop them in the tumbler for 10-15 minutes to remove the lube (and any tiny burs left on the case mouth) and you've got your rifle brass processed and ready to handload. Now that's what I call labor savings and I'm willing to spend the money to make the job more streamlined. True, but I'm called "anal" over my processing. I resize on a Big Max, then trim at the next press (die adjusted to not size), then I chamfer/debur, then clean the primer pocket, etc. All done by hand, and not rapidly. I clean pistol case primer pockets, for God's sake. |
|
|
|
[#15]
Quoted: True, but I'm called "anal" over my processing. I resize on a Big Max, then trim at the next press (die adjusted to not size), then I chamfer/debur, then clean the primer pocket, etc. All done by hand, and not rapidly. I clean pistol case primer pockets, for God's sake. Whoa boy, you are anal! |
|
|
|
[#16]
Quoted:
Quoted:
True, but I'm called "anal" over my processing. I resize on a Big Max, then trim at the next press (die adjusted to not size), then I chamfer/debur, then clean the primer pocket, etc. All done by hand, and not rapidly. I clean pistol case primer pockets, for God's sake. Whoa boy, you are anal! A while back I <finally> finished a five gallon bucket of 9-sillimeter brass. They look like new now––bright shiny, fully cleaned and processed, including a chamfer to avoid shaving the bullets, as I don't bell any more than absolutely necessary. I cringe every time I read where someone says they don't bother using corn cob to make them shine like gold. 
|
|
|
|
[#17]
You wouldn't like my whole reloading process because I clean all my brass till it's clean, not shinny. I see no need as it goes into a magazine and is shot so any stains on the brass aren't visible anyway.
I cringe when I hear someone using Lemonshine to polish their brass because it's using an acid to clean it which could weaken the brass over time. I guess we each have our own phobias. |
|
|
|
[#18]
I set my trimmer on my 650 up similar to most here.
Station 1 fl size/deprime set to punch primer and uniform mouth. Station 2 empty. Station 3 empty. Station 4 dillon trim die set to FL size and trim. Station 5 empty. I set up the trim die with the lock ring on the bottom of the die and the trimmer lock ring under the trimmer. This gives me plenty of room for the vacuum to pull the brass chips and debris away. I screw the die down until the case mic puts me where I need to be for bumping the shoulder back, then I lock the ring. Then I slowly adjust the trimmer down until it cuts the brass to 1.750" and them firmly lock the trimmer in place. When I turn the trimmer on I hold it so it doesn't try to torque and so far it's never worked loose. I check the cases with the case mic/calipers every time I fill the case feed to make sure nothing walked around. Once I'm done trimming a batch I wet SS tumble it, this helps knock any sharp edges off the mouths from the trimming. |
|
|
|
[#19]
OK... I had a chance to get the trimmer moved over to station 4 and eliminated the expander die.
Lock nut is now on the bottom of the size/trim die like this: 
And here is a close up view of a case in the die with the blade in contact. 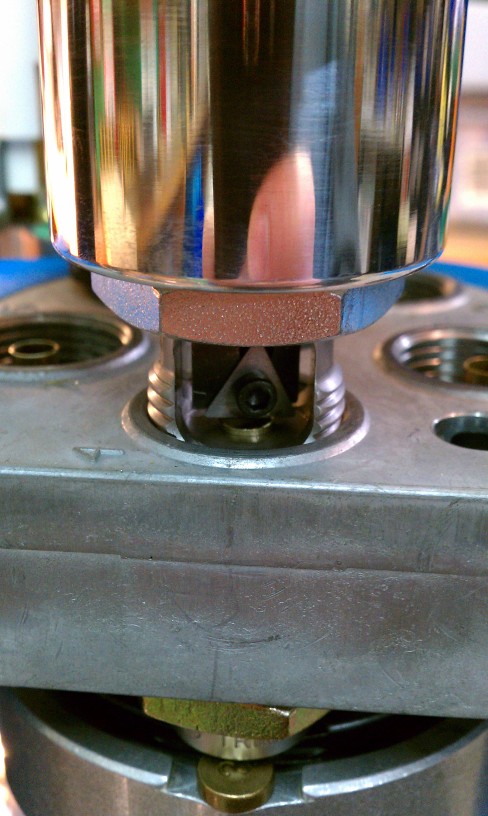
|
|
|
|
[#20]
Now run like the wind.....

MP |
|
|
 Win a FREE Membership!
Sign up for the ARFCOM weekly newsletter and be entered to win a free ARFCOM membership. One new winner* is announced every week!
You will receive an email every Friday morning featuring the latest chatter from the hottest topics, breaking news surrounding legislation, as well as exclusive deals only available to ARFCOM email subscribers.

AR15.COM is the world's largest firearm community and is a gathering place for firearm enthusiasts of all types.
From hunters and military members, to competition shooters and general firearm enthusiasts, we welcome anyone who values and respects the way of the firearm.

Subscribe to our monthly Newsletter to receive firearm news, product discounts from your favorite Industry Partners, and more.
Copyright © 1996-2024 AR15.COM LLC. All Rights Reserved.
Any use of this content without express written consent is prohibited.
AR15.Com reserves the right to overwrite or replace any affiliate, commercial, or monetizable links, posted by users, with our own.


