|
Posted: 3/28/2010 8:33:33 AM EDT
Dillon 550B Toolhead Stand Project
I’ve been frustrated for a while now about how I’ve been storing my toolheads. They are kept in the bottom drawer of my reloading cabinet where they lay there all cockeyed and are continually tumbling around and knocking against each other. Dillon sells a very nice stand that resolves this problem but I’ve never been able to bring myself to drop the twenty bucks or so per toolhead for that privilege. Currently I only have three toolheads but I do have five sets of dies, each of which needs its own. I can certainly justify the purchase of the extra toolheads for each die setup but to double that cost by buying a separate stand for each one just goes against my frugal (cheap) nature. I’ve been toying with this project idea for a while now and finally I took the time to get it done. Now, for less than the cost of one Dillon toolhead stand, I have a very nice and attractive stand for six of my current and future toolheads. Here’s how it went: Tools Needed: -Wood saw. No intricate cuts or lengthy ripping involved if you’re buying your boards pre-cut, so a basic hand saw will do just fine if that’s all you have. I used a small power miter saw. As always when working with wood or anything else, power tools are a huge benefit. -Drill. I used a drill press and I doubt I would have been very successful if I attempted to do this with a hand drill. However, if you have a steady hand and are confident you can make accurate and perfectly perpendicular holes with a hand drill, then go for it. If you do opt for a hand drill, you’ll need a vise or some other way to secure your boards and a way to determine that your drill is level while drilling. -Drill bits. Highly recommend using Forstner bits. Some brad points should work well too. I suppose you could get by with standard bits if that’s all you have. You’ll need at least a ¾” and a ½” (flat bottom bits highly recommended for these). You’ll also need a standard 9/64” bit. You may need a variety of other bit sizes if you choose to construct your stand with the same option that I did. I’ll call this the Deluxe option and you’ll see what I mean by that in a moment. -Basic tools such as a square, tape measure, and a pencil. -If you select the Deluxe option, you’ll also need a metal cutting method—a hack saw or Dremel tool will suffice. I used a band saw. -Sandpaper. (Note: for Deluxe option, a small rounded file is recommended but you can get by with sandpaper wrapped tightly around a nail or pencil. Materials: -One piece of 1x4 (nominal inches; ¾ x 3.5 actual) x 3 foot wood of your choice. I chose oak for this project because it’s not terribly pricy but makes a very attractive finish. -About two feet of ¾” dowel rod of the same type wood as the 1x4. -About one foot of ½” dowel rod of the same wood type. Of course it’s a good idea to go ahead and purchase twice this amount in case you damage something or make an error during construction. If you buy these at a Big Box store or lumber supply store, chances are you’ll have to buy at least twice as much as needed anyway. Time needed: Varies according to your skill level and tools you have at your disposal. This project took me about four hours but that included the time to take pictures and several interruptions by the spouse unit for a variety of estrogen induced “emergencies.” Let’s get started… All the materials you need 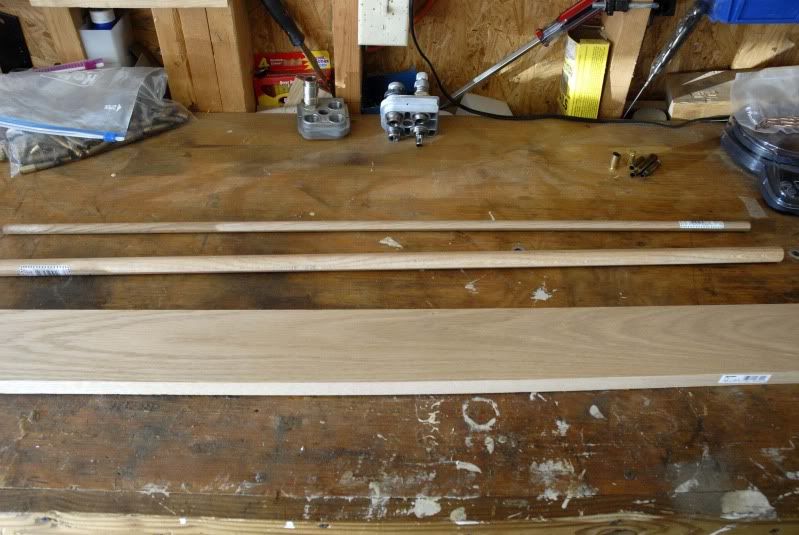
Cut the 1x4 to the desired length. This is determined by the number of toolheads you want the stand to support. I made mine for six. Calculate 3.5” of board space per toolhead and then add 4” 3.5 x 6 = 21 21 + 4 = 25 I cut the base of my stand to 25” 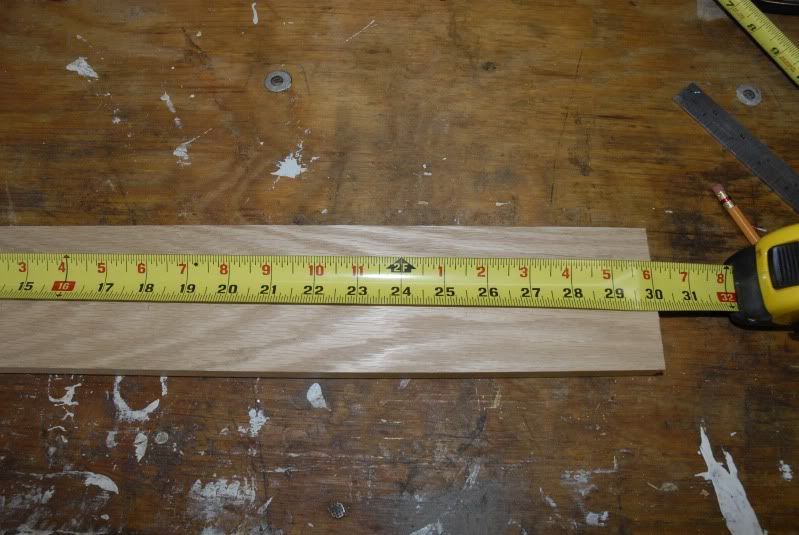
Next cut 3” sections out of the ¾” dowel rod. Cut as many as the number of toolheads your stand will support. Again, mine is for six. 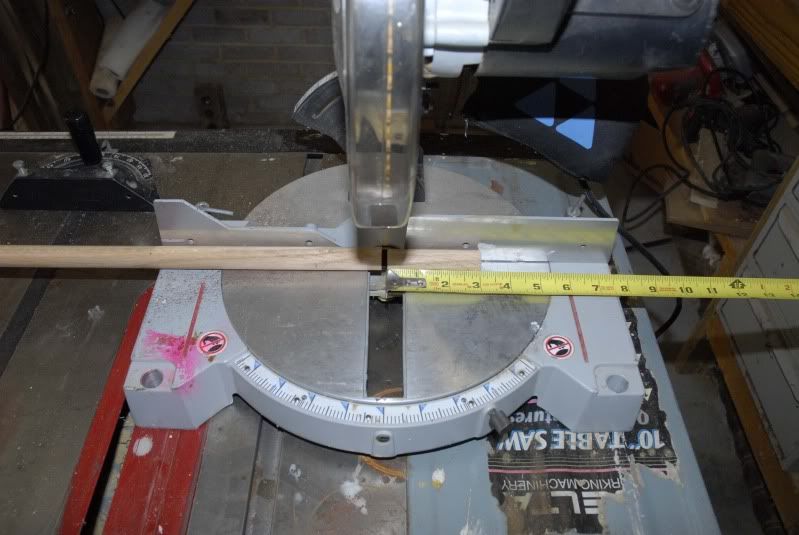
Cut the ½” dowel into six separate 1.5” sections. 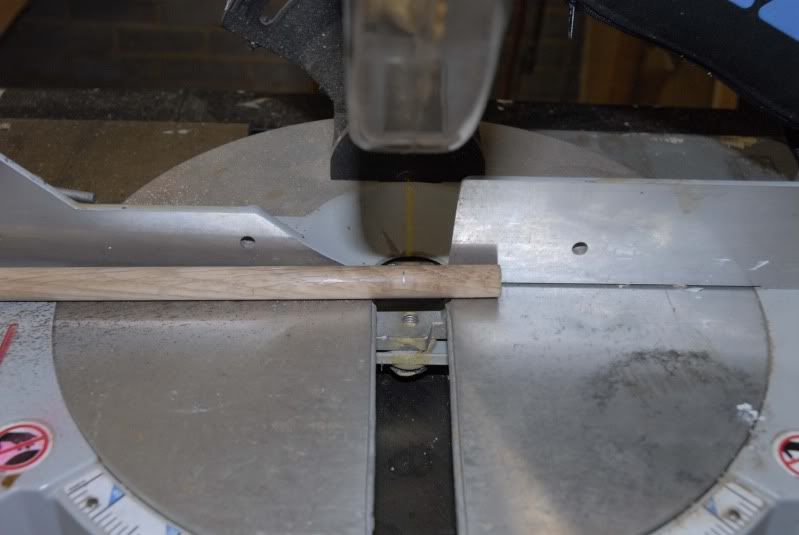
So far everything has been rather boring. So let’s take it up a notch and do some boring. We’ll need to first make a jig out of some scrape 2x4 material in order to keep your ¾” dowel pieces positioned securely and square. Simply bore a hole into the scrap. This is also a good test to ensure the hole size you’re drilling is a good fit for your dowels. 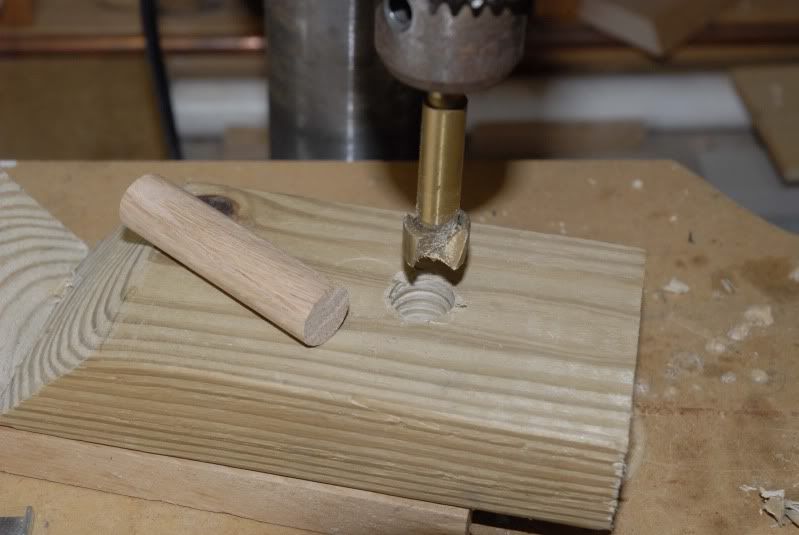
Find and mark the center of your dowel piece and set it into the hole in your jig and position and secure it directly under the center of your ½” bit. 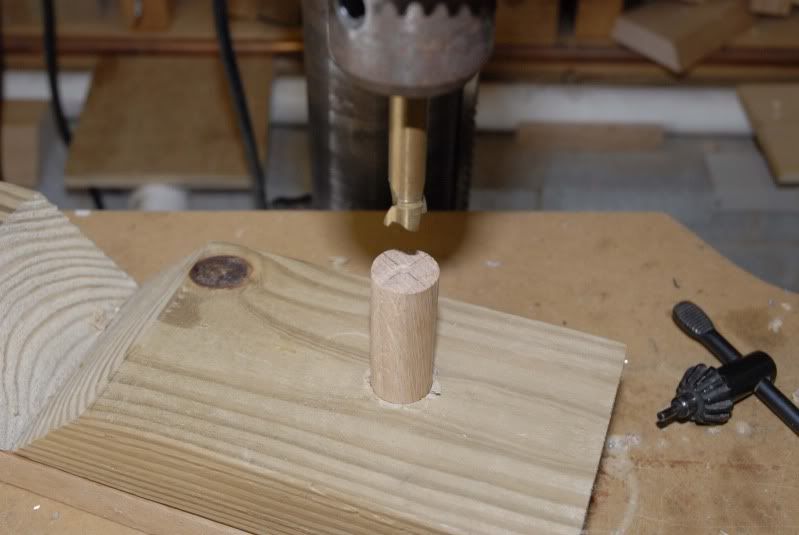
Set your drilling depth to bore a hole ½” deep and bore your hole into the end of the dowel. NOTE: you’ll probably need more than just hand grip strength to keep the dowel from spinning while boring. Once I got the hole started I used channel locks and a piece of rubber sheeting to grab hold of the dowel. 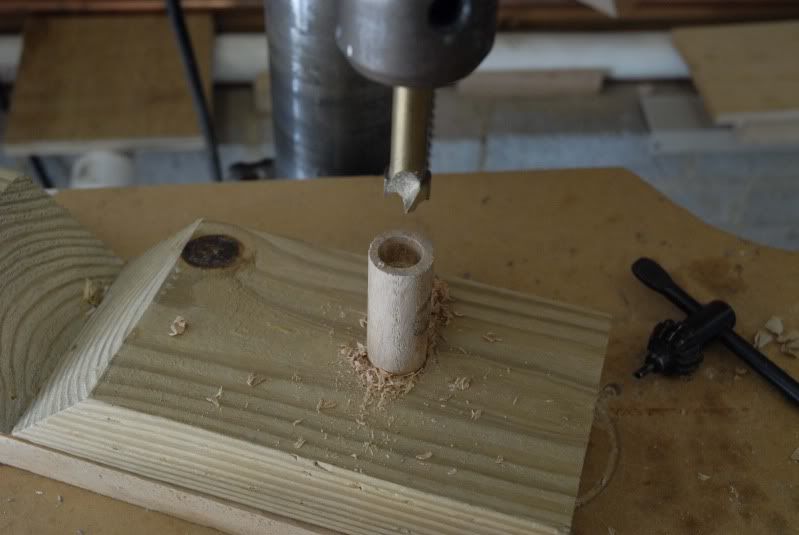
The next step involves inserting the ½” pieces into the ¾” pieces. First add a little wood glue into the holes you just drilled and spread it around with a nail, a small piece of wood, or an appendage of your anatomy. Personally, I don’t have an appendage small enough to fit into a half inch hole but I’m pretty sure some of you guys do. 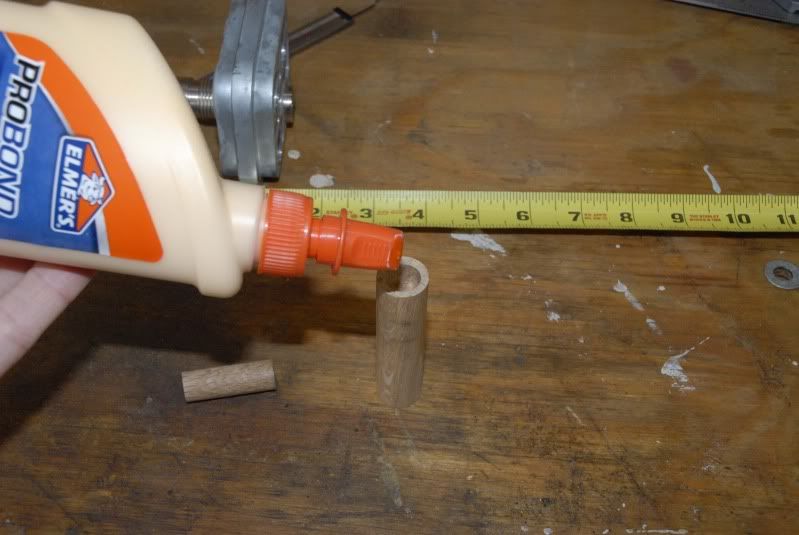
Now insert the ½” dowel pieces into the hole and tap them securely with a soft faced hammer until they bottom out. Take care during this step. It would be very easy to split the ¾” dowel as the “wall” around the hole is comparatively thin. If it appears to be too tight of a fit, sand down the small dowel a bit. OBSERVATION: I fully recognize that a preferred method would be to make these dowel sections from a single piece of ¾” rod and turn the top 1” portion down using a lathe. However, I don’t have a lathe so this is the best alternative I could come up with. 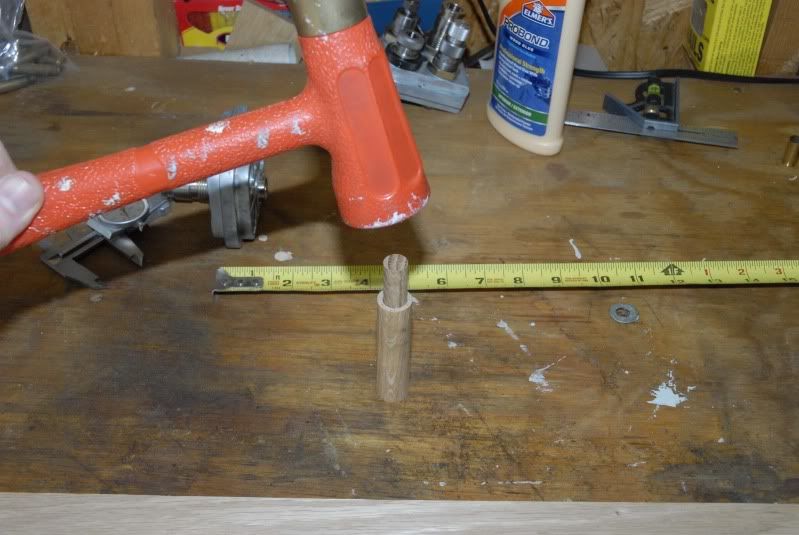
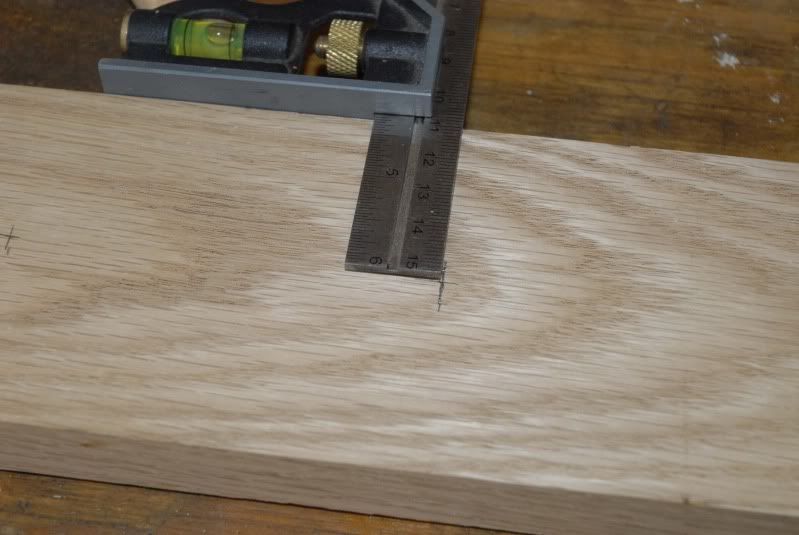
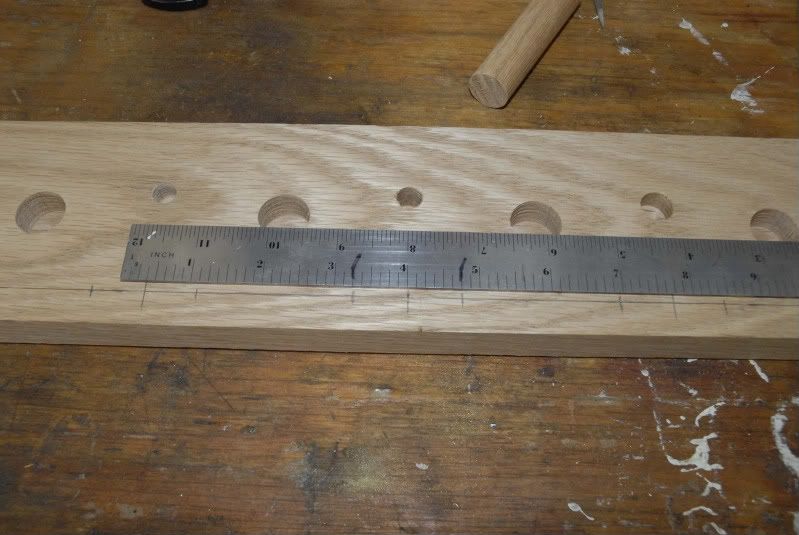
Now it’s time to lay out your measurements. I determined that the dowels should be positioned at 3.5 inches on center. You may decide you’d like a little more space between toolheads. If so, be sure to take that into consideration when you plan the initial length of your base. 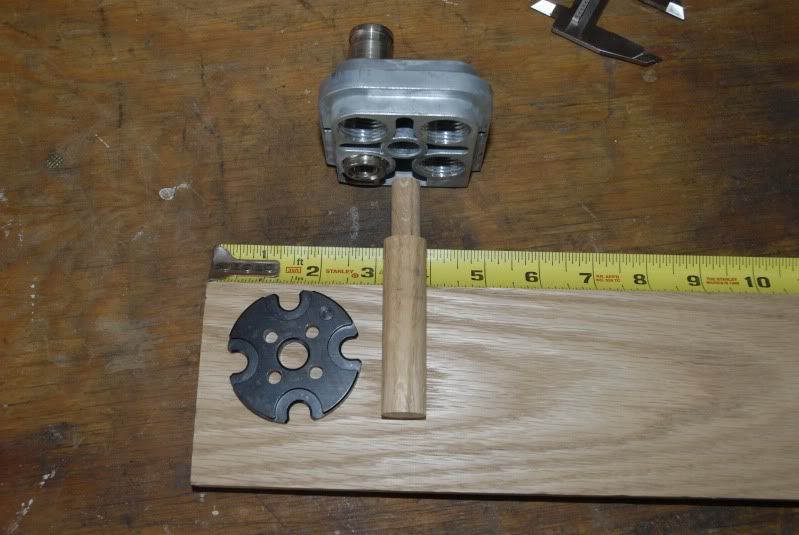
Now simply bore ¾” holes into the base. Using the Forstner bit, I set the drill press to stop at about ¾ of the thickness of the base or just a little deeper. 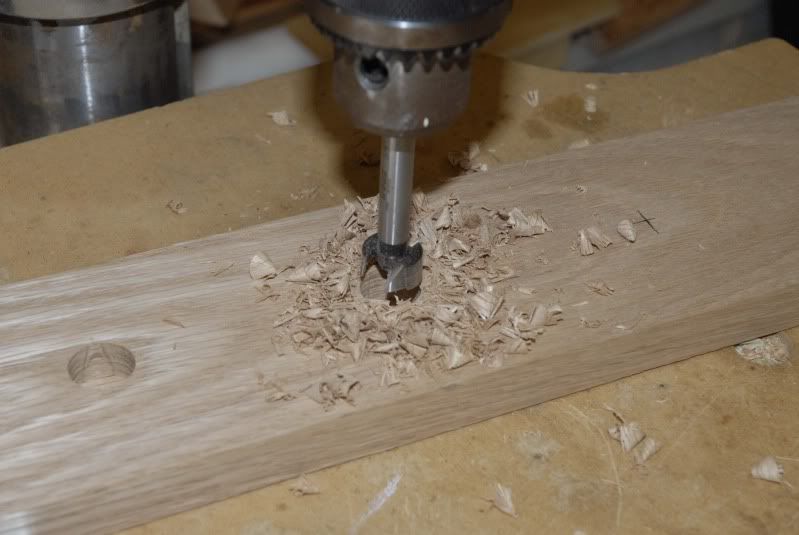
After all the holes are bored, you can insert the dowel sections and get a good look at what’s shaping up. 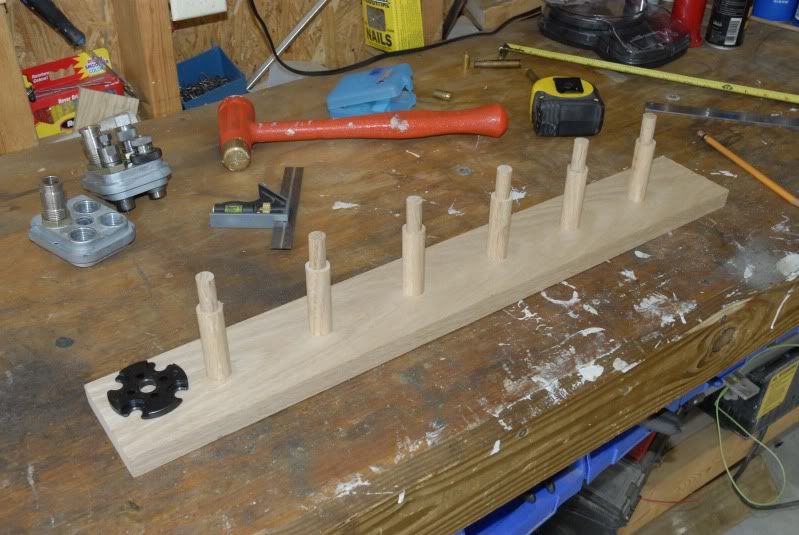
While the dowels are still in place you’re next step is to mark the center points for the holes needed to secure your shell plates. I used a 1/8” piece of scrap wood as a spacer that kept the shell plate exactly 1/8” away from the back edge while I simply “eyeballed” the centering of the shell plate between the dowels. Then using the center of the shell plate, I simply marked the center point of the position I intend to drill out. 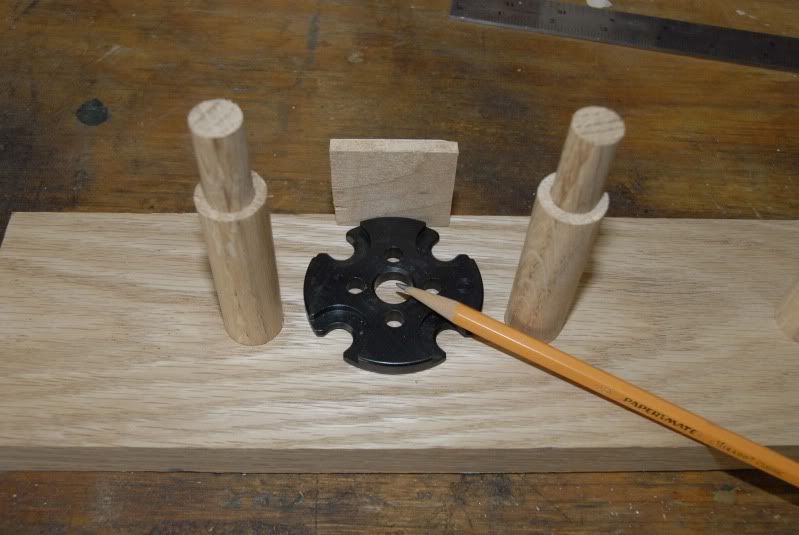
After you have all the shell plate hole positions marked you’ll need to decide whether you want to go with a standard or deluxe option. The following instructions are for the deluxe; if you would rather simplify things and make a standard holder, just proceed by boring ½” holes about a half inch deep at the positions you just marked and cut ½” dowels into ¾” long sections. Insert into holes. The deluxe option involves using actual shell casings as the shell plate holders. By doing this you not only add an attractive accent to your toolhead stand, but your shell casings (along with their head stamps) offer a quick and easy visual indicator of the toolhead/shellplate combo you’ll be wanting to grab for your next reloading project. I’ll not attempt to offer specifics as to what size holes you’ll need for which cartridges. Yours are most likely different than mine so I’ll only offer the basic principles and you can take it from there. Choose a drill bit that is the same size (or slightly larger) than the diameter of your cartridge. For example, I used a ½” bit for the .45 ACP cartridge. 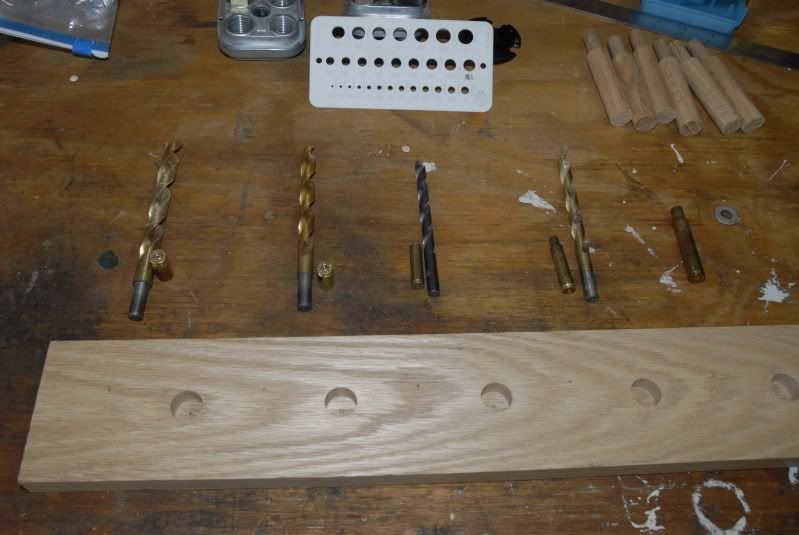
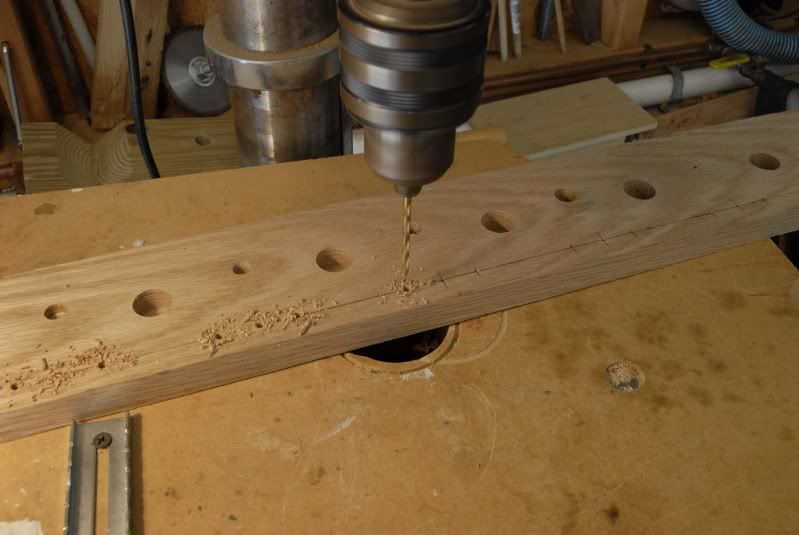
Drill holes at your marks that penetrate about half the thickness of the base of your stand. Of course a Forstner or flat bottomed drill bit would be preferred but it may be difficult (or cost prohibitive) to obtain those bits in exactly the diameter you’re looking for. I had to settle for standard bits. 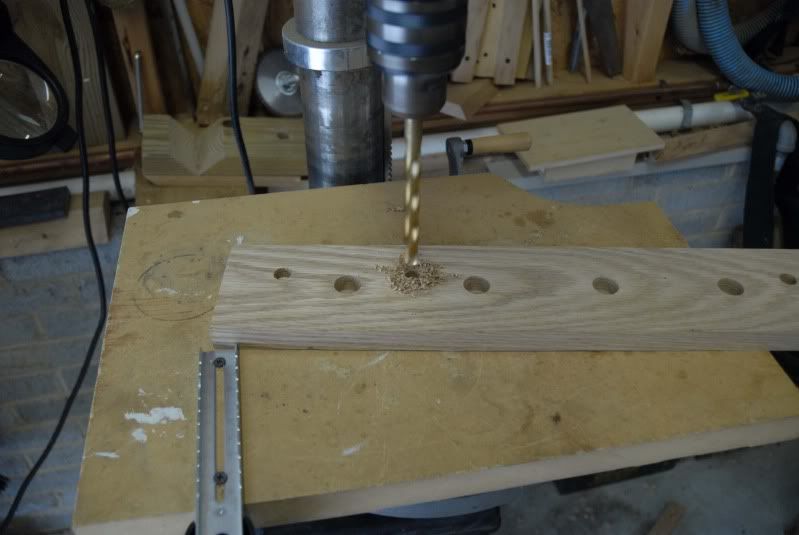
After you’ve drilled the case holes it’s time to prepare your cases. Shorter cases such as many pistol cartridge cases may not need cutting but most rifle cases will. Cut the longer cases to a length that will allow them to be inserted into the holes in the base and protrude ¼ to ½ inch. You can see here where I’ve cut a .223 and a 30-06 case on my band saw. 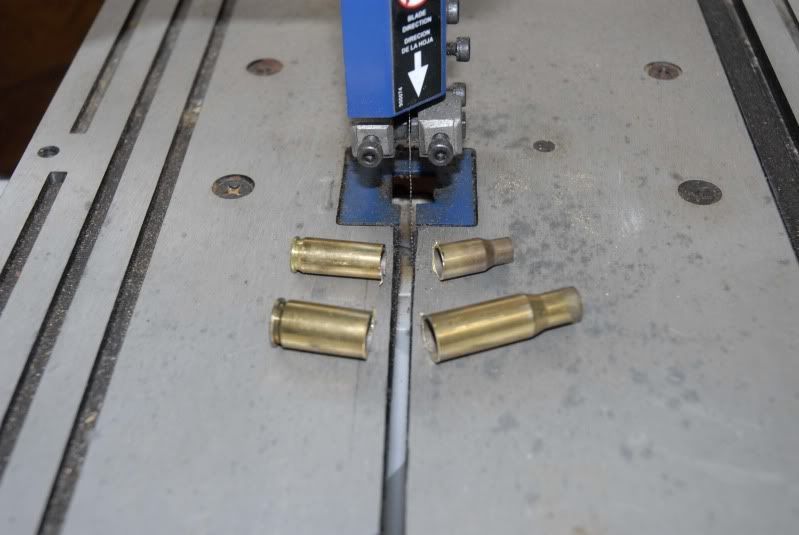
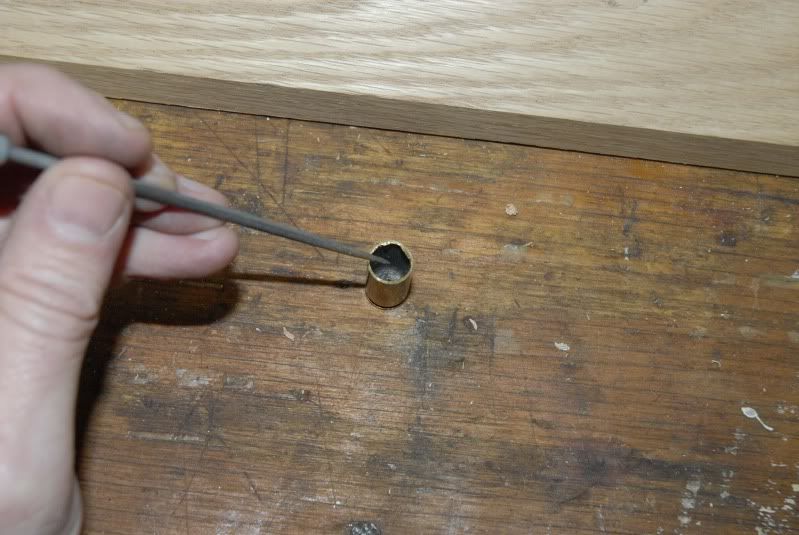
After I cut the cases I used my bench top belt sander to put a sharp edge around the mouth of the cases. A small file, sandpaper, or a Dremel tool will be able to perform the same task. I then used a small rounded file to de-burr and sharpen the inside of the case mouth. 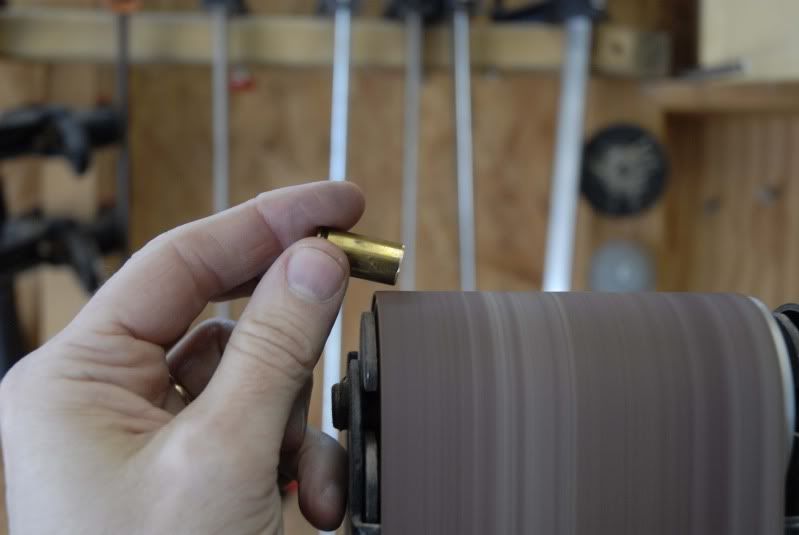
The next step is to lay out and drill the holes for the locator buttons. Three simple holes, located near the front edge of the base, centered below the shell plate position is a pretty straight forward task. Mark your center hole first, aligning it directly underneath the shell plate hole. Then mark the other two holes ¾” from the center hole. 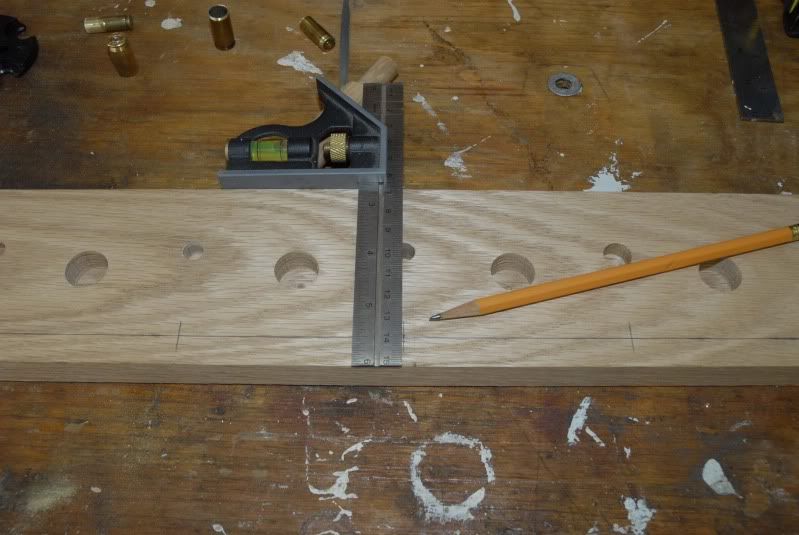
Using a 9/64” bit, drill holes on you marks. Depending on your preference, you can make the holes deep enough so the buttons bottom out or leave them shallow enough so that the buttons are slightly elevated and easier to retrieve. 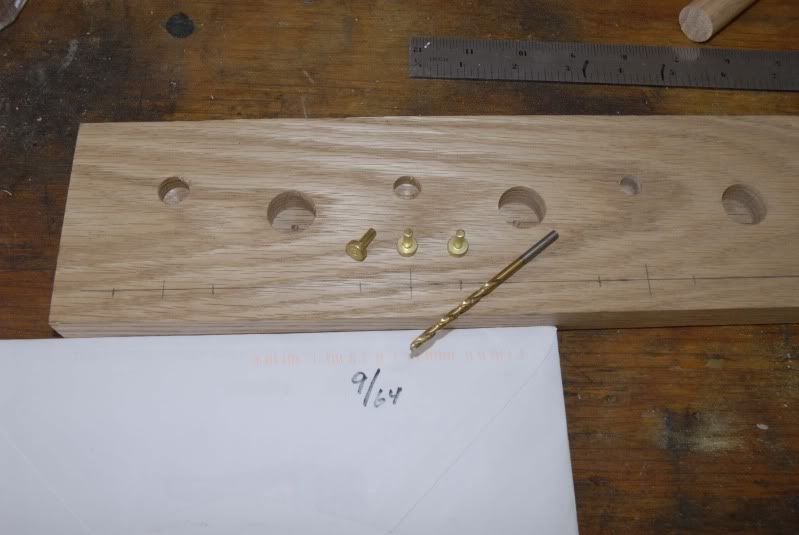
Now we’re closing in on the finish. A quick sanding is in order. If you have the tools and the inclination, this is the time to take a router to your edges. I have a nice router table but I opted to keep my corners relatively square with only a slight rounding using only sandpaper to take down the sharp edge of the corners. 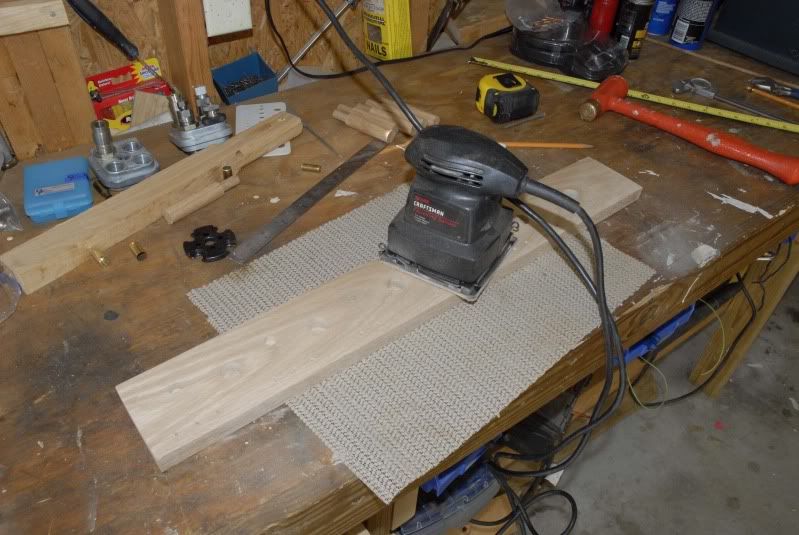
You can finish with the protective and/or decorative coating of your choice. I chose a stain that I happened to have sitting around. You can stain it or hand rub multiple times with tung oil but if you are using an attractive wood and choose to paint it, I’ll find out who you are, come to your house and put a “I Love Nancy Pelosi” bumper sticker on your car. 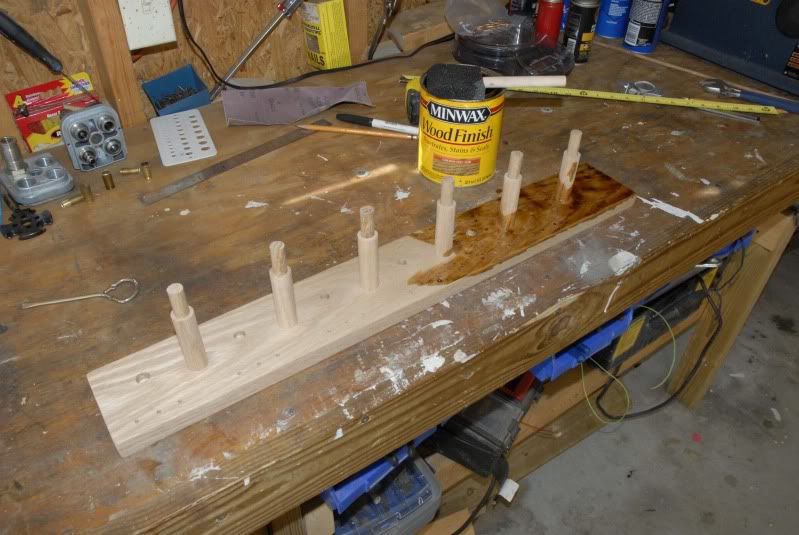
Final Step ! Take your cartridges that you’ve prepped and simply seat them in the shell plate holes. Take a rubber mallet, plastic hammer, or use a protective piece of wood with a steel hammer and give them a couple of good whacks until the sharpened edges cut into the bottom of the holes. If you’re concerned about the cartridges working loose, you can use some epoxy to help secure them but in reality, they should never be under any stress and only serve to keep the shell plate from sliding around so they should be just fine resting in the hole without much extra bonding. 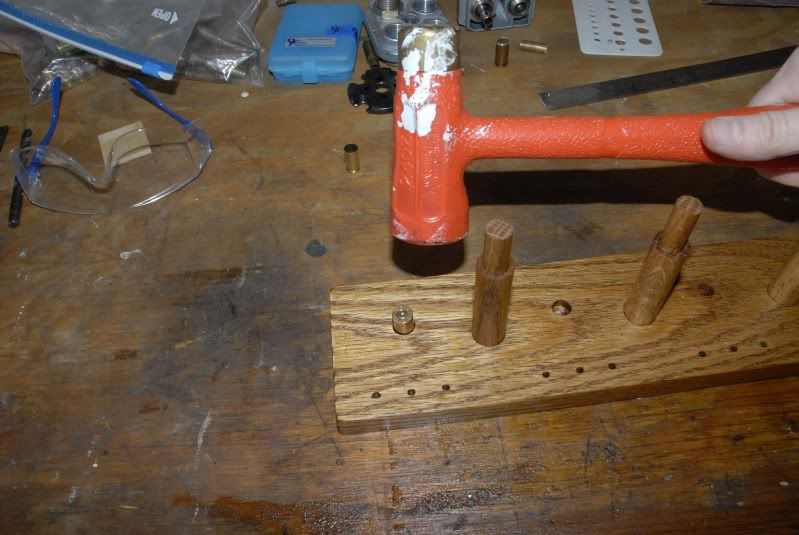
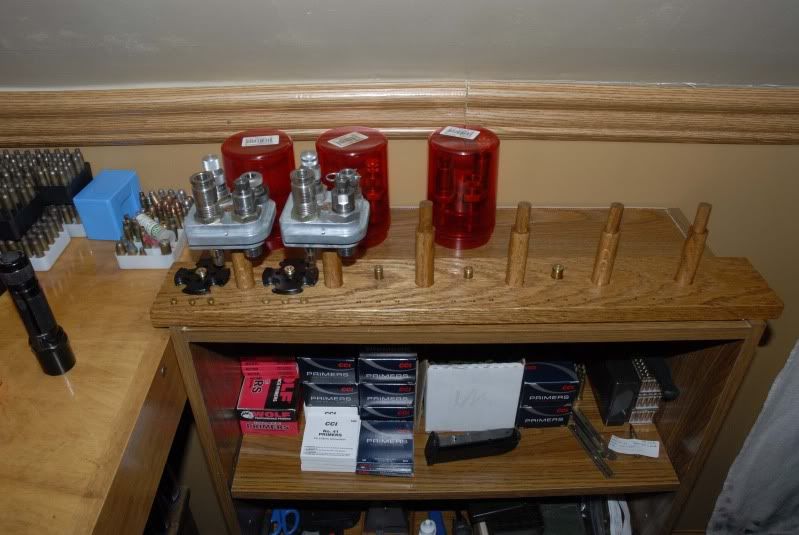
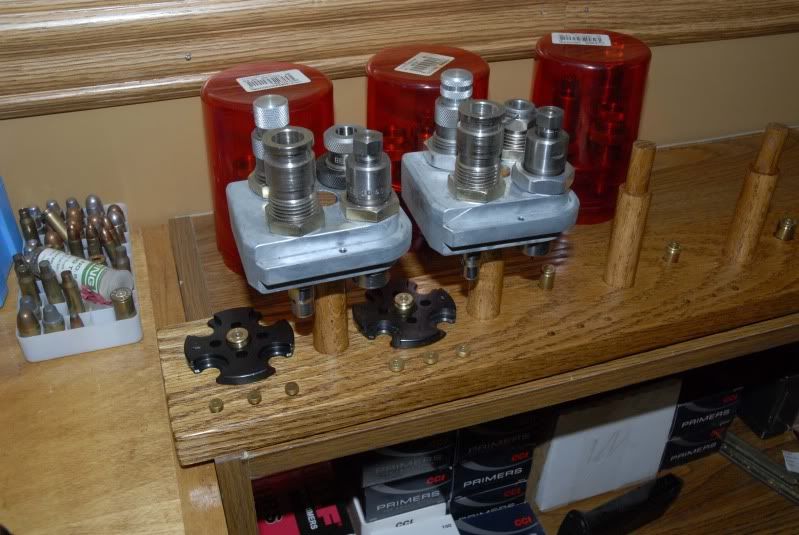
The Final Product 
|
|
|
|
[#1]
Nice work! Thanks for taking the time to share!
You should think about selling those... You could make stands for different numbers of toolheads.. Great job! -Masta |
|
|
|
[#2]
Very nice, thanks for the idea after I bought the 12 toolheads. Maybe in my next life I'll save some money. It looks great. I think I would have just used dowels for the shell plate instead of the cartridge cases. I write the caliber on my tool heads with majic marker to I.D. them. It would have saved you all the custom work with the brass modification.
Thanks. |
|
|
|
[#3]
BRILLIANT!
Do you take orders? |
|
|
|
[#4]
great job!
|
|
|
|
[#5]
I have a plan for somehting just like that but in alum. Just finished up my drawings a month or so back. Yours seems cheaper and easier.
mine would require a large amount of lathe work. thanks. |
|
|
|
[#6]
Great writeup! Very nicely done.
|
|
|
|
[#7]
Nicely done.
|
|
|
|
[#8]
Excellent! You'll have to make a whole new one if you a 7th caliber
 |
|
|
|
[#9]
Good post, you deserve an extra sip of kool aid.
For your next project make a primer tube holder. 
Behind the 550 next to the blue box. A 10 holer is the standard size. Red oak FTW. Then there is the 2" disc for the powder measure adjustment bolt........... I saw you already made a bullet tray. |
|
|
|
[#10]
Great Job!! I like it!!
|
|
|
|
[#11]
Excellent post and DIY idea, I vote for this to be added to the gateway area.
AeroE could you please help save this post please? |
|
|
|
[#12]
Excellent all around. Thanks for that.
|
|
|
|
[#13]
Very Nice and as stated you should sell some of these
|
|
|
|
[#14]
Quoted:
Good post, you deserve an extra sip of kool aid. For your next project make a primer tube holder. http://i250.photobucket.com/albums/gg272/dryflash3/PB280310.jpg Behind the 550 next to the blue box. A 10 holer is the standard size. Red oak FTW. Then there is the 2" disc for the powder measure adjustment bolt........... I saw you already made a bullet tray. Well then... I guess it's back to the shop. Thanks for the ideas. |
|
|
|
[#15]
I actually did that myself (to save $$), but used my chop saw to turn down 1" of the end of the dowel to the correct diameter to fit through the toolhead, so no glueing 2 pieces at the top.
I also didn't make all the drill holes for the pins & shellplate, I just put them in the little blue box & set the box on the wood base. nice work. I've also bent & threaded some 3/16 brass rods to make my own powder measure failsafe rods. That way I can adjust them & leave them with the toolheads that have their own powder measures. I think I spent $12-15 to make 5 failsafe rods. |
|
|
|
[#16]
Quoted:
I actually did that myself (to save $$), but used my chop saw to turn down 1" of the end of the dowel to the correct diameter to fit through the toolhead, so no glueing 2 pieces at the top. I also didn't make all the drill holes for the pins & shellplate, I just put them in the little blue box & set the box on the wood base. nice work. I've also bent & threaded some 3/16 brass rods to make my own powder measure failsafe rods. That way I can adjust them & leave them with the toolheads that have their own powder measures. I think I spent $12-15 to make 5 failsafe rods. Where did you find 3/16" brass rods? |
|
|
|
[#17]
Quoted: Quoted: I've also bent & threaded some 3/16 brass rods to make my own powder measure failsafe rods. That way I can adjust them & leave them with the toolheads that have their own powder measures. I think I spent $12-15 to make 5 failsafe rods. Where did you find 3/16" brass rods? I got them at home depot & saw them at lowe's also. They were with the steel & aluminum bar stock (round & flat). some pics... notice the angle of the top most bend is not the same as the dillon. I did this to avoid it hanging up as it is a thicker material than the dillon.    the lock (below); made from 1/2"X1" nylon spacer, also purchased from home depot. once adjusted to function properly, i tighten the wingnut to lock down the flat "nut" i made from an old door hinge (drilled & tapped). i can simply slide the nylon lock out and not have to mess with the adjustment at all. plus, i made one for each of my 3 toolheads that have powder measures permenantly attached. 
|
|
|
|
[#18]
Quoted:
Good post, you deserve an extra sip of kool aid. For your next project make a primer tube holder. http://i250.photobucket.com/albums/gg272/dryflash3/PB280310.jpg Behind the 550 next to the blue box. A 10 holer is the standard size. Red oak FTW. Then there is the 2" disc for the powder measure adjustment bolt........... I saw you already made a bullet tray. Where are your spring clips/retention clips that keep the primers from falling out? |
|
|
|
[#19]
Very nice.
|
|
|
|
[#20]
Very nice!
|
|
|
|
[#21]
|
|
|
|
[#22]
Very nice job! I got my 550 Used, and it came with several home made individual tool head stands. They're basically exactly like yours, only they just hold the tool head. I've thought about drilling some holes for the stop buttons, and maybe carving a slot in the base for the shell holder.
|
|
|
|
[#23]
Quoted:
Very nice job! I got my 550 Used, and it came with several home made individual tool head stands. They're basically exactly like yours, only they just hold the tool head. I've thought about drilling some holes for the stop buttons, and maybe carving a slot in the base for the shell holder. If you have a radial arm saw you COULD cut grooves like the Dillon factory stands by lowering the blade down onto the stand at a suitable location. I wouldn't recommend it though, as you are likely to cut off body parts––unless you are very careful and skillful. Again, don't do it. |
|
|
|
[#24]
Quoted:
Quoted:
Good post, you deserve an extra sip of kool aid. For your next project make a primer tube holder. http://i250.photobucket.com/albums/gg272/dryflash3/PB280310.jpg Behind the 550 next to the blue box. A 10 holer is the standard size. Red oak FTW. Then there is the 2" disc for the powder measure adjustment bolt........... I saw you already made a bullet tray. Where are your spring clips/retention clips that keep the primers from falling out? The very top of the tube in the blue plastic part. Didn't show up well in the pic. I can make out a couple though. |
|
|
|
[#25]
Tagscribed for a slick solution.
 |
|
|
 Win a FREE Membership!
Sign up for the ARFCOM weekly newsletter and be entered to win a free ARFCOM membership. One new winner* is announced every week!
You will receive an email every Friday morning featuring the latest chatter from the hottest topics, breaking news surrounding legislation, as well as exclusive deals only available to ARFCOM email subscribers.

AR15.COM is the world's largest firearm community and is a gathering place for firearm enthusiasts of all types.
From hunters and military members, to competition shooters and general firearm enthusiasts, we welcome anyone who values and respects the way of the firearm.

Subscribe to our monthly Newsletter to receive firearm news, product discounts from your favorite Industry Partners, and more.
Copyright © 1996-2024 AR15.COM LLC. All Rights Reserved.
Any use of this content without express written consent is prohibited.
AR15.Com reserves the right to overwrite or replace any affiliate, commercial, or monetizable links, posted by users, with our own.


