NC, USA
|
Posted: 12/7/2008 11:17:39 AM EDT
[Last Edit: AEnemaBay]
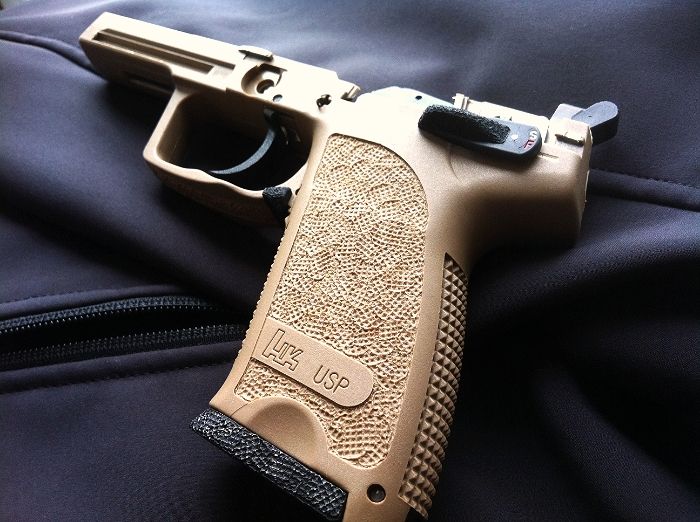
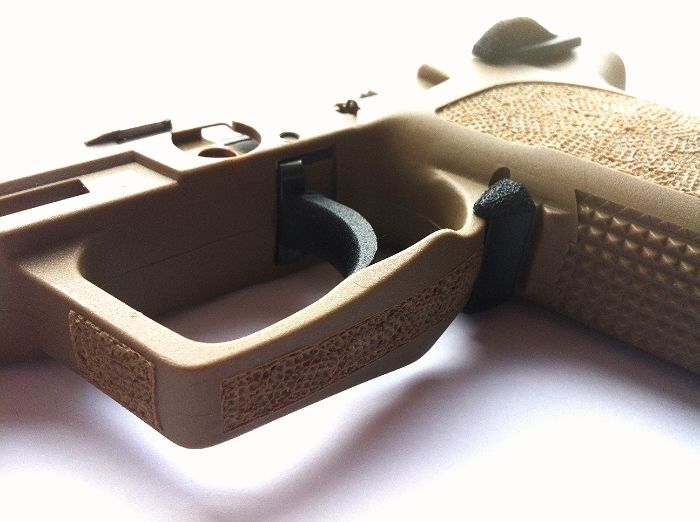
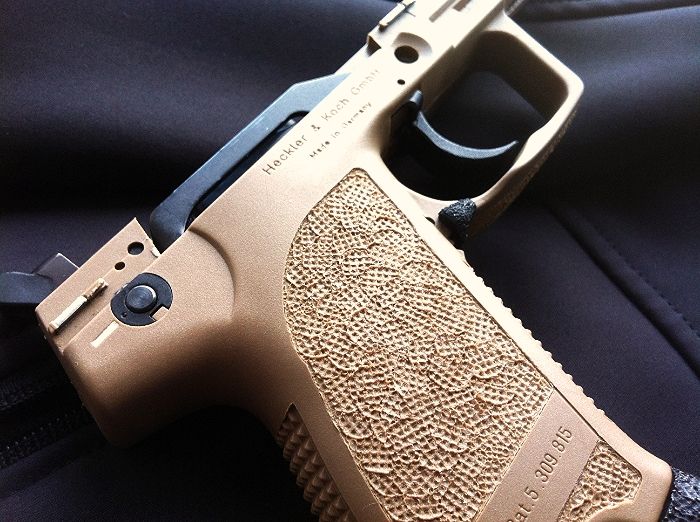
So you want one of your polymer pistols stippled, eh? Or maybe a synthetic stock, or a handguard? Well if you’re like me you don’t want to spend upwards of $150 for a polymer heat stippling job, so I’m going to show you how to do it for about $15! First of all you’re going to need some materials.
You’ll need the following (everything is available at Lowes Hardware): Weller 25 watt soldering iron (I use the SP23L model) An assortment of 10-24 x 1/2" BRASS machine screws (screws that are already flat on top are best) A Dremel with cutoff wheel A needle file Masking tape A polymer victim 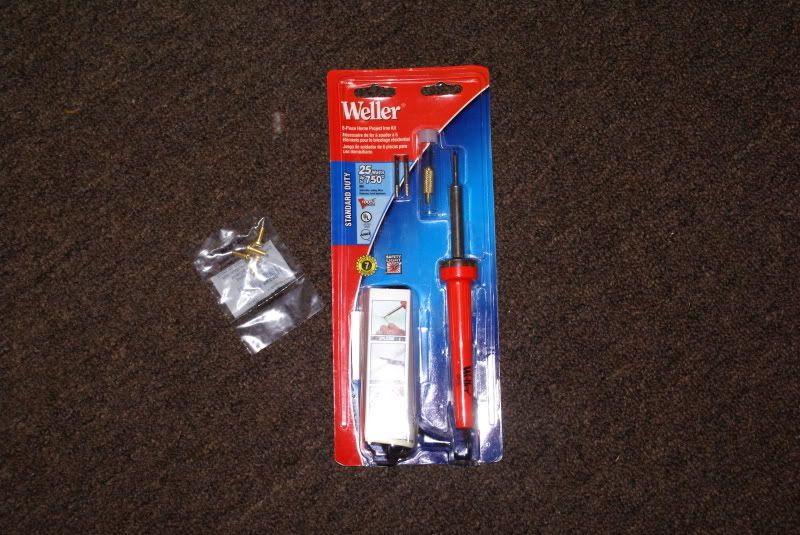
Next we'll have to checker the top of one of our brass machine screws. To do this I simply used the existing Philips slots in the screw as my starting lines. I then took my Dremel with cutoff wheel and began to checker my brass screw. IT DOESN'T HAVE TO BE PERFECT! I personally use an assortment of screws that range from very deep checkering to very shallow checkering. This, of course, creates either very aggressive stippling or not so aggressive stippling. I also use the tips that come with the Weller soldering iron kit for fine points and edges. Once you have done both your vertical and horizontal lines on your screw, break out your needle file and carefully point the tops of the pyramids to gain a more uniform pattern. Or don't if you want a crazy pattern. After you're done thread it into the soldering iron. 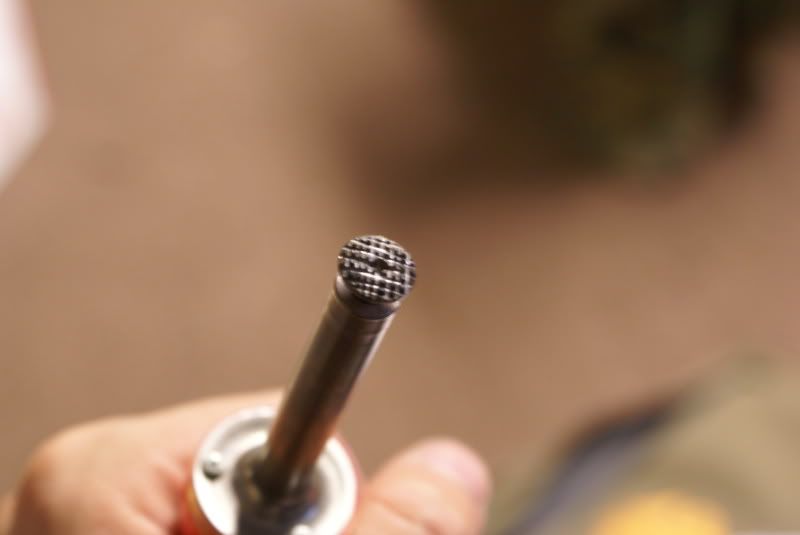
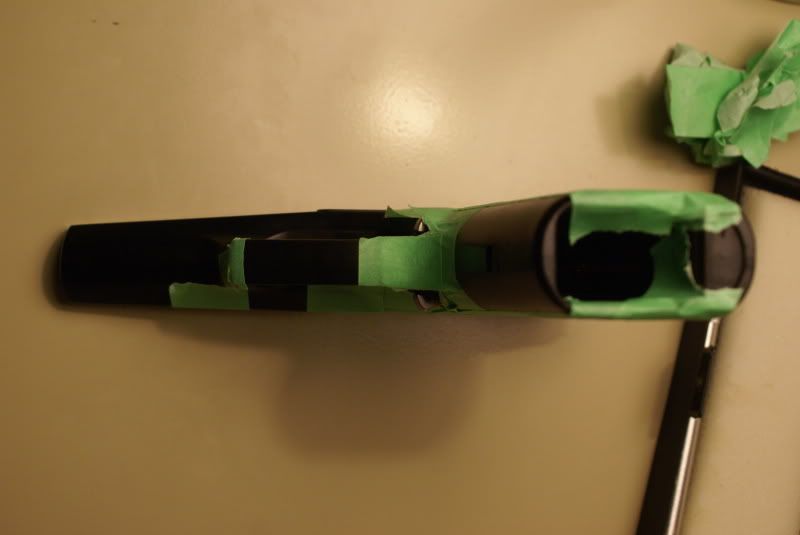
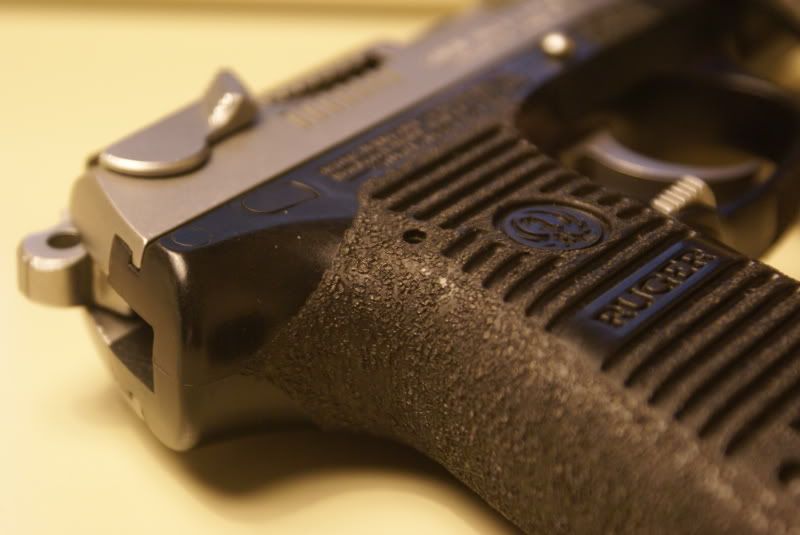
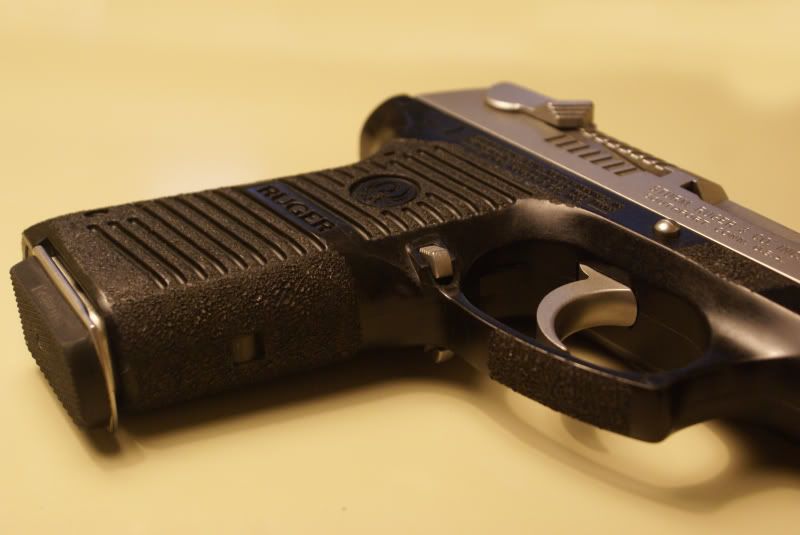
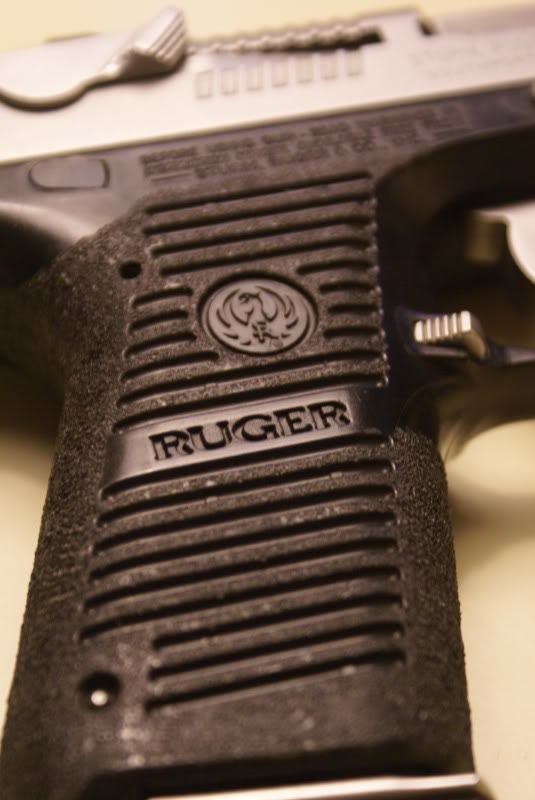
Now, take your victim and begin mapping out where you want it stippled with your masking tape. Take your time here and make sure everything is where you want it in the design that you want it. It would be a PITA to remove the stippling once it's been applied. Our victim for this tutorial is my first generation Ruger P95DC. 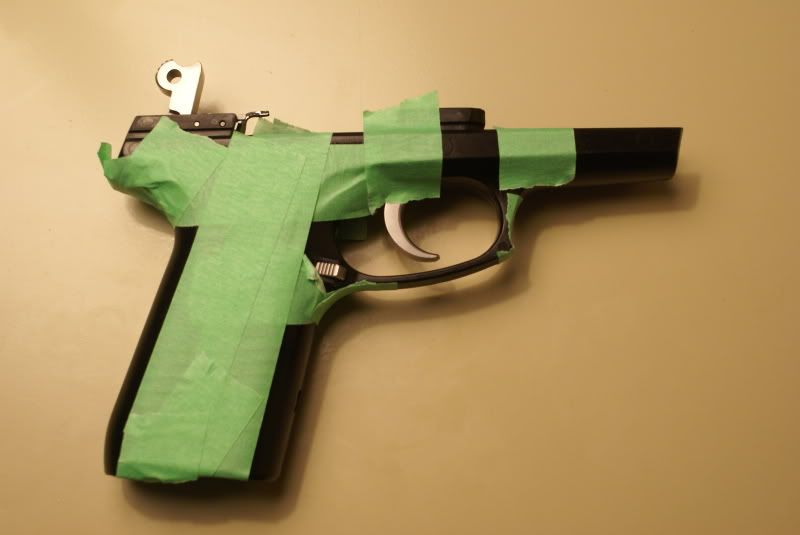
Now with the soldering iron all heated up you can start stippling. If you're still unsure of your abilities I'd suggest practicing on some scrap pistol grips and the like. Take your time and get used to the pattern that your particular screw makes. Twist the iron as you go to change up the direction and blend the dots together. Occasionally check your screw head for melted polymer sticking to the checkering. If this occurs just take a brass brush and brush it out of the screw. That's it, it's that simple! You just saved yourself $150! Now if you want a deeper more uniform pattern you can use a soldering tip that you slightly round off. This will give you a "golf ball" like pattern. Here is our victim after only 25 minutes of work. 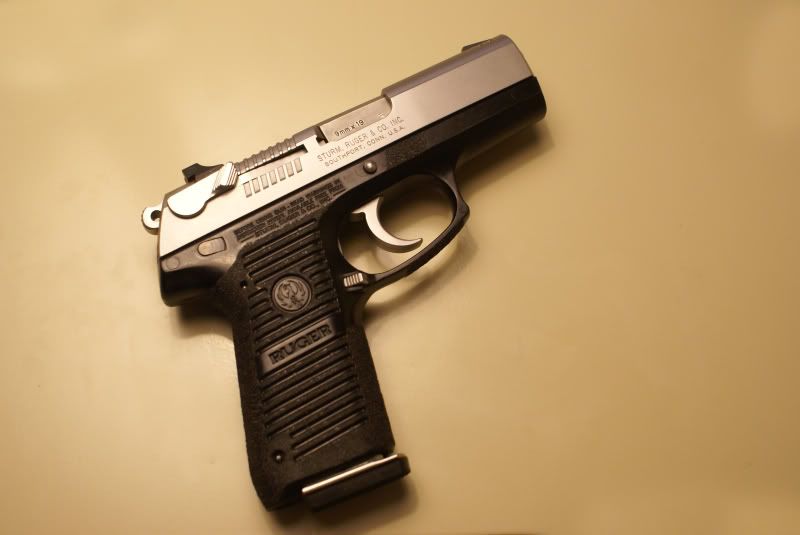
I hope this tutorial helps you all. If you have any questions don't hesitate to ask! |
|
|
|
[#1]
Originally Posted By p4R4d0x:
I'll play. <a href="http://flic.kr/p/jm7zTk" target="_blank">http://farm4.staticflickr.com/3821/12042036405_4f814a96bd_c.jpg</a> <a href="http://flic.kr/p/jmc2j3" target="_blank">http://farm3.staticflickr.com/2816/12042902386_2574229329_c.jpg</a> <a href="http://flic.kr/p/jm7E5r" target="_blank">http://farm6.staticflickr.com/5550/12042050505_dfb1925d83_c.jpg</a> Another nice gen 2. I really want one |
|
|
|
|
[#2]
New Project Completed... Very difficult to accomplish this texture on FDE without any discoloration/blackening of material. Not easy... and time consuming. The result though is not disappointing. Wish I had the full handgun to show but all I am sent are the frames for stippling.
   |
|
|
|
|
[#3]
Little Ruger LCP .380 just finished with much needed additional grip. Has a dual texture in just the right spots. Pistol was very slick and the factory checkering was weak to say the least. Stippling will help with wet or sweaty hands and with drawing from coat pocket. I like that the texture will grab skin well without hanging up on fabric.
  |
|
|
|
|
[#4]
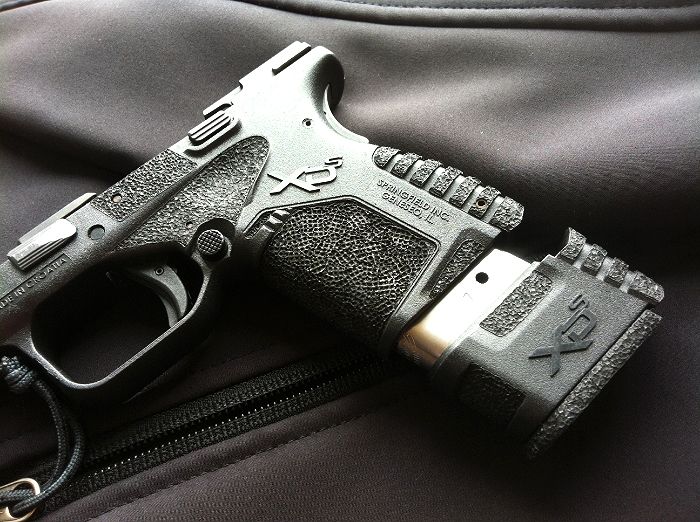 Nice Springfield XD 45 I stippled as well... a carry gun for someone. So it has a good texture all around on the key spots where you need it and some extra aggressive texture on the frontstrap where you can really dig in. Much better control without hanging up on a shirt or holster... and it looks awesome!   |
|
|
|
|
[#5]
killjoy mind sharing what kind of tip you're using to get that texture?
|
|
|
|
TX, USA
|
[#6]
Originally Posted By atran:
killjoy mind sharing what kind of tip you're using to get that texture? Looks like one of these: 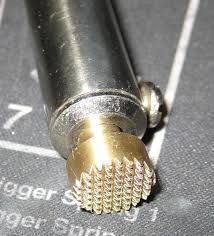
|
|
|
VA, USA
|
[#7]
|
|
|
|
[#8]
Originally Posted By p4R4d0x:
Looks like one of these: http://i479.photobucket.com/albums/rr159/mikeinla100/waffle_zps596cffc2.jpg Originally Posted By p4R4d0x:
Originally Posted By atran:
killjoy mind sharing what kind of tip you're using to get that texture? Looks like one of these: http://i479.photobucket.com/albums/rr159/mikeinla100/waffle_zps596cffc2.jpg Yea, I've seen that but where do you get that tip? |
|
|
|
VA, USA
|
[#9]
Originally Posted By atran:
Yea, I've seen that but where do you get that tip? Originally Posted By atran:
Originally Posted By p4R4d0x:
Originally Posted By atran:
killjoy mind sharing what kind of tip you're using to get that texture? Looks like one of these: http://i479.photobucket.com/albums/rr159/mikeinla100/waffle_zps596cffc2.jpg Yea, I've seen that but where do you get that tip? Guys modify a wood burner tip |
|
|
|
[#10]
The tip I use is a modified soldering tip. It has to be checkered by hand and requires very specific, expensive hand tools to do it. It is not easy and took me two tries to get the tip right. The technique for using the checkered tip is also very hard to master. And it is not faster to use for stippling. I have to keep it cleaned out and wiped off for best results. Compared to the other stippling I do it is more difficult in every way. But it does give a texture with an aggressive grip that will last a long time.
Posted Via AR15.Com Mobile |
|
|
|
|
[#11]
 |
|
|
|
|
[#12]
Originally Posted By lostman518:
http://i43.photobucket.com/albums/e363/lostman518/null_zpsd3085ba7.jpg That's very nice. What sort of tip did you use to do that? |
|
|
|
|
[Last Edit: lostman518]
[#13]
Originally Posted By Mecha_Loopy: That's very nice. What sort of tip did you use to do that? Originally Posted By Mecha_Loopy: Originally Posted By lostman518: http://i43.photobucket.com/albums/e363/lostman518/null_zpsd3085ba7.jpg That's very nice. What sort of tip did you use to do that? 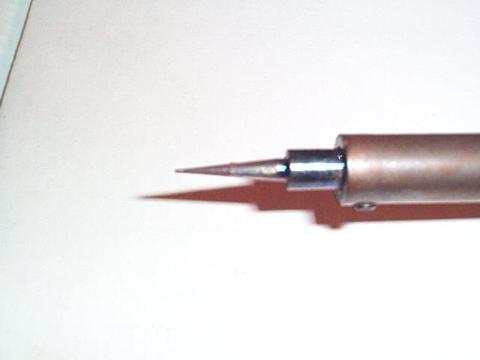 |
|
|
|
VA, USA
|
[Last Edit: CtSmshr]
[#14]
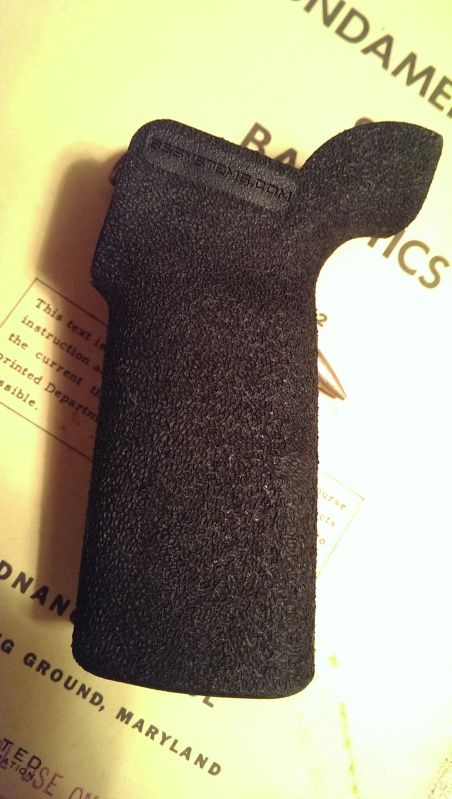
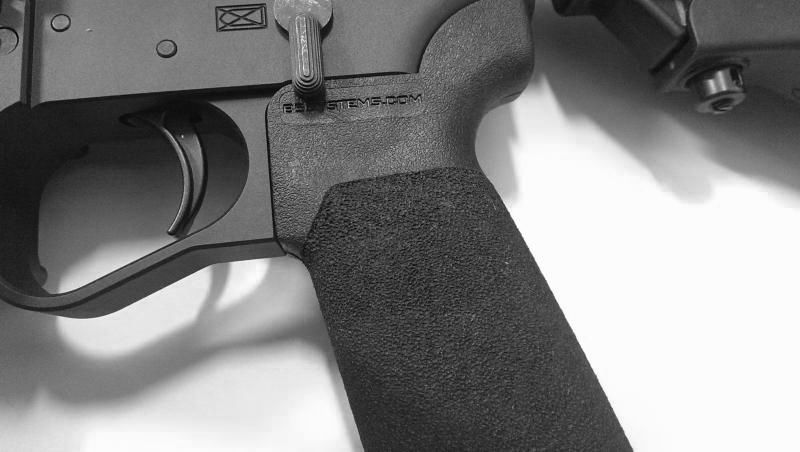
AFG I did for my pistol build. I tried something different on this, I wanted a very aggressive texture... It's got some bite to it!

|
|
|
|
[Last Edit: AceV]
[#15]
Here's a buddy's 9L I just stippled for him last night - I'll be giving my 9L the same treatment shortly...
Strippling was done with a Colwood Detailer with the B1 tip. 


|
|
|
|
|
[#16]
|
|
|
|
|
[#17]
Originally Posted By TheTacticalCoyote:
<a href="http://www.flickr.com/photos/taccoyote/13072389093/" target="_blank">http://farm8.staticflickr.com/7442/13072389093_6eae589235_b.jpg</a> And I hate you 
|
|
|
|
|
[#18]
Originally Posted By SecretSquirell:
And I hate you Originally Posted By SecretSquirell:
Originally Posted By TheTacticalCoyote:
<a href="http://www.flickr.com/photos/taccoyote/13072389093/" target="_blank">http://farm8.staticflickr.com/7442/13072389093_6eae589235_b.jpg</a> And I hate you Pew pew pew!
Love you bro. |
|
|
|
|
[#19]
nice work everyone !
I would like to stipple my plastic shotgun stock where the checkering is. Do I have to sand off the checkering or can I just go over it? |
|
|
|
NM, USA
|
[#20]
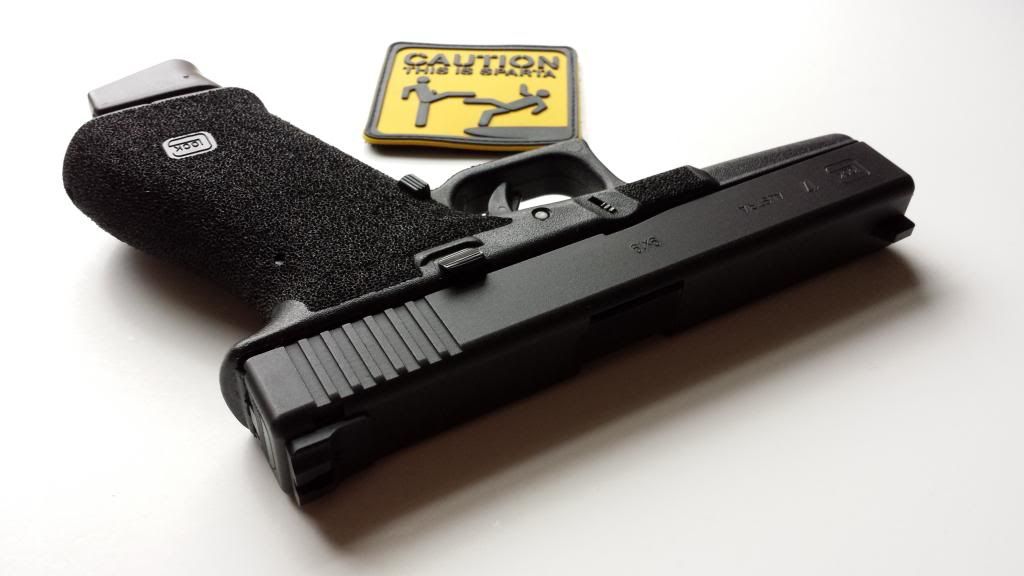
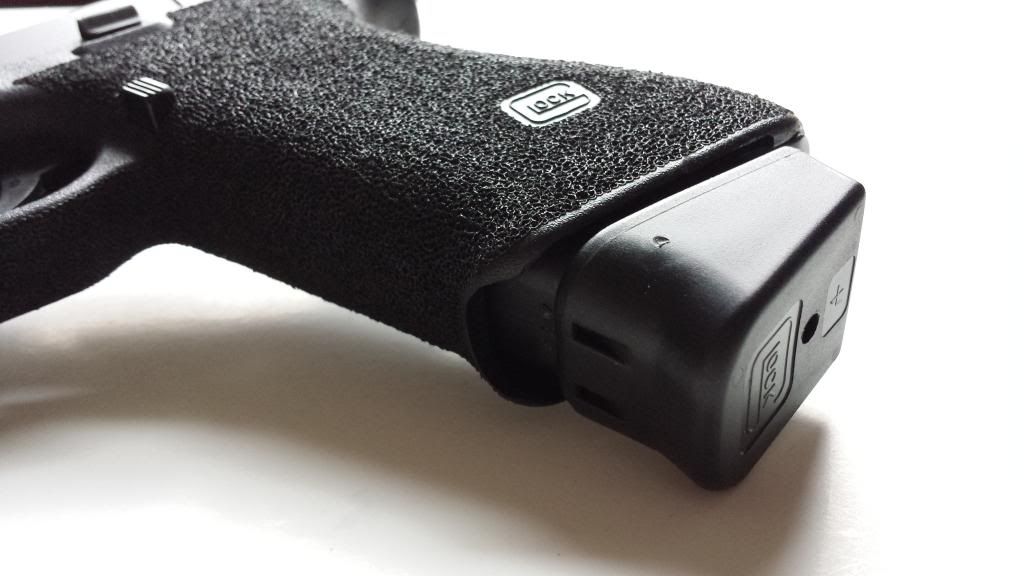
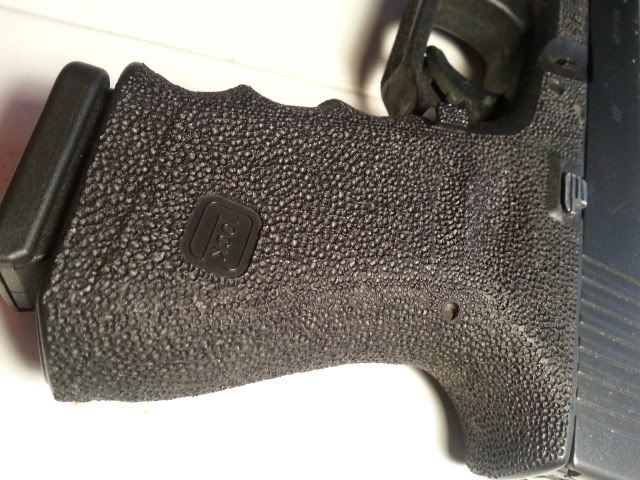
I just finished work on my G19. I've been holding off doing any work to it for a few months but I finally got tired of having a permanent blister on my middle finger so I decided to go ahead and do everything at the same time. I removed the finger bumps, undercut the trigger guard, and stippled all around. I sanded the frame smooth of all the factory texturing to provide a smooth surface to stipple, and I only stippled the backstrap in the same rectangular area that comes with texture from Glock. I might stipple more area there later, but I thinks it looks nicer and seems to be plenty functional.

|
|
|
|
[#21]
Originally Posted By I_Ware:
I just finished work on my G19. I've been holding off doing any work to it for a few months but I finally got tired of having a permanent blister on my middle finger so I decided to go ahead and do everything at the same time. I removed the finger bumps, undercut the trigger guard, and stippled all around. I sanded the frame smooth of all the factory texturing to provide a smooth surface to stipple, and I only stippled the backstrap in the same rectangular area that comes with texture from Glock. I might stipple more area there later, but I thinks it looks nicer and seems to be plenty functional. http://imagizer.imageshack.us/v2/1024x768q90/19/3awp.jpg Sick. |
|
|
|
NM, USA
|
[#22]
Originally Posted By AEnemaBay:
Sick. Originally Posted By AEnemaBay:
Originally Posted By I_Ware:
I just finished work on my G19. I've been holding off doing any work to it for a few months but I finally got tired of having a permanent blister on my middle finger so I decided to go ahead and do everything at the same time. I removed the finger bumps, undercut the trigger guard, and stippled all around. I sanded the frame smooth of all the factory texturing to provide a smooth surface to stipple, and I only stippled the backstrap in the same rectangular area that comes with texture from Glock. I might stipple more area there later, but I thinks it looks nicer and seems to be plenty functional. http://imagizer.imageshack.us/v2/1024x768q90/19/3awp.jpg Sick. Thanks man. The texturing isn't quite as uniform as I'd like on one side but I'm a perfectionist. Getting the front strap flat was also worrying me, but it ended up being pretty easy. If anyone is thinking about removing the finger humps, it isn't nearly as hard as you think it is. A dremel with a 120-150 grit sanding drum and some patience will get the job done, and you can turn out a pretty good result. |
|
|
|
[#23]
Originally Posted By I_Ware:
I just finished work on my G19. I've been holding off doing any work to it for a few months but I finally got tired of having a permanent blister on my middle finger so I decided to go ahead and do everything at the same time. I removed the finger bumps, undercut the trigger guard, and stippled all around. I sanded the frame smooth of all the factory texturing to provide a smooth surface to stipple, and I only stippled the backstrap in the same rectangular area that comes with texture from Glock. I might stipple more area there later, but I thinks it looks nicer and seems to be plenty functional. http://imagizer.imageshack.us/v2/1024x768q90/19/3awp.jpg MOAR! |
|
|
|
TX, USA
|
[#24]
Here is my most recent.
My EDC G23 I used my dremel and large sanding disk to remove the ribs from the finger groves, back strap and to undercut the trigger guard. I have always like the finger groves but they feel so much better now. They fit my fingers like a latex glove. The stippling was all done with a single tip and my wood burner. Yesterday I sanded my G22 and will be doing it as well but I will be using some sort of design on it. I am thinking about the Cannon on the Gonzales "Come and Take it" flag. Also on my this one I blended the raised side panels so they wont be noticeable like on the above G23. 


This is my last G22. You can see I didnt grind off the ribs but wished I had. What can I say....you learn with each project. 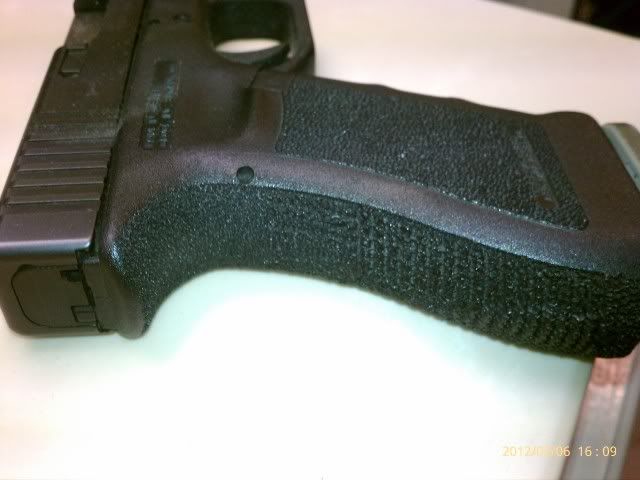
|
|
|
MD, USA
|
[#25]
|
|
|
|
[#26]
Originally Posted By wayne1one:
Some of Lightfighter Innovations work! <a href="https://flic.kr/p/nACsNi" target="_blank">https://farm6.staticflickr.com/5072/14175367173_94f2d193bd_b.jpg</a> IMG_6184 by 556 Channel (HD), on Flickr That looks really good. |
|
|
|
|
[Last Edit: splitbolt]
[#27]
   |
|
|
|
TX, USA
|
[#28]
 _DSC5348-Edit by alstauffer, on Flickr _DSC5348-Edit by alstauffer, on Flickr
 _DSC5345-Edit by alstauffer, on Flickr _DSC5345-Edit by alstauffer, on Flickr
 _DSC5304-Edit by alstauffer, on Flickr _DSC5304-Edit by alstauffer, on Flickr
|
|
|
TX, USA
|
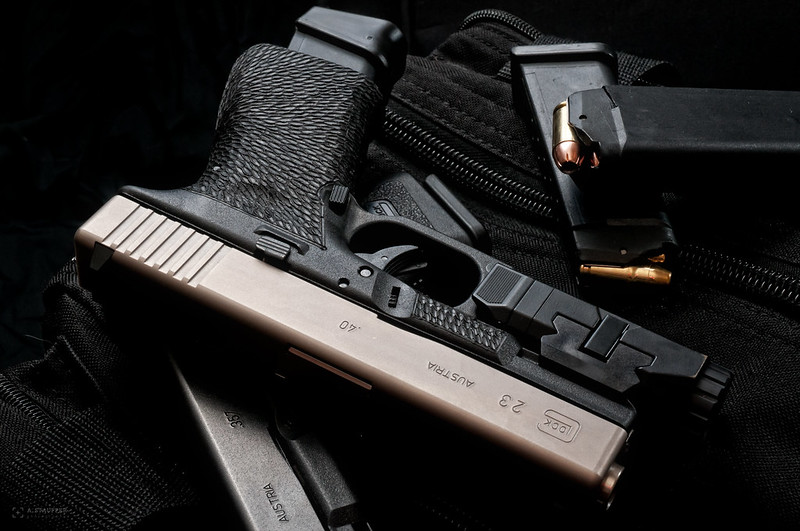
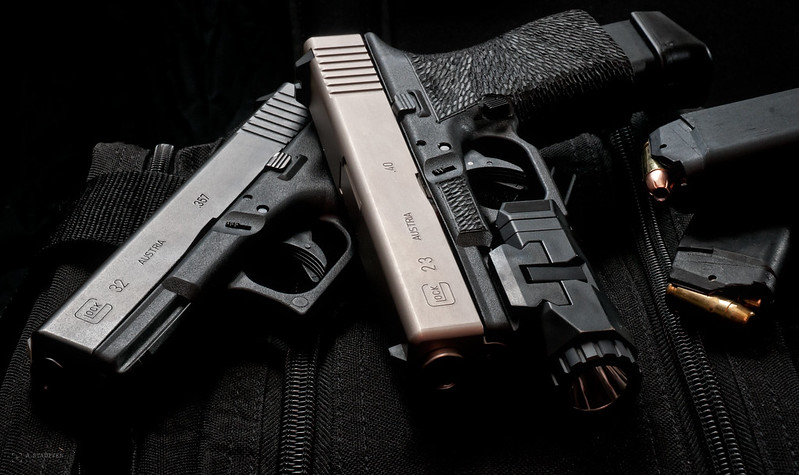
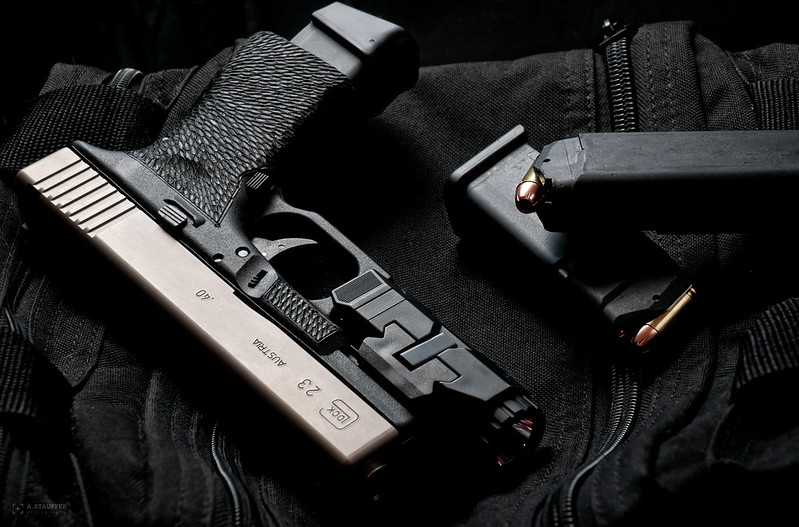
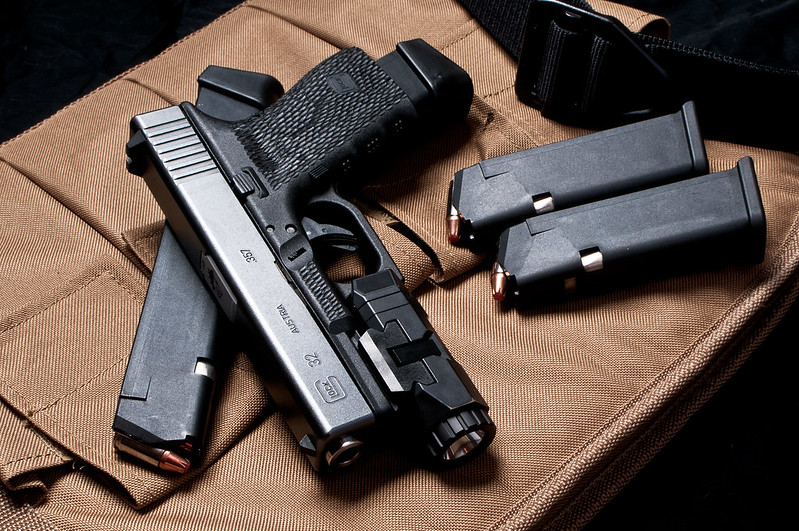
[#29]
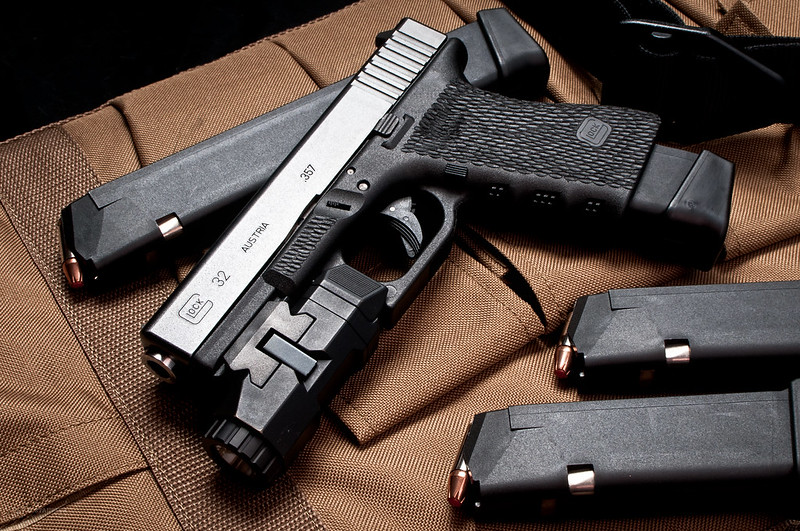
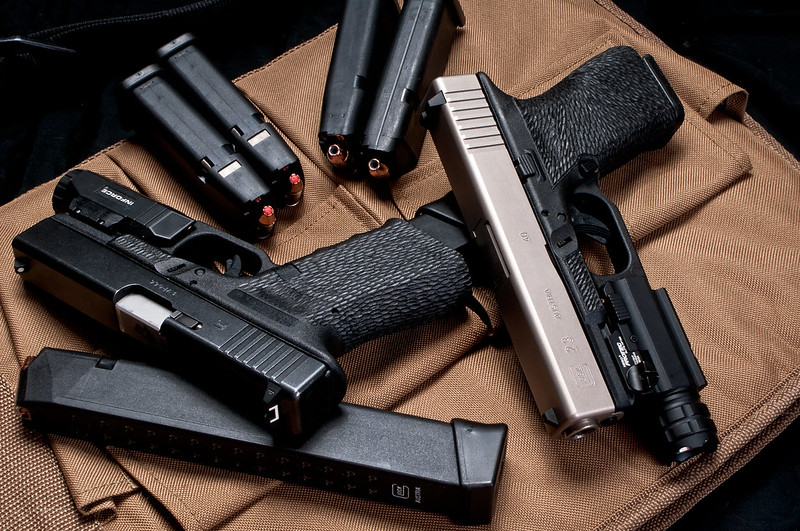
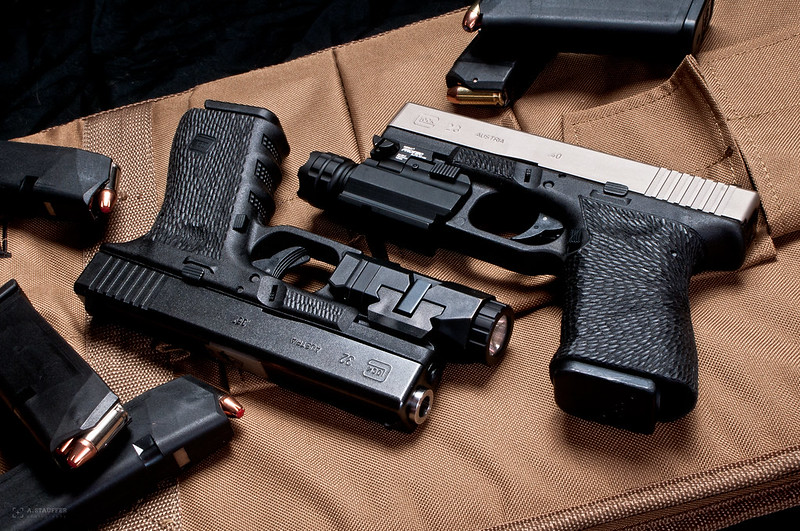
Friend bought a Glock and had me stipple the frame. He chose the pattern and wanted to retain the finger grooves. Here it is (with my 32 slide mounted) and my 23.
 _DSC5459-Edit-2 by alstauffer, on Flickr _DSC5459-Edit-2 by alstauffer, on Flickr
 _DSC5463-Edit by alstauffer, on Flickr _DSC5463-Edit by alstauffer, on Flickr
 _DSC5474-Edit by alstauffer, on Flickr _DSC5474-Edit by alstauffer, on Flickr
 _DSC5481-Edit by alstauffer, on Flickr _DSC5481-Edit by alstauffer, on Flickr
|
|
|
ND, USA
|
[#30]
Here's a few I've done...


|
|
|
TX, USA
|
[#31]
Damn, that looks awesome!
|
|
|
|
[#32]
How would you go about stippling a grip with a lot of serrations such as the XDm 5.25, which has a lot of large serrations. Would you shave it down? Or fill it in? I would worry that shaving it down would make the grip small and if anything I would want it a little bigger.
Thanks |
|
|
|
|
[#33]
Originally Posted By DakotaGlockGuy:
Here's a few I've done... http://i.imgur.com/Oy9IMdt.jpg http://i.imgur.com/Yq44xHM.jpg http://i.imgur.com/QMMhSii.jpg http://i.imgur.com/Y4qNLj2.jpg Damn that's clean!!! How did you do your borders and mag release scallop? |
|
|
|
AZ, USA
|
[#34]
Originally Posted By blaznhot_23:
Damn that's clean!!! How did you do your borders and mag release scallop? Originally Posted By blaznhot_23:
Originally Posted By DakotaGlockGuy:
Here's a few I've done... http://i.imgur.com/Oy9IMdt.jpg http://i.imgur.com/Yq44xHM.jpg http://i.imgur.com/QMMhSii.jpg http://i.imgur.com/Y4qNLj2.jpg Damn that's clean!!! How did you do your borders and mag release scallop? ^ What he said That's the cleanest, most professional looking work I've seen. |
|
|
|
[#35]
Originally Posted By 0uTkAsT:
^ What he said That's the cleanest, most professional looking work I've seen. Originally Posted By 0uTkAsT:
Originally Posted By blaznhot_23:
Originally Posted By DakotaGlockGuy:
Here's a few I've done... http://i.imgur.com/Oy9IMdt.jpg http://i.imgur.com/Yq44xHM.jpg http://i.imgur.com/QMMhSii.jpg http://i.imgur.com/Y4qNLj2.jpg Damn that's clean!!! How did you do your borders and mag release scallop? ^ What he said That's the cleanest, most professional looking work I've seen. He sells his technique, he is not going to tell his secrets. His is some of the best work out there. |
|
|
|
|
[#36]
These are the first two guns i have stippled and cerakoted. It took some thinking and experimenting to figure stuff out like the border.


|
|
|
|
|
[Last Edit: dtux]
[#37]
|
|
|
|
USA
|
[#38]
Decided to try stippling the MOE for end on the AR were I grip it. I absolutely love it, wish I had done this sooner. Also did the AFG.


|
|
|
|
[#39]
I still need to touch some stuff up but this is what I came up with for my XDm 5.25. 

|
|
|
|
|
[#40]
|
|
|
|
|
[#41]
Did this B5 grip tonight, just finished 'er up. I did my M&P9L with the screw method a while back. This one got the pointy woodburning tool treatment -- first I've done that way.
|
|
|
|
|
[Last Edit: 4DAIVIPAI2K5]
[#42]
|
|
|
|
|
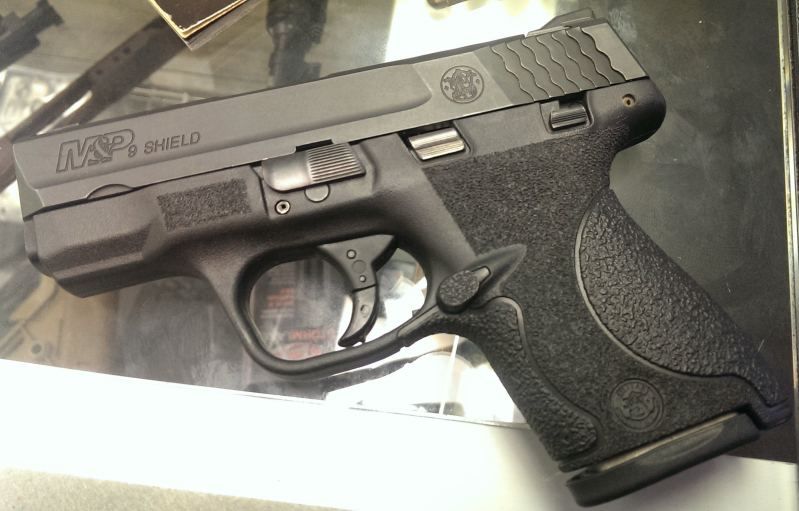
[#43]
Did my Shield this morning. I'm not going to complain much, as I'm fairly satisfied with the results for this only being my second serious attempt at this, but I really want to figure out a way to clean up and get a little more definition to my edges.
|
|
|
|
|
[Last Edit: clads314]
[#44]
Not stylish, very functional and aggressive. Doesn't move at all.
Sorry for the crappy photo. 
|
|
|
|
|
[#45]
|
|
|
|
|
[#46]
Surprised I don't see more of the Magpul 1911 grips done here.
|
|
|
|
|
[Last Edit: NapeSticksToKids]
[#47]
Did these today on a set of Magpul 1911 grips, tried to mimic the VZ Operator IIs.


|
|
|
|
TX, USA
|
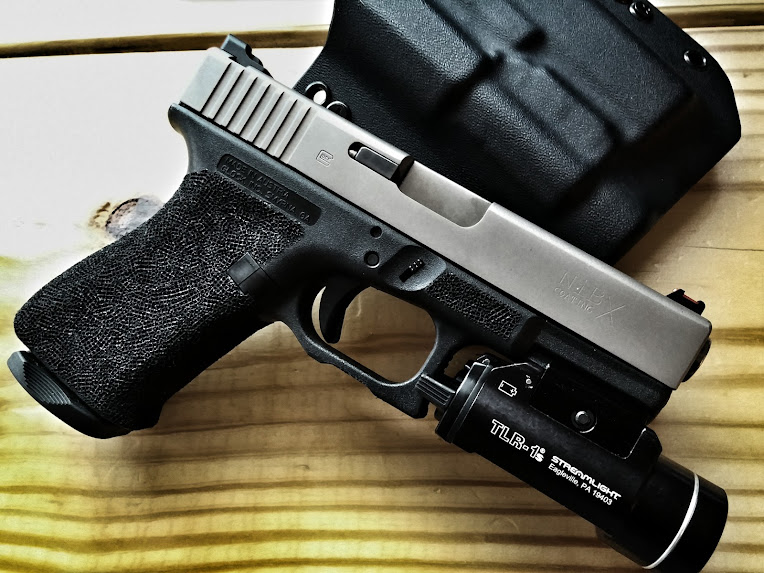
[#48]
Crappy cell phone picture, but I did another Glock:
|
|
|
|
[#49]
p4R4d0x I like the shape of the stipler that you used on your 23, that is different! Loots of good ideas on this thread. I got a new woodburning kit in with some stuff I bought at an auction this past summer. I didn't know what I was going to use it for.I think it will get put to good use soon.
|
|
|
|
CA, USA
|
[Last Edit: ManjawDan]
[#50]
A few magazines i did about a month ago:
BCM logo (used a stencil i made) 

Simple textured one 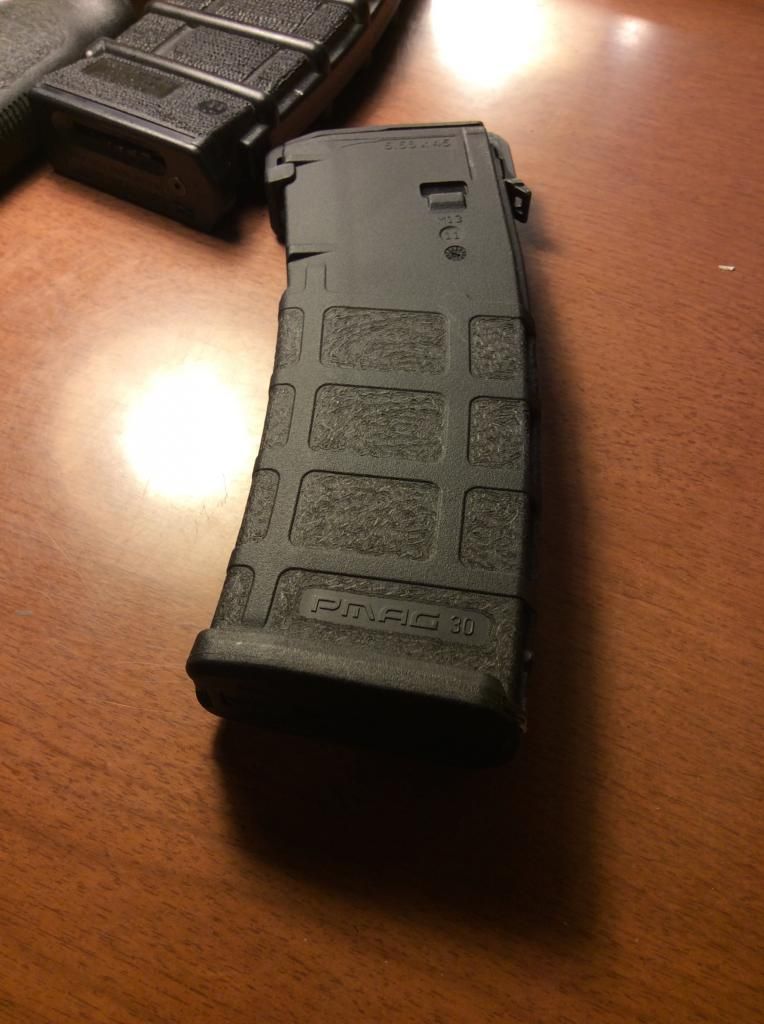
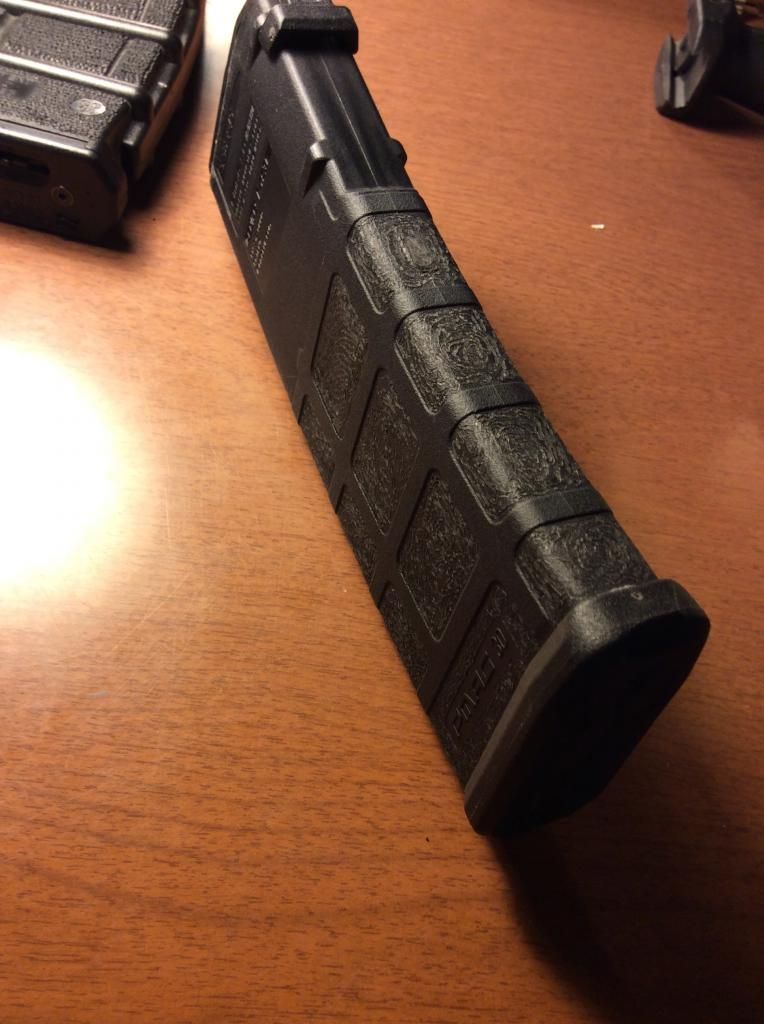
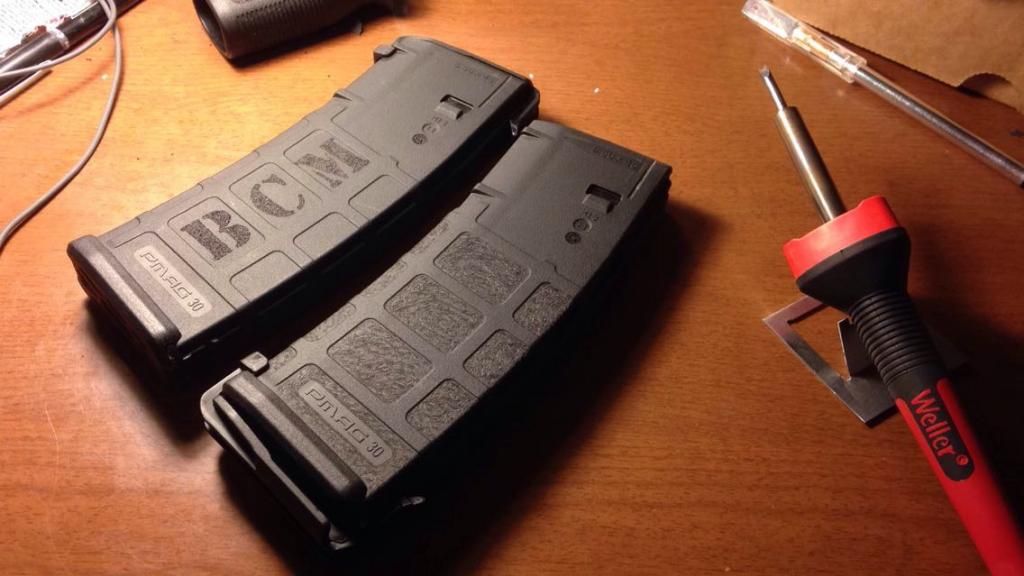
Since then i have run out of polymer surfaces to stipple... It is addicting EDIT: Two more done, tried a different pattern 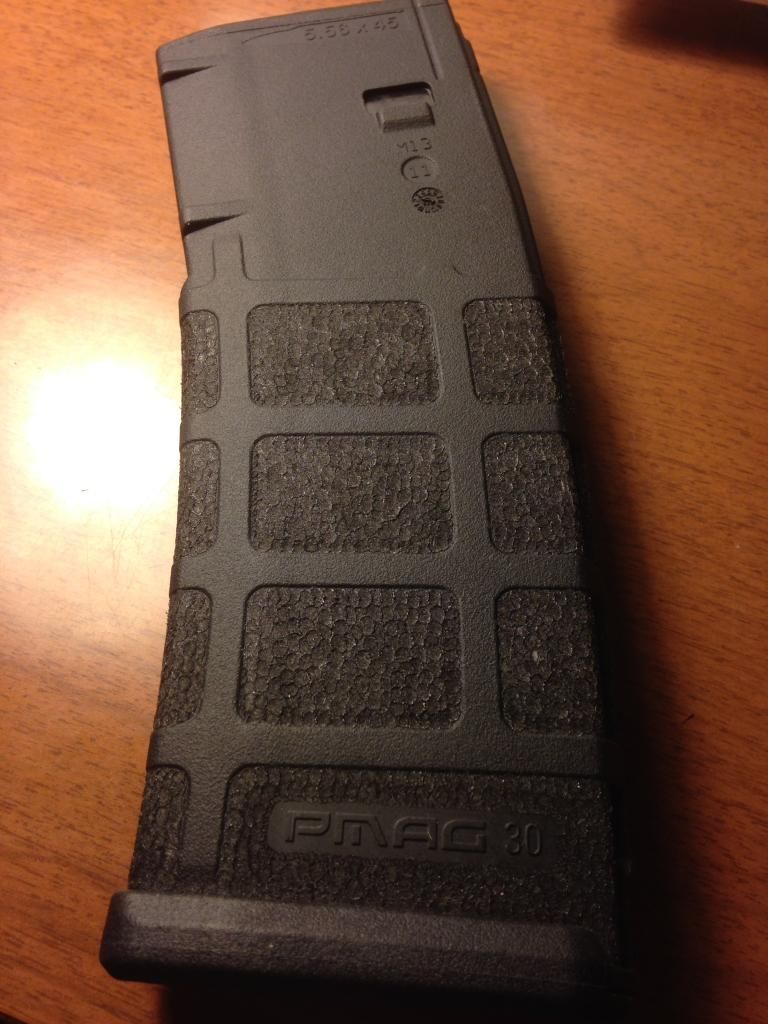

|
|
|
 Win a FREE Membership!
Sign up for the ARFCOM weekly newsletter and be entered to win a free ARFCOM membership. One new winner* is announced every week!
You will receive an email every Friday morning featuring the latest chatter from the hottest topics, breaking news surrounding legislation, as well as exclusive deals only available to ARFCOM email subscribers.

AR15.COM is the world's largest firearm community and is a gathering place for firearm enthusiasts of all types.
From hunters and military members, to competition shooters and general firearm enthusiasts, we welcome anyone who values and respects the way of the firearm.

Subscribe to our monthly Newsletter to receive firearm news, product discounts from your favorite Industry Partners, and more.
Copyright © 1996-2024 AR15.COM LLC. All Rights Reserved.
Any use of this content without express written consent is prohibited.
AR15.Com reserves the right to overwrite or replace any affiliate, commercial, or monetizable links, posted by users, with our own.


