|
Posted: 2/4/2013 6:08:15 PM EDT

This is for all the DIYers out there that would rather learn a skill and do it yourself. I will cover every step from pattern making to applying finish and hardware installation. Have a new gun that has ZERO holsters available? Don’t Like the ones that are available? I got into doing this a year or so ago after buying a new gun that had no holsters available. I read some tutorials, watched some youtube videos, joined a leatherworking forum, and a lot of trial and error. Almost anyone can do this and there are only a few special, but inexpensive tools needed that can be purchased from Amazon or other websites. Some you can make. Some you may already have. A custom holster usually costs $100-$200. For that cost you can buy the supplies to make your own. Then everyone after that is essentially free. I am using a Springfield XDS for this guide since one of my buddys just got it and needed an IWB. HOPE YOU LIKE IT. Here are most of the supplies used. I will discuss them as I use them. 
Start with a piece of paper with a line drawn down the center. Center the gun on the line and care fully roll it over onto its side. Now trace the gun as accurately as possible. 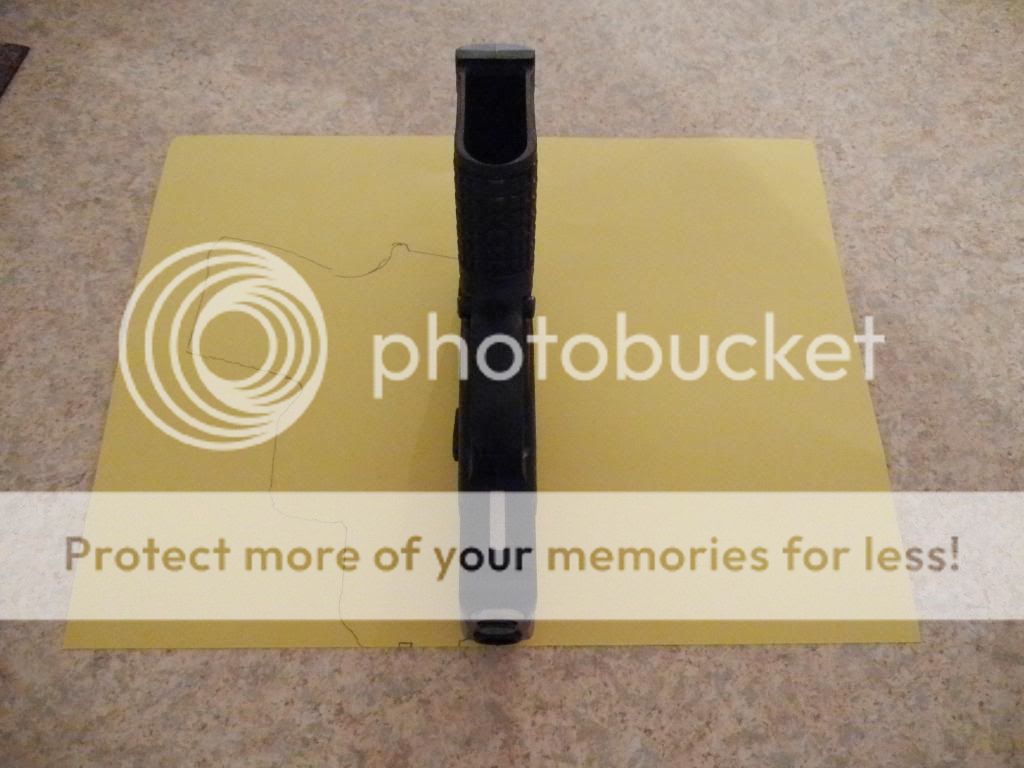

Measure the thickness of the frame at the trigger guard and muzzle end of frame. Divide by 2 and add ~1/8”. You can see where I wrote them on the paper. Use these measurements to draw a line around the tracing. This will be the stitch line. 


Now is the time that you draw the layout of the holster. Things to consider are placement of the front and rear tabs where the belt loops will be installed and also leave enough room between the grip and the holster that a good grip can be achieved when drawing. This will take trial and error while drawing. This design is my interpretation of some of the most popular IWB holsters that are on the market. 
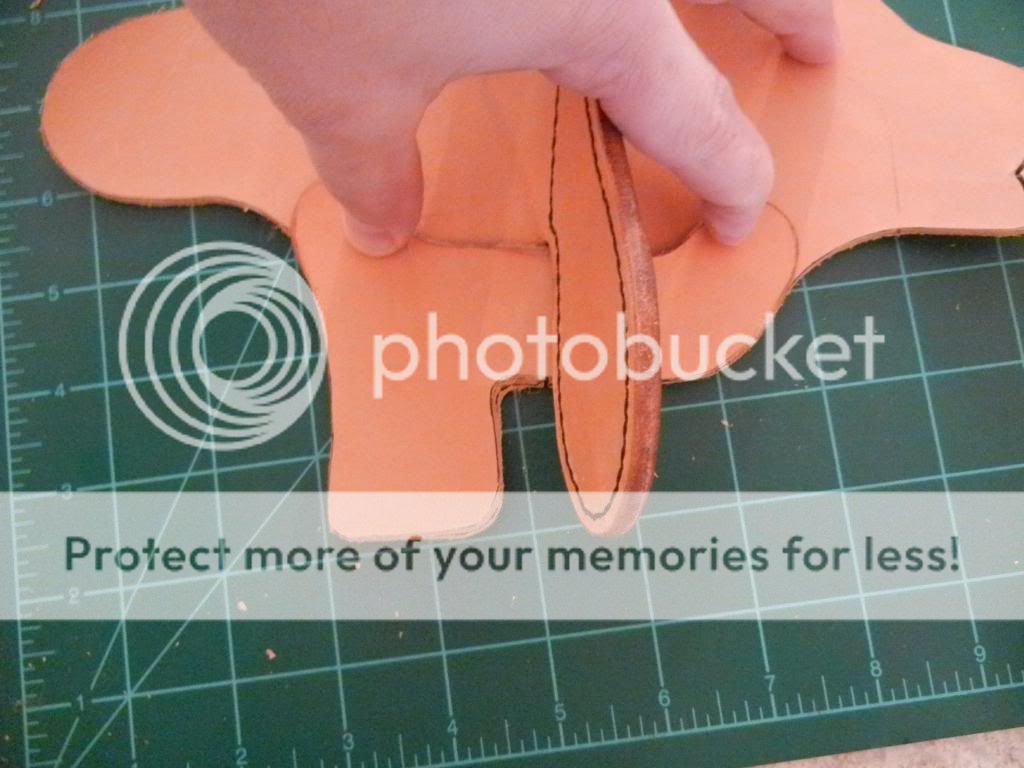
Cut out the design. To check the pattern you can lay the gun on the pattern and roll it around the gun to make sure the the stitch lines, the original line and the one from the frame measurements, line up a little above the center line of the gun. 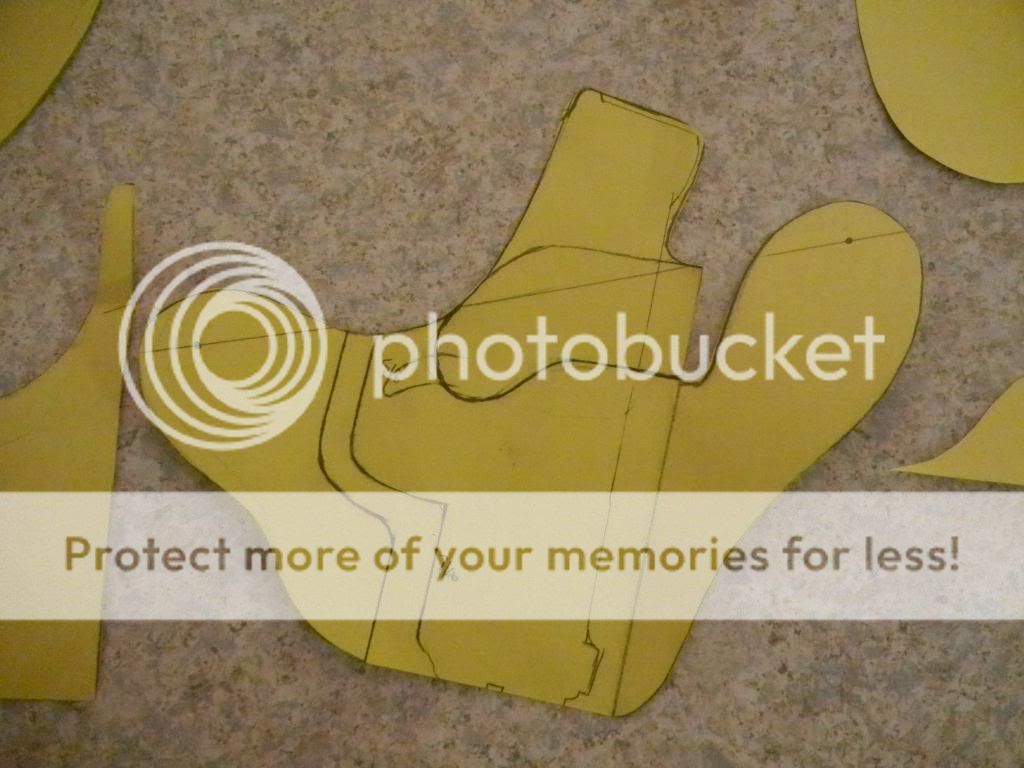
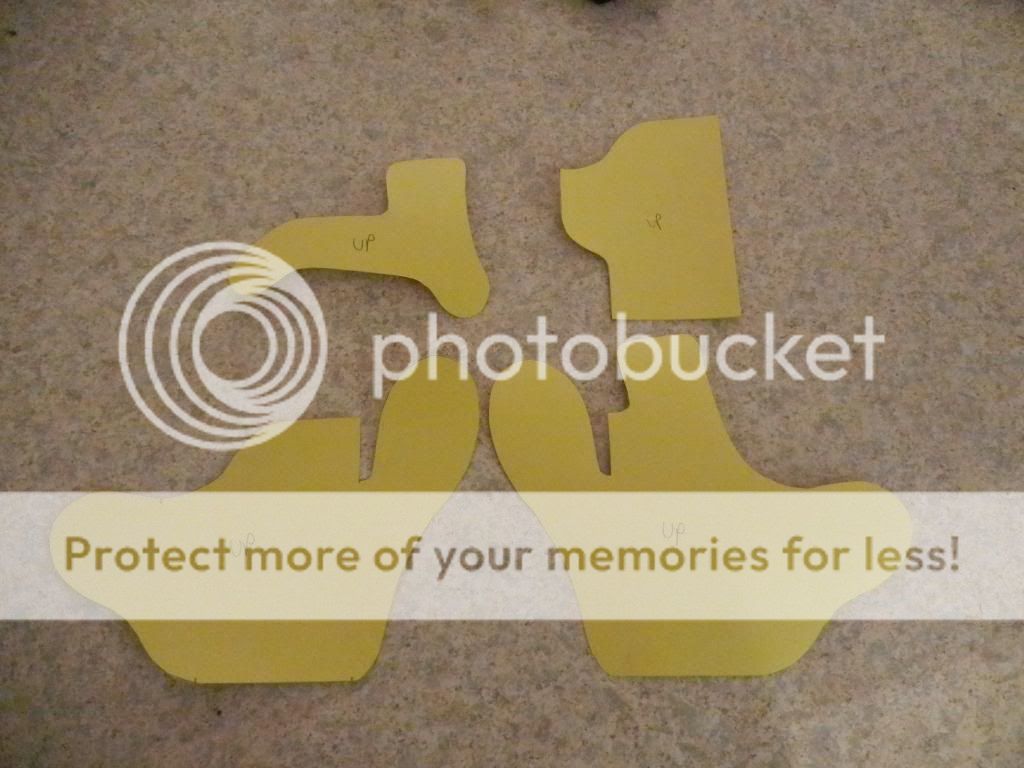
Cut out the parts of the pattern and transfer them to another piece of paper. This will involve taping some of the pieces back together to get all the pieces since the 2D pattern has parts that overlap. This pattern has three parts of the body, Front, Back, and Throat Support. It also has a stitchline guide. You will endup with all the pieces of the pattern. Label them with UP so you know which side is up when tracing them on the leather. It is a bad feeling to trace the part upside down and endup with the smooth side of the leather on the wrong side. 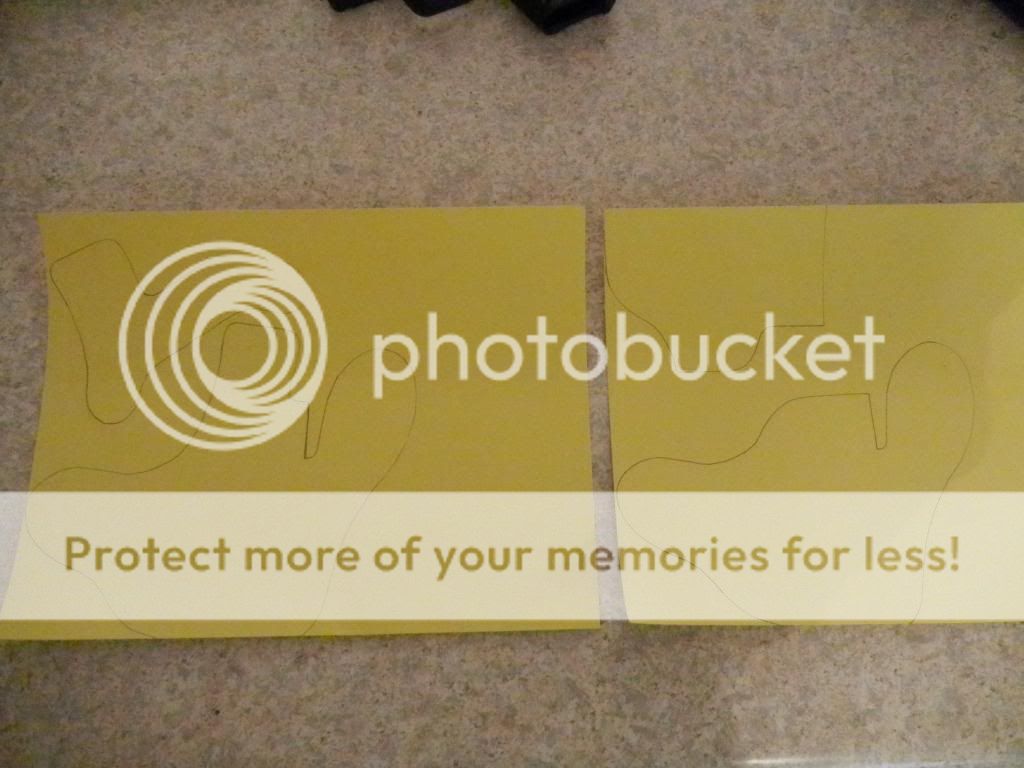
Trace the pattern onto leather and cut them out. I like 5-6 oz leather since it is the tright thickness for IWB holsters, not to thick or thin. 

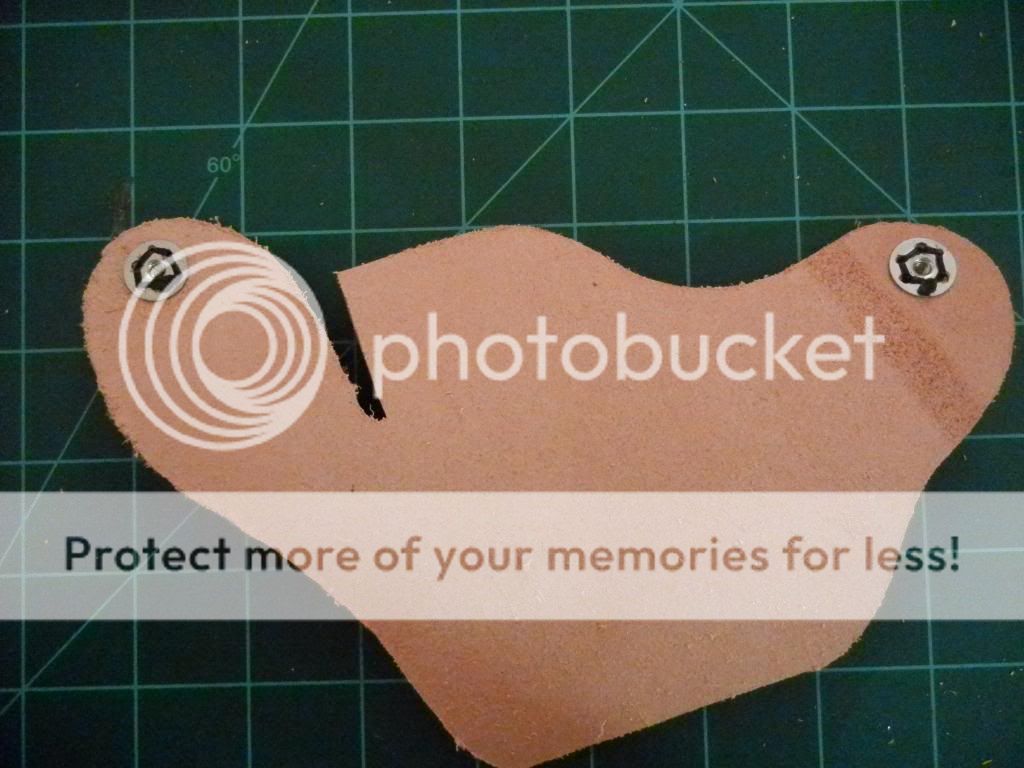
Now is the time to attach the t-nuts for the belt loops. I like to sandwich the t-nuts between the layers of leather since it give the Rear panel a more finished look. Punch a hole in the leather where the t-nut goes. I then stitched the t-nut to the leather. I will cover how to stitch it later. 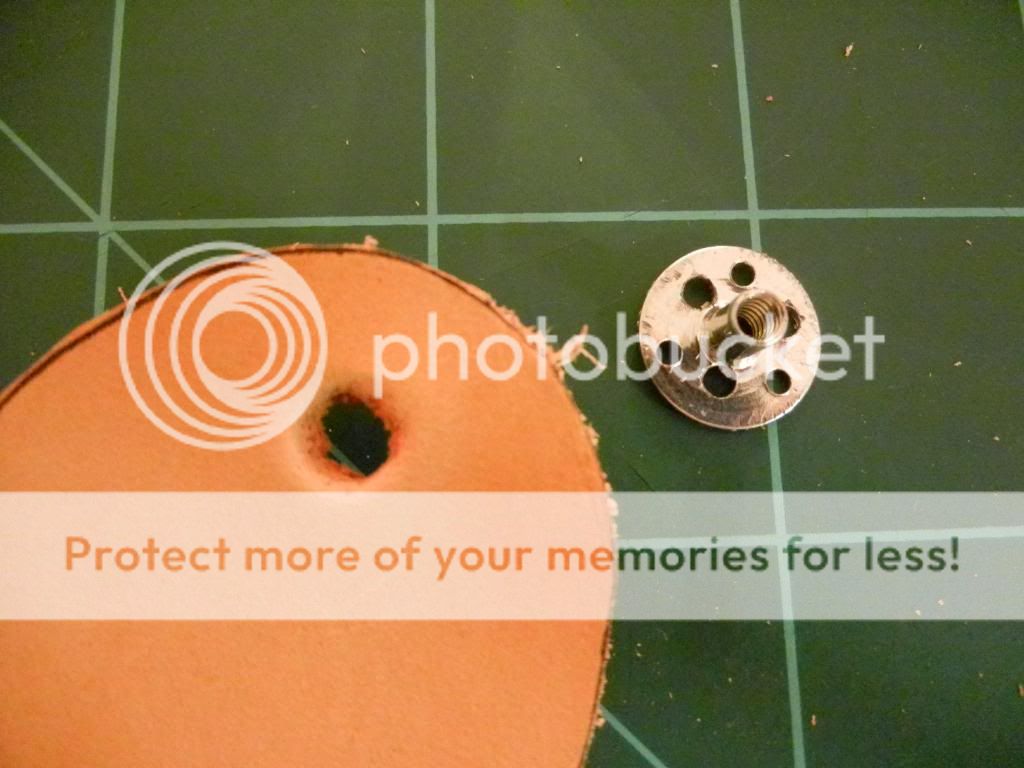

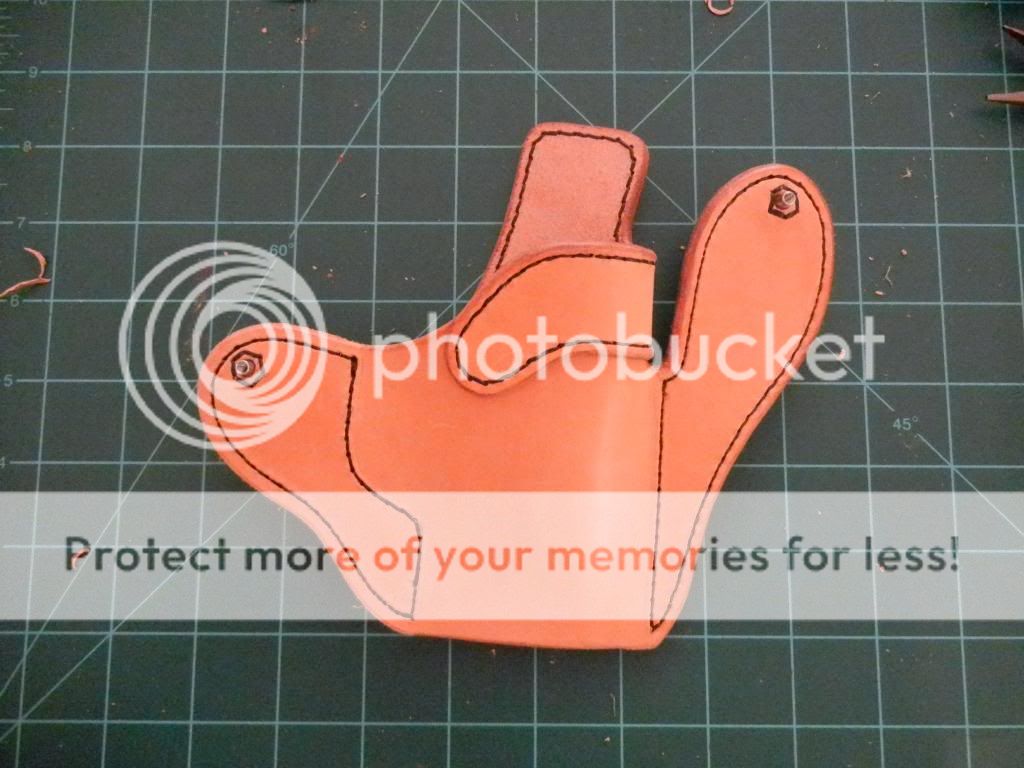
Trace the stitch line pattern onto the inside of the holster. This gives you a border for applying the cement. 
Use contact cement on to glue together the front tab only at this point. This holster requires a certain order to glue and stitch it together. You will see as I go along. 


After the cement has time to set, 10-15 minutes, trim the edges of the front tab so they are flush and then sand it even with sandpaper. I think this is 150 grit. It is important that the edge is even since it will affect the final stitch line and overall look. 
You will now use a Stitch Groove tool to make a groove around the outside of the tab and then along the stitch line. 
After the groove is complete use a Stitch layout tool to evenly space where stitches will be. 
Use an Awl to make the stitch holes more visible. 
Use an edgeing tool to remove the sharp edge from the tab. I made this one for less than five dollars from a piece of bar stock, but you can buy them also. 


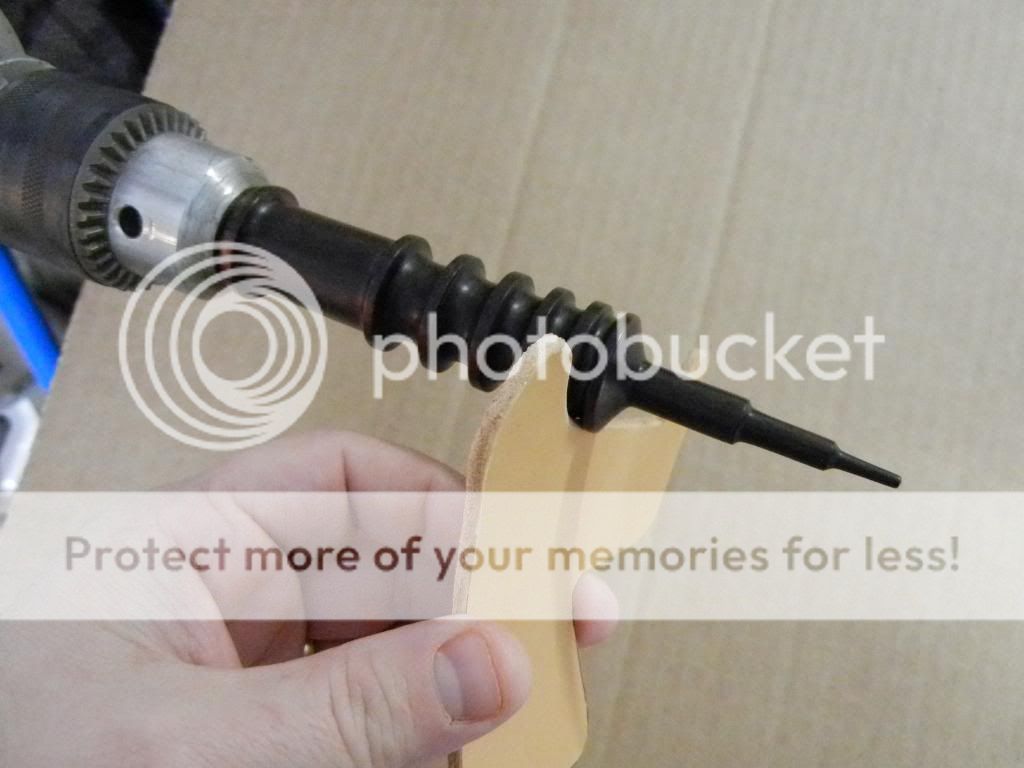
Now To make the stitch holes. I use a large stitch needle to drill through the leather to make the holes. This is the easiet way I have found. Don’t use a drill bit since it will tear the leather. 
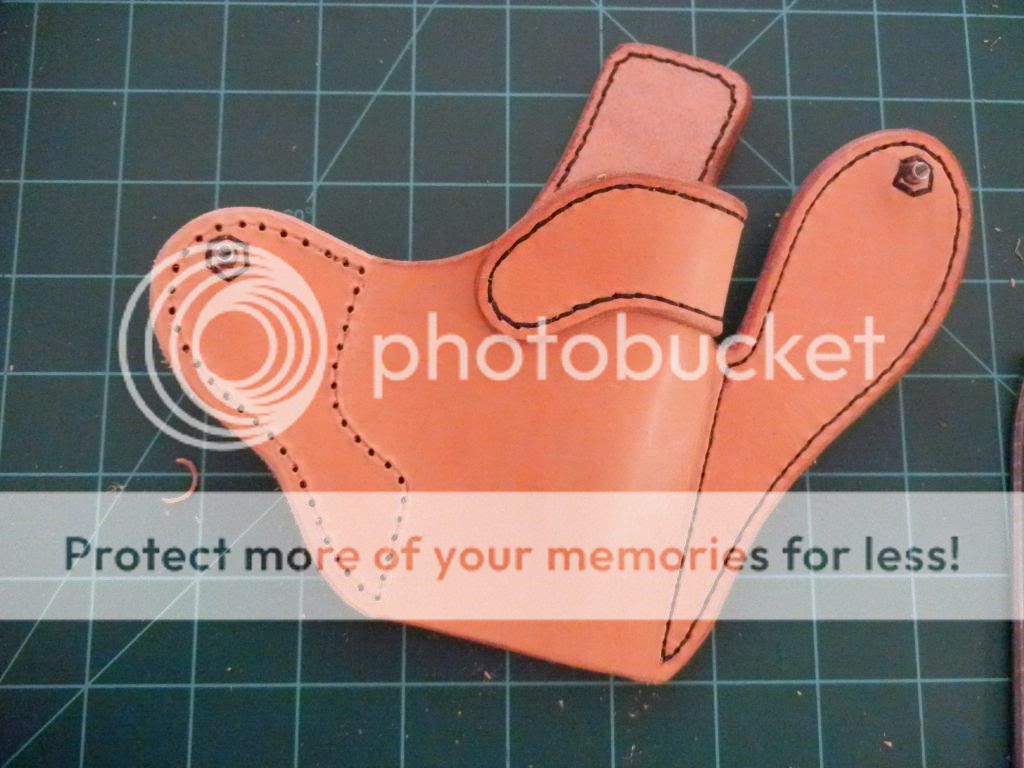
Here is the front and back after making the holes. 

Now time to stitch. I use Tandy Leather stitching thread. To figure the amount of thread, lay it around the stitch line. Measure 5 times this amount and add 6 inches, ie. If the stitch line is 10 in. the you would need 56 inches of thread. 
How to stitch. I use 2 needles. Put a needle on each end of the thread and pic a starting point. Center the thread in the first stich hole. 
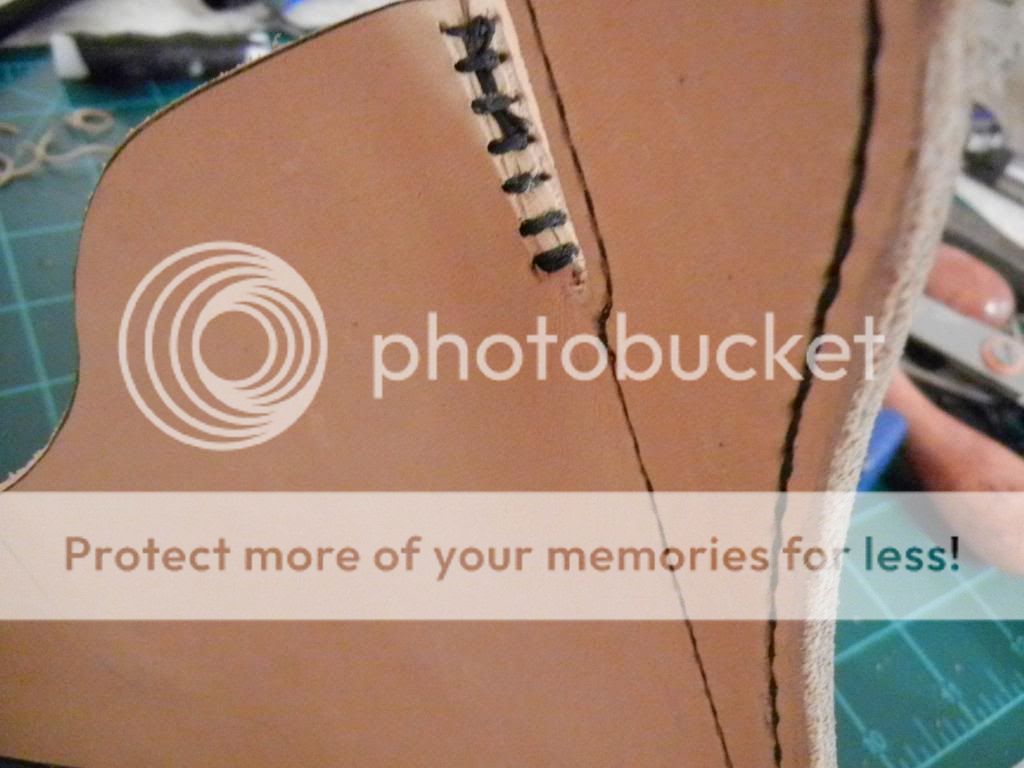
I start stitching from the back panel. Pass the needle through the next hole, but don’t pull it tight. Pass the other needle through the same hole from the front. The loop that was left on the back will be wrapped around the needle 2 times that is passing through from the front. Then pull the needle the rest of the way through. By doing it this way you are essentially tying a knot in each hole. Kind of hard to explain. Hopefully these pics will help explain. 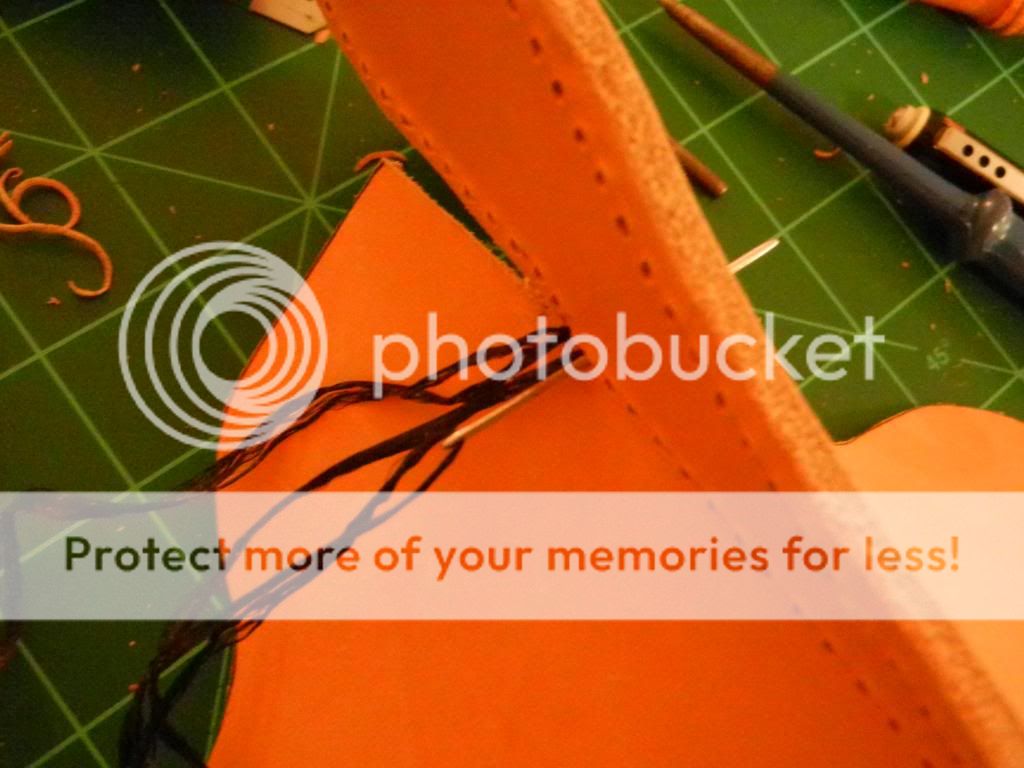


To finish off the stitch I putt the needle through only one layer of the leather so that it comes out on the inside of the holster. The two ends can then be tied off and the knot can be melted with a lighter. 

Front tab is complete. 
Time to move to the Throat Reinforcement. The front of the throat is stitched so that the ends are touching. This starts to show hoe the form will take shape. 
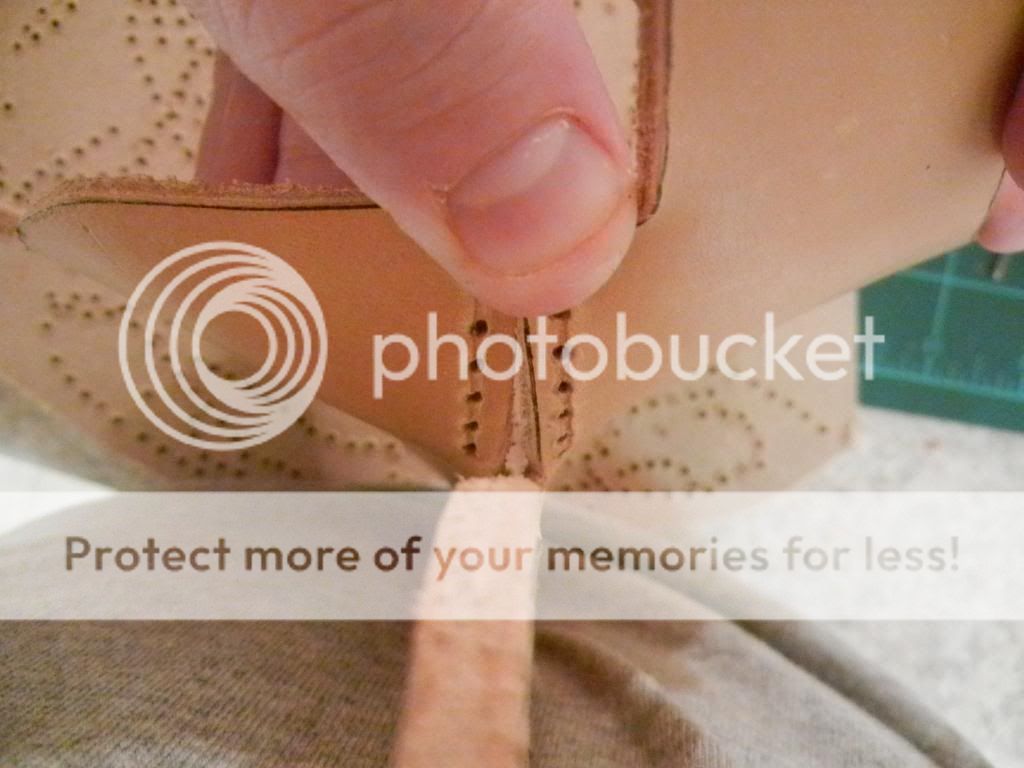

Before the Throat Reinforcement is stitched the bottom of it needs to be burnished since after it is in place it will not be able to be. 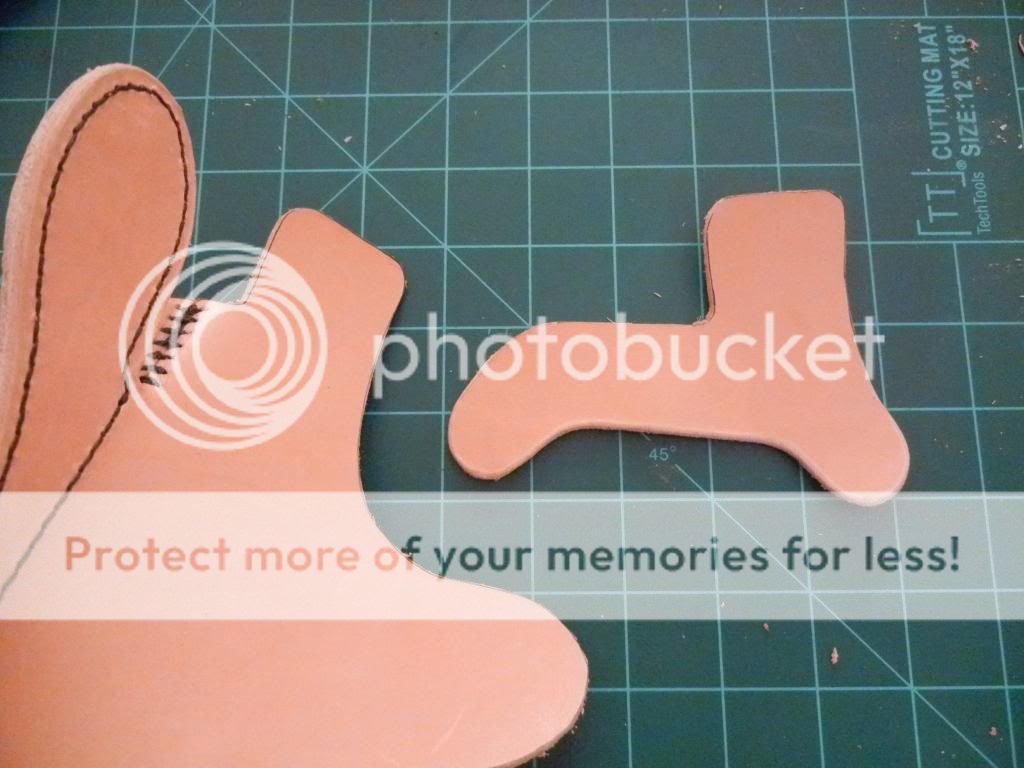
Burnishing is just a way of finishing off the rough edge of the leather and make it smooth. To do this I use a bar of Saddle Soap and apply it to the edge that has been trimmed, sanded, and edged. The edge is then wet and I use a burnishing bit that I chuck up in a drill. This burnishing bit was purchased online at leatherburnisher.com for $35. Yell worth the money. Process is pretty self explanatory and only takes a minute to get a good smooth edge. 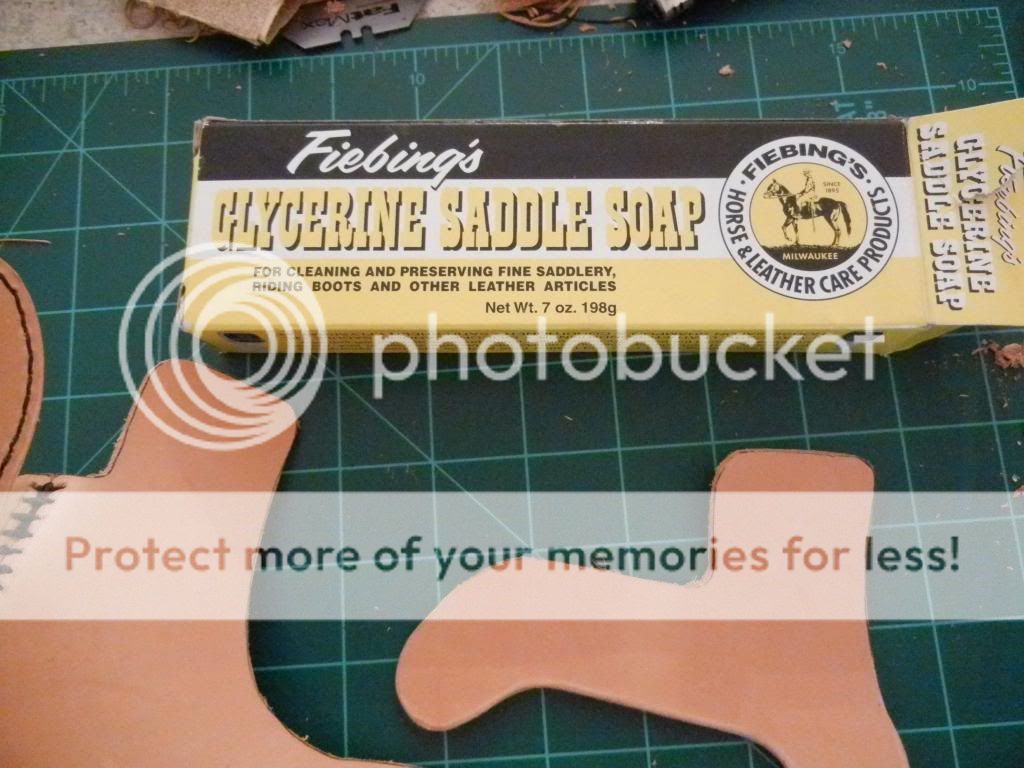


The front tab is also burnished at this time. 
I held the Reinforcement piece in place and traced it to show where the cement needs to go. I did the stitch groove on the bottom of the piece and then cemented in place. 


After the cement sets it time again to trim, sand, groove, edge, and stitch the panel the same way as before. 


The upper edge of the hostler is now burnished as before and it is time to cement together the rear tab. 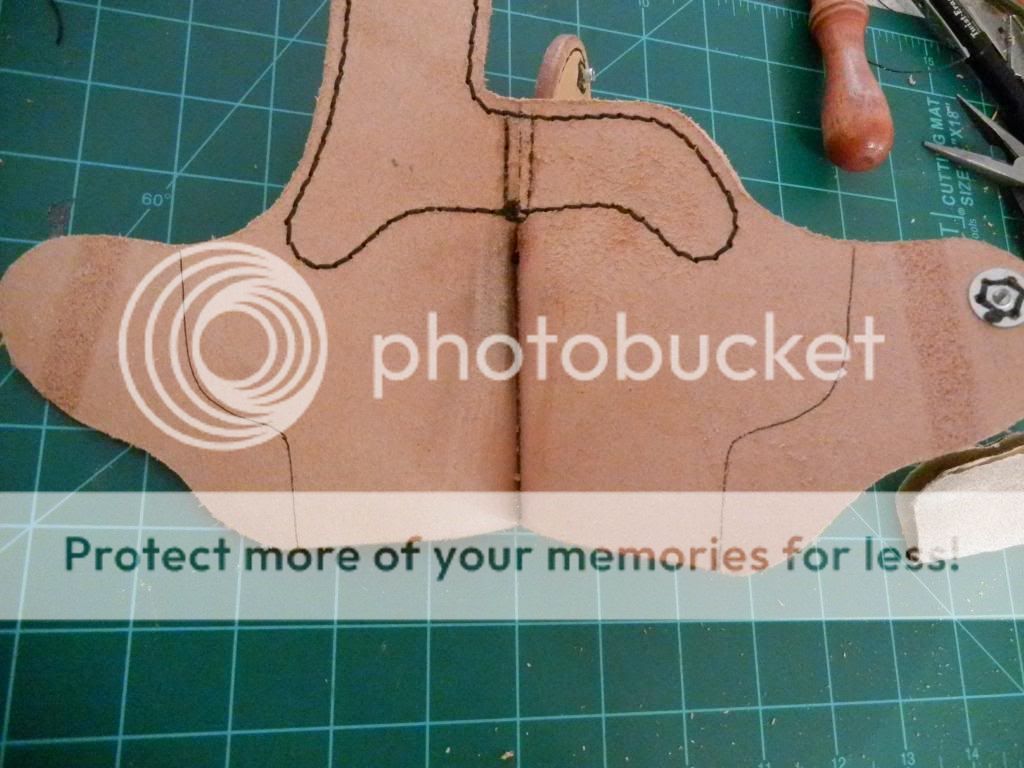
Same as before. Rrim, sand, groove, edge, and stitch. 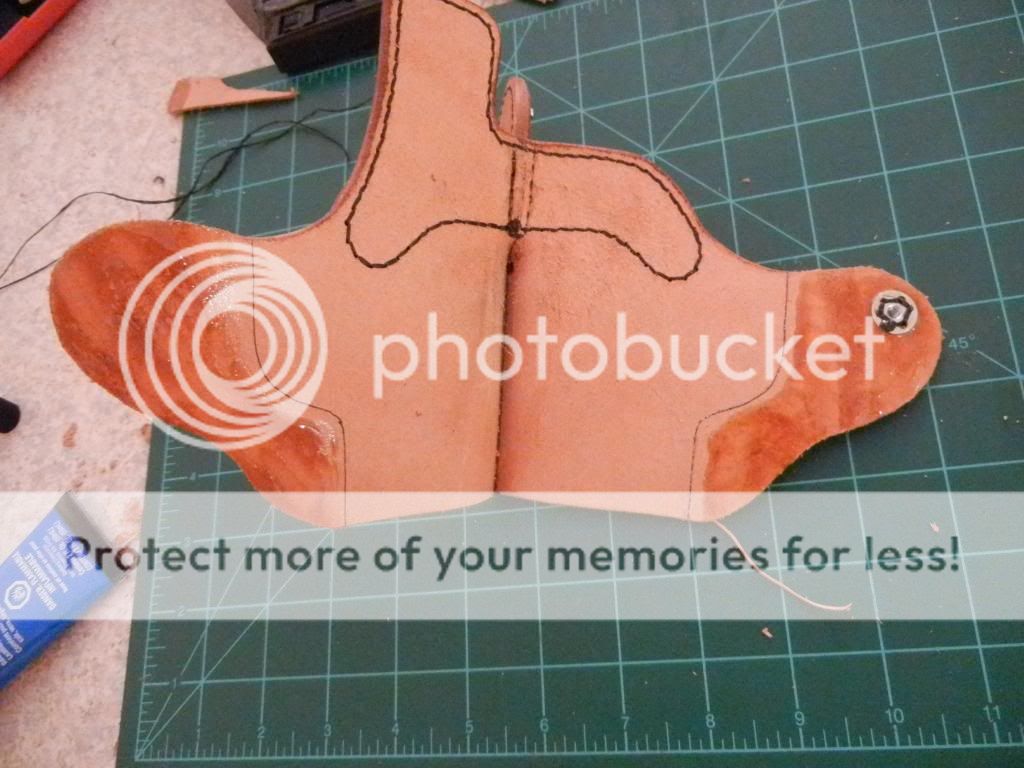

Now it is time to mold the holster to the gun. I run the holster under warm water for 20-30 sec. I let the holster sit until light patches start to reappear. While doing this I tape a piece of dowel rod to the top of the slide between the sights. This will make a sight channel in the holster. I put the gun into the holster and the put it in a vacuum bag. I use a food storage vacuum sealer, but there are other ways to do this. Some use a vacuum table or a press with rubber pads. 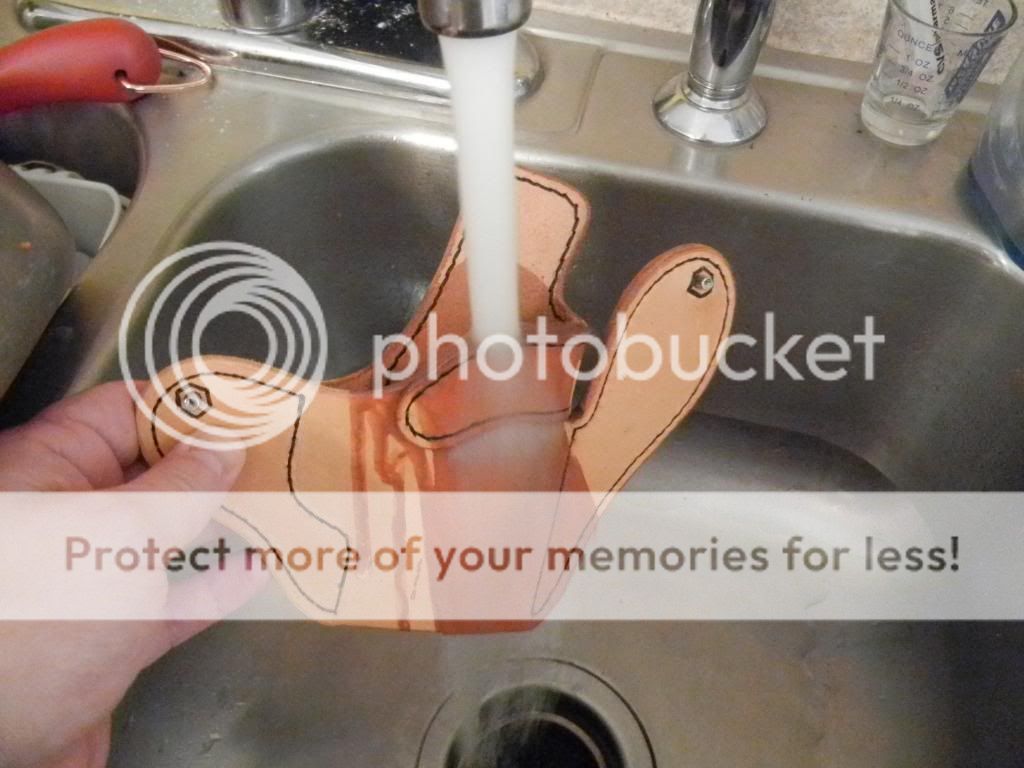


Holster is removed from the vacuum bag after 5 minutes or so. Now it’s time to finish the molding. The vacuum gave it the majority of the form, but now it needs detail. I use a paper creaser to define details of the gun. Also put a makers mark on the back. 


Looking at the inside you can see the sight channel and the impressions of the gun inside the holster. This will help with retention. 

To dry the holster I put it in the oven hanging from a “holster hanger” I made from a coat hanger. I put it in for 10 minutes at 170 degrees and then turn the oven OFF and leave it in there until it is at room temp, about 1 hr. Turn the OVEN off after 10 minutes. Too much heat will make the leather brittle or burn it. 


While the holster dries I made the belt loops. I cut 2 strips that measure 7/8” by ~5.5”. I use the end of the paper creaser as a temple for the ends of the tabs. A small piece of leather is added to one end of the staps to make a gap for the pants to go between the loop and the holster body. 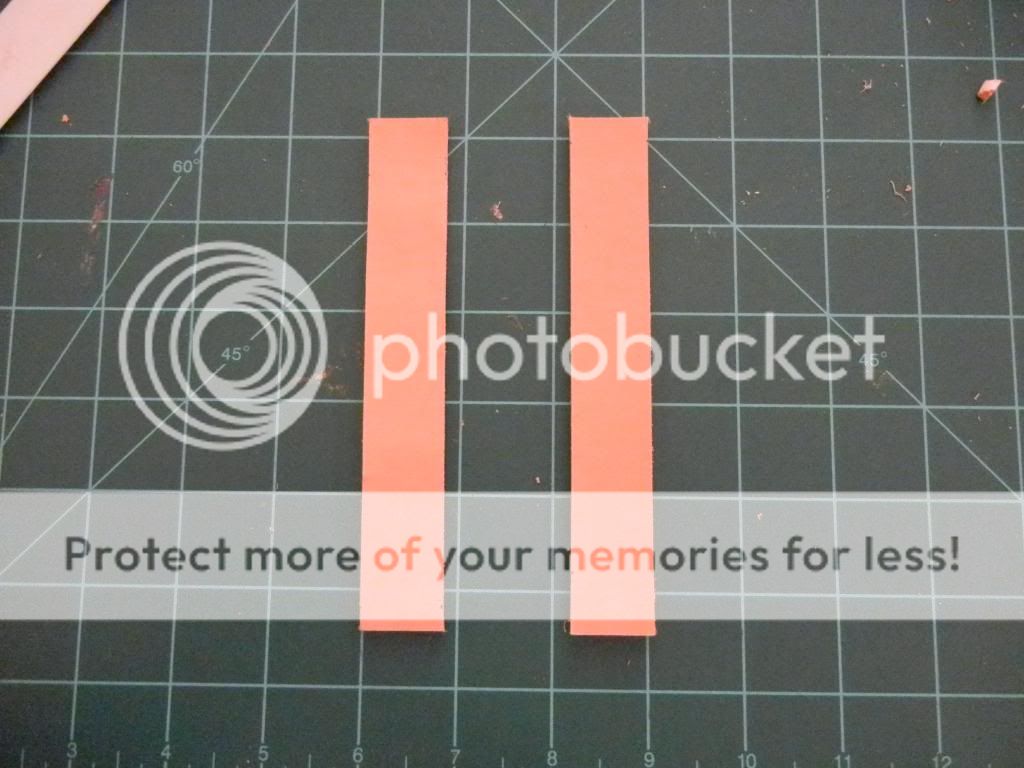
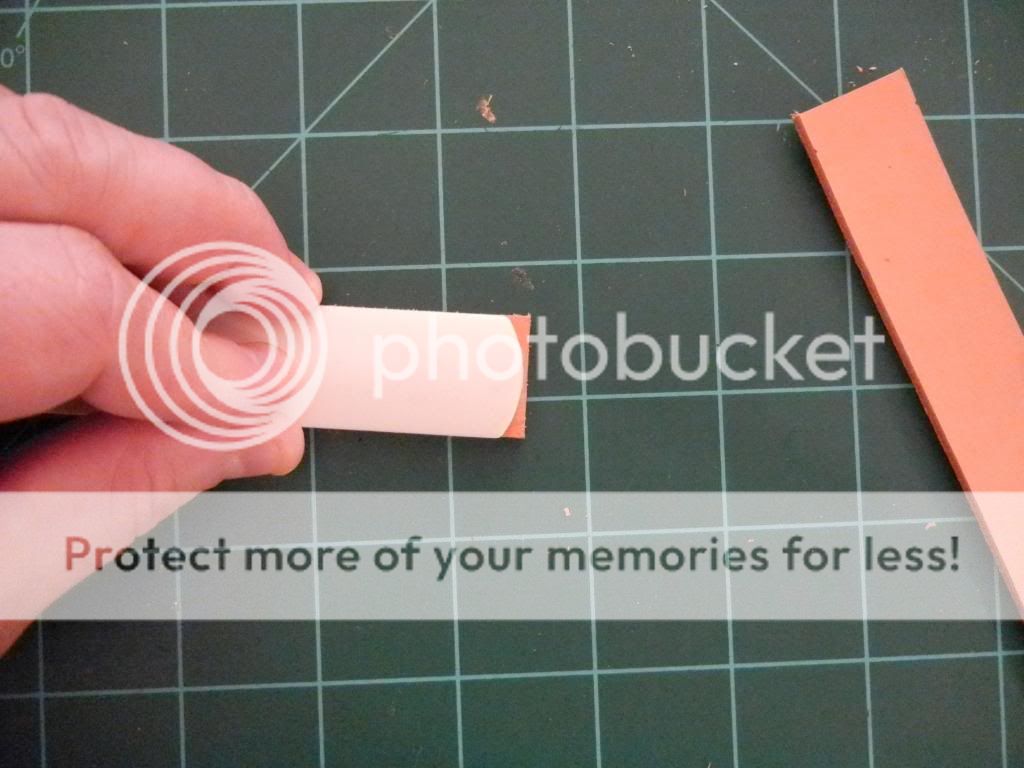


I punch holes in the other end of the loop for the snap to be installed. The snap is installed later. A hole is also punched in the other end also where the extra piece was attached. To put a bend in the loop just the portion where the bend will be need to be wet. Fold it over and let it dry. 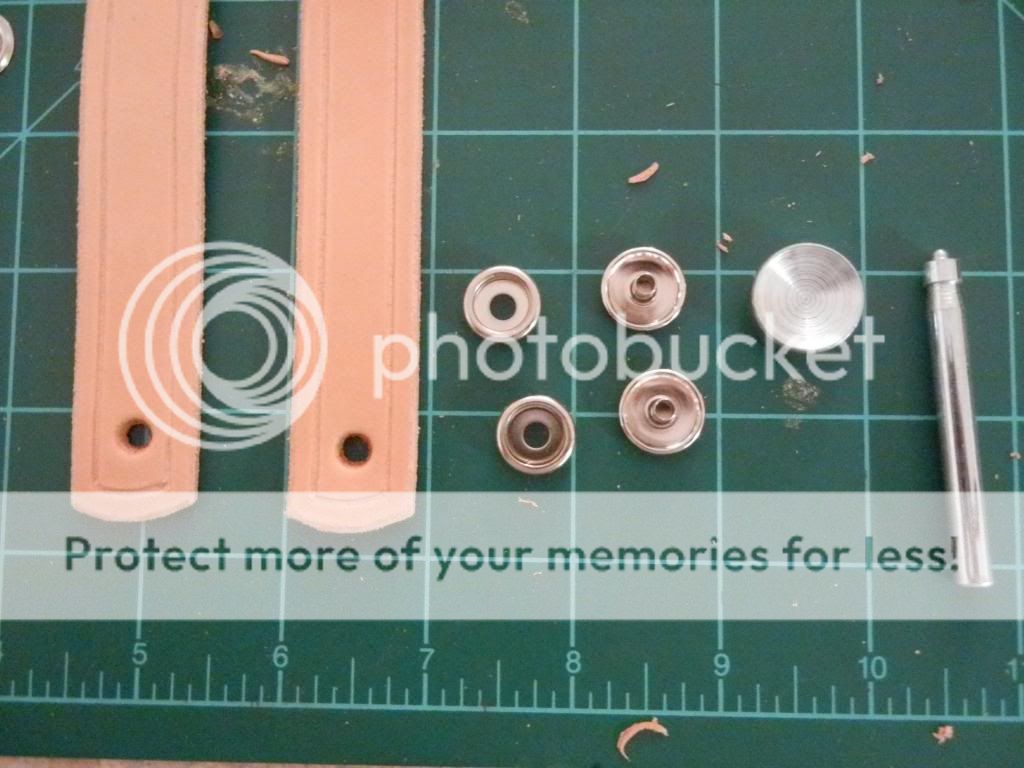

After the holster is dried, I do the final burnish of the outside edges using the cream saddle soap and a piece of demin. All burnishing can be done with denim or canvas, but requires a good bit of elbow grease. 
Time to dye. I use this Fiebling’s Oil Dye. Apply it with a dauber. I do 3-4 coats starting with the inside. 

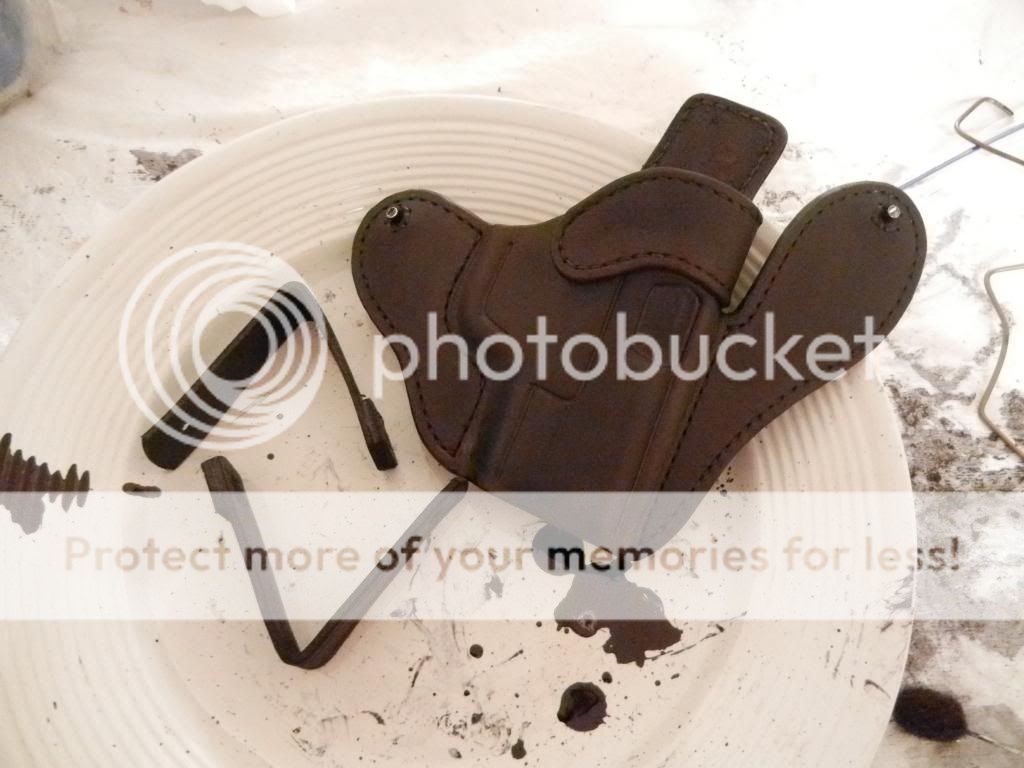
After the holster dries it will have a grayish haze from oxidized dye. Just use natural colr polish and rag and it will buff to a shine. This will also remove excess dye. Buff it until no more dye rubs off the holster. 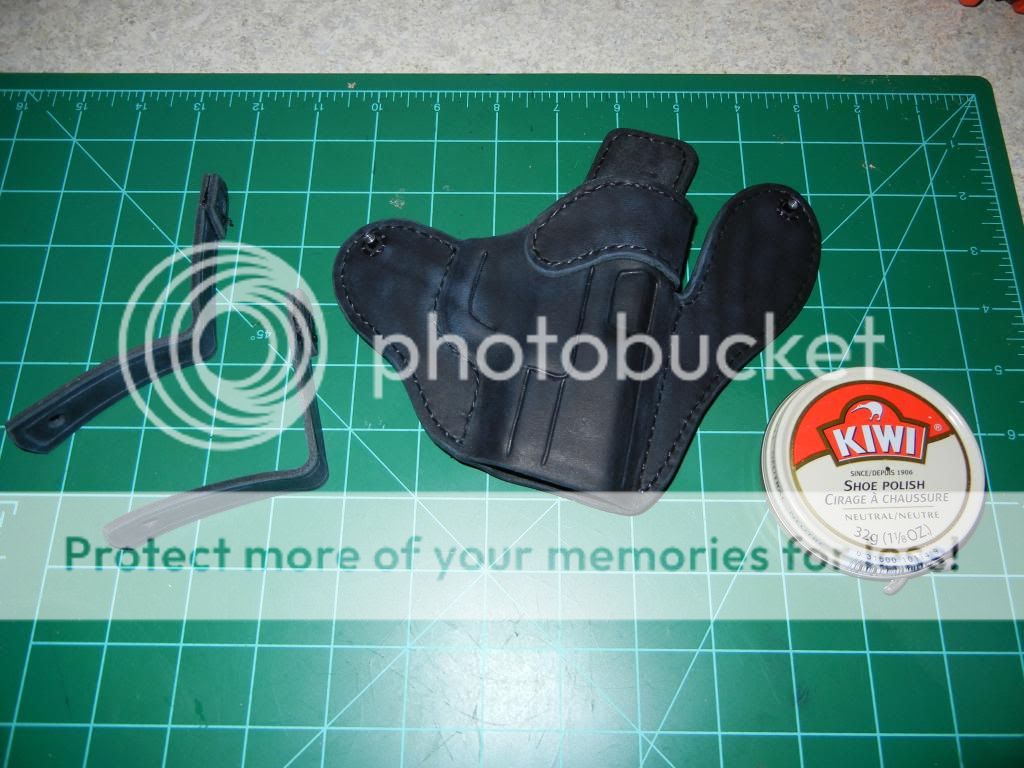

Time to put a sealing finish on. I use Fiebling’s Resolene mixed 50/50 with water applied with an airbrush. I do 3-4 coats, again starting with the inside. After doing the inside, I put it on the hanger and spray the outside. 
After the belt loops have dried I installed the snaps. I use line 24 snaps. You can use pull-the-dot direction snaps, but I like the regular snaps better. I have used both. The install tool comes with the snaps. 
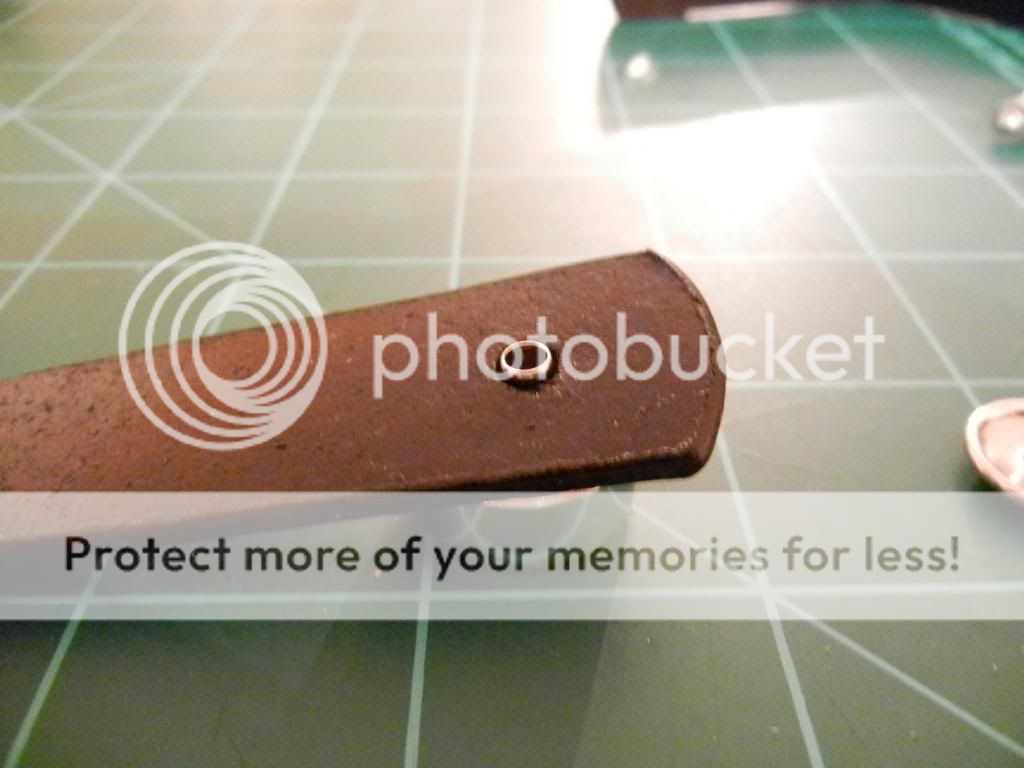
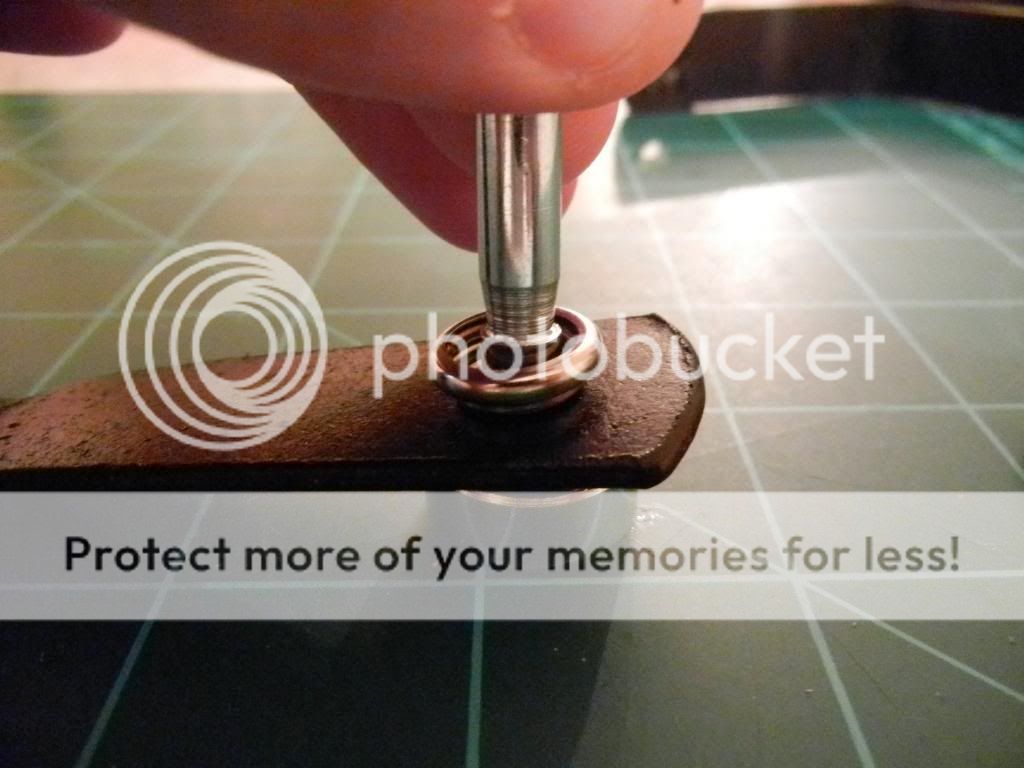


The holster is now dry and I installed the belt loops on the holster using stainless steel machine screws into the t-nuts. The screw head needs to be small enough that it fits down inside the male part of the snap so the snap will fasten. 


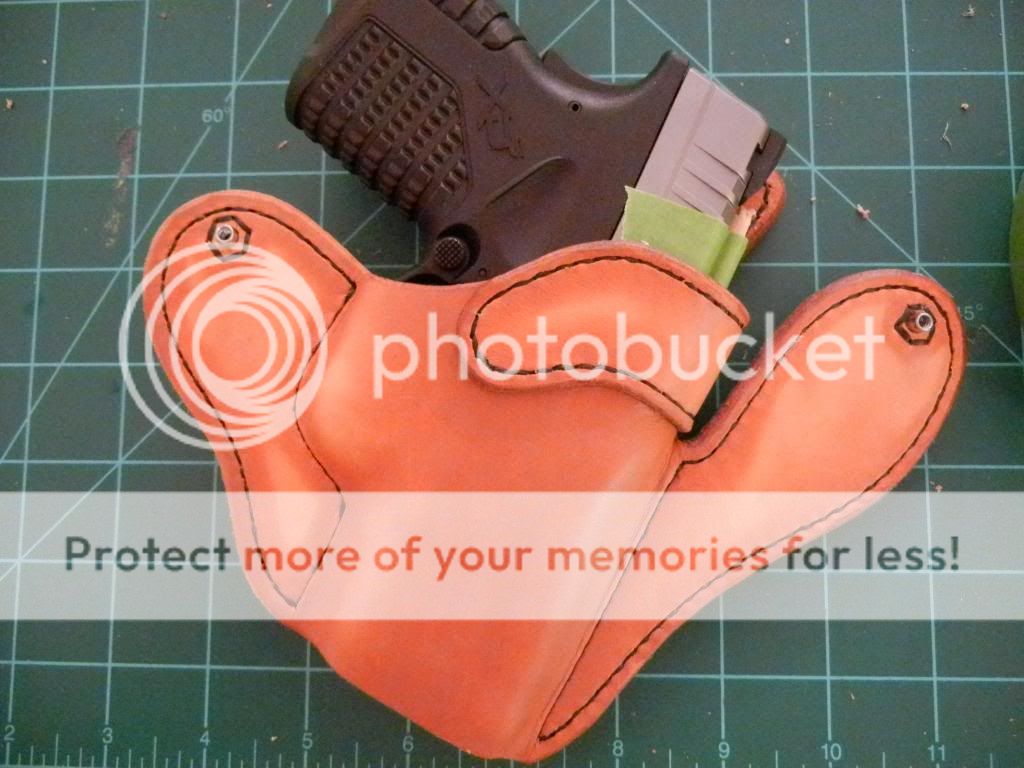
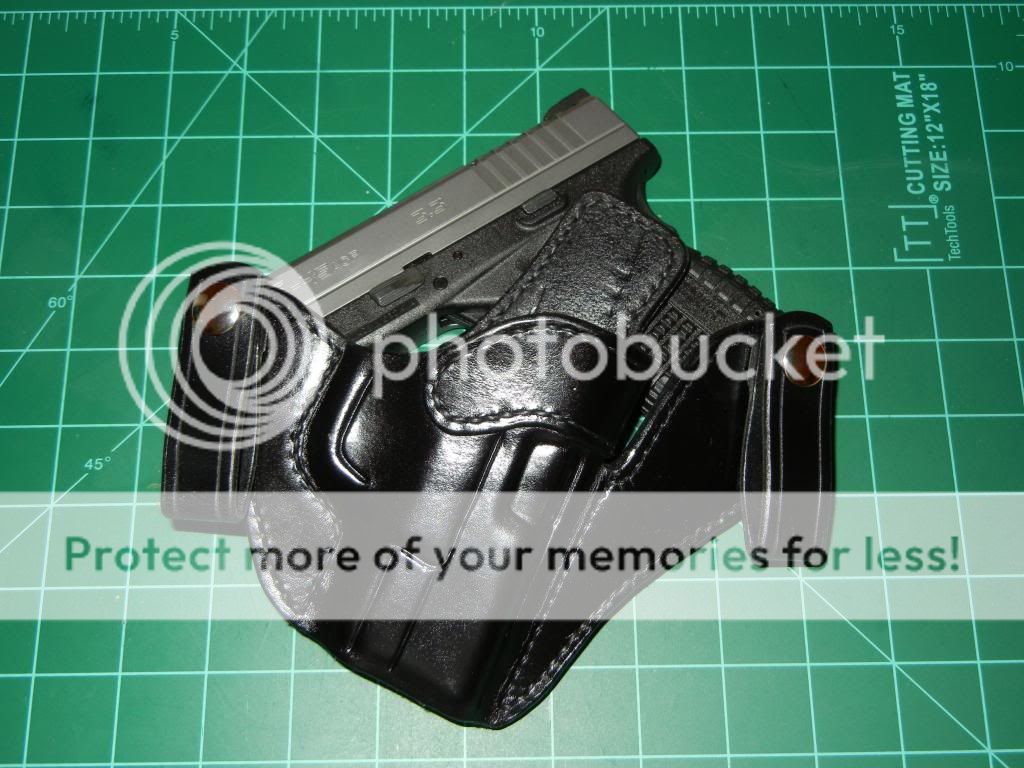
Here is the Finished product. I have about 7 hrs total into the holster. The patter design process and hand stitching takes the longest. 


|
|
|
|
[#1]
Excellent, Very, Very nice.
Thanks for posting! Maybe a sticky? Mods? |
|
|
|
[#2]
If you have a friend with a wood lathe you can have him make a burnishing wheel. Make different size groves in a block of wood so it is perfectly round and can be fixed to the arbor on the end of a motor. Kind of like a buffing wheel. Wax on the wood and press the leather into the grooves to burnish the edges. They can really be formed so they are really rounded and comfortable.
My last holster I just used antique dye and made it look rough so it looks like an old Threepersons style holster of antique age. Artificial sinew can be split to make it the right size and can be used to stitch the holster together. Makes for incredibly strong stitching. |
|
|
|
[#3]
Glad you like it.
|
|
|
|
[#4]
Great post, you take requests? =]
|
|
|
|
[#5]
Awesome post...and I've now figured out why my holsters are so tight. I wet mold BEFORE stitching.
|
|
|
|
[#6]
To notwen: I need to have the gun in-hand in order to make the holster, or a dummy. I mainly just do this as a hobby, but also make one here and there for friends that have guns with no holster options or may need a left hand version or something like that. Since I do it all by hand it takes a while and I would get pretty burnt out trying to make any real money at it.
To dispatch55126: There are definitely more ways than one to skin a cat. The hardest part for me to learn was to get the stitch lines correct. The first few I made were either too loose or too tight. Doing it the way I posted allows me to get a nice tight fit but still be able to draw. I have heard of people that mold first, but either way if it works... I have spent hours on a holster just to make it to the point of molding and find that the holster way way too tight and have to throw it out. I can get it almost perfect the first time now, sometimes making very slight changes to the stitch lines on my pattern for the next one. |
|
|
|
[#7]
Great tutorial.
|
|
|
|
[#8]
I'm quite jealous! Your work looks excellent. I've wanted a leather IWB for a loooong time but just don't have the time to put into it.
Been trying to find a MS VM2 but that's proved to be a hassle. Oh well maybe some day. |
|
|
|
[#9]
Quoted:
Great tutorial. Holster turned out beautifully |
|
|
|
[#10]
Great work!
I have been thinking of trying my hand at this too, so your tutorial in an excellent resource for me. I have purchased a few of the tools needed and will piece the rest together in the next little while. I have a few questions for you, or any of the other guys that might read this for that matter, if you wouldn't mind answering. What thickness / weight hide did you use? How many stitches per inch did you do? Can you elaborate on the T nut? where did you get them? How did you sew them on? Do you actually run the drill with the needle, or just chuck it up to push it through? Please and thank you of course |
|
|
|
[#11]
Quoted:
Great work! I have been thinking of trying my hand at this too, so your tutorial in an excellent resource for me. I have purchased a few of the tools needed and will piece the rest together in the next little while. I have a few questions for you, or any of the other guys that might read this for that matter, if you wouldn't mind answering. What thickness / weight hide did you use? 5/6 oz for IWB holsters since they need to be as thin as possible, 5/6oz still gives enough thickness that the holster is rigid. i measured a few IWB holster that i purchased and this was the thickness. I also use it for owb holster, but will have more areas of the holster that is 2 layers thick to give a little more heft. I have used 3-4oz leather for iwb holster before for small pocket pistol holsters which will keep the holster really thin, but it will collapse on itself when the gun is removed. it takes 2 hands to reholster those. How many stitches per inch did you do? I use the medium size wheel that comes with the stitch layout tool. it is ~6 stitched per inch. The contact cement is doing 99% of the work holding the holster together. I just like the look of the one i cho Can you elaborate on the T nut? where did you get them? How did you sew them on? I uses 6-32x1/4 t-nut and 6-32x3/8 machine screws. The screw has to be small enough to fit in the male part of the snap. I sandwich the t-nut between the two pieces of leather that make the tabs of the holster. I punch a hole in the front piece of leather so the shaft of the t-nut can stick through. T\i use the t-nuts that have 3 holes in them and drill tree more holes in them for stitching them in. before the tabs are glued together i stitch the t-nut in so it will not rotate when screwing on the belt loops. I have used the t-nut with the barbs before, but have found that the barbs are a little long and the t-nut could free spin between the leather pieces when trying to csrew on the belt loops. Do you actually run the drill with the needle, or just chuck it up to push it through? yes, i put the holster on a piece of wood and "drill" through the leather to make the stitch holes. you can see the piece of mdf with all the holes in it from from drilling through the leather. i use a large leather needle as a "drill bit". An actual drill bit will tear the leather. the needle just opens up the hole, it doesnt remove any material. the hole will shrink back when the leather is wet during the mold process. Please and thank you of course Just let me know if you have any other questions. |
|
|
|
[#12]
Cool thread....
|
|
|
|
[#13]
Thanks, for the thread. I think I'm jumping in with both feet to try this this weekend.
|
|
|
|
[#14]
Quoted:
Thanks, for the thread. I think I'm jumping in with both feet to try this this weekend. Good luck with it! Let me know if I can help. |
|
|
|
[#15]
I'm officially started, there is definatley a bit of a learning curve but for my first time working with leather mine looks alright so far. I have the pieces cut out and the groove done on the right wing and the stitch holes all have been hit with the awl. I have to go back to the store and get the damned t-nuts though, they were the only thing I didn't get.
|
|
|
|
[#16]
Hey where did you get your t-nuts from? I checked home deopot and a crafts store today and they didn't have them.
|
|
|
|
[#17]
That is some nice work there partner ! I also have wonder about making holsters, I will definitely save or sticky this thread. Thanks for taking the time to post this.
|
|
|
|
[#18]
Quoted:
Hey where did you get your t-nuts from? I checked home deopot and a crafts store today and they didn't have them. T-nuts and screws came from lowes. I have also found them at ace hardware. They aren't hanging on peghooks, they are usually in the slide outs. |
|
|
|
[#19]
That's awesome! Thanks for the thread. Have you done any OWB holsters?
|
|
|
|
[#20]
Quoted:
That's awesome! Thanks for the thread. Have you done any OWB holsters? yeah, I have done quite a few OWBs. I have recenently started doing the "flat back" style OWB holsters that conform more to the wearer than the normal pancake and are more concealable. I make OWB almost the same way, buy I incorporate the mouth reinforcement into the front tab. Here is one I made for a g19/23. I think the g19 is a little thick for IWB so I made this OWB for fall/winter. 


|
|
|
|
[#21]
Quoted:
Quoted:
That's awesome! Thanks for the thread. Have you done any OWB holsters? yeah, I have done quite a few OWBs. I have recenently started doing the "flat back" style OWB holsters that conform more to the wearer than the normal pancake and are more concealable. I make OWB almost the same way, buy I incorporate the mouth reinforcement into the front tab. Here is one I made for a g19/23. I think the g19 is a little thick for IWB so I made this OWB for fall/winter. http://i1327.photobucket.com/albums/u661/nismo0542/Holster/DSCN2837.jpg http://i1327.photobucket.com/albums/u661/nismo0542/Holster/DSCN2838.jpg http://i1327.photobucket.com/albums/u661/nismo0542/Holster/DSCN2839.jpg Excellent!!! I have been thinking along the lines of this exact style for my G26. I have used Galco FLETCH holsters in the past, but am not a big fan of the thumbbreak / strap. Any chance you could scribble out a pattern for this style and share it? Am I seeing the main body of the holster is one pice folded, then the front tab is sewn on to reinforce it? |
|
|
|
[#22]
Looks pretty cool! Leather working is a dying art.
|
|
|
|
[#23]
Quoted:
Looks pretty cool! Leather working is a dying art. I don't think it's dying... Unless you're speaking of literally dying the leather. 
Lots of DIY leatherworkers out there, and lots of relatively new holster makers. There's quite a few DIYers on this very board. When I started making holsters on my own, there wasn't much else about it on the net... And that wasn't all that long ago. At the time, the Holsters & Belts section at Pistolsmith.com was probably the best place to get detailed tips and tricks from many of the top makers - Lou Alessi, Matt Del Fatti, Tony Kannaly, Gary Brommeland, Josh Bulman, Mark Garrity... Around that time, I also ran across this step-by-step. Aside from that, Leatherworker.net was around then, but there's wasn't a whole lot out there specific to the types of holsters we're really wanting here. I eventually put up a tutorial of my own that seemed to be well-received at the time, and although I probably went a little deeper into leatherworking theory, tool options, and other useless jibber-jabber, I like the OP's step-by-step better, especially with the more-involved design and his more methodical way of measuring things out. OP: I noticed you're starting out with some nice looking leather. What exactly are you using? Hermann Oak? Wickett & Craig? Tandy? |
|
|
|
[#24]
OP: I noticed you're starting out with some nice looking leather. What exactly are you using? Hermann Oak? Wickett & Craig? Tandy? I get mine from zackwhite leather. double shoulders. veg tanned. |
|
|
|
[#25]
Wow that's awesome work. I wish I was your buddy as there's no way I could find that kind of dedication to make one.
|
|
|
|
[#26]
Great post OP! Thanks for sharing!
|
|
|
|
[#27]
Here is the holster I made for my dads PK-380 as it is right now. I probably won't get to finish it till next weekend. It was a damned fun project minus the stitching, that tandy thread sucks a dick. Also I think the leather we used was a little to thin/soft. The girl at the tandy store acted like I was speaking japanese when I said 5 to 6 oz leather. She also said not to polish it with neutral polish but if I remember right it says right on the side of the die bottle she sold me to polish it with neutral polish.

|
|
|
|
[#28]
Not bad. Great to see more folk picking up a needle & having a go
...putting it in the oven cracked me up though. Never seen that done before. Good to see you went with the Fiebings Oil Dye, good stuff. A good edge sealer can be made with either PVA glue or Gloy Gum thinned with water. Goes on easy & gets a good shine to it - cheap too N.B. NEVER USE POWER TOOLS FOR LEATHERWORK UNLESS YOU ARE WEARING A FACE MASK - THE DUST IS HIGHLY CARCINOGENIC = A ONE-HIT DEAL; ONE EXPOSURE MAY BE ALL YOU NEED.... Want to make stitch holes? Buy a sewing awl...4 sided-diamond shaped blade. Use it in conjunction with a pricking iron...the rotary markers are not that accurate, unless you have one that costs $200-$300 or so Get the Al Stohlman book on hand-sewing. It's a good book & will get you started. Then you can ignore some of the ideas in it & read up on how to sew with a sewing awl & two needles - English saddlestitch technique. ....holes are made JUST small enough for the needles & thread to pass through. Think of the holes as temporary, the leather will regain its original profile & then close up around the waxed thread. Barbour brand linen thread is good - 3 cord 18 or similar. Wax it first. You may also find that 0.7 or 1mm tiger thread does a better job. It's like small paracord tubing that has been flattened. Happy to send you a few scans from some of the older books I have if you want some tips & more ideas? |
|
|
|
[#29]
Quoted:
N.B. NEVER USE POWER TOOLS FOR LEATHERWORK UNLESS YOU ARE WEARING A FACE MASK - THE DUST IS HIGHLY CARCINOGENIC = A ONE-HIT DEAL; ONE EXPOSURE MAY BE ALL YOU NEED.... Want to make stitch holes? Buy a sewing awl...4 sided-diamond shaped blade. Use it in conjunction with a pricking iron...the rotary markers are not that accurate, unless you have one that costs $200-$300 or so I wish I had known that the other day cause I was sandin the shit out of my edges with a dremel. I used a dremel with the tiny dremel drill bits for my holes, worked pretty good. |
|
|
|
[#30]
Quoted:
Quoted:
N.B. NEVER USE POWER TOOLS FOR LEATHERWORK UNLESS YOU ARE WEARING A FACE MASK - THE DUST IS HIGHLY CARCINOGENIC = A ONE-HIT DEAL; ONE EXPOSURE MAY BE ALL YOU NEED.... Want to make stitch holes? Buy a sewing awl...4 sided-diamond shaped blade. Use it in conjunction with a pricking iron...the rotary markers are not that accurate, unless you have one that costs $200-$300 or so I wish I had known that the other day cause I was sandin the shit out of my edges with a dremel. I used a dremel with the tiny dremel drill bits for my holes, worked pretty good. i have tried the sewing awl, but didnt reallt like it and it was really slow. i actually use the sewing awl needle in my drill to make the holes. there isn't any dust created doing that, it is just easier to "poke the hole" that way rather that just ramming it though. i sand the edges by hand so no real airborn dust there. i will take heed of the caution though. i normally do use a respirator when making dust, easy enough to put on when drilling holes and sanding just to be safe. |
|
|
|
[#31]
Quoted:
Here is the holster I made for my dads PK-380 as it is right now. I probably won't get to finish it till next weekend. It was a damned fun project minus the stitching, that tandy thread sucks a dick. Also I think the leather we used was a little to thin/soft. The girl at the tandy store acted like I was speaking japanese when I said 5 to 6 oz leather. She also said not to polish it with neutral polish but if I remember right it says right on the side of the die bottle she sold me to polish it with neutral polish. http://i47.tinypic.com/vex08j.jpg turning out pretty good! i have use some really thin leather before for small pocket pistols to make iwb holsters. i was going for "as thin as possible" and use 3-4oz leather that you can get from hobby lobby in a small sheet. it would definitely collapse on itself after drawing but is was meant for carrying, no something like idpa were i would need to draw and reholster. i am sure there are as many opinions out there as leather workers on how to finish or how not to finish a holster. the way i posted is kind of a conglomeration of about three different tutorials and many threads i read before diving in myself. It has worked well for me so far and haven't had any complaints from people i made them for. the guy i learned the neutral polish thing from used it because after wetting, molding, drying, dyeing, drying agin, the leather can get "dried out" and could be more brittle. the polish would help condition the leather to take out some of the brittleness. It sounded good so i do it. YMMV. welcome to the addiction. now all your guns will have leather. |
|
|
|
[#32]
re - SANDING
Me again!! OK. I think that in some ways its easy to approach some of the tasks in leatherwork almost as if you were looking at a woodwork project. Most folks ARE used to doing woodwork on some level, so have items to hand to get the job done on that basis - i.e. sandpaper, small power tools, etc. The better way to get the edges to a nice smooth polished finish is by burnishing them. Use a good edge dye; these are normally water based. Fiebings are a good make to opt for. You can choose a colour that is a close match to the leather you are using, or pick one that will give a little detailing contrast (darker than the hide is the best rule here) Apply the edge dye with a wool dauber or small piece of sponge or cotton cloth. Once it has ALMOST dried, you get to the fun part....burnishing. (You CAN apply a second coating if you want the colour to be darker than with just the one application) The moisture from the edge dye soaks into the leather fibres, swelling them. Burnishing them allows them to be compressed under pressure, giving a very slick polished surface. you may ebd up applying so much pressure that the edges take on a flared look...thats easy to remove using side pressure to reshape the leather I use a couple of different sized oak sticks. You can also use a few layers of cotton canvas, folded to make a small pad. If you want pics of the tools or how to do it get back to me. Keep on doing the good work! |
|
|
|
[#33]
Quoted:
re - SANDING Me again!! OK. I think that in some ways its easy to approach some of the tasks in leatherwork almost as if you were looking at a woodwork project. Most folks ARE used to doing woodwork on some level, so have items to hand to get the job done on that basis - i.e. sandpaper, small power tools, etc. The better way to get the edges to a nice smooth polished finish is by burnishing them. Use a good edge dye; these are normally water based. Fiebings are a good make to opt for. You can choose a colour that is a close match to the leather you are using, or pick one that will give a little detailing contrast (darker than the hide is the best rule here) Apply the edge dye with a wool dauber or small piece of sponge or cotton cloth. Once it has ALMOST dried, you get to the fun part....burnishing. (You CAN apply a second coating if you want the colour to be darker than with just the one application) The moisture from the edge dye soaks into the leather fibres, swelling them. Burnishing them allows them to be compressed under pressure, giving a very slick polished surface. you may ebd up applying so much pressure that the edges take on a flared look...thats easy to remove using side pressure to reshape the leather I use a couple of different sized oak sticks. You can also use a few layers of cotton canvas, folded to make a small pad. If you want pics of the tools or how to do it get back to me. Keep on doing the good work! thanks for your input, but i think you are misunderstanding the actual "sanding" that i was doing. i am only running sandpaper along the edge to remove any slight inconsistency left after trimming the edges even with a blade. i don't sand the edges to make them smooth, only to even out any imperfection that is keeping the edge from being a "smooth" line after burnishing. the point is not to create a cloud of dust from removing any large amount of leather. i only run a piece of sandpaper along the edge, 3 or 4 times in one direction to remove any slight high spots. you can see in the pics that i also use a hardwood burnishing tool to "smooth the edge." this thread is just to show how i do it, and what i do to get the result i am after, ymmv. |
|
|
|
[#34]
Quoted:
Quoted:
re - SANDING Me again!! OK. I think that in some ways its easy to approach some of the tasks in leatherwork almost as if you were looking at a woodwork project. Most folks ARE used to doing woodwork on some level, so have items to hand to get the job done on that basis - i.e. sandpaper, small power tools, etc. The better way to get the edges to a nice smooth polished finish is by burnishing them. Use a good edge dye; these are normally water based. Fiebings are a good make to opt for. You can choose a colour that is a close match to the leather you are using, or pick one that will give a little detailing contrast (darker than the hide is the best rule here) Apply the edge dye with a wool dauber or small piece of sponge or cotton cloth. Once it has ALMOST dried, you get to the fun part....burnishing. (You CAN apply a second coating if you want the colour to be darker than with just the one application) The moisture from the edge dye soaks into the leather fibres, swelling them. Burnishing them allows them to be compressed under pressure, giving a very slick polished surface. you may ebd up applying so much pressure that the edges take on a flared look...thats easy to remove using side pressure to reshape the leather I use a couple of different sized oak sticks. You can also use a few layers of cotton canvas, folded to make a small pad. If you want pics of the tools or how to do it get back to me. Keep on doing the good work! thanks for your input, but i think you are misunderstanding the actual "sanding" that i was doing. i am only running sandpaper along the edge to remove any slight inconsistency left after trimming the edges even with a blade. i don't sand the edges to make them smooth, only to even out any imperfection that is keeping the edge from being a "smooth" line after burnishing. the point is not to create a cloud of dust from removing any large amount of leather. i only run a piece of sandpaper along the edge, 3 or 4 times in one direction to remove any slight high spots. you can see in the pics that i also use a hardwood burnishing tool to "smooth the edge." this thread is just to show how i do it, and what i do to get the result i am after, ymmv. That's exactly why I sanded my edges. Once I sanded them so they were even I then burnished them. |
|
|
|
[#35]
Awesome work!!!
One question: Have you ever tried kydex between the leather at the belt loop for the OWB holster? That seems to be a weak spot for most holsters and wondered it kydex would stiffen it more and force it to ride closer to the hip. |
|
|
|
[#36]
Quoted:
Awesome work!!! One question: Have you ever tried kydex between the leather at the belt loop for the OWB holster? That seems to be a weak spot for most holsters and wondered it kydex would stiffen it more and force it to ride closer to the hip. It's common for some saddlery makers to have a layer of nylon webbing between outer layers of leather for some straps (to prevent stretching & increase breaking strain) , so doing the same thing with Kydex would work at strengthening too |
|
|
|
[#37]
No pics yet but I'm working on a tuckable iwb for my XDs using your pattern as a basic outline. The vacuum sealer works much better than a press. I still need to work on stitching and cutting the edges straight but getting better.
|
|
|
|
[#38]
I'm having a problem with the dying. I used a Tandy water-based dye and it left swirl marks. I then tried a Tandy matte professional finish and it seemed to strip some of the dye off. What did I do wrong?
|
|
|
|
[#39]
Quoted:
I'm having a problem with the dying. I used a Tandy water-based dye and it left swirl marks. I then tried a Tandy matte professional finish and it seemed to strip some of the dye off. What did I do wrong? I actually had the same problem kinda. We used the die the OP used but when we pollished the leather it started to come off in some places. Did you get your leather damp before you died it? |
|
|
|
[#40]
Excellent post OP. Very nice work!!!
Glad someone posted about the dust cause I have been using my dremel for smooth things out. Here is an OWB I did for a Sigma. 
|
|
|
|
[#41]
Here's my first attempt at a fully functional, decent looking holster.
Using the basic layout from the OP, I made a tuckable iwb. I need to do a better job with cutting the edges and for some reason the stitch line went crooked. Next time I'll try an oil-based dye to see if I get better results and the professional finish I used leaves a lasting smell that I hope goes away. It carries well, has good retention yet draws very smoothly. 

|
|
|
 Win a FREE Membership!
Sign up for the ARFCOM weekly newsletter and be entered to win a free ARFCOM membership. One new winner* is announced every week!
You will receive an email every Friday morning featuring the latest chatter from the hottest topics, breaking news surrounding legislation, as well as exclusive deals only available to ARFCOM email subscribers.

AR15.COM is the world's largest firearm community and is a gathering place for firearm enthusiasts of all types.
From hunters and military members, to competition shooters and general firearm enthusiasts, we welcome anyone who values and respects the way of the firearm.

Subscribe to our monthly Newsletter to receive firearm news, product discounts from your favorite Industry Partners, and more.
Copyright © 1996-2024 AR15.COM LLC. All Rights Reserved.
Any use of this content without express written consent is prohibited.
AR15.Com reserves the right to overwrite or replace any affiliate, commercial, or monetizable links, posted by users, with our own.


