|
[#1]
What brand 20 round mags, and did you pull the mags apart to CLP clean them before they where used?
|
|
|
|
[#2]
Quoted:
What brand 20 round mags, and did you pull the mags apart to CLP clean them before they where used? Colt 20's, an adventure line 20, and Pmag straight 20's. I have not clp cleaned the mags. I removed the bolt catches and cleaned them, I will also clp clean the mags and report back. |
|
|
|
[#3]
So I removed the bolt catches and cleaned, then CLP cleaned the mags. Still have the same issue. Both rifles work with 30's but not the 20's. Thinking about just selling off my 20rd'ers and just sticking with 30's. I've never heard of any thing like this, very confusing.
|
|
|
|
[#4]
Short of just a worn out mag spring that is causing the problem,
Let break it down, 1. make sure that the threaded end of the mag catch button is flush with the face of the mag release catch. If it not, then push the mag release button all the way in with a pencil eraser, and spin the catch on the other side of the receiver the needed amounts so end of the threaded section is flush with the face of the button. If you find that you end up either a half thread in, or half thread out of the tip of the threaded section flush with the face of the mag release button, then spin the catch all the way out, turn the mag release button 180*, then reinstall the mag release. 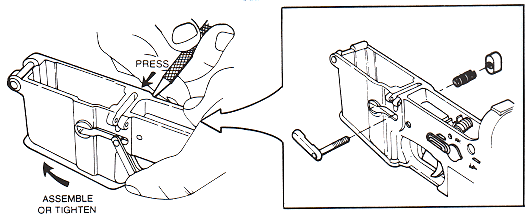
2. with the upper shotgunned open, work the bolt catch to make sure it not bind in the slot for it in the upper receiver. If you feel that the bolt catch is binding, then add some CLP and work the catch by hand until the bolt catch loosen up. 3. Since you now know how to remove the mag catch, do so, and with the mag bodies only, one by one insert the mag into the well tight up against the bottom of the carrier against a locked home bolt, and take a look at the catch slot in the mag, and how it compares to the bottom of the mag catch slot in the lower receiver. The bottom edge in the mags catch slot, should be just a slight bit higher than the bottom of the bottom ledge in the receiver slot, and not way up higher instead (read too much of a gap from the top of mag lips, to bottom of the carrier when they are locked in place. 
Now since we already have the mag stripped down to the bodies, lets check the mags out. Starting with the mag spring installed on the follower, the long loop on the top of the spring should be forward, towards the forward of the follower. With the spring correctly installed on the follower, and the parts all CLP cleaned, put a mag back together. Now add only two rounds to the mag, shove the front of top round down, let the two rounds snap back up, then shove the top round via the back rim side down into the mag, and let the two rounds snap back up. In either side push down test with the rounds free to snap back up in the mag, the top round should have popped back up, with the entire lenght of the top round tight against the bottom of the feed lip. Now add in a third round and do the test again, and pay close attention to which side you are pushing down on, is not allow the 2 or three rounds to snap back up with the top round tight against the entire bottom surface of the mag lip. 
Tweaking mag spring to get the top round in the stack to come up tight against the entire feed lip on recovery. On the spring coil loop just off the front of the follower, we are going to bend that loop either wire farther apart, or closer together, to equal out the spring pressure against the follower, so the spring is putting even pressure against the follower to remove the top round evenly to the bottom of the feed lip. If its the front of the follower that needs more spring tension, the first coil will need too be bent more apart, and if it the back of the follower that needs more pressure, then that first coil wind that drops off the follower bottom will be bend closer together instead. So with the spring off the follower, grab both sides of the wire right after the coil bend, and bend/tweak that first coil drop loop in the needed direction. Once you have the mags recovering correctly, now install the empty mag in the rifle, pull all the way back on the charging handle, and confirm that the mag catch is rising up in front of the bolt face, to stop the bolt via the face of the bolt (not just catching the bottom of the carrier instead. If the bolt will not retract that far back, or during the last inch of charging handle pull, the tension to pull the charging handle back increases, then you have a problem with something now right in the rifle instead. It could be the wrong spring in play that is coil binding up, too long of a butt stock screw (a2 screw being used with an A1 stock), or the receiver extension not milled deep enough for the buffer, or wrong lenght buffer in play. Also during live fires, make sure that when the bolt catch is catching the bolt on the bolt face, and not just on the bottom of the carrier with the 30 round mags. If the bolt face is coming back far enough for the catch to rise up, but the 20 round mags will still good springs is not lifting the non-binding in slot catch up, then chances are when you install the bolt catch, you did not clean out the debris in the mag catch spring channel/it was not drilled deep enough, and the bolt catch return spring it creating too much tension for the mag follower to over come. 
Note, you install the spring into the channel, then the buffer on top, then the catch against two. Do not install the spring buffer towards the receiver, under the spring. If the bolt catch spring channels is clean of any debries, but was milled too shallow, https://www.ar15.com/forums/t_3_66/648701_-ARCHIVED-THREAD----AR-15-Bolt-Catch-Plunger-is-stuck.html&page=1 |
|
|
|
[#5]
Quoted:
Short of just a worn out mag spring that is causing the problem, Let break it down, 1. make sure that the threaded end of the mag catch button is flush with the face of the mag release catch. If it not, then push the mag release button all the way in with a pencil eraser, and spin the catch on the other side of the receiver the needed amounts so end of the threaded section is flush with the face of the button. If you find that you end up either a half thread in, or half thread out of the tip of the threaded section flush with the face of the mag release button, then spin the catch all the way out, turn the mag release button 180*, then reinstall the mag release. http://i78.photobucket.com/albums/j87/rsidner/AR%20assembly/magazineCatch.gif The threaded end of mag catch buttons are flush with face of mag release. 2. with the upper shotgunned open, work the bolt catch to make sure it not bind in the slot for it in the upper receiver. If you feel that the bolt catch is binding, then add some CLP and work the catch by hand until the bolt catch loosen up. Bolt catches were cleaned and made sure they don't bind before last outing. 3. Since you now know how to remove the mag catch, do so, and with the mag bodies only, one by one insert the mag into the well tight up against the bottom of the carrier against a locked home bolt, and take a look at the catch slot in the mag, and how it compares to the bottom of the mag catch slot in the lower receiver. The bottom edge in the mags catch slot, should be just a slight bit higher than the bottom of the bottom ledge in the receiver slot, and not way up higher instead (read too much of a gap from the top of mag lips, to bottom of the carrier when they are locked in place. http://i57.tinypic.com/316n21f.jpg Mags (20's and 30's) check out good when doing this test. Now since we already have the mag stripped down to the bodies, lets check the mags out. Starting with the mag spring installed on the follower, the long loop on the top of the spring should be forward, towards the forward of the follower. With the spring correctly installed on the follower, and the parts all CLP cleaned, put a mag back together. Now add only two rounds to the mag, shove the front of top round down, let the two rounds snap back up, then shove the top round via the back rim side down into the mag, and let the two rounds snap back up. In either side push down test with the rounds free to snap back up in the mag, the top round should have popped back up, with the entire lenght of the top round tight against the bottom of the feed lip. Now add in a third round and do the test again, and pay close attention to which side you are pushing down on, is not allow the 2 or three rounds to snap back up with the top round tight against the entire bottom surface of the mag lip. On the 20's, the top round snaps back up when pushing the front top of round, when pushing the back rim down the round snaps back up, but is not fully seated against the feed lips. http://rifleshooter.com/wp-content/uploads/2012/10/4m.jpeg Tweaking mag spring to get the top round in the stack to come up tight against the entire feed lip on recovery. On the spring coil loop just off the front of the follower, we are going to bend that loop either wire farther apart, or closer together, to equal out the spring pressure against the follower, so the spring is putting even pressure against the follower to remove the top round evenly to the bottom of the feed lip. If its the front of the follower that needs more spring tension, the first coil will need too be bent more apart, and if it the back of the follower that needs more pressure, then that first coil wind that drops off the follower bottom will be bend closer together instead. So with the spring off the follower, grab both sides of the wire right after the coil bend, and bend/tweak that first coil drop loop in the needed direction. I've tweaked the 20 rd mags but with the 2&3 round test when pushing the back rim down and rounds snapping back up, there is still a small gap between feed lip and back rim of round (maybe a millimeter). Once you have the mags recovering correctly, now install the empty mag in the rifle, pull all the way back on the charging handle, and confirm that the mag catch is rising up in front of the bolt face, to stop the bolt via the face of the bolt (not just catching the bottom of the carrier instead. If the bolt will not retract that far back, or during the last inch of charging handle pull, the tension to pull the charging handle back increases, then you have a problem with something now right in the rifle instead. It could be the wrong spring in play that is coil binding up, too long of a butt stock screw (a2 screw being used with an A1 stock), or the receiver extension not milled deep enough for the buffer, or wrong lenght buffer in play. Also during live fires, make sure that when the bolt catch is catching the bolt on the bolt face, and not just on the bottom of the carrier with the 30 round mags. Bolt catch engages face of bolt while manually charging, tension to pull charging handle doesn't increase. If the bolt face is coming back far enough for the catch to rise up, but the 20 round mags will still good springs is not lifting the non-binding in slot catch up, then chances are when you install the bolt catch, you did not clean out the debris in the mag catch spring channel/it was not drilled deep enough, and the bolt catch return spring it creating too much tension for the mag follower to over come. Bolt comes back far enough and isn't binding. Mag catches were taken apart and cleaned as well as the channel they ride in. http://www.ar15armory.com/Guides/boltCatch.gif Note, you install the spring into the channel, then the buffer on top, then the catch against two. Do not install the spring buffer towards the receiver, under the spring. Mag catches are installed correctly. If the bolt catch spring channels is clean of any debries, but was milled too shallow, https://www.ar15.com/forums/t_3_66/648701_-ARCHIVED-THREAD----AR-15-Bolt-Catch-Plunger-is-stuck.html&page=1 |
|
|
 Win a FREE Membership!
Sign up for the ARFCOM weekly newsletter and be entered to win a free ARFCOM membership. One new winner* is announced every week!
You will receive an email every Friday morning featuring the latest chatter from the hottest topics, breaking news surrounding legislation, as well as exclusive deals only available to ARFCOM email subscribers.

AR15.COM is the world's largest firearm community and is a gathering place for firearm enthusiasts of all types.
From hunters and military members, to competition shooters and general firearm enthusiasts, we welcome anyone who values and respects the way of the firearm.

Subscribe to our monthly Newsletter to receive firearm news, product discounts from your favorite Industry Partners, and more.
Copyright © 1996-2024 AR15.COM LLC. All Rights Reserved.
Any use of this content without express written consent is prohibited.
AR15.Com reserves the right to overwrite or replace any affiliate, commercial, or monetizable links, posted by users, with our own.


