|
Posted: 8/8/2011 12:16:02 PM EDT
I've seen many times where someone will send their rifle off to be tweaked and have "trigger work" done but I don't really know what it means when I read that.
What does that entail? Are there modifications or changes someone who is mechanically inclined can make to their trigger group? I'm not talking full-auto mods. I can't afford the ammo or the legal bills associated with that. Is it possible to change spring tension or polish your trigger group parts on your own? |
|
|
|
AL, USA
|
[#1]
I have read about people replacing their trigger with a rock river arms 2 stage trigger to get a better feel. the words "match grade" are then thrown around. you can buy the rra 2 stage trigger parts kit from their website. I don't know if that would compare or how it would compare to whatever these people you would send it to would do. I'd rather do it myself and not send off the gun, personally.
|
|
|
|
[#2]
I sent Bill Springfield a few hammer and trigger sets (keep them paired, with springs) and got back some nice stuff for a few builds I did.
I haven't used him for a bit, but I'm still happy with the work. http://www.triggerwork.net/ar15s.html |
|
|
|
|
[#3]
Originally Posted By jtap:
I have read about people replacing their trigger with a rock river arms 2 stage trigger to get a better feel. the words "match grade" are then thrown around. you can buy the rra 2 stage trigger parts kit from their website. I don't know if that would compare or how it would compare to whatever these people you would send it to would do. I'd rather do it myself and not send off the gun, personally. I'm the "do it yourself" type, but I'm not sure what to "do" to a trigger to make it smoother. The only thing I can thing of to do is polish the individual parts. I'm really not even sure where I'd start. Maybe I should just buy a few cheap triggers and tinker with them till I screw them up. |
|
|
|
AL, USA
|
[#4]
I like what kaos is saying if you just have to send off parts of the trigger but like you are saying, if you aren't replacing any parts it would seem like it should be some simple modifications (like polishing, as you are saying). I don't know how complex it really is. I am curious though.
|
|
|
AL, USA
|
[#5]
You can do it yourself and end up with a much improved trigger for under $20.
Set screw in the grip screw hole to take out some of the trigger pretravel, bob the hammer, set of JP springs, and lightly polish the sear surface. There are a few write ups out there, and I know there's been at least 2 threads on the subject in the last week. |
|
|
GA, USA
|
[#6]
this helped mine out alot
http://www.youtube.com/watch?v=sJegVLr1rEU&feature=related http://www.youtube.com/watch?v=BVhJNEX6alQ |
|
|
|
[#7]
|
|
|
|
|
[#8]
Thanks guys!
|
|
|
|
CT, USA
|
[#9]
Originally Posted By kaos:
I sent Bill Springfield a few hammer and trigger sets (keep them paired, with springs) and got back some nice stuff for a few builds I did. I haven't used him for a bit, but I'm still happy with the work. http://www.triggerwork.net/ar15s.html The only way to go!!!!!!!!!!!!!!!!! |
|
|
|
[#10]
Normally I just polish and debur everything in the FCG and the polish is just for smooth operation... They wear in anyways but since I have had some disconnectors not work right I do this before I install them into the lower...Unless its a match rifle it not really needed more than just wanted...
|
|
|
|
AL, USA
|
[#11]
Since arf keeps archiving threads and the search sucks, I'll throw up some pics again..
1. Tap the grip screw hole all the way through. 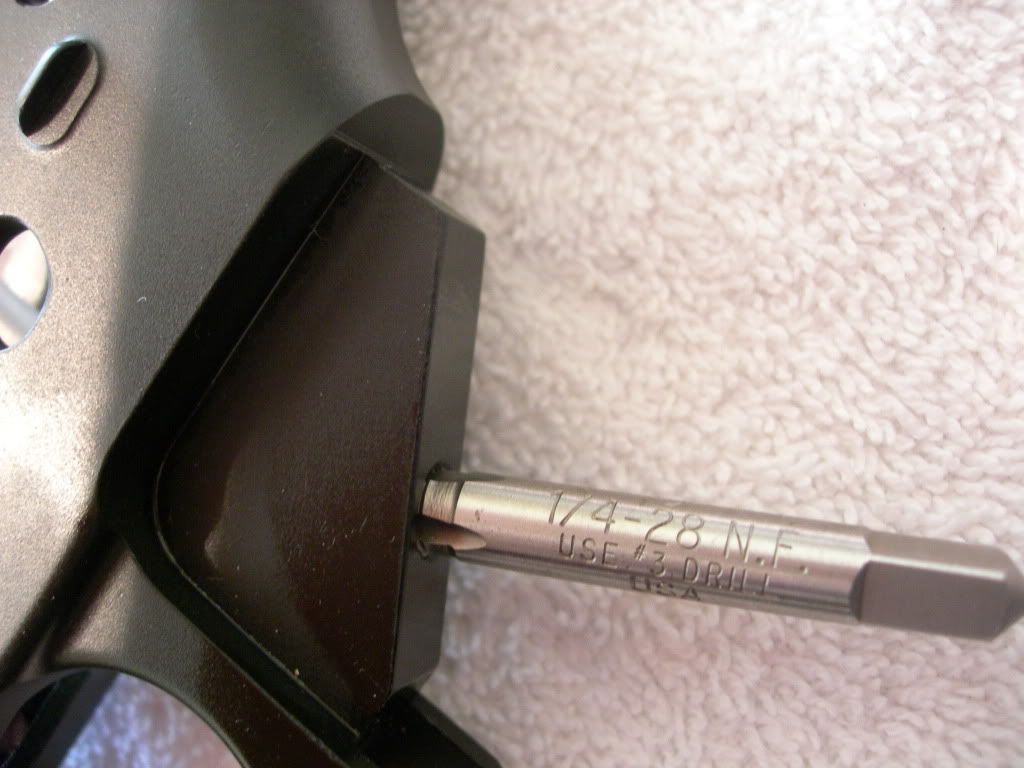
2. Take your run of the mill LPK hammer and cut the crap out of it to lighten it up. Touch it up with a spray of paint when you're done. An object at rest stays at rest until acted upon. A heavy hammer takes more force to accelerate than a light hammer. Since I use light springs, the light hammer allows them to accelerate it to full travle speed alleviating light strikes. 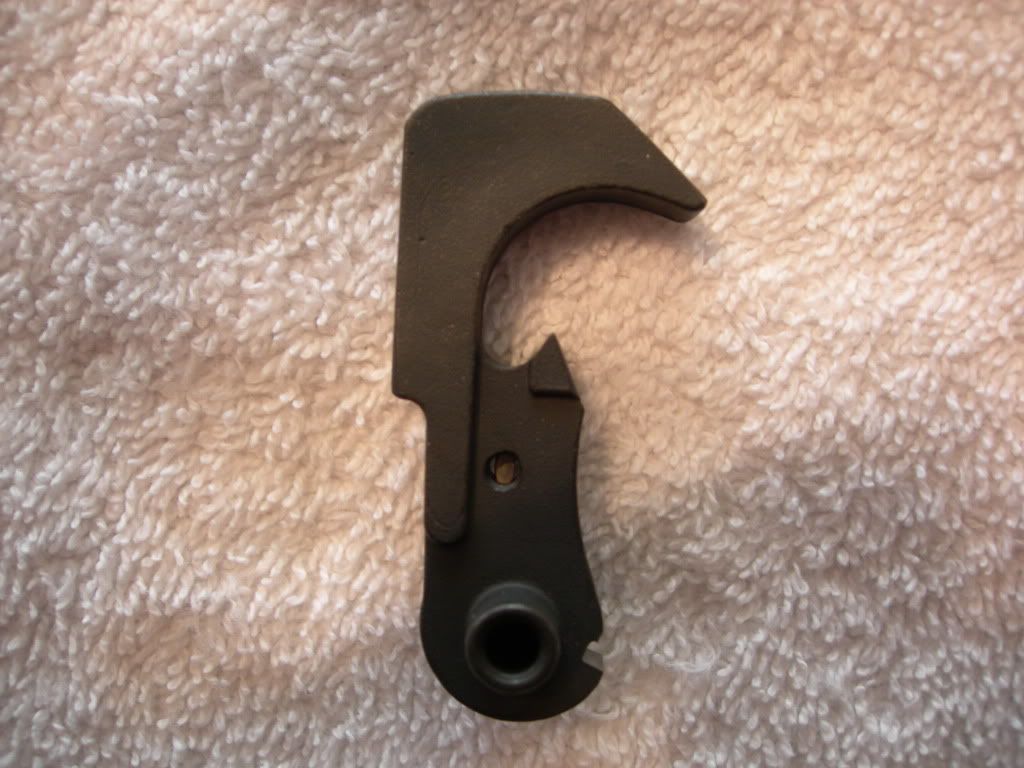
3. Add in some light weight springs, they are cheap and work great. 
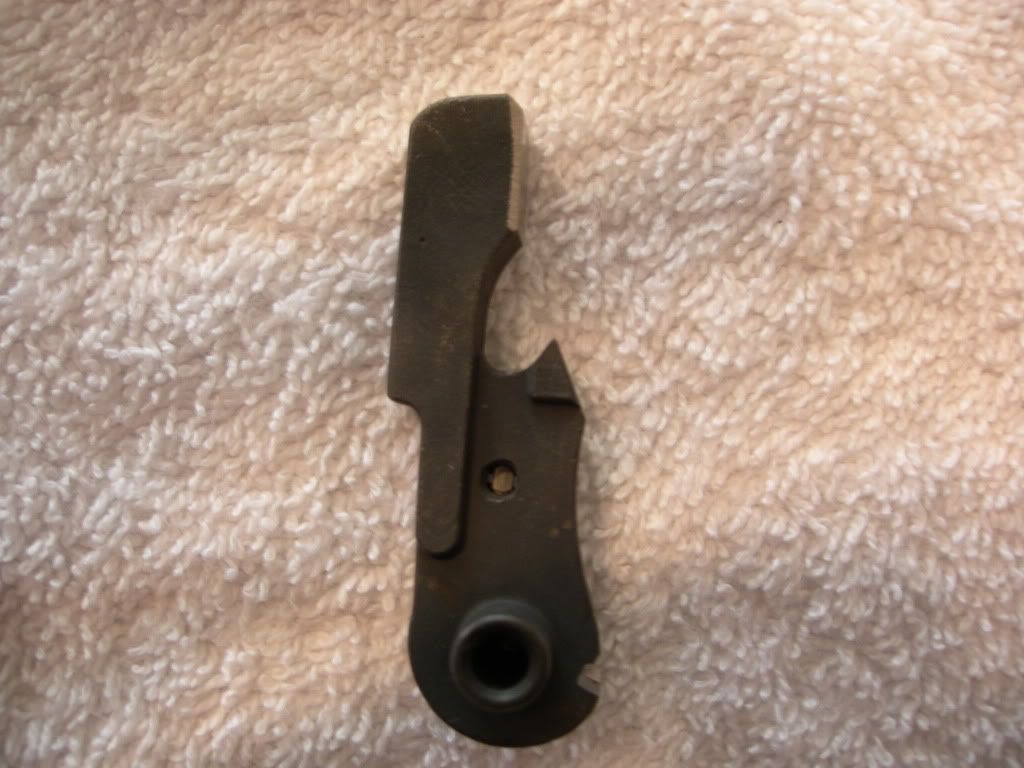
4. Clean up the machining marks on the sear surface. These are what gives you that gravel road trigger pull. Before. 
After. 
My tool of choice is a small ceramic knife sharpening stone. Very fine cut and a nice flat surface. You don't need to take much off, and be careful to keep the sear flat on the stone, you don't want to change any angles. 
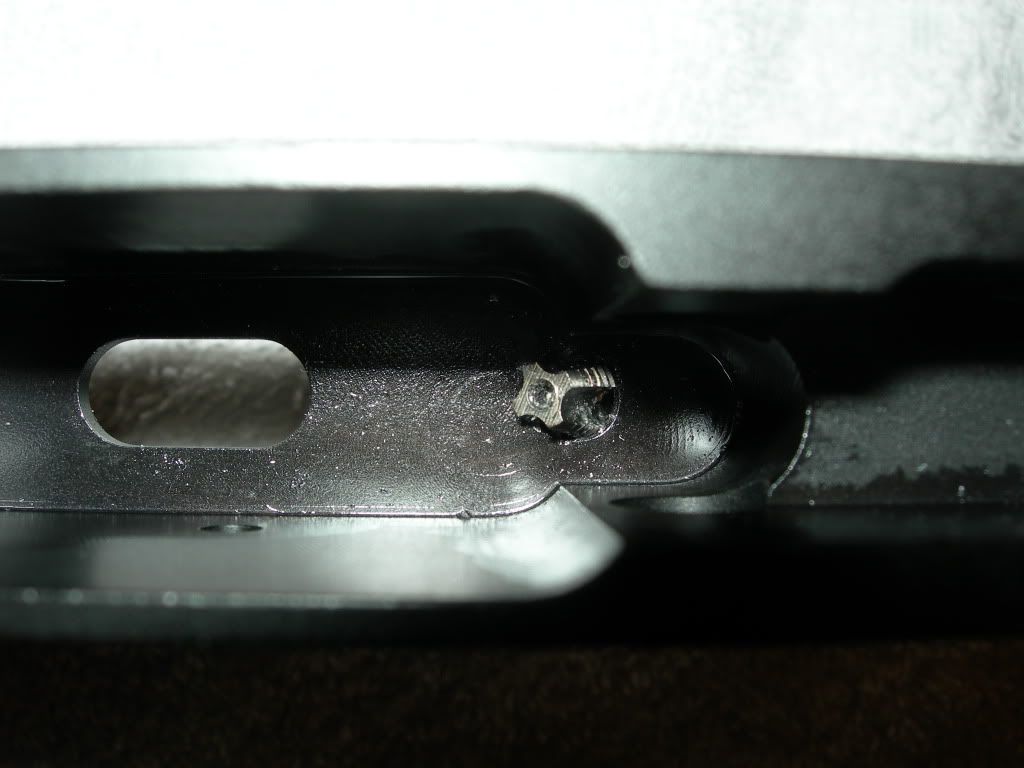
5. Put it all together. FIrst you'll need a set screw and some blue locktite. 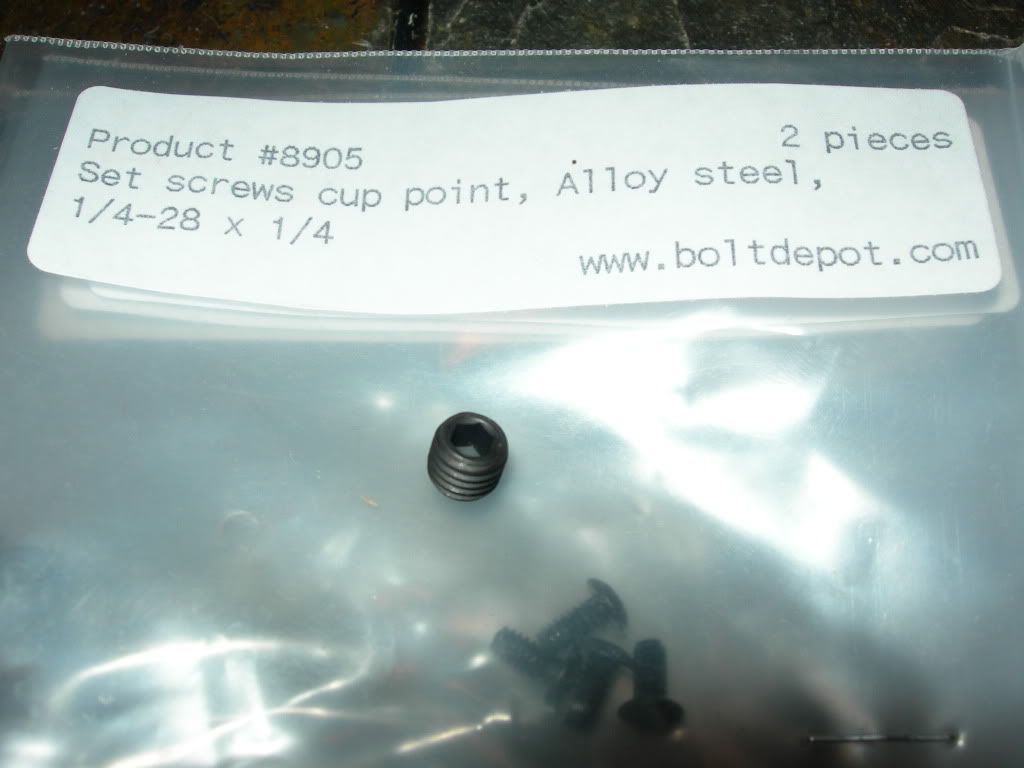
Run that puppy up the grip screw hole untill it contacts the bottom of the trigger. 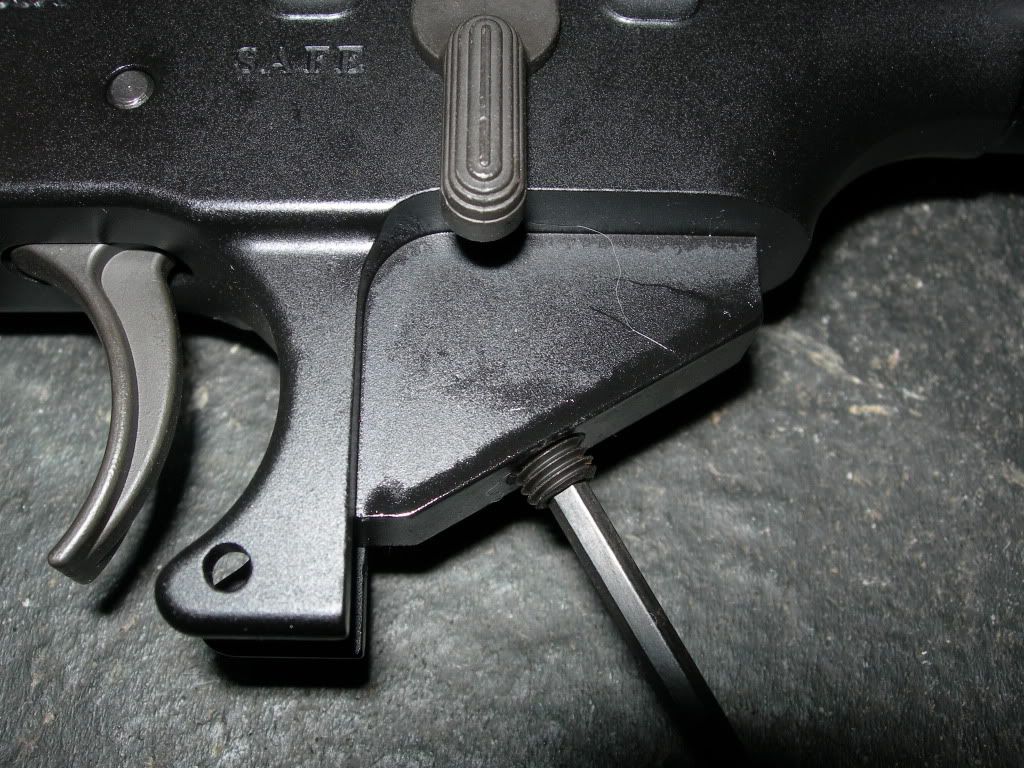
Hold the trigger to the rear and cock the hammer so that it is caught by the disconnector. 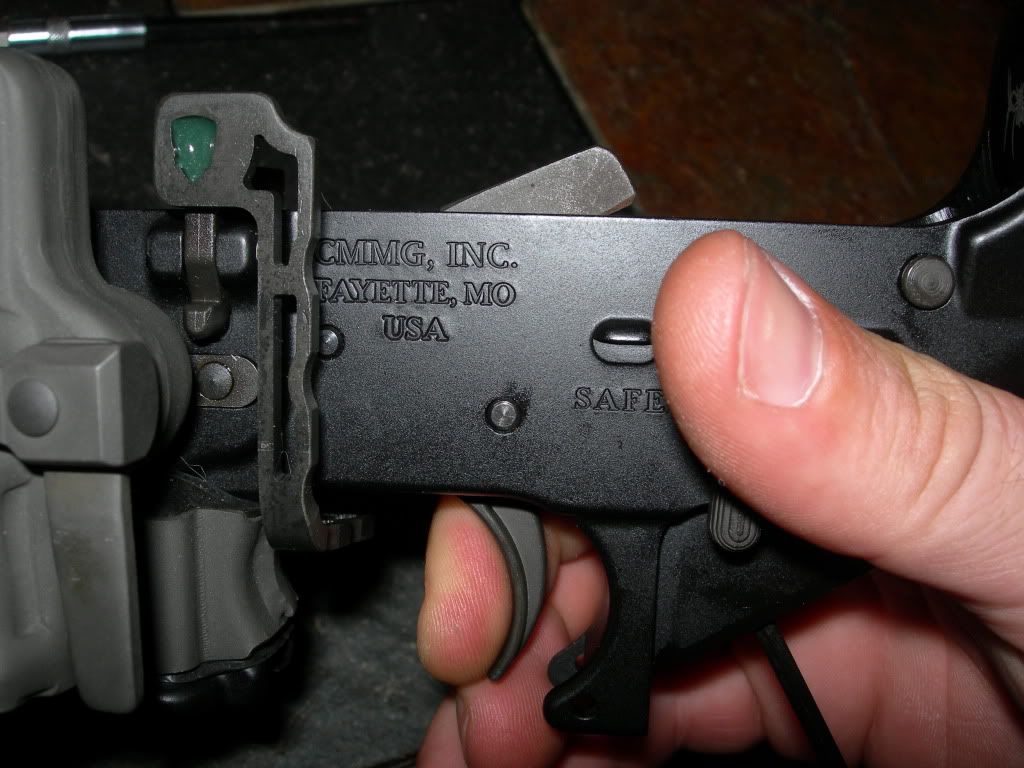
Then let go of the trigger and back out the set screw until the hammer falls from the disconnector to the sear. 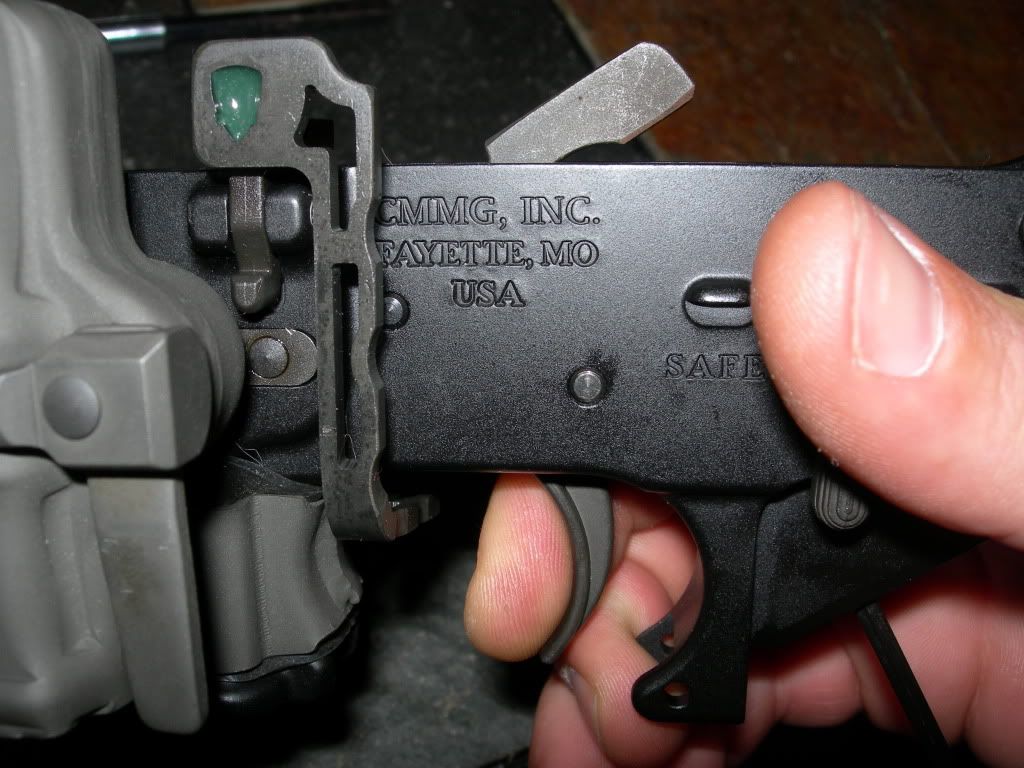
Function check and adjust as necessary. You may have interference issues with the safety, if so then use a round file to make a groove in the back upper surface of the trigger so the safety clears. Once everything is good, set it aside and let the locktite set up. 6. Go to the range and see just how good the trigger feels now, you'll be amazed. |
|
|
|
[#12]
That looks great but it leaves me with a question....What does the setscrew do for the function of the action?
|
|
|
|
AL, USA
|
[#13]
Originally Posted By esa17:
That looks great but it leaves me with a question....What does the setscrew do for the function of the action? It takes up the pretravel so you have a shorter trigger pull. Pull the upper off your rifle, cock the hammer (don't let the hammer drop on the mag catch, catch it with your thumb) and pull the trigger. Notice how far you pull the trigger before the hammer drops. |
|
|
|
[#14]
Originally Posted By kwrangln:
Originally Posted By esa17:
That looks great but it leaves me with a question....What does the setscrew do for the function of the action? It takes up the pretravel so you have a shorter trigger pull. Pull the upper off your rifle, cock the hammer (don't let the hammer drop on the mag catch, catch it with your thumb) and pull the trigger. Notice how far you pull the trigger before the hammer drops. So essentially it's a permanent mod that makes the trigger function as if it's always in the 2nd stage of a 2 stage trigger? The rifle I'm planning on doing this to is my hunting rig in 6.8. Would your mods be a terrible idea? |
|
|
|
AL, USA
|
[#15]
Originally Posted By esa17:
Originally Posted By kwrangln:
Originally Posted By esa17:
That looks great but it leaves me with a question....What does the setscrew do for the function of the action? It takes up the pretravel so you have a shorter trigger pull. Pull the upper off your rifle, cock the hammer (don't let the hammer drop on the mag catch, catch it with your thumb) and pull the trigger. Notice how far you pull the trigger before the hammer drops. So essentially it's a permanent mod that makes the trigger function as if it's always in the 2nd stage of a 2 stage trigger? The rifle I'm planning on doing this to is my hunting rig in 6.8. Would your mods be a terrible idea? It's not permanent, you can always remove the set screw and repalce the lpk for $50 or so. Only done this on stock parts, so no idea if you have a 2 stage. Worth it? Hell yea. If you don't like it you can go back to stock or buy an aftermarket trigger. It's a low cost high reward project. Since you aren't touching the disconnector or changing angles on anything there is no concern about making it double fire or anything. Give it a shot. Just remember it's better to go too light on the polishing and have to redo it than to get heavy handed and really screw the pooch. |
|
|
|
[#16]
I'm buying a new hammer and spring set today, along with some anti-roll pins I think.
I've never tapped a lower before, what kind of lube do you use? Any other tips for tapping the lower? |
|
|
|
AL, USA
|
[Last Edit: kwrangln]
[#17]
just use a 1/4 x 28 NF tap, and use whatever oil you have laying around. You are only cutting a couple threads towards the inside of the reciever. Just spin the tap into the grip screw threads being careful not to cross thread em and continue until the tap bottoms out and you can see it on the inside of the reciever. Good to go, nothing to it.
edit: no real need for the anti roll pins, the stock ones work just fine. |
|
|
|
[#18]
Originally Posted By esa17:
Originally Posted By kwrangln:
Originally Posted By esa17:
That looks great but it leaves me with a question....What does the setscrew do for the function of the action? It takes up the pretravel so you have a shorter trigger pull. Pull the upper off your rifle, cock the hammer (don't let the hammer drop on the mag catch, catch it with your thumb) and pull the trigger. Notice how far you pull the trigger before the hammer drops. So essentially it's a permanent mod that makes the trigger function as if it's always in the 2nd stage of a 2 stage trigger? The rifle I'm planning on doing this to is my hunting rig in 6.8. Would your mods be a terrible idea? The stock trigger is a single stage trigger. It is still acting like a single stage trigger just without the "after" pull. On the JP (company that makes the springs) Match Single Stage Trigger, there are screws that you adjust to eliminate the "take-up" or pre-travel as well as the post-travel which he is doing with the set screw through the hand grip hole. Plus their parts are not cast surface-hardened parts. They are precision machined parts and properly hardened to last year and years of service life. I have one that is now going on it's 16th birthday, still crisp at 2.75 pounds. I also once had a stock part sear off in a match due to improper gunsmith heat treatment on his refinement. 
Bill |
|
|
|
IA, USA
|
[#19]
This topic should be a sticky.. Every week someone asks "can I improve the stock trigger group" or "will I be happy with the stock trigger" and the search option is not the greatest––-I have better luck searching the archives via google. Any votes for a sticky???
|
|
|
|
[#20]
The trigger is polished and the springs adjusted! It's great so far!
Once I find the set-screws I'll tap the lower. Hopefully I can find them locally because I don't want to pay $13 shipping on $.35 worth of hardware. |
|
|
|
TX, USA
|
[Last Edit: c3jy]
[#21]
I just finished this. The only difference was my Spikes lower was already drilled and tapped all the way through. It makes a HUGE difference. Next on the list I’m gonna install the JP yellow reduced power spring kit and thought I’d also go with their speed hammer.
Originally Posted By esa17:
The trigger is polished and the springs adjusted! It's great so far! Once I find the set-screws I'll tap the lower. Hopefully I can find them locally because I don't want to pay $13 shipping on $.35 worth of hardware. I found my set screw at the local commercialized hardware store. 69 cents for 2. I also got a 1/4" thick heavy nylon washer and shaved 2 sides to fit into the grip. My factory bolt was a little long and couldn't find a 3/4" 1/4 x28. So far, no problems and everything functions perfect. Wanted to add: I was able to reduce my trigger pull to 1/8” with everything functioning as designed. Even performed the “drop” test from 6” onto the padded floor. Sorry but I’m not dropping it in the driveway. |
|
|
|
[#22]
I finished the project today. My trigger and hammer are polished but I wasn't brave enough to shave the hammer. I found everything I needed at Lowes and spent last night tapping the lower, it went perfectly.
This afternoon following work I finished the trigger work. While I'm not sure exactly how much travel I took up it is a noticeable difference. I'm amazed at how noticeable the difference is between a stock trigger and the modified trigger. Even my wife was able to tell the difference and she hates my BRD. Thanks for the help and advice gents! |
|
|
|
AL, USA
|
[#23]
You may get away with not cutting the hammer, but if you get light strikes, it's the cure with the lighter springs.
Congrats on taking the step to do it yourself. |
|
|
|
[#24]
Tomorrow is the range test so we'll find out. I can't wait.
|
|
|
|
IA, USA
|
[#25]
Still think this mod to the stock trigger group should be a sticky.. Anyway would this set up work in the DPMS 308 platform? Any reason why the JP springs would not work in that style lower?
|
|
|
|
[#26]
Originally Posted By cohrs:
Still think this mod to the stock trigger group should be a sticky.. Anyway would this set up work in the DPMS 308 platform? Any reason why the JP springs would not work in that style lower? A triggermod sticky is a good idea but I don't think my thread is worthy. I bent the legs of my hammer spring as mentioned in one of the links and it worked great! You can probably do the same in your 308. The only thing that might not work is the set screw, but it might. I installed a MOE grip on my 308 so the screws are the same size and thread pitch. Polishing the trigger group seems like a great idea for the entire AR platform. |
|
|
|
IA, USA
|
[#27]
kwrangln took some very nice pictures in my opinion and there are links to a few other threads.. This topic has surfaced numerous times in the short time I've been reading here and one can only imagine what is in the archives..
|
|
|
AL, USA
|
[#28]
Originally Posted By cohrs:
kwrangln took some very nice pictures in my opinion and there are links to a few other threads.. This topic has surfaced numerous times in the short time I've been reading here and one can only imagine what is in the archives.. Send a message to one of the mods stating what you want, worth a shot. |
|
|
|
[Last Edit: esa17]
[#29]
I took my rifle to the range this morning and I am shocked! The difference is phenomenal between the old trigger and the "new" setup. It feels so crisp and so light that it surprised me on my first few groups, I still am not used to it.
My three shot groups all shared the same pattern. The first shot was always pulled because the break surprised me, but the second and third shots were about half an inch higher and to the right almost in the same hole. Once I had my new scope mount dialed in this was the result: 
100m, 6.8SPC 110gr nosler custom load. Now I get to do it all over again on my 5.56! |
|
|
|
IA, USA
|
[#30]
Originally Posted By esa17:
I took my rifle to the range this morning and I am shocked! The difference is phenomenal between the old trigger and the "new" setup. It feels so crisp and so light that it surprised me on my first few groups, I still am not used to it. My three shot groups all shared the same pattern. The first shot was always pulled because the break surprised me, but the second and third shots were about half an inch higher and to the right almost in the same hole. Once I had my new scope mount dialed in this was the result: http://jfc17.smugmug.com/photos/i-3mtCNNw/0/M/i-3mtCNNw-M.jpg 100m, 6.8SPC 110gr nosler custom load. Now I get to do it all over again on my 5.56! I thought the difference was pretty amazing especially for the low cost of the springs and the little amount of time you spend doing it. Thinking I'm going to compare this to the RRA 2 stage system––I mean I have another lower laying and handguard laying around and have been thinking about a lightweight 14.5 build anyway–– .. I did contact a the moderator a few days ago and he said he would keep his eye on it.
|
|
|
FL, USA
|
[#31]
Originally Posted By cohrs:
Still think this mod to the stock trigger group should be a sticky.. Anyway would this set up work in the DPMS 308 platform? Any reason why the JP springs would not work in that style lower? I've done it to a DPMS style .308, works great. +1 for making this one a sticky, it's got it all, pictures, links to past threads, and it addresses aquestion asked weekly. In before the naysayers! |
|
|
|
[#32]
It worked so well I'm in the process of doing it on my other rifle too.
It's too bad that I will have to go take it to the range for a test now too. |
|
|
|
FL, USA
|
[Last Edit: wmaldridge]
[#33]
I have now done this to my stock trigger, but my question is: What if I bought a Geissele SSA or Rock River 2 Stage match trigger and used the same set screw to take most of the take up out of the first stage of the trigger? Would it work just as well and just not have the slack of the first stage? I love what it has done to the stock trigger and i am so glad that this has been posted and added as a sticky.
|
|
|
IN, USA
|
[#34]
I did this exact mod last night. Chopped the trigger, polished the face, installed the set screw, and added a set of JP springs. AMAZING difference! No gritty trigger travel, just a squeeze and crisp clean break. OUTSTANDING!
|
|
|
|
[#35]
I tried Bill Springfield's trigger kits, nothing but disappointment. Nice crisp clean break at an even 3.5 lbs BUT it doubled up on me. I sent it back, he sent me another one...same frickin thing! So to correct it, he sent me a a trigger group of his own, guess what, same shit!
Disgusted, I installed the original trigger group and have been sticking with that. |
|
|
|
AL, USA
|
[#36]
Originally Posted By a79flhrider:
I tried Bill Springfield's trigger kits, nothing but disappointment. Nice crisp clean break at an even 3.5 lbs BUT it doubled up on me. I sent it back, he sent me another one...same frickin thing! So to correct it, he sent me a a trigger group of his own, guess what, same shit! Disgusted, I installed the original trigger group and have been sticking with that. Bill Springfield has nothing to do with this thread. From what I understand, he gets into changing geometry of the trigger/sear interface, and tunes the diconnecter. I purposely did not change any geometry, and did not touch the disconnecter for precisely the reason you posted, I don't want the trigger to double. Since you have a stock FCG back in your rifle, give it a shot, I'll bet you are suprised by how nice you can make it. |
|
|
AZ, USA
|
[Last Edit: elkoholic]
[#37]
Originally Posted By a79flhrider:
I tried Bill Springfield's trigger kits, nothing but disappointment. Nice crisp clean break at an even 3.5 lbs BUT it doubled up on me. I sent it back, he sent me another one...same frickin thing! So to correct it, he sent me a a trigger group of his own, guess what, same shit! Disgusted, I installed the original trigger group and have been sticking with that. +1 Get a Timney. No testing, or buying new hammers. Love the trigger. |
|
|
|
[#38]
Originally Posted By elkoholic:
Originally Posted By a79flhrider:
I tried Bill Springfield's trigger kits, nothing but disappointment. Nice crisp clean break at an even 3.5 lbs BUT it doubled up on me. I sent it back, he sent me another one...same frickin thing! So to correct it, he sent me a a trigger group of his own, guess what, same shit! Disgusted, I installed the original trigger group and have been sticking with that. +1 Get a Timney. No testing, or buying new hammers. Love the trigger. How much do they cost? If it's more than the $14 I spent I'm not interested. |
|
|
|
AZ, USA
|
[#39]
Good luck...hope it works.
Oops, hope it doesn't ..... double-burst! 
|
|
|
|
[#40]
Originally Posted By elkoholic:
Good luck...hope it works. Oops, hope it doesn't ..... double-burst! In 500 rounds over the last two weeks there hasn't been a single hiccup. Every single person who has shot my rifles has said the same thing: "WOW!" |
|
|
|
MO, USA
|
[#41]
AGP makes a lower with the set screw already installed.
I assembled a Stag LPK in mine and tried it "as issued." I didn't really seem as good as the rack guns I used in the Reserves, H&R, Colts, or FN's. But once that screw was adjusted, it had travel like my Remington 700, and nearly the same feel. I didn't stone, bend, or install light springs either, pull remained issue weight. I won't put target weight springs in a field gun. The screw removed 85% of the travel, and that removed 85% of the creep and grit - it doesn't reset back behind all that. If nothing else is done, the travel setscrew - which many many hunting rifles use - will deliver MOST of the improvement we see in $250 triggers. Full function testing after done is required - fortunately most AR's lock up the safety before it gets too far, and you know it. What won't radically change is group size, none of the trigger makers can even document the slight reduction in improvement, simply because the affect is less than the natural MOA of the gun. What few targets I've seen posted with any measurable result were on 1/2MOA precision guns - it takes that much barrel and ammo to make the trigger the bad boy. However, it doesn't take much in travel to alter our perception of the trigger, and a set screw has the least potential for doing something wrong. There are quite a few posts about both modified and purchased target triggers going bad in a few thousand rounds. For the shooter on a limited budget, it's a risk that needs a lot more research AND return on the dollar before I spend it. |
|
|
AZ, USA
|
[#42]
Just did this (the set screw, not the springs and hammer reduction) to my Stag. didnt seem to change much, but then again, I havent taken it to the range to test it live fire.
|
|
|
|
[#43]
How much did you tighten down the set screw?
I ran it up until my safety wouldn't function and then I backed it off and filed the trigger down just enough to gain clearance. Once it was function tested and the safety selector operated properly I noticed a huge difference in pre-travel of the trigger. |
|
|
|
AZ, USA
|
[#44]
Originally Posted By esa17:
How much did you tighten down the set screw? I ran it up until my safety wouldn't function and then I backed it off and filed the trigger down just enough to gain clearance. Once it was function tested and the safety selector operated properly I noticed a huge difference in pre-travel of the trigger. I locked the safety, then backed off until it was freed up. I didnt take the time to file down anything for fit, but there's almost no slack as it is now. I really like how it feels, but I dont notice a HUGE difference. I'm thinking that I just wasnt conscious of it before, and it almost has me wanting to pull the set screw back out to see the difference. (I didnt loctite it, so its probably in order, anyways.) One thing of note, I didnt have to tap it. it was threaded all the way through already. I was kinda disappointed, as I kind of wanted a bigger project out of it. I ended up getting it all done in 5 minutes or so...
|
|
|
|
[#45]
Just for referance I had sent Bill springfield a trigger , he did time the disco, tapped and added a stop on the bottom ig the trigger and polished and cut the hammer. all in all mu buddy was happy for the 50 bucks. and for the 4lb pull. me I spent the 100 bucks and bought a JP and cut my hammer. and love my 3lb single stage.
|
|
|
|
CT, USA
|
[#46]
Originally Posted By kwrangln:
Since arf keeps archiving threads and the search sucks, I'll throw up some pics again.. 1. Tap the grip screw hole all the way through. http://i277.photobucket.com/albums/kk58/kwrangln/new%20ar%20build/newar47.jpg http://i277.photobucket.com/albums/kk58/kwrangln/new%20ar%20build/newar54.jpg 2. Take your run of the mill LPK hammer and cut the crap out of it to lighten it up. Touch it up with a spray of paint when you're done. An object at rest stays at rest until acted upon. A heavy hammer takes more force to accelerate than a light hammer. Since I use light springs, the light hammer allows them to accelerate it to full travle speed alleviating light strikes. http://i277.photobucket.com/albums/kk58/kwrangln/new%20ar%20build/newar26.jpg http://i277.photobucket.com/albums/kk58/kwrangln/new%20ar%20build/newar27.jpg 3. Add in some light weight springs, they are cheap and work great. http://i277.photobucket.com/albums/kk58/kwrangln/new%20ar%20build/newar31.jpg 4. Clean up the machining marks on the sear surface. These are what gives you that gravel road trigger pull. Before. http://i277.photobucket.com/albums/kk58/kwrangln/new%20ar%20build/newar28.jpg After. http://i277.photobucket.com/albums/kk58/kwrangln/new%20ar%20build/newar29.jpg My tool of choice is a small ceramic knife sharpening stone. Very fine cut and a nice flat surface. You don't need to take much off, and be careful to keep the sear flat on the stone, you don't want to change any angles. http://i277.photobucket.com/albums/kk58/kwrangln/new%20ar%20build/newar30.jpg 5. Put it all together. FIrst you'll need a set screw and some blue locktite. http://i277.photobucket.com/albums/kk58/kwrangln/new%20ar%20build/newar48.jpg Run that puppy up the grip screw hole untill it contacts the bottom of the trigger. http://i277.photobucket.com/albums/kk58/kwrangln/new%20ar%20build/newar49.jpg Hold the trigger to the rear and cock the hammer so that it is caught by the disconnector. http://i277.photobucket.com/albums/kk58/kwrangln/new%20ar%20build/newar51.jpg Then let go of the trigger and back out the set screw until the hammer falls from the disconnector to the sear. http://i277.photobucket.com/albums/kk58/kwrangln/new%20ar%20build/newar52.jpg Function check and adjust as necessary. You may have interference issues with the safety, if so then use a round file to make a groove in the back upper surface of the trigger so the safety clears. Once everything is good, set it aside and let the locktite set up. 6. Go to the range and see just how good the trigger feels now, you'll be amazed. Any pics on where to file trigger? Tried set screw mod and i dont want to take off any material in the wrong places. Thanks |
|
|
AL, USA
|
[#47]
Originally Posted By MGP:
Originally Posted By kwrangln:
4. Clean up the machining marks on the sear surface. These are what gives you that gravel road trigger pull. Before. http://i277.photobucket.com/albums/kk58/kwrangln/new%20ar%20build/newar28.jpg After. http://i277.photobucket.com/albums/kk58/kwrangln/new%20ar%20build/newar29.jpg My tool of choice is a small ceramic knife sharpening stone. Very fine cut and a nice flat surface. You don't need to take much off, and be careful to keep the sear flat on the stone, you don't want to change any angles. http://i277.photobucket.com/albums/kk58/kwrangln/new%20ar%20build/newar30.jpg Any pics on where to file trigger? Tried set screw mod and i dont want to take off any material in the wrong places. Thanks Hopefully this will clear it up for you. The grigger group is placed how it sits in the reciever, so you can see how the parts interact. The small screwdriver on the leatherman is pointing at the sear surface that you want to smooth out. Do not file it, you don't want to remove much if any metal, just polish out the machining marks from when it was shaped. The machining marks are what makes it feel gritty as they slide past the sear surface of the hammer. DO NOT reshape the surface, DO NOT change the angle, and again, try to remove as little metal as possible to get a smooth surface. It doesn't take much to smooth it out considerably. 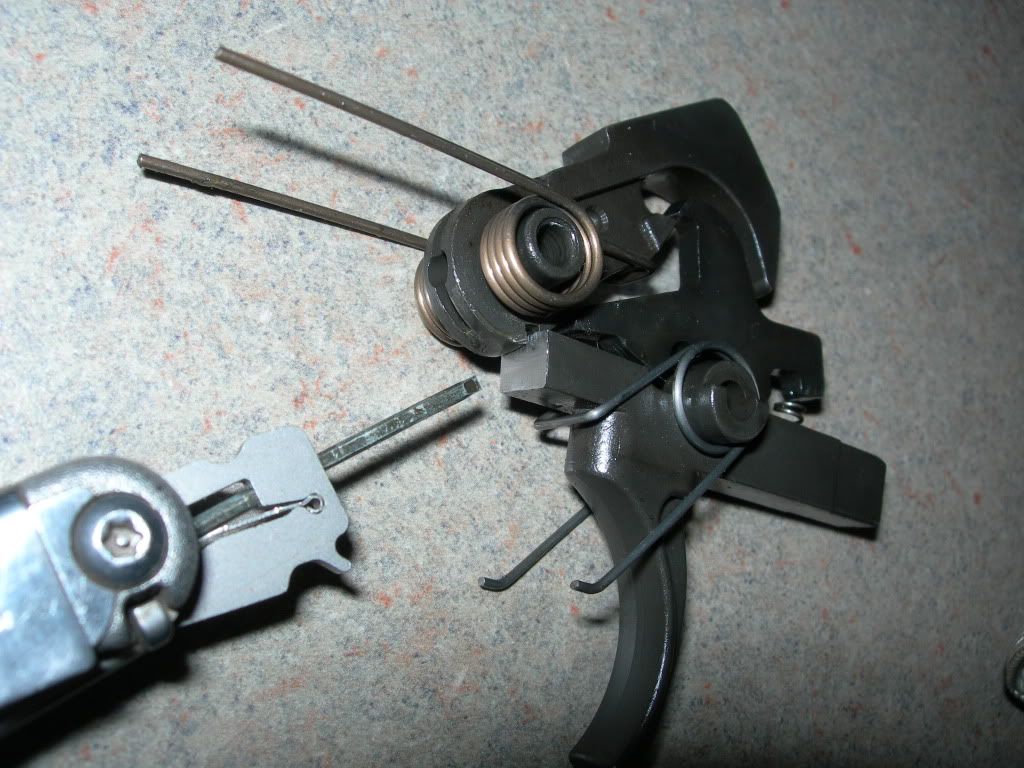
|
|
|
CT, USA
|
[#48]
Originally Posted By kwrangln:
Originally Posted By MGP:
Originally Posted By kwrangln:
4. Clean up the machining marks on the sear surface. These are what gives you that gravel road trigger pull. Before. http://i277.photobucket.com/albums/kk58/kwrangln/new%20ar%20build/newar28.jpg After. http://i277.photobucket.com/albums/kk58/kwrangln/new%20ar%20build/newar29.jpg My tool of choice is a small ceramic knife sharpening stone. Very fine cut and a nice flat surface. You don't need to take much off, and be careful to keep the sear flat on the stone, you don't want to change any angles. http://i277.photobucket.com/albums/kk58/kwrangln/new%20ar%20build/newar30.jpg Any pics on where to file trigger? Tried set screw mod and i dont want to take off any material in the wrong places. Thanks Hopefully this will clear it up for you. The grigger group is placed how it sits in the reciever, so you can see how the parts interact. The small screwdriver on the leatherman is pointing at the sear surface that you want to smooth out. Do not file it, you don't want to remove much if any metal, just polish out the machining marks from when it was shaped. The machining marks are what makes it feel gritty as they slide past the sear surface of the hammer. DO NOT reshape the surface, DO NOT change the angle, and again, try to remove as little metal as possible to get a smooth surface. It doesn't take much to smooth it out considerably. http://i277.photobucket.com/albums/kk58/kwrangln/trigger3.jpg Im sorry i meant for the safety to clear. Where on the trigger do i file down ? |
|
|
AL, USA
|
[#49]
Originally Posted By MGP:
Originally Posted By kwrangln:
Originally Posted By MGP:
Originally Posted By kwrangln:
4. Clean up the machining marks on the sear surface. These are what gives you that gravel road trigger pull. Before. http://i277.photobucket.com/albums/kk58/kwrangln/new%20ar%20build/newar28.jpg After. http://i277.photobucket.com/albums/kk58/kwrangln/new%20ar%20build/newar29.jpg My tool of choice is a small ceramic knife sharpening stone. Very fine cut and a nice flat surface. You don't need to take much off, and be careful to keep the sear flat on the stone, you don't want to change any angles. http://i277.photobucket.com/albums/kk58/kwrangln/new%20ar%20build/newar30.jpg Any pics on where to file trigger? Tried set screw mod and i dont want to take off any material in the wrong places. Thanks Hopefully this will clear it up for you. The grigger group is placed how it sits in the reciever, so you can see how the parts interact. The small screwdriver on the leatherman is pointing at the sear surface that you want to smooth out. Do not file it, you don't want to remove much if any metal, just polish out the machining marks from when it was shaped. The machining marks are what makes it feel gritty as they slide past the sear surface of the hammer. DO NOT reshape the surface, DO NOT change the angle, and again, try to remove as little metal as possible to get a smooth surface. It doesn't take much to smooth it out considerably. http://i277.photobucket.com/albums/kk58/kwrangln/trigger3.jpg Im sorry i meant for the safety to clear. Where on the trigger do i file down ? Mine required no mods in this area, so I have not done any filing for the safety and you are on your own. Install the parts and pay close attention to how everything interacts while cycling them back and forth. Know how the safety works (tight enough clearance that you can not engage the safety without the trigger being cocked, and when it is cocked the safety contacts the trigger preventing it from moving enough to release the trigger). Once you've spent some time playing around with it, you'll see where it needs to be clearanced (if it actually does). Again, go slow, you do not want to remove too much material. You'll probably end up installing the LPK a bunch of times getting it just right, so don't try just grinding it and throwing it together. The other option is to back off the set screw some more so that the safety functions properly. You may not be removing as much pre travel this way, but it'll be a lot easier than installing the LPK a couple dozen times while making minute changes each time. Take too much off and it's new trigger time as the safety will not function properly. |
|
|
CT, USA
|
[Last Edit: MGP]
[#50]
Thanks for the reply i know how everything works i just wanted to make sure before i filed the back of the trigger where the saftey contacts. I don't want to back off the set screw until the saftey clears then the set screw mod would be useless. Thanks Mike
|
|
|
 Win a FREE Membership!
Sign up for the ARFCOM weekly newsletter and be entered to win a free ARFCOM membership. One new winner* is announced every week!
You will receive an email every Friday morning featuring the latest chatter from the hottest topics, breaking news surrounding legislation, as well as exclusive deals only available to ARFCOM email subscribers.

AR15.COM is the world's largest firearm community and is a gathering place for firearm enthusiasts of all types.
From hunters and military members, to competition shooters and general firearm enthusiasts, we welcome anyone who values and respects the way of the firearm.

Subscribe to our monthly Newsletter to receive firearm news, product discounts from your favorite Industry Partners, and more.
Copyright © 1996-2024 AR15.COM LLC. All Rights Reserved.
Any use of this content without express written consent is prohibited.
AR15.Com reserves the right to overwrite or replace any affiliate, commercial, or monetizable links, posted by users, with our own.


