|
[#1]
Actualy crayons work pretty good but I use paint pens when I do a color fill. It dries harder and more permanant.
Just rub it into the engraving and then take a cloth with some Gun Scrubber / Brake Clean and wipe over the top to take the excess off. |
|
|
|
[#2]
China White pencils at an art store.
|
|
|
|
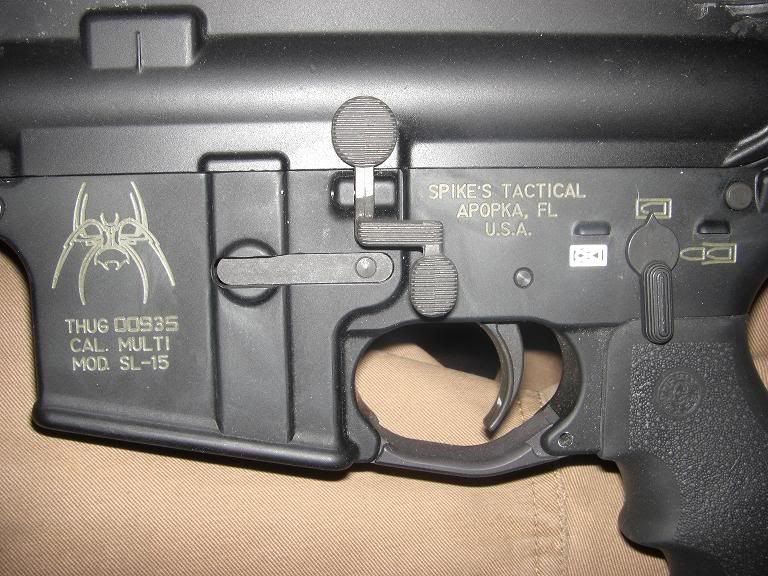
[#3]
i wouldnt recomend the crayons or grease because they look horrible after a little use. The proven best way to do it is to use testors model car paint. mix it up with some thinner and then use a tiny micro brush or something simular to put it into the rollmark and let the paint flow throw the roll mark itself. next mix put 1 drop of thinner and 1 drop of clp on a shotgun pad and lightly buff over the roll marks to remove any excess paint. looks professin when your all done...

|
|
|
|
[#4]
I use acrylic paint.
Just wipe down the area with some alcohol to clean. I use a toothpickpick to "paint" the acrylic into the area I want. Fill up the markings pretty good and evenly. Do each color at time and it doesnt take long for the acrylic to dry. Then carefully (I use a q-tip and tissue, gently) clean around the markings with Acrylic Thinner. It will wipe off excess paint better than cleaner or alcohol. |
|
|
|
[#5]
I've used Crayon, Testors model paint, and nail polish.
Yes, I said nail polish. Believe it or not, I've found that the nail polish actually works pretty damn well for a "permanent" color fill, since it really isnt affected by heat or the solvents most of us use to clean - but it can still be removed with acetone based nail polish remover and a little elbow grease if you want to get it out. Testors is nice because it flows well and is easy to put on...but the caveat is that gun solvents will remove it pretty quickly if you're not careful. The paint has to have had a couple of FULL days to really dry/cure before it becomes durable...but after that, it works pretty well. They also make lacquer paint stick that you can use for this purpose, though I've never been able to find it locally and since I've had sucess with other easier to obtain methods, I've never really felt compelled to pay $7 shipping for a $3 paint stick. I started with white crayon on my XD40, then later switched to nail polish because it was melting and made a mess. Sold that gun as it was - the buyer really liked it with the white accents. My AR right now is currrently a hybrid of all three methods, lol...The rollmarks are white crayon, the SAFE mark is testors paint, and the FIRE mark is red nail polish. I will tell you that white crayon in deep rollmarks like AA logo turns out BRIGHT white, it really pops. Some like that, some dont. I'm toying with the idea of taking the crayon out completely and going with Testors again. I'll take a pic later and post it. |
|
|
|
[#6]
That's the info I was looking for. Thanks! I'll try the testors at first.
|
|
|
|
[#7]
Quoted:
That's the info I was looking for. Thanks! I'll try the testors at first. Alright, if thats the route you are going to go, be messy with it. Make sure you get it down into all the areas you want it, and then put some extra on...it has a tendancy to "sink" as it dries (nail polish does the same thing). Like I said above, let it dry thorooughly...at least a day or two, BEFORE trying to remove the excess. If you try to remove it before it's cured, you'll take almost all of the paint out of the rollmarks and have to start over. |
|
|
|
[#8]
Quoted:
Quoted:
That's the info I was looking for. Thanks! I'll try the testors at first. Alright, if thats the route you are going to go, be messy with it. Make sure you get it down into all the areas you want it, and then put some extra on...it has a tendancy to "sink" as it dries (nail polish does the same thing). Like I said above, let it dry thorooughly...at least a day or two, BEFORE trying to remove the excess. If you try to remove it before it's cured, you'll take almost all of the paint out of the rollmarks and have to start over. true, let it sit for atleast 5 mins before buffing the excess off... Isn't nail polish a little thick? or is it thick enough to move around with the toothpick fairly easily or what? seems like it would be tough |
|
|
|
[#9]
Well, I get a color called "french manicure white" (I stole the first bottle from my wife actually, which is why I know about this...I swear
Anyway, with the french manicure version, it comes with a slanted brush, so it's easier to apply to the rollmarks. Yes, it's VERY thick. I usually apply one coat, then go over it with an exacto knife and pop any little air bubbles I see. Let it dry for a half hour or so, then come back and add a second coat. Remeber, this stuff REALLY likes to sink as it dries, so two coats at a minimum will be needed. After the second coat is applied, I usually let that dry for about a half hour more, then take a patch with acetone nail polish remover on it and start working my way around the rollmarks. For some people, the nail polish will "stain" the reciever around the rollmarks. This happend to me on my AA lower...it's not very apparent, but in bright light you might notice a little ghosting around the areas that were color filled. This WILL go away, it just takes time and several wipedowns with solvent or cleaner or whatever you use during your cleanings. When all the ghosting is gone, you're left with very attractive mostly-permanent color filled rollmarks. |
|
|
|
[#10]
hmm. sounds like testors paint with some thinner added is the way to go as far as application goes. I never had a problem with it and it's going on about a year old now and the color is still 80% or better. Im satisfied.
|
|
|
|
[#11]
Testors paint? Mixxing? Thats too much work! go to wal mart in their craft section and buy your self Elmers "Painters" its a paint pen. Comes in a lot of colors and a fine piont. Used it on several lowers and have never had a problem. Just open shake and fill the rols. Let dry then wet a cloth and rub with your finger. Done Here is the lastest I did like an hour ago. Dont like the blue safe so I will change to another color soon.


|
|
|
|
[#12]
so how durable is this paint pen paint? will it come off easily with CLP after it is dry? let us know... might be the best idea I have heard yet for rollmarks
|
|
|
|
[#13]
I just bought some black red and white testors tonight for this very reason. Ill post before and after shots when I am finished. Flat black works great to fix any errant nicks you might have made while pounding in the trigger guard roll pin
Dale |
|
|
|
[#14]
tag for future ref. Those look great.
|
|
|
|
[#15]
Quoted:
tag for future ref. Those look great. This. |
|
|
|
[#16]
I'm using this method tomorrow.
http://www.ar15armory.com/forums/Painting-rollmarks-t21008.html |
|
|
|
[#17]
Quoted:
I just bought some black red and white testors tonight for this very reason. Ill post before and after shots when I am finished. Flat black works great to fix any errant nicks you might have made while pounding in the trigger guard roll pin Dale DO IT! THEN POST A PIC! I have a Stag lower as well, and I want to know what it will look like! I think I am going to go with FDE parts,so I was thinking of filling in the stag with TAN, but I can't find Testor Paint locally. |
|
|
|
[#18]
Quoted:
Quoted:
I just bought some black red and white testors tonight for this very reason. Ill post before and after shots when I am finished. Flat black works great to fix any errant nicks you might have made while pounding in the trigger guard roll pin Dale DO IT! THEN POST A PIC! I have a Stag lower as well, and I want to know what it will look like! I think I am going to go with FDE parts,so I was thinking of filling in the stag with TAN, but I can't find Testor Paint locally. Testor paint is available pretty much any where that sells models. I got this stuff at Michaels crafts. Ill post as soon as I get it done. |
|
|
|
[#19]
I used the Elmers Paint Pens myself, turned out greatm would post a pic but I cant seem to get it done right.
|
|
|
|
[#20]
After viewing this thread I went out to Walyworld and picked up a pair of the Elmer's pens. Very easy to use and worked like a charm. I love the new look. Here are a couple of pics after the touch up. I just filled in the roll marks let it sit for fifteen minutes then wiped off the excess with a rag and a dab of bore cleaner. Then wiped the lower down with a little gun conditioner to get the shine. There is alittle excess on there I now see on the pictures looks like I need to wipe it down again.


|
|
|
|
[#21]
Where in Walmart did you find the paint pins?
|
|
|
|
[#22]
I found 'em right where they mentioned above in the crafts section. Each pen is about $3.30 they have several colors too.
|
|
|
|
[#23]
Quoted:
I just bought some black red and white testors tonight for this very reason. Ill post before and after shots when I am finished. Flat black works great to fix any errant nicks you might have made while pounding in the trigger guard roll pin Dale I just did the stag with a white paint pen-filled it in-let dry for 15 min. and wiped excess off.Looks great-sorry don't know how to do pics. |
|
|
|
[#24]
The paint pens worked great for me.
 [/img], this is one I did for a friend [/img], this is one I did for a friend
|
|
|
|
[#25]
This is a great thread!!!!
If you painted your lower, I'd like to see what you used and how it looks. Please attach a pic THANKS! |
|
|
|
[#26]
playing off RallySoob. just did this tonight using Duplcolor red and Krylon tan, spraypaint. i sprayed the paint into a cup and used a small brush. its very difficult to get the extra cleaned off without getting it into the other color. you can see on my Rock River Arms in the middle of the crosshairs, how the tan looks slightly pink, thats from the red being rubbed onto it while cleaning off the extra. thats about the best i can get it.
http://i161.photobucket.com/albums/t239/tig488/P1000745.jpg |
|
|
|
[#27]
I would but I cant seem to get any pics posted, I have Tinypic but the link never shows right.
|
|
|
|
[#28]
I did this one for a friend, he wnated it this way, a little to much for me though.

|
|
|
|
[#29]
Figured I would add mine to the mix.. Testers paint with a toothpick. Cleaned up with Testers paint thinner on a paper towel. Nothing fancy.
Looks better in person since the camera flash kinda washed the center of the picture out. Hard to tell but the SOG info in in Silver, Safe in White, Fire in Red. 
|
|
|
|
[#30]
My write-up in the Anvil Arms Industry thread.
http://www.ar15.com/forums/topic.html?b=2&f=244&t=159428 |
|
|
|
[#31]
I'm not a fan of coloring everything. I like to keep it simple and basic. Just the safty marked.

|
|
|
|
[#32]
A CMMG in Yellow
http://inlinethumb54.webshots.com/40693/2485473380048047469S600x600Q85.jpg You "should" be able to click on the pic for a larger view.... |
|
|
|
[#33]
Quoted:
A CMMG in Yellow <a href="http://image55.webshots.com/755/4/73/38/2485473380048047469ixJHOm_fs.jpg" target="_blank">http://inlinethumb54.webshots.com/40693/2485473380048047469S600x600Q85.jpg</a> You "should" be able to click on the pic for a larger view.... Says "forbidden, don't have access..." Definitely a great thread. I might paint the markings on my receivers now. |
|
|
|
[#34]
I picked up red and white acrylic paint called Pebeo Porcelaine 150. This stuff goes on like a regular paint but you bake it in your home oven for a half hour at 300deg after a 24 hour air dry period. to cure it. I didn't like the way the red would cover so I only did the white and I like the result so far. It took a while to get the DPMS logo and text just right because if you wait too long to wipe it off the dried paint on the surface pulls it out of the roll marks and if you don't wait long enough it wipes the paint out of the roll marks. I'm likely going to use the testors to do the fire in red.
http://www.never-follow.net/images/ar/IMG_2312.JPG http://www.never-follow.net/images/ar/IMG_2314.JPG http://www.never-follow.net/images/ar/IMG_2315.JPG It looks better in person then in pictures. |
|
|
|
[#35]
Quoted:
I picked up red and white acrylic paint called Pebeo Porcelaine 150. This stuff goes on like a regular paint but you bake it in your home oven for a half hour at 300deg after a 24 hour air dry period. to cure it. I didn't like the way the red would cover so I only did the white and I like the result so far. It took a while to get the DPMS logo and text just right because if you wait too long to wipe it off the dried paint on the surface pulls it out of the roll marks and if you don't wait long enough it wipes the paint out of the roll marks. I'm likely going to use the testors to do the fire in red. It looks better in person then in pictures. I think the pics look cool. I did mine with some Testors and it came out so so. I think you did a good job with the filling of the roll marks. Way to go. I will have to try the Elmers trick next. |
|
|
|
[#36]
I used Lacquer Stick fill in paint from Brownells. It was so fricking easy using this. It is softer than crayons and really fills in the rollmarks. It is easy to clean up with a rag and some CLP.
|
|
|
|
[#37]
Took me a few tries with the Testors. Its alot harder when you have this rollmark vs filling in the white dots of pistol sights.
|
|
|
|
[#38]
I just got my DoubleStar Lower over the weekend and my Doublstar Kit arrived this week. I finished my build on Thursday
|
|
|
|
[#39]
Picked up an Aero Precision stripped lower (my third!) today as well as some Testors model paint. I will be experimenting and will have pics to post soon.
EDIT: Sooo, what do you guys suggest for cleaning off the excess? My attempts so far are pretty messy. |
|
|
|
[#40]
Quoted:
I'm not a fan of coloring everything. I like to keep it simple and basic. Just the safty marked. http://img262.imageshack.us/img262/2435/dsc00276qz1.jpg What is that doohickey that is connecting the trigger and hammer pins? |
|
|
|
[#41]
Quoted:
Picked up an Aero Precision stripped lower (my third!) today as well as some Testors model paint. I will be experimenting and will have pics to post soon. EDIT: Sooo, what do you guys suggest for cleaning off the excess? My attempts so far are pretty messy. I used PAINTER's PENS by Elmers.....I 1st scratched off the excess with my finger nail. Then the light stuff I buffed with a paper towel. Then the dried paint I used nail polish remover and a Q-tip so I get in those hard to reach places without screwing the good paint. |
|
|
|
[#42]
What is that doohickey that is connecting the trigger and hammer pins? Looks like kns anti-rotational pins, pretty common on transferable m16 lowers where you don't want rotating pins wiping out a $9000 receiver. |
|
|
|
[#43]
Well I tried the Elmer's paint pen today. Sadly it didn't turn out well. It did a nice fill but left a little residue around the edges of the rollmark. After trying to scratch it away with my fingernail I moved on to some thinner. Still no luck.
What would be the strongest thinner/paint remover that would take all of the paint off the lower. Brake cleaner? I just want to start over fresh. What do yall recommend? |
|
|
|
[#44]
i fill everything completely in till i cant see the rolls mark any more. let it dry completely. then get an old shirt or something and thinly use brake cleaner softly moving over it till it all comes off.
|
|
|
|
[#45]
Quoted:
Well I tried the Elmer's paint pen today. Sadly it didn't turn out well. It did a nice fill but left a little residue around the edges of the rollmark. After trying to scratch it away with my fingernail I moved on to some thinner. Still no luck. What would be the strongest thinner/paint remover that would take all of the paint off the lower. Brake cleaner? I just want to start over fresh. What do yall recommend? I used Elmers and used a Q-tip and nail polish remover. -First I rubbed what I could with my fingernail or buffed it with a paper tower. what wouldn't come off I used nail polish remover -Don't drench the Q-tip. -What I did was shake the bottle, remove the cap and then swipe the inside of the cap with the Q-tip so its not drenched. -you can lightly rub the Q-Tip in those places and it comes right off. it may smear a bit but it comes off -after everything is good and dry (I gave it at least a day), I took gun oil to rubbed it on the receiver to give it a nice good sheen. -When I used the Elmers Pen....I angled the lower so when I pushed the paint it would fill the letter instead of dragging the pen over the engraved letter. I let gravity work to my favor. hope this helps...good luckk |
|
|
|
[#46]
See, I actually experimented with nail polish remover. I put some paint on the receiver that will be under the pistol grip (so if it doesn't come of it will be hidden) and then let it dry and tried to take it off with nail polish remover and a q-tip. It took most of it off but there is still a faded blob on there. I'm going to try the break cleaner next. I am using the "get messy" method so I need something will definitely get rid of the over-spill.
|
|
|
|
[#47]
I have posted these photos many, many times, but here they are again. Testor's Model Enamel...


|
|
|
|
[#48]
Quoted:
See, I actually experimented with nail polish remover. I put some paint on the receiver that will be under the pistol grip (so if it doesn't come of it will be hidden) and then let it dry and tried to take it off with nail polish remover and a q-tip. It took most of it off but there is still a faded blob on there. I'm going to try the break cleaner next. I am using the "get messy" method so I need something will definitely get rid of the over-spill. I had the same problem. Looked great there was just a little bit of faded white around the edges that wouldn't come off. Post how well the brake cleaner works! |
|
|
|
[#49]
Those are really nice FYRARMS.
|
|
|
|
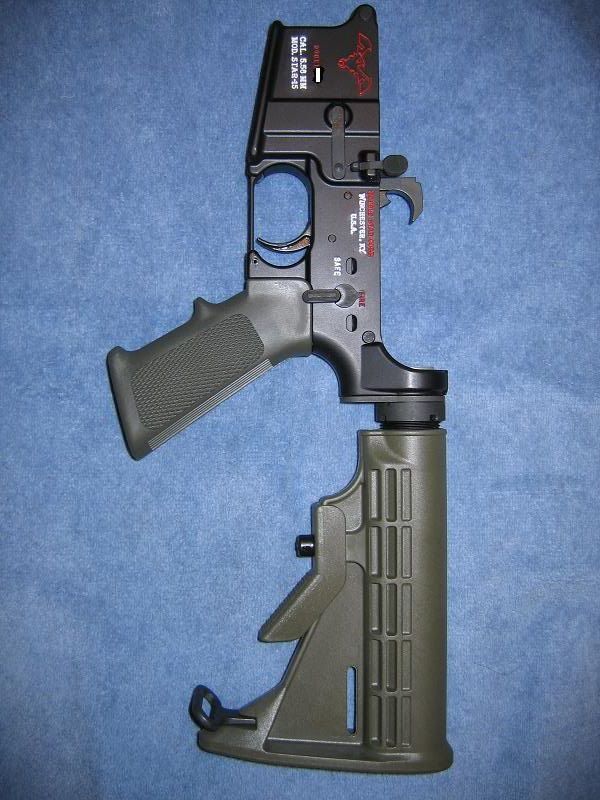
[#50]
Thanks, Frank. This is ALL that I ever use to fill marks. Takes 5 minutes or less per lower:

|
|
|
 Win a FREE Membership!
Sign up for the ARFCOM weekly newsletter and be entered to win a free ARFCOM membership. One new winner* is announced every week!
You will receive an email every Friday morning featuring the latest chatter from the hottest topics, breaking news surrounding legislation, as well as exclusive deals only available to ARFCOM email subscribers.

AR15.COM is the world's largest firearm community and is a gathering place for firearm enthusiasts of all types.
From hunters and military members, to competition shooters and general firearm enthusiasts, we welcome anyone who values and respects the way of the firearm.

Subscribe to our monthly Newsletter to receive firearm news, product discounts from your favorite Industry Partners, and more.
Copyright © 1996-2024 AR15.COM LLC. All Rights Reserved.
Any use of this content without express written consent is prohibited.
AR15.Com reserves the right to overwrite or replace any affiliate, commercial, or monetizable links, posted by users, with our own.


