|
Posted: 2/5/2008 6:05:12 PM EDT
There have been several questions in threads recently asking about the need for buying the $15 front pivot pin install tool to install the Pivot Pin.
If you are only doing one build, it's hard to justify spending money on a single use tool, if you're building 100 the technique below works equally well. Many here have talked about using a 1/4" clevis pin to install the Pivot Pin but there are always follow up questions as to the technique. Below is a step by step procedure to install the Pivot Pin using a clevis pin, this takes 10 times longer to describe than to actually perform and costs nearly nothing. Got to your local hardware store and buy a 1/4" clevis pin. Get the kind with at least one hole through it not the kind with a captured ball bearing on the end. I use a 2" long pin which reaches completely across the front of the lower. Get one at least this long. I paid 65¢ for mine. 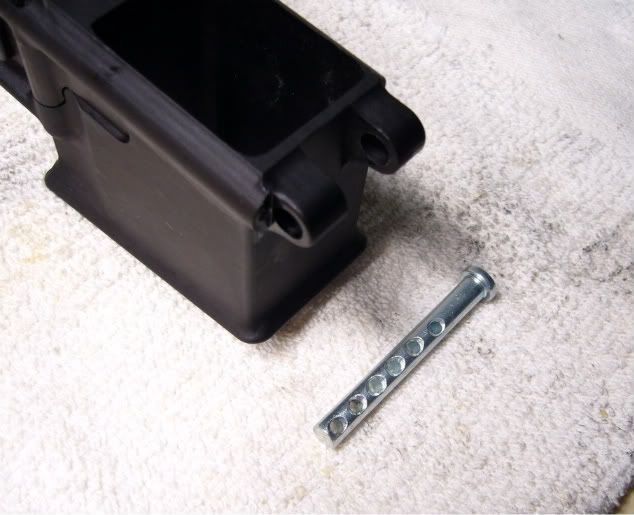 Insert the clevis pin through the pivot pin holes in the front of the lower from the left side. Align the hole (or one of the holes) in the clevis pin with the pivot pin detent channel in the lower. 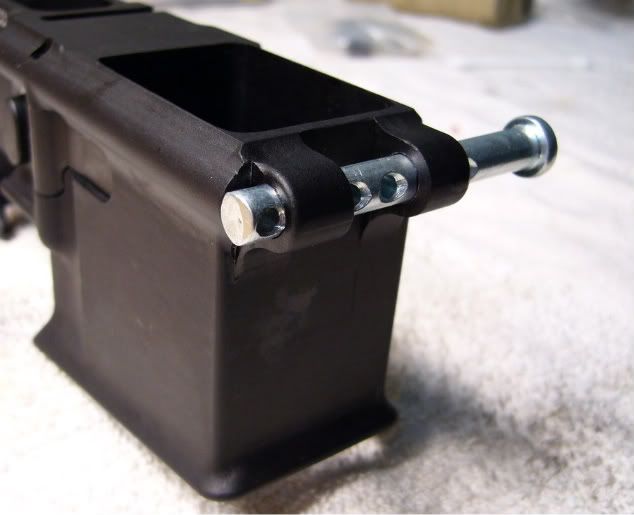 Insert the pivot pin detent spring through the hole and into the channel in the lower. 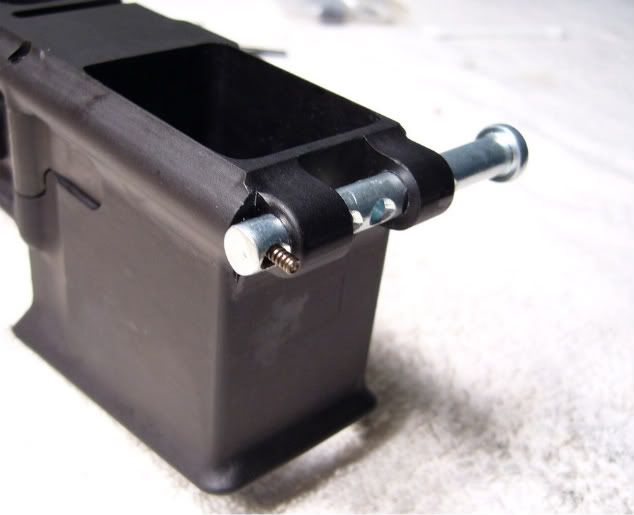 Insert the pivot pin detent through the hole. The spring will not let it go in very far without pressure. 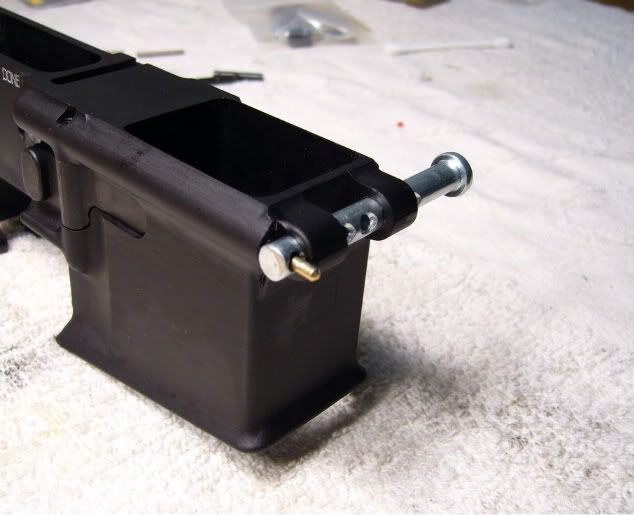 I perform the next three steps inside a 2 gallon zip-loc bag so I don't lose the detent or spring in case it gets away from me. With a punch or other suitable tool (like an allen wrench) push the detent through the hole in the clevis pin and into the lower while compressing the spring. The detent and spring are now inside the lower and clear of the clevis pin. The only thing holding them in place is pressure on the punch. 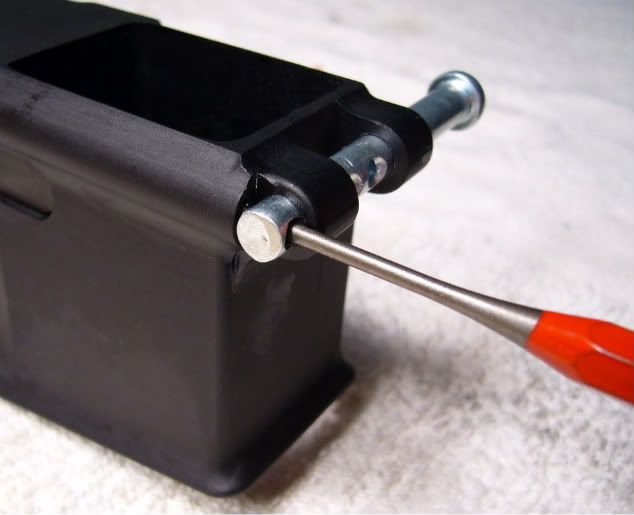 Turn the punch or allen wrench 90 degrees counter-clockwise so the hole is now at the top of the clevis pin. This will capture the detent and spring along the side of the clevis pin. 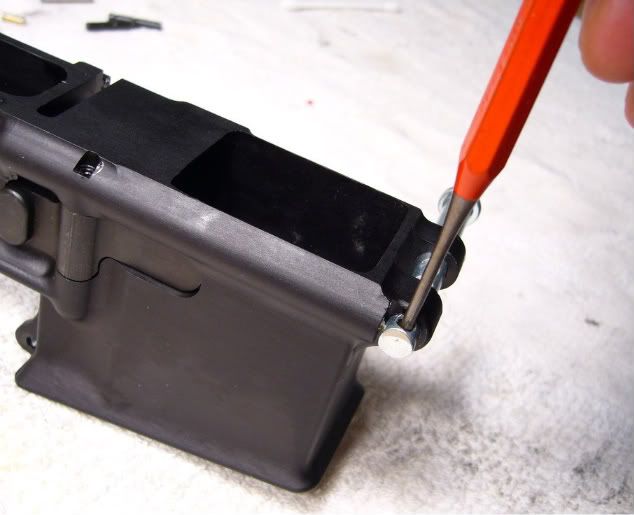 Remove the punch. You can see the detent poking out of the hole. 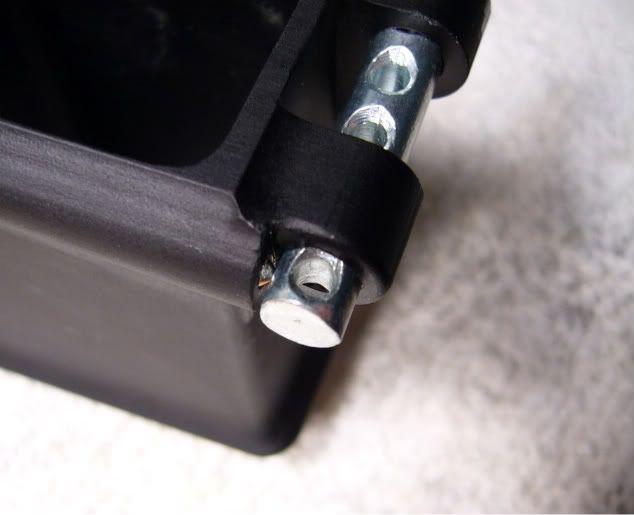 Start the pivot pin into the lower from the right side. Make sure the groove in the pivot pin is at the top. 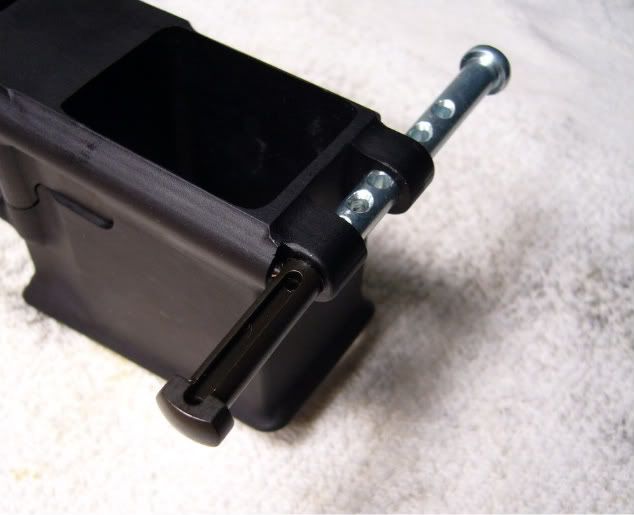 As you push the clevis pin out of the hole, keep sideways pressure on the detent until it is captured by the pivot pin.  Keep pushing the pivot pin though the right side pivot hole. Once it is in the hole and won't fly out under spring pressure, remove the clevis pin. 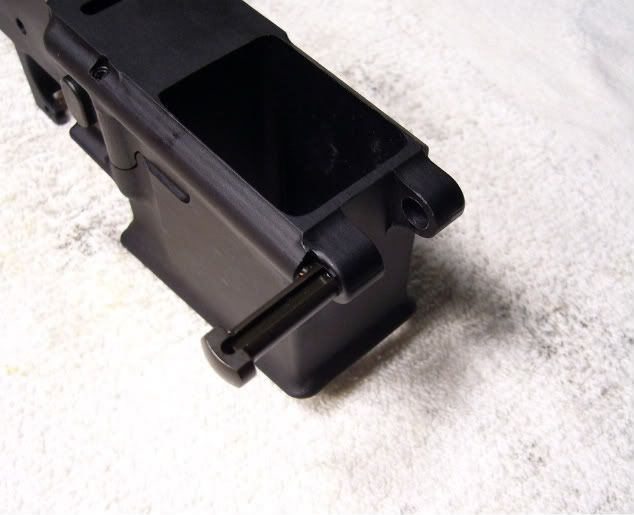 Rotate the pivot pin 90 degrees counter-clockwise until the groove in the pivot pin captures the detent. 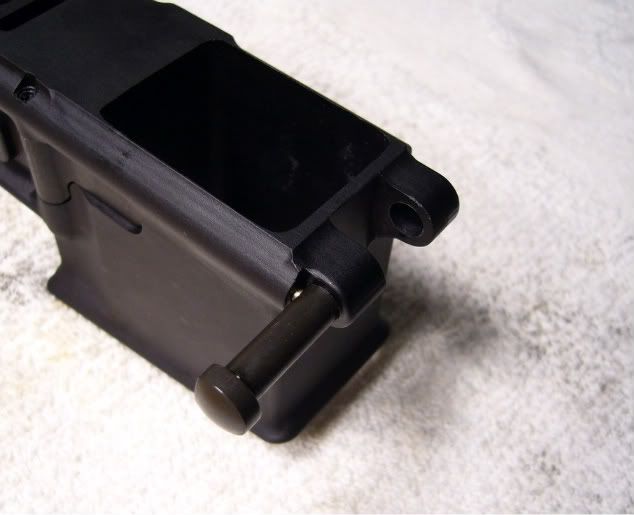 You are finished! 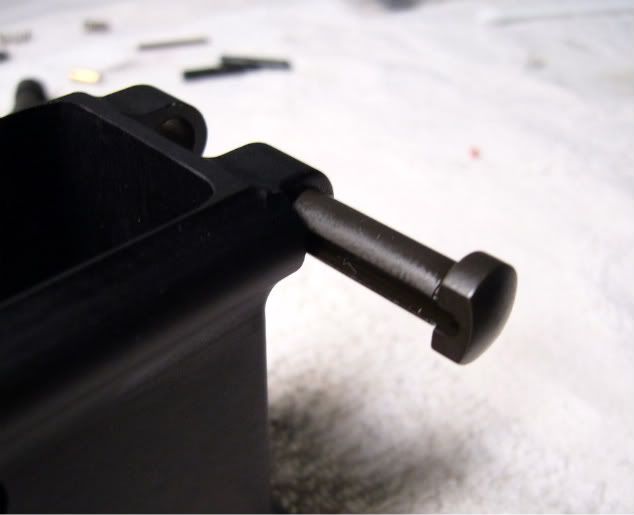 |
|
|
|
[#1]
That makes me want to get another stripped lower.
ETA - BTW, whose lower? |
|
|
|
[#2]
And what caliber? |
|
|
|
|
[#3]
this should be tacked so i can refer to it when i build my soon to be purchased upper and lower.
|
|
|
|
[#4]
CNC Guns/TANGOCHASER/Khalan - AR45 in 45 ACP CNC Guns AR45 Happened to be to last stripped one I had |
||
|
|
|
[#5]
Ive read a few how tos on installing that pivot pin, and I guess there is alot of trouble keeping the spring and detent from flying away and whatnot...I seriously did not have a single issue with my build, except for getting the trigger guard pin through...and the only tools I had were a sledge hammer (light taps only, mind you) and a PC screwdriver set...
|
|
|
|
[#6]
Bump for a great photo-write-up.
|
|
|
|
[#7]
Great trick! I'll have to put my pocketknife away on future builds.
|
|
|
|
[#8]
|
|
|
|
[#9]
I need to add one of these to my toolbox. Thanks for the tip.
|
|
|
|
[#10]
nice write up !
|
|
|
|
[#11]
Thats a nice write up with great pics. Job well done
|
|
|
|
[#12]
EXCELLENT write up. Thank God and man, does this need to be tacked.
If I see one more time about using a razor blade to depress the detent while slipping the pin in and thinking that is a safe and good way to install it I will scream. I don't care if one has done it that way a thousand times, it is foolhardy and yes, you will shoot your eye out eventually or cut yourself. The clevis pin method is the only way that makes since IMO outside of buying the special tool that works exactly the same way, or the new and expensive tool that Brownells sells. Great job. Now nobody has any excuse for sending those little pins flying and no need to work in a plastic bag or spread out sheets or work under them. |
|
|
|
[#13]
I don't want to be a dink, but I managed to install my front pivot pin/detent without any tools besides needle nosed pliers, and I have a broken wrist, casted to immobilize my elbow and most of my fingers on my dominant hand. I didn't realize these things were supposed to be that hard, or maybe I used the wrong spring? The pivot pin feels like the guns at work so I'm pretty sure I got it right.
Edit: That is a pretty trick solution though, I like your creativity! |
|
|
|
[#14]
Great write-up. Used the exact method on my Mega lower last week. I had to buy 4 clevis pins (packaged that way). But they only cost me $2.50 - not $5 plus shipping.
For those who don't think it necessary for these or other specialty tools; a friend tried to install the pivot pin in an engraved lower for a buddy and ended up scratching it He had to buy him a new one. Of course he kept the scratched one but learned a costly lesson. |
|
|
|
[#15]
That is great for you, but did you do it in 30 seconds, because that is all the longer it takes using the clevis pin tool. And, how many have you done? Do it your way a few more times then tell us how many detents you had to replace. Even a blind pig finds an acorn once in a while. Why is it that on an excellent post like this some, as you said, Dink, always has to come on to try and throw water on the OP's effort. Note I ended the sentence with a period, not a question mark as this is a rhetorical statement. |
|
|
|
|
[#16]
+1 |
|
|
|
|
[#17]
That's a great write-up and no doubt lots of people will find it very useful.
OTOH, I feel a little inadequate for just using a very small screwdriver. |
|
|
|
[#18]
i tryed this and when i pushed the piovt pin in it sliped and bang there goes the detent. i then used a box cutter blade to push the detent and a worked just fine.....just my 2c
|
|
|
|
[#19]
Nice write up and good idea. Had to install one of these for the first time the other nite. Ended up using a credit card. Only had one shot though and almost didn't make it. Wes
|
|
|
|
[#20]
Excellent info! Thanks for the post.
|
|
|
|
[#21]
Awesome write up
|
|
|
|
[#22]
i just used tape, i think it was far more easier.. but sweet write up
|
|
|
|
[#23]
Thanks for taking the time to photograph the install and do the write up. Nice job.
I had just read about the clevis pin somewhere else and bought one the same day at Lowe's for $1 and change and then I read your post that afternoon. |
|
|
|
[#24]
Well done!

|
|
|
|
[#25]
I used this trick when I built my lower a few months ago. One thing to note is that some pins (mine came from Lowe's) have a burr around the holes. This will scratch the lower. The solution is to chuck it up in a drill and use a bit of sandpaper (or a file) to knock down the burrs. Took about 30 seconds on mine.
|
|
|
|
[#26]
very nice!
|
|
|
|
[#27]
+1 |
|
|
|
|
[#28]
I use an even cheaper tool.
I took an 1/4 inch dia. bolt about 3 inchs long and cut the head off and drilled a hole for the spring and detent to fit throught. I then stuck the bolt in the vise and bent it 90 degrees just above the thread for a handle to turn it. It works like a charm and it was super cheap just the price of a 1/4 bolt and a little time. 
|
|
|
|
[#29]
People actually buy a $15.00 tool to do that!!??
Great idea, write up and pics. Jon |
|
|
|
[#30]
What section of the hardware store can these be found? I just tried looking it up on homedepot.com and the word clevis does not show anything.
|
|
|
|
[#31]
Thnx
|
|
|
|
[#32]
They're in the specialty hardware section with the set screws, cap screws, threaded inserts, etc. |
|
|
|
|
[#34]
Great idea and write up. I just use a box knife and use the blade to hold down the pin. Saw this method in a video build and it works just fine.
|
|
|
|
[#35]
this should be tacked.
|
|
|
|
[#36]
I used this method as well after launching a spring and detent across the room (I was able to recover both). I can't imagine an easier way of doing it.
|
|
|
|
[#37]
Breaking your wrist & casting your whole arm, just to keep a little pin straight, seems like a lot more $ & trouble than using the $1 clevis pin method. |
|
|
|
|
[#38]
I've built about a half dozen lowers, and I've always just used the pivot pin itself to push down the detent/spring while I slid it into the hole.
Now... having said that I'm sure I'll launch the detent on my next build! I better get one off those clevis pins! |
|
|
|
[#39]
Same here. I have always used a thin blade knife to do this. This looks much easier!! Thanks for sharing. |
|
|
|
|
[#40]
Do people really have that much trouble installing this pivot pin? I've built about a dozen lowers and never needed a special tool to get it done.
Don't get me wrong... I admire ingenuity.... but it almost seems like a solution to a non-existent problem. |
|
|
|
[#41]
Thanks for the write up I am going to try this on my next build.
|
|
|
|
[#42]
Having been to the Colt class twice (they expire) for work, I just use the pin itself. It is a very funny process to watch 20 individuals in one room learning to assemble firearms though. We call it the "Armoror's crawl" while on the floor looking for pins,springs and such. I have been to the Smith & Wesson and Remington factory classes as well. Same routine just different parts flying around the room.
I like this site for just this info. Most of the time it is old news to me, but usefull to some. Sometimes it is great information I have never been exposed to. Keep up the great work. I appreciate your time and effort. |
|
|
 Win a FREE Membership!
Sign up for the ARFCOM weekly newsletter and be entered to win a free ARFCOM membership. One new winner* is announced every week!
You will receive an email every Friday morning featuring the latest chatter from the hottest topics, breaking news surrounding legislation, as well as exclusive deals only available to ARFCOM email subscribers.

AR15.COM is the world's largest firearm community and is a gathering place for firearm enthusiasts of all types.
From hunters and military members, to competition shooters and general firearm enthusiasts, we welcome anyone who values and respects the way of the firearm.

Subscribe to our monthly Newsletter to receive firearm news, product discounts from your favorite Industry Partners, and more.
Copyright © 1996-2024 AR15.COM LLC. All Rights Reserved.
Any use of this content without express written consent is prohibited.
AR15.Com reserves the right to overwrite or replace any affiliate, commercial, or monetizable links, posted by users, with our own.


