|
[#1]
Steps for building the upper receiver assembly
Step 1 - Ejection Port Cover Start by attaching the pin retaining ring on the ejection port cover pin. This is the small “C” ring that is easily slipped into the groove in the pin. Mine came pre-assembled, but I removed it and reattached it to check for ease of installation. Align the ejection port cover on the side of the upper receiver in the open position and hold it flat against the side. Insert the pin from the front, leaving the “C” ring toward the front of the pin. Stop when the pin reaches the first opening in the cover. 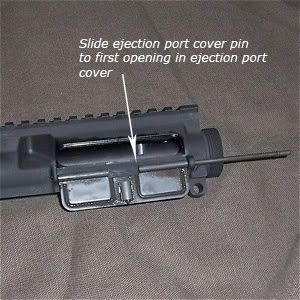 Now is time for a fairly tricky part, but not too hard if you remember one thing - make sure you hold everything tight against the side of the upper receiver. The ejection port cover spring has two arms on it, one long, one short. The long arm goes toward the front of the receiver and rests in a groove on the ejection port cover. You must then twist the spring by hand to have the short arm pointing up, resting against the side of the receiver. Once this is held in place, you can advance the retaining pin the rest of the way through the cover. The pin will eventually be secured by the barrel assembly. 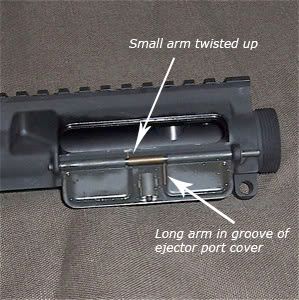 Step 2 - Charging Handle Insert the charging handle latch spring into the hole designed for it.  Align the charging handle to the hole. For those that do not like roll pins, such as myself, it can be a tough chore getting a roll pin in while having to hold a piece in place against the pressure of a spring. I typically found that if you use something in place of the roll pin to hold it, things went more smoothly. I have pictured here a plain jane push pin doing the job. However, I found it easier to have a set of hex wrenches handy so you could insert a hex wrench that was more closely sized to the hole. Simply align the part and insert the hex wrench. As the roll pin was inserted, it would push out the hex wrench. You can also use punches instead of hex wrenches if you have them available.  The finished charging handle latch. I used a Badger tactical latch, but the process is the same for any latch you may choose. 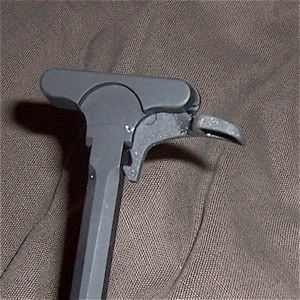 Step 3 - Bolt Push the extractor spring on to the extractor spring insert. The wide end of the spring goes toward the flat disc of the insert.  This little assembly has a nice home in the form of a cut out circle in the extractor arm. Push the spring and insert into the hole of the extractor with the wide end going in. When it “snaps” in place, it is properly inserted. Hold the extractor in place in the slot in the side of the bolt with firm pressure and insert a the ejector retaining pin. This is an easy pin to insert and will probably not need a punch. 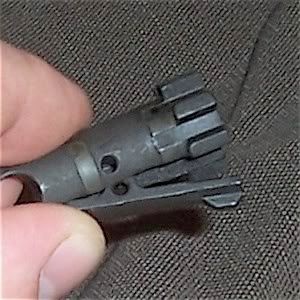 Here is the bolt with the extractor attached. Notice the groove on the left (rear) of the bolt to put the bolt gas rings. 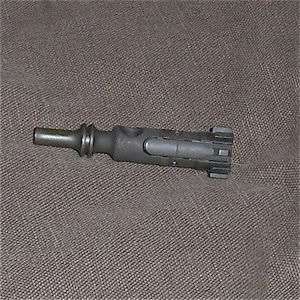 The three gas rings easily snap into place in the groove available. Just be certain that they are all three in the groove and not hanging over. Also, make sure the openings in the rings do not align with each other. Finally, be certain that all three are flat in the groove and not twisted over each other. They should be secure, but there will be a little play in their movement.  Finally, for the bolt, there is the insertion of the ejector spring and ejector. These will be inserted in the front of the bolt face, spring, then ejector. The ejector has a slot cut from it to allow it to be retained by a roll pin. Be certain that this slot is open toward the opening for the firing pin. In addition, you will notice on the ejector that there is a “short” end and a “long” end. Be certain that the short end goes in first. It will take substantial pressure to get the ejector in place enough to accept a roll pin, so use a punch to push in hard. Then use a hex wrench or a punch to hold everything together until the roll pin is inserted. 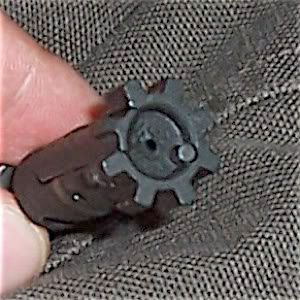 Step 4 - Bolt Carrier Insert the bolt into the front of the bolt carrier. I find this an ideal time to lube up the inside of the bolt carrier. Once the bolt is in there, I also like to spin the bolt around a couple times, allowing the lube to spread. Once the bolt is in the bolt carrier, rotate the bolt so that the extractor is on the right side of the bolt carrier. In addition, you should be able to line up the hole as you look down through the cam pin hole. Insert the cam pin so that the hole in the cam pin will allow the firing pin to pass through it.  Insert the firing pin from the rear of the bolt carrier. You may have to rotate the bolt back and forth and twist the cam pin a bit to get the firing pin to go all the way through.  Once the firing pin is in place, insert the firing pin retaining pin (the cotter pin) into the left side of the bolt carrier. Again, you may have to twist the cotter pin to get it to go all the way in. Finally, attach the bolt carrier key to the top of the bolt carrier with the two bolt carrier key screws. The holes should only line up one way, and be certain to secure the screws with a hex wrench. 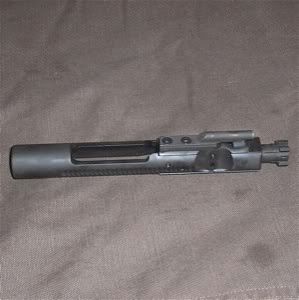 Step 5 - Forward Assist Insert the pawl spring into the forward assist, followed by the pawl and the forward assist pawl. Push in on the forward assist pawl and insert the pawl spring pin. Place the forward assist spring over the forward assist and insert into the upper receiver. When inserting into the upper receiver, be certain that the forward assist pawl bends to the right, to be certain it is going in correctly.  Push in on the forward assist until it is all the way in. Insert the forward assist roll pin to secure it. Here is the upper with what we have done so far. 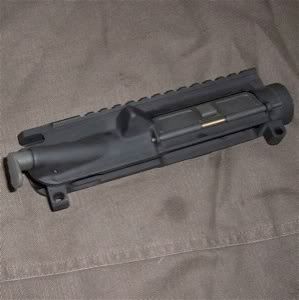 Now, we just have to insert the charging handle, bolt carrier and bolt into the upper to be complete. Be certain that the ejection port cover is open. Also, be certain that the bolt is in the de-cocked position. Lay the upper upside down and slide the charging handle into the rear. Do not slide it in where the charging handle will eventually go, rather slide it in above that, and when it is about one inch in, it should easily drop down to where it belongs. Push it in a little farther to secure it on its tracks. Turn the bolt carrier so that the bolt is going in first, and the carrier key is down, going into the groove in the charging handle. Push in the bolt carrier, and the charging handle should advance with it. Push them all the way forward and the charging handle should lock. 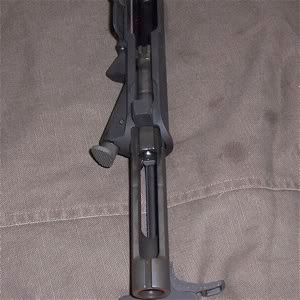 You have now assembled an upper receiver. 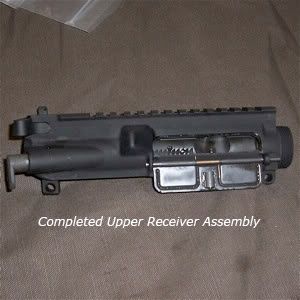 |
|
|
|
[#2]
Tag cause I am starting my first upper build. Thanks man, good stuff
|
|
|
|
[#3]
Nice work...don't have time right now to really look at it in detail but...
Tag for when I do. |
|
|
|
[#4]
Tag
|
|
|
|
[#5]
tag...
well done! |
|
|
|
[#6]
You are about four days late for me, changed my upper this weekend and after I put my barrel on I noticed my spring looked funny on my ejection port cover, put the damn thing on wrong.
 Nice post I hope its added to the tacked ones in the build section... Now you need to do an A1 or A2 sight assembly... 
|
|
|
|
[#7]
Tagged
|
|
|
|
[#8]
Tag
|
|
|
 Win a FREE Membership!
Sign up for the ARFCOM weekly newsletter and be entered to win a free ARFCOM membership. One new winner* is announced every week!
You will receive an email every Friday morning featuring the latest chatter from the hottest topics, breaking news surrounding legislation, as well as exclusive deals only available to ARFCOM email subscribers.

AR15.COM is the world's largest firearm community and is a gathering place for firearm enthusiasts of all types.
From hunters and military members, to competition shooters and general firearm enthusiasts, we welcome anyone who values and respects the way of the firearm.

Subscribe to our monthly Newsletter to receive firearm news, product discounts from your favorite Industry Partners, and more.
Copyright © 1996-2024 AR15.COM LLC. All Rights Reserved.
Any use of this content without express written consent is prohibited.
AR15.Com reserves the right to overwrite or replace any affiliate, commercial, or monetizable links, posted by users, with our own.


