|
Posted: 10/6/2006 5:37:04 AM EDT
[Last Edit: Hemi-Cuda]
Let's face it some of us don't condone doing this, but it's a great project if you're on a tight budget and you have an extra carrying handle laying around. I recently made a thread regarding the chop and someone asked for a How-To, so I figured I can give it a shot.
Tools you will need: - Spare A3 Carry handle - Metal Cutting Hand-Saw (Stanley 6" 9$) - Sand-paper (150 Grit 4$) - Primer Spray Paint 3$ - Flat Black Spray Paint 3$ - Painting tape 3$ Note: You do not have to use primer and spray paint, if you can anodize it. Surprisingly the flat black matches very well to my reciever (Mega and Bushmaster), and I'm positive it will look fine with any other. If you have a dremel and other power-tools to help you with the job, then more power to you! Warning: When doing the chop please wear protective clothing and a cover over your mouth and nose. Aluminum flakes can be TOXIC if inhaled or on the skin. Step one: Preparation  The carrying handle is layed out, you want to apply tape in front of the area you are about to begin cutting. I recommend starting from the top of the handle, as there is less mass to chop through. You want to begin the cut directly in front of the beveled region in front of the sight aperture and straight down. Step Two: Upper Region  I recommend making two incisions on each side of the rear sight guards, if you begin the cut with both edges simultaneously you will most likely begin sawing at an angle. Once you have begun the cut, you can remove the tape. Every couple of millimeters you take off, run some water over the cut to remove flaking. It will be extremely difficult to cut with aluminum flakes in the way.  You'll begin to notice that the straight cut leaves a protruding region to the left and between the rear aperture and elevation. Not to worry the sand paper will smooth everything right out.  Once you get past the rear sight guards, you want to start cutting diagnolly if you're using a hand saw. Notice I am not cutting directly downwards. Cutting in a diagnol will make it easier to finish the cut, since you are chopping through smaller mass.  The top of the carry handle should now be cut, you should be able to see the protruding region in this picture. Step Three: Lower-Region  Now we begin cutting the lower region. This time you want to flip the carry handle over, and cut in front of the rail arm (Okay I made that up, it's the piece that holds on to your picatinny rail  ). Set some tape in front of the cut again so you can begin a straight chop. Again I recommend cutting it diagnolly or vertically! ). Set some tape in front of the cut again so you can begin a straight chop. Again I recommend cutting it diagnolly or vertically! Your final cut should look like this, without the "I can't hold my camera still blur." Step Four: Sanding  Now we can begin the sanding. I used hand sand-paper and elbow grease. I layed a piece over my table and began grinding, the now, buis against it. Once I got a steady and smooth surface I began doing a couple of touch-ups to the rough edges with the sand paper by hand. Step Five: Final Touches  Now we lay down a layer of primer. I used the "Rustoleum" brand. If you're a sloppy painter, then you can apply two layers and use 500-1000 grit sand-paper to get rid of blemishes. I didn't bother painting the entire BUIS as to keep most of it's finish looking exactly the same. I covered the entire thing with tape, and left the area that was cut and sanded only to be painted.  The next morning we apply the flat black, which was also "Rustoleum" brand. I put 2 layers of black, to prevent chipping and exposed aluminum with scuffs.  The finished product before removing tape and putting it on my rifle. Finished Product   Total Price: 22$ Total Price of LMT Chopped BUIS: 119$ I hope this post helps someone out there on a tight budget! Or else you maggots just made me waste over an hour of my time
|
|
|
|
|
[Last Edit: QUIB]
[#1]
Here’s how mine turned out a few years ago. With some blending and filing you can get very close to the look of the LMT BUIS.
 |
|
|
|
|
[#2]
Nice very nice. Someday I'll either get the courage up to do this, or convince someone to do it for me.
Post more pics of the completed sight. We'll wait. |
|
|
|
|
[#3]
You throwing out hints again? |
||
|
|
|
[#4]
Who me? I would never do that. |
|||
|
|
OH, USA
|
[#5]
Minor technical issue: you cannot blue aluminum or any other non-ferrous metal. Paint, anodize, or powder coat, yes. Blue, no.
|
|
|
|
[#6]
I would use a mill if you have access to one. You will get a much cleaner result.
|
|
|
|
|
[#7]
Ah thanks JER, someone said "blue" it in a thread. Figured it was possible. Fixed the error. |
||
|
|
|
[#8]
Glad you posted this Hemi. I get asked this quite often, and I'm glad that there is a sticky on it now.
|
|
|
|
GA, USA
|
[#9]
Excellent idea! Sure beats spending $$$ on a BUIS, and since I am already dropping $$$ on an Aimpoint - I am glad you posted it. I plan on doing this within the next week or so.
|
|
|
|
[#10]
Post some pictures on how it turns out! |
||
|
|
VA, USA
|
[#11]
What type of scope is that you have on your AR?
|
|
|
|
[#12]
It's an Aimpoint Comp M3 www.aimpoint.com/o.o.i.s?id=258&product_id=115 |
||
|
|
|
[#13]
Very good idea, and inexpensive.
From, Joe.... |
|
|
|
|
[#14]
I could never bring myself to cut a COLT handle like that!
If I had an aftermarket, I would do it though! |
|
|
|
OR, USA
|
[Last Edit: rparrish]
[#15]
Just out of curiosity, what is the difference between a Colt carry handle and one from the other manufacturers? Are they designed or built differently? I can't tell a difference between any of mine. Thanks
|
|
|
|
[Last Edit: markm]
[#16]

|
|
|
|
OR, USA
|
[#17]
So, the other manufacturers are using non mil-spec parts? If so, the non Colt handles I have seem to zero just fine. I just wasn't sure what the difference was. Thanks
|
|
|
|
[#18]
www.ar15.com/forums/topic.html?b=3&f=18&t=237552 |
||
|
|
OR, USA
|
[#19]
Thanks for the link - I had not seen that particular thread yet.
|
|
|
VA, USA
|
[#20]
Bogus! Wow, remind me to tell all those aluminum parts I blued.  Correct: You cannot blue aluminum or any non-ferrous metal w/ blue designed for ferrous metal. They do make a thing called Aluminum Black and another formula designed for brass. Most metals oxidize to some extent and that is all you are doing; creating a colored oxide coating on the surface of the metal. |
|
|
|
OK, USA
|
[#21]
Used your thread instructions last night...even I couldn't screw it up...turned out great, will go on my new midlength build...
|
|
|
|
[#22]
Glad it helped Now post some pictures! |
||
|
|
OK, USA
|
[#23]
WILCO...my gear shipped from Del-Ton yesterday, will have pics up in about a week...
|
|
|
TX, USA
|
[Last Edit: superbee24]
[#24]
Thanks for the info. I cut mine down. Here's a couple of pics, I actually sanded it down just a little more than yours for a smoother look. I turned out pretty good for an hours worth of work with a dremel tool.
   IMG]i95.photobucket.com/albums/l152/superbee24/CUtcarryhandle.jpg |
|
|
TX, USA
|
[#25]
Here is the cut handle and cowitness.
http://i95.photobucket.com/albums/l152/superbee24/CUtcarryhandle.jpg http://i95.photobucket.com/albums/l152/superbee24/cowitness.jpg |
|
|
|
[#26]
Great job superbee
|
|
|
|
|
[#27]
+1 Very nice work! |
||
|
|
TX, USA
|
[Last Edit: superbee24]
[#28]
Thanks for the compliments.
It was actually pretty easy with a demel tool. I wanted it to be as low profile as possible, so I sanded the "ears" down to where they are barely over the aperture. I also smoothed out a couple of sharp edges on it in a couple of places. Again, thanks for posting the instructions and giving us brave souls a guide. 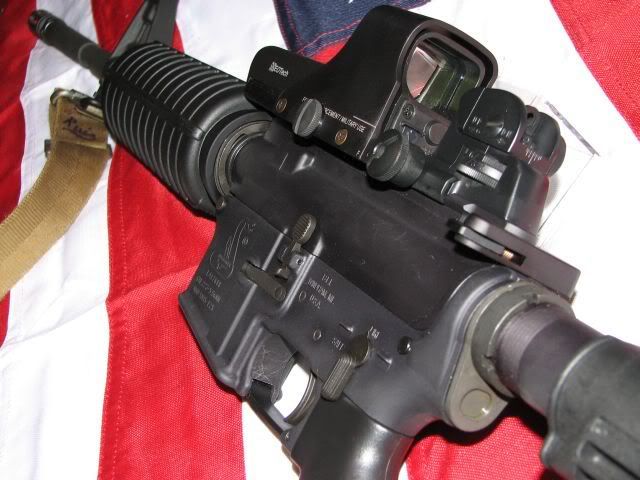
|
|
|
|
[Last Edit: Hemi-Cuda]
[#29]
Sadly, I used a hand saw. But yeah man, it turned out real nice. No problemo, glad it helped you. |
||
|
|
OK, USA
|
[#30]
HemiCuda, As promised...  Thanks for the guide...I'll use a band saw on the next one though... |
||
|
|
|
[#31]
Great looking middy you got there, good job |
||||
|
|
SC, USA
|
[#32]
Does anyone have a pic of how this would cowitness with an Aimpoint?
I have been debating getting a flip up BUIS but I didn't want to lose the distance adjustment. Do you look over the aperture when using the reflex sights or through it? Nice job to all who did this and posted pics. |
|
|
|
[Last Edit: Hemi-Cuda]
[#33]
I'm trying to find my pic, I'll update but If you do this process depending on your mount you should have absolute co-witness (dot right over the front sight post) and since the Aimpoint is Parallax free, you can most certainly just aim over the aperture. Looking for pic, will update. 
|
||
|
|
|
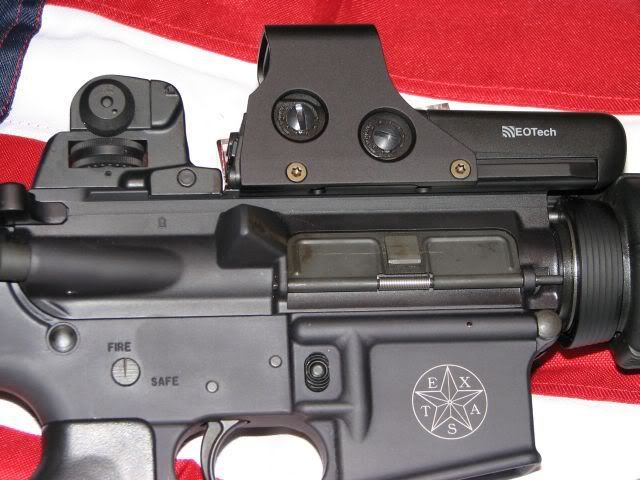
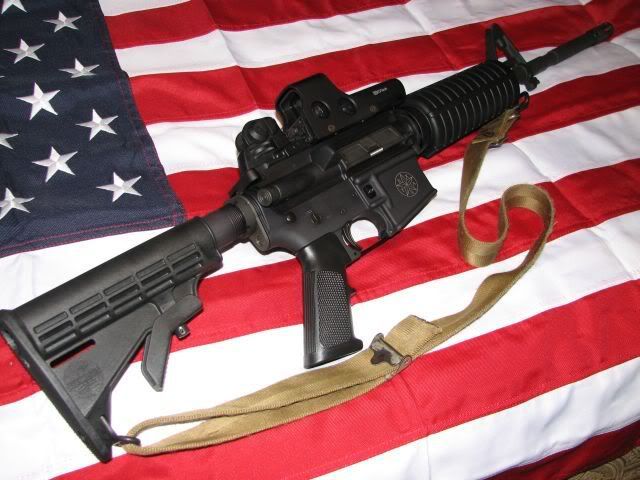
[#34]
You can find pics here (first page, first post) of my EOTech/CCH BUIS combination and the views looking through it. I know it’s not an Aimpoint, but it’ll give you some basic idea of what to expect.
FOR THOSE NEW TO THE AR: HERE ARE SOME “OPTICS OPTIONS”. |
|
|
|
|
[#35]
This man is my tag team partner. 
|
||
|
|
|
[#36]
|
|||
|
|
|
[#37]
Also:
Fixed all of the image links with a permanent host. |
|
|
|
|
[Last Edit: EricCartmanR1]
[#38]
Those kind of cut down carry handle sites go for $30 at AIM. I say sell your carry handle for $50 and buy the one at AIM for $30. No labor involved and you just made $20
www.aimsurplus.com/acatalog/Removable_AR15_M16_adjustable_Rear_Sight.html 
|
|
|
|
USA
|
[#39]
Anyone have one of these from Aim? Stupid question...but what's the difference that makes LMT's version of the same thing cost nearly $100 more? It's got to be more than just the logo. |
|
|
|
|
[#40]
Mil-Spec sight bases and I believe the LMTs are specifically machined to that shape, the ones on AIM look chopped. |
|||
|
|
|
[#41]
I chopped an AR-10 carry handle that I got for cheap as cosmetic seconds from ArmaLite a few years ago. I get a good co-witness with my Aimpoint and an SR-25 flip-up front sight using a Bushmaster raised front sight blade.
 
|
|
|
|
TX, USA
|
[Last Edit: Roger3]
[#42]
Yes I got one. And it was a waste of $30. First Problem: Sight sits to high. Had to raise the front sight/post so that it was even with the protective ears, just to get the bullets on the paper. And yes the rear sight was all the way down. Second Problem: Sight won't stay put. Even with the screw tighted with a screw driver the sight still moves back and forth on my RRA flat top receiver. It does not fall off, but can move about 1/8" of an inch back and forth. The good news. This crappy piece of chinese junk, pissed me off. And in my anger I found the motivation to chop my extra Bushmaster carry handle and make my own BUIS. And it came out great. Thanks Hemi-Cuda. |
||
|
|
USA
|
[#43]
I feel validated then. A couple nights ago I decided to give one of these "cut carry handle" sights a try, but I found one of the EE dealers selling the LMT for $89 delivered, and figured for the extra $60 over the Aim one, it was worth it to just get the quality one to start with. I should have it any day now. |
|
|
|
TX, USA
|
[#44]
As I mentioned above, after wasting $30 on the chinese sight I cut my extra Bushmaster carry handle. Here is a pic of the finished BUIS.  . |
|
|
|
[Last Edit: Hemi-Cuda]
[#45]
Wow excellent work Roger. You did a great a job. Really smooth painting and sanding. |
||
|
|
|
[#46]
+1 Excellent job! Looks a lot like mine. 
|
||
|
|
|
[#47]
|
|||
|
|
MO, USA
|
[#48]
you can't expect a quality sight for $30
i am suprised that AIM carries that chinese crap |
|
|
WI, USA
|
[#49]
I did mine today. I'm more of a hack and don't really care if it looks perfect or not. Plus it's something I did with about a matter of less than 1/2 hour labor.
Check it out: Here's how I did it: cut it with a chop saw shimmed it in a vice and went to town with a hand held belt sander and wallah: I used a sharpie to cover up the cut part If you don't sit there and inspect it, it looks just fine. If you nitpick it, yes, it's not as nice as some of you other guys. But it works the same as the nice looking one. One thing that I didn't realize is the sight picture is actually alot cleaner with the handle cut off. I used to get that reflection off the inside of the carry handle. This is way better. Plus a hair lighter. Every ounce counts on this one, it's an HBAR. |
|
|
 Win a FREE Membership!
Sign up for the ARFCOM weekly newsletter and be entered to win a free ARFCOM membership. One new winner* is announced every week!
You will receive an email every Friday morning featuring the latest chatter from the hottest topics, breaking news surrounding legislation, as well as exclusive deals only available to ARFCOM email subscribers.

AR15.COM is the world's largest firearm community and is a gathering place for firearm enthusiasts of all types.
From hunters and military members, to competition shooters and general firearm enthusiasts, we welcome anyone who values and respects the way of the firearm.

Subscribe to our monthly Newsletter to receive firearm news, product discounts from your favorite Industry Partners, and more.
Copyright © 1996-2024 AR15.COM LLC. All Rights Reserved.
Any use of this content without express written consent is prohibited.
AR15.Com reserves the right to overwrite or replace any affiliate, commercial, or monetizable links, posted by users, with our own.


