|
Posted: 11/9/2005 9:45:19 AM EDT
Finnaly decided to give this paint thing a try.
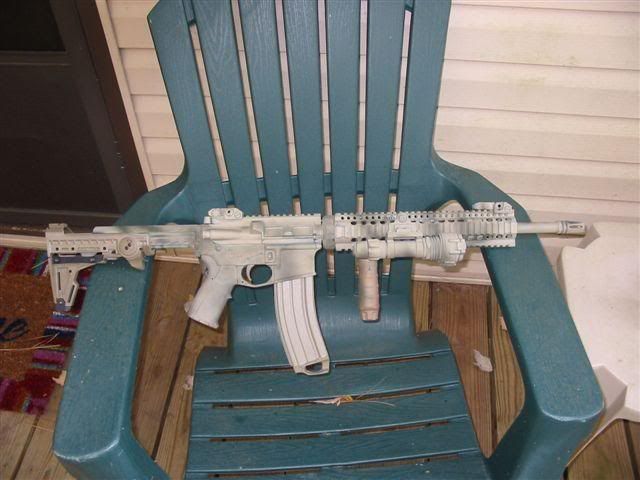
Phase one complete. The base coat. Krylon Camo Khaki The stock is drying right now. Got a can of OD and a can of brown. I'm just going to do a few spots and streaks on it. Mostly it will be the Khaki. Tonight the stock will get baked and I will put it all together and take a new pic. After the paint dried I put it in the oven on about 200 F for about 30 minutes. Was that about right?  Update*** Finished almost everything. A mag is drying now. As you can see I missed the stock ring and the rear pin on the lower, but I just figure those will get hit with some brown and OD.   UPDATE** X2 Finished the mag, here is the gun with the mag.  Here it is with some brown streaks.  Here is it with brown and green. Green looks a little dark, but it's still wet.  Link to Hi-Res Other side  Link to Hi-Res Better pic on the carpet. Just need to bake it and I am done. I am happy as a pig in poo!  Link to Hi-Res  Link to Hi-Res |
|
|
|
[#1]
Sounds like you are doing fine, but I hope you are doing multiple light coats as opposed to heavy coats.
|
|
|
|
[#2]
I did three kinda medium coats. That okay? |
|
|
|
|
[#3]
It looks heavy from the picture, but it could just be the picture....
Light coats will always wear better than medium or especially heavy coats. Don't worry about covering everything evenly in one coating, as it doesn't matter what the individual coats look like. All that matters is the end prodcut. Remember that if you like your finished look, drop it in the oven and cure it for awhile, I would leave it sit overnight, then drop it in the oven for longer than just 30 minutes, and probably make it 90 minutes to 2 hours. If you are happy with the look, clearcoat it by misting light coats on from a distance. Multiple LIGHT coats will help keep a flat look, and make it solvent resistant. Drop it back in the oven after it drys overnight. Or just spray it on heavy and don't worry about it, there are people who really don't care about the subtle angles of finishing it, and only want to break up the outline. |
|
|
|
[#4]
Cool! Thanks for the advise! This is my first time trying, and this is a "beater" rifle that I built to experiment on so I can mess it up and not cry about it. I already am liking it though and am thinking about doing it on other rifles. So your advise is much appreciated. |
|
|
|
|
[#5]
Looks great! What's the next step?
It's a little late in the year, but you'd be shocked how well plain old sunlight can dry paint. G |
|
|
|
[#6]
mjohn3006,
No problem at all, feel free to post any questions you may have, or email me at [email protected] if you need anything. Leaving it outside will make the paint feel dry, but the low oven temps for extended time give it a full hard cure. |
|
|
|
[#7]
Updated above.
|
|
|
|
[#8]
Looks great!
I'm always impressed by you guys that have the balls to do that to your rifles. I'd love a cool paint job but I'm afraid mine would be crap haha. I do have a toy 9mm AR I might it try it on sometime. good luck and post more pics later. |
|
|
|
[#9]
Looks good so far

|
|
|
|
[#10]
It does look nice. Are you going to add any other color or is that it? Looks good regardless.
|
|
|
|
[#11]
Took me a few years to get the balls to do it. I build this rifle to have absolutly no purpose but fun. So I don't mind if I mess it up. |
|
|
|
|
[#12]
I am going to add some Brown and some OD Green. Thanks to all for the complements. |
|
|
|
|
[#13]
I'm painting my first this weekend also.
In order to error on the side of caution I choose a 243 NEF handi rifle with a tasco scope.  |
|
|
|
[#14]
I think I have finally found an excuse to buy an Airsoft. I can paint it without worrying about messing it up...
you guys got guts... |
|
|
|
[#15]
I did mine last weekend, I have added some more brown to it,
|
|
|
|
[#16]
Sweet!! Very nice!!! This is so going to be one of my next projects soon... busy working but man I would love to paint my AR.. still learning.
- rem
|
|
|
|
|
[#17]
Update X2
|
|
|
|
[#18]
What type of rail is that? |
|
|
|
|
[#19]
Looks like a LaRue rail to me.
|
|
|
|
[#20]
its a Daniel Defense |
||
|
|
|
[#21]
I like the camo job. Looks easy to do and the result is really nice. Can you take pics outdoors whenever you have time ?
|
|
|
|
[#22]
I live on a second floor apartment. I did all the spraying out on my balconey. I am heading up to my parents house for Thanksgiving. I will bring it and take some pic in my parents back yard. |
|
|
|
|
[#23]
I put some plastic parts I didn't want to cook in an oven in my truck for a few Texas summer days and the cure was as good as on the oven baked metal parts.
Hello...my name is Ricky and I'm an AR-coholic |
|
|
|
[#24]
Hi Ricky, welcome to the addiction. You'll find this is a support group like no other. We treat our adiction by not treating it at all, in fact we encourage it. Go with your feelings, and arm yourself as you feel fit! |
|
|
|
|
[#25]
I was thinking about putting some krylon on an M4forgery I have. But I didn't know you had to let that stuff sit in the oven??? |
|
|
|
|
[#26]
Looks good, but I keep wondering with painted guns: will you be able to smell the spray paint everytime you put it up to your shoulder to get a cheek weld? Also, you are able to put the whole thing in the oven, handguards, pistol grip and all?
Regardless it looks sweet. |
|
|
|
[#27]
There is no smell once it is fully cured. |
|
|
|
|
[#28]
Its only in the oven at about 175-200F. The plastic seems to be fine. |
|
|
|
|
[#29]
Hey guys,
First off, they look great! The only questions that I had were with regards to the baking/curing. First, thanks for the temperature setting, as I was concerned about warping the plastic parts. So here goes: 1) I'm assuming you just took the whole thing apart (or where it needed to be taken apart), sprayed accordingly and baked the broke down parts, and reassembled once cured. Is this right? 2) How did you place it in the oven? Meaning, did you spray, wait for the paint to dry and then put in the oven? Did you put the parts on a tray, on a grill, hang parts from a grill, etc.? Any info is greatly appreciated. 3) Any ill effects to the oven or do you have an extra one for shop purposes (my brother has an extra one that he bakes powder coating onto engine parts with and you cannot use it for food due to it)? I'm planning on picking up a kit rifle once I finish my government sponsored tour of Korea, and wouldn't mind dressing it up a bit with a sand/desert paint job (like shown on Page 1 by the second pictured rifle). So, again, information is awesome and appreciated. Thanks in advance, SPC Richard A. White, Senior Medic 249th MP Detachment (EACF) Camp Humphreys, ROK |
|
|
|
[#30]
Thank you for your service! |
|
|
|
|
[#31]
Looks great man! I can't wait to paint another one of mine.
Is the Krylon khaki a really light tan or is it a darker shade? |
|
|
|
[#32]
Really light tan, actually drifting torwards a greyish. The first several pics are nothing but the Khaki. |
|
|
|
|
[#33]
I think you did good.
|
|
|
|
[#34]
Wait a minute, am I retarded? I thought krylon was just spray on, didn't need curing. And that other products like norrells and gunkote needed to cure in an oven. Edumacate me please.
|
|
|
|
[#35]
Looks like it came out good. I like it!
|
|
|
|
[#36]
People told me I should put it in an oven. So I did. That is the extent of my knowledge on the subject. |
|
|
|
|
[#37]
|
|
|
|
[#38]
I have a question for someone who knows their way around the paint. How do you go about painting a scope? I want to paint my scope to match the rifle I painted, but a couple of concerns are holding me back.
1) I have a rubber armored scope, how well will the coat of paint stick to that rubber? 2) I'm a little leery about sticking my scope in the oven How 3) Whats the best way to keep the lenses from getting painted as well? Thanks guys, any help with these questions will be appreciated so feel free |
|
|
|
[#39]
Krylon doesn't need to be chucked in the oven, but it certainly doesn't hurt. As it gets colder and with a higher humidty in areas of the country, getting your weapon to dry fully may be harder. Instead of leaving it sit around, a trip to the oven for a little bit gets the finish fully ready to go get abused. |
|
|
|
|
[#40]
I'm with Stickman on this.
I would highly recommend a very light coat of the pigment (just enough to cover), and after it has flashed-off (appx. 1 hr) a couple of coats of clear to seal and protect the base coat. Let it flash-off then bake to get it hard. The sun-lit ,car dash trick works great too. I've measured temps up to 150 in my Toyota. If it comes out a little too glossy, hit it with some 000 steel wool or soft leather. P.S. DON"T BAKE YOUR SCOPE Shoot it the same as everything else (after masking off the lenses), then set it aside while baking the other stuff. It will cure fine over time, and although it may not get as hard, you don't NORMALLY bang your scope around, so it doesn't need to be as durable....IMHO. |
|
|
|
[#41]
I need to do this to some of my rifles. Have just been to scared to screw them up.
|
|
|
|
[#42]
|
|
|
|
[#43]
Just paint it black. |
|
|
|
|
[#44]
No, but the coloring may lightly stain the parkerizing in areas. Barrells and areas that get real hot are more prone to this. |
|
|
|
|
[#45]
Nice work mjohn.
Thought I'd offer my own bit of peanut gallery advice.............. Perhaps using some Maapul ladder rail covers - in black, would brake it up nicely and add a bit of contrast Just a thought. Overall, two thumbs up and kudos for having the stones to paint a $1,000+ rig as a first timer! |
|
|
|
[#46]
Did you paint the inside of the upper, where the bolt carrier rides? It looks like there's alittle paint in there.
|
|
|
|
[#47]
A little bit got in there. But not much. Bolt carrier is sliding just fine. I'll be taking it to the range sometime in the next few days. |
|
|
|
|
[#48]
Looks real GOOD , very nice job
|
|
|
|
[#49]
|
|
|
|
|
[#50]
Well said. |
||
|
|
 Win a FREE Membership!
Sign up for the ARFCOM weekly newsletter and be entered to win a free ARFCOM membership. One new winner* is announced every week!
You will receive an email every Friday morning featuring the latest chatter from the hottest topics, breaking news surrounding legislation, as well as exclusive deals only available to ARFCOM email subscribers.

AR15.COM is the world's largest firearm community and is a gathering place for firearm enthusiasts of all types.
From hunters and military members, to competition shooters and general firearm enthusiasts, we welcome anyone who values and respects the way of the firearm.

Subscribe to our monthly Newsletter to receive firearm news, product discounts from your favorite Industry Partners, and more.
Copyright © 1996-2024 AR15.COM LLC. All Rights Reserved.
Any use of this content without express written consent is prohibited.
AR15.Com reserves the right to overwrite or replace any affiliate, commercial, or monetizable links, posted by users, with our own.


