|
Posted: 10/27/2017 9:42:57 AM EDT
[Last Edit: November5]
First off, screw photobucket for ruining the original thread and the internet. All photos here will be hosted on ARFCom.
Original ARFCom thread is here. Thanks to Hellbender (a.k.a. @Lostinthewoods), @wheelchairman, and @MRW. The following posts are Hellbender's original content, I've added a few notes that are annotated as such where needed
|
|
|
|
|
[Last Edit: November5]
[#1]
Part 1: Bolt Slick Up
These mods will reduce or eliminate the "brassshaving" problem many rifles exhibit, it will also increase reliability in several ways and make the return to battery very consistent. These pics are of a DPMS LR bolt, but all these things will be the same for AR-15's also. Remember, on all these mods, you are onlypolishing and slightly (a couple of thousandths) rounding the corners off, you ARE NOT removing a lot of metal. Get the following tools: A pack of black emory paper in mixed grits of220-400 Dremel tool with some buffing pads andpolishing compound Hand drill or drill press or lathe Can of brake cleaner 600 grit lapping compound, here's what Iuse.... https://www.brownells.com/gunsmith-tools-supplies/metal-prep-coloring/abrasives/lapping-compounds/lapping-compounds-prod1137.aspx (Guessing here as the original link is dead - Josh) A fine sharpening stone. COMPLETELY disassemble the bolt and clean all the oiloff everything with brake cleaner Start with the extractor, look at the picbelow and polish the area where the extractor slides over the rim of the case, start with the 320 grit paper wrapped around a round rod and finish up with the Dremel, it should look like a mirror after you're done. Don't mess with the actual "hook" that grabs the case rim. I also smooth up the sharp edges on each side of the extractor groove, as these can scrape off brass as the case rim turns during bolt rotation. Check the ejector spring in the hole and makesure it slides freely with nothing grabbing in the hole, stone the sharp edges of the spring where it can rub/scrape on the sides of the hole. Check the ejector in the hole and make surenothing rubs, polish the face (that touches the shell head) of the ejector, use the stone and the Dremel to a mirror finish. 
Now the bolt body..... The flat, sharp edge on the bolt face (where the extractor sits) needs a small chamfer put on it, also the edges of the ejector hole needs smoothed up. Think of the case head turning and sliding against these sharp edges with several thousand pounds of pressure on it......and you wonder why there are brass shavings there? 
Chuck the tail of the bolt body (the small end) in a drill or lathe, and while spinning it, wrap some 320 emory cloth around a small, flat tool and polish the bolt face. Here's what it should look like when you are finished: 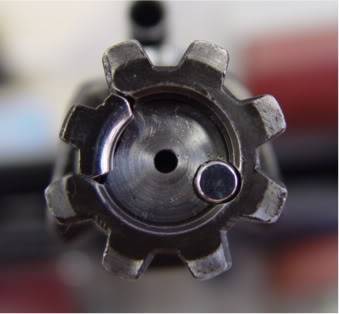
Now to the bottom of the bolt; put the bolt in the carrierand find the lugs that grab the shells from the magazine, here's a pic: Slightly round and polish the rear sharpcorners (bolt carrier side only) of these lugs, as they can scrape the shoulders of the cases in the mag as the bolt cycles to the rear. (Not all calibers/mags will hit here, but I do it on everything anyway) 
Now we can lap the bolt lugs to the barrelextension...... Take an empty case and cut it in two, thenfind a spring that will fit inside the case like this: 
Clean the locking lugs on the bolt and inside thebarrel extension with the brake cleaner. Assemble the bolt and carrier group all backtogether, WITHOUT the ejector and extractor in the bolt. Put a little of the 600 grit lapping compoundon the rear (bolt carrier side) of each of the bolt locking lugs. Put your spring loaded cartridge in thechamber, slide in the BCG, and assemble the rifle. Pull back slightly on the charging handle(1/2" or so), just enough to work the locking lugs and slightly retract the bolt. The spring inside the case needs cut so that the rifle recoil spring will close the bolt. Work the bolt 100 times or so, put new lappingcompound on the lugs every 25 strokes or so. I watch the wear pattern on the bluing on the back of the lugs and quit when I get to about 70% contact on all the lugs, many rifles only hit 3 or 4 lugs when new. You will NOT create excessive headspace bydoing this if you use the 600 grit, it is very fine, and will only knock off the high, rough spots on the lugs, it is basically doing what 500-1000 fired rounds would do to a stock bolt. That should finish the bolt. |
|
|
|
|
[Last Edit: November5]
[#2]
Part 2: Ultimate AR Bolt Carrier Slickum
Now I'll attack the bolt carrier, some of these are so rough (esp. the sliding rail surfaces) they look like a wood rasp. Use a fine stone and 320 emery paper to smooth up the surfaces shown in the pics below. Buff them all to a mirror finish when done. 
Also slick up the face of the hammer (remove it from the lower receiver) where it slides against the bottom of the Bolt Carrier. 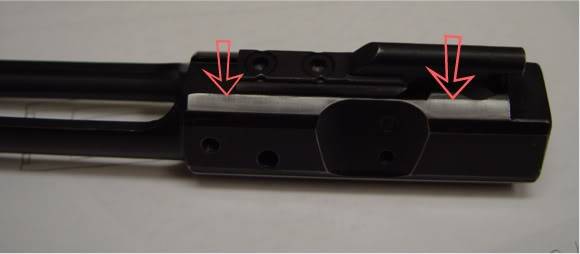
|
|
|
|
|
[Last Edit: November5]
[#3]
Part 3: The Barrel Extension
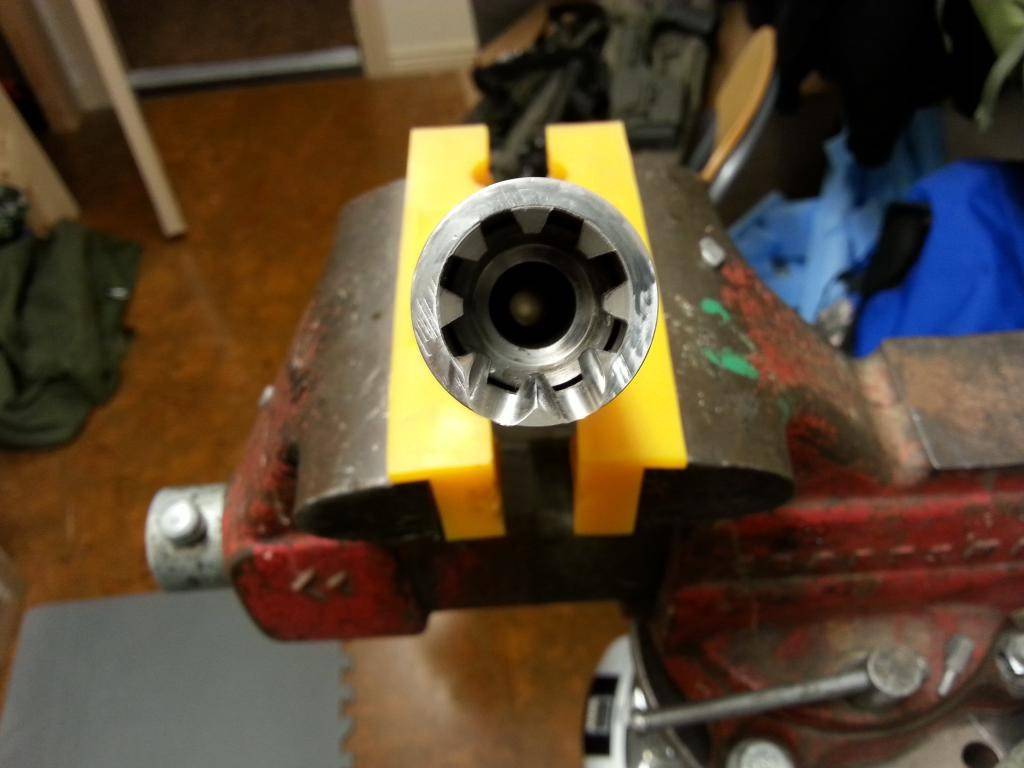
The barrel extension usually only needs the feed rampspolished and the sharp edges knocked off the 2 lugs shown in the last pic below. Notice how the rough machine marks run at 90degrees to the nose of the cartridge (scraping a little off the bullet on the way in). BAD......... 
GOOD......... 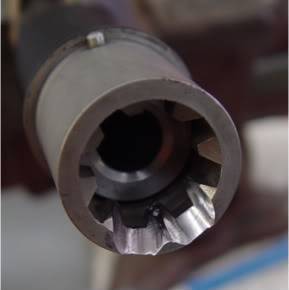
Also note how I knocked off the sharp ridge down the center, which will scratch the case on the way into the chamber. On some guns the two lugs shown below will make longitudinal cuts/scratches on the shoulder and neck of the case upon ejection. Knock off the sharp points and slick up the edges a little to cure this problem. 
|
|
|
|
|
[Last Edit: November5]
[#4]
Part 4: The Chamber
Wrap a strip of 320 grit emery paper around a snug fitting swab, secure it with a piece of tape. I use a couple of full turns so as to cover the tape. 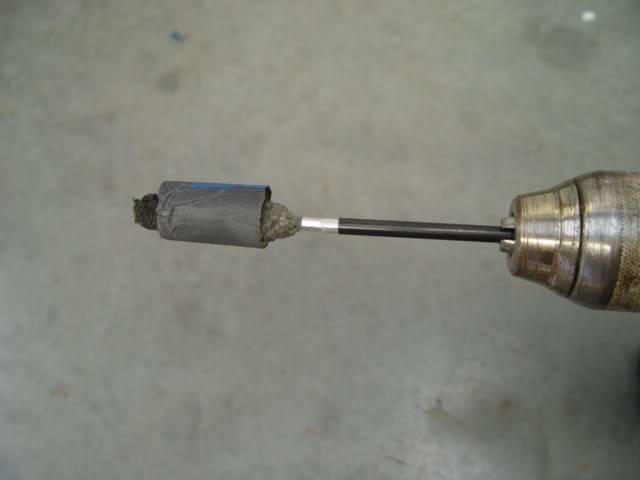
Chuck the rod into a medium speed hand drill and polish the chamber....keep it out of the shoulder area, just polish the straight, parallel walls of the chamber. This will help with extraction and brass life. Here's more than you've ever wanted to know about chamber polishing..... http://www.varmintal.com/a243z.htm On an AR, I just go to 320 grit, it lowers bolt thrust forces about 500-700 lbs over going a full polish to crocus cloth, but still adds to reliability and brass life. |
|
|
|
|
[Last Edit: November5]
[#5]
Part 5: The Magazines
Disassemble your mags and degrease everything with thebrake cleaner. Use the 320 grit paper and smooth up all thesharp edges, there is usually a sharp wire edge on many of the stamped edges, esp. the mag lips. 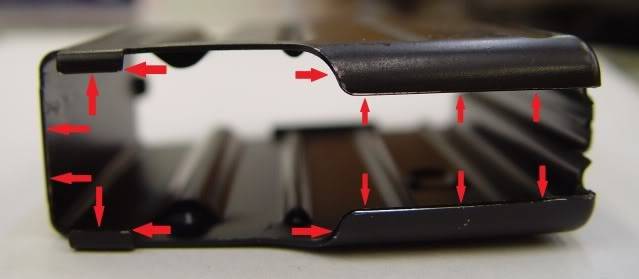
Slightly round the sharp corners here 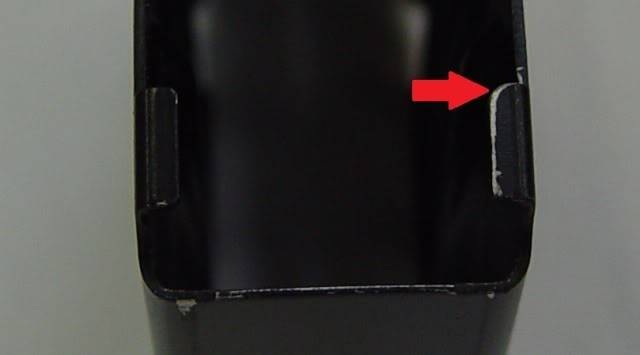
|
|
|
|
|
[Last Edit: November5]
[#6]
Part 6: The Bolt Catch
The bolt catches are cast and usually have lots of bumps and high spots that need stoned off. You want the catch to work quickly and smoothly with no drag. When we start tuning things later this will be important. Check the spring and plunger for any burrs that drag in the hole. Make sure the catch pivots easily on the pivot pin and the hole is not too tight around the pin. Take some cold blue when you're done and touch everything up. 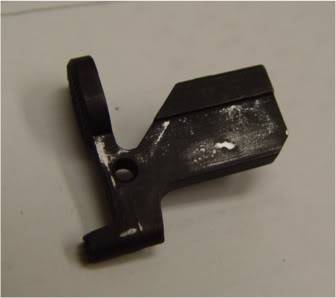
|
|
|
|
|
[Last Edit: November5]
[#7]
Part 7: The Pivot/Takedown Pins
Many AR's have pins that are very tight and hard to push, requiring a tool (bullet tip, punch, etc) to push them in. The tool tends to slide off the rounded head of the pin and scratch the lower. I chuck mine in the lathe and put a slightly concave indentation on them. If you don't have a lathe, you can chuck the pin in a drill and use a stone on your Dremel and do the same thing. 
|
|
|
|
|
[Last Edit: November5]
[#8]
Part 8: The Gas Block
For those that use the JP Adjustable Gas Blocks (&some other brands), I don't like the single set screw that is supposed to be secured with Loctite (which breaks down under high heat, like a gas block). So I add an extra set screw that locks the gas adjustment screw... 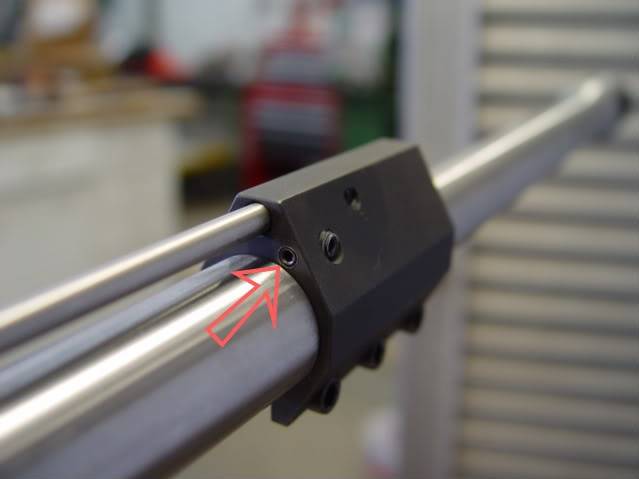

PS: I also always use a CLAMP on style gas block in a small (.750" or smaller dia.) barrel, as I've heard of the set screw type actually deforming the bore of the barrel when tightened. |
|
|
|
|
[Last Edit: November5]
[#9]
Part 9: DPMS LR308 Mag Catches
IDIOCITY, ie STUPIDITY...definition: med. jur.That state of the mind which cannot perceive and embrace the data presented to it by the senses; and therefore the stupid person can, in general, form no correct judgment. It is a want of the perceptive powers. Ray, Med. Jur. c. 3, Sec. 40. Vide Imbecility. This post concerns the DPMS LR series rifles only. DPMS decided to use the standard AR15 mag catch and button on the LR series rifle, even though the receiver is almost 1/4" wider at this point. This results in the stock ALUMINUM button usually having only 2 (TWO) threads engaged...... CHECK YOURS!! This is a major malfunction waiting to happen....please reference definition above. Anyway, this is how I fixed it; buy an extended STEEL button, this is the one I used...... https://www.brownells.com/rifle-parts/receiver-parts/magazine-parts/magazine-releases/ar-15-m16-extended-oversized-magazine-release-button-prod18770.aspx (Again, guessing on the link -Josh) Take a file or a belt sander and cut off all the "oversized" part, making a long, standard sized button. This will allow at least 4-5 STEEL threads to secure the button, it's a little higher than stock, but you could cut it down more if you wanted it shorter. 
|
|
|
|
|
[Last Edit: November5]
[#10]
Part 10: Checking and adjusting Bolt Catch overrun.
The amount of Bolt Catch overrun is important,as too little may not allow the Bolt Catch time to fully engage, and too much (most common) beats excessively on the Catch and causes a "slamming" feel when the bolt locks back on the last shot of a mag. It is also hard on your lower receiver. On Large frame AR's, this is a common cause of premature Bolt Catch breakage, as the heavy parts really slam the Stop. Doubly important if you have added mass with a Tubb weight or heavy buffer. First (for A1 and A2 style stocks only),remove the Buffer and Buffer Spring, take a flashlight and look down the Buffer Tube and MAKE SURE the Buttstock Screw is below the level of the Buffer Tube end. Many of these screws are too long and protrude into the end of the tube. This is where the Buffer strikes and stops the rearward movement of the Buffer. If it is too long, grind or file off the end of the screw until it is below flush. With the rifle fully re-assembled (if you have a Tubb weight, install it also), pull the charging handle ALL the way to the rear and hold it there. Push in the Bolt Catch and hold it. Check how much gap there is between the Catch and the Bolt face, it should be about .075 inches (2mm). This is about the thickness of a nickel. If it is too close, you can sand or file some off the plastic snubber on the rear of the Buffer. If it is too wide (most common), remove the buffer and spring, then place shims (Quarters are almost the perfect size, and work well) down in the bottom of the Buffer Tube until the gap is correct. When you get the gap correct, remove the shims, and drill a small hole in the center of them so the air hole in the Buttstock Screw is continued. Check all your mags and make sure they engage the Bolt Catch properly, sometimes the follower hangs a little in the last little bit of travel and will not engage the Catch fully. |
|
|
|
|
[Last Edit: November5]
[#11]
Part 11: Buffer Spring Tuning
What we are doing here is adjusting your Buffer Spring rate to your individual gun and load. Stock springs are a "one size fits all" and are almost always much heavier than needed. This mod, coupled with an Adjustable Gas Block(AGB), will allow you to adjust both the amount of rearward movement (w/ AGB), and forward movement (by adjusting Buffer Spring) of the Bolt Carrier Group. The recoil feel, smoothness, and gun movement will be considerably lessened when these 2 forces are balanced properly. FIRST: Do all the other mods (1-10) I've outlined in the last few weeks. Click on my Username in the upper left corner, and then hit "View Posts" to look them up. SECOND: You MUST have your load worked up and finalized and your adjustable gas block (if equipped) adjusted properly (per directions with gas block). If you are gonna be shooting a bunch of different loads, don't do this mod, as you may need to buy a new spring and start over if your load changes very much in either gas pressure or recoil energy. THIRD: Only do this with a chrome silicone spring (I use Tubb's CSS) as a normal spring will change rates as the spring wears. Now, on to the tuning. Load up 20 rounds with 1/2 grain LESS powder than your normal, finalized load; OR, as an alternate, or if you shoot factory loads, remove your scope. I usually pull my scope off, or, if you have a heavy stock, like a PRS, pull it off. What you are doing here is either reducing the recoil/gas pressure input OR reducing the mass the recoil spring has to work against. This makes sure the spring cutting will be on the safe side and not cut too much. Load a magazine full of your loads and ready the gun for firing. Now, while holding the rifle VERY LOOSELY at arms length (let the rifle free recoil as much as possible, NOT against your shoulder) shoot a couple of rounds. If the rifle functions properly, remove thebuffer spring and cut a full coil off the buffer spring (not counting the first flat coil). I use a Dremel tool with a thin cutoff wheel to cut the spring. Replace the spring with the cut end towards the butt of the rifle. Reassemble the rifle and repeat this process,1 coil at a time, until the rifle malfunctions, or you remove 6 coils maximum, whichever comes first. Make sure you always hold the rifle at arms length, loosely, as you do this. My guns, which are slicked up, always go the full 6 coils (plus the flat coil, which does not count). Now, go back to your normal load and readjust your AGB, if equipped. |
|
|
|
|
[Last Edit: November5]
[#12]
Part 12: Fitting Barrel Extension to Upper Receiver
This is a little out of order with the other HOW-TO's but here it is anyway. Most people use Loctite for this step and it is a lot easier, but...This is the ULTIMATE AR !!! So, we're gonna do it right. First we get to measure the Inside Diameter(ID) of the upper where the Barrel Extension slides into, then we will measure the Outside Diameter (OD) of the Barrel Extension. Check the Barrel Extension for any burrs or high spots. If the difference is .0025" or less, you are good to go, no need for a shim. 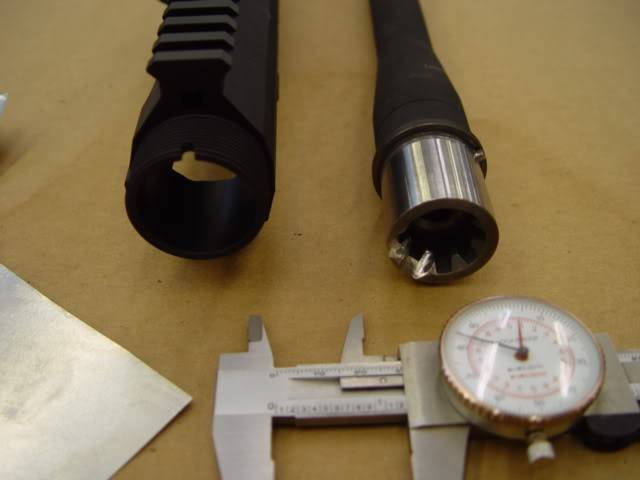
Now we get to do some math..... 
Then we make a trip to the local Industrial supply house and get some Stainless Steel shim stock of the correct thickness (in this case .002"). Get a pair of sharp scissors and cut the shim to fit around the barrel extension (make sure it clears the feed ramps). I take a flat stone and knock the burrs off the shim to make it flat again. 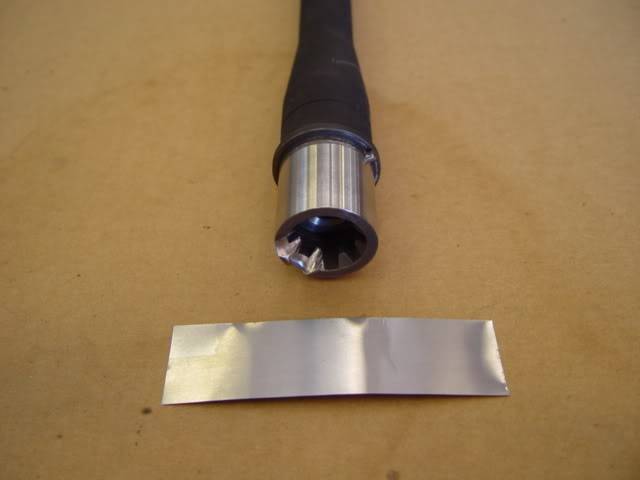
Wrap it tightly around the extension, with the seam to the right or left side of the rifle (NOT the top or bottom), secure it with a piece of tape to get it started (remove the tape before you slide it all the way in). I put a drop of blue Loctite in the seam right before I put it all together 
You can heat the receiver up a little if it's a little tight getting together. 
DON'T FORGET to install the ejection port cover before the barrel nut! Install the barrel nut and torque to spec. |
|
|
|
|
[Last Edit: November5]
[#13]
Part 13: For the Lazy
Get an old Weaver ring and grind off the excess and throw the top steel part away. I used a piece of 1/16" thick Kydex, butany plastic will do. Put the ring base in a location that will clear everything and be easy to get to the thumbscrew on the offside. Cut the plastic to fit, and screw it to the base, I used the stock Weaver screws, the angle of the base screw location holds the plastic at the correct angle. I have a brass catcher, but it is a pain. This piles it in a neat little pile right beside the rifle. They sell these premade for AR15's, but they have never worked very well for me, and the attachment screw never fits with my scope ring location. The premade ones don't work well on the large platform AR's, as they are too high. Excuse the spots all over the gun, I haven't cleaned the mud off it from my last match! Only downside I can tell is you will either need to trim your gun case foam to fit, or I just remove it before I put it in. 
|
|
|
|
|
[Last Edit: November5]
[#14]
The following post is from @LRRPF52 -Josh
--------------------------------------------------------------------------------------------- I've been following these techniques for a while as well. I remember the original thread on SH. I also follow Robert Whitley's accuracy enhancement guide. The difference is basically hand-fitting and polishing all the points of conflict, versus slapping parts together. Here's a Krieger barrel that I did for a friend of mine. He was only getting 1.5" groups at 100yds at best. Barrel needed bedding to the upper, and the gas system needed work, with an ArmaLite tube vs, the AR15 that was in it, DPMS aluminum gas block needed replacement, etc. Before: 

After: 
You can see some ugly tool marks that were already there, but are inconsequential to function and accuracy. I wasn't too impressed with that extension aesthetically, but after all the work I did, the gun shoots into the .6's with a random 155gr SMK load he had, 5rd groups. |
|
|
|
|
[Last Edit: November5]
[#15]
This post is from @desertmoon
------------------------------------------------------------------------------------------------- A very painful lesson I learned from positional alignment along the fore and aft axis of port alignment is this: if you move the gas block back more than a few thousandths, you can run into the issue of setting the gas tube back into the carrier key by that same distance. When I made the mistake of doing that on my big Mega, I had the carrier key colliding with the gas tube enough to actually pretension the barrel. My cold shot would be something like four to six inches from the rest of one very strange group. If it weren't for a very odd experience at Fort Benning back in the 80s, I don't know if I EVER would have figured it out. Replacing the gas tube and the block with a unit that needed no alignment fixed the issue immediately. I went from this:  To this: 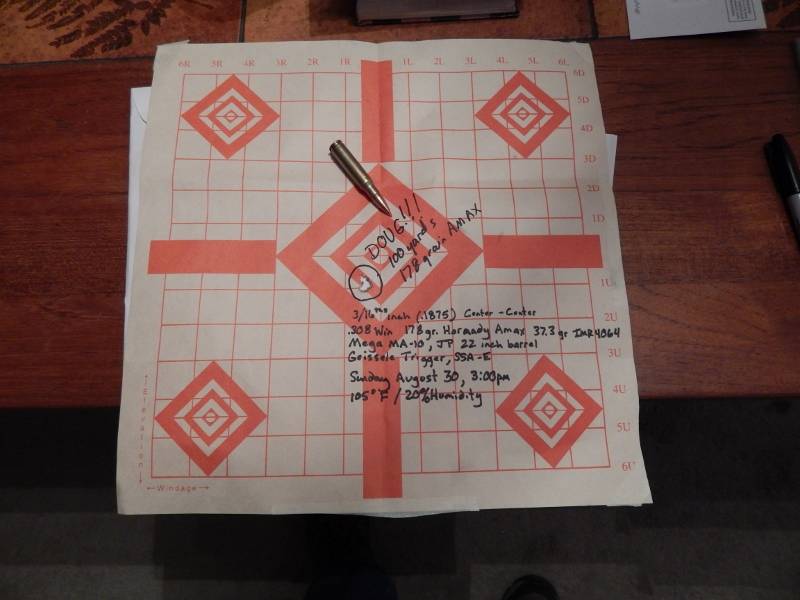
The Benning incident that clued me in to the gas tube having that much influence on a barrel stemmed from the 20 ( or whatever...Ranger, help me out ) to 600 meter pop up range qualifications in Infantry School back in the 80s. The day I had to qualify it was sometime in December or January and it was raining cats and dogs. My qual rifle was an old...old...old....XM16E1 with triangular hand guards. Everyone was wet as could be and everything we had was soaked. It was about 40 or 45 degrees out. I'm in my foxhole when the targets start popping up and I take aim and squeeze the trigger on my first shot and POW! The water just EXPLODED off of the gas tube. It literally superheated right off the tube. Sooooo....for every shot I took I would have to raise up my head and BLOW the steam away ( the rain was comnig down that hard ) each time. I still managed a 35/40 score.....but I was pissed....I would have had expert had it not been for my bobbing and weaving above the sights with each shot. It made me realize how incredibly HOT a gas tube gets with one shot....and also HOW FAST IT COOLS BETWEEN SHOTS. The weirdness in my groups with my Mega was VERY indicative of something reacting to temperature over time. Changing the block and tube fixed the issue immediately. The key thing HERE is that when I check the original alignment of my ports, the gas block was .037 thousandths of an INCH forward of being in true position over the barrel port in the FORWARD direction. Sooooo, I milled the block BACK .037 INCH. In my job, I work with SI Units (metric) and I think in MICRONS. Can you see where I got into trouble. To add insult to injury I was using a straight Wilson Gas tube along with the Wilson block. I fucking Hubble Space Telescoped my gun. Add the possible over length of the straight gas tube with with over length (almost 40 thousandths ) of the block position and who KNOWS how over long I had that system. I never thought how proprietary their parts might be versus Syrac or Odin Works. Lemme tell ya...I learned my lesson and learned it well. THE MORAL OF THE STORY: When attempting to align the block and barrel port positions to "true" make sure you aren't setting your gas tube too far back. I have learned you can reshape and remove a bit off of the ball end of the tube....enough to prove my theory which incited me to replace the gas system....and the gun will run. Your best bet though is to shim forward a bit but try to keep from "milling backward" if you can. |
|
|
|
|
[Last Edit: November5]
[#16]
This post is various links and videos from the original thread. I'm also including links to a few parts that weren't available back then that address some of the issues brought up. -Josh
 Building Match Grade AR-15s Brownells AR15 Upper Receiver Lapping Tool Pacific Tool & Guage AR-10 Upper Receiver Lapping Tool 2A Armament Drilled Through Takedown Pins Battle Arms BAD-EPS Forward Controls ABC/R AR-15 Forward Controls ABC/R AR-10 Forward Controls EMR-C |
|
|
|
USA
|
[#17]
Thanks for posting this.
Needs sticky. |
|
|
|
[#18]
Well... this is simply awesome.
I have always wanted to view this.... but , damned PhotoBucket. Thank you VERY much for this !!! This post , just made my day ! |
|
|
|
|
[Last Edit: MRW]
[#19]
Yay! Glad to help.
I used just a few of these tips when building this rifle below with a Faxon 18" Gunner barrel. It is NOT free floated. Look at the groups, 10 shots at 100 yards, with a magnified optic 
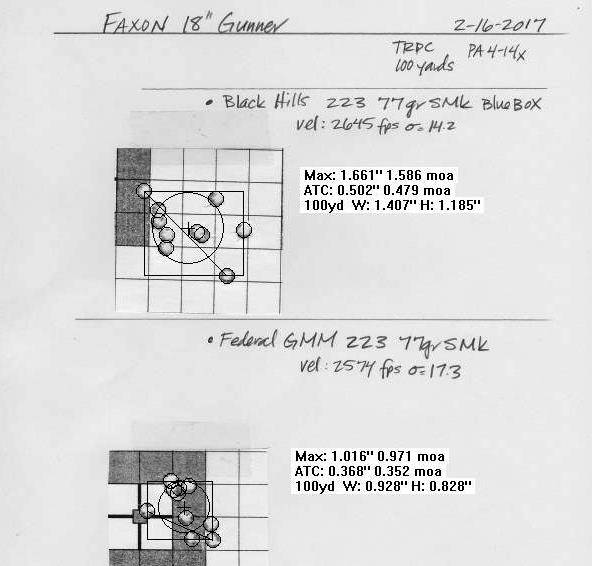
I squared the receiver face and built up the outer diameter of the barrel extension with multiple thin layers of spray paint to give it a snug fit. Blue locktite was used between the receiver and barrel extension. The shim method would certainly be better. Gas tube is aligned to be perfectly centered in the carrier key. Muzzle device is an A1 with symmetrical ports all the way around the muzzle and not overly tourqued down. |
|
|
|
|
[#20]
Originally Posted By MRW:
Yay! Glad to help. I used just a few of these tips when building this rifle below with a Faxon 18" Gunner barrel. It is NOT free floated. Look at the groups, 10 shots at 100 yards, with a magnified optic https://www.AR15.Com/media/mediaFiles/5205/Faxon-18-Gunner-Build-147983.jpg https://www.AR15.Com/media/mediaFiles/5205/2-16-2017-Faxon-18-and-BH-FGMM-77--2-147966.jpg I squared the receiver face and built up the outer diameter of the barrel extension with multiple thin layers of spray paint to give it a snug fit. Blue locktite was used between the receiver and barrel extension. The shim method would certainly be better. Gas tube is aligned to be perfectly centered in the carrier key. Muzzle device is an A1 with symmetrical ports all the way around the muzzle and not overly tourqued down. Questions; How many rounds have you fired from it? {Meaning, you think the spray-paint shim will give way afrter a while? |
|
|
|
|
[#21]
Thank you for redoing this thread!

|
|
|
|
|
[#22]
Thank you X 87,000!
|
|
|
|
|
[#23]
I have an AR that does the cold bore flyer.... off to check its gas tube inter face..
|
|
|
|
|
[#24]
Originally Posted By EVR:
VERY nice!! Questions; How many rounds have you fired from it? {Meaning, you think the spray-paint shim will give way afrter a while? |
|
|
|
|
[#25]
Interesting
|
|
|
|
|
[#26]
Thank you for redoing this! It is a huge help to those that are new, or just plain forgot like me!

|
|
|
|
|
[#27]
Originally Posted By MRW:
Yay! Glad to help. I used just a few of these tips when building this rifle below with a Faxon 18" Gunner barrel. It is NOT free floated. Look at the groups, 10 shots at 100 yards, with a magnified optic https://www.AR15.Com/media/mediaFiles/5205/Faxon-18-Gunner-Build-147983.jpg https://www.AR15.Com/media/mediaFiles/5205/2-16-2017-Faxon-18-and-BH-FGMM-77--2-147966.jpg I squared the receiver face and built up the outer diameter of the barrel extension with multiple thin layers of spray paint to give it a snug fit. Blue locktite was used between the receiver and barrel extension. The shim method would certainly be better. Gas tube is aligned to be perfectly centered in the carrier key. Muzzle device is an A1 with symmetrical ports all the way around the muzzle and not overly tourqued down. 
|
|
|
|
|
[#28]
Great to have info, thanks for the repost.
|
|
|
|
|
[#29]
bump
|
|
|
|
MA, USA
|
[#30]
Many use the Loctite method of securing the barrel to the upper receiver but over time I cannot help but think that .002 thick film will degrade and break down. I've used the shim method described above with resounding success! In general I've found .002 think shim stock is the most common. I do have shim stock starting at .001 in .0005 increments up to .003.
Yesterday once I was finished polishing the feed ramps and "detailing" the barrel bushing, I used a .002 hard shim stock. Since it was close, I heated the receiver in order to expand it allowing it to fit over the shim stock. I use a rubber hammer to tap the rear of the upper until the flange bottoms out on the receiver face. I do put a little copper never seize just inside the receiver to aid in its assembly. Never seize on the threads, torque then release several times and finally torquing to approximately 30 foot pounds. This approach isn't hard to do and if you take your time and think about each step, in the end you'll have a concentric, rock solid upper and barrel assembly... |
|
|
|
[#31]
where do you buy shim stock? I don't think ACE Hardware carries it
|
|
|
|
MA, USA
|
[#32]
I bought some from Zoro but many other online sellers have it as well...even Amazon
Zoro https://www.zoro.com/precision-brand-shim-stock-cold-low-stl-00200-in-pk2-16585/i/G3104997/feature-product?gclid=Cj0KCQjwlK7cBRCnARIsAJiE3MiQFg54dftq0CxPfsXXLdq8noLh1ceFt6LtwwOTxeYeJ0l_scu24CMaAn7xEALw_wcB&gclsrc=aw.ds Amazon https://www.amazon.com/Precision-Brand-Steel-Stock-Rolls/dp/B015CSNA4M |
|
|
|
[#33]
That shin stock at Amazon is NOT stainless steel. I think it will rust and should not be used on firearms. Am I wrong?
|
|
|
|
|
[Last Edit: SuperJlarge]
[#34]
Stainless shim stock is available. I order all of mine from Amazon.
|
|
|
|
|
[#35]
I just looked and all I could find was $50+ per roll. Is there a smaller quantity available somewhere?
|
|
|
|
MA, USA
|
[#36]
I routinely use the shim method when assembling barrels to upper receivers. I just finished one where I used 0.002 hard blue shim stock normally used in precision stamping work. I've never had an issue with it and always apply some synthetic grease before tapping it together..
|
|
|
|
[Last Edit: HighpowerRifleBrony]
[#37]
MRW meant to bump this thread, I think.
|
|
|
|
|
[#38]
prolly, yeah
|
|
|
|
|
[#39]
364 day bump
|
|
|
|
|
[#40]
I'm re reading this thread for a new build bump
|
|
|
|
|
[#41]
Good info, but some of which is dated. Worth the look in any event.
|
|
|
|
|
[#42]
the new hotness is JBweld?
|
|
|
|
|
[Last Edit: JPL]
[#43]
@JoshAston
Please help me better understand the issue described above about the gas block being too far back and causing the gas tube to do something? It's mentioned that he "basically hubble telescoped it". I have read through 3 times and even googled what does phrase hubble telescoped it mean and I just don't understand what was happening in that scenario. |
|
|
|
|
[#44]
@JPL you don't see it often anymore because not many barrels are cut for a handguard cap.
I don't know what Hellbender meant by Hubble telescoping it, but what I do is flip the gas block over 180* and make sure the gas port on the barrel is centered in the gas port on the block. |
|
|
|
|
[#45]
Originally Posted By JoshAston: @JPL you don't see it often anymore because not many barrels are cut for a handguard cap. I don't know what Hellbender meant by Hubble telescoping it, but what I do is flip the gas block over 180* and make sure the gas port on the barrel is centered in the gas port on the block. This is to make sure the gas block isn't shoved too far back? What was happening back at the bolt/gas key? Was it preventing the bolt from going all the way into battery? |
|
|
|
|
[#46]
Originally Posted By JPL: This is to make sure the gas block isn't shoved too far back? What was happening back at the bolt/gas key? Was it preventing the bolt from going all the way into battery? Originally Posted By JPL: Originally Posted By JoshAston: @JPL you don't see it often anymore because not many barrels are cut for a handguard cap. I don't know what Hellbender meant by Hubble telescoping it, but what I do is flip the gas block over 180* and make sure the gas port on the barrel is centered in the gas port on the block. This is to make sure the gas block isn't shoved too far back? What was happening back at the bolt/gas key? Was it preventing the bolt from going all the way into battery? I've never seen it so bad that it prevented it from going into battery, but the gas tube could bottom out inside the key and cause damage over time. |
|
|
|
|
[#47]
Originally Posted By JoshAston: Yes. I've never seen it so bad that it prevented it from going into battery, but the gas tube could bottom out inside the key and cause damage over time. Thank you. |
|
|
|
MI, USA
|
[#48]
For lapping the bolt lugs, If I cant find a spring for a casing cut in half can I put a spring on the tail of the bolt instead?
|
|
|
ME, USA
|
[#49]
Originally Posted By sneakytails: For lapping the bolt lugs, If I cant find a spring for a casing cut in half can I put a spring on the tail of the bolt instead? I don't lap in lugs on ARs, but if you want to simply put a sized case in the chamber, the ejector will push back on the bolt so it's fully engaged with the lugs in the barrel extension. B |
|
|
MI, USA
|
[Last Edit: Tiribulus]
[#50]
[b]Originally Posted By November5: Wrap [the barrel extension shim] tightly around the extension, with the seam to the right or left side of the rifle (NOT the top or bottom) If you see this, what's the rationale behind this, if you don't mind my asking. I would have thought putting the seam on the bottom. To be clear, that's a question, not a challenge. |
|
|
 Win a FREE Membership!
Sign up for the ARFCOM weekly newsletter and be entered to win a free ARFCOM membership. One new winner* is announced every week!
You will receive an email every Friday morning featuring the latest chatter from the hottest topics, breaking news surrounding legislation, as well as exclusive deals only available to ARFCOM email subscribers.

AR15.COM is the world's largest firearm community and is a gathering place for firearm enthusiasts of all types.
From hunters and military members, to competition shooters and general firearm enthusiasts, we welcome anyone who values and respects the way of the firearm.

Subscribe to our monthly Newsletter to receive firearm news, product discounts from your favorite Industry Partners, and more.
Copyright © 1996-2024 AR15.COM LLC. All Rights Reserved.
Any use of this content without express written consent is prohibited.
AR15.Com reserves the right to overwrite or replace any affiliate, commercial, or monetizable links, posted by users, with our own.


