|
Posted: 2/11/2009 12:19:48 PM EDT
Detailed instructions, links, photos, all are welcome. This thread is set to not be archived and is linked to on the Survival Forum FAQs-Acronyms/Bug Out/In Basics, other handy info, etc. page so it can be quickly found. |
|
|
|
TN, USA
|
[Last Edit: Enforcer]
[#1]
Phil, thanks for letting me post this again. I think it is more appropriate here. I have another ALICE enhancement post that will be geared towards making the ruck more useable without the frame; and will make it very "kid friendly". It should be ready in a couple of days; anyway, here's my "hellcat" hybrid.
Assembling the ALLE Pack "Hellcat": a ALICE/MOLLE hybrid
By Enforcer
This is my version of the ALICE/MOLLE hybrid that I call the ALLE Pack or "Hellcat"; The ALICE/MOLLE systems are inexpensive; plentiful and solid platforms from which to build a hybrid ruck. Hopefully this post will help you assemble a Hellcat without any difficulty or maybe give you some additional ideas on how to develope your own hybrid. The Hellcat has between 3500 ci (calculated by dimension) and 4000 ci (measured) capacity (4000 ci and above are generally considered an expedition class pack). Adding the MOLLE sustainment pouches will add an additional 1000 ci of capacity and using the the large ALICE ruck will give a potential 7500- 8000 ci capacity. The Hellcat in it's described form is a legitimate expedition pack before the additions are added; all for far less money than you will pay for any commercial pack. 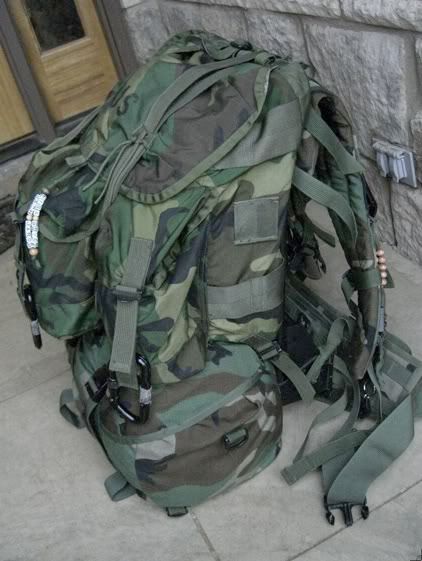
Lets first start with all the components needed to assemble the Hellcat. 1. ALICE frame and medium ruck 2. one set MOLLE shoulder straps 3. one MOLLE moulded kidney belt 4. one MOLLE sleep system carrier 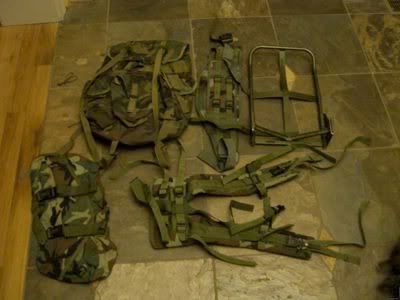
All of these items can be purchased for between $50-$70; even less if you shop around. STEP 1: Inspecting and attaching medium ALICE ruck to the frame Inspect the frame for cracks and loose rivets; rivets should be tight as well as the joined parts; repair or replace the frame if it is damaged. 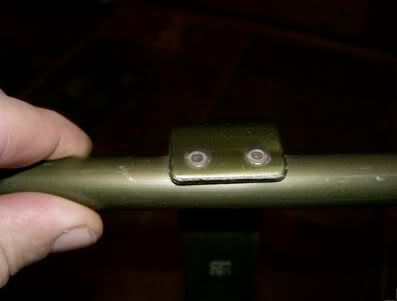
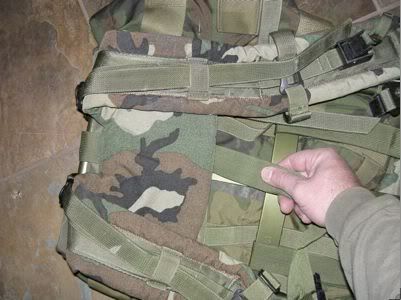
Slip the medium ruck over the frame 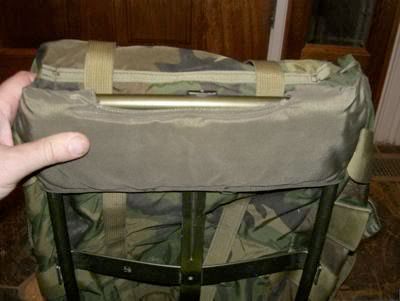
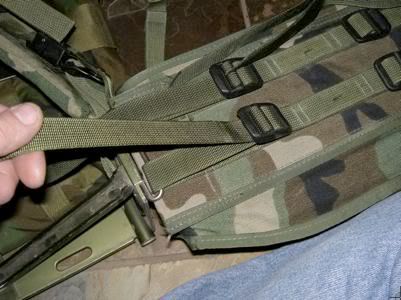
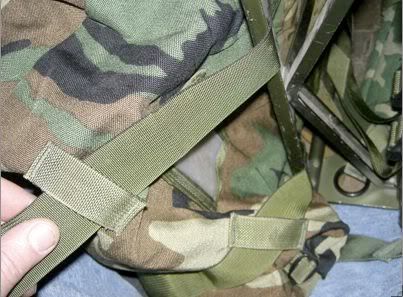
Loosen the bottom attachment straps on the ruck and slip the strap through the triangular holes created by kidney brace at the bottom of the frame. DON"T OVER TIGHTEN at this point. You want some play so the ruck can expand properly while loading. Once your pack is loaded then these straps can be tightened. 
STEP 2: Preparing the MOLLE Shoulder straps First start by removing the short attachment strap at the top of the shoulder straps(they are attached to the load lifter straps); once both are removed set them aside; keep up with them because you will need them in a few minutes. 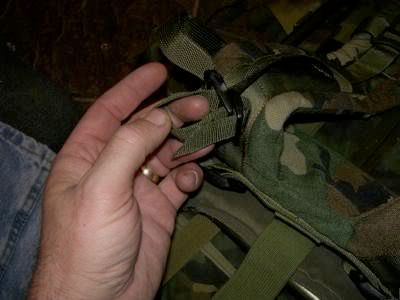

Next inspect and prepare the flat "yoke" portion of the MOLLE straps. There is a long wide strap tacked in the center with a large fastex buckle under neath it; separate the two if they have been fastened together. next you will notice two sets of attachment straps running parallel to the yoke. Leave the straps in the buckles of the top set(you will not need these) but loosen and remove the straps from the bottom set on both sides. 
Next, fold the long center strap up so that it falls over the top of the shoulder straps. 
Don't worry about the top set of attachment straps; we'll fold those over and tuck them later in the assembly 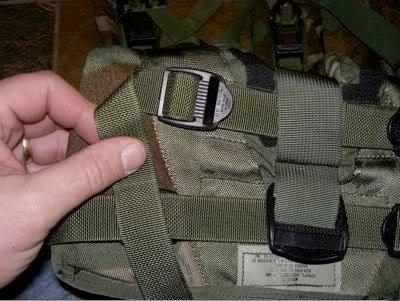
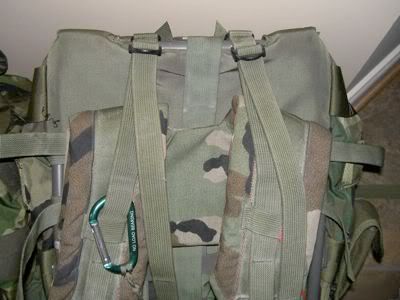
STEP 3: Attaching the MOLLE shoulder straps Lay the pack down and place the prepped shoulder straps in this approximate position; keeping them centered with the long center strap protruding from the top 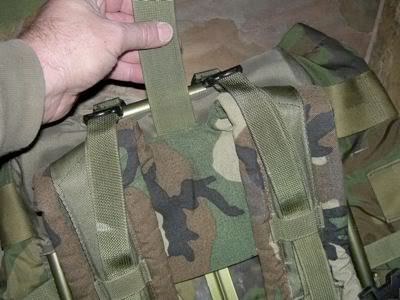
next take the short attachment straps that you had set aside and slip into the fastex buckle from the top . This the same buckle you just removed them from. 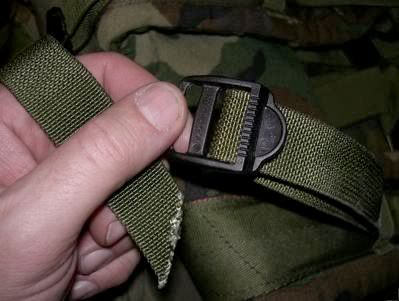
it should look like this when you are done 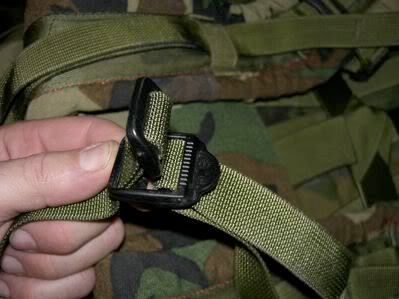
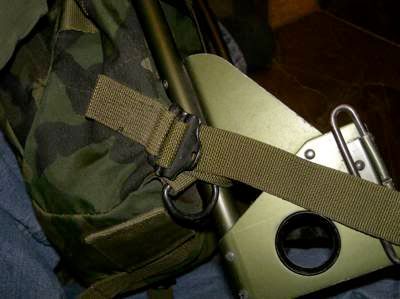
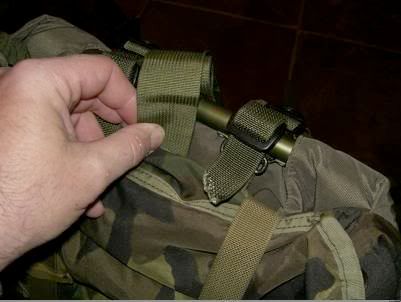
Now you are going to slip the end of this strap under the top of the frame and thru the slot; then it will go thru the small d ring attachment on the alice ruck 

Now slip it back thru the buckle and back thru again...snugging it down. It should look like this when you are finished. Repeat the process for the other shoulder strap. 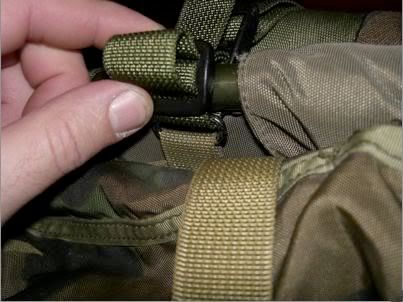

Now we begin attaching the long center strap; pull it over the top of the frame and push or tuck the strap down between the frame and the ruck 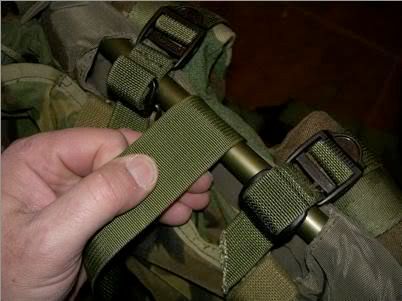
Once you have the strap tucked, lay the pack down so the underside of the frame is exposed 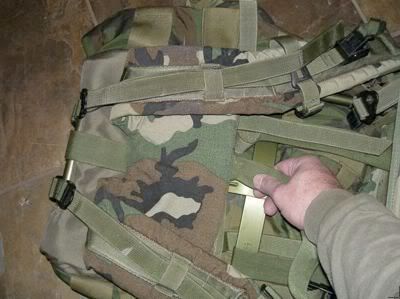
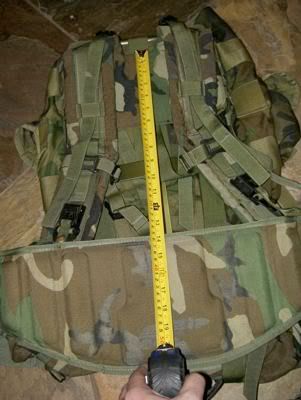
This in my opinion is where the MOLLE shoulder straps really show their worth; you can now adjust for torso fit/length. Something you could never do with issue straps or after market enhancements. In the pics above I have shown you can have as much as 5 inches of adjustment; so realistically you can adjust for about 15-20 inches of torso length. For now we will go ahead and secure the straps and adjust for torso fit later. Adjust the straps so that they are a couple of inches below the top of the frame; as illustrated in the last pic above. Next wrap the strap around the center cross members as shown in the next pics. You can wrap several times but once is enough, this will make torso fit a little easier. 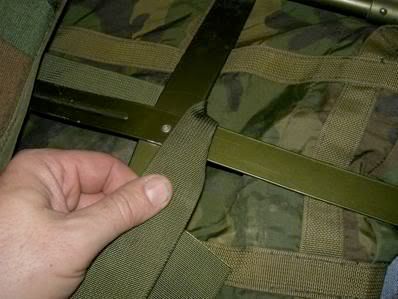
Flip up the yoke of the MOLLE straps and feed the long strap thru the buckle and tighten securely. 

Attach the side bottom strap as shown; looping it around the frame and threading thru the buckle; snug down; then do the other side; adjusting so it is centered. Fold and tuck the loose ends. 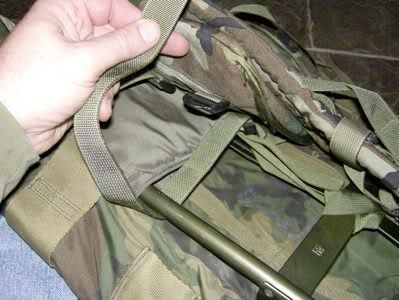

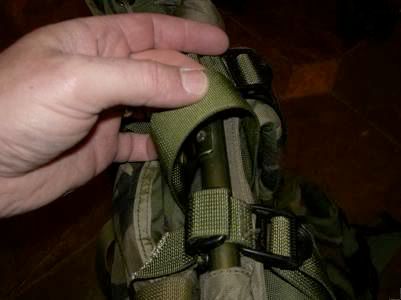
Separate the lower portion of the shoulder straps using the quick release mechanism (be carefull at this point; IMO the quick release is the weakest link in the MOLLE system and can be broken if forced open). Once released take the loop end and feed thru the round hole on the bottom of the frame; feed from outside to inside. Slip the QR end thru the loop and tighten. 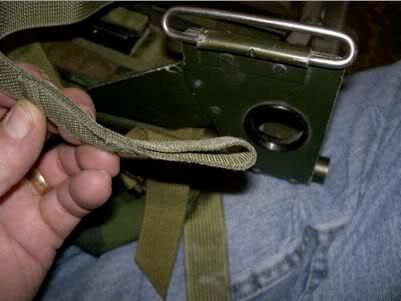
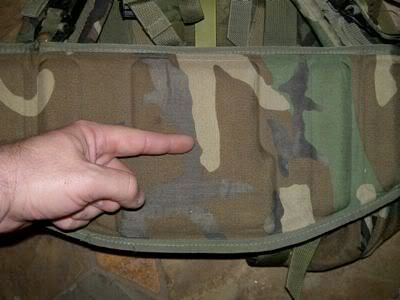
Reattach the QR end back to the shoulder straps and you are done with attaching the MOLLE straps STEP 4: Attaching the MOLLE kidney belt First, place the kidney pad as shown to ready it for attachment. THIS IS THE CORRECT POSITION. The hump should go down. Install this pad upside down and you'll kick the Hellcat to the curb like I almost did two years ago. I put it on upside down because it looked like it belonged that way. Nevermind that I could clearly see the MOLLE assembly instructions show the hump goes down. I paid for that bit of arrogance with two bleeding blisters the size of my hand on each side of my butt. Again "HUMP GOES DOWN". 
next, flip it over to one side and feed the straps thru the metal slot and attach to the buckles; snug the straps down 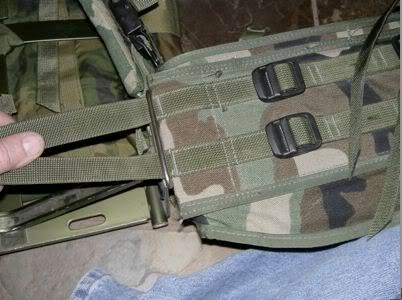
Flip the belt back over and feed the straps thru the other side; attach to the buckles and snug down. 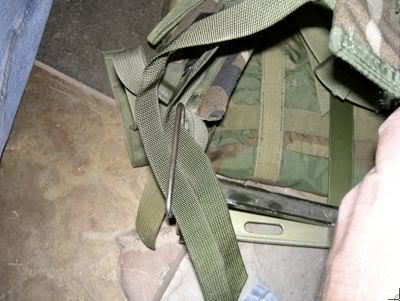
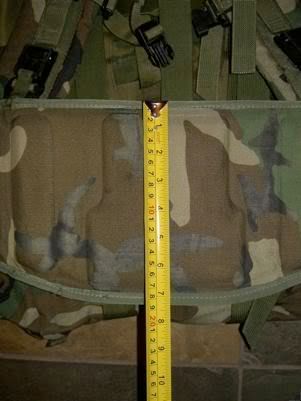
Do not tighten so hard that you deform the belt. There is going to be some play; but under load this has never been a problem. You are now finished attaching the MOLLE kidney belt. STEP 5: Attaching the MOLLE sleep system carrier We are now on the last leg to assembling the Hellcat; first thing to do is stuff a pillow into the ruck so as to give it some shape and offer some resistance while attaching the sleep system. You may want to give the carrier some bulk as well; but this step is optional. 
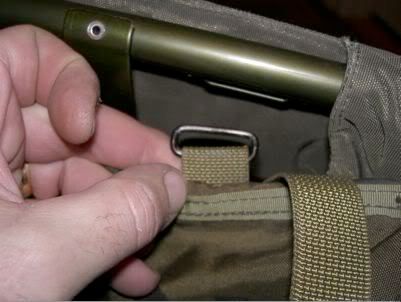
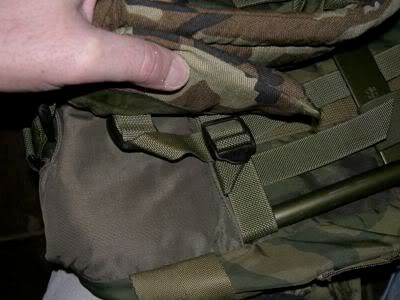
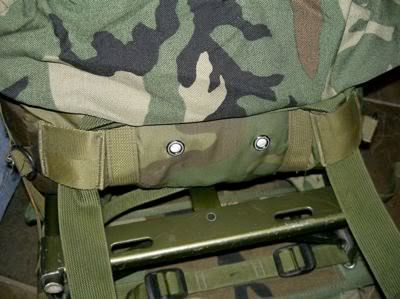
after you have cinched the top of the ruck, lay it down so that you can see the bottom and the two lashing loops; these will be the primary points of attachment to the ruck. 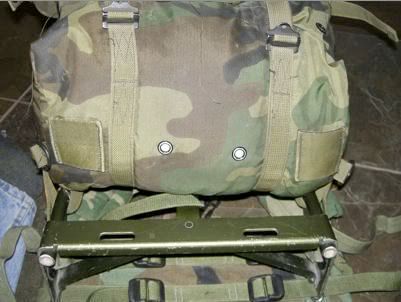
next, disconnect the fastex QR buckles on the sleep carrier; remove the male end from the straps and set aside. You will also want to slide the elastic keepers off as well. 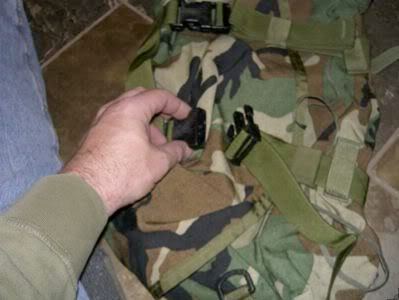

Next you'll slide the cinch straps out of all the their respective "strap loops"; three on each side untill your carrier looks like this; this is the top view of the carrier. 
As a point of reference; the lashing loops of the ruck will set between the carrier handle and the rear top strap loops 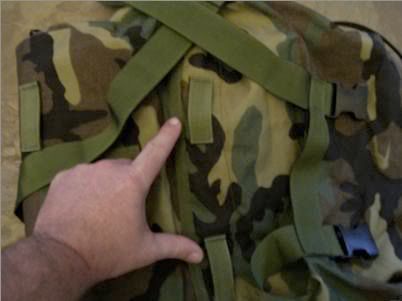
Slide the cinch straps thru the rucks lashing loops and then thru the top rear strap loops of the carrier 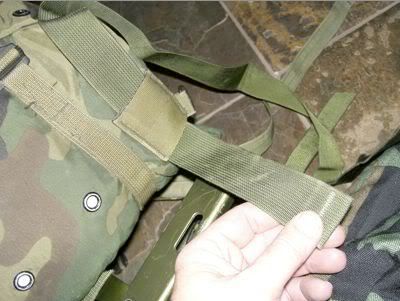

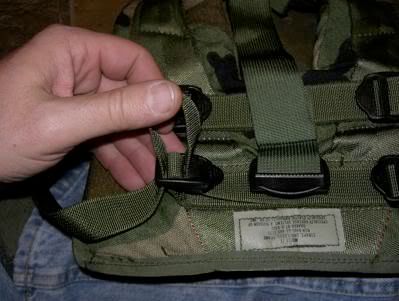
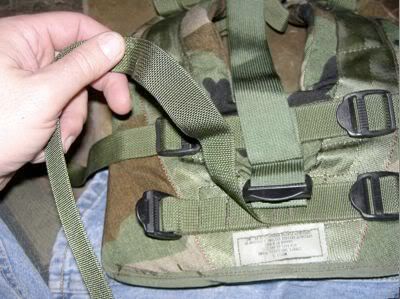
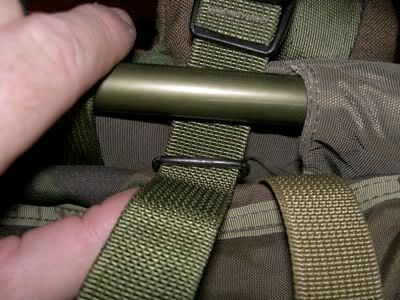
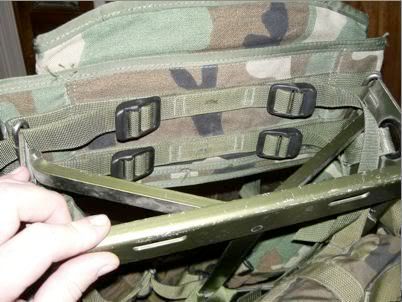
The sleep system carrier is now attached to the bottom of the ruck; but it's not stable at this point. We now attach it to the frame by running both cinch straps up the back of the ruck and over the cross support of the frame 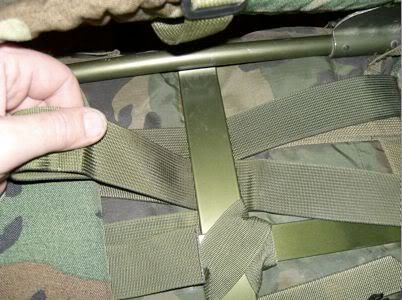

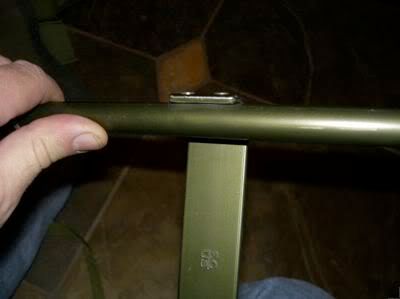
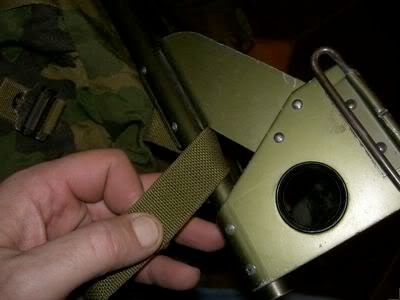
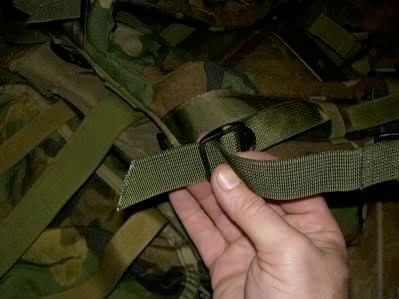
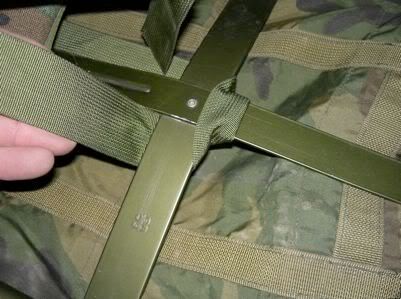
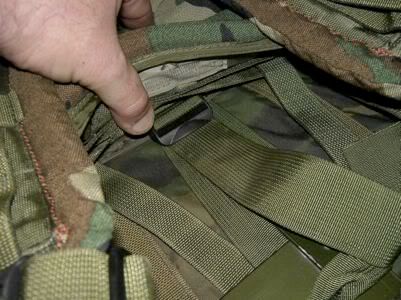
Once you are over the cross support bring the cinch straps down; threading them thru the slots at the bottom of the frame; feed them through the flat side and exit the channel side. Snug them down securely 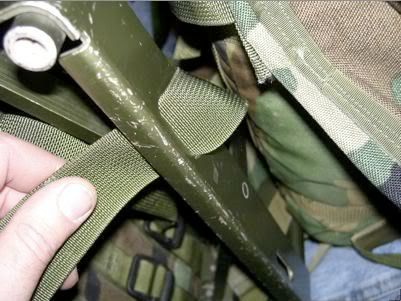
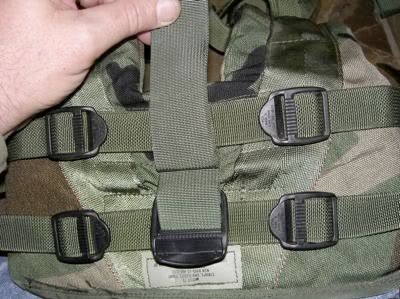
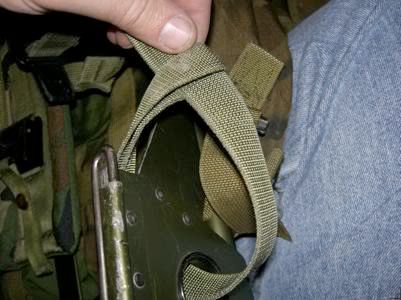
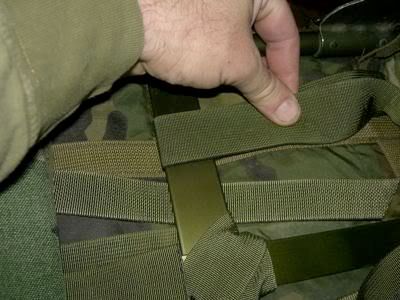
the straps will now wrap around the bottom of the frame, ready to be threaded thru the second set of strap loops 
Once you've threaded them; snug them up to the frame and thread the cinch straps thru the bottom front strap loops; reattach the male ends of the fastex buckles and slide the elastic keepers back on. I kept mine off. 
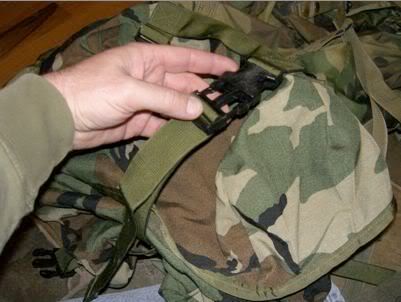
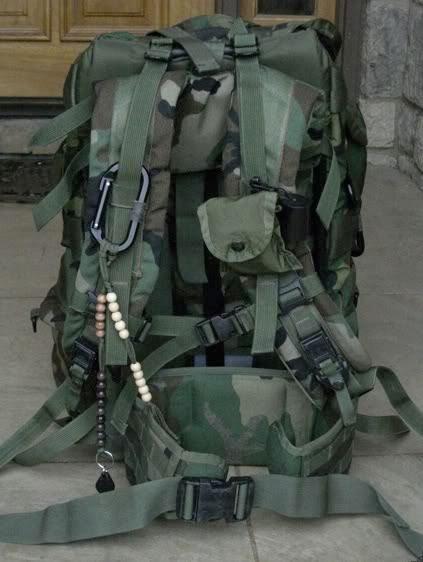
Now your Hellcat is ready for business; you should have a pack that looks just like one of these 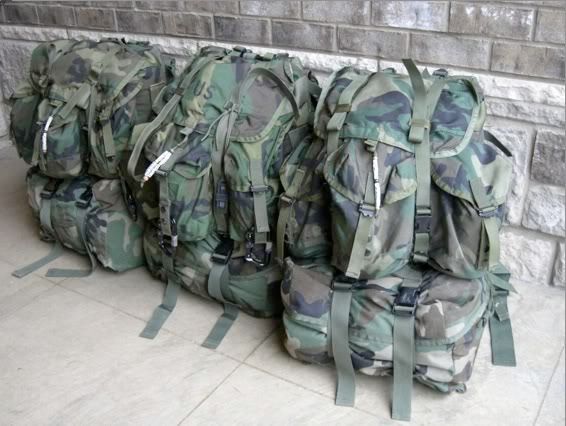
Hopefully this wasn't too confusing; like any system not all of these may work for you. I have found this particular hybrid to be very forgiving and rock solid; but it's only as good as the person putting it together. Assemble it using the ALICE and MOLLE parts properly and the Hellcat should take you there and back. Enforcer Torso Fit and Pack Adjustment Guide As promised here is a guide for proper torso fit and pack adjustment. Once you have familiarized your self with torso fit and adjustment guides you will find the Hellcat has ALL the modern adjustments that are common on todays commercial packs. First read these links to REI's backpack adjustment guides Finding Your Torso and Hip Size Adjusting the Fit Points of reference for torso adjustment should be the notch ( C-7 ) at the top of the shoulder pads and the midpoint of the hip pad( line of iliac crest). Remember these are just references; but I believe they will get you in the right ball park. 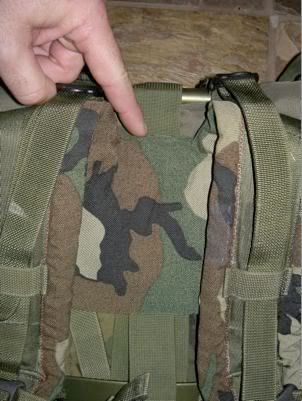
Loosen the side and torso attachment straps...you don't have to remove them.....measure your torso length; move the shoulder straps up or down accordingly and retighten the attachment straps. EDIT I have another comment here and I have added a couple of more pics. You must also loosen the load lifters significantly for torso fit. I just recently fit my 10 yo (Webelo II) and his torso length was 14 inches. No surprise it worked fantastic. The bonus for him was we were able to use the second set of side attachment straps and the load sets higher for better balance. The beauty is this adjustment can be reset as he matures, giving him use of the pack well into his adulthood(the Hellcat will probably outlast him) 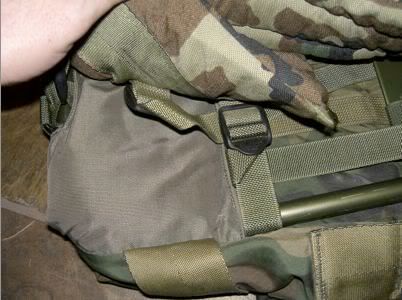
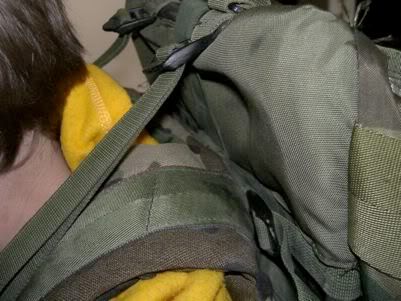
You should now be fitted for torso length. Readjust load lifters; sternum strap; hip belt and tweak lower adjustment on shoulder strap per the REI guide. The next two pics show the difference in height of shoulder straps and load lifter straps. The top pick is mine set at a torso length of 18 inches; the bottom pic is of my 10 yo's set at o torso length of 14 inches. 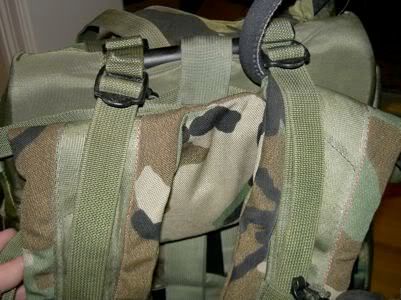
In case you didn't know these are the parts refered to in the REI article "adjusting the fit" Load Lifters 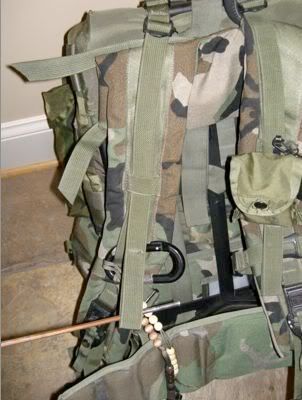
Sternum strap 
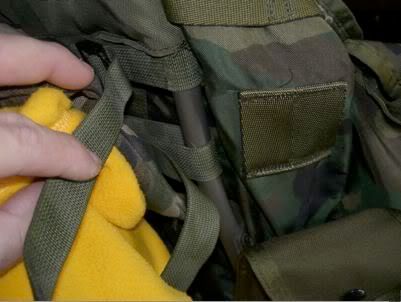
Shoulder strap adjustment 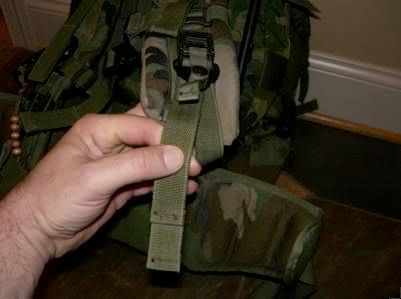
Stabilizer strap.... notice it is not on the kidney belt.... it's the strap I told you not to tighten until the ruck was loaded 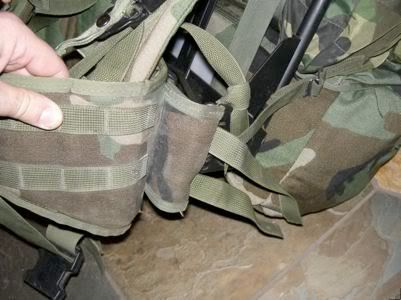
Quick release... most of us will never use this other than for convenience during assembly/disassembly 
Now you have it; all the tools for proper fit and load stabilization of your Hellcat. Enforcer |
|
|
|
[#2]
Potential Minor Problem With Some MOLLE Gear
This is a minor issue, but also very easily fixed. Some MOLLE pouches, notably the 100- and 200- rd SAW/utility pouches have milky-white plastic stiffeners sewn into the sides of the pouch. There may be other examples of this unknown to me. "Point" is that the corners of these stiffener panels are sufficiently sharp, and so located as to guarantee their wearing/punching a hole in the base material over time. This isn't a problem for service people, as they just turn them in. You and I don't have that luxury. Not only that, but I could easily see some unlucky person stabbing their finger quite nicely at some unlucky point. Sorry, no pun intended. So, just take a sharp pair of small shears or fingernail clippers and nip off the sharp corners. Make sure to not cut off too much; leave enough material outside the stitching. That is all. As you were. |
|
|
|
CA, USA
|
[#3]
Hellcat? I think not. This pack is based on a MOLLE and ALICE gear, so "MALICE" is the only logical choice. You're welcome.
|
|
|
|
[#4]
tag
|
|
|
|
TN, USA
|
[#5]
Originally Posted By Sawgunner101:
Hellcat? I think not. This pack is based on a MOLLE and ALICE gear, so "MALICE" is the only logical choice. You're welcome. The story behind the name was that I initially called the hybrid the ALLE pack. My youngest son misunderstood and began to call it the "alley cat". My two older boys and a friend of mine began calling it the "Hellcat" after several trips to the Smoky Mtn's. The name stuck. Call it what you want; ALLE: MALICE( trouble with that is can be a bit confusing because of the current MALICE products and attachments) or Hellcat; it's still pretty cool |
|
|
|
[#6]
The best of both systems.
Nice. sw1217 |
|
|
|
|
[Last Edit: JPC]
[#7]
Why not just get a large A.L.I.C.E. pack and a H.S.G.I. Alipad ?
http://www.youtube.com/watch?v=wKDX4UgIDPY example pics of the Alipad,,I've used the Alipad it's a good product,,and has extra storage. http://www.optactical.com/alipad.html |
|
|
|
TN, USA
|
[#8]
Originally Posted By JPC:
Why not just get a large A.L.I.C.E. pack and a H.S.G.I. Alipad ? http://www.youtube.com/watch?v=wKDX4UgIDPY example pics of the Alipad,,I've used the Alipad it's a good product,,and has extra storage. http://www.optactical.com/alipad.html could $95 be a deterrent ? My hybrid will cost less than $50-$60 total. Enforcer |
|
|
USA
|
[#9]
I have an extra set of MOLLE shoulder straps that I am going to post on the EE. IM or email me if interested. Thanks
|
|
|
FL, USA
|
[#10]
I found this trick on youtube
I never thought of this before http://www.youtube.com/watch?v=NGIcCRJGYug |
|
|
OK, USA
|
[#11]
anyone ever made a rifle sling from 550 Para cord? It'll take roughly 50 feet of cord depeding on how long you want your sling, its simple to do just weave it. If you need the Para cord just unweave it.
Also you can make a hobo stove from a coffee can with holes cut in the bottom and sides (this acts as a wind screen) and drill two holes in the sides and get some welding rods and use those as a support for a pot or can of your choice. |
|
|
TX, USA
|
[#12]
Originally Posted By Muerte:
I found this trick on youtube I never thought of this before http://www.youtube.com/watch?v=NGIcCRJGYug Great idea..Thanks for posting!! |
|
|
TX, USA
|
[#13]
Here is some information on how to make different types of tarp shelters..Both cheap and potentially useful..
http://www.equipped.org/tarp-shelters.htm |
|
|
TX, USA
|
[#14]
Why not TAG gear Shoulder straps and kidney pad? comes to 50 bucks when they do the 50% off sale (most holidays)
Also your bottom straps should go threw the bottom holes as well not around the frame (rub issue). |
|
|
MD, USA
|
[#15]
A small dry piece of Toilet paper will catch the sparks from a ferocerium rod and ignite pretty quickly a lot of times on even the first strike.
Just have more tinder immediately ready. You can place other fine tinder right on the TP so it will catch flame directly from the TP. |
|
|
USA
|
[#16]
tag
|
|
|
|
[Last Edit: colt_sniper]
[#17]
well if this dont belong here, Mods feel free to move it to the correct area!...
For some time now , I have been toying around with the kydex sheath that came on the cold steel UWK knife i bought. Its a sturdy sheath, but I like the spec ops style sheaths , that have the pouch on them. (spec ops survival sheaths. ) So i set out , trying to figure out how to build my own. Since i own several cold steel knives, I was able to salvage some of screws that hold the belt hanger to the kydex sheath, that come from the factory with cold steel brand knives.. I then went to the local military surplus store, an found a couple of suitable pouches . 1 was a standard military compass pouch. the other was a molle pouch. After making the choice on which pouch I was going to use, I had to figure out how to go about securing the pouch to the sheath ,this is the part that is interesting. I wanted something secure, an would not be torn off easly. So i decided to use the existing holes in the factory sheath. I lined the sheath up where i wanted it mounted, I made a reference mark with a marker on where the holes should be on the top. I then took the handy dandy table tourch, an heated a ice pick up , nice an HOT!! an burnt a perfect hole through the reference points on the top of the pouch. ( this makes nice clean hole ) the holes are just large enough to allow the srews to pass through, an hold it securly in place, with no fraying or further ripping or shredding of the pouch. After mounting the top of the pouch in place, I repeated the procedure , on the bottem of the pouch, making sure the pouch is inline with the sheath, an pulled tight. then marking the reference points, i burnished the 2 bottem mounting holes. Once this is finished, 1 small drop of loctie is applied to the screws an all are firmly tightened . i now have a small accessory pouch for my UWK knife, that will hold a fire starting kit, 35mm film canister fishing kit, ,ect... Just though i would share...... picts are comming..... but are slow, have to charge up the camera batterys... I left the camera on!....DUH!!! Here is a list of some of the items i keep in the survival pouchs... AAA minimag light or LED waterproof matches esbit fire tabs ( 3 pack) 35mm fishing kit ( with needle an kevlar line.) trick birthday candles ( hard to blow out ) small lock blade knife ( gerber lst ) –––––––––––––––––––––––––––––––––––––––––––––––––––––––––––– ––––––––––––––––––––––––––––- contained in a altoids tin painted od green mini FAK ( bandaids, tylonel, immodium , benadryl ) duct tape mole skin aluminum foil ( wind break / cooking vessle. ) 3 water purifing tabs. all wrapped up in a contractors trash bag ( emergency shelter, poncho , or sleeping bag. ) with some paracord (10 feet colt! |
|
|
|
|
[Last Edit: TANGOCHASER]
[#18]
Direction finding without a compass.
The Army teaches the "shadow tip-stick method" of finding the four directions. Place a stick in the ground and put a rock on the tip of the shadow. Wait ten minutes and place a rock on the tip of the second shadow. draw a line between the rocks. Draw annother line bisecting the first and label the lines north, east, south and west. My method - Put you left foot on the first shadow tip and you right foot on the second shadow tip. Voila! Your facing north. Edited to add. If it's overcast or can't see the sun, just go sit down and wait for the rescue crew to arrive. |
|
|
|
|
[#19]
#10 can stove. which can be used with wood ,coals , sterno , tuna can heater made from cardboard and paraffin or what ever else U can stick in it to make it hot lol. ( I've never tried to cook directly on top of one) Just boiled water or heated up canned food.
Materials One #10 can that has been opened (no longer has a top on one end) one triangle can opener tin snips , a knife or anything else that cuts! Make vent holes around the top edge of the can to vent your fuel source Cut a door to put your fuel source in the can Light fuel source 
|
|
|
|
NH, USA
|
[#20]
Would shoe polish be a viable alternative fuel for a camp stove? Any thoughts?
|
|
|
CO, USA
|
[#21]
Field Expedient MRE OC Canister
Punch a small hole in the center of a water bottle cap. Take the heater from the MRE, roll it to fit through the top of the water bottle, which should have about an inch of water inside. Drop it inside. Dump the tobasco sauce inside. Screw the cap on. Set your canister in the area you want OC'd. After a couple minutes there will be a steady spray of tobasco steam coming out of the top of the cap. It lasts for about a minute. |
|
|
|
[#22]
Really awesome post. To think after 15 years of good times and bad times I just cheated on Alice and replaced her with a Camelback Tri-Zip last night. A beautiful well made pack but I am having trouble adding enough snivvel gear to make it a useful 3 day here in the northeast.
And it cost my wife 200 bucks (nice work though HH6, you know what daddy like!!) Do you suggest any MOLLE compatible exterior pouch large enough to remedy this? I need a good sized pouch in Multicam .. |
|
|
|
|
[Last Edit: Enforcer]
[#23]
Originally Posted By burlysoldier:
Really awesome post. To think after 15 years of good times and bad times I just cheated on Alice and replaced her with a Camelback Tri-Zip last night. A beautiful well made pack but I am having trouble adding enough snivvel gear to make it a useful 3 day here in the northeast. And it cost my wife 200 bucks (nice work though HH6, you know what daddy like!!) Do you suggest any MOLLE compatible exterior pouch large enough to remedy this? I need a good sized pouch in Multicam .. the molle sustainment pouches(500cc) each will add another 1000cc of volume. They fit nicely on the sides of the Hellcat....not sure about the camelbak. You should be able to find them in multicam from an after market vendor. If you are not concerned with matching camo you can find them in surplus woodland and desert. |
|
|
|
|
[#24]
This thread rocks.
|
|
|
|
|
[#25]
Originally Posted By ArmaNotSoLite:
This thread rocks. Agreed. thanks for the quick reply! |
|
|
|
|
[#26]
Originally Posted By Slug64:
.............Also your bottom straps should go threw the bottom holes as well not around the frame (rub issue). no rub issue..........I've used this set up for over 5 years and the strap needs to go thru the channel slot as pictured and around the bottom of the frame; otherwise you will have rub issues. You will loose leverage and the strap will loosen while under load and then it will begin to rub in the channel slot while the Molle SSC begins to flop around. Think thru it.......it's simple high school physics.(levers and pulleys). Sorry for not responding to this sooner; I completely missed the last line. |
|
|
|
|
[Last Edit: raf]
[#27]
One thing that the ALICE pack lacks is compression straps. We all start out with a pack more-or-less full, but as time goes by, the food contents get used up, and the pack gets a bit sloppy, with adverse impact on the user's balance. For you tactical types, subtract ammo used, and the effect is even more pronounced.
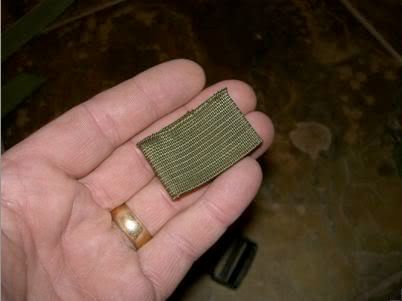
The solution is simple. Examine the ALICE pack closely, and you will see sewn-on webbing on the sides that will easily accept 1" horizontal straps that wrap around the body of the pack, and will serve to compress the back into a stable, compact, non-shifting unit. A closer examination will show that the straps on the pockets––not the pocket flaps–– have a space behind them so the user can put his finger beneath the snaps to press the halves of the snaps together. By happy coincidence, this space behind the webbing on the pocket will allow a 1" strap to be threaded through all the pockets, serving as an additional compression strap. Between the original tunnels on the ALICE, and the pocket closure tunnels, the user should be able to install a sufficient amount of horizontal compression straps to accomodate most any need. Vertical compression can be done via use of the existing top flap straps. Now you're asking where to get the straps. All right, go here: http://www.sportsmansguide.com/net/cb/20-new-swiss-military-web-straps-olive-drab.aspx?a=561508 for Swiss OD adjustable, QD straps, which are perfect for this application. Be advised that the fastex-style QD buckles will NOT mate to most US-available genuine fastex (or close foreign copy) buckles, but for a stand-alone use, such as compression straps, this matters little. There is plenty of life in a good condition ALICE pack. You all update the green tick as enforcer suggests, and you'll have the equal of packs costing many hundreds of dollars more. |
|
|
|
|
[Last Edit: Enforcer]
[#28]
Thanks raf, that is an excellent mod; one I will be using for sure.
|
|
|
|
CA, USA
|
[#29]
Rather than lugging around a big clunky roll of duct tape:
Take a business card or something of similar size and wrap a few feet of duct tape lengthwise around the card. This will keep your tape relatively compact but still readily accessible. Alternatively if you use something like an old hotel key or one of those fake credit card type of plastic cards you can wrap a few feet around it width wise (perpendicular to the long axis), punch a hole in the exposed plastic part and attach to a key ring or zipper pull etc. This has worked for me with regular duct tape, but I have heard of issues with the stronger "gorilla tape" types that end up being a mass of useless tape after some time. |
|
|
|
[#30]
Originally Posted By JoinTheRukus:
Rather than lugging around a big clunky roll of duct tape: Take a business card or something of similar size and wrap a few feet of duct tape lengthwise around the card. This will keep your tape relatively compact but still readily accessible. Alternatively if you use something like an old hotel key or one of those fake credit card type of plastic cards you can wrap a few feet around it width wise (perpendicular to the long axis), punch a hole in the exposed plastic part and attach to a key ring or zipper pull etc. This has worked for me with regular duct tape, but I have heard of issues with the stronger "gorilla tape" types that end up being a mass of useless tape after some time. Or you can chuck a bic pen in a drill, use a drill bit that fits snug inside to stop flex. Stick the duck tape to it. Drill slow and steady, aim tape nice and square. Go as large as you like. now you have a compact roll. Gorilla tape is very difficult to do. |
|
|
|
|
[#31]
Good info, thanks!
|
|
|
|
NC, USA
|
[#32]
An old trick is that if you need to carry someone around, you can make the body of a stretcher by taking some durable shirts (think BDU tops) maybe 3 or so if you got em, turn the sleeves inside out, and run long poles through the sleeves. Keeps the poles nice and separated, keeps the sleeves from getting tangled or in the way.
|
|
|
|
[Last Edit: PolyTechKID]
[#33]
Originally Posted By inop:
Originally Posted By JoinTheRukus:
Rather than lugging around a big clunky roll of duct tape: Take a business card or something of similar size and wrap a few feet of duct tape lengthwise around the card. This will keep your tape relatively compact but still readily accessible. Alternatively if you use something like an old hotel key or one of those fake credit card type of plastic cards you can wrap a few feet around it width wise (perpendicular to the long axis), punch a hole in the exposed plastic part and attach to a key ring or zipper pull etc. This has worked for me with regular duct tape, but I have heard of issues with the stronger "gorilla tape" types that end up being a mass of useless tape after some time. Or you can chuck a bic pen in a drill, use a drill bit that fits snug inside to stop flex. Stick the duck tape to it. Drill slow and steady, aim tape nice and square. Go as large as you like. now you have a compact roll. Gorilla tape is very difficult to do. Whenever my rolls of tape get low I wrap old empty gift cards, one time the cashier asked why I wanted an empty card and explained the ducktape trick and just got this  look.... look....
Gorilla tape is the best! |
|
|
|
|
[#34]
Originally Posted By Psamtik:
An old trick is that if you need to carry someone around, you can make the body of a stretcher by taking some durable shirts (think BDU tops) maybe 3 or so if you got em, turn the sleeves inside out, and run long poles through the sleeves. Keeps the poles nice and separated, keeps the sleeves from getting tangled or in the way. You can also make an improvised litter by placing a poncho (a tough one like military issue) on the ground putting th two pols evenly spaced over it then folding the flaps over. The weight of the person on it keeps it folded. I'll try to steal a photo from another site. I've carried (along with several other people) a guy that weighed about 230lb who was also wearing full body armor/helmet/weapon, etc in JUST a poncho (no poles that time...like a big sloppy taco). It is hard to grip but it didn't rip until we skimmed the top of a rock and it cut the material that was under so much tension. |
|
|
|
|
[Last Edit: aklferris]
[#35]
Originally Posted By Infantry26:
Originally Posted By Psamtik:
An old trick is that if you need to carry someone around, you can make the body of a stretcher by taking some durable shirts (think BDU tops) maybe 3 or so if you got em, turn the sleeves inside out, and run long poles through the sleeves. Keeps the poles nice and separated, keeps the sleeves from getting tangled or in the way. You can also make an improvised litter by placing a poncho (a tough one like military issue) on the ground putting th two pols evenly spaced over it then folding the flaps over. The weight of the person on it keeps it folded. I'll try to steal a photo from another site. I've carried (along with several other people) a guy that weighed about 230lb who was also wearing full body armor/helmet/weapon, etc in JUST a poncho (no poles that time...like a big sloppy taco). It is hard to grip but it didn't rip until we skimmed the top of a rock and it cut the material that was under so much tension. The same can be done with a blanket. We did it back when I was a boy scout during a SARS excercise (my troop leader was a Disaster Field Representative with American Red Cross). Try carrying an adult through the woods though when you are a kid and only have a few other kids to help (The "victim", one of the boy's dad, cheated and walked most of the way for us)! |
|
|
|
|
[#36]
ok cheap and valuable, 1 nitrile glove as part of your EDC kit, or even in your wallet.
I decided to start this after i saw an horrible accident where a man was t-boned while riding his bike by an suv with a steel brushguard at 50mph at least.(found out later biker was very drunk) The biker was thrown 20+ feet on impact (across an entire intersection), i run to his aid and he is totally unconscious, bleeding heavy from his forehead, but he was breathing, (actually snoring like a train) had a pulse and his airway did not seem obstructed. Just after i had established he was at least breathing an off duty cop still in uniform was driving home from work and had a basic first aid kit in his trunk. He was able to control the bleeding with a t-shirt and gauze, while it took over 20mins for the "amber lamps" to arrive, and he was not conscious for about 30mins . With very little "stuff" you can do basic lifesaving measures until more able hands can arrive, but you have to protect yourself first. |
|
|
|
|
[#37]
Want a 50-gallon Zip Lock bag?
Take a 6' length of clear poly tubing. Cut it into 2 equal lengths. Slit one of these for the entire length, preferably on the inside of the coil (so the tubing curls with the slit on the inside). Put the other length over the end of the bag and fold the bag over it. Now force-fit this length into the slit tubing. Viola! Instant ziplock bag! This won't hold a lot of pressure (i.e. don't depend on it to keep stuff in if the bag is upside down), but it WILL keep out the sand and dampness. |
|
|
|
NC, USA
|
[#38]
Another couple of duct tape tricks -
I wrap duct tape around cut-off lengths of old aluminum arrows. You can put a piece of 550 cord through the tube to attach it to whatever. Just cut the arrow tube with a tubing cutter and deburr. When roll of duct tape gets small (1/2 roll or less), peel the cardboard tube out of the center and squash the roll flat. Takes up a lot less room that way. Can be wrapped with 550 cord as an added bonus. |
|
|
FL, USA
|
[#39]
Save those little plastic clips that hold the bread bags closed. They weigh nothing inside your pack and can be used like a clothespin to hang socks and other clothing up to dry.
Save the paper backing of sticker stock the next time you print a shipping label or something. Duct tape can be place on it and easily pulled off later. An 11” strip folded up fits great in a survival tin. |
|
|
|
[#40]
Increase the life of your Boots!
I 'scrub' the bottoms of your feet as I walk. This wears out the bottoms of my boots 'way too early. I've found that I can increase the life of my boots and shoes by coating the bottoms with a glue called Shoe Goo. This is also marketed under the name Goop. It comes in a squeeze tube, very easy to dispense. It resembles very thick airplane cement. I am using some old shoes that have had this stuff on the soles for at least 2 years, so it is very hardy. This stuff also makes a terrific adhesive. Good to keep in your BOB for emergencies. It stinks while it sets up, though. |
|
|
|
USA
|
[#41]
bump
|
|
|
|
[#42]
Originally Posted By AmericanPatriot1776:
bump It's a sticky
|
|
|
|
|
[#43]
You can also do this as an MRE "bomb". Same materiel, just don't drill a hole in the cap, dump the magniziume powder from the ration heart, dump in as much tobasco as you lik on to the magnezium, replace cap, shake up good and hard and give it a good toss. Once the pressure builds up in the bottle, POP!! Good way to spook folks, delay tactic, or even a super crude flashbang.
|
|
|
|
USA
|
[#44]
Originally Posted By FrankSymptoms:
Increase the life of your Boots! I 'scrub' the bottoms of your feet as I walk. This wears out the bottoms of my boots 'way too early. I've found that I can increase the life of my boots and shoes by coating the bottoms with a glue called Shoe Goo. This is also marketed under the name Goop. It comes in a squeeze tube, very easy to dispense. It resembles very thick airplane cement. I am using some old shoes that have had this stuff on the soles for at least 2 years, so it is very hardy. This stuff also makes a terrific adhesive. Good to keep in your BOB for emergencies. It stinks while it sets up, though. I believe that stuff can be used as an excellent fire starter as well. |
|
|
|
[#45]
String or fishing line can be used as a tourniquet, after several rounds upon itself, the tension you add for each round is cumulative and can add up to considerable force.
|
|
|
|
|
[#46]
Originally Posted By RR_Broccoli:
String or fishing line can be used as a tourniquet, after several rounds upon itself, the tension you add for each round is cumulative and can add up to considerable force. Do you mean wrapping it so that its over a wide area? Thats the only way i could see that working without tissue damage. String is generally a bad idea for tourniquet unless its the only thing you have because its too narrow and cuts/damages tissue. At least if you use a belt they can still save your limb if you get to the hospital in time and its quicker and easier than what you describe. |
|
|
|
|
[#47]
RR-Broc.......String or fishing line can be used as a tourniquet, if you use that vs a belt, you can tell your friend kiss the area plus 2 to 4 inches above the injury good bye. With the number of troops coming back from war zones spend 5-10 bucks and get an SF tourniquet or similar product. I am not going to insult your brain capacity but unless you have Civilian, Combat Medical, or other similar training keep the fingers off the key board! with out going in to deep. Medical Tech has expanded by leaps and bounds can save most limbs a good number of the time. Please go to Amazon and get a good survival first aid book before commenting further.
Tourniquet= is a life or limb for use in mass trauma situations, your discussion to use this is never to be used litely |
|
|
|
|
[#48]
Originally Posted By RustyBolt:
Originally Posted By FrankSymptoms:
Increase the life of your Boots! I 'scrub' the bottoms of your feet as I walk. This wears out the bottoms of my boots 'way too early. I've found that I can increase the life of my boots and shoes by coating the bottoms with a glue called Shoe Goo. This is also marketed under the name Goop. It comes in a squeeze tube, very easy to dispense. It resembles very thick airplane cement. I am using some old shoes that have had this stuff on the soles for at least 2 years, so it is very hardy. This stuff also makes a terrific adhesive. Good to keep in your BOB for emergencies. It stinks while it sets up, though. I believe that stuff can be used as an excellent fire starter as well. E6000 from the walmart crafts section is a better adhesive and sets up much faster. |
|
|
|
GA, USA
|
[#49]
Originally Posted By iwouldntknow:
Originally Posted By RustyBolt:
Originally Posted By FrankSymptoms:
Increase the life of your Boots! I 'scrub' the bottoms of your feet as I walk. This wears out the bottoms of my boots 'way too early. I've found that I can increase the life of my boots and shoes by coating the bottoms with a glue called Shoe Goo. This is also marketed under the name Goop. It comes in a squeeze tube, very easy to dispense. It resembles very thick airplane cement. I am using some old shoes that have had this stuff on the soles for at least 2 years, so it is very hardy. This stuff also makes a terrific adhesive. Good to keep in your BOB for emergencies. It stinks while it sets up, though. I believe that stuff can be used as an excellent fire starter as well. E6000 from the walmart crafts section is a better adhesive and sets up much faster. I remember Shoe Goo from the 80's. My dad was a runner and went through tubes of that stuff. I seem to remember them discontinuing it, but I'd love to have some. I'll look for the E6000 stuff too. as for my "cheap" contribution, you can get sewing kits ridiculously cheap at craft stores like Michael's, and I saw para cord there once or twice. Weird, ya. Usually Michael's will have a 30-50% off coupon on the backs of their receipts (sometimes single item, sometimes whole order), so you can go in, scout your stuff, buy something small for a coupon, then go back the next day and use it. |
|
|
MT, USA
|
[#50]
Small 2 oz bottle of alcohol based antibacterial hand sanitizer. Sells for about $2. Obvious uses are as a disinfectant for small wounds and a cleaning agent.
The trick is you can also use it to start a fire. Just a small drop will burn for nearly a minute. I find the sanitizer that has more of a gell consistency to work best for fire starting. In a pinch where you need a fire fast or dont have enough dry tinder this little bottle can make all the difference. Another trick is that strangely after roughing it for days this little bottle of nicely smelling cleaner can be a good morale booster, and in a survival situation can be very important. Anyone that has been on a long tough backpacking trip can attest to this. For some reason just the smell can raise ones spirit a bit. 
|
|
|
 Win a FREE Membership!
Sign up for the ARFCOM weekly newsletter and be entered to win a free ARFCOM membership. One new winner* is announced every week!
You will receive an email every Friday morning featuring the latest chatter from the hottest topics, breaking news surrounding legislation, as well as exclusive deals only available to ARFCOM email subscribers.

AR15.COM is the world's largest firearm community and is a gathering place for firearm enthusiasts of all types.
From hunters and military members, to competition shooters and general firearm enthusiasts, we welcome anyone who values and respects the way of the firearm.

Subscribe to our monthly Newsletter to receive firearm news, product discounts from your favorite Industry Partners, and more.
Copyright © 1996-2024 AR15.COM LLC. All Rights Reserved.
Any use of this content without express written consent is prohibited.
AR15.Com reserves the right to overwrite or replace any affiliate, commercial, or monetizable links, posted by users, with our own.


