|
Posted: 6/13/2015 11:57:09 AM EDT
First and foremost this is not approved by Sig. Do this at your own risk. Other than that enjoy. I have over 10k rounds through my MPX and test fired over 500 with this fix. (also since I already had my barrel chopped. I don't not covered by Sig anyways. Also running a G S3G trigger without a trigger bridge so I'm already not covered by them anyways.
So currently a bunch of the people who have bought a Sig MPX know about the issue with play in the charging handle. This issue is causes by a couple of factors that went into the design of the weapon platform. They are currently working with a company to find a solution. 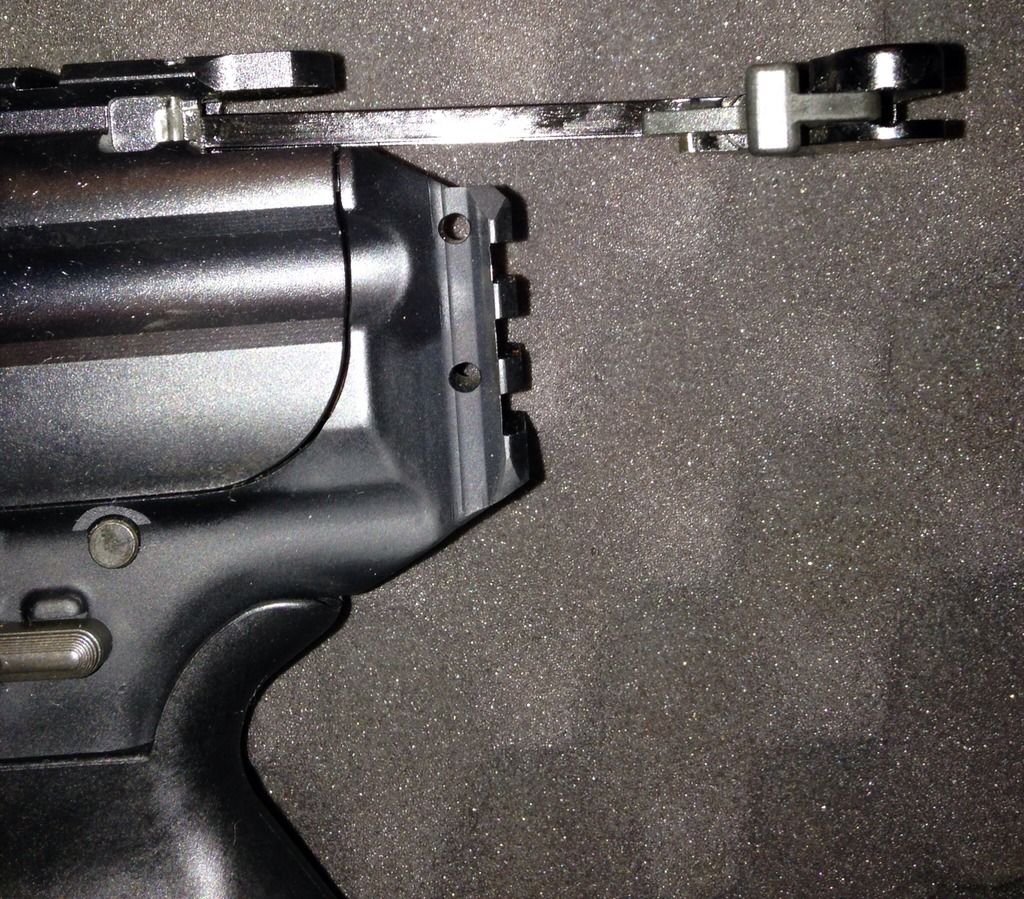
In the mean time anyone who wants to use their MPX might want to either never release a pulled back charging handle or cover the surface with Velcro. The issue I found with using Velcro is that the bounce can slow the entire Bolt Carrier Group (BCG) down which can cause a miss feed. Now let's look into the source of the problem. If you have ever used/disassembled a normal AR-15 variant rifle before in your life you will notice that the charging handle has much higher ridge to it on each side. This is because the part that the charging handle pulls on to move the BCG back is the Bolt key. This is above the BCG and the recoil system of a typical AR-15. On the MPX the recoil system is above the BCG and not in-line with the BCG. I'm not going into why they did this but it makes how the charging handle interacts with the BCG different. Now instead of having a Bolt Key to pull back they are stuck with this little lip which is in line with the recoil springs. See image below: 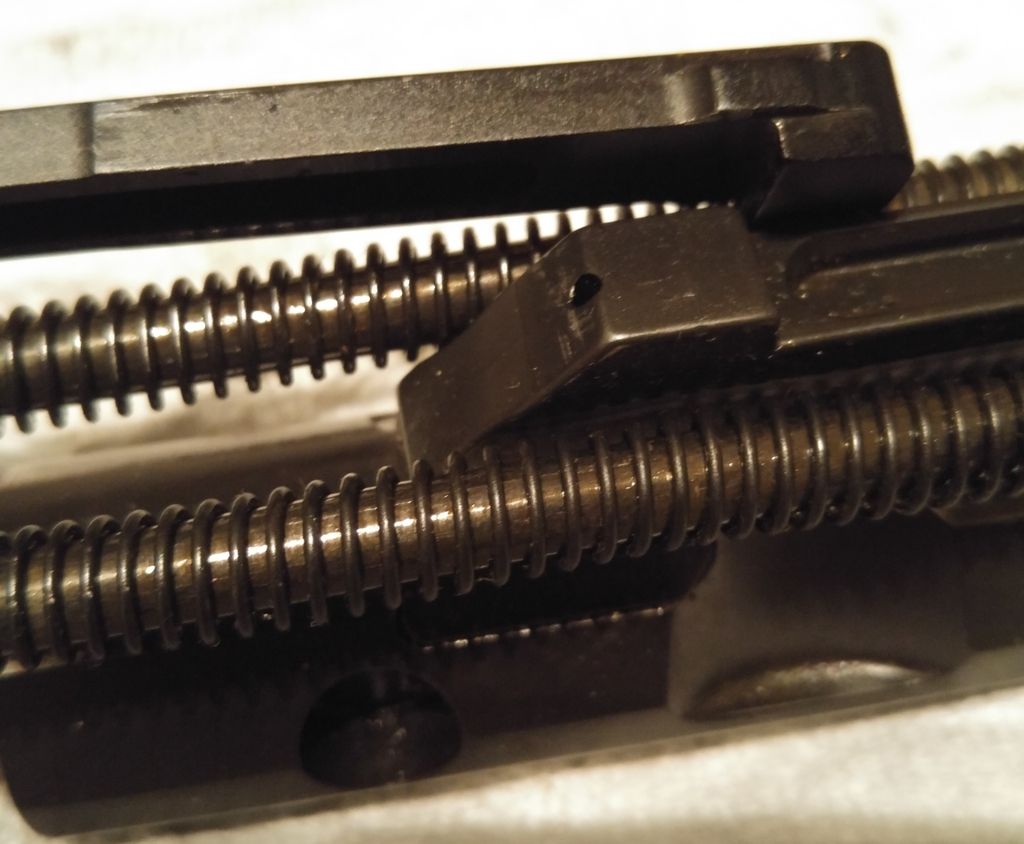
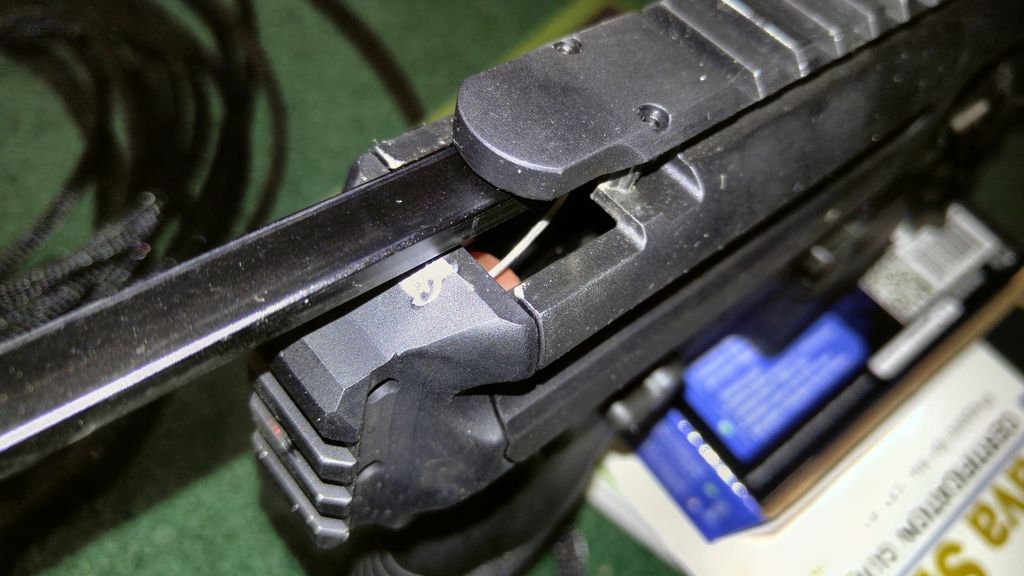
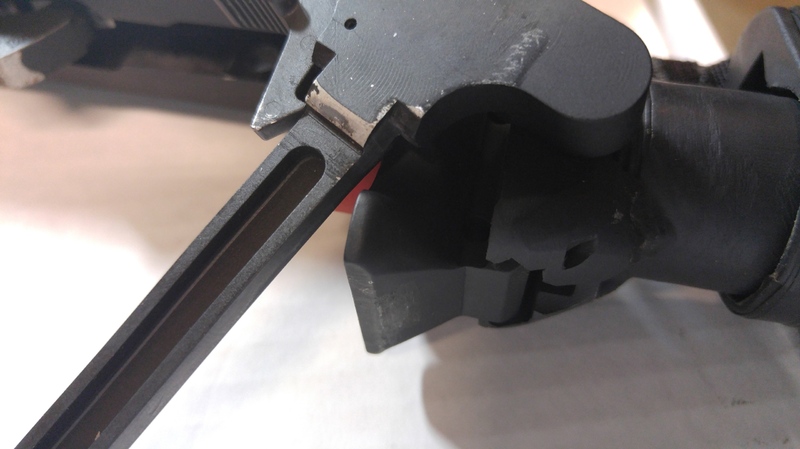
On the MPX there is no BCKey going inside of the grove in the charging handle. This means that when the bolt cycles when the gun is fired the charging handle must now stay out of the way of that metal lip. If the charging handle had the normal height sidewalls the gun couldn't fire. The problem is since it doesn't have those high side walls it will now sag when it's pulled back causing it to bounce off the receive making marks on your receiver and the upper. See image below. 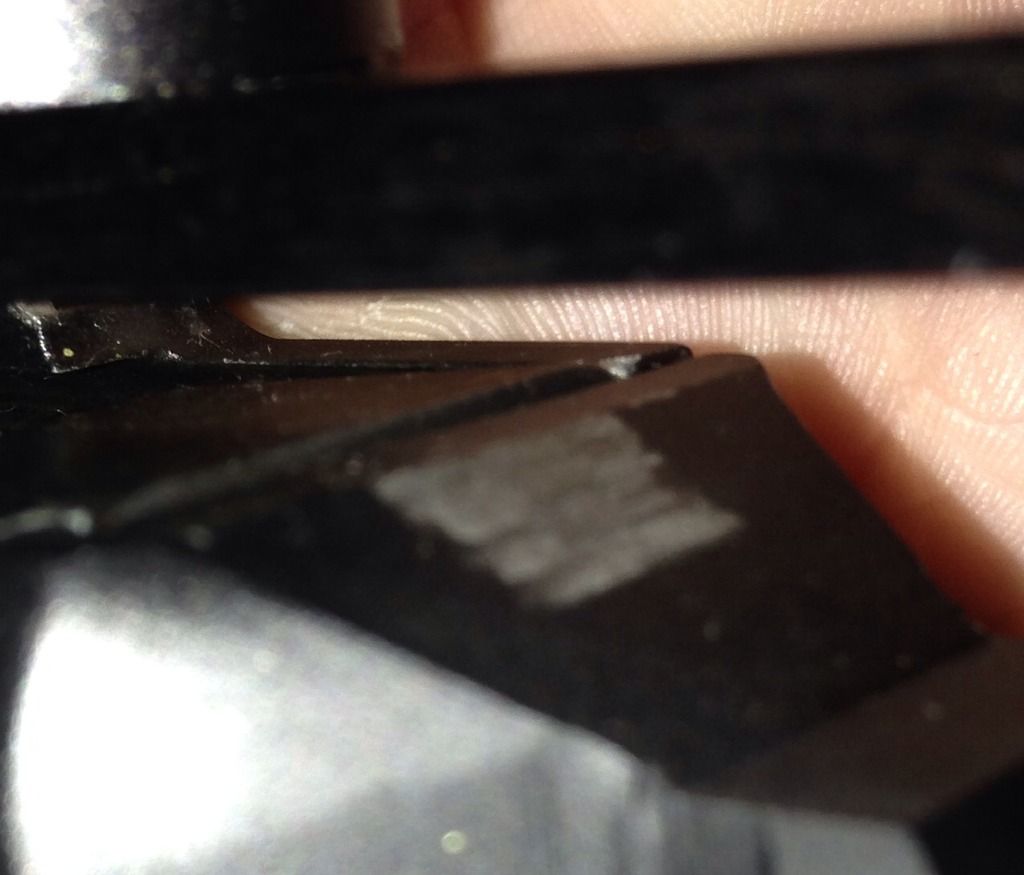
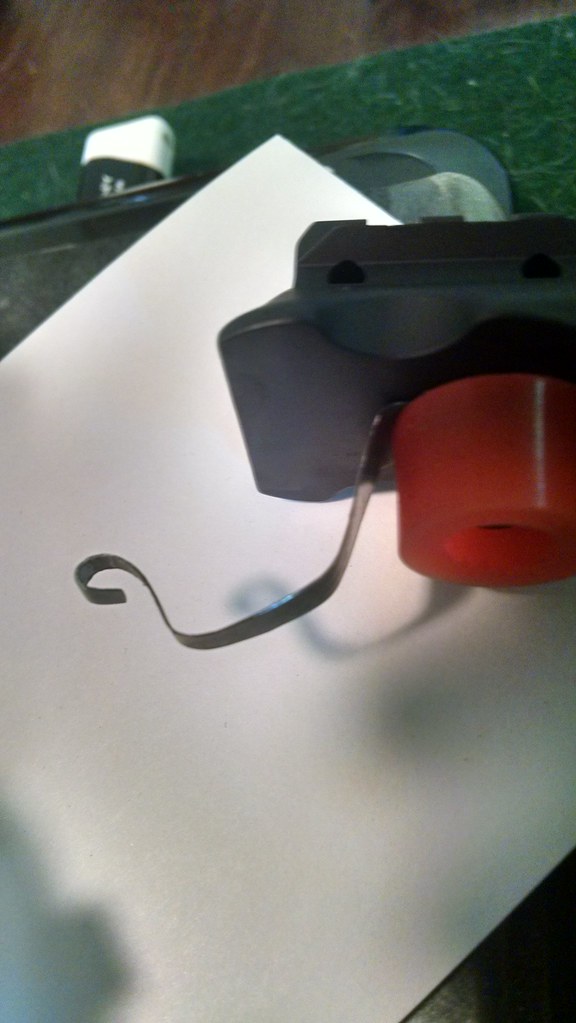
Now how do we solve this? Well I the only thing we need to do is add something like a spring to push the charging handle up to it stays parallel to the top rail. This would prevent it from hitting the receiver when you release the charging handle. My spring of choice. A paperclip. I was trying to find a way to attach something to the piece of metal that holds the guide rods in place but since I didn't want anything that would mod the gun I used the recoil buffer to be the perfect candidate for a mounting surface.  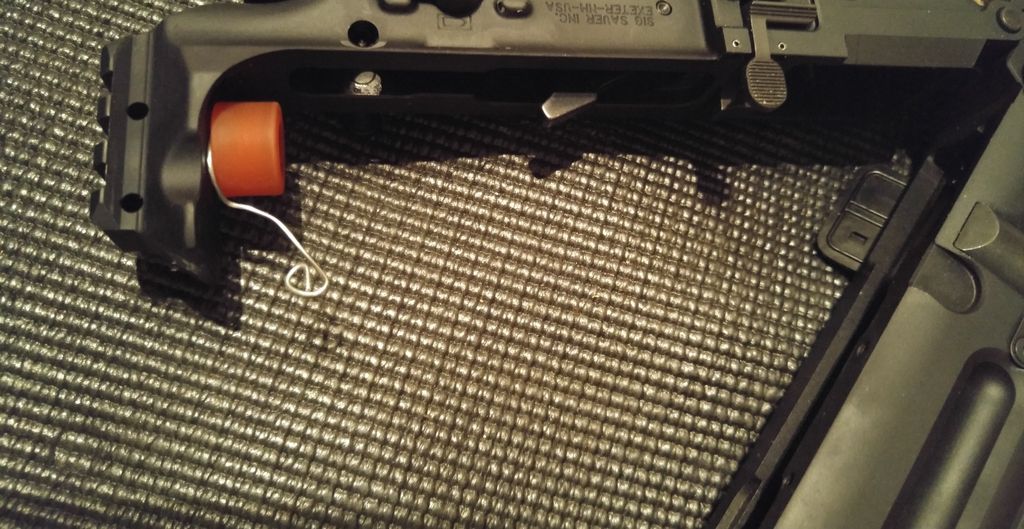
Now all you have to do is bend a paperclip in a circle around the screw behind your buffer and tighten it down. Then bend a 45 degree angle upwards off the buffer pad. This will give the spring enough clearance that it won't hit the BCG when it cycles. Take the top part and coil it a few times so it only has a smooth surface that will be hitting the underside channel of the charging handle. Line it up so when you attach the upper it goes in front of the plate that holds the guide rods. That is all you have to do. Now the paperclip will be applying upward force to the charging handle after it's been released preventing it from scratching up your lower receiver and your upper. 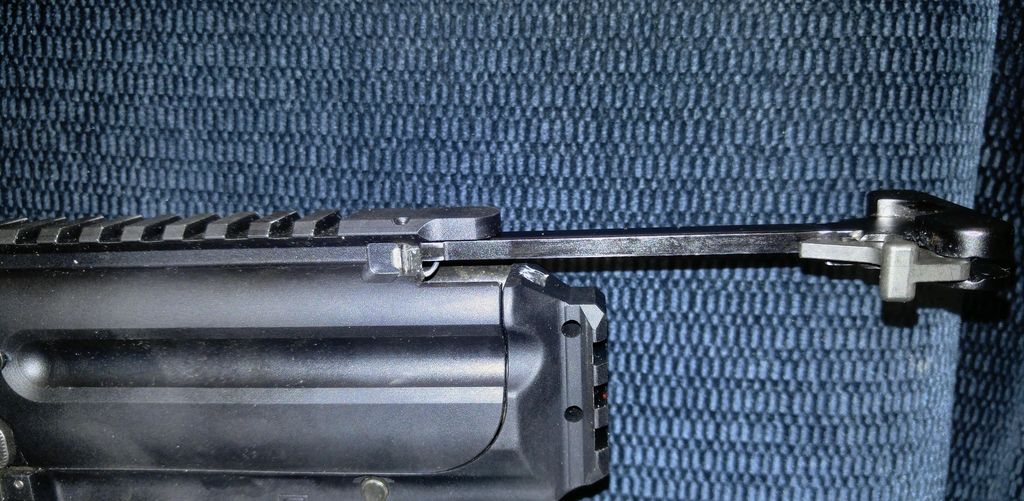
Now some to answer some concerns with this design. 1. The BCG does not impact the paperclip. It stops 3mm short of hitting my setup from the buffer. 2. I've already ran 500 round through this design and the paperclip still works like new since there is 0 stress on the paperclip. 3. The OAL of the buffer on the back of the receiver did not move closer to the BCG with the paperclip behind it when tightened down. 4. I used a thin piece of packing tap after sanding the paper clip that will be pressed by the buffer into the receiver so it doesn't scratch the receiver behind the buffer. 5. The underside of the charging handle is not scratched by the paperclip. The paperclip is to soft of a material. 6. This is my temp fix until Sig can come out with a real part. (Basically they just need to mod the part that holds the guide rod with a piece of metal pushing upward and that will fix this.) It is not complicated... Finally legalities part 2. Do this at your own risk. I'm not liable for anything stupid you do with your guns. If your gun is damaged by this odds are Sig will not warranty your firearm. Use common sense please. Any comments please comment below. If you need more details about the setup or more pictures please request. (as for changing out the paperclip I think it could m maybe go 3k rounds before it might let the handle drop down again. |
|
|
|
[#1]
Nice writeup, gonna have to try this.
|
|
|
|
[#2]
Thank you for pictures and write up. I added Velcro to mine yesterday, and the paperclip today.
|
|
|
|
[#3]
I just wondering which the material is stronger between lower, upper and the charging handle. If I am seeing the wear off of the paint, and also seem the charging handle is chewing my upper receiver. If it is only paint wear off then I am not worried about it. Any one seeing the chewing off also?
|
|
|
|
[#4]
Haven't shot mine yet but have a question. If you charge the weapon and are careful to let it slop and slam home is anybody experiencing the wear problems?
|
|
|
|
[#5]
As long as I don't let the charging handle slam, it is not causing any wear on my upper.
|
|
|
|
[#6]
Quoted:
As long as I don't let the charging handle slam, it is not causing any wear on my upper. Good to know |
|
|
|
[#7]
I paused then went frame by frame the film introducing the MPX. This film is on the Sig Sauer sight, MPX, intro, right when the narrator says charging handle.
The chipping away of the upper is clearly visible. Just a mention. |
|
|
|
[#8]
I added black duct tape instead of Velcro. I will see how it stands up, long term. I have only put 100 rounds with the tape in place. Seems to work though.
|
|
|
|
[#9]
Your idea got me wondering if a modified leaf spring, like one in a revolver only thinner could be modified in place of the paper clip, and the end of the leaf spring curled to prevent it from digging in, just a thought.
|
|
|
|
[#10]
Thanks to Jaysondiesel for the R&D.
A fix we developed is to use a .012 Feeler guage. The hole that holds feeler guages in a set needs to be enlarged slightly. It provides enough tension to hold the charging handle permanently in the up position shown in pics by Jaysondiesel. You can force it down but now it guides itself. That was the lightest guage we chose. Thicker could work. Thinner, no. It promises to be a resilient fix with no worries of the softer metal of the paperclip. |
|
|
|
[#11]
Quoted:
Thanks to Jaysondiesel for the R&D. A fix we developed is to use a .012 Feeler guage. The hole that holds feeler guages in a set needs to be enlarged slightly. It provides enough tension to hold the charging handle permanently in the up position shown in pics by Jaysondiesel. You can force it down but now it guides itself. That was the lightest guage we chose. Thicker could work. Thinner, no. It promises to be a resilient fix with no worries of the softer metal of the paperclip. Do you have pics perhaps? TIA |
|
|
|
[#12]
We are already updating the design.
Thicker gauge and a new config and position. More soon! |
|
|
|
[#13]
I haven't posted enough for automatic display of pics so they're coming
Went to the thickest feeler gauge. .025 It is thinned in width so that it would fit between the springs to get to the charging handle. From the side and upside down it is the shape of a J with a 45° bend at the top. Feeler gauges come in a set held together by a thumb screw. Remove a gauge and drill out that hole to correspond to the Allen headed bolt that holds that orange bumper. As it leaves the orange bumper it extends towards the muzzle at a .45 degree angle then has a complete curve back on to itself away from the muzzle. The top that contacts the charging handle is the top of the curve. When closing the upper on the lower the new feeler gauge spring must be lifted over the brace in the base of the upper. If it doesn't want to close then pull the charging handle out slowly. The spring assembly will come out an inch or so and the new part will scoot between the springs and contact the handle. Push the spring and handle back in. The upper will close now. The charging handle stays up against the top of its path and does not contact the bottom unless you yank it down. Let it go like it's your AR and it's great. My gunsmith did this work. He checked all functions including test firing. Nothing is contacting the feeler gauge but the area behind the orange bumper and the bottom of the charging handle. I make no claims or recommendations that anyone should do this. (The Legal Dept) Again many thanks to Jasondiesel for the inspiration! |
|
|
|
[#14]
I read that SIG is supposed to have a fix available soon for that...........when they do I will purchase one
|
|
|
|
[#15]

|
|
|
|
[#16]

|
|
|
|
[#17]

|
|
|
|
[#18]

|
|
|
|
[#19]
Quoted:
Your idea got me wondering if a modified leaf spring, like one in a revolver only thinner could be modified in place of the paper clip, and the end of the leaf spring curled to prevent it from digging in, just a thought. Exactly what I had in mind, looks to be an easy enough fix. |
|
|
|
[#20]
Intelligent minds......think alike? Go crazy in tandem?
|
|
|
|
[#21]
Quoted:
Intelligent minds......think alike? Go crazy in tandem? Intelligent? Speak for yourself, I'm just here to Troll........... ;) |
|
|
|
[#22]
Range today. Excellent groupings. Flawless performance with Winchester white box, Federal red box & PNC. Charging handle was guided to stay up. No impact with low end of upper.
|
|
|
|
[#23]
Would it be possible for you to post the dimensions of the "spring assist" ? I'm going to tackle the fix this week. TIA
|
|
|
|
[#24]
So the charging handle is slotted like an AR CH, but does that slot clear anything? Could you insert a delrin strip the full length of the charging handle, protruding from the bottom, to ride along the top of the lower and keep it from drooping?
|
|
|
|
[#25]
Quoted:
So the charging handle is slotted like an AR CH, but does that slot clear anything? Could you insert a delrin strip the full length of the charging handle, protruding from the bottom, to ride along the top of the lower and keep it from drooping? I think clearance is one issue and wear and tear another, I thought the same thing until I took mine apart and saw the original idea was on track for the shape of the assist. |
|
|
|
[#26]
My feeler gauges are 1/16 shorter than 3".
3/8" from hole end to first bend. One that appears above Orange bumper. 1 3/8" to second bend. The curve measures 9 /16" across viewed from the side. Strong yet flexible. The gauge is narrowed 1/2" from rear of hole end to be 7/16" wide. You could take a hair more off. So it's base where the Orange bumper bolt goes through is standard feeler gauge width. 1/2". Use .025 feeler gauge. Hope all that make sense. |
|
|
|
[#27]
Quoted:
My feeler gauges are 1/16 shorter than 3". 3/8" from hole end to first bend. One that appears above Orange bumper. 1 3/8" to second bend. The curve measures 9 /16" across viewed from the side. Strong yet flexible. The gauge is narrowed 1/2" from rear of hole end to be 7/16" wide. You could take a hair more off. So it's base where the Orange bumper bolt goes through is standard feeler gauge width. 1/2". Use .025 feeler gauge. Hope all that make sense. Yep, thanks much. |
|
|
|
[#28]
This charging handle fix everyone is doing is BS. This needs to be corrected by Sig and now not later
|
|
|
|
[#29]
I personally could care less and do not think that sig needs to do anything. In fact, they should be pumping out carbon handguards and 4" barrels before looking at this "issue"
|
|
|
|
[#30]
Quoted:
I personally could care less and do not think that sig needs to do anything. In fact, they should be pumping out carbon handguards and 4" barrels before looking at this "issue" Well that's you but the majority that own the MPX want it fixed. Wear and tear is one thing, but this is beyond the norm. |
|
|
|
[#31]
Quoted:
Well that's you but the majority that own the MPX want it fixed. Wear and tear is one thing, but this is beyond the norm. Quoted:
Quoted:
I personally could care less and do not think that sig needs to do anything. In fact, they should be pumping out carbon handguards and 4" barrels before looking at this "issue" Well that's you but the majority that own the MPX want it fixed. Wear and tear is one thing, but this is beyond the norm. Don't put me in that group. My weapons get used and thus scratched etc... I could care less if my guns are pretty. This charging handle thing is really not a big deal. I'd rather see Sig focus on putting out barrels, stocks etc... Before they cater to those that are worried about scratches on their receivers. |
|
|
|
[#32]
Quoted:
Don't put me in that group. My weapons get used and thus scratched etc... I could care less if my guns are pretty. This charging handle thing is really not a big deal. I'd rather see Sig focus on putting out barrels, stocks etc... Before they cater to those that are worried about scratches on their receivers. Quoted:
Quoted:
Quoted:
I personally could care less and do not think that sig needs to do anything. In fact, they should be pumping out carbon handguards and 4" barrels before looking at this "issue" Well that's you but the majority that own the MPX want it fixed. Wear and tear is one thing, but this is beyond the norm. Don't put me in that group. My weapons get used and thus scratched etc... I could care less if my guns are pretty. This charging handle thing is really not a big deal. I'd rather see Sig focus on putting out barrels, stocks etc... Before they cater to those that are worried about scratches on their receivers. Well good for you. My duty rifle gets put in and out of the rack and has been charged a few hundred times and I have nothing close to the the wear and gouging that my MPX has in just a few chargings, so yes it is an issue that needs to be addressed. |
|
|
|
[#33]
Quoted:
This charging handle fix everyone is doing is BS. This needs to be corrected by Sig and now not later I think most of us agree it is just a temp fix until Sig pulls their head out of their ass. In the interim I'd rather not get gouges in my $1200+ firearm and if I have the a pair of tin snips and drill that's what I'll do. |
|
|
|
[#34]
Quoted:
I think most of us agree it is just a temp fix until Sig pulls their head out of their ass. In the interim I'd rather not get gouges in my $1200+ firearm and if I have the a pair of tin snips and drill that's what I'll do. Quoted:
Quoted:
This charging handle fix everyone is doing is BS. This needs to be corrected by Sig and now not later I think most of us agree it is just a temp fix until Sig pulls their head out of their ass. In the interim I'd rather not get gouges in my $1200+ firearm and if I have the a pair of tin snips and drill that's what I'll do. My comment was dirrected at the problem and not what you are doing to fix it. We shouldn't have to be fixing this, Sig should have already done so. |
|
|
|
[#35]
I cut the sharp angle on the bottom of the CH off at a 45 with a file. No further wear on the lower in that spot now.

|
|
|
|
[#36]
Quoted:
I cut the sharp angle on the bottom of the CH off at a 45 with a file. No further wear on the lower in that spot now. I don't have access to my MPX right now to look at the CH. Can you show a pic of where you filed it down? Thanks. |
|
|
|
[#37]
Quoted:
I don't have access to my MPX right now to look at the CH. Can you show a pic of where you filed it down? Thanks. Quoted:
Quoted:
I cut the sharp angle on the bottom of the CH off at a 45 with a file. No further wear on the lower in that spot now. I don't have access to my MPX right now to look at the CH. Can you show a pic of where you filed it down? Thanks. As soon as I get back to my shop I'll grab a picture. |
|
|
|
[#38]
I just called Sig customer service and asked about the charging handle issue, and was told a different charging handle would be available within a month, but it will be sold separately, not as a replacement/fix. I don't have an MPX yet, but really want one.
|
|
|
|
[#39]
Here's what my CH looks like now. Kinda did it as a half assed prevent the chipping issue and it's working like a charm.
|
|
|
|
[#40]
I am looking to do the feeler gauge fix for my sagging MPX charging handle and had some questions.
How long is the completed feeler gauge from the top of the orange rubber buffer (after installation) to the highest point of the curve which contacts the bottom of the charging handle? Does the final width of the feeler gauge where it contacts the underside of the charging handle make contact with the two outer edges of the charging handle or is it thinned down so that it fits in the center groove of the underside of the charging handle? Also, how did you make the top tight curve in the feeler gauge and what tools did you use? Did you have to heat it to bend it? I tried a .025 feeler gauge and it snapped at my bend point and I had to start over. Thanks for your help. |
|
|
|
[#41]
Quoted:
I am looking to do the feeler gauge fix for my sagging MPX charging handle and had some questions. How long is the completed feeler gauge from the top of the orange rubber buffer (after installation) to the highest point of the curve which contacts the bottom of the charging handle? Does the final width of the feeler gauge where it contacts the underside of the charging handle make contact with the two outer edges of the charging handle or is it thinned down so that it fits in the center groove of the underside of the charging handle? Also, how did you make the top tight curve in the feeler gauge and what tools did you use? Did you have to heat it to bend it? I tried a .025 feeler gauge and it snapped at my bend point and I had to start over. Thanks for your help. I used long, thin needle nose pliers and applied heat with a mapp torch while making the "curl" that will go in the underside of the hande, this will be trimmed to sit inside the bottom of the handle. I will then trim the feeler gauge with a dremel and cutting wheel. not done yet so I do not have any measurements, as this is an experimental fix I'm not sure what the final look will be. FYI, so I didn't ruin my gauges you can buy a 10" feeler gauge strip on Ebay for a couple of bucks. |
|
|
|
[#42]
|
|
|
|
[#43]
Tapered feeler gauge with dremel and form with needle nose and torch, going to give it a run through, but may go with a heavier gauge if it starts to sag, but for now it's holding the charging handle in place quite well.
|
|
|
|
[#44]
Quoted:
Tapered feeler gauge with dremel and form with needle nose and torch, going to give it a run through, but may go with a heavier gauge if it starts to sag, but for now it's holding the charging handle in place quite well. How high up above the receiver does the top of the gauge/spring fix extend and how far forward of the inside back wall of the receiver? Is it tapered to fit inside the groove on the bottom of the charging handle or is it wider, so tjat the outer rails of the bottom of the charging handle ride along it? Lastly, did you make yours out of the .025 feeler gauge? Thanks |
|
|
|
[#45]
My gunsmith used two pairs of pliers and did gradual bends. The measurements above and eyeballing the pics should get you there. Mine is not narrowed to fit groove in charging handle but is just enough to fit between the springs.
Practice on a thinner gauge they are more flexible and you can hone your skill. Personally I'd take it to a gunsmith. You don't want to restrict any function. This is a device that does go boom. I found that people who are used to fabrication can bend metal with an ease we novices have to learn. Mine sits up very snug at all times while functioning like any AR. |
|
|
|
[#46]
I agree with Akurate, if you do it yourself, do at your own risk, I am only showing what I did to eliminate slop, I don't condone any one else doing this.
|
|
|
 Win a FREE Membership!
Sign up for the ARFCOM weekly newsletter and be entered to win a free ARFCOM membership. One new winner* is announced every week!
You will receive an email every Friday morning featuring the latest chatter from the hottest topics, breaking news surrounding legislation, as well as exclusive deals only available to ARFCOM email subscribers.

AR15.COM is the world's largest firearm community and is a gathering place for firearm enthusiasts of all types.
From hunters and military members, to competition shooters and general firearm enthusiasts, we welcome anyone who values and respects the way of the firearm.

Subscribe to our monthly Newsletter to receive firearm news, product discounts from your favorite Industry Partners, and more.
Copyright © 1996-2024 AR15.COM LLC. All Rights Reserved.
Any use of this content without express written consent is prohibited.
AR15.Com reserves the right to overwrite or replace any affiliate, commercial, or monetizable links, posted by users, with our own.


