|
Posted: 10/9/2017 9:26:00 PM EDT
As I've delved further into rifle reloading I've bought more tools to address perceived problems and have some questions if anyone's willing to share their experience.
Primer crimp removal A couple years ago I bought a Dillon Super Swage that does a fine job but sometimes it does too good of a job (  ). The adjustments are kind of crude and (so I'm told) will need to be adjusted for each headstamp. ). The adjustments are kind of crude and (so I'm told) will need to be adjusted for each headstamp.
In looking for an easier alternative I just bought the RCBS small rifle military crimp remover. I like the design because the case head bottoms against the base of the non-adjustable tool to limit the material removed and the tapered entrance to the primer pocket should make it easier to press primer's in cleanly instead of getting hung up on the edge once in a while. I use an RCBS hand primer. Is the cone the RCBS tool cuts into the primer pocket entrance going to compromise primer retention in any way? As a guess the cone is .005 deep. Here's what it looks like for those who haven't seen one. The threaded shaft is to convert the tool from female threads to male threads depending on what it's used on. 
Prime pocket uniforming I started off with the standard adjustable uniforming tool that comes with the RCBS Case Prep Center but after using it for a couple thousand rounds am afraid the adjustable base can be pushed down off center or slid down the cutter shaft too easily. My new purchase is a Sinclair carbide uniformer and adapter to allow it to be used on the case prep center. Like the crimp remover above it's non-adjustable which I like. Being extremely sharp carbide it cuts very well! The cutting depth is set for the SAAMI maximum of .123" which is what concerns me. One of the answers on the Brownell's website claimed a cutting depth of .120" (dead middle of the SAAMI spec) which I'd have preferred. Mine definitely cuts to .123". I've uniformed 10 cases as a test and the uniformer is very consistent. With a primer pocket cut to .123" the CCI #41 primers sit .007" below flush. Here's a picture of Winchester, WCC and LC brass after being run through the crimp remover and uniformer. Would cutting every primer pocket I own to SAAMI max spec ever cause me problems with ignition (assuming good in spec firing pin protrusion) or weakening of the case head? (It's removing a lot of material out of Winchester pockets to get to that depth and I have to lift the case off and brush the chips away a couple times to get a complete cut.) Does anyone who owns this uniformer have one that cuts to a shorter depth? Is this one of those instances where I need to order 10 of them and measure them all to get the cutting depth I want or does Sinclair make all of these identical? Here's a pic of the uniformer for those unfamiliar with it. 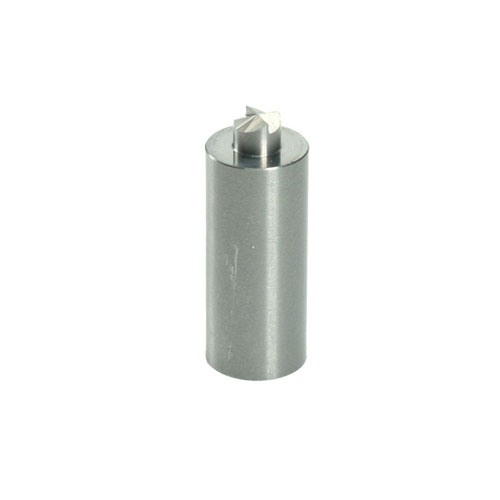
Beyond the current few thousand Winchester cases I have a few thousand Lake City and a few thousand of a few other brands I'll need to do as well. |
|
|
|
[#1]
I remove the crimp with a reamer (Hornady) and use an old RCBS uniformer.
Can't comment on your tools except ensure the uniformer is cutting a SAMMI spec depth. http://www.saami.org/specifications_and_information/publications/download/xZ299-4_ANSI-SAAMI_CFR.pdf Primer pocket info on page 36. |
|
|
|
[#2]
Thanks and yes it is within spec.
For anyone else reading this the small primer pocket depth SAAMI spec is .117" - .123". Because my Sinclair tool is cutting to the max depth I'm a little concerned that it's putting me on the edge of functionality or light strikes. |
|
|
|
[#3]
I have my uniformer adjusted so that primers are .002 to .003 below flush.
If that's your results, your golden. |
|
|
|
[#4]
Quoted:
I have my uniformer adjusted so that primers are .002 to .003 below flush. If that's your results, your golden. I won't be able to hit the range until this weekend and don't want to screw up a bunch of brass if cutting the pockets to max depth and setting primers so far below flush is going to create ignition issues. |
|
|
|
[#5]
Updated with a photo of deeply recessed primers in the OP.
|
|
|
|
[#6]
Just got off the phone with Brownell's.
They're overnighting me a new one. Mike at tech support said it should be cutting to a depth of .120" which is what is claimed on the product page (SAAMI spec is .117" - .123"). Hopefully this next one will be correct. I'm always leery about this kind of stuff and wonder if I need to order 10 of the item and keep the one that's dead on manufacturer spec and return the others. Can't complain about the service as Brownell's has always taken care of me. We'll see where this goes! |
|
|
|
[#7]
That looks like alot of material was removed from the primer pocket when the crimp was removed. When I do mine you have to really look at the brass to tell if it's been done.
I was told to just remove enough material to get rid of the crimp. Any more and you risk not having enough of the pocket to keep the primer in place. |
|
|
|
[#8]
Quoted:
That looks like alot of material was removed from the primer pocket when the crimp was removed. When I do mine you have to really look at the brass to tell if it's been done. I was told to just remove enough material to get rid of the crimp. Any more and you risk not having enough of the pocket to keep the primer in place. Should be like a third to a quarter of what was removed. |
|
|
|
[#9]
Quoted:
I have my uniformer adjusted so that primers are .002 to .003 below flush. If that's your results, your golden. |
|
|
|
[#10]
edit
nvr mind brain cramp |
|
|
|
[#11]
In my experience once material is removed it is really hard to add back. Fortunately brass is cheap.
This seems to work well enough for me. I am contemplating a uniformer since I shoot a lot of different head stamp brass for my "plinking" ammo. The adjustments are relatively fine in that you can adjust the internal stop within the case to get as much or as little swaging as you want. It just isn't always repeatable if you change to the larger stems for large primer vs. small primer. https://rcbs.com/Products/Case-Preparation/Accessories/Primer-Pocket-Swager-Combo-2.aspx |
|
|
|
[#12]
Quoted:
You have given me many pointers in reloading. I wish i could hang out with you in your shop for a weekend! Quoted:
Quoted:
I have my uniformer adjusted so that primers are .002 to .003 below flush. If that's your results, your golden. |
|
|
|
[#13]
Quoted:
I agree, way too much material removed when crimp was removed. Should be like a third to a quarter of what was removed. Kind of frustrating that a company makes a non-adjustable cutting tool with a hard stop but if you use it to the stop it over-cuts. 
All I want is a cutter that takes the edge off the crimp and breaks the edge of the primer pocket entrance. Is that too much to ask (rhetorical unless there is some brand of tool that does all this without overdoing it)? |
|
|
|
[#14]
Quoted:
Next time I'll just touch the case to the cutter for a moment instead of holding the case on the cutter until the cutter has stopped cutting which is what I did for these test cases. I'll wait to do that for the replacement pocket uniformer to get here so I can test them together. Kind of frustrating that a company makes a non-adjustable cutting tool with a hard stop but if you use it to the stop it over-cuts.
All I want is a cutter that takes the edge off the crimp and breaks the edge of the primer pocket entrance. Is that too much to ask (rhetorical unless there is some brand of tool that does all this without overdoing it)? https://www.midwayusa.com/product/253550/hornady-primer-pocket-reamer-cutter-head |
|
|
|
[#15]
I don't think you can get precise, repeatable crimp removal by depending on "just touching" the cases with the tool you have. You may need to completely change your process to get repeatable, minimal crimp removal. If the RCBS tool was adjustable, it would be a simple task to just back it off and reset it, but it's not.
No knock against RCBS - they're great people who have helped me out with parts to fix a number of bone-headed goofs on my part, all for free. But I am not a fan of their tool. The Hornady primer crimp reamer indexes on the tip of the tool, not on the case head, so it self-centers well and stops positively. And even with that, you can push too hard and take too much off of the pocket. If you're using a power drill, that's probably the first issue. It's hard to keep a drill going slowly with this kind of tool (I know from experience!). I went from using a cheap-o battery powered electric screwdriver which ran down pretty quickly, to a decent Black & Decker variable speed drill. That was quicker, but less controllable. My fix was to adjust the torque setting on the drill to minimum...the clutch slipped with too much pressure, even with only the tiniest crimp. Finally, yes brass is plentiful and if you overdo reaming a case you can just scrap it and get another one, but when I decrimp, I've already spent plenty of time and effort on that case. I like to get it right instead of wasting time. |
|
|
|
[#16]
Quoted:
That's what a Hornady reamer does. https://www.midwayusa.com/product/253550/hornady-primer-pocket-reamer-cutter-head Quoted:
That's what a Hornady reamer does. https://www.midwayusa.com/product/253550/hornady-primer-pocket-reamer-cutter-head Quoted:
The Hornady primer crimp reamer indexes on the tip of the tool, not on the case head, so it self-centers well and stops positively. And even with that, you can push too hard and take too much off of the pocket. If you're using a power drill, that's probably the first issue. It's hard to keep a drill going slowly with this kind of tool (I know from experience!). From the photo and your description the Hornady tool indexes on the bottom of the primer pocket. One needs to remove the crimp before you can uniform the pocket bottom to keep the primer entrance from being too tight for the uniformer (I think) which would make the amount of crimp removed inconsistent because of variation in pocket depth (definitely not any worse than my idea of not bottoming the RCBS cutter though I guess???). Theoretically (don't you love that!) the RCBS tool should be ideal because the crimp location is on the case head thus indexing the cutter off the case head would be the perfect way of getting a consistent cut. Wouldn't it be nice if someone at these companies actually improved their products instead of just selling the same one over and over? Sigh. |
|
|
|
[#17]
My RCBS primer pocket uniformer fits in in the primer pocket without removing crimp.
Maybe it shouldn’t and I honestly never gave it much thought before reading the last post, but it does. This is using mainly IMI brass. |
|
|
|
[#18]
It does look like it a trimmed a bit much....But I bet those primers slid in nice and easy.
|
|
|
|
[#19]
Quoted:
I'm using the very slow turning RCBS Case Prep Center. No fear of that thing getting out of control. From the photo and your description the Hornady tool indexes on the bottom of the primer pocket. One needs to remove the crimp before you can uniform the pocket bottom to keep the primer entrance from being too tight for the uniformer (I think) which would make the amount of crimp removed inconsistent because of variation in pocket depth (definitely not any worse than my idea of not bottoming the RCBS cutter though I guess???). Theoretically (don't you love that!) the RCBS tool should be ideal because the crimp location is on the case head thus indexing the cutter off the case head would be the perfect way of getting a consistent cut. Wouldn't it be nice if someone at these companies actually improved their products instead of just selling the same one over and over? Sigh. |
|
|
|
[#20]
Quoted:
Dryflash3 and I were both talking about Hornady’s reamer, not their uniformer, but yes, you do need to decrimp before you can uniform the pockets. Have you ever run into consistency problems as far as how much crimp is removed? |
|
|
|
[#21]
I use an ancient RCBS primer pocket swedging tool. It screws into the press and squeezes the crimp out. I have been using it for over 20+ years without any problems.
Here is the updated version of it. Primer Pocket Swedge tool |
|
|
|
[#22]
Quoted:
I was referring to the reamer as well but probably worded my response wrong. Have you ever run into consistency problems as far as how much crimp is removed? Quoted:
Quoted:
Dryflash3 and I were both talking about Hornady’s reamer, not their uniformer, but yes, you do need to decrimp before you can uniform the pockets. Have you ever run into consistency problems as far as how much crimp is removed? Takes to about a count of three and the shavings stop coming off and I take the case to my other cordless drill with the uniformer. I have used drills for many years and get a consistent crimp removal. A slow speed tool is a nightmare to me. It causes you to press down on the tool for long periods (hard on the hand) and use too much force. |
|
|
|
[#23]
That's what's worked for me also except that I use a regular drill. High speed and just touch it gently for a couple seconds and your done.
I use the same reamer for 9mm to 50 BMG, it's an RCBS .17-.45 reamer. Chucks up nicely in a drill and go to work. |
|
|
|
[#24]
Quoted:
A slow speed tool is a nightmare to me. It causes you to press down on the tool for long periods (hard on the hand) and use too much force. |
|
|
|
[#25]
The real trick for me is getting the case lined up right before I start the drill. There’s the temptation to just hold the trigger down, but that doesn’t work well for me; I let go, position the case, then squeeze. I don’t mash the trigger, just squeeze until it comes up to speed.
|
|
|
|
[#26]
Quoted:
Is the cone the RCBS tool cuts into the primer pocket entrance going to compromise primer retention in any way? As a guess the cone is .005 deep. No. I remove primer pocket crimps with a 45 degree countersink chucked into a drill press. It produces a contoured edge on the primer pocket similar to the one shown in the picture of the primed brass. In 38 years, I haven't had a problem with primers staying in the pocket, so I am assuming retention is adequate. |
|
|
|
[#27]
Slight update.
The replacement Sinclair uniformer from Brownell's showed up today and measures exactly the same as the other one at the SAAMI max spec of .123". I managed to get a hold of the same tech guy (Mike) and he swears they are supposed to be .120" (dead middle of SAAMI spec). He put in an order for someone in the warehouse to measure a uniformer before sending me a third one to try. Either I'm really lucky at getting the only two uniformers that are out of Sinclair's spec or Brownell's has a pile of out of spec uniformers and I'm the only one who actually measures this stuff. We'll see what happens. My other option would be to have a machinist make me a precision washer .003" thick to take up the extra space so that the uniformer cuts to the desired depth. I measured my firing pin protrusion on my two AR's last night. Spec is .028" - .036". The Daniel Defense measures .033" (I'd call that ideal) and the Bushmaster measures .028" (not so good if the primer pockets are cut to max depth). Both rifles have been 100% reliable as far as ignition goes but I'm not interested in pushing that by adding another .005" of primer depth over the non-uniformed depth. |
|
|
|
[#28]
Update again:
The third Sinclair uniformer showed up and like its brethren it is cut to .123" at the max of SAAMI spec. I measured 3 Winchester cases before and after uniforming and after using RCBS's hand tool to prime them. They measured .117 - .1185 pocket depth and after uniforming they measured .123" - .1235". Primers seated .007, .0075 and .0085 below flush. Not sure if I got too aggressive seating that last one or what. I'll call Brownell's on Monday and see if they can rustle up a uniformer that's actually cut to the claimed .120" spec. Am I the only guy in the world that measures this stuff? You'd think they'd have gotten calls from a bunch of pissed off OCD reloaders by now. |
|
|
|
[#29]
My original style RCBS PP uniformer is adjustable.
I checked it and it was set fine and have never touched it in 20 years. Perhaps you should try a different brand. |
|
|
|
[#30]
Quoted:
My original style RCBS PP uniformer is adjustable. I checked it and it was set fine and have never touched it in 20 years. Perhaps you should try a different brand. I'll see what Brownell's/Sinclair says next week about this. Just frustrating to buy what's supposedly the good stuff and it's not living up to the hype. |
|
|
|
[#31]
I guess I'm the lone dissenter here regarding the amount of crimp removed by the reamer - I think it's fine.
If you look closely at the primer itself you'll see the primer can't make contact with the primer pocket wall because of the primer's edge radius. The bevel cut by the reamer ends well above that point. I've never had a primer back out after cutting away the crimp to that degree. |
|
|
|
[#32]
Quoted:
That's where I'm leaning. With an adjustable one at least I can set it. I'll see what Brownell's/Sinclair says next week about this. Just frustrating to buy what's supposedly the good stuff and it's not living up to the hype. |
|
|
|
[#33]
Quoted:
....you do need to decrimp before you can uniform the pockets. |
|
|
|
[#34]
Quoted:
I guess I'm the lone dissenter here regarding the amount of crimp removed by the reamer - I think it's fine. If you look closely at the primer itself you'll see the primer can't make contact with the primer pocket wall because of the primer's edge radius. The bevel cut by the reamer ends well above that point. I've never had a primer back out after cutting away the crimp to that degree. But that does not mean we shouldn't do things correctly. Cutting crimp away and some primer pocket with the crimp weakens the case and we try to teach proper methods in this forum. Save the bubba way for a utube video. This would include using a countersink to remove crimp. Glad that works for you, but not up to the standards of this forum. We have a lot of folks that just read posts and never join the site, no need to teach them poor techniques. |
|
|
|
[#35]
Quoted:
I guess I'm the lone dissenter here regarding the amount of crimp removed by the reamer - I think it's fine. If you look closely at the primer itself you'll see the primer can't make contact with the primer pocket wall because of the primer's edge radius. The bevel cut by the reamer ends well above that point. I've never had a primer back out after cutting away the crimp to that degree. The problem is both of these non-adjustable tools are cutting to the max end of spec or worse. If my uniformer cut to Sinclair's claimed spec the primer would only be half as recessed and be up onto the bevel. |
|
|
|
[#36]
This thread is one reason why I don't like to ream my primer pocket, but rather swage it with Dillon's Super Swage. Swaging doesn't remove brass, it forms it. That way you end up with a correctly formed primer pocket, not the grossly over reamed examples shown here.
|
|
|
|
[#37]
Quoted:
This thread is one reason why I don't like to ream my primer pocket, but rather swage it with Dillon's Super Swage. Swaging doesn't remove brass, it forms it. That way you end up with a correctly formed primer pocket, not the grossly over reamed examples shown here. The reamer appealed to me because (theoretically) I could just crank through them without having to adjust the tool for different brands. |
|
|
|
[#38]
I've used the Dillon swager for a few decades. Have you fitted an Inline Fabrication insert to hold cases true in the swager? It seems to help with consistency over different brands of brass.

|
|
|
|
[#39]
Quoted:
There is some tolerance in the range of how much crimp and case primer pocket that should be removed. But that does not mean we shouldn't do things correctly. Cutting crimp away and some primer pocket with the crimp weakens the case and we try to teach proper methods in this forum. Save the bubba way for a utube video. This would include using a countersink to remove crimp. Glad that works for you, but not up to the standards of this forum. We have a lot of folks that just read posts and never join the site, no need to teach them poor techniques. Quoted:
Quoted:
I guess I'm the lone dissenter here regarding the amount of crimp removed by the reamer - I think it's fine. If you look closely at the primer itself you'll see the primer can't make contact with the primer pocket wall because of the primer's edge radius. The bevel cut by the reamer ends well above that point. I've never had a primer back out after cutting away the crimp to that degree. But that does not mean we shouldn't do things correctly. Cutting crimp away and some primer pocket with the crimp weakens the case and we try to teach proper methods in this forum. Save the bubba way for a utube video. This would include using a countersink to remove crimp. Glad that works for you, but not up to the standards of this forum. We have a lot of folks that just read posts and never join the site, no need to teach them poor techniques. As for swaging primer pockets I understand the idea of no material being removed therefore the case is not weakened but I've never felt that swaging magically puts the displaced brass back in it's original location. |
|
|
|
[#40]
Quoted:
I've used the Dillon swager for a few decades. Have you fitted an Inline Fabrication insert to hold cases true in the swager? It seems to help with consistency over different brands of brass. https://cdn.shopify.com/s/files/1/0235/0841/products/9d9b2ba440afba7a963f31df98bc95b9_jyj7_wpc2_large.jpg?v=1369873522 I have something like 2k of WCC 9mm brass that’s going to get swaged soon, but sometimes “large batches” become dauntingly large.
|
|
|
|
[#41]
Quoted:
Whoa hold on there my good man I never said anything about how I remove crimps, I simply stated I do ream them with no mention of how or what tool is involved. My comment was on the OP's use of the RCBS tool. I would hardly call using the RCBS reamer a "bubba way" of performing said task. As for swaging primer pockets I understand the idea of no material being removed therefore the case is not weakened but I've never felt that swaging magically puts the displaced brass back in it's original location. Quoted:
Quoted:
Quoted:
I guess I'm the lone dissenter here regarding the amount of crimp removed by the reamer - I think it's fine. If you look closely at the primer itself you'll see the primer can't make contact with the primer pocket wall because of the primer's edge radius. The bevel cut by the reamer ends well above that point. I've never had a primer back out after cutting away the crimp to that degree. But that does not mean we shouldn't do things correctly. Cutting crimp away and some primer pocket with the crimp weakens the case and we try to teach proper methods in this forum. Save the bubba way for a utube video. This would include using a countersink to remove crimp. Glad that works for you, but not up to the standards of this forum. We have a lot of folks that just read posts and never join the site, no need to teach them poor techniques. As for swaging primer pockets I understand the idea of no material being removed therefore the case is not weakened but I've never felt that swaging magically puts the displaced brass back in it's original location. I did not say the RCBS reamer was a bubba method, the countersink is. But over reamed cases are not good however you got there. |
|
|
|
[#42]
Quoted:
I've used the Dillon swager for a few decades. Have you fitted an Inline Fabrication insert to hold cases true in the swager? It seems to help with consistency over different brands of brass. https://cdn.shopify.com/s/files/1/0235/0841/products/9d9b2ba440afba7a963f31df98bc95b9_jyj7_wpc2_large.jpg?v=1369873522 I've sorted 10k+ cases of 7 headstamps to get them all ready to load this winter. The greatest numbers are Winchester and LC but I have enough Hornady, Remington, Wolf and some others (all once fired from Appleseeds where the student didn't want their brass) that I'll load them for 55gr ammo to shoot when I won't be able to save my brass. |
|
|
|
[#43]
Quoted:
I've used the Dillon swager for a few decades. Have you fitted an Inline Fabrication insert to hold cases true in the swager? It seems to help with consistency over different brands of brass. https://cdn.shopify.com/s/files/1/0235/0841/products/9d9b2ba440afba7a963f31df98bc95b9_jyj7_wpc2_large.jpg?v=1369873522 |
|
|
|
[#44]
I have the Dillon SS , Sinclair PP Uniforming tool and flash hole deburring tool. I've never had a case fail or failure to fire from using them but I guess its possible.
|
|
|
|
[#45]
Quoted:
Actually, if you adjust the brass cradle at the bottom of the Swage correctly, it aligns the brass for you automatically. It's simple to do by loosening the set screw on the side, inserting a piece of brass and cycling the ram to seat the swage into the brass, make sure the brass is square to the swage by wiggling it if necessary, and then tighten up the set screw. It's worked well for me for over of 100,000 pieces of rifle brass I've swaged. Maybe I'm lazy, but when I'm looking at swaging a buttload of cases, I'll take all the help I can get. |
|
|
|
[#46]
Quoted:
There's still some lateral movement to adjust for, particularly with 9mm and .223 cases. I meticulously adjust my support and still have to frequently mess with lateral alignment with small cases. It definitely impairs getting into a good (and efficient) rhythm with the tool. Maybe I'm lazy, but when I'm looking at swaging a buttload of cases, I'll take all the help I can get. Quoted:
Quoted:
Actually, if you adjust the brass cradle at the bottom of the Swage correctly, it aligns the brass for you automatically. It's simple to do by loosening the set screw on the side, inserting a piece of brass and cycling the ram to seat the swage into the brass, make sure the brass is square to the swage by wiggling it if necessary, and then tighten up the set screw. It's worked well for me for over of 100,000 pieces of rifle brass I've swaged. Maybe I'm lazy, but when I'm looking at swaging a buttload of cases, I'll take all the help I can get. Looking forward to trying the insert Sinister mentioned |
|
|
|
[#47]
Quoted:
Yep that play no matter how I adjusted the cradle drives me nuts and kills rhythm. Looking forward to trying the insert Sinister mentioned Quoted:
Quoted:
Quoted:
Actually, if you adjust the brass cradle at the bottom of the Swage correctly, it aligns the brass for you automatically. It's simple to do by loosening the set screw on the side, inserting a piece of brass and cycling the ram to seat the swage into the brass, make sure the brass is square to the swage by wiggling it if necessary, and then tighten up the set screw. It's worked well for me for over of 100,000 pieces of rifle brass I've swaged. Maybe I'm lazy, but when I'm looking at swaging a buttload of cases, I'll take all the help I can get. Looking forward to trying the insert Sinister mentioned |
|
|
|
[#48]
Quoted:
There's still some lateral movement to adjust for, particularly with 9mm and .223 cases. I meticulously adjust my support and still have to frequently mess with lateral alignment with small cases. It definitely impairs getting into a good (and efficient) rhythm with the tool. Maybe I'm lazy, but when I'm looking at swaging a buttload of cases, I'll take all the help I can get. Quoted:
Quoted:
Actually, if you adjust the brass cradle at the bottom of the Swage correctly, it aligns the brass for you automatically. It's simple to do by loosening the set screw on the side, inserting a piece of brass and cycling the ram to seat the swage into the brass, make sure the brass is square to the swage by wiggling it if necessary, and then tighten up the set screw. It's worked well for me for over of 100,000 pieces of rifle brass I've swaged. Maybe I'm lazy, but when I'm looking at swaging a buttload of cases, I'll take all the help I can get. |
|
|
|
[#49]
Quoted:
Lets see, I've only swaged about 35,000 pieces of 5.56, 2,500 pieces of 7.62x51, and 3,500 pieces of 30-06 and use the spring addition so I can process 1,000 pieces of 5.56 in an hour, all without a single piece being damaged. I read Inline's sales pitch and just don't get the problem. But hey, I haven't done that many yet. I guess I'm just less detail-tolerant than you are...
Honestly, it's probably a matter of not being as coordinated as your normal 12 year old. Having a little help with that coordination stuff sounds like it's a good thing to me. (Inside joke: I'm an occupational therapist, and OTs work on coordination stuff... I can teach it, but not do it too well... )
|
|
|
 Win a FREE Membership!
Sign up for the ARFCOM weekly newsletter and be entered to win a free ARFCOM membership. One new winner* is announced every week!
You will receive an email every Friday morning featuring the latest chatter from the hottest topics, breaking news surrounding legislation, as well as exclusive deals only available to ARFCOM email subscribers.

AR15.COM is the world's largest firearm community and is a gathering place for firearm enthusiasts of all types.
From hunters and military members, to competition shooters and general firearm enthusiasts, we welcome anyone who values and respects the way of the firearm.

Subscribe to our monthly Newsletter to receive firearm news, product discounts from your favorite Industry Partners, and more.
Copyright © 1996-2024 AR15.COM LLC. All Rights Reserved.
Any use of this content without express written consent is prohibited.
AR15.Com reserves the right to overwrite or replace any affiliate, commercial, or monetizable links, posted by users, with our own.


